Advanced eDiscovery can help your organization in a few ways. First is to respond to litigation, meaning there is a legal matter, for example, a civil action or dispute. These suits require an evidence and information discovery process. The second is freedom of information requests when a citizen requests information from a government organization. Another reason is to comply with the European General Data Protection Regulation (GDPR) or California Consumer Privacy Act (CCPA) data subject requests (DSRs) from people outside your organization. These requests require you to let these people know what personal data you have about them. Advanced eDiscovery can also help with other types of internal investigations or any situation where you want to search for information in Microsoft 365, review it for relevancy to your situation, and export the results. It is a much more powerful tool than Core eDiscovery or content search.
Which chapter sections you should read to accomplish each scenario
Chapter section | Litigation | Information requests | Data Subject Requests | Investigation |
|---|---|---|---|---|
Create an Advanced eDiscovery Case | X | X | X | X |
Manage Custodians and Holds | X | X | ||
Custodian Communications | X | |||
Processing and Error Remediation | X | X | X | X |
Advanced eDiscovery Searches | X | X | X | X |
Manage Review Sets | X | X | X | X |
Relevancy | X | |||
Export | X | X | X | X |
The Litigation Process

The litigation process
First, someone will initiate a suit, meaning somebody informs a party that they intend to sue or take civil action against them. The receiving party then answers the lawsuit and files a motion to dismiss the suit or agrees to proceed.
Next, both parties move into the discovery phase, where we look for potential evidence or documents related to the case. This discovery process is where we focus in this chapter on Advanced eDiscovery.
When discovery is complete, there will be a motion process, where the legal council will move to either proceed or dismiss the case. At this point, if the parties have not settled the lawsuit, it will move to a trial. Cases rarely get to a trial and usually settle before they go to trial.
There could be an appeal process after the trial until finally, there is a final disposition and the case is closed. You do not have to go through all the steps in the cycle. You can complete some of them and skip to the final disposition at any point.
Litigation and discovery focus mostly on organizations in the United States. Still, there are equivalent processes worldwide, such as the United Kingdom’s common law system or the civil law system in France. Litigation in these locations is not subject to the same rules but involves mostly the same process. There is a beginning, a middle, and an end to the case. The initiation is always when someone files a complaint in court, and this begins the life of the suit .
What Is eDiscovery?
As mentioned in the preceding text, discovery is the middle part of the litigation process. We find out about the underlying evidence, the issue regarding the complaint, or the response. During the discovery process, we could demonstrate that the opposition is blaming the wrong person or that the defense is grounded in evidence. We could also move to dismiss the case because the opposition sued the wrong person.
Discovery also includes exchanging information between the parties in the suit. It is focused on evidence and what evidence and witnesses they will present at trial. The discovery process is to identify, locate, preserve, secure, collect, prepare, review, and produce facts, information, and materials. Its purpose is to fulfill a request to produce documents. There is no rule for when discovery begins or ends, and it is an ongoing obligation. If at any time you come across relevant information, you need to give it to your adversary.
eDiscovery is the electronic aspect of identifying, collecting, and producing electronically stored information in response to discovery requests in a lawsuit or investigation. We refer to the content we are dealing with throughout the discovery process as electronically stored information (ESI). The goal of eDiscovery is to produce a core volume of evidence for litigation in a defensible manner.
The initial phase of litigation requires the parties in a dispute to provide each other relevant information and records, along with all other evidence related to a case. eDiscovery and legal hold obligations run from when a lawsuit is foreseeable to the time they present digital evidence in court. Attorneys do work upfront to agree with the opposition about what they will and will not include in discovery. For example, are you going to have document versions? How much effort, time, and expense will you go through to discover relevant documents? Since you are only required to produce what is reasonable, how do we define what is warranted in this situation?
Why do we have discovery? It enables the parties to know what evidence the opposition will present during the trial before it begins. It gives each side an understanding of the strengths and weaknesses of the case. And most importantly, the process is meant to be reasonable and not burdensome, meaning you only must produce what is not going to be a burdensome cost or a substantial time investment. This caveat is something I see people running the technical aspects of eDiscovery forget. If something is difficult to produce, talk to your legal team for advice.
There are several challenges with eDiscovery, especially when working with electronic files. First is the volume of information; there is just a lot of information produced in organizations today, and the rate at which we create data is not slowing down. Second, electronic data and metadata are dynamic, and electronic data is typically in an intangible form. Third, there are many different stakeholders involved, so it can be tough to coordinate with them about storing data. Fourth, the export of data can be time-consuming and sometimes takes days if not culled before export. Fifth, the explosion of social media applications adds complexity to the problem. There’s also widespread adoption of third-party apps and cloud computing, which scatters information across multiple platforms. Sixth, there’s further dispersal of this electronic information to mobile devices, employee-owned devices, and the Internet of things. Finally, there are increased concerns for privacy and data security that go along with all the preceding points.
The great news is that Advanced eDiscovery in Microsoft 365 can help you solve all these challenges. Let us discuss how, in the next section.
The Electronic Discovery Reference Model

The Electronic Discovery Reference Model
Before we even get into eDiscovery, you want to manage your organization’s data volume through excellent information protection and governance practices. Implementing processes like managing retention and deletion of your content reduces risk in the discovery process. Retention ensures people do not delete content prematurely, which would result in fines. Deletion reduces risk because if you can find it and it is relevant, you must produce it in discovery. It would not be enjoyable to lose a case based on information that you could have legally deleted. Deletion also reduces the volume of discoverable information, which reduces costs in the review process. We covered information governance in Chapter 8.
The next step in the EDRM is the processing stage. In the processing stage, we try to convert electronically stored information into forms suitable for reviewing and analyzing the data for this case. For example, in Microsoft 365, Advanced eDiscovery breaks apart emails into the message and any attachments. This way, we can search for each of them. Processing also conducts more in-depth indexing of locations on hold to search on all the metadata. Finally, Microsoft 365 Advanced eDiscovery will attempt to process and reindex any partially indexed or unindexed items and provides a report for anything unsuccessful in the Processing tab.
Now let us look at the preservation step. You might also call this step a legal hold. In this step, we identify the data related to our case to preserve it, meaning that people cannot delete it or modify it. Advanced eDiscovery allows you to put custodians on hold and customize the specific locations. For example, you could select their email, OneDrive, Teams of which they are a member, Yammer private messages, and SharePoint sites. You can also place locations on hold separately from a custodian. This option is useful if you release a custodian from a hold but want to keep some locations on hold. You can also use Advanced eDiscovery features to manage custodial hold notifications.
Next is the collection step. This step is where we search for data that might be relevant to our case. Typically, your legal team will tell you what data to search for and how. Advanced eDiscovery uses the same search options as content search and Core eDiscovery. However, we will not run into as many issues with unindexed and partially indexed items because of the previous step’s processing, resulting in a more thorough search.
The system reruns the search so we can work with the most up-to-date data.
The system copies all search results from the original data source in the live services to a secure Azure storage location. The system also adds additional metadata to the content specific to the discovery process.
Content and metadata are reindexed so that all data in the review set is fully and quickly searchable during the review of the case data.
If you have enabled optical character recognition (OCR) , text from images is extracted and included with the data.
The system can reconstruct emails and Teams and Yammer chats and conversations into threads for a faster and more accurate review.
The system groups duplicate and near-duplicate content, including email threads and files, so you only must review and tag them once.
It automatically identifies potentially privileged content.
The system enables us to import files from outside of Microsoft 365 into the review set.
For large cases, we can use a predictive coding relevancy module to train a machine learning module that can predict which content is relevant in a case.
Throughout the search and review process, your team may perform early case analysis to ensure you are on the right track with your discovery. This analysis finds critical patterns, topics, people, and discussion items in the data. Advanced eDiscovery supports early case analysis in almost every step of the EDRM process, even though the model shows it as a separate step. This analysis can include statistics about your holds and searches. It also includes charts and graphs showing content metadata, using artificial intelligence to identify themes in your dataset, and detailed reports and statistics. This analysis can help you refine search queries, identify other custodians, and more.
Next, you will reach a point where the discovery process is complete and you are ready to export your data. Some organizations may export the content and go directly to producing it to the opposing counsel. Other organizations may export Microsoft 365 data into another eDiscovery tool, where they combine data from all the electronic content sources in their company. Advanced eDiscovery can handle both scenarios and has many options for how to configure the export. It can even create load files with tagging information that you can use for your import into the other system. The export process is the last step in the EDR model involving Microsoft 365.
The next step is to produce the discovery to the opposing counsel. Advanced eDiscovery does not help with this step. There are specialized tools that the legal team uses for production.
The final step in the EDRM process is to produce your evidence in court. Again, there are specialized tools for this step, and you would not use Microsoft 365 for this purpose.
Now that you understand the overall process for discovery, the rest of the chapter will review complete details for each step and how Advanced eDiscovery works. With that, let us start by discussing how we create a new case.
Licensing and Permissions
Microsoft 365 E5 Compliance
Microsoft 365 E5 eDiscovery and Audit
Office 365 E5
There are two ways to manage permissions in Advanced eDiscovery. First, you can add people to the default role groups. This method is useful if you want a simple permissions model. The second way to manage permissions is to create custom role groups. This way is great if you will utilize the least permissions model and only permit people to perform the tasks required by their role.
eDiscovery Manager: Can perform all functions within a case. eDiscovery managers can only access and manage the cases they create. They cannot access or manage cases made by other eDiscovery managers.
- eDiscovery Administrator: An eDiscovery administrator is a member of the eDiscovery Manager role group and can perform all functions in a case. Additionally, an eDiscovery administrator can
Access all cases in both Core and Advanced eDiscovery in the Compliance Center.
Access case data in Advanced eDiscovery for any case in the organization.
Manage any eDiscovery case after they add themselves as a member of the case.
Case Management: Create, edit, delete, and control access to eDiscovery cases.
Communication: Manage all communications with the custodians.
Compliance Search: Perform searches across mailboxes and get an estimate of the results.
Custodian: Identify and manage custodians for Advanced eDiscovery cases.
Export: Export mailbox and site content returned from searches.
Hold: Place content in mailboxes, sites, and public folders on hold.
Preview: View a list of items returned from content searches and open each item from the list to view its contents.
Review: Use Advanced eDiscovery to track, tag, and analyze documents.
RMS Decrypt: Decrypt RMS-protected content when exporting search results.
Search and Purge: Lets people bulk-remove data that match the criteria of a content search.
To finish creating your role group, click Done and Next. Click Choose members and then Add, and check the boxes next to the people you want to add to the custom role group. Click Add, Done, and Next. Review your settings and click Create role group. You will need to add the custom role group to each case separately.
Create an Advanced eDiscovery Case
The Advanced eDiscovery Cases page in the Compliance Center
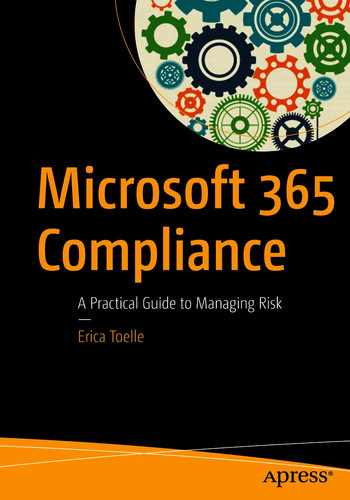
Click the Cases tab. Here you can see a list of all your cases, as shown in Figure 14-3. This list shows both active and closed cases but not deleted cases. You can view the case name, the status, the created date, last modified date, and the person who last modified the case. You can also export a list of the cases, search for a case, group the cases by status, and filter the list by case status.
Also, on the Cases page is the option to configure global analytics settings. At the time of writing, the only option is to manage the attorney-client privilege setting. This feature helps us when we get to the point where we are reviewing content for privilege in a review set. If you have an attorney-client privilege detection setting on, Advanced eDiscovery runs an attorney-client privilege model on your data and flag documents that are likely to be privileged. This flag is based on content analysis and by comparing participants against a user-provided attorney list, which you can upload on this page. This feature does not replace the need for privilege review. It helps you to get started and save time.

The case overview page
If you select no, the system will bring you to the case homepage in Figure 14-4, where you can see several widgets and information about your case. First, you can see the custodian information, including how many total custodians there are in the case and how many custodians are on hold. Next, you can see the communications widget, which shows you how many custodian notices you have sent. This widget also provides how many custodians have acknowledged the notice. You can also see how many reminders you sent and how many escalations you sent. You can then see recent job status. This view shows you recent jobs that you have ran in the eDiscovery case across different types of jobs and how complete they are. Lastly, you can see any errors for the specific review set. These are unprocessed content, such as how many files are password protected or how many have unknown data types.
You will see the following tabs: Overview, Data sources, Searches, Review sets, Communications, Hold, Processing, Exports, Jobs, and Settings. In the rest of the chapter, we will go through each one of these tabs. For now, let us look at case settings.
Case Settings

Advanced eDiscovery case settings
Lastly is Search & analytics. The search and analytics section is where you configure the processing options for the case. It is where you can set analytics settings such as identifying duplicate information. You can also thread emails and Microsoft Teams conversations. There are settings for machine learning and artificial intelligence capabilities such as theming and OCR. You can also specify text that you would like to ignore in the case.

Members and role groups for the case
The next section in settings is Access & permissions. Click Select to access the options. Here you will see individual members of the case and role groups that you have added to the case, shown in Figure 14-6. For example, if you have designated role groups based on geography for Advanced eDiscovery, instead of adding individual members to the case, you could add that geography’s role group to grant everyone in that geography access. See the “Licensing and Permissions” section earlier in this chapter to learn more about role groups and Advanced eDiscovery permissions.
If you would like to change case permissions, click Add under either the Members or Role groups heading. Here, you will see a list of all users or compliance role groups in your organization. If you would like to narrow down the list, you can use the search functionality to show a subset of role groups. Check the box next to a name and click Add. Once you have added your users and your role groups, click Exit.

Search & analytics settings
First is the checkbox in Figure 14-7 for near-duplicate/email threading. This checkbox allows artificial intelligence (AI) in Advanced eDiscovery to process what emails, Microsoft Teams chats and conversations, and Yammer messages are a part of a thread or conversation. Threading helps to decrease the time required for manual review. The idea is that it is easier for someone to review a conversation thread than individual messages. It is also easier to review all near-duplicates at one time, highlighting the documents’ differences.
For Teams conversations in a channel and Yammer messages in a group, a thread is a post and its replies. For Teams chats, it groups threads by the time stamp. The system groups discussions that occurred around the same time. Emails are grouped in conversations by threads. Near-duplicate detection parses every document with text. It compares every document to determine whether the similarity is greater than the set threshold. If it is, the system groups the documents. You set the threshold using the document and email similarity threshold percentage under the checkbox.
Next are themes. Themes use AI to help you find topics related to your dataset, of which you were not aware. For example, a theme might be a project, customer, or keyword. You can then modify your search to include discovered topics. You can set the max number of themes that you would like the AI to find. Another choice is whether to include numbers as themes. For example, you might have the fiscal year of 2020 that the system would represent as a theme number. Next, you can choose whether to adjust the maximum number of themes dynamically. If you check this box, the artificial intelligence module will decide the number of appropriate themes for your dataset. If unchecked, it will find the number of themes from the Max number of themes box.
There is a checkbox to automatically create a query named “For Review” after running analytics on a review set. This query filters out duplicate items from the review set, so you only review unique items. You will need to run analytics on the review set, covered in the “Review Set Settings” section of this chapter, for this view to work.
Then, you have options to set a min number of words and a max number of words. These fields are related to the near-duplicate and email threading. They ensure that near-duplicate and email threading analyses are performed only on documents that have at least the minimum number of words and, at most, the maximum number of words.
Finally, we can ignore text. This feature is useful for things like an email disclaimer footer, which can throw off your searches and near-duplicate detection. If you add this disclaimer to ignore a text, the system will not use it in search and analysis in your dataset.
The last set of options is for optical character recognition (OCR). OCR allows us to extract text from images. To make this feature performant, we can set a maximum image size that should be analyzed. Large images can increase the processing time and slow down your results. Images with sizes above the set size will not have their text extracted.
Similarly, you could set whether you want a low or a high accuracy for the text extraction. This accuracy setting will affect your processing times. Finally, you can select your timeout for OCR, meaning that if the system cannot extract the text from an image in this number of seconds, it will stop and move on. If this happens, the system will list that image as a processing error that you can remediate later. We will discuss processing and error remediation in a later section of this chapter.
Once you are happy with your settings, click Save. Now that we have configured all the case settings, we can either put people and content on hold or perform a search if you do not need the hold functionality.
Manage Custodians and Holds
What is a custodian? A custodian is a person of interest in your eDiscovery case. You usually want to put a custodian on hold to ensure that no one deletes or modifies relevant case information. When you add a custodian to a case, a hold is placed on all the associated data sources that you have chosen for that custodian.
The other option is to put non-custodial data sources on hold. We recommend this method when you have a data location, such as a project site, related to a case but not necessarily tied to a custodian. Holds placed on these types of areas separate from a custodian are not affected when you release the custodian from the hold. You can also use a search query to narrow down content within the chosen locations to place on hold, referred to as a query-based hold.
In Microsoft 365, holds are in place, meaning the system places one copy of the information on hold. It protects the original email or documents from deletion or modification by maintaining a copy of that information if the users attempt either action.

The Data sources tab in Advanced eDiscovery
Starting with custodians, you can see each custodian’s name and their email address, seen in Figure 14-8. The Validated column confirms the custodians and their corresponding data sources are valid. The information on each custodian also includes their country/region, their role, and the status of the hold, which is active or inactive. Then you can see the date the custodian acknowledged their hold if you use the custodian communications module. Finally, you can see the custodian indexing status and the date the index was last updated.
There are two ways to add a custodian to a case. You can add them in bulk using a spreadsheet or add them a few at a time. Please note that there is currently a limit of 100 custodians per case. If your case has more than 100 custodians, you will need to create a separate case to manage them. We will cover adding bulk custodians in the next section. Let us start with adding one or a few custodians.
Add Custodians to the Case

Choose custodial locations in Advanced eDiscovery

Addition locations you can add to the custodian hold
On the next screen, you can set additional locations for each custodian, shown in Figure 14-10. We associate these locations with the custodian. When we release a custodian from a hold, it will include associated locations. You can add additional locations for each custodian, such as Exchange mail accounts, including user mailboxes, group email accounts, or Microsoft Teams chats. You can also add SharePoint sites, Microsoft Teams, and Yammer groups.
Let us start by adding additional Exchange email locations. Click Choose users, groups, or teams. This click will bring you to a screen to choose which user or group mailboxes to add to the hold. Type a minimum of three characters to get the list of mailboxes that match that search. Check the boxes next to the group mailboxes or individual users that you would like to add to the hold. When done, click Choose and then Add.

Add additional Teams locations to the hold
To add a Microsoft Team, click Choose Teams and then Choose Teams again. Here, it will show you a list of all the Teams where the custodian is a member or owner, shown in Figure 14-11. This filter is helpful because you do not have to use a different process to find Teams where the custodian interacts. Check the boxes next to any Microsoft Teams you would like to add to the hold. Click Choose and then Add. Please note that if you add a custodian to a new Team, it will not automatically place that Team on hold. You will need to update the hold locations on an ongoing basis to account for new team memberships.
Now let us add a Yammer location. Click Choose Yammer and Choose Yammer again. Again, the system will show you a list of all the Yammer group memberships for that individual user. Check the boxes next to the groups you want to add; click Choose and then Done.
When you finish adding locations, click Save. The screen will summarize the additional locations for the users, and you can click Next. The next page is where you place the hold. Uncheck the boxes if you are not ready to put the person on hold to save the configuration. Click Complete. Please note the system will put new content items, such as emails, within a location on hold. But as a reminder, for entirely new locations, such as a new Microsoft Team, the system will not place that location on hold automatically.
Custodian Hold Details
Once you place a custodian on hold, it will appear in the custodian list on the Data sources tab. Click the custodian’s name to view the hold details. You will see summary information about the custodian, such as their title, manager, location, and more, on the details screen. You can also double-check that the hold went through correctly by seeing hold status = true. Scroll down to see a summary of the data sources, like the number of mailboxes and sites in the hold. If you would like to edit the custodian’s data sources, click Edit and add or remove data source locations.

Custodian activities in Advanced eDiscovery
To view custodian activity, make sure the person viewing the activity has View-Only Audit Logs or Audit Logs permissions. The audit log also must be enabled in your tenant. Click View custodian activity to see a screen showing you the custodian’s audit log activities, shown in Figure 14-12. Here you can filter options by date, IP address, activity, or item name. You can also show results for all activities in the audit log, or you can show specific audit log activities. You can also export the audit log. If you are interested in this feature, please see Chapter 16.
The last action on the custodian details page is Release custodians. When you click this button, it will give you a warning that asks if you are sure you want to remove the custodian from the hold. You can choose yes or no. If you release this custodian from the case, all holds placed on the custodian’s data sources will be removed. Any holds placed on the custodian’s data sources in other cases will still apply. You can also release custodians from their holds in bulk. To do this action, select multiple custodians and click the Release source button that appears on the Custodians toolbar when you select multiple people. You can also update the index for those custodians or view their activities.
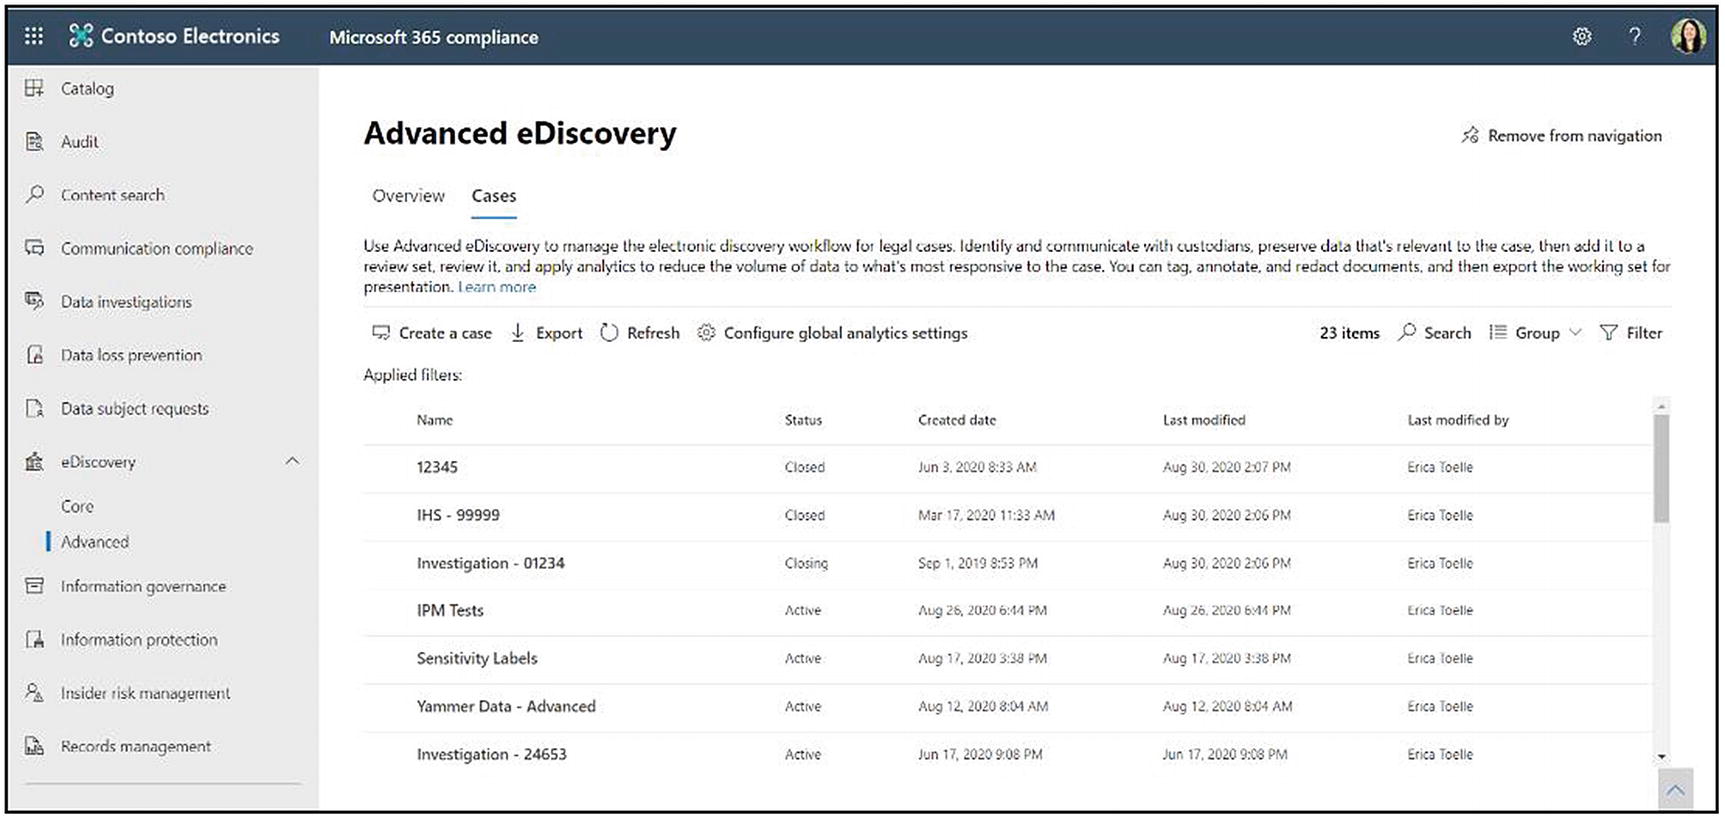
Add Custodians in Bulk
Import custodians in bulk to Advanced eDiscovery
Add the custodial information to the CSV file and save it on your local computer. See the next section for information about the properties in the CSV file. On the Data sources tab, click Import custodians again. On the page that appears, click Browse and upload your CSV file.
After the CSV file is uploaded, the system creates a BulkAddCustodian job, which you can find on the Jobs tab. The job validates the custodians and their corresponding data sources and then adds them to the Custodians tab on the case’s Sources page.
Custodian ContactEmail: Enter the UPN email of the custodian, for example, [email protected].
Exchange Enabled: Enter TRUE to put their mailbox on hold and FALSE if not.
OneDrive Enabled: Enter TRUE to put their OneDrive on hold and FALSE if not.
Is OnHold: Enter TRUE to put the custodian on hold and FALSE if not.
Workload1 Type: Enter ExchangeMailbox, SharePointSite, TeamsMailbox, TeamsSite, YammerMailbox, or YammerSite. This functionality is to add additional locations to the custodian’s hold, described in the previous section.
Workload1 Location: Depending on your workload type, this would be the data location of your workload (e.g., the email address of an Exchange mailbox or the URL of a SharePoint site).
Currently, you can only import custodians who are in Azure Active Directory (AAD). The system validates and finds custodians using the UPN value in the Custodian ContactEmail column in the CSV file. If it cannot validate a custodian, it will show them as Not validated in the Validated column on the Data sources ➤ Custodians tab.
Put Data Locations on Hold

Add data locations to the case
This click will bring you to a pop-out window that asks you to choose locations, shown in Figure 14-14. For example, you can select specific users, groups, or teams based on Exchange mailboxes to include in the hold. Or you can add URLs to SharePoint sites or OneDrive accounts. Once you are happy with your location, click Next. The final screen asks you to place the hold. You can uncheck the box if you want to save the configuration but not activate the hold. Click Submit.
The hold will now appear in the data locations list. Click the name of the hold to view the hold details. Here you can see the information about the hold, update the index, or release the hold.
Create a Query-Based Hold

Query-based holds in Advanced eDiscovery
To create a query-based hold, click the Hold tab in an Advanced eDiscovery case, shown in Figure 14-15. Here you will see a list of your existing query-based holds and the date they were last modified. You can also export a list of the holds. To make a new hold, click Create.
A window will appear and ask you to name and optionally describe the hold. Click Next. The next screen asks you to choose locations. These locations will scope your search query. For example, if you later choose a date range when you create your query, it will only find the items within that date range for the locations you choose here – let us say Exchange. Choosing only Exchange returns mailbox items that fall within the date range .
These locations are the same as in content search. We review them in depth in Chapter 12, in the “Create a Content Search” section. As a reminder, the first location group corresponds to Exchange mailboxes. You can click Choose users, groups, or teams to select individual or group mailboxes. If you choose an individual mailbox, it captures that person’s emails, other mailbox items, Teams chats, Yammer private messages, and To Do tasks. Selecting a group mailbox covers any group emails and other mailbox items and Teams conversations if the mailbox is associated with a Team. However, it does not include Yammer group messages.
The next group of locations covers site locations, such as SharePoint and OneDrive accounts. You can add these items by using the site’s URL. You can also put an entire Yammer network on hold by adding the URL of your Yammer network.
Let us pause for a moment and discuss Yammer group holds. Suppose you want only to put individual Yammer groups on hold and not the entire network. You can do that by associating a Yammer group with a custodian as described in the “Add Custodians to the Case” section. If you want to place your Yammer network on hold permanently, I recommend creating a separate query-based hold only for that purpose, so you can easily understand how to disable the hold later.
A query for a hold in Advanced eDiscovery
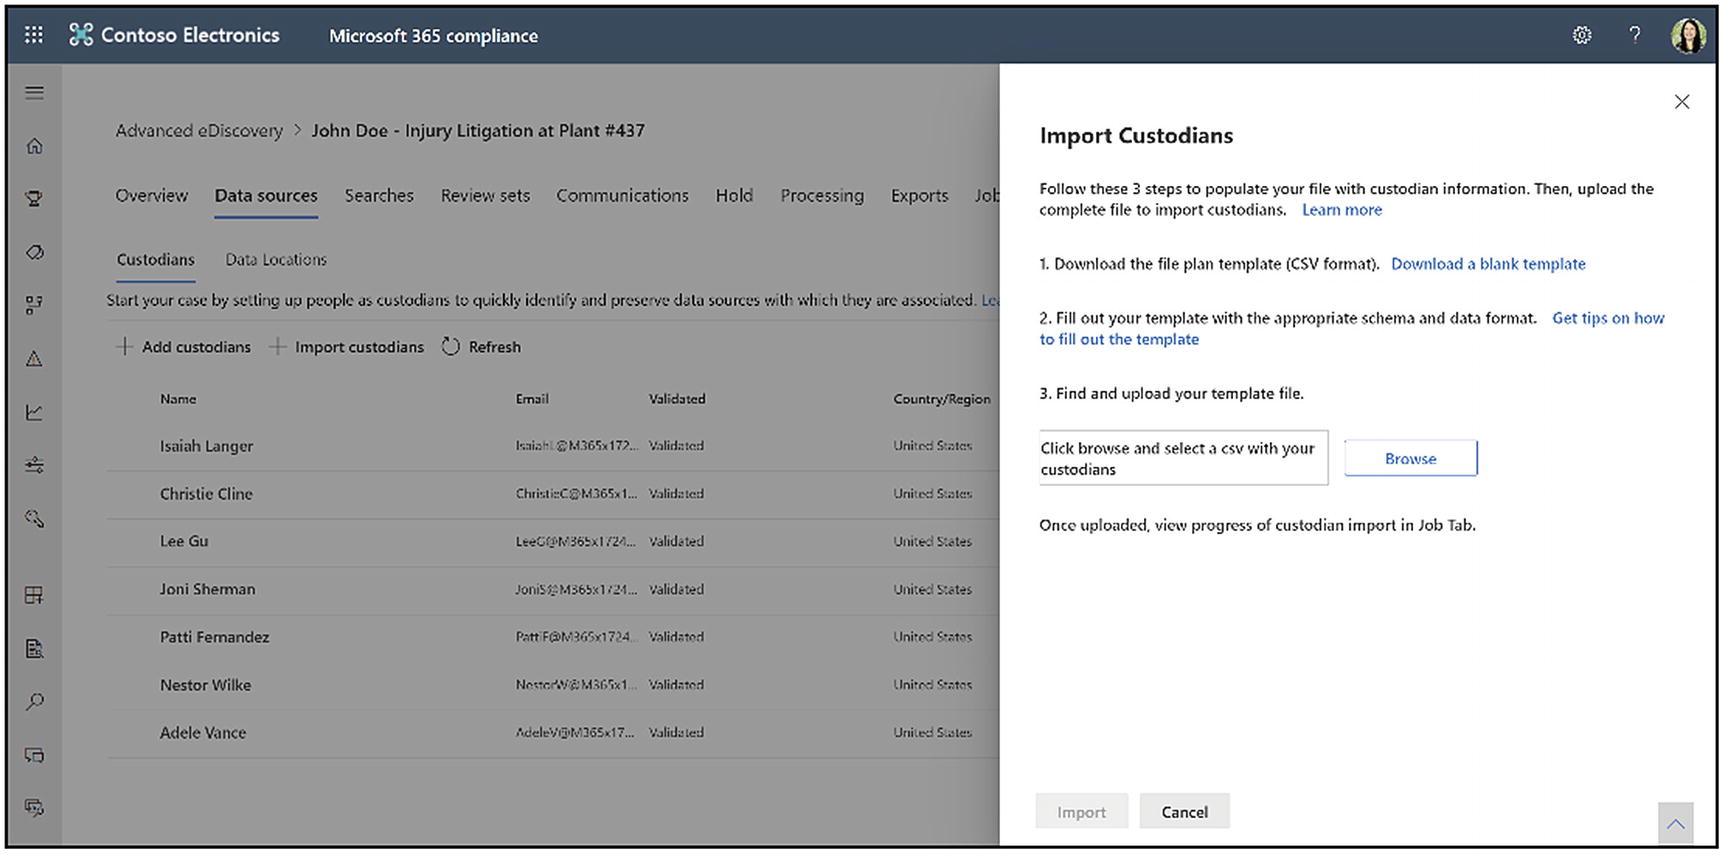
The Create query screen is where you create the search conditions for what content you place on hold. Figure 14-16 shows an example of a query. This query looks for Teams chat messages (keyword =kind:im) created between February 1, 2020, and June 30, 2020, sent or received by Adele Vance. In the location step, I choose Adele’s Exchange mailbox as the location. Again, for more details on creating a search query, see Chapter 12. Click Next when you are finished. On the next screen, you can review your settings for the hold. Click Create this hold when you are happy.
Once you add a hold, you can see it in the list on the Hold tab. If you would like to see more details about the hold, double-click its name. The details screen will pop up. Here you can edit or delete the hold. You can also see hold details such as the locations, statistics, last modified information, and any errors .
Additional Hold Details
What happens to the content we have put on hold? Let us start with Exchange Online. When we put content on hold in Exchange Online, if someone edits a message or attachment, the modified version will stay in the mailbox, and the custodian can view it. The original message is moved to the Versions subfolder and is kept intact in an immutable state. If someone deletes an email message, it is moved to the Deletions subfolder in the Recoverable Items partition. If the item is also under a retention policy, then the hold will always override the retention policy, meaning that we cannot delete content prematurely if it is on hold, and then once the hold is released, the retention policy would then take over as to whether the item is kept or deleted.
When a custodian’s email content is on hold, if a custodian tries to delete an item in the Deletions folder, the item will be moved into the Purges subfolder. The system preserves it according to the hold settings.
The system purges a message that is on targeted hold. When a targeted hold has been placed on specific messages or attachments, rather than on the entire mailbox, a cleanup process runs roughly every week, which acts on items that exceed the single item recovery limit. The cleanup process moves the items that matched the targeted query criteria to the Discovery Hold folder for ongoing preservation. The system also moves items with any index errors to Discovery Hold for continued preservation. The cleanup process then expunges the rest of the items that do not match the criteria and have no index errors.
If your organization uses Exchange Online archiving, which we covered in Chapter 8, the system moves mailbox items to an Archive folder after two years by default. When you place a custodian’s Exchange mailbox on hold, the hold takes effect for this archive, the same as for the primary mailbox. If the custodian tries to delete archive content on hold, the system preserves the content in the Recoverable Items folder of their Exchange Online mailbox. Microsoft 365 eDiscovery searches include the Exchange Online archive, so you do not have to include it as a secondary source location. Every time you search a custodian’s mailbox, it also searches the archive.
- 1.
On hold content is due to expire under a retention policy: If you apply a retention policy to SharePoint Online or OneDrive content, if content expires under a retention policy while it is on hold, the system preserves the content in the preservation hold library. When you remove the hold, the system deletes the content.
- 2.
Someone deletes the content: The system preserves deleted content in the preservation hold library. When you remove the hold, the system permanently deletes the content.
- 3.
Document versioning is enabled: Document versioning is enabled in SharePoint Online by default. When a custodian creates a new version of a document, the system preserves the previous version in the site’s Versions directory.
The last thing I want to mention in this section is that it is possible to use PowerShell to script eDiscovery holds. You can also use the Microsoft Graph API to create and manage custodian holds. Microsoft will release more APIs in the future, so please check the documentation for the latest information.
Custodian Communications
What are custodian communications? Often there is a legal requirement or organization policy to notify custodians when you place them on hold. You may want to simplify the process of issuing and tracking notifications. Sending communications instructs custodians to preserve electronically stored information and any content relevant to an active or impending legal matter. Legal teams must know that each custodian has received, read, understood, and agreed to comply with the given instructions. As mentioned in the preceding text, there are also sometimes laws around notifying custodians that they are on hold.
- 1.
The issuance notice: The issuance notice is a legal hold notice issued or initiated by a notification from the legal department to custodians who may have relevant information about the case matter. This notice instructs the custodians to preserve any information that you may need for discovery.
- 2.
The reissuance notice: You may require custodians to preserve additional content or less content than was previously requested during the case. For this scenario, you can update the existing hold notice and reissue it to custodians.
- 3.
The release notice: Once a matter is resolved and the custodian is no longer subject to a preservation requirement, you can release the custodian from the case. Additionally, you can notify the custodian that they are no longer required to preserve content and provide instructions about how to resume their regular work activity concerning their data.
- 4.
Reminders and escalations: In some instances, just issuing a notice is not enough to satisfy legal discovery requirements. With each notification, legal teams can schedule a set of reminders and escalation workflows to follow up with unresponsive custodians automatically. First is the reminder workflow. After a legal hold notice has been issued or reissued to a set of custodians, an organization can set up reminders to alert unresponsive custodians. Second are escalations. In some cases, if a custodian remains unresponsive even after a set of reminders over some time, the legal team can set up an escalation workflow to notify the unresponsive custodian and their manager.
Set Up Custodian Communications

The custodian communications overview page in Advanced eDiscovery
To create a new communication, click the New communication button. In the wizard that appears, name your communication – for example, initial notification. You will also choose your issuing officer. Any member of the case or an eDiscovery administrator assigned to the case can be the issuing officer. Click Next.
People added to the case through a role group cannot be an issuing officer. You must add a person individually to a case to show in the Issuing officer dropdown.

Add content for the hold notice to custodians
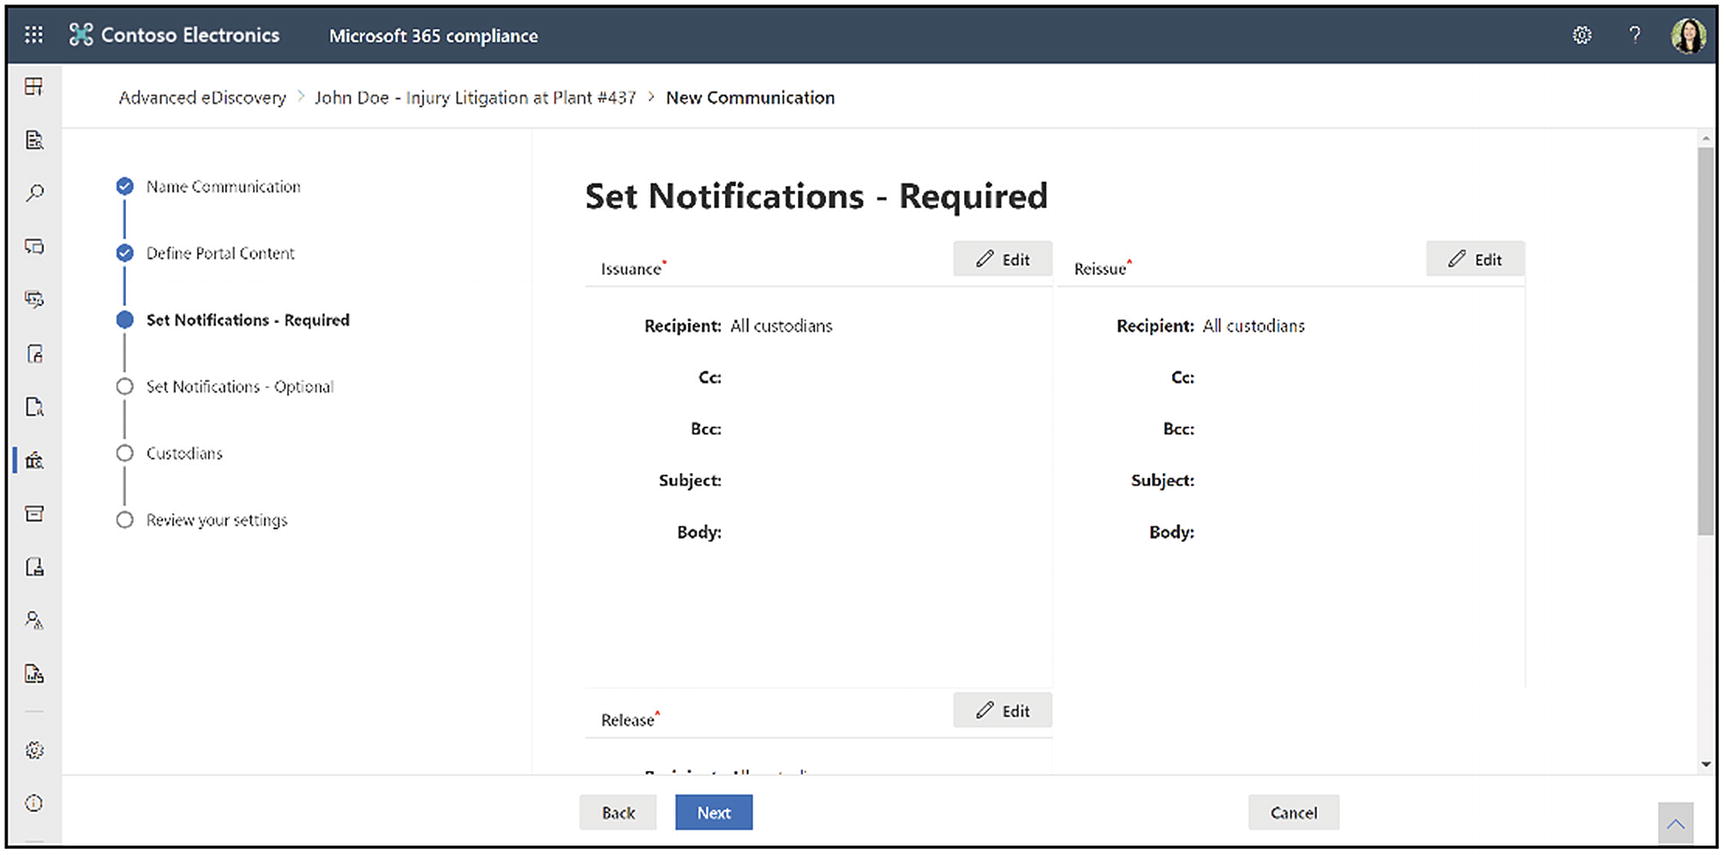
Set custodian notifications for communications
What triggers notifications
Type of communication | Trigger |
|---|---|
Issuance notices | The initial creation of the notification. You can also manually resend a hold notification |
Reissuance notices | Updating the portal content on the Define Portal Content page in the Edit communication wizard |
Release notices | Releasing the custodian from the case. |
Reminders | The interval and number of reminders configured for the reminder. |
Escalations | The interval and number of reminders configured for the escalation. |
There are several types of notices, explained in Table 14-2 above. First, we configure the required issuance notification. The issuance notification tells the custodian that they are on hold. The email sender is the issuing officer we designated in the first step. You can add additional people in the Cc or Bcc line. Enter a subject and the body. Again, you have full formatting capabilities as well as dynamic content fields that you can add. Click Save.
Next is the reissue notification. The system will automatically trigger this notification if the portal content changes. Now we configure the release notification. The system automatically sends this notification when you release a custodian from hold. It has the same options as previous notices.
Once you have configured these notices, click Next.

Optional notices for custodian communications
First, let us configure the reminder notification. On the configuration screen, you can toggle the reminder on or off. You can set the reminder interval, which is the number of days between each reminder, and the count, which is the number of reminders. For example, suppose you set the reminder interval for three days and the count to three. In that case, it will send the first reminder email three days after the initial notice if the custodian does not acknowledge the notice. Then, it will wait three days and send another reminder for three total cycles. You have the usual notice configuration fields for the subject and body. Click Save.

Select custodians for the communication
Click Next when you finish with the optional notifications. The next page asks you to Choose the custodians you want to notify, shown in Figure 14-21. You can choose to inform all custodians or only some custodians. Click Select custodians and check the boxes next to the names you want to add. Click Next.
The custodian view of the issuance notice
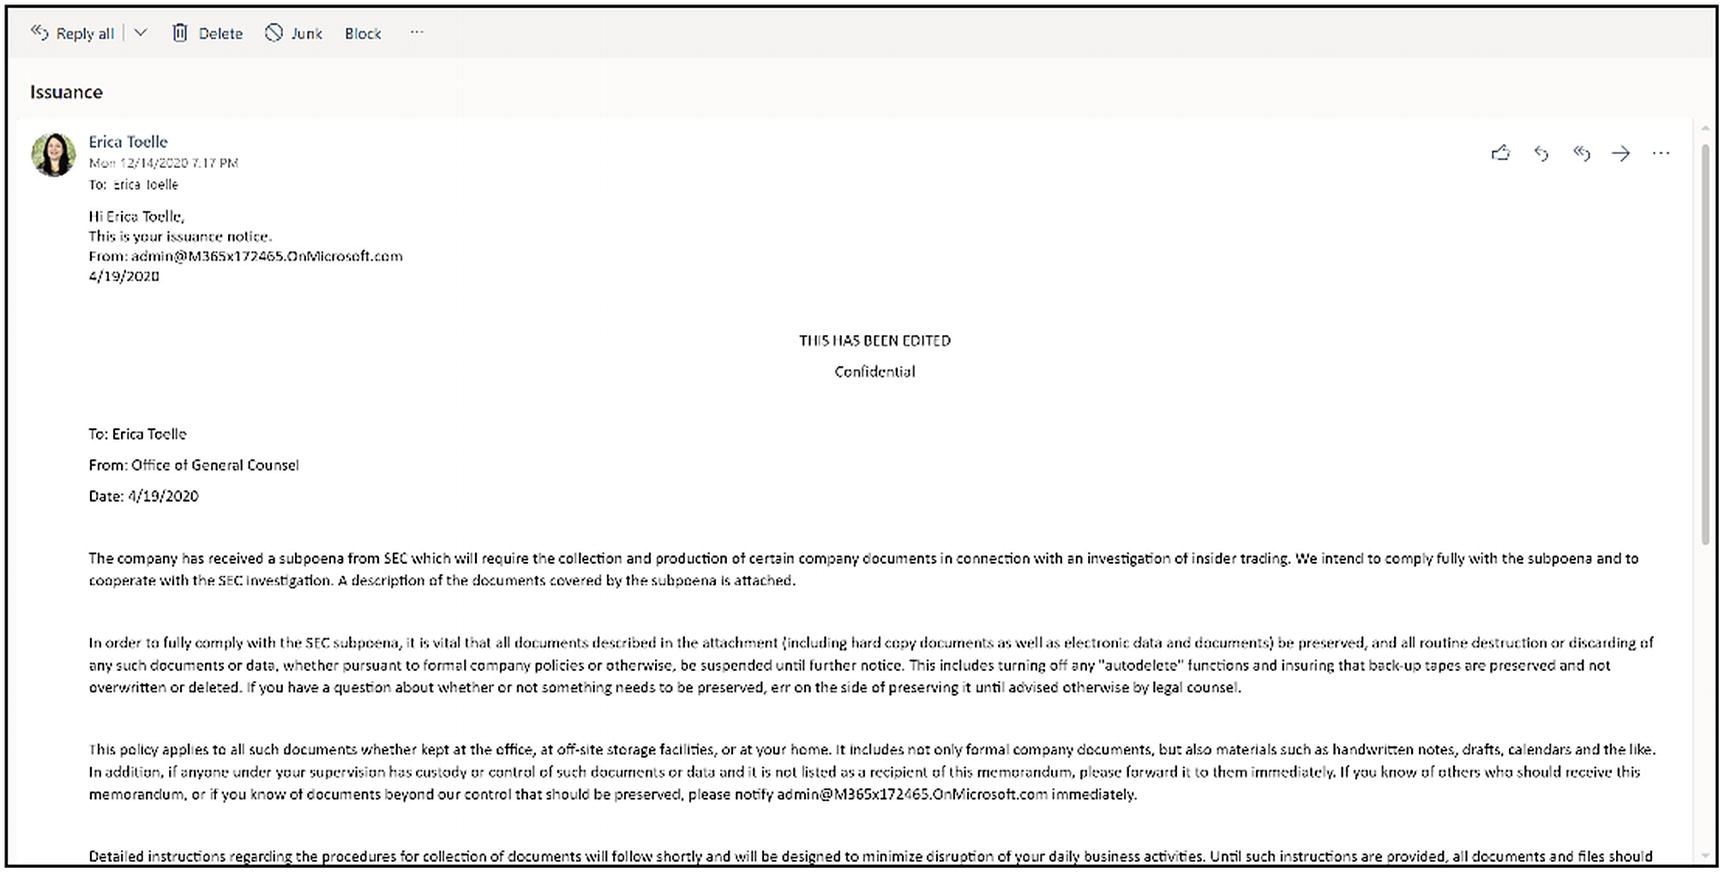
The custodians will receive the issuance email asking them to acknowledge the hold, shown in Figure 14-22 above. Once they click the acknowledgment, it will bring them to a page that says, “Thank you. Your acknowledgment has been recorded.” The system records their acknowledgment, and you can see it counted on the Communications tab and in Data sources ➤ Custodians.
You can also view details about each communication on the Communications tab. Click the name of the notice to open the details pane. Here you can see how many people have acknowledged the hold notice and how many are awaiting acknowledgment. You can also see the list of custodians and their responses. You can also edit or delete the communication from the details pane or resend the notice.
Finally, you can download the complete text and configuration of the communication for your records.
Processing and Error Remediation
What is processing? Processing provides visibility into advanced custodian indexing. It is where you can address processing errors with file identification, expansion of embedded documents and attachments, and text extraction. When you place content on hold, a reprocessing of this content occurs. First, it identifies the files that need to be processed. Next, it expands embedded documents. For example, if you have a Word document with an embedded PowerPoint presentation, it will expand those into two separate files.
Next, it extracts any attachments, for example, email attachments. Next, it extracts text. This process is where the optical character recognition or OCR of images occurs, where we turn text from images into searchable text. And then, the content is also reprocessed to make it fully searchable. By default, in the Microsoft 365 search index, you cannot thoroughly search on every single possible piece of data, whereas Advanced eDiscovery reprocesses this content so you can search on every single aspect of the file.
The Processing tab also gives you information about the effectiveness of reprocessing. When you do this processing, you will have some content that is partially indexed. Partially indexed content occurs for several reasons. Unsupported file types or indexing file size limits result in partially indexed content. Other types of errors include documents that the system cannot extract correctly or images larger than the Optical Character Recognition (OCR) size limitation that you designated in the case settings. Other reasons include general timeouts or general internal errors. We also went over more of these partially indexed items in Chapter 12.

The processing overview screen in Advanced eDiscovery
Now, let us go through the Processing tab and the options that are available there. To access processing, click the Processing tab in an Advanced eDiscovery case. You see the processing overview page in Figure 14-23. Here you can select your view and see either index status, processing errors, or remediations. Looking at the index status page first, we can see that it gives you information about the hybrid index. The hybrid index is where Advanced eDiscovery stores the reprocessed content. It is a separate search index just for this eDiscovery case, and it is stored separately from the usual Microsoft 365 search index in Azure.

The processing errors view in Advanced eDiscovery
The next view contains errors, which are processing errors. This view is where you will see a list of all the processing errors that the system encountered, shown in Figure 14-24 above. You can scope this view by the entire case or by review set. The view shows the errors grouped by error type, and you can expand or collapse those groups. Each line item displays a file extension within the groups, and then the count and size of the files with that extension and type. You can also export a list of errors.
- 1.
Bulk remediation
- 2.
Single file error remediation
The individual item error remediation is useful because you can view the file’s metadata to decide if it is worth your time to do error remediation. The error remediation process for both options is manual, meaning you will need to download the file, open it up, fix the error, and reupload it to the eDiscovery case. Because this process is time-consuming, it may not be required to do that for every single file.
Bulk Remediation
- 1.
From the errors page, click New error remediation.
- 2.
Select the files you would like to remediate.
- 3.
Click New error remediation.
The remediation process will start to process the selected data to prepare it for the download process. This process will take several minutes. Once the data is ready, you can click Next ➤ Download files.
To download the data, you need to use a tool called AzCopy. Before you start, you will need to install it. You can find AzCopy here: https://erica.news/AzCopy81. Something important to note is that there is AzCopy version 8.1 or AzCopy version 10. For eDiscovery, you need to use AzCopy version 8.1 because it integrates with the Advanced eDiscovery UI.
To install AzCopy, download it to your Downloads folder on your computer or similar. Double-click the executable. This click will bring you to an install screen. Click Next and go through the install process.

Build the download command prompt for remediation files
Go back to Advanced eDiscovery to the screen where we left off. Fill out the destination path for the download, shown in Figure 14-25. This path is where you want your downloaded remediation files to go. By default, files will be downloaded to your Downloads folder on your local machine in a folder called Errors. Filling out the destination path for download is going to populate the next field automatically.
Under the heading Copy this command and run it in a Windows command prompt, click Copy to clipboard, go back to AzCopy, paste it, and press Enter. This step is why we want to use AzCopy 8.1. With AzCopy version 10, you cannot easily copy and paste that command. With 8.1, you can paste the tool’s information, and you do not have to know how to write PowerShell.
Then, the files will download to the destination you specified, and you can go to Downloads ➤ Errors on your computer to view the files.
Now you need to remediate each item. The exact steps will depend on the error. For example, if the error is a password-protected file, like when someone puts a personal password on their Excel sheet, you will need to get the person’s password or run a password cracking tool to break into the file. If it was an unrecognized file type, you need to save it as a file type that eDiscovery can process. Or, if it is a text-based file, you could copy and paste it into something like Notepad, so at least the text is discoverable to get around an unknown file type. Those are just some examples of how to remediate files, but do what makes sense.

Upload the remediated files back into Advanced eDiscovery
Go back to eDiscovery and click Next on the upload file screen. You will put the path to the remediated files’ location in the first field, shown in Figure 14-26. Again, copy the resulting command to the clipboard, go back to AzCopy, paste it, and press Enter to upload your remediated files. Then Advanced eDiscovery will process the files. This process may take several minutes, depending on the amount of data. When the processing completes, the remediated files will now be available in the search index.
Extracted text size
Has text
Is error remediate
Load ID
Processing error message
Processing status
Text
Word count
Working set ID
These fields are all related to Advanced eDiscovery and do not change the files themselves .
Single File Error Remediation

The document metadata and processing error for a partially indexed file
Above the file metadata , you will see a red box that says “Processing failed: [error type]”, shown in Figure 14-27. Here I have two choices. First, I can ignore the file, which removes it from the bulk remediation list, and I will not see it again in this view. Second, I can click Remediation. When I click that, it allows me to upload a remediated file. First, download the individual file by clicking the downward-facing arrow with the line under it, located in the document pane’s upper-right corner. I added a box around it in Figure 14-27. You then perform the file remediation and click the Remediation button to upload the new file. When the upload is complete, the system reprocesses it and lets you know when processing is complete.
Another usual review set query related to processing remediation is a query to view remediated files. To set this up, click New query and name the query. Add the condition “was remediated.” Choose equals true. This query shows a list of all the files that you have remediated through either the single item remediation or bulk remediation method.
After performing file remediation using either option, you now have a fully searchable set of files for either your custodial or search data. The files are fully indexed and ready for the full discovery process. In the next section, we will examine how to perform an eDiscovery search to gather files for review, analysis, and export .
Jobs

The Jobs tab in an Advanced eDiscovery case
The Jobs tab shows each of the processes in your case, shown in Figure 14-28 above. You can see the job type, review set name (if applicable), search name (if applicable), scope, status, date created, and date completed. You can export a list of jobs or refresh the view.
You can filter the jobs view to see a subset of information. To do this, click the filter button. Here you can filter by job type, status, or scope.
Click a job to view the job details. Here you can see the job type, job status, progress, and subtasks of the process and their status. You can also get support information from the job details. This screen is useful if you want a more detailed status on the process. It is also helpful if there is an error, so you can see why the error occurred. If you contact Microsoft support because of a processing error, they will need the support information in this details pane.
Advanced eDiscovery Searches
We use searches in Advanced eDiscovery to identify the content for your case or investigation. This identified content is what you will review and/or export.
Advanced eDiscovery has two steps. First, you will build the search query and run the search. This step uses the content search functionality we went over in Chapter 12. Please review that chapter for a deep dive on search. Next, review the search statistics and preview the search results to ensure that the search has the expected content.
Finally, when you are happy with the documents, you will add them to a review set for further analysis or export. Let us look at each of these steps in more detail.
How to Run a Search

The search overview page in Advanced eDiscovery
To create a search, go to the Searches tab in the Advanced eDiscovery case, shown in Figure 14-29 above. You can see a list of your searches, any query text, and the last time someone ran the search. You can also see the search estimate status, the preview status, and the add to the review set process.
To create a new search, click New search. The first screen asks for a name and a description. Click Next. If you would like to run the search against custodian data locations, select a custodian here. You also have the option to choose all custodians. Selecting a custodian will run a search against all the data sources mapped to that custodian. You do not have to add a custodian. This step is optional. Click Next.

Search additional locations in Advanced eDiscovery
Next, the wizard asks if you would like to add additional locations to the search, shown in Figure 14-30 above. This step allows you to search locations that are unrelated to the custodian or non-custodian data sources. You can choose to search all Exchange email mailboxes and SharePoint sites or specific locations. You can also search all Exchange public folders. Click Next.
The next screen asks for the search criteria. This search criterion is the same as in content search. You can add keywords, a keyword list, KQL, or no keywords. You can also add conditions to the search, such as a date range or participants in an email. Click Next. Review your search settings and click Submit. There are some limits that affect search. Microsoft increases these limits frequently, so please see the latest information here: http://erica.news/AeDLimits.
Search Statistics
Searches are a long-running process. You can view the status of your search from the Searches tab. For example, this page’s information will tell you if the search is still in progress or has been successful or has failed. You can see whether the search preview status was successful or is still processing. Then, when you add the search to a review set, you can see that status as well.
It can be useful to view the search details to learn more about your results. This information in the search details area can help you ensure the search aligns with your expectations. Click the name of a search, and the search details screen will appear. On that display, you will be able to view the description of the search. You will also see the query and the custodian, non-custodian, and additional locations. It also shows the last time you ran the search with an option to rerun the search. Finally, the screen displays when you created the search, the last modified date, and the estimated search results.
Under the estimate, you will see the estimated number and size of items that match the search criteria. You will see the number and size of partially indexed items and the number of mailboxes and searched sites. Look at this estimate and make sure that those numbers seem reasonable for what you expected.

The Search Statistics Top locations view
Next, for Type, choose Top locations. In this view, shown in Figure 14-31 above, you see the individual content locations with the most items that matched the search query. For each content location, it displays the following information. First, it shows the name of the location. This name could be the email address for mailboxes or the URL for SharePoint sites. Next, it shows the location type, which is Exchange or SharePoint. Then, the number of items that matched the search criteria for that location is displayed. Lastly, the total size of all items that met the search criteria for that location is shown. You can click Download to get a report on this view. This report can be useful because if your search is hitting any search limitations, you can use it to see what locations have the most significant size in your search. You can use that information to break the locations out into multiple searches.
Lastly, for Type, choose Queries. You can see the detailed search statistics for each component of the search query in the Queries view. For example, if you used the keyword list in the search query, you could see enhanced statistics in the Queries view, showing how many items matched each keyword or keyword phrase. This view helps you identify which parts of the query are the most and least significant. You can then use that information to modify your query as needed.
The system displays the following information in the Queries view – first, the location type, which is SharePoint or Exchange. The next column will display one of the following values – primary or keyword. If the column’s value is primary, the statistics for the entire search query are displayed. If the value is a keyword, it shows the query component’s statistics. For example, if you use a keyword list, then the statistics for each of the keywords are displayed.
NOT IsExternalContent:1: This term excludes any content from the on-premises SharePoint organization.
NOT isOneNotePage:1: This term excludes all OneNote files because these are duplicates of any content that matches the search query.
Items: Displays the total number of things that matched the search criteria for the part or condition in the row.
Size: Shows the total number of items that matched the search query for the part or condition in this row.
Click the back arrow to return to the search details screen.
Next, let us click Preview in the search details window. This option allows us to see a sample of our search results. You can click an item to view the file’s contents in full fidelity or the file metadata. Click the back arrow to return to the search details pane.
The next option is to add results to a review set. We will review this option in the next section. The Edit option allows you to modify the search query. You can change anything except the name of the search. Click More to see further options. Here you can delete or copy the search. You can also sample the search.
The sample option allows you to add a statistically significant sample of the search to a review set for a more detailed analysis. When you click Sample, the system will bring you to a wizard that asks you to select the sampling parameters. You can specify a confidence level and confidence interval or take a random sample of the data and specify a percentage for how much data to include. Select which option you would like and click Next.
You can then choose the review set where you would like to add the data. If you have existing review sets, they will show up as options. You can also create a new review set. Then you can choose the collection options. We will discuss these options in the next section about creating a review set. When you finish your selections, click Next and then Submit. Now you can use the options we discuss in the next section to analyze the sample.
Now let us go over the options for adding a search or sample to a review set.
Manage Review Sets
- 1.
The search is rerun. This action means the actual search results copied to the review set may differ from the estimated results returned when the search previously ran. This change mostly happens if there was a gap between when you initially ran the search and when you add it to the review set. It adds the most up-to-date search results to the review set.
- 2.
The system copies all search results from the original data source in the live services to a secure Azure storage location. This copy means that you have a separate copy of the items from where they live in the live services.
- 3.
It reindexes all items, including the content and metadata, so that all data in the review set is fully searchable during the review of the case data. Reindexing the data results in thorough and fast searches when searching the data in a review set during the case investigation.
- 4.
If OCR is enabled, text from the image is extracted and included with the data. OCR is supported for loose files, email attachments, and embedded images. Remember that you need to enable this option in the case settings before you add the content to a review set.
- 5.
A file encrypted with Microsoft encryption technology and is attached to an email message returned in the search results is decrypted when you add the email message and attached file to the review set. You can review and query the decrypted file in the review set. You must be assigned the RMS Decrypt role to add decrypted email attachments to a review set.
- 6.
Conversation threading. Advanced eDiscovery reconstructs Teams and Yammer conversations into threads so that you can review the entire conversation. Please note you need to choose the option Collect contextual Teams and Yammer messages around your search results when you add your search to the review set to see the entire thread. Otherwise, you will only see messages that match your search query. This process preserves unique message-level metadata across all your messages within a conversation.
Please note that there is currently a limit of 20 review sets per case, and you cannot delete review sets from a case.
Create a Review Set
- 1.
Create an empty review set.
- 2.
Add a search to a review set.

Add search results to a review set in Advanced eDiscovery
To create a review set by adding search results, visit the Searches tab. Click the search name. In the search details pane that appears, shown in Figure 14-32 above, click Add results to review set. You then have a few options to configure.
First, choose the review set where you want to put the search results. If you have existing review sets, you can see them here and select one. You also have the option to create a new review set.
- 1.
Collect all versions of SharePoint items: This option includes all versions of a SharePoint file instead of only the most recent version. Keep in mind this can significantly increase the amount of content. By default, SharePoint Online keeps 500 major versions of a file. Your admin can increase or decrease this number or can set the number of versions to unlimited.
- 2.
Collect contextual Teams and Yammer messages around your search results: If you check this box, it will bring all messages in the conversation if one message meets the search criteria. For Teams chat and Yammer private messages, it will include messages from about four hours before and after the message that met the search criteria. For Teams conversations and Yammer groups, it will consist of the original post and any replies.
- 3.
Collect cloud attachments from items found in your search results : Cloud attachments are files stored in either SharePoint or OneDrive and shared in an email, Teams message, or Yammer message by attaching a link, as opposed to attaching the actual file. Check this box to include these files in your review set.
When you finish, click Add. Adding data to a review set from a search is a long-running process. You can track the progress of this process in the Jobs tab. Please note that there are limits to the amount of data you can add to a case and a review set. Microsoft frequently increases these limits, so see the latest information here: http://erica.news/AeDLimits.
Review Set Settings
Like the case settings, you may want to configure review set settings before proceeding with the data review. These settings allow you to create additional analytics and reports, add non–Office 365 data to the case, configure your review tags, and use machine learning to predict document relevance.
- 1.
Analytics: This option allows you to analyze documents in the review set for more efficient reviews.
- 2.
Summary report: View a summary of the documents in this review set.
- 3.
Load sets: View load set statistics, compare load sets, or download a load set report.
- 4.
Tags: Manage the review tags for your case.
- 5.
Non–Office 365 data: This section allows you to load data into a review set from sources other than Office 365.
- 6.
Relevance: This module allows you to train the system to identify responsive documents automatically. The relevance module is most useful for large cases involving outside counsel, where you outsource some of the reviews of your data to low-cost resources. We will cover relevance in a later section of this chapter.
Now let us look at the details for the review set settings. First, let us start with analytics. Before you can view analytics for the review set, you need to run an additional process. Click Run analytics for the review set. A warning will pop up that says, “This will take some time. Are you sure?” That is because running analytics is a long-running job that can take from several minutes to several hours.
- 1.
Near-duplicate detection: Remember that we set our document and email similarity threshold in the case settings near the chapter’s beginning. For example, if we put this threshold to 80%, any documents that have text that is at least 80% similar will be considered a near-duplicate. If they are 100% similar, the system regards it is as a duplicate. This way, we can review all the near-duplicates in bulk, highlighting only the differences, to speed up our manual review.
- 2.Threads emails: The system looks at each email individually and compares it to other emails. It categorizes each email into one of the following buckets:
- a.
Inclusive: The last message in the email has unique content, and the email has all the attachments included in other emails. Because it is the last message in the thread, it contains all the previous messages. You can review only this email and see all the thread’s content.
- b.
Inclusive minus: The email’s last message has unique content, but the email does not contain some of the attachments included in other emails.
- c.
Inclusive copy: An exact copy of an inclusive/inclusive minus email.
- d.
None: This email’s content is in at least one email marked as inclusive/inclusive minus, so you do not need to review it.
- 3.
Find themes in your review set: The themes functionality in Advanced eDiscovery attempts to mimic how humans reason about documents. Themes identify the dominant document theme as the one that appears the most often in the document. It then shows you the most prevalent themes in your review set. Themes can help you find patterns in your data you were not aware of, so you can further investigate the interesting ones. Please see the section “Query and Filter Data in a Review Set” to view the resulting themes.

Review set analytics in Advanced eDiscovery
Once you run the analytics, you can click View report under the Analytics heading in the review set settings. The report will give you additional data about your review set, shown in Figure 14-33. For example, it will tell you the target population, including the number of errors, emails, attachments, and documents. It will also show you documents, excluding attachments, and how many are unique vs. exact duplicates. Other useful information includes statistics about the emails and how many are inclusive vs. other types.
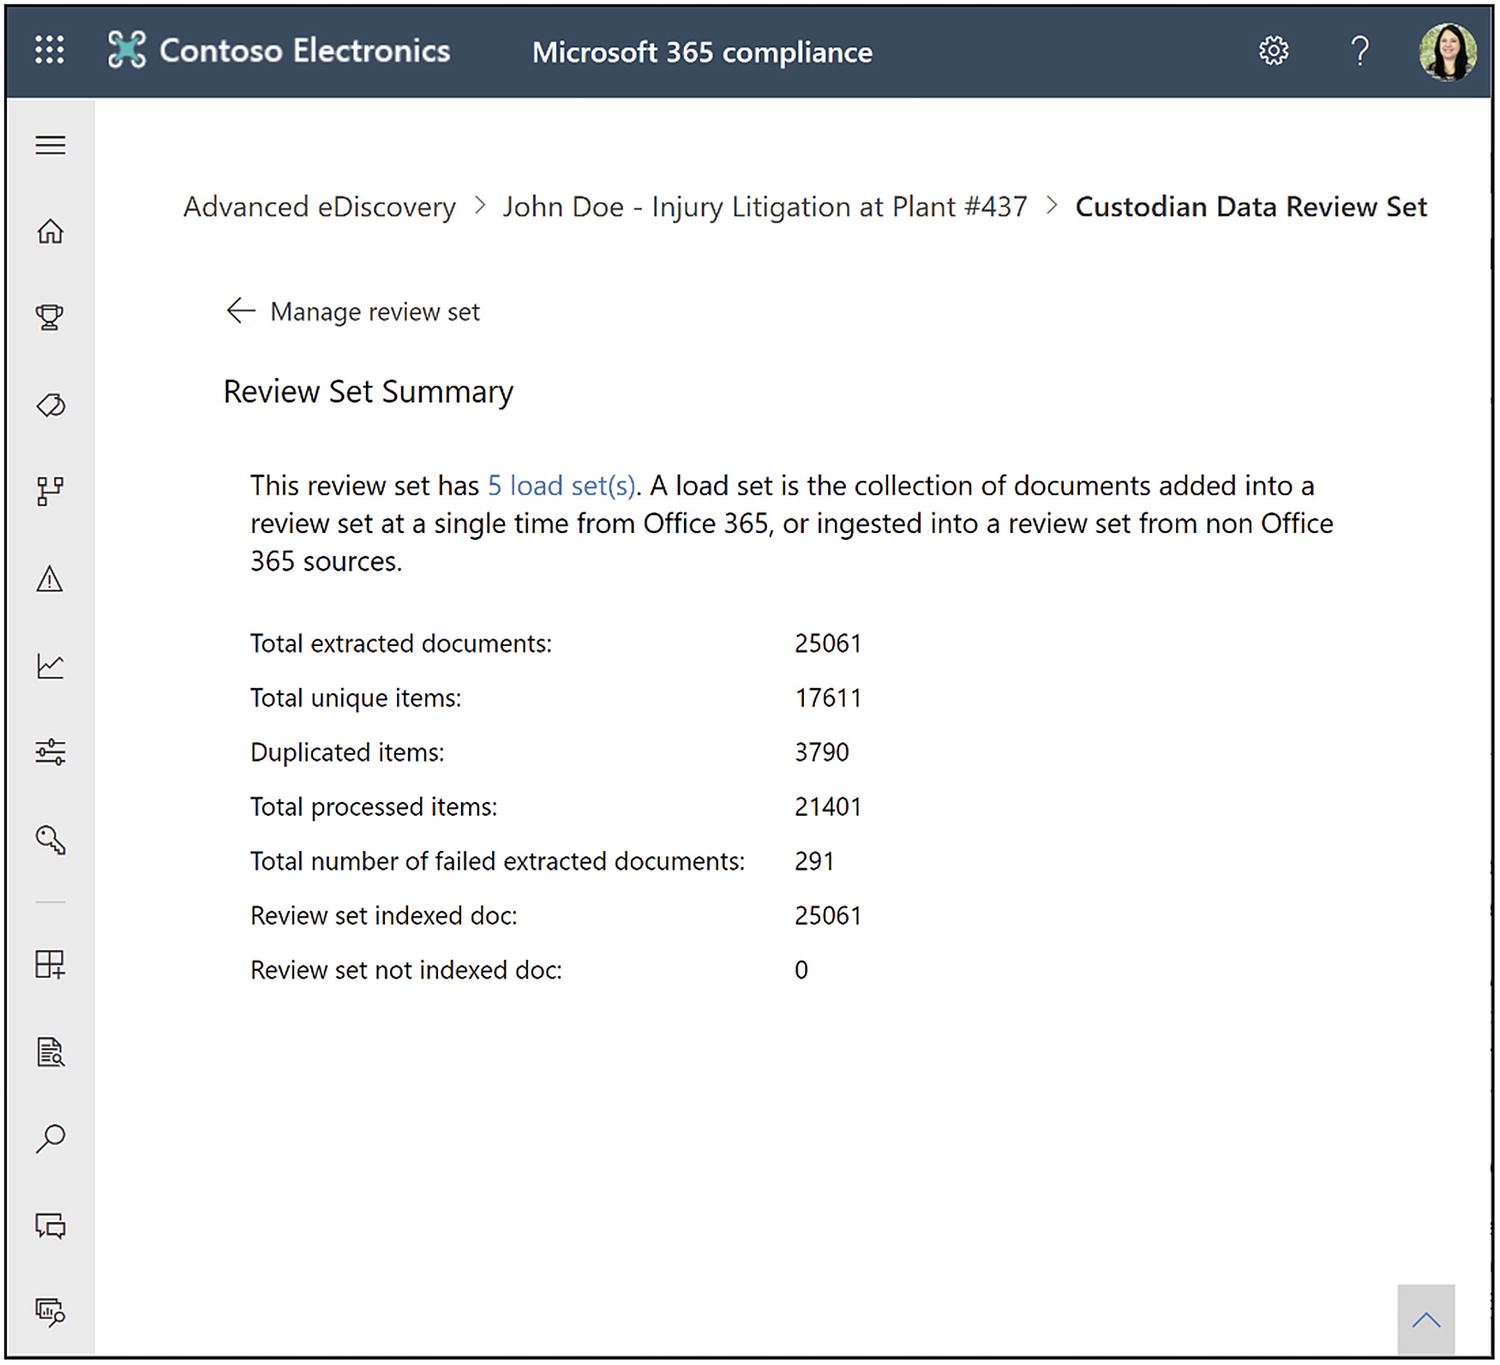
The review set summary report in Advanced eDiscovery
Now’s let us talk about the summary report, shown in Figure 14-34 above. Go back to the settings screen. Under the Summary report heading, click View summary. The review set summary will give you some additional summary data about your review set. It will show you how many load sets are in the case. We will talk about load sets in the next paragraph. The statistics show you things like the total extracted documents, total unique items, duplicate items, total processed items, the total number of failed extracted documents, review set indexed documents, and review set not indexed documents. Again, this information lets you see an overview of what content is in your review set to help with pre-case analysis.
Next, let us cover load sets. Go back to the settings screen. Under Load sets setting, click Manage load sets. A load set is a collection of documents that you added to a review set at a single time from Microsoft 365 or ingested into a review set from non–Office 365 sources. For example, every time you run a search and click Add results to review set, that would be considered one load set. If you then later added another search, the system would view that as a second load set. This area will show you all the load sets added to the review set. If you like, you can download a report, and that report will show you the same information you see on the screen. Each load set has a unique load ID, and it will show you some information about the source and from where it came.

The load set comparison tool in review set settings
I can also select two load sets and compare them, shown in Figure 14-35 above. This view allows you to understand what files are added or removed from load set to load set. This information can be useful if you have a long-running case and you reran the search to get new search results and then added them to the review set. It might be useful to see how many new files you added need to be reviewed and processed.
Now let us manage tags. The tags are what you will use to tag the documents during the actual review process. These tags are completely customizable based on your business needs. Go back to the settings screen and under the Tags heading, click Manage tags.
Here you will see a blank screen where we can add groupings and tags. First, click Add section and select Add smart tag group. This area is where some of the cool artificial intelligence features of Advanced eDiscovery come into play. When we include a smart tag, we will eventually have several models from which to choose. As of the writing of this book, the available one is the attorney-client privilege smart tag.
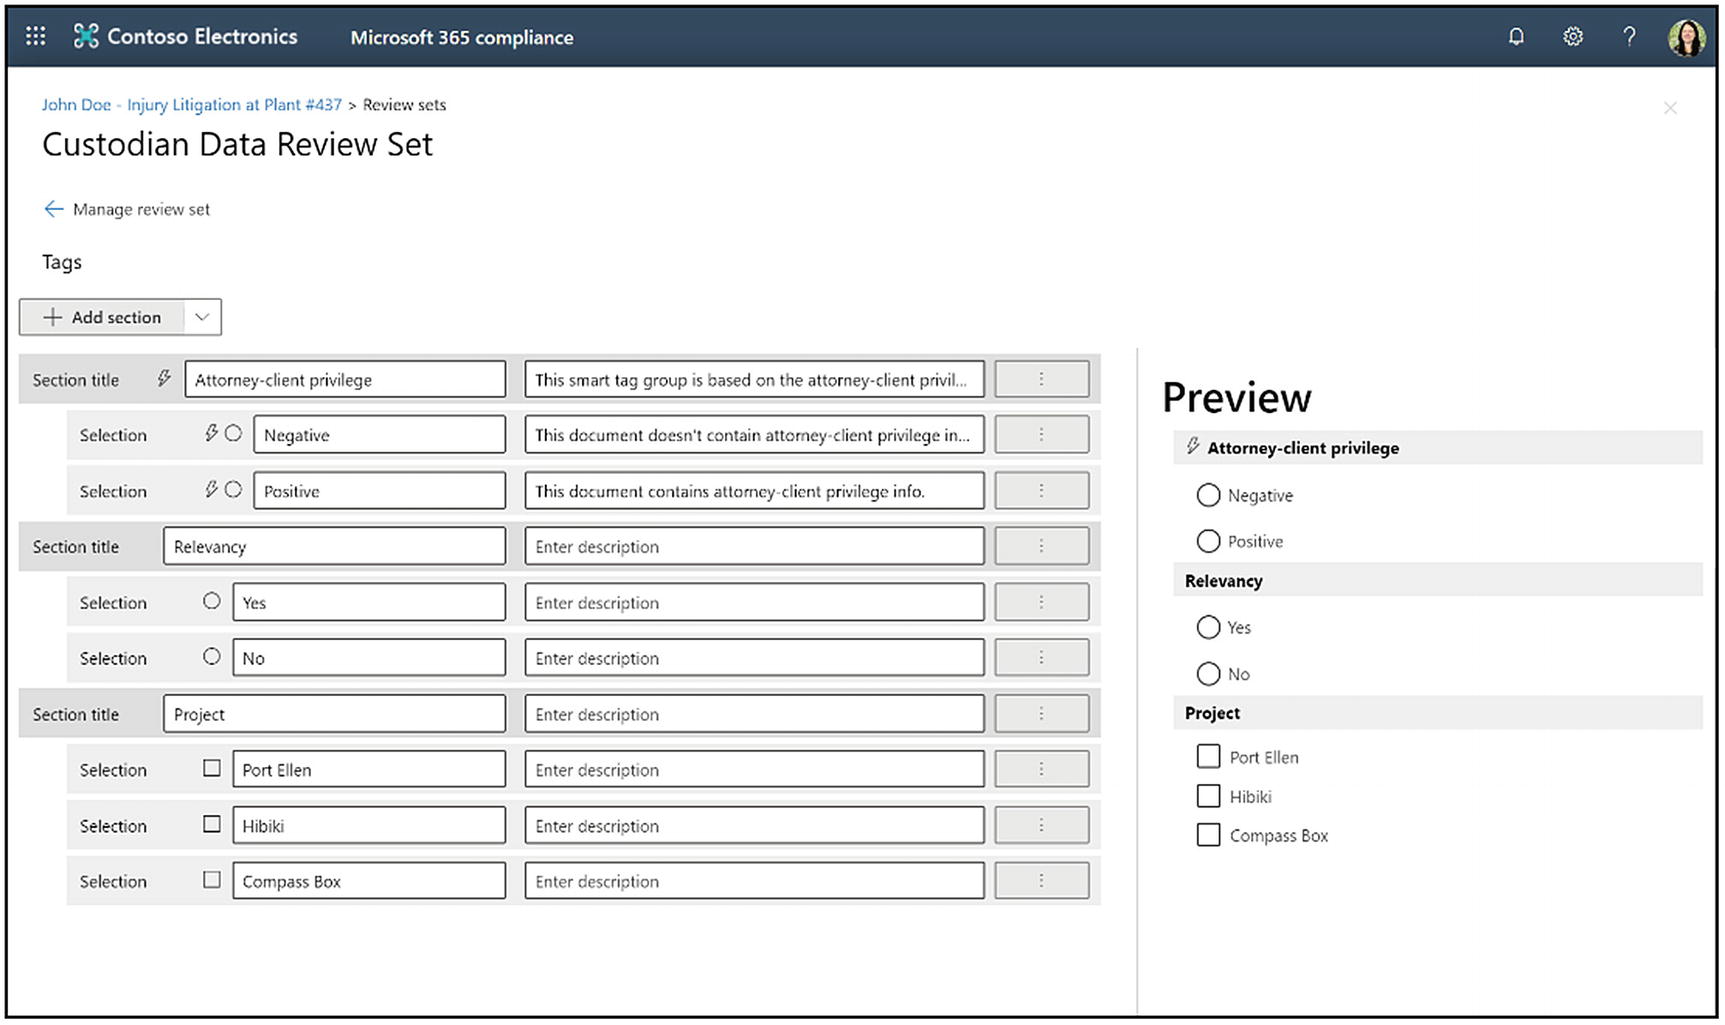
An example of a tagging panel for a review set
Now let us add more tags to the review set. Click Add section. Here you will be able to add a section title and click Save. Then, from there, you can click the ellipsis that is to the right of the description for the section title, and you have the option to add a button if you need to have mutually exclusive tags. You can add a checkbox if people can select more than one option. You can move the section up so it is above other sections, or you can delete the section. You can also see a live preview on the right side of the screen that shows you these changes and additions in real time. Add your sections and tags as needed. An example of a complete tagging panel is shown in Figure 14-36 above.
If you go back to the review set settings screen, we have gone over all the options except for the non–Office 365 data import, which we will go over in the next section, and the relevance model we will go through near the end of this chapter.
How to Add Non–Office 365 Data into a Case
You may want to add non–Office 365 data to a review set for a couple of reasons. First, if you have old PST files that you are keeping for discovery purposes, your organization may sometimes store those in a file share or other locations. You can add those to your discovery by uploading the PST files to your case.
Second, this process also works for any documents or other files that you might have sitting around. We will add the non–Office 365 data to custodian mailboxes and associate them with a custodian. They need to have an active online mailbox in your organization for it to work.

Instructions to prepare non–Office 365 data for upload

Instructions for uploading files using the AzCopy tool

A successful upload of non–Office 365 data
- 1.
The custodian named in the file folder needs to be a custodian in the case. If you have not added them as a custodian to the case, it is going to fail. You can always add custodians to the case and then not place them on hold for this purpose.
- 2.
Any loose files that are not in a custodian folder will result in an error.
Then it will show you the processing of the files. This processing could take several minutes to several hours, depending on the amount of data you are uploading. You cannot pause or cancel this process, and you can see the status in the Jobs tab. Once the non–Office 365 data upload process completes, you will see the success message shown in Figure 14-39 above. The import will appear in the list of non–Office 365 data load sets.
When you search against the review set, you can search the files by the individual custodian location, which is their Exchange mailbox.
Reviewing Data in a Review Set

Review set options in Advanced eDiscovery
- 1.
New query: This option will allow you to search within the review set. We will go over how to do this in the next section.
- 2.Action: This has a few sub-options.
- a.
If one or many files are selected, you can download those individual files.
- b.
Export data outside of Microsoft 365. We will review that option in detail in the last section of this chapter.
- c.
Add the data to another review set, which could be useful if you want to analyze a subset of documents separately.
- d.
Convert all redacted files to PDF. We will show you how to redact files later in this section. You must convert the redacted files to PDF before an export to preserve the redactions.
- 3.
Manage review set: This will take you to the review set settings described earlier in this section.
- 4.
Show all documents or Group family attachments: The next option is how you want the files to display in your view. Show all documents shows you a list of all the documents in the review set. Group family attachments shows you emails grouped with their attachments and Yammer or Teams messages with their cloud attachments.
- 5.
Edit columns: This option allows us to specify what columns of data we want to see in this file overview screen. There are 49 columns you can add or remove to or from the view. Check the boxes next to the columns you want to see. You can also click Reset to go back to the default view of columns.
- 6.
Individual results or the Search profile view: The Individual results view is our default list of files. The Search profile view can be interesting for doing your pre-case analysis. It allows you to see different charts and graphs about the data that is in your review set.
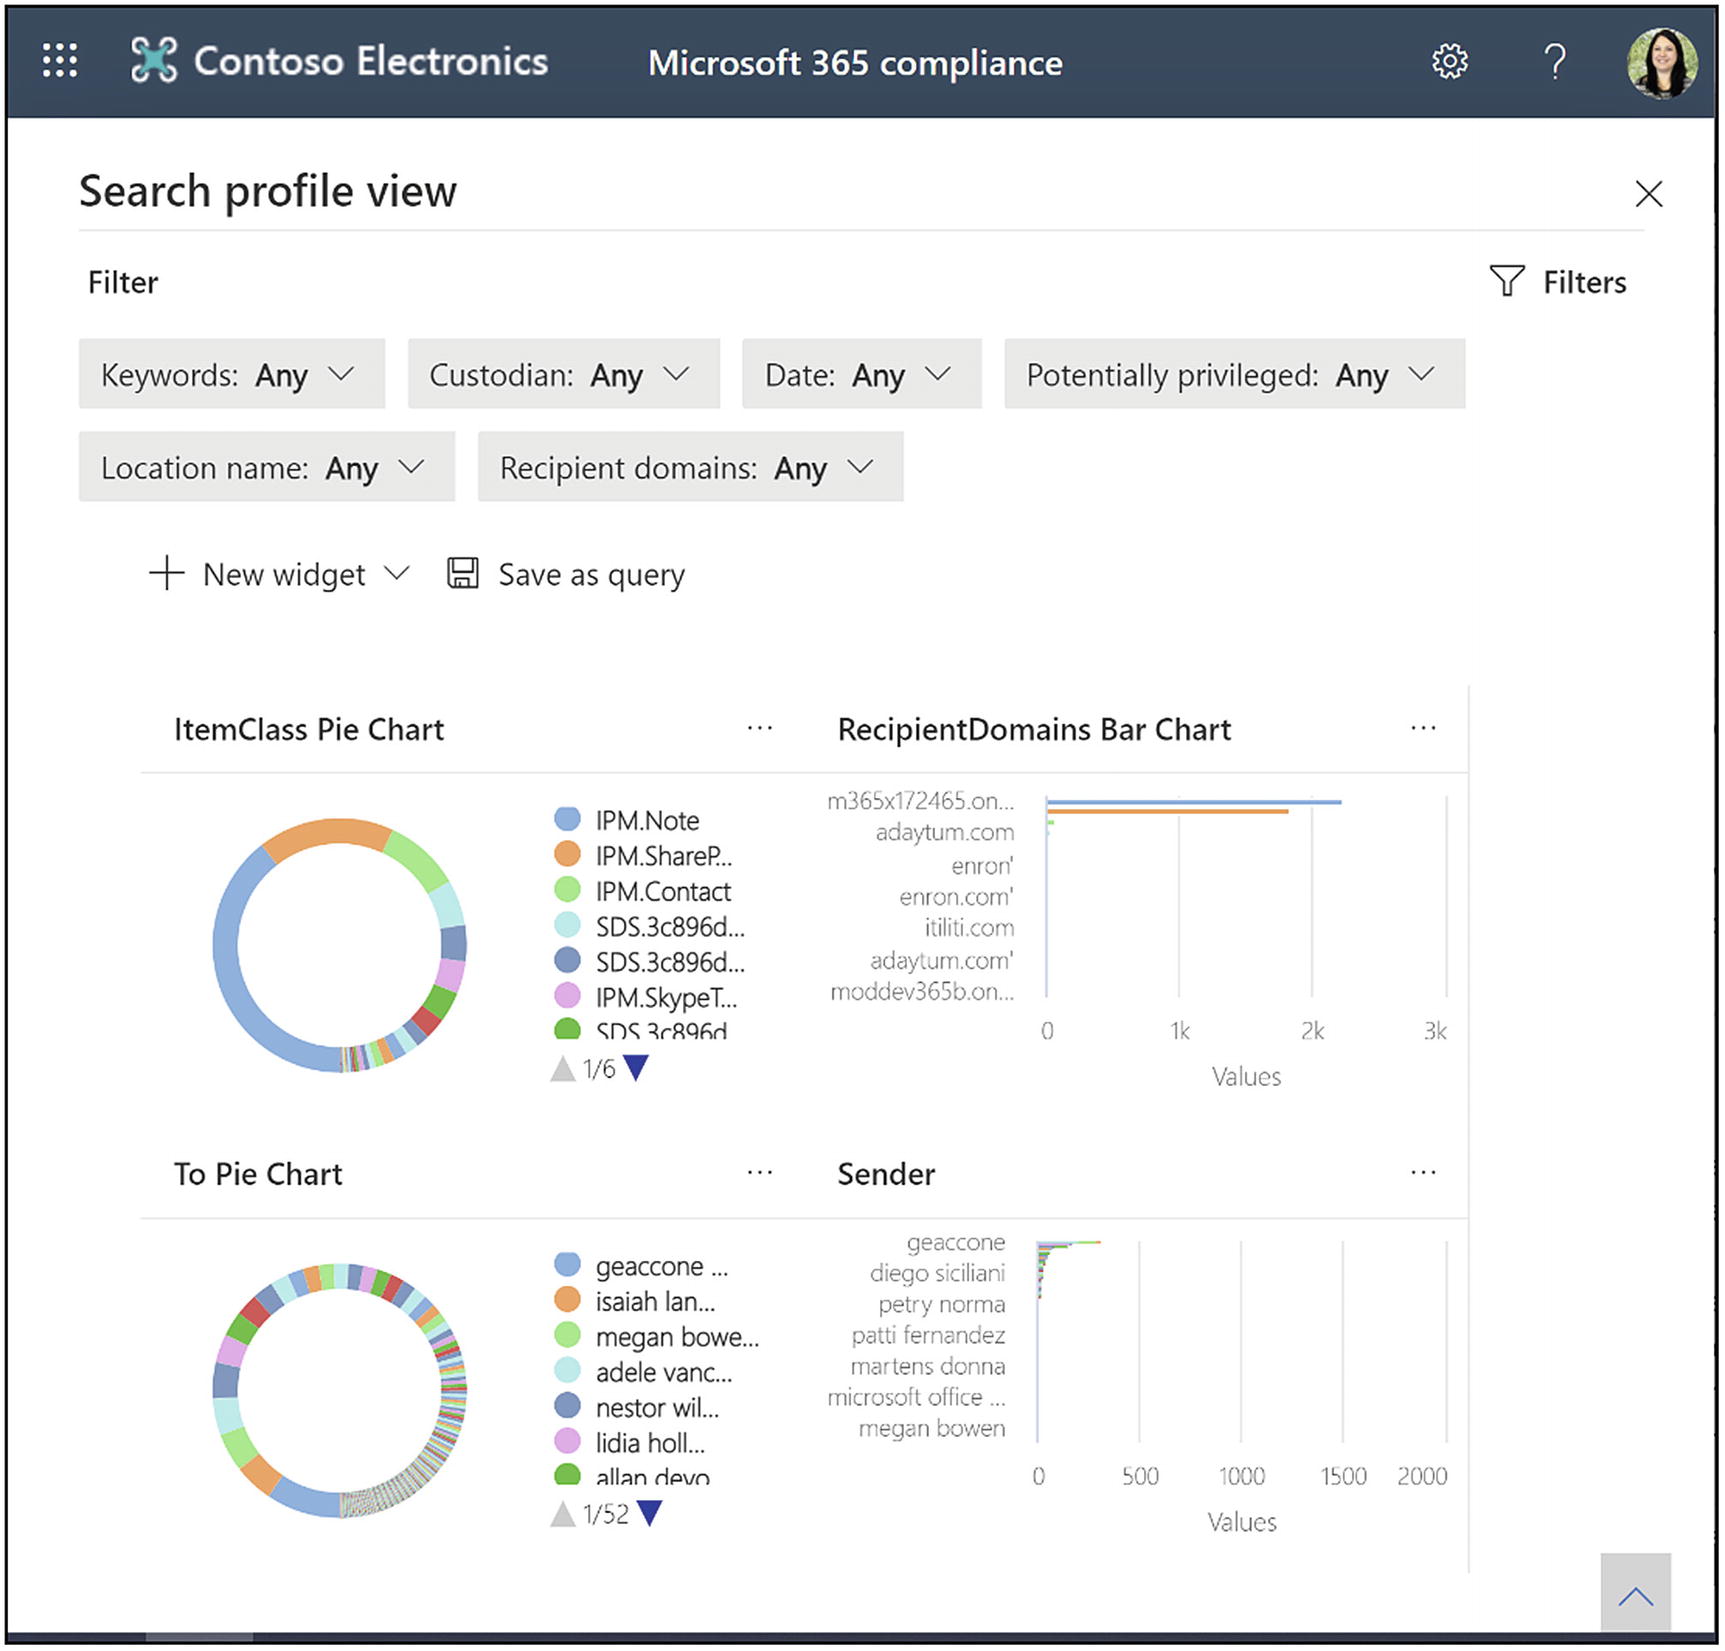
The search profile dashboard for your review set
In the Search profile view, run the review set analytics first, described in the section “Review Set Settings.” If you click Search profile view, it will bring you to a new screen that allows you to filter all the charts on the page based on different criteria, shown in Figure 14-41. You can also either add new filters or add new chart widgets to the page.

Add a custom widget to the search profile dashboard
To add a new widget, click New widget ➤ Create custom widget. Create a title, choose a pivot, and then choose the chart type and click Add, shown in Figure 14-42 above. There are also some pre-built charts you can access by clicking New widget ➤ Choose from library.

The document review options in Advanced eDiscovery
Click the X in the upper right-hand corner of the screen to go back to the view of documents to review content.
Now we will review the content. Click the name of a file to view the contents. Click the diagonal arrows on the upper-right side of the document to make the document full screen.
- 1.
File metadata: Expand this panel to see every piece of metadata associated with the file. This metadata includes the original file data and the metadata added by Advanced eDiscovery. We will go over this in detail in the following.
- 2.
Source view: Allows us to view the file as any end user would see it.
- 3.
Text view: Shows only text and no formatting. On the right side of the text view, you will also see a highlighting of where terms that matched the query are present in the document.
- 4.
Annotate view: Redact or write on the content. We will go over this in detail in the following.
- 5.
Zoom and rotate: Make the document larger/smaller or rotate it on the screen.
- 6.
Navigation: The up and down navigation arrows move us to the next document. The downward arrow with a line lets us download the original document or download it as a PDF. The two arrows pointing toward each other decrease the document’s size to go back to our standard view. The X closes the document that we are viewing to go back to the list view.
- 7.
Tagging panel: Displays the tags we configured in the review set settings. This location is where we tag the documents.
- 8.
Tagging panel display: Click this button to show or hide the tagging panel.
- 9.
Document family display: Shows previously grouped items, such as an email and its attachments.
- 10.
Conversation display: This shows us emails in a thread, Teams chats, conversation threads, or Yammer threads. We will go over this in detail in the following.
- 11.
Near-duplicate display: Shows similar documents based on the threshold you designated in the case settings. We will go over this in detail in the following.
- 12.
Exact duplicate display: This shows us exact duplicates of the file so that you can tag them in bulk instead of each file. We will go over this in detail in the following.

The file metadata view in an Advanced eDiscovery review set
You can view a file’s metadata by expanding the gray bar above the file viewer, shown in Figure 14-44 above. Here you can see all the metadata for the file, including information added by Advanced eDiscovery. To see a full list of the metadata fields and their meaning, visit this link: http://erica.news/AeDFileProperties.

Annotate view in an Advanced eDiscovery review set
Choose the cursor: This allows you to get the mouse functionality back after using one of the other options.
Select text: Highlight text in the document so you can copy it.
- Drawing: Allows you to add content to the document. Your options include
Color: Choose from 16 colors for your pencil or redaction.
Pencil: Write or draw on the document.
Area redaction: Draw a box over the content. There is text in the box that says, “Redacted.”
Remove drawings on the current page: Removes pencil marks and redactions from the current page.
Remove all drawings in the document: Removes pencil marks and redactions from the entire document.
Toggle annotation transparency: Show or hide your pencil marks and redactions.

A document family in an Advanced eDiscovery review set

Email conversation view in an Advanced eDiscovery review set
The conversation view shows an email thread conversation. The system creates this view when you run analytics on the review set, covered in this chapter’s “Review Set Settings” section.
This view allows you to view the email thread in context, bulk tag items, or open them in explorer to view each file in detail.
The near-duplicate display shows you documents that are almost the same. You define what percentage of the files must be similar in the case settings. The analysis to find duplicates happens when you run analytics on the review set.

Compare near-duplicates in an Advanced eDiscovery review set
As with the other views, you can bulk tag the files and open them in the explorer view.

Bulk tag exact duplicates in an Advanced eDiscovery review set
Query and Filter Data in a Review Set

Example of a search query in a review set
To create a new search, click New query from within the review set. This click will bring you to the query wizard, where you can add conditions and condition groups, shown in Figure 14-50 above.
Click Add condition group. The condition group evaluates the conditions, with AND or OR statements connecting the group’s conditions. You then add conditions to the group.
Click Add condition. Adding a condition allows you to choose from many different metadata fields in Microsoft 365 and Advanced eDiscovery. There are over 50 fields from which to choose. For example, if we want to search for documents authored by a specific individual or email that they participated in, we will do the following. First, choose the condition “author” and select “equals any of,” and check the box next to the custodian’s name. Then we will create a second condition and choose the “participants” condition. We will select “contains all” and put the individual’s email address in the box below. We will connect these two statements with an “OR” operator. If we are only interested in finding documents and emails within a specific date range, we would add a new condition group, select date, and choose the date range we want to search.
We will connect the two condition groups with the AND operator. Our query says that if the author or the participant on the email is Adele Vance and the date range is within the last year, return the result. We would then save the search query so that we can use it later.
Next, let us talk about filters. Filters are useful when you want to query data temporarily. They are an addition to the search query, meaning you are filtering the data within the query view. You also do not have the flexibility to group conditions with AND and OR statements with a filter. If you click a different search query, you will lose the filter. In comparison, the system saves searches for reuse, and you can build complexity in the query with multiple conditions in groups, using AND and OR.
To create a filter, click Filters ➤ Add condition. This click will bring up the same list of conditions that were available for a search. Check the boxes next to the conditions you want to use and click Add. Add the values to the conditions and click Search.

Create a filter within a review set search query
First, go ahead and create a new filter. Add a condition and scroll down until you see the condition called themes list. Click Add. Now you are going to see the list of themes that the analytics engine created for your case. You can browse through the list of themes and check the boxes next to ones that seem interesting to explore them further.
Relevancy
The attorney from an outside counsel looks at 200 to a few thousand random samples of documents.
They code these documents as either responsive or nonresponsive.
The predictive coding module looks at how these documents have been marked and learns from this information.
It gives the remaining documents a 0–100 score predicting responsiveness, where 100 is responsive and 0 is nonresponsive.
The relevancy module is excellent for data investigations, where accuracy is not essential. It is also great to reduce costs where accuracy is necessary. We are looking for a statistically significant model where we can make a call, such as “We’ll only review documents that have a score of 35 and above that are most likely to be relevant, and then we’ll ignore all the documents that are 35 and below.”
We will then take an illusion sample, which is a statistically significant random sample of everything below 35, to make sure that we can prove that these documents are not responsive. An attorney will then do a privileged review and pass off everything else to the government or opposing counsel.
People have done studies that show the Microsoft algorithm is slightly more accurate than if a human manually marked all the content as responsive or nonresponsive. The risk is that this process will produce nonrelevant content to the opposing counsel. Remember, we are trying to find most of the responsive documents while having a reasonable discovery cost. Through predictive coding, we can prove that we statistically found 95% of responsive documents in the organization and that the cost to find the remaining 5% would be too great. Everyone involved in the case would typically agree that this percentage is reasonable.
Specifically, the Advanced eDiscovery relevancy module will produce the best culling of data and prioritize relevant results when your collection of documents has more than 10,000 items. At a minimum, your control set, called the assessment, will need to contain 500 documents but usually will need to have a lot more. And then, if you include that plus 50 training iterations to reach stability to apply the classifier, you are looking at an attorney tagging 2,500 documents at a minimum. Because of this time investment in tagging documents, the relevancy module is an excellent tool for service providers with lower-cost attorneys on staff to process and review huge matters. The relevancy module is usually not as useful for issues that remain in house because they are not big enough and the cost of the attorney’s time is too much.
The Relevancy Process
- 1.
Prepare: Actions to set up our case and issues correctly.
- 2.
Train and apply: Tagging documents and validating the model.
- 3.
Validate and test

The relevancy process in Advanced eDiscovery
At its core, these steps build a machine learning model to determine what documents are relevant to a specific case and, more specifically, to a particular case issue. For each step in this process, there are both mandatory steps and optional settings. I will explain each part of the process’s required actions first and then optional steps.
To access the relevancy model, click Advanced eDiscovery in the Compliance Center. Click Review sets and the name of a review set. Click Manage review set and Show relevance.
Within the relevancy module, there will be new navigation. The gray bars along the top are the overall steps in the process. The settings for each step are on the left navigation with the blue bar highlights.
Prepare
The first process step is to prepare. These are simply the steps we need to do to set up our case and case issues appropriately. Our required steps are to run pre-processing on the container of documents and to set up our case issues. Our optional steps are the process advanced settings, process task status, process results, process custodians, set uploads, set up keywords, and set up advanced keywords.

Run pre-processing on a container

Add an issue to the case
To add someone, click their name in the left box. Click the arrow to add them to the right box. Once added, you can designate the person as on, off, or idle. This status defines whether they can train the model. You can only add one person to an issue, and this person is the only one who can perform training. To add a user to an issue, you first need to add them individually to the case. You cannot add them through a role group. If someone does not appear as an option for your issue, this is most likely why.
Those are the two required steps for the prepare phase. Next, we will review the optional steps. The first optional step is process task status. To view this page, click Process on the gray bar at the top. Then click Task status on the left navigation. This page shows you the status of whatever tasks you are performing at that time, such as pre-processing or adding files to a case, which we will go over later. If you are unsure if processing was successful, check this page.
The next optional step is results. Click Results in the left navigation. This page will show you the process summary results, how many files it extracted, how many were processed and processed with errors, erroneous file types, and more. It is good to check this page after you run pre-processing, but before you proceed to training to make sure everything worked and you received the expected results.

Keywords to highlight during the relevance tagging step
Finally, the last optional step is to set up advanced settings. Click Setup on the top gray bar and then Advanced settings in the left navigation. Here there are two cost parameters. These parameters are the cost per hour for one of your low-cost attorneys to review the files and the number of files they can review per hour. Once you have trained your model, when you are trying to decide what percent relevancy makes sense for your case, these parameters help you. For example, 35% relevancy means reviewing all the files with a 35 and above relevancy score, which would cost $500,000 based on these cost parameters. This information helps you determine where to set that percent relevancy and even if the case is worth it to pursue or settle based on the costs required to go through discovery.
Train and Apply
Tracking your progress
Loading files
Running an assessment
Assessment tagging

The Track page in the Advanced eDiscovery relevancy module

Load files for the relevancy training process

Run the assessment in the relevancy module
The next step in the train and apply process is to run the assessment, shown in Figure 14-58. The assessment starts with 500 documents to build your machine teaching model. We need the relevancy model’s statistics to be defensible, meaning that they are in an acceptable range of significance. We will configure these statistics with our first 500 documents, and then we may need to add more assessment documents later to meet our statistical goals.
The number of documents we need to tag for the entire process depends on various things, such as the assessment’s richness. Richness is the number of relevant documents in the sample of 500. If you have a high level of richness, the training will go a lot faster than if you have a low level of richness. If your richness is less than 2%, then this process could take so long that it is just not worth the time. The assessment process’s output will determine the estimated richness; the recall level, which is the percentage of relevant documents that we want to find; and an error margin, which we want to be 10% or less. The error margin is determined based on the richness of the data. A higher richness means it is easier for the system to find relevant documents, which means you will have a higher recall level with a lower error margin.

Tagging panel in the Advanced eDiscovery relevancy module
Let us start tagging documents. From the Track page, click Assessment to start the evaluation. That click brings you to a screen. The screen displays the file on the right side of the page, and the tagging panel is on the left. View the document and mark it as either R for relevant or NR for not relevant, or skip if you do not know, shown in Figure 14-59. As a reminder, we defined keywords earlier that the system displays in color to make it easier for them to find these relevant files while they are tagging.
- 1.
Be consistent. If you make errors during training, you need to return to those files to correct them. If you have too many errors, you need to abort and start over. I will cover how you can clear the data and start over later in this section.
- 2.
Tag the files based on content only. Do not consider metadata, such as the custodian, a date, or any other file metadata. You should not consider a date range or graphical images when tagging the files. Also, do not consider the formatting of the text. Only consider the actual text and words in the document.
- 3.
Use the skip tagging option only when necessary. The relevancy module does not train based on skipped files, and if you pass on too many, it is hard for the model to tell what is relevant and not relevant.

Sample files in the Advanced eDiscovery relevancy module
You can browse sample files, for example, if you need to go back and correct a tagging error. To do that, select sample files from the dropdown in the upper-left corner of the page, and this will give you a list of all the files in your current set, shown in Figure 14-60. You can find the document in the scroll menu or put the file number in the file field, which will let you jump directly to that file.

Calculate the statistics to see if you have completed training
To start, go back to the Track tab and click Training. The process is going to be the same as in the assessment phase. You will go through the batches of 40 documents, and you need to decide whether the file is relevant or not relevant. When you finish the sets of 40 files, click calculate in the lower left of the screen, shown in Figure 14-61. The model will determine whether your training is complete, meaning that we have hit our statistical targets for error margin. If we have not hit our targets, the system will give us another set of 40 documents to review for training.
Eventually, you will hit your statistics goals, which will end the training. The amount of training sets you need to do is going to be entirely different for every case. But once the training bar is all orange and up to 40, the next step is to run the batch calculation.

Decide
- Review-recall ratio: A comparison of results according to relevance scores in a hypothetically linear review. The recall is estimated given the review set size. Move the slider at the bottom of the graph to change the review percentage, which affects the cost information.
Review: The X-axis is the percentage of files to review based on this cutoff.
Recall: The y-axis is the percentage of relevant files in the review set.
Parameters: Cumulative calculated statistics about the review set concerning the file population for the entire case. The cost shows the projected cost of discovery based on the parameters you entered in the prepare ➤ advanced settings step earlier in this section. It shows the cost to review one document and for the overall discovery process.
Distribution by relevance score: A graph of the relevance score of the files in the load set.
Details: Data about the file collection (load set), the statistics, parameters, costs, and document families.
These graphs give us a calculation of how much it costs to review a single document. It allows us to decide what percentage of documents we want to review and at what cost. We need to weigh the risk of missing documents based on the case specifics with the cost of reviewing more documents. For example, if it is a litigation case and costs you $100,000 to settle, you will not spend $150,000 to review all the documents. Our machine learning model module that you just built by reviewing those documents will identify what documents are likely relevant and export those for manual review.
Validate and Test
The last step in the relevancy process is to validate our model through testing. We do this test through an illusion sample. We do the test by taking a statistically significant random sample of the unreviewed documents to make sure that we did this process correctly. We want to ensure that the files we think are below our review percentage are, in fact, irrelevant. This test proves to the court that our model is valid.
- 1.
Test the rest: Used to validate culling decisions, such as reviewing only files above a specific relevance cutoff score based on the final Advanced eDiscovery results.
- 2.
Test a slice: Performs testing like the “Test the rest” test but focuses on a segment of the file set specified by Relevance Read %.

Set up a test to provide our Advanced eDiscovery relevance model’s validity
Enter any name and description for the test.
Under Parameters, for test type, choose Test the rest or Test a slice.
For Issue, choose the model you want to test.
For Load, choose the load set you used when training the model.
- For Read percentage
If you chose Test the rest, choose the relevance score under which you want to collect the sample.
If you chose Test a slice, choose the relevancy score range you want to test.
For Test size, 500 is the default number of documents to sample. You can change this number.
Click Start tagging to begin the tagging process for the test – tag in the same way you did in the train and apply phase. When you complete tagging, click Calculate on the bottom left of the screen. Click Test on the gray bar. Click View results next to your test.
The table’s Sample parameters section contains details about the number of files in the sample tagged by the expert and the number of relevant files found in that sample.
Includes files with read % – stated cutoff
The total number of files
The estimated number of relevant files
The estimated richness
The average review cost of finding another relevant file
In this section, we reviewed the relevancy module. There are a couple more settings and things that you can do with it, but those extra settings confuse people when you are just getting started with it. This walk-through helps you understand how relevancy might be useful in your organization, how you can test it out, and, if you do want to use it, how to get started.
Export
The last feature area in Advanced eDiscovery is export. Use export when you want to get files or a summary out of Advanced eDiscovery. Usually, there are two reasons people export files. First is to give them to the opposing party or the person who made the file request. Second is to import them into another eDiscovery system using a load file. There are many reasons you might only want to export an inventory or summary of your files. For example, your legal department might wish to see a manifest of the information. Or you can use this list to comply with a privacy data subject request.

Export options for Advanced eDiscovery
First, create a name and description for the summary export, shown in Figure 14-64. Under Export these documents, choose from Selected documents only, to export only the subset you selected in the previous step. Or you can choose to export information for all documents. Under Metadata, select the load file option, which will result in your summary report. You can also choose to include any tags you added. Skip the Content and Options sections. For Output options, choose Condensed directory structure. Click the blue Export button. This click starts a job to create the export.
Suppose you would like to import the file metadata and review data into a different eDiscovery system. In that case, you should check the boxes next to load file and tags in the export option box. The load file and tags will export all the metadata associated with the file, including metadata added by Advanced eDiscovery. It will also preserve the tags you have added to the files. In this use case, you would also typically include the files, so follow the directions below to include those.
The next choices are around how to export the files. Check the box next to native files to export all the files in your review set. You can choose to export Teams and Yammer conversations as either conversation files or as individual chat messages. The conversation files option will preserve the reconstructed conversations in a PDF. The individual chat messages option will export each message as an email message.
Under Options, you can select text files to include extracted text versions of native files. You can choose to replace redacted natives with converted PDFs. If you have performed document redaction or marked on any of your files, check this box to preserve the redaction. Note that you need to convert the redacted files to PDF before starting your export. You can do this by opening the review set and choosing Action ➤ Convert all redacted files to PDF.
- 1.
Loose files and PSTs (email is added to PSTs when possible): Export files in a format that resembles the original directory structure seen by users in their native applications.
- 2.
Condensed directory structure: Files are exported and included in the download.
- 3.
Condensed directory structure exported to your Azure storage account: Exports files to your organization’s Azure storage account. This option is useful if you want to share the files with someone outside your company or if you already have a process set up with other people in your organization who wish to access the same blob to get the exported data repeatedly. I go into detail about using this option in the following.

The Advanced eDiscovery Exports tab
Click the Exports tab to see a list of all the exports you have created, shown in Figure 14-65. Once the status equals successful, you are ready to export your data. To do this, click the export name you want to download and click Export. These exports are available for the life of the case.
If you chose the preceding Loose files and PSTs or Condensed directory structure, you could click a blue Download button. This click starts the download to your local machine.

Azure Storage Explorer for Advanced eDiscovery exports
To add your data location, find a black bar with something that looks like a power plug on the left-hand side of Azure Storage Explorer, shown in Figure 14-66. Click the power plug icon, and then a screen will pop up asking how you want to connect to Azure Storage. Choose Use a shared access signature (SAS) URI. Click Next. On the next screen, you will want to paste the URI that you copied from the Advanced eDiscovery export window. Go ahead and change the display name or keep it as it is.
You will then click Connect, and it will add the storage location to Azure Storage Explorer. To see your files, double-click the folder in the export location. You will then see information such as a summary file, export load file, and then your actual files in separate folders, just depending on the options you chose in the export configuration screen.
Review the Export Files
- Root folder: Contains the export information. Unzip it to see the files. The export names the folder as ExportName.zip.
Summary.csv: Contains export statistics.
Results.csv: A manifest of the files included in the export, listed in the following.
Azure folder ➤ AED export ➤ folder named as export GUID:
Export_load_file.csv: The metadata file.
Summary.txt: Information about the export.
Exchange: This folder contains all content from Exchange in native file format.
SharePoint: This folder contains all native content from SharePoint in a native file format. There are subfolders for each site or OneDrive.
- Root folder: This folder is named ExportName.zip.
Export_load_file.csv: The metadata file.
Summary.txt: Information about the export.
Input_or_native_files: This folder contains all the native files included in your export. If you included redacted PDF files, they are in a separate folder.
Error_files: This folder contains the following error files if they are included in the export:
ExtractionError: A CSV file that contains any available metadata of files that were not correctly extracted from parent files.
ProcessingError: This file contains a list of documents with processing errors. This content is item-level, meaning if an attachment resulted in a processing error, the email message that contains the attachment is included in this folder.
Extracted_text_files: This folder contains all the extracted text files generated at processing.
An overview of the eDiscovery process
- Creating a case and setting permissions
Configuring case settings
- Managing custodians and holds
Fixing processing errors
Managing custodian communications
How to run a search
- Working with review sets
Managing review set settings and analytics
Adding non–Office 365 data to a case
Reviewing content in a review set
Querying and filtering data in a review set
Working with the relevancy module
Exporting data out of Advanced eDiscovery
In the next chapter, we will look at the Data Investigations tool to run an internal investigation, using functionality like Advanced eDiscovery.