Information governance is a collection of solutions that help you manage your organization’s life cycle of content. It allows you to keep what you need and delete what you do not need. Information governance includes tools for retention and deletion, importing PST files into Microsoft 365, and using the mailbox archive and unlimited archive to store large mailboxes. In the first part of this chapter, we will discuss the different retention methods available in Microsoft 365. We will then discuss how to import PST files into Microsoft 365 and, finally, how to enable archive and unlimited archive mailboxes.
An Introduction to Retention and Deletion Policies
Retention helps to reduce the risk of litigation present by keeping expired content. It helps reduce the risk of a security breach by deleting unneeded content. Retention also reduces the risk of regulatory fines that can be caused by deleting files too early. It also helps your organization be more productive by only having relevant content available in search and content repositories. Lastly, it supports all your security and compliance efforts because there is a smaller volume of content to manage.
Microsoft 365 can help you retain or delete content. This functionality ensures you cannot accidentally delete the content before you should delete it. It can also help you to remove content permanently at the end of the retention period. For example, Microsoft 365 could help you retain project documents three years after the project is complete. These policies can also help you automatically delete content. For example, many organizations do not want to keep Teams chat messages. A deletion policy can automatically delete Teams chats after 30 days to comply with your company policy not to store those chats.
Retention policies
Retention labels
First, we will talk about retention policies. Then, we will move on to retention labels and deploying retention labels using retention label policies.
I have a quick note before we move on. Information Governance and Records Management are similar solutions. I would argue that the line between them is blurry and not well defined. One of the questions people frequently ask me is what solutions they can use with a specific license. To help answer that question, everything in this chapter requires an E3-type license, and everything in Chapter 9 requires an E5 license. Hopefully, this helps you understand the differences and make a case for purchasing E5 if you need that functionality.
What Are Retention Policies?
Retention policies apply general retention settings to broad areas of content. For example, you might want to retain all SharePoint content for three years or delete all Microsoft Teams conversations and chats after 30 days.
A benefit of retention policies is that they are easy to implement. You point a policy at sites or mailboxes, and that is it. Of course, you can configure the settings to make them more complex as needed. For example, if you want to follow a capstone approach for email, you will use retention policies. Have one broad retention policy for everyone in your obligation, and then target people with a more extended retention period with a different policy. You are not allowed to categorize individual documents with retention policies. You can only apply retention policies to all content in a location. You can use retention policies to keep or delete information, and it is also the best choice for email for reasons that I will explain later.
Here are some common business scenarios for retention policies. Retention policies are suitable for content sources with a high volume of content, such as Teams chats and conversations, Yammer content, Skype conversations, and email. You would never be able to classify each Teams chat or email, nor would you want to.
Retention policies are also excellent if you are not a government or highly regulated organization. If you want to eliminate redundant, obsolete, or trivial content in your environment, retention policies are for you. You can also use retention policies as a catch-all policy for content that is not covered by another type of retention.
Licensing and Permissions
Microsoft 365 E5
Microsoft 365 E3
Office 365 E5
Office 365 E3
If you are only managing data stored in Exchange Online, you could use a Microsoft 365 Business Premium license or an Exchange Online Archiving license.
Compliance Administrator
Compliance Data Administrator
Organizational Management
Create a Retention Policy
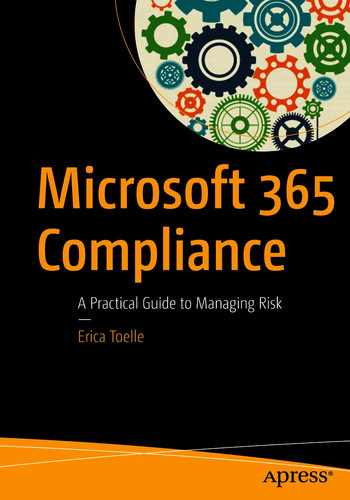
The retention policy overview screen in the information governance solution
This tab shows you an overview of all the retention policies currently in your organization, shown in Figure 8-1. It shows you who created the policy and when it was last modified. You can also click “Search” to search through your policies or export a list of retention policies.
Retention policy settings in the information governance solution
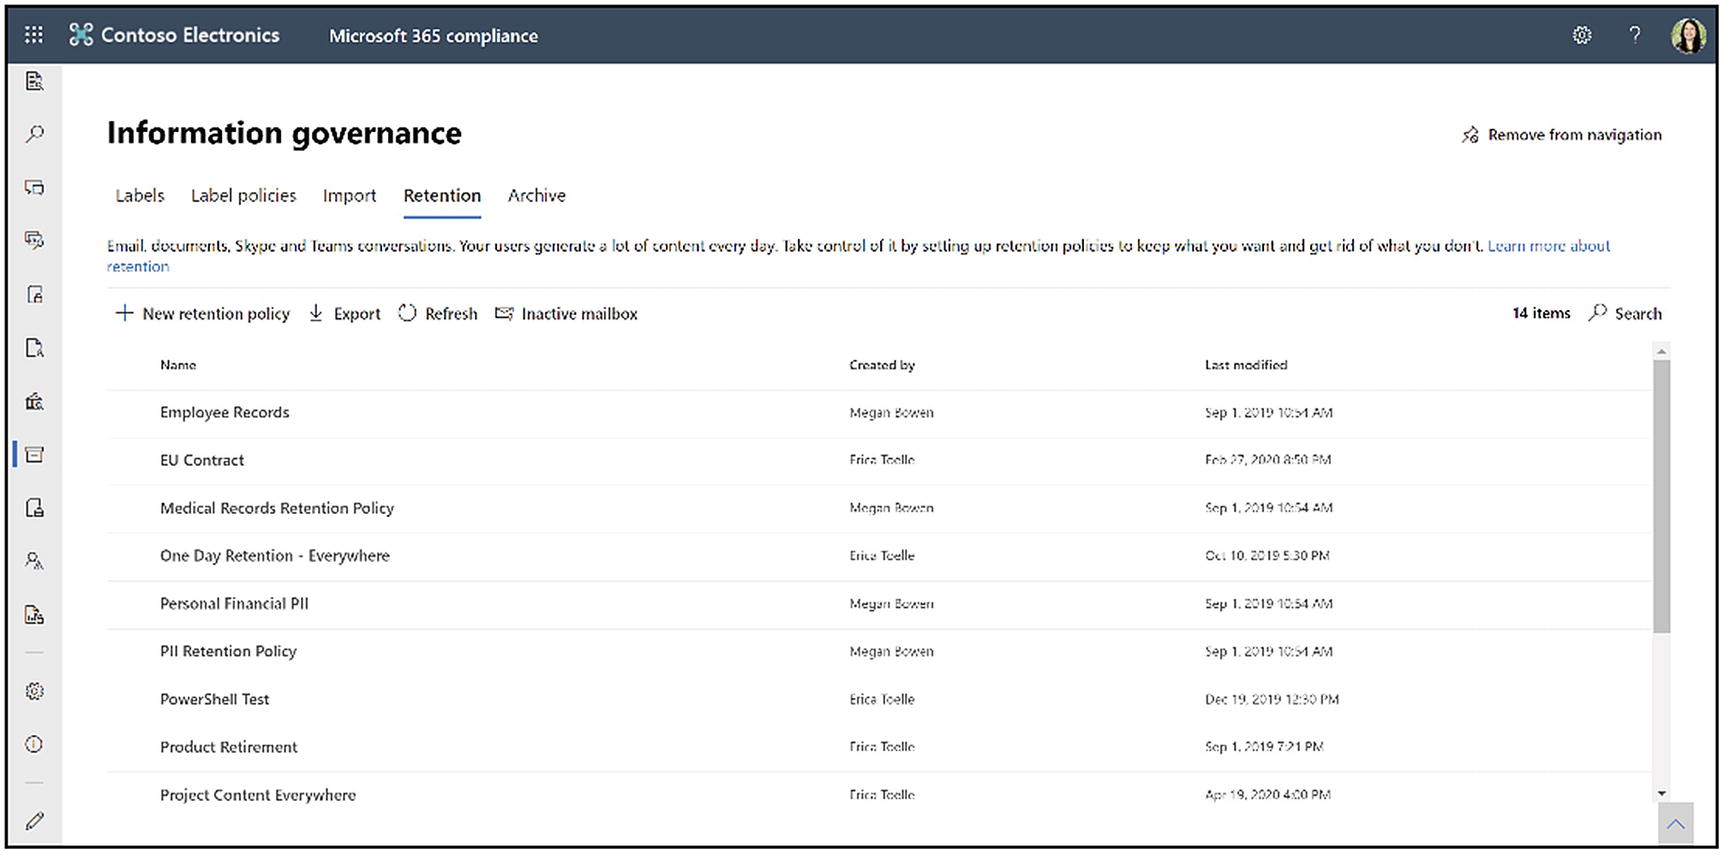
Retain items for a specific period
Retain items forever
Only delete items when they reach a certain age
If you want to retain content, you can choose to keep content for a certain number of days, months, years. By default, you can select 5, 7, or 10 years or custom to choose your duration. You can start the retention period based on the content creation date or the last modified date.
After the retention period is over, we can choose to delete the items automatically. In this case, the content will follow the process we discuss later in this chapter, in the section “How Deletion Works.” Or we can do nothing and leave the content unprotected by a retention period. You can delete unprotected content by a user or an automated process.
If you retain items forever, they will be available to content search and eDiscovery even if an end user deletes the items.
If you want to delete content, you can only delete items when they reach a certain age. Again, we can select days, months, or years, and we can start the retention period based on the date the content creation date or the last modified date. The system will start the deletion process of all content that is older than that period almost immediately after you apply the policy.

Choose the locations to apply your retention policy
The wizard will then ask us to choose locations where we want to apply the retention policy, shown in Figure 8-3. Your options are to select all locations, including Exchange email and public folders, SharePoint, OneDrive, and Microsoft 365 groups. I do not see many people using this option. Usually, they select one of the locations instead. These locations include Exchange email, SharePoint sites, OneDrive for Business, Microsoft 365 groups, Skype for Business, Exchange public folders, Teams channel messages, or Teams chats. Soon, you will also be able to choose Yammer groups or Yammer private messages as locations.
Please note that if you choose Teams channel messages or Teams chats as one of the location options, all the rest of the locations will be disabled. You would need to create a separate retention policy to manage content other than Teams.
Exchange mailboxes: 1000
SharePoint sites: 100
OneDrive for Business accounts: 100
Microsoft 365 groups: 1000
Skype for Business users: 1000
Exchange public folders: Unavailable
Teams channel messages: 100
Teams chat users: 1000
Yammer groups: 1000
Yammer private message users: 1000
Let us use an example to explain these further. Say 3,000 people in your organization have a different retention policy than everybody else. You would need to create three retention policies to cover all 3,000 of those accounts because you can only specify up to 1,000 recipients per policy.
If you go that route, I highly recommend that you look at PowerShell to automate this process. Otherwise, it is impossible to keep track of these policies and members manually. Also, note that you can have up to 10,000 retention policies per tenant. However, for Exchange Online, the maximum number is 1,800. These numbers include retention policies, retention label policies, and legal holds.
When you finish configuring your locations, click Done to create your retention policy. The system will apply this policy within 24 hours to all the content locations.
Retention Policies with Preservation Lock
Preservation Lock puts restrictions on how a retention policy or retention label policy can be modified. No one – including a global admin – can turn off the policy, delete the policy, or make it less restrictive. This configuration might be needed for regulatory requirements and can help safeguard against rogue administrators.
No one can disable the policy or delete it.
Locations can be added but not removed.
You can extend the retention period but not decrease it.
To use a preservation lock, first, create the retention policy. You must use PowerShell if you need to use Preservation Lock. Because administrators can’t disable or delete a policy for retention after this lock is applied, enabling this feature is not available in the UI to safeguard against accidental configuration.
For more information about this process, please see http://erica.news/PreservationLock.
Edit or Delete a Retention Policy
The retention policy name
The retention settings, except for the retention period
When to start the retention period
If you edit a retention policy, all items governed by the policy will inherit the new settings.
This update can take several days. When the policy replication across your Microsoft 365 locations is complete, you’ll see the retention policy’s status change from On (Pending) to On (Success).
Inactive Mailboxes
Inactive mailboxes retain mailbox content after employees leave the organization. Inactive mailboxes allow you to remove their Microsoft 365 license and account but keep certain content. Without using an inactive mailbox, the system retains the employee’s mailbox data for 30 days after removing the account.
A mailbox will automatically become inactive if the account’s content is subject to a litigation hold or retention policy. The inactive mailbox will continue to exist as long as the content meets one of those two conditions.
You can view a list of inactive mailboxes by visiting the information governance solution and the Retention tab and clicking Inactive mailbox in the toolbar.
This section covered everything you need to know about retention policies. The next section will cover the other method to apply retention or deletion policies – retention labels.
Retention Labels
What are retention labels? Retention labels allow you to label individual files with specific retention or deletion period. They also allow you to leverage advanced retention options, such as a file plan, disposition review, or event-based retention. Retention labels are also useful for finalizing content as an immutable record. We will cover these advanced retention options in Chapter 9. In this chapter, we will cover how to create a label and apply it manually to content.
When you ask an end user to label content manually, you present them with a list of potential retention labels to apply to content. It is best to keep the number of labels provided to them to a minimum. There are numerous psychology studies, such as Miller (1956), on the amount of data that a human can keep in their short-term memory. While there is no agreement on the exact range, they all find between five and nine labels to be the maximum number. But of course, they are not testing the user’s ability to remember and differentiate between records schedules. I have found that between two and three labels is best to ensure accuracy, such as asking users to label final content to declare it immutable manually. Three to four labels is okay. Suppose you give end users five to seven label choices. In that case, you are putting your accuracy level in danger unless you’ve already trained your organization to care about records management.
Licensing and Permissions
Microsoft 365 F3.
Business Premium.
Office 365 E1/A1.
Office 365 F3.
Standalone Exchange plans provide the rights for a user to benefit from manually applying non-record retention labels to mailbox data.
Standalone SharePoint plans provide the rights for a user to benefit from manually applying non-record retention labels to files in SharePoint or OneDrive.
Compliance Administrator
Compliance Data Administrator
Organizational Management
Create a Retention Label

Retention labels in the information governance solution
To create a new retention label, click + Create a label. This click will bring up a wizard that will ask you to name your label. This label cannot be the same name as a retention policy or sensitivity label. Try to make the name specific and add a description for administrators. You can also add a description to help end users understand when to use this label. Once you complete these fields, click Next.
You may see a screen for the file plan descriptors. I will cover this screen in Chapter 9. Click Next.

Retention label settings in information governance
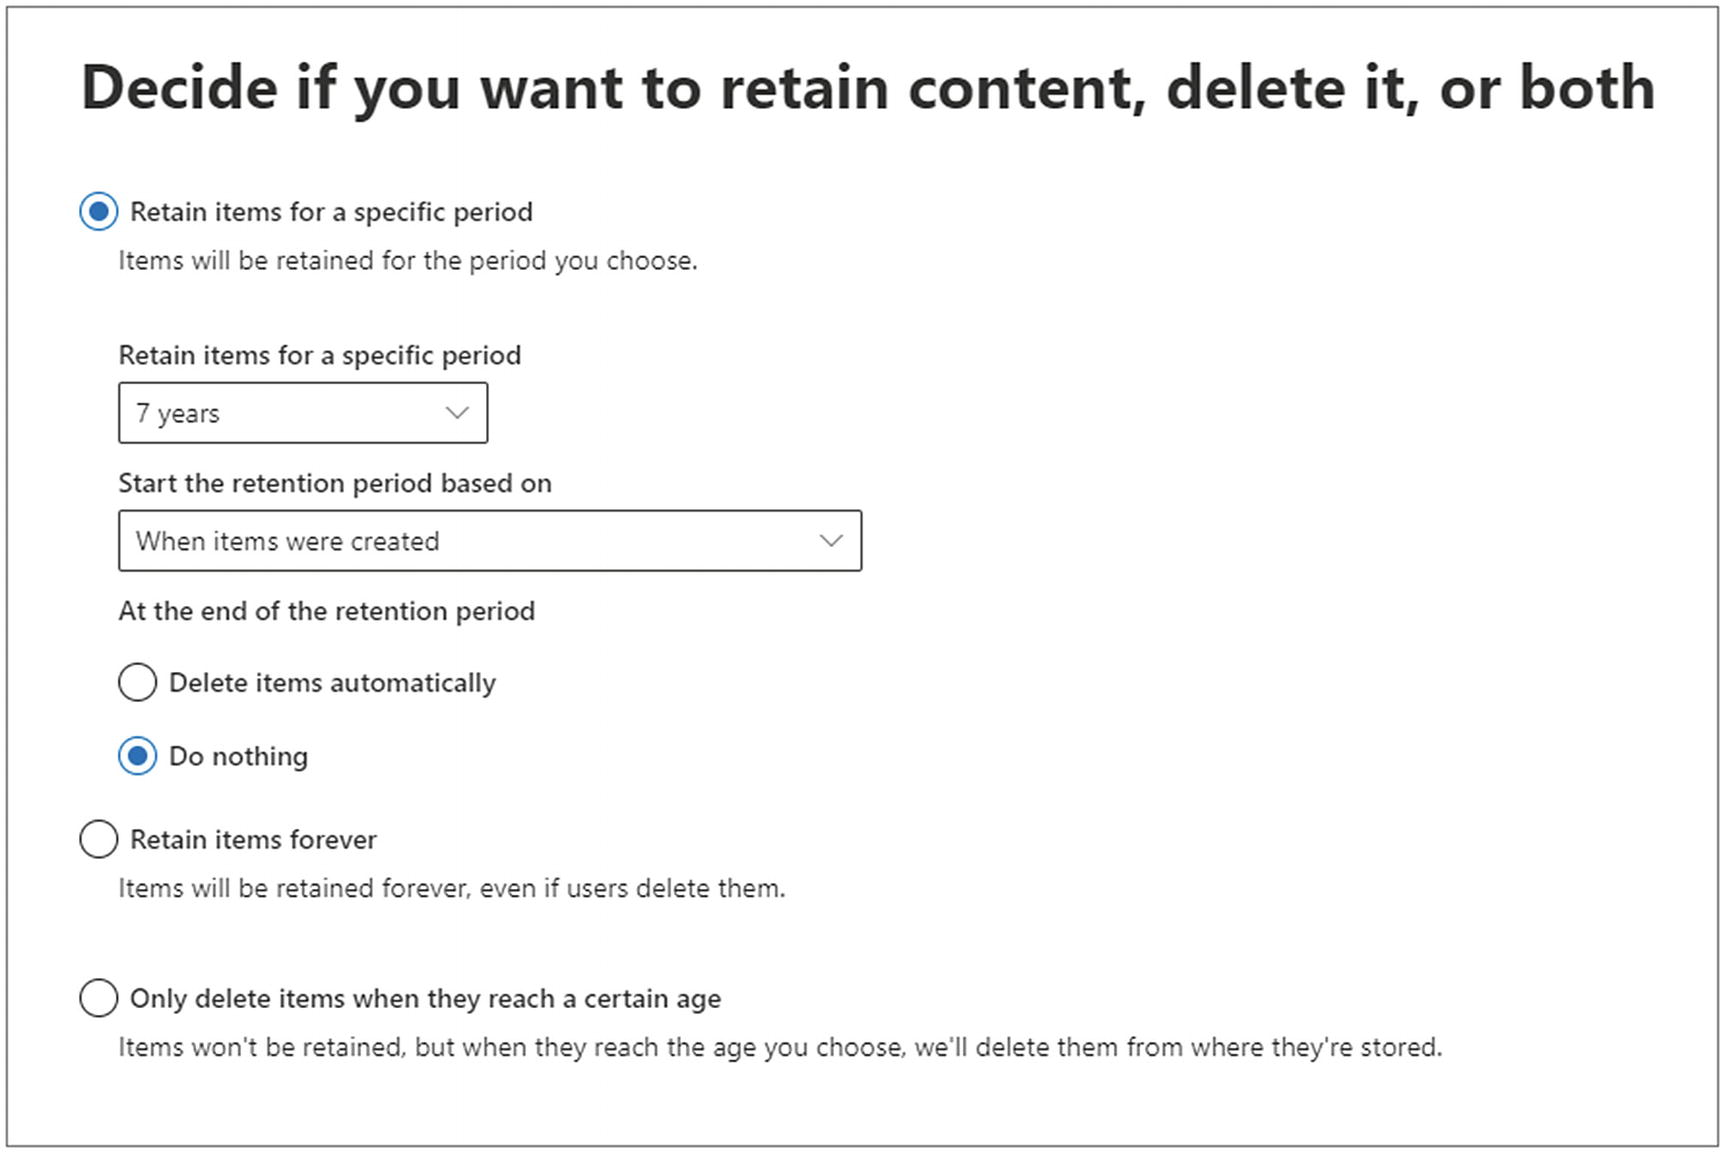
Retain items for a specific period
Retain items forever
Only delete items when they reach a certain age
Don’t retain or delete items
Let us start with the option to retain items for a specific period. When selecting this option, by default, you can choose 5, 7, or 10 years or custom to select your duration in days, months, or years. You can trigger retention based on the creation date, the last modified date, the date you label the content, or an event type. We will cover event types and event-based retention in Chapter 9.
Optionally, you can use the label to declare content as a record or a regulatory record. Again, we will cover these topics in Chapter 9.
Delete items automatically: This choice will start the deletion process outlined in the “How Deletion Works section” of this chapter.
Trigger a disposition review: This option is only available with advanced licenses. We will cover disposition in Chapter 9.
Do nothing: Choosing this option means content will be left alone, without retention. A user or process can delete the file, or it will remain in its current location.
Choices for a deletion label in information governance
The next option is to only delete items when they reach a certain age. Use this option to enforce the deletion of content rather than retention. Selecting this option allows some additional fields to appear, shown in Figure 8-6. First, decide how old content should be when the system enforces deletion. You can specify the number of days, months, or years. Then, choose how to trigger the deletion period. You can begin based on the creation date, the date last modified, or the date you label the content.
The last option is Don’t retain or delete items. This option is if you want only to label content but not enforce retention or deletion.
When you finish your selection, click Next. Here you can review your label settings and click Create label when you are happy.
Publish a Retention Label
For the label to appear to end users for manual labeling, you need to publish the label. You can publish one or many labels in the same policy. I recommend publishing all the labels for the target location in one policy. You can publish one label by checking the box next to it on the Labels tab and clicking Publish labels. Alternatively, you can publish many labels by clicking the “Label policies” tab and then “Publish labels.” This click will bring up a wizard.

Locations to publish a retention label in information governance
All locations. Includes content in Exchange email, Office 365 groups, OneDrive, and SharePoint documents
Exchange email mailboxes
SharePoint sites
OneDrive accounts
Microsoft 365 groups
You can include or exclude specific locations, such as a site or mailbox, within the preceding locations.
For example, let’s say you have a list of retention labels you want to publish to finance SharePoint sites. In this case, I would turn off all the locations except for SharePoint, and then I would click “Edit” in the Included column next to “All sites.” I would then paste in the URLs for each SharePoint site, one at a time. After going through the remaining publishing steps, within 24 hours, these labels will appear for manual labeling on the finance SharePoint sites.
Maintaining the list of finance sites and updating the policy could get quite tedious. Instead, you could automate managing the site list and policy using PowerShell. Another thing to note is that if you have connected your SharePoint sites to a Microsoft Team or their membership is managed with a Microsoft 365 group, you need to choose Microsoft 365 group as the location as opposed to SharePoint sites. The SharePoint site location will only work for sites that do not have their membership managed by a Microsoft 365 group.
Once you are happy with the locations, click “Next.” Here you will enter a unique name for your policy and a description for admins. Click “Next,” and then review your settings. Click “Submit” when you are happy.
Please note that it will take up to one day for the labels to appear to the end users. Labels will appear only in Outlook mailboxes with at least 10 megabytes of data. Sometimes this requirement confuses people when they are testing labels in a non-production environment. They have fake user mailboxes that do not have 10 megabytes of data in their accounts, and they wonder why their labels do not show up.
Manually Apply a Retention Label
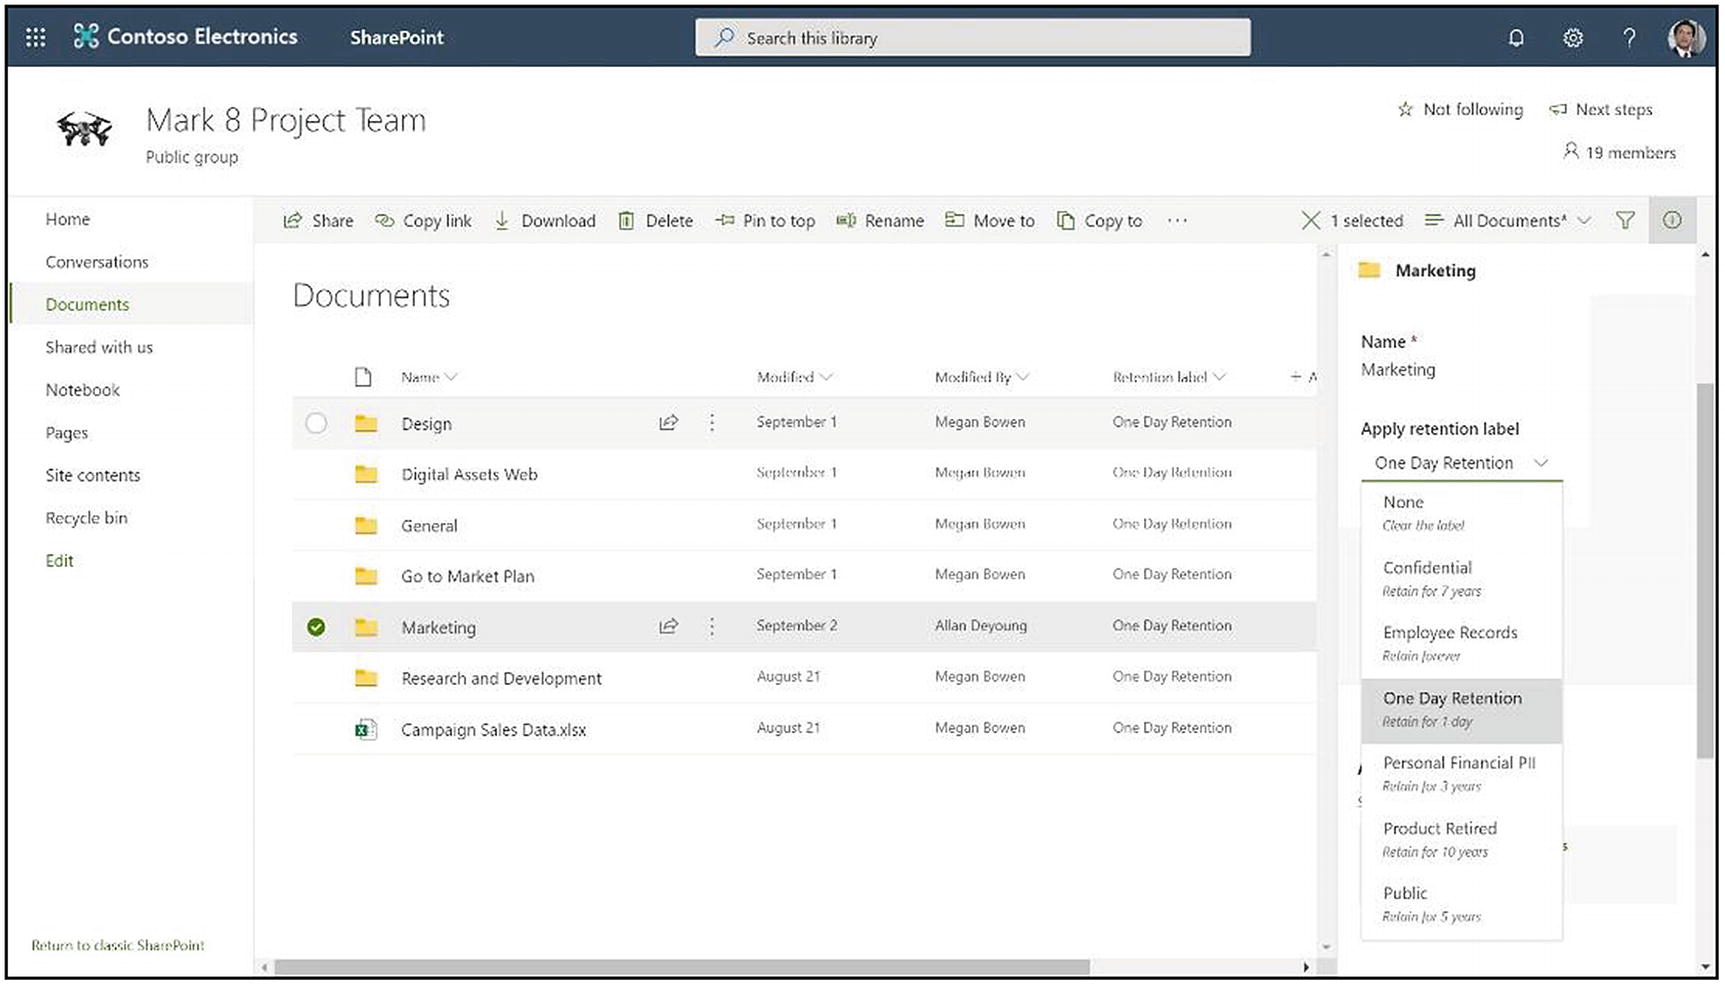
Manually apply a retention label in SharePoint
Manually apply a retention label to an email
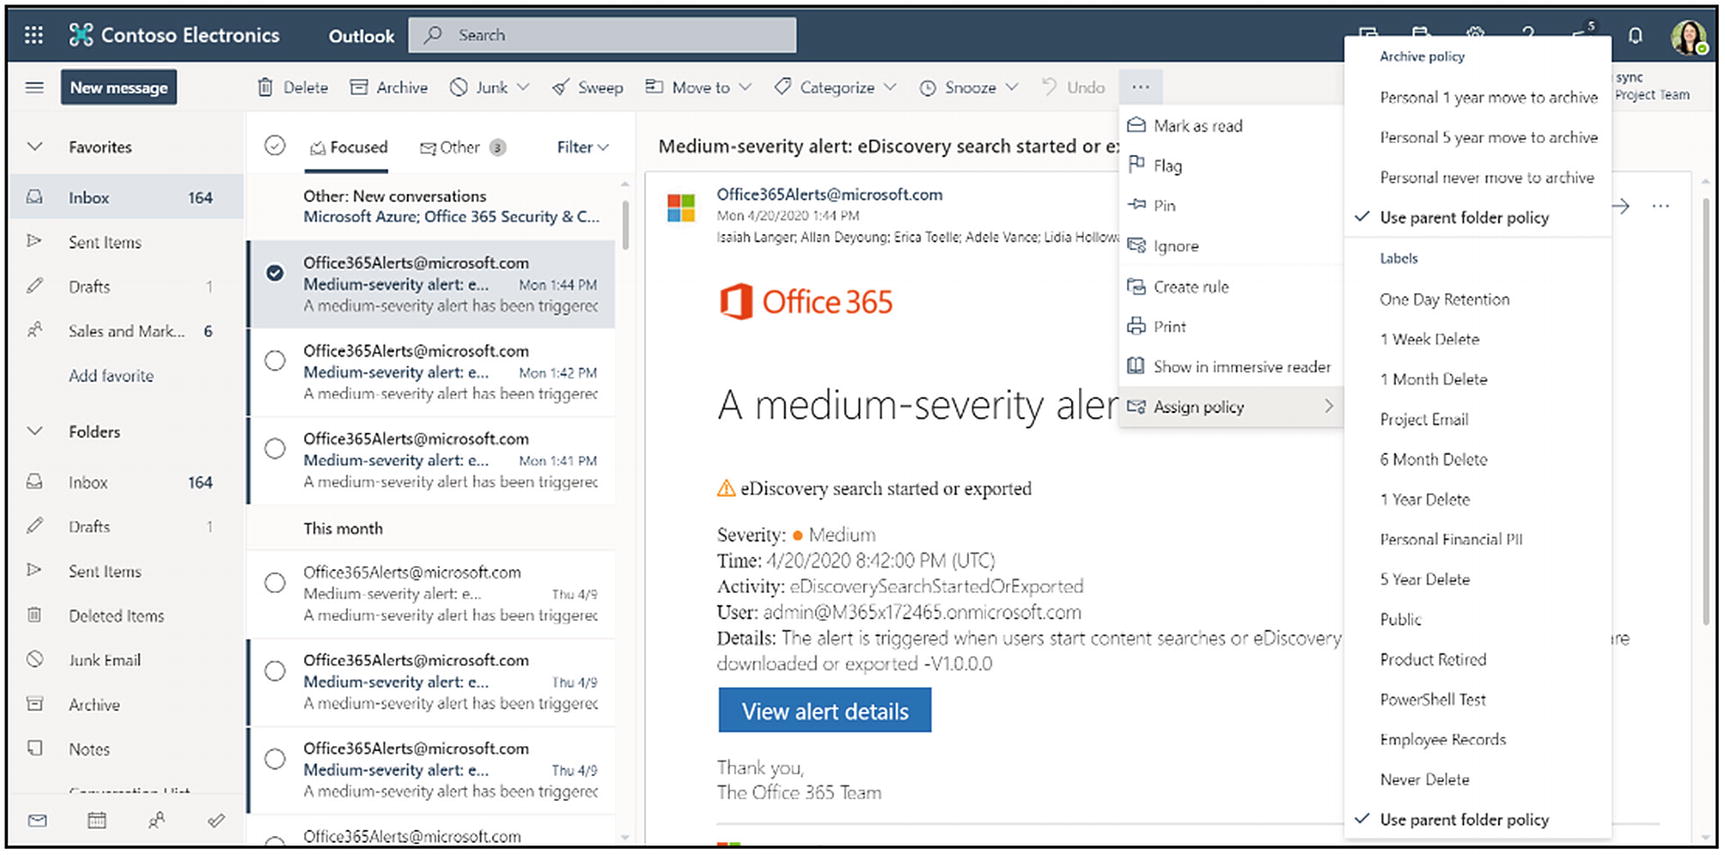
In Outlook, users can label one email at a time, shown in Figure 8-9. To do this, right-click an email and choose “Assign policy.” Then select the retention policy from the list that appears.
You can also manually apply labels in OneDrive. From OneDrive, select one or more documents. End users can choose the labels from the “Apply Retention Label” dropdown in the document property pane, similar to SharePoint.
Preservation Lock
Some regulatory requirements specify no one, including a global admin, can turn off the policy, delete the policy, or make it less restrictive. The Preservation Lock feature can fulfill this requirement. You can use Preservation Lock with both retention policies and retention label policies.
No one can disable the policy or delete it.
Locations can be added but not removed.
Labels can be added but not removed.
No one can disable the policy or delete it.
Locations can be added but not removed.
Labels can be added but not removed.
You must understand the impact of using a preservation lock on a policy. Administrators won’t be able to disable or delete these policies. You cannot ask Microsoft support to disable or delete them. Once applied, they are permanent.
- 1.
Connect to Security and Compliance Center PowerShell.
- 2.
Find the name of the policy that you want to lock by running Get-RetentionCompliancePolicy. This command will output a list of your policies.
- 3.To place a preservation lock on your policy, run the following cmdlet. Replace <name of policy> with the exact name shown in the list from step #2. Keep the quotations:Set-RetentionCompliancePolicy -Identity "<Name of Policy>" –RestrictiveRetention $true
- 4.
When prompted, read and acknowledge the restrictions that come with this configuration by entering Y :
- 5.
Prompt to confirm that you want to lock a retention policy in PowerShell.
- 6.You now have a preservation lock on the policy. To confirm, run this command:Get-RetentionCompliancePolicy -Identity "<Name of Policy>" |Fl
- 7.
You should see RestrictiveRetention set to True.
How Retention Works in Microsoft 365
To summarize, retention labels and retention policies are the two ways to apply retention in Microsoft 365. You can use one or both in the same environment. Now, let us go into how retention works once you have applied it to a document or location. We will discuss what happens if two retention periods could apply to the same document. We will also cover how Microsoft 365 deletes content once it reached the end of its retention period.
The Principles of Retention Policies
What if content qualifies for more than one retention policy? In that case, the system follows the principles of retention to decide what retention period and deletion action to apply to the content.
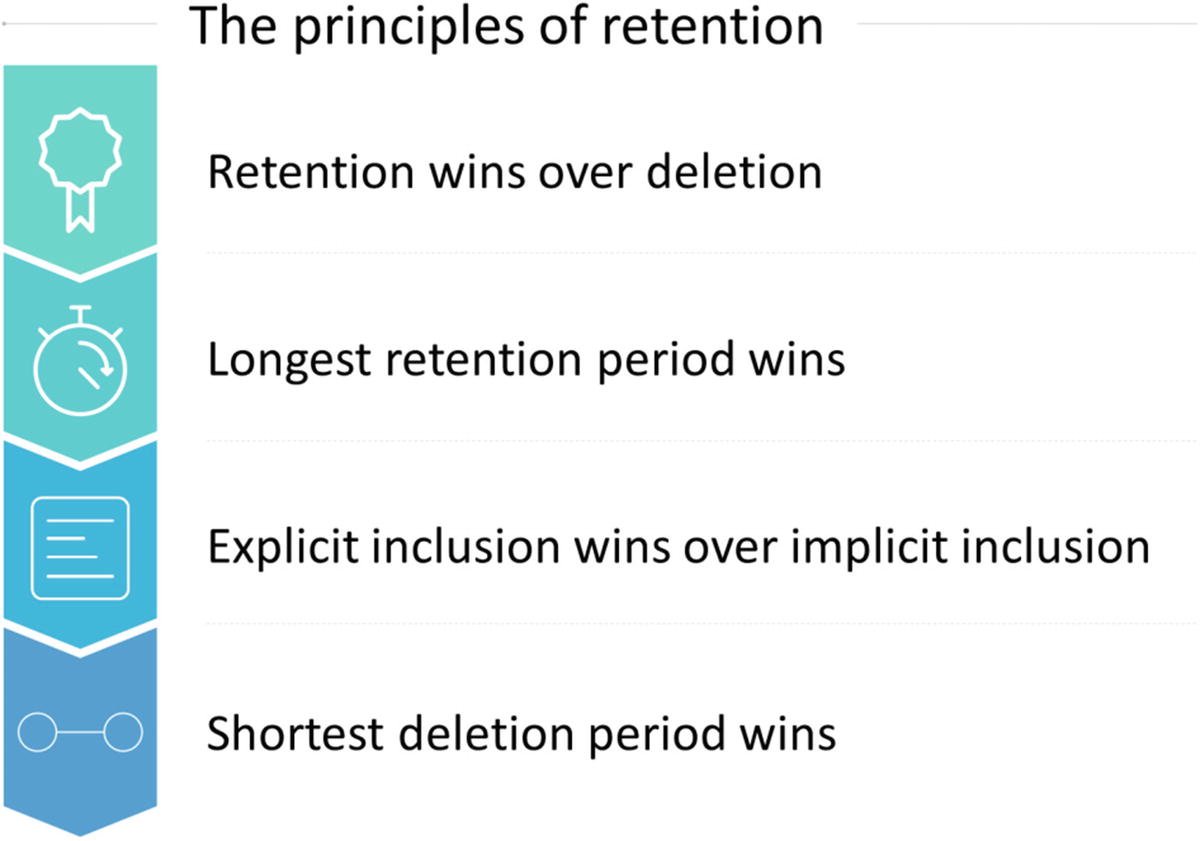
The principles of retention policies in Microsoft 365
We start at the top of the list, shown in Figure 8-10. If one of the principles resolves the conflict, we can stop, and we do not need to consider the rest of the principles. For example, the first principle states that retention wins over deletion. If you have one policy that retains content and one policy that deletes content, the former will be applied. The principles err on the side of caution.
If the first principle does not resolve the conflict, we go to the next principle: the longest retention period wins. If you have one policy that retains content for three years and one policy that retains content for seven years, the seven-year retention policy will apply.
The next principle states that explicit inclusion will always win over implicit inclusion. This principle means that the most specific policy will win. Because the previous principles have determined that the conflicting policies have the same retention period, this principle determines when to delete content. For example, let us say we have a retention policy of three years that applies to all content in all SharePoint sites. We also have a retention label of three years used on individual documents within sites. The retention period applied via the label will take precedence because it is more specific.
Finally, if none of the preceding principles resolve the conflict, the shortest deletion period would win. For example, let us say we have a policy that deletes Teams chats after 60 days. We have another policy that says to delete them after 30 days. The 30-day deletion policy will win .
How Deletion Works
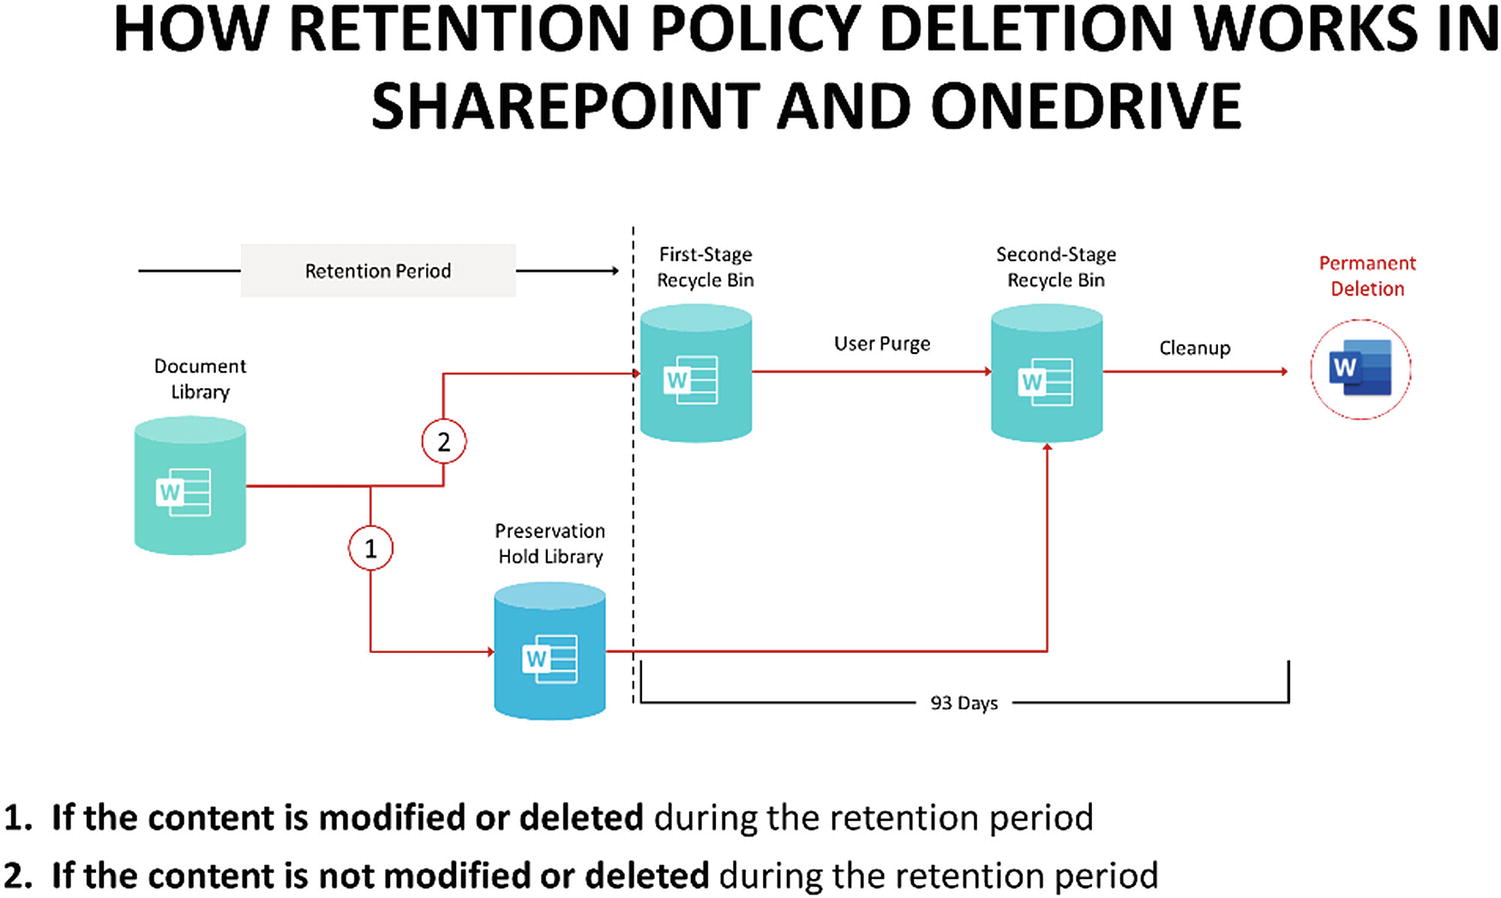
How retention policy deletion works in SharePoint and OneDrive
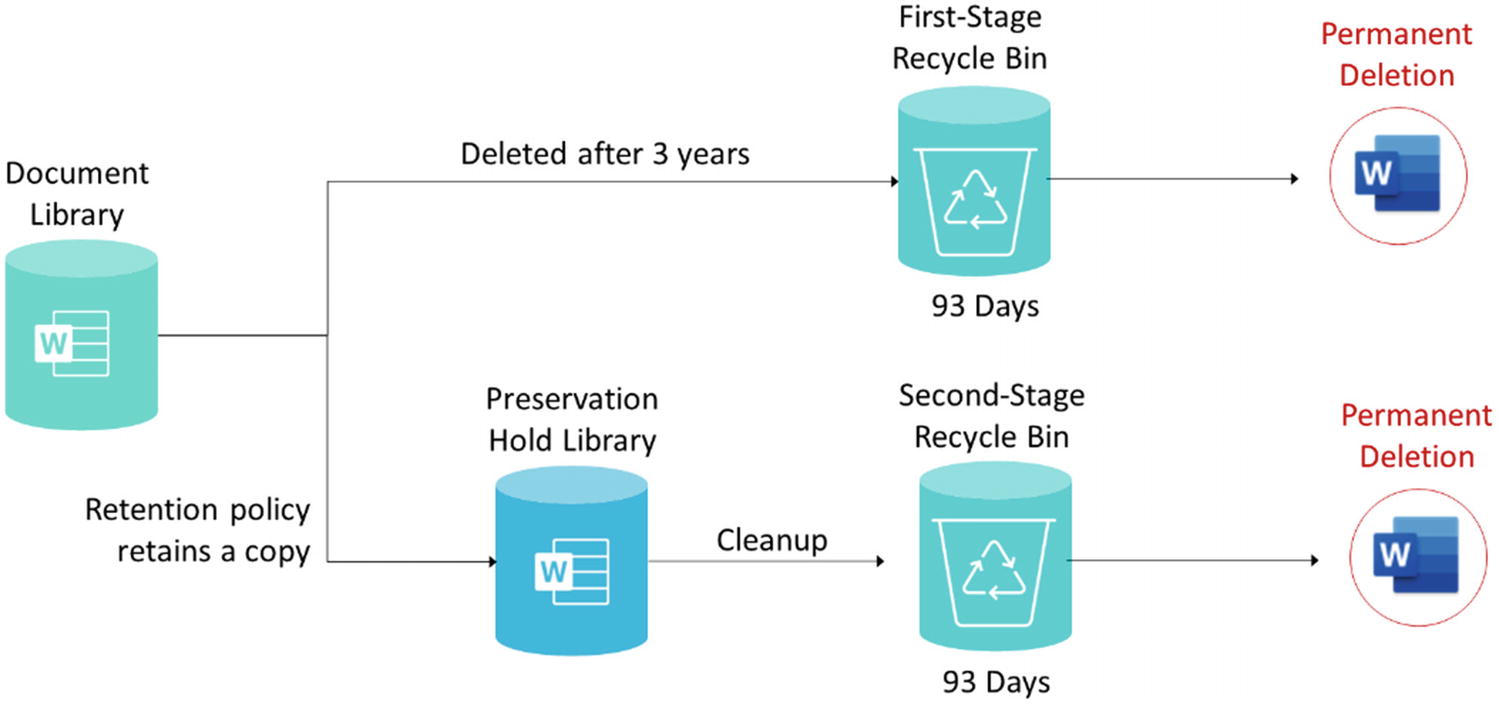
- 1.If someone attempts to modify or delete the file, the system checks if the document has changed since you applied the retention settings.
- a.
If the content already existed when you first applied the policy and if this is the first change since you applied retention, the system copies the content to the preservation hold library. This copy allows the person to change or delete the original content. It will stay here until the end of the retention period. At the end of the period, the system moves the file to the first-stage recycle bin, where it exists until it gets deleted permanently. The only exception is if an end user purges the first-stage recycle bin. In that case, the file moves to the second-stage recycle bin until deleted.
- 2.
If the document is not modified or deleted by a user during the retention period, it stays in the document library. At the end of the retention period, the file moves to the second-stage recycle bin.
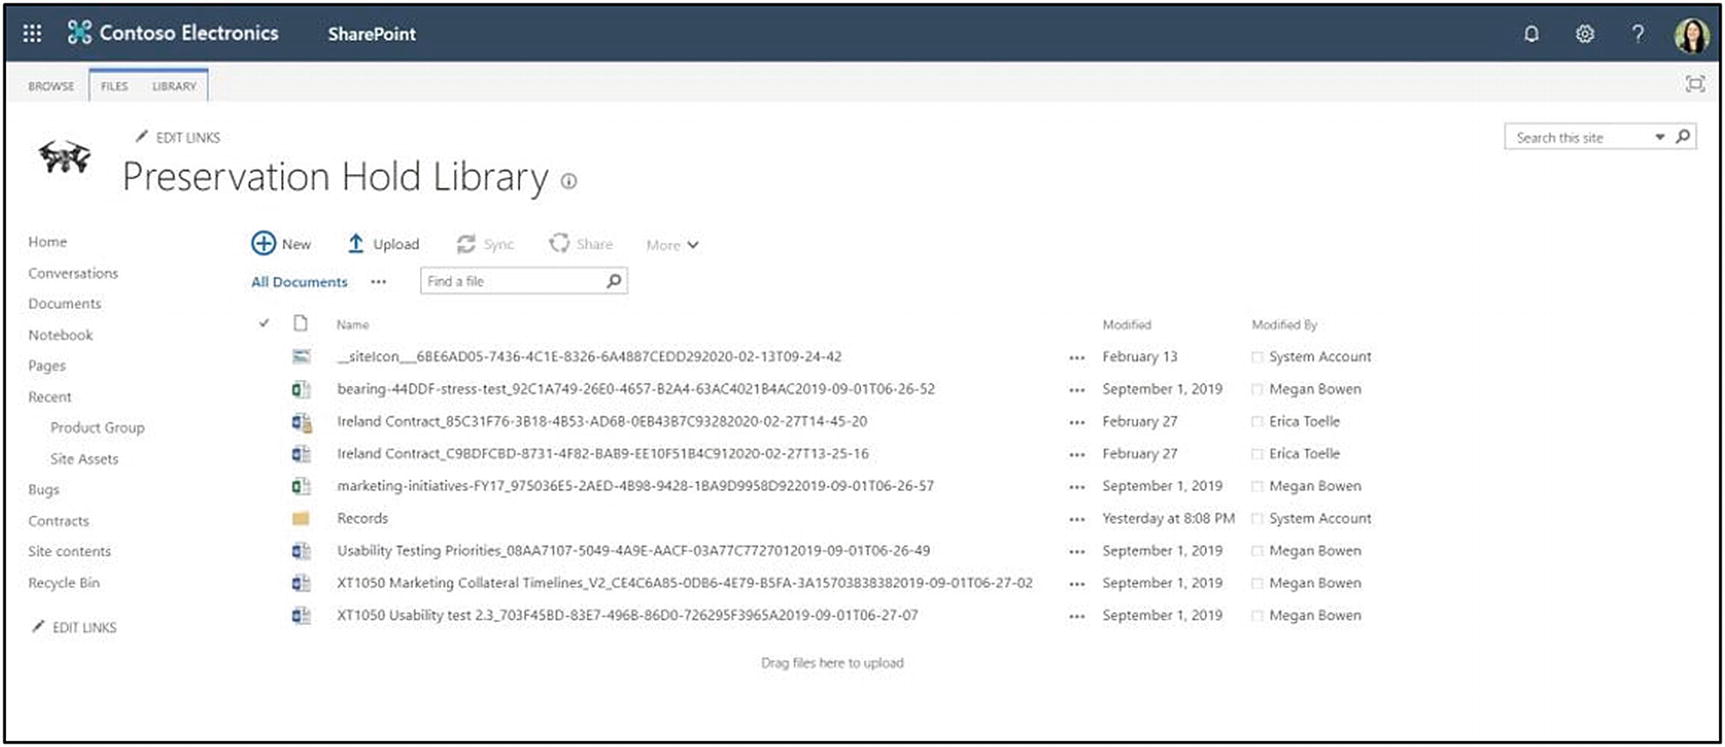
The preservation hold library
Remember that you cannot do a disposition review on content preserved using a retention policy. You can only do a review using a label. Therefore, once the retention period on the file has passed, one of two things will happen. The file in the preservation hold library will be moved to the second-stage recycle bin where it will stay for 93 days. The system permanently deletes the data after 93 days.
Only site collection administrators can view and access the preservation hold library and the second-stage recycle bin.
Files that exist only in the document library will be moved to the first-stage recycle bin. They will stay there until an end user empties the first-stage recycle bin or for 93 days. When we empty the first-stage recycle bin, the files are moved to the second-stage recycle bin until the end of the 93 days. Also, note that files in either recycle bin are not indexed in search and therefore are not available for eDiscovery.

The error when deleting a file with a retention label
If the label triggers a disposition review, then the file will follow the review process outlined in the preceding text. Once the review approves the disposal, the content is moved to the first-stage recycle bin and deleted after 93 days.
If the label deletes the content automatically, it is moved to the first-stage recycle bin and kept for 93 days.
If the label setting is Nothing, leave the content as is, and then the system does not act.
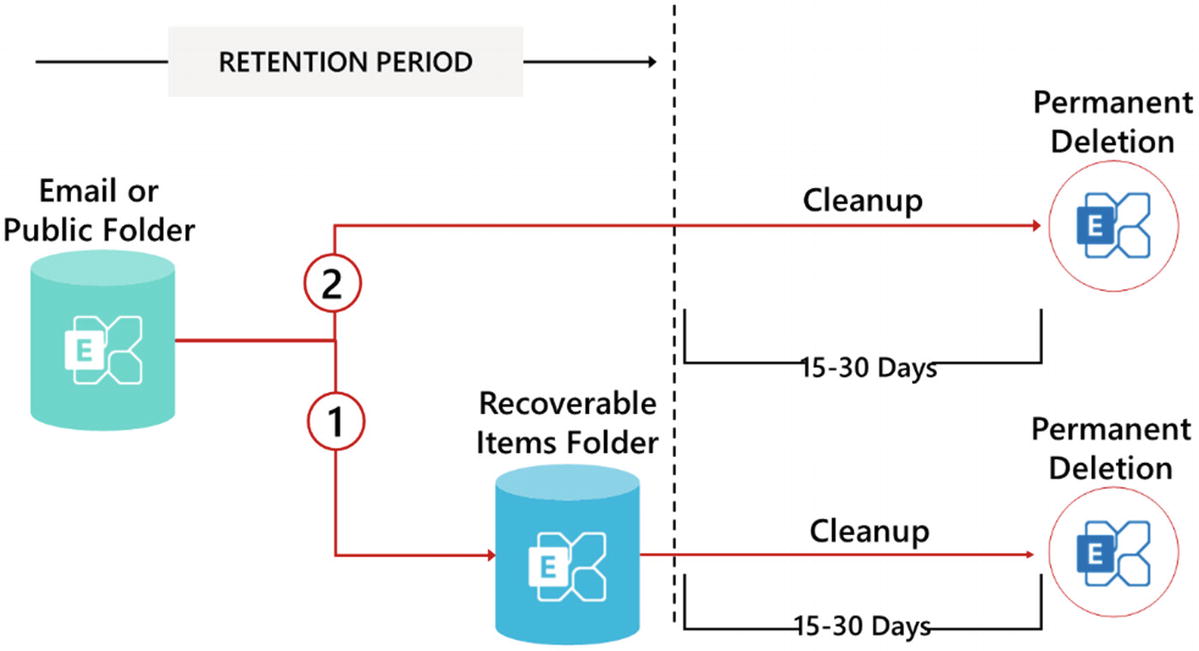
How retention policies work in Exchange
- 1.
If a user then tries to delete an item, the item will be moved to the hidden Recoverable Items folder in the user’s Exchange mailbox. It will exist in that folder until the end of the retention period. At that point, there is a cleanup job that runs every 15–30 days, and then it will permanently delete that item.
- 2.
If the content is not deleted or modified during that time, it will just exist in the user’s mailbox or archive folder until the end of the retention period. Then, the same cleanup job will recognize the expired item and permanently delete it.
Now let’s put the information about retention principles and the deletion information together into one scenario. This scenario is useful if you are concerned about the exact location of the file throughout this process. What if a retention label and a retention policy cover the same file? Where does the file physically live in the site? An excellent article covers these scenarios in detail authored by Stefanie Bier and the technical editor for this book, Ryan Sturm. I encourage you to check it out: http://erica.news/LabelsAndPolicies.
How retention policies and labels work together in Microsoft 365
- 1.
Retention label: Keep for three years and then delete.
- 2.
Deletion policy: Delete after two years.
- 3.
Retention policy: Retain for ten years and then delete.
It ignores the deletion policy.
The retention label deletes the file after three years.
The retention policy keeps a copy of the file for ten years and then deletes it.
- 1.While users collaborate, Microsoft 365 keeps the file in the SharePoint document library.
- a.
If someone tries to delete the file before three years, the label will prevent the action. The file stays in the library.
- b.
If a user deletes the file between three and ten years, the file moves to the preservation hold library.
- 2.After three years, the retention label moves the file to the first-stage recycle bin. Ninety-three days later, it deletes the file permanently.
- a.
The system retains a copy of the file in the preservation hold library.
- 3.
After ten years, the system moves the file to the second-stage recycle bin. After 93 days, the system permanently deletes the file.
This chapter has discussed retention policies, retention labels, and retention label policies. Additionally, we talked about how content is deleted from Microsoft 365 when it is subject to a retention policy and what happens when one document qualifies for two different retention periods. Next, we will switch gears to talk about how to import PST files into Microsoft 365 and how to enable an archive mailbox and unlimited archive.
How to Import Content into Microsoft 365
Import allows you to bulk-import PST files to Exchange Online mailboxes. People usually do this when they have old PST files sitting on a server. They may want to retain and dispose of the content or make the PST files available for eDiscovery.
There are two ways that you can import PST files to Microsoft 365. The first option uses network upload. The second option is to ship BitLocker encrypted hard drives to Microsoft. Each of these methods follows the same process.
First, we will want to collect the PST files. We need to discover where PST files exist in our organization and move them to one central location to upload them to Microsoft 365. We could also optionally prevent users from creating new PST files, so this is not an ongoing issue.
Second, we need to upload those PST files to a temporary Azure storage location. This upload is where the two options differ. If you have a reasonable amount of data, you could use the network upload option to get data into the Azure storage location yourself. However, if you have a lot of data and it would take too long to upload it yourself, you can ship the hard drives to Microsoft, and they will upload it for you.
It does not matter which method you use. Both approaches result in having your data in a temporary Azure storage location. After that, you will import the PSTs to the appropriate Microsoft 365 mailbox. We will talk about this process more in-depth in the rest of this section.
Permissions and Licensing
- 1.
Visit the Exchange admin center here: https://admin.exchange.microsoft.com/.
- 2.
In the left navigation, click Roles ä Admin roles.
- 3.
Click Add role group.
- 4.
Name the new role group. Click Next.
- 5.
Scroll down until you find the Mailbox Import Export role. Check the box next to it. Click Next.
- 6.
In the Members field, enter the user account that should have this role.
- 7.
Click Next and Add role group.
- 8.
Wait at least 15 minutes for the changes to propagate.
- Mail Recipients role in Exchange Online. By default, this role is assigned to the following role groups:
Organization Management
Recipient Management
You could also be a global administrator.
Microsoft 365 E5
Microsoft 365 E3
Office E5
Office 365 E3
Office 365 E1
Also, note that to use the drive shipping option, you must have a Microsoft Enterprise Agreement. Drive shipping is not available through Microsoft Products and Services Agreement.
Using a network upload to import PST files is free, but drive shipping is not. We will get into the specific pricing structure for drive shipping in the “Drive Shipping” section later in this chapter.
Use Network Upload
Network upload is unfortunately not available everywhere. It is only available in the United States, Canada, Brazil, the United Kingdom, France, Germany, Switzerland, Norway, Europe, India, East Asia, Southeast Asia, Japan, Republic of Korea, Australia, and United Arab Emirates (UAE). Network upload will be available in more regions soon. You can import content into either an active or an inactive mailbox. If you are in an Exchange hybrid environment, you can import it into an online archive mailbox.
Before you begin, you must collect all the PST files for the import into one location. You must locate the PST files in a file share or file server in your organization.
There is some information to consider before we start. The speed of the upload depends on the capacity of your network. It typically takes several hours for each terabyte of data to be uploaded to the Azure storage area for your organization. If, for example, you are trying to upload 100 TB of data, that could take anywhere from 10 days to 100 days, depending on network capacity. This situation is where drive shipping might be a better option. After you copy the PST files to the Azure storage area, the system imports a PST file to a Microsoft 365 mailbox at a rate of at least 24 gigabytes per day. This rate is the same, whether you are using the network import or the drive shipping option.
If you import different PST files to different target mailboxes, the import process from Azure to the mailbox occurs in parallel, meaning it introduces each PST mailbox pair simultaneously. Likewise, if you import multiple PST files to the same mailbox, it will import them simultaneously. Each one of those different import threads has a rate of 24 gigabytes per day.
The Import tab overview in the information governance solution
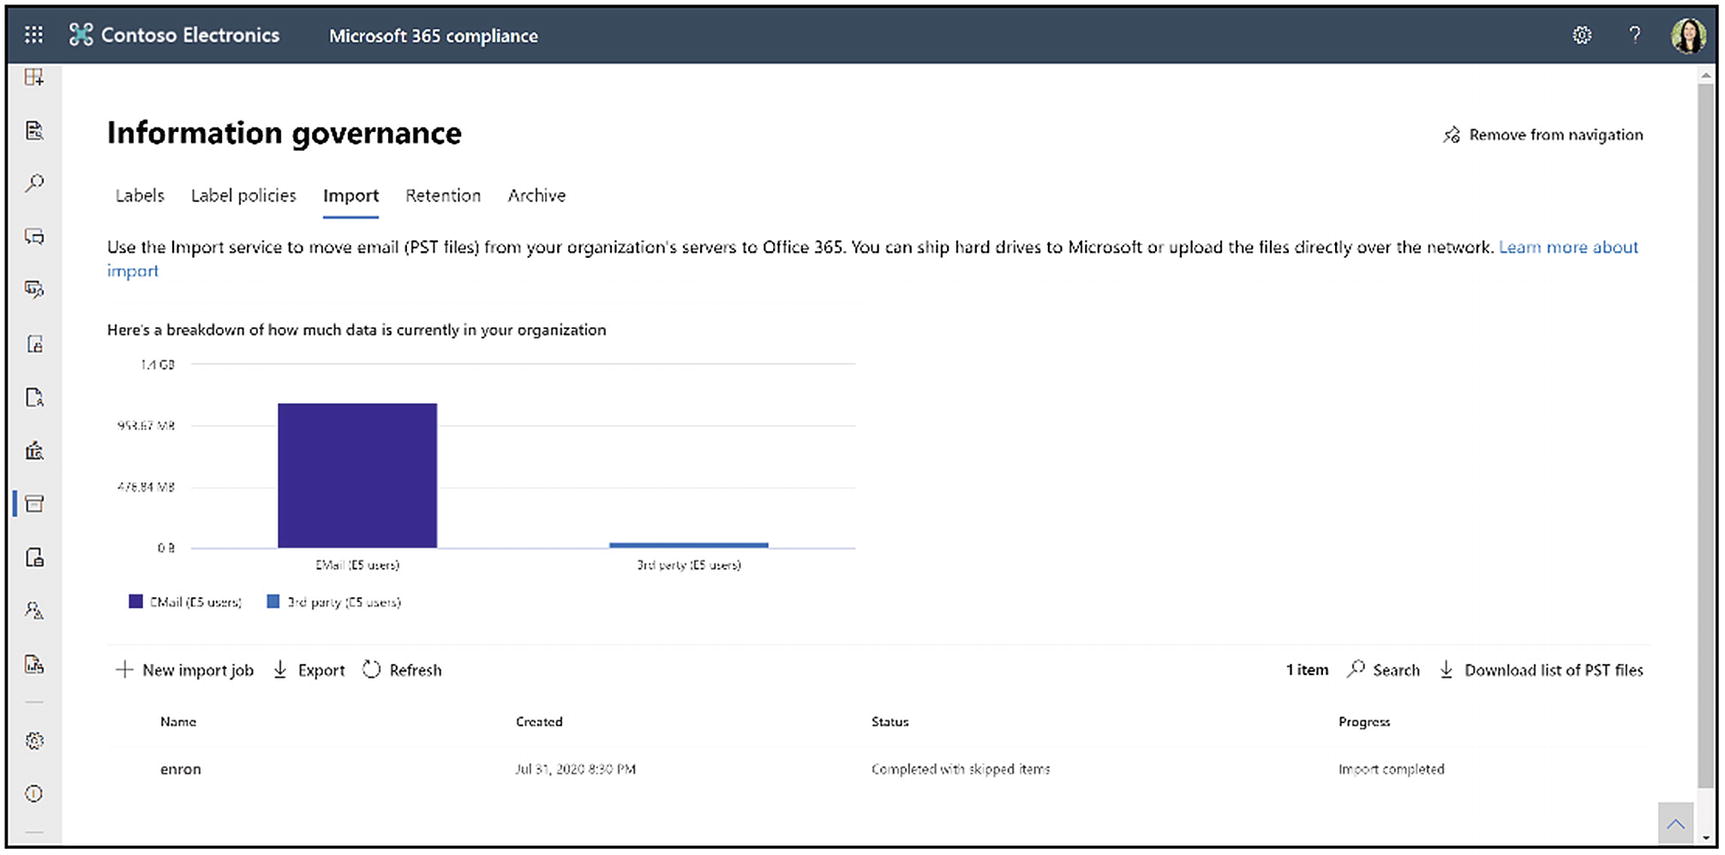
To start an import PST process, visit the Microsoft 365 Compliance Center. In the left navigation, click Information governance. Then click the Import tab, shown in Figure 8-16. Here, you can see a breakdown of how much data is currently in your organization, including PST imports and third-party connectors. You can also see a list of previous PST imports, including the name, creation date, status, and progress information. You can also download a list of past import jobs or a list of the PST files contained in the import. Lastly, you can search for an import or refresh the list.
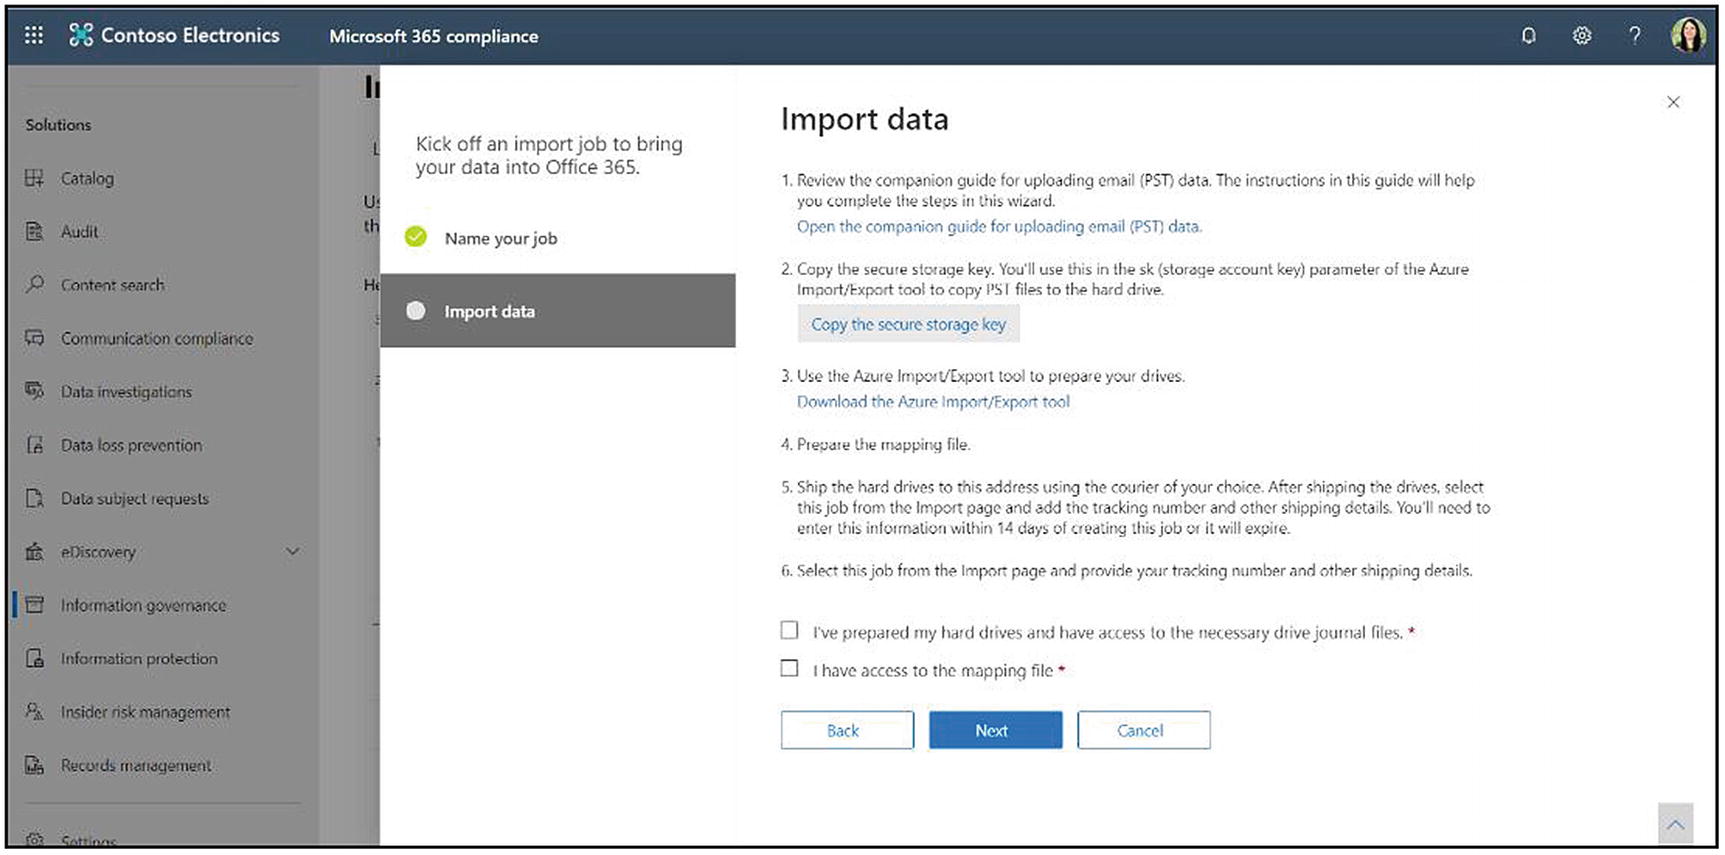
Instructions to prepare for data upload
The next screen has the steps you need to complete to import your data, shown in Figure 8-17. First, you will want to review the companion guide or Microsoft’s instructions for uploading email PST data. You can click the first blue link to read that information.
Next, you will get your SAS URL key for the network upload. This SAS URL is the password that allows you access to your data, so please keep this confidential just as you would with any other password. Click Copy the secure storage key and then Copy to clipboard.
Now, you need to use the Azure AzCopy tool to upload your files. The link provided in the instructions is for AzCopy 8.1, but unfortunately, you need to use AzCopy version 10. You can download version 10 here: http://erica.news/AzCopy10.
- 1.
Open a command prompt on your local computer.
- 2.
Navigate to the directory where you put the AzCopy.exe file.
- 3.Run this command. You will need to modify it to include your parameters:AzCopy.exe /Source:<Location of PST files> /Dest:<SAS URL> /V:<Log file location> /Y
- a.
/Source: The file path of your PST files. Surround the file path with quotes, that is, “file path”.
- b.
/Dest: Paste the SAS URL that you copied earlier.
- c.
/V: Pick a location to store the log file. This location can be anywhere on your machine. Surround the file path with quotes, that is, “file path”.
- d.
/Y: A switch allows the use of write-only SAS tokens when you upload the PST files to the Azure storage location.
If there are any errors here, it will tell you why so you can resolve them.
Workload: Exchange.
File path: Leave that blank unless you uploaded the PST files into a subfolder. If you did, enter the subfolder name.
Name: This is the name of your PST file. It is case sensitive, and you need to include the file extension (.pst).
- Mailbox: The email address for the mailbox where you put the data.
If you want to use an inactive mailbox, put the mailbox GUID in this field. To get the GUID, run the following PowerShell command in Exchange Online:
IsArchive: Use TRUE or FALSE. If TRUE, the process will import the data into the user’s archive mailbox. If FALSE, it will import it into their primary mailbox. The user must have an archive already enabled to use the TRUE option. We go over the archive in the next section of this chapter.
- TargetRootFolder: Specifies where in the mailbox the process will place the data. For example, if you leave it blank, the import job will create a folder called “Imported” at the same level as the inbox.
Use /YourFolderName to change the folder name from “Imported” to what you specify.
Use /Inbox to merge the messages with what currently exists in the inbox.
Use /Inbox/YourFolderName to create a new folder under the inbox if it does not exist yet.
- ContentCodePage: We mostly use this field to import folder names in Chinese, Japanese, and Korean (double-byte characters) correctly.
Leave blank if you do not have any special characters.
If you have special characters, find the code on this page that matches the characters: http://erica.news/CodePageIdentifiers.
SPFileContainer: Leave blank.
SPManifestContainer: Leave blank.
SPSiteUrl: Leave blank.
When you finish, check the two boxes for “I’m done uploading my files” and “I have access to the mapping file.”
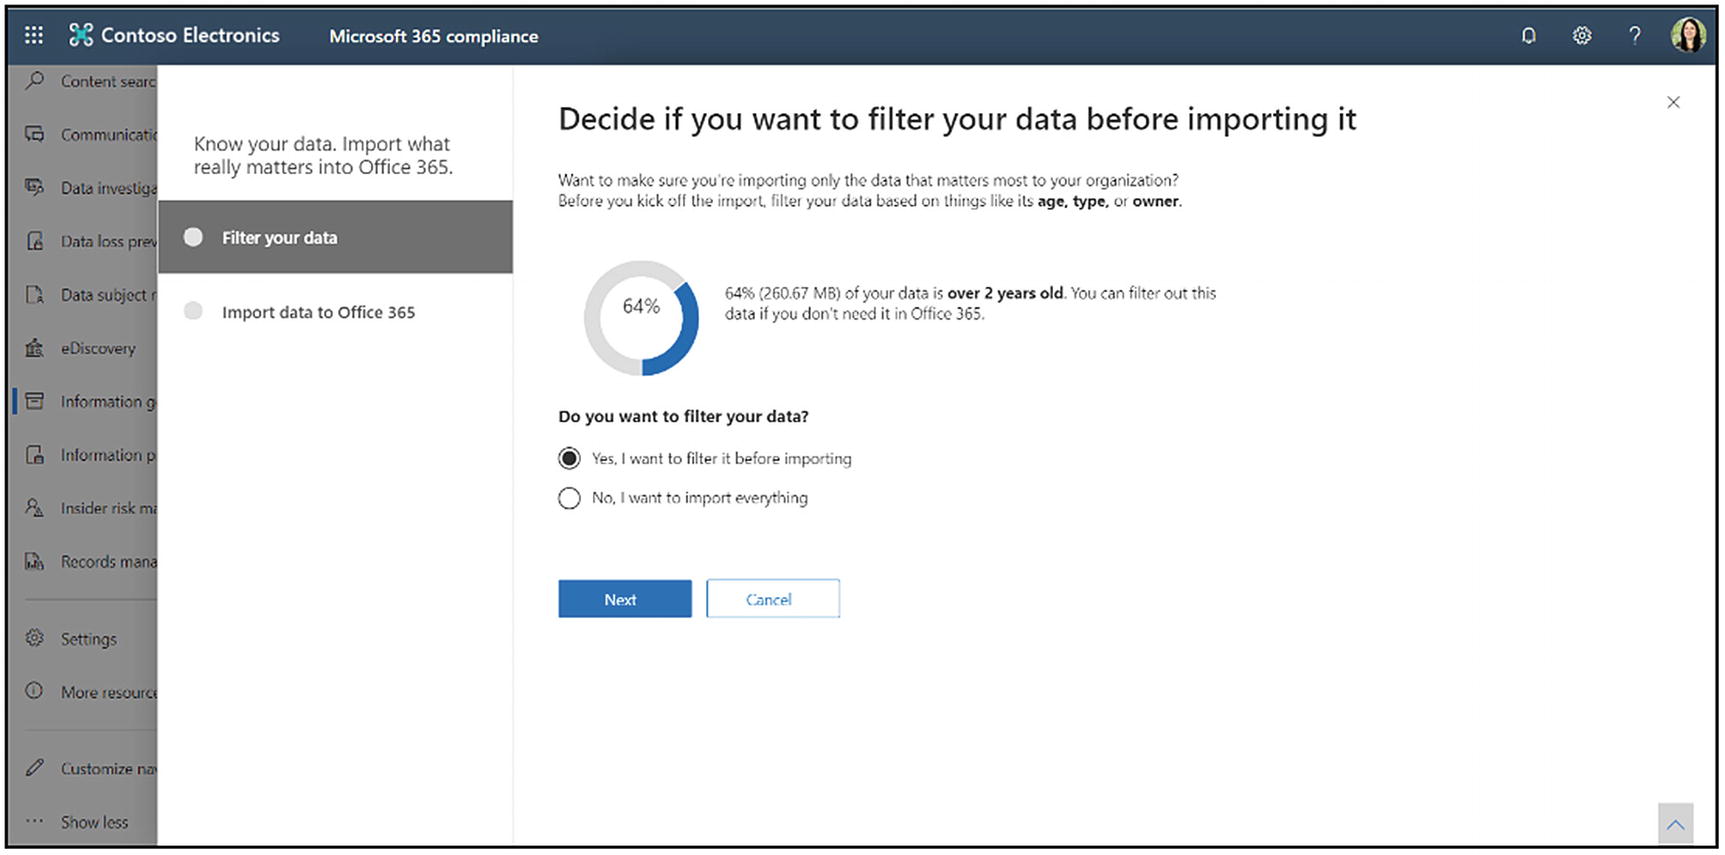
Decide if you want to filter your data before importing it into Microsoft 365
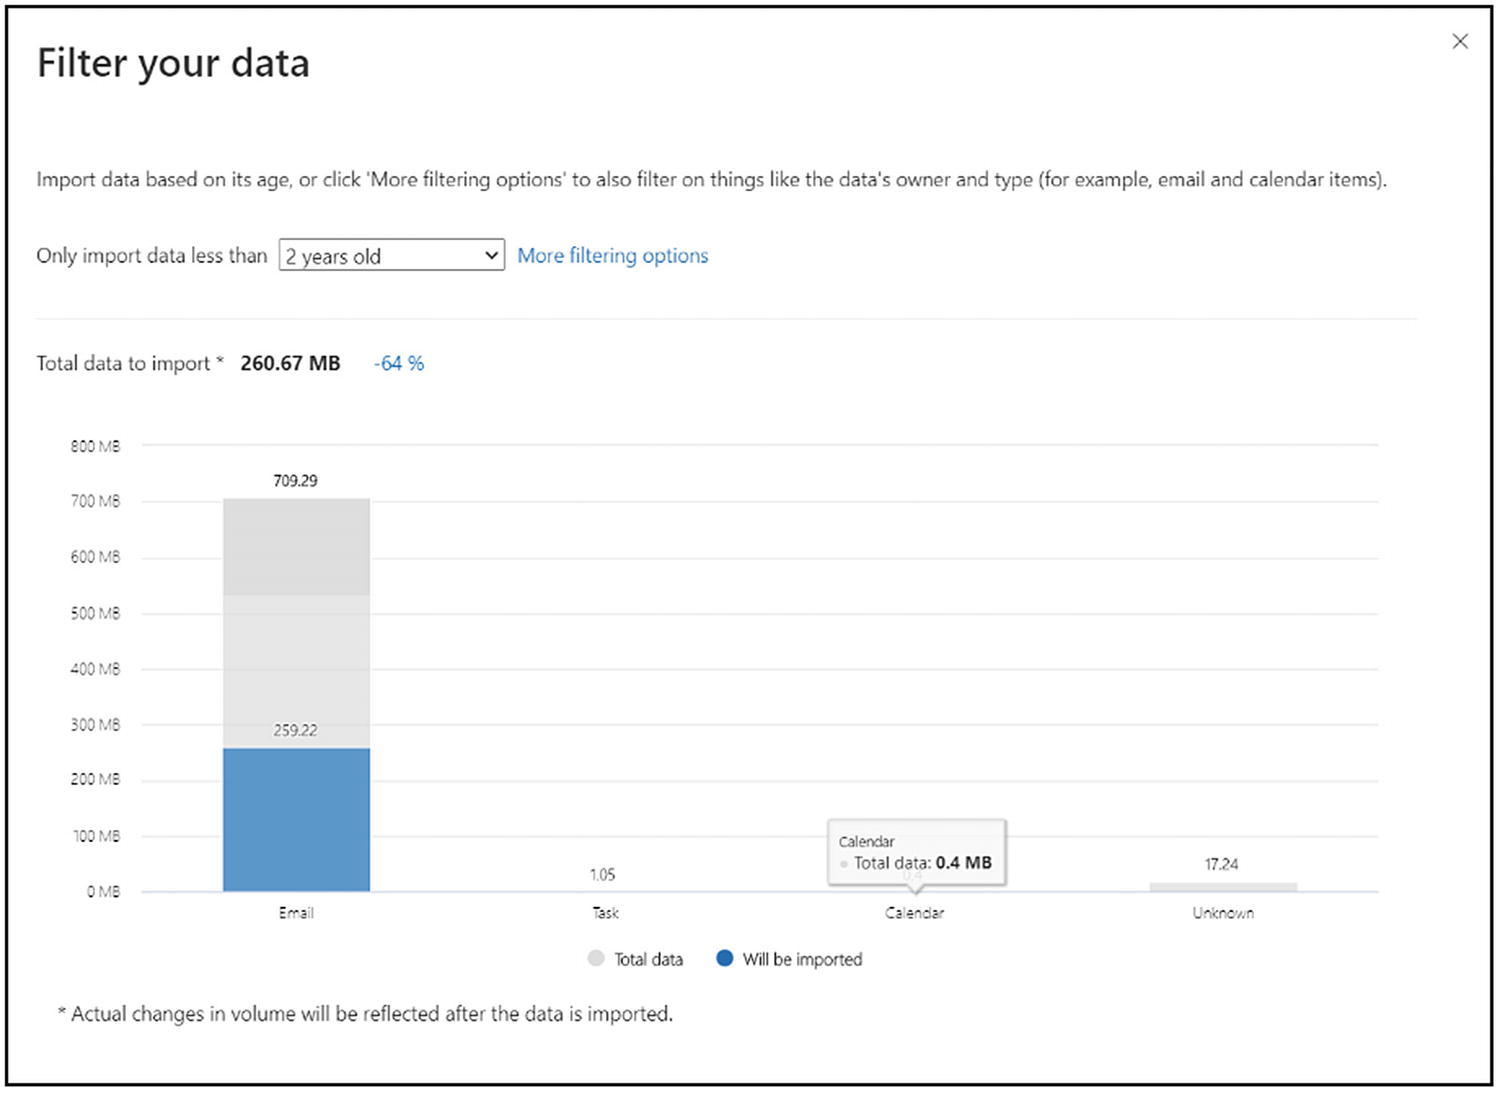
Filter the data from the PST files before import into Microsoft 365
Age: You can choose the age in year increments.
Type.
Users listed in the From field.
Users listed in the To field.
Users listed in the Cc field.
When you are happy, click Next. The next screen asks you to confirm your filter settings or your decision not to filter data. If you are happy, click Import data. The next screen tells you the job scheduled successfully, how much data it will import, and that you can check the progress column on the import page to see your import’s progress. Go ahead and close this wizard.
Now, we go back to the Import tab. Here you can see your import job, the current status, and the current pace. You can always click that job to have an information panel that shows you more detailed status information.
The number of items imported
The number of items skipped because the file is corrupted
The number of items skipped because they are too large
The number of items skipped for another reason
Any status details
You can also see a summary of your data filters, the last modified time, the job type, and who created the job.
When you load your data into Microsoft 365, a few things happen. First, the PST import process checks for duplicate items and does not copy the items from a PST file to the mailbox or archive if a matching item exists in the target location.
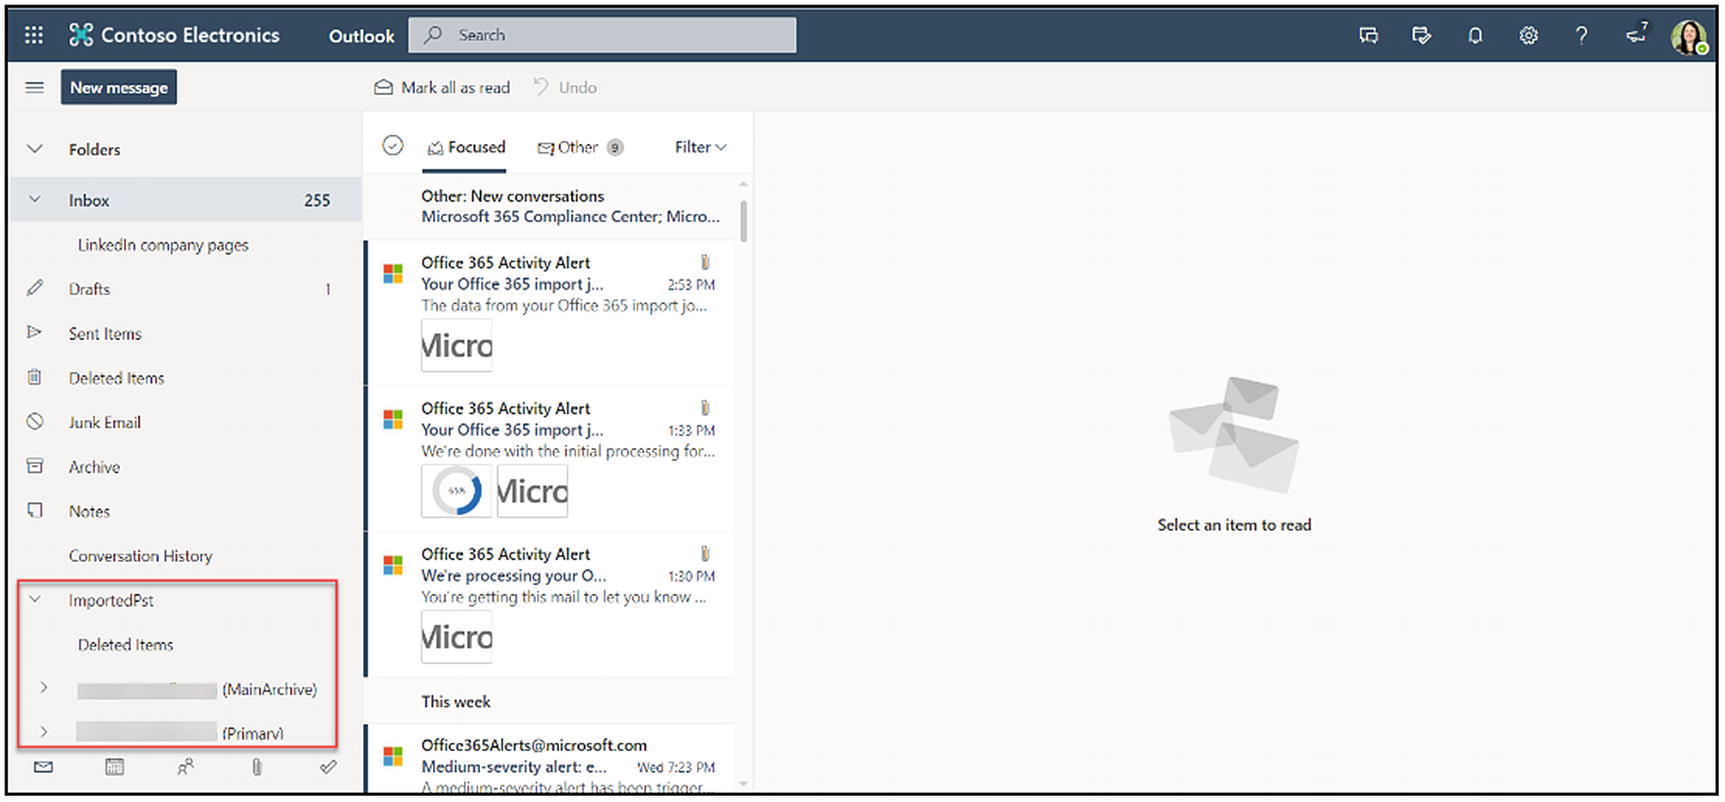
The finished PST import in a user’s mailbox
Once the system completes the import, you can navigate to one of the mailboxes to view the files. Here I can see that I have my imported PST mailbox, shown in Figure 8-20.
The Microsoft 365 import service enables the retention hold setting for an indefinite duration after importing the PST files to a mailbox. The system does this hold, so the newly imported emails are not deleted right away by a retention policy. For example, let us say you have a retention policy on your mailbox that deletes emails older than three years. If you import emails older than three years and the system did not turn on the retention hold setting, it would delete all your newly imported emails.
If you’re happy having this hold on the mailboxes, you can leave it on indefinitely. You can turn this setting on or off or set a different retention period using PowerShell. You can also configure the retention hold, so it turns off on some date in the future. You need to set the number of days in the future that you want it turned off. For example, take today’s date, and if you wish to have it turned off in 120 days or four months, you will specify 120 days in the setting.
Drive Shipping
Now, let us talk about the drive shipping import option. Drive shipping is a way you can import PST files at scale to Microsoft 365. You must have an Enterprise Agreement with Microsoft to use this method. With drive shipping, you physically ship the hard drive to a Microsoft data center. When Microsoft receives the hard drive, data center personnel will upload the PST files on the hard drive to your organization’s temporary Azure storage location. After your hard drive is received, it can take seven to ten business days to upload the PST files. Like the network upload process, Microsoft 365 would then analyze the data and the PST files and set filters to control what data gets imported. Subsequently, Microsoft would ship the hard drive back to you with the data intact.
The cost to use drive shipping to import PST files to Microsoft 365 is $2 USD per gigabyte of data. If you want to upload a terabyte of data, that would be $2,000. You can work with a partner to pay the import fee; you do not pay that directly to Microsoft. They only accept 2.5-inch solid-state drives or 2.5-inch or 3.5-inch SATA 2 or SATA 3 internal hard drives. They do not allow external hard drives. You can use hard disks up to 10 terabytes, and for import jobs, they will only process the first data volume on the hard drive. You must format your data volumes within NTFS, and you can ship a maximum of ten hard drives for a single import job, which equals an overall maximum of 100 terabytes for a single import job. You or your organization must have an account with FedEx or DHL because Microsoft will bill that account for the shipping cost when Microsoft returns it to you.
If you’re going to use this option, there are a lot more details you should know. Check out the documentation here: http://erica.news/DriveShipping.
Lastly, I will mention that if you want to import files and documents to SharePoint sites or OneDrive accounts, you can do that. There are several methods available that do not involve the Compliance Center. Microsoft provides a free SharePoint migration tool. You can also migrate using PowerShell. Or you could always use a third-party migration tool to move that data.
In this section, we reviewed why you would want to import data into Microsoft 365. We went into details about how to do a network import job and briefly discussed drive shipping and file imports. Next, we will cover archive and unlimited mailboxes .
Archive Mailboxes and Unlimited Archive
Archive mailboxes provide additional email storage for people in your organization. Using Outlook or Outlook web app, people can view messages in their archive mailbox and move or copy messages between their primary and archive mailboxes. After an archive mailbox is enabled, messages older than two years are automatically moved to the archive mailbox by the default retention policy assigned to every mailbox in your organization. Of course, you can customize this policy for your needs. People mostly use archive mailboxes to free up storage in their primary mailbox. With archive mailboxes, you can also enable unlimited archive, allowing unlimited space in the archive mailbox folder.
Licensing and Permissions
A user must be assigned an Exchange Online Plan 2 license to enable the archive mailbox. Microsoft includes this license by default in all E3 and E5 plans. If a user is assigned an Exchange Online P1 license, you would need to assign them an additional separate Exchange Online Archive license to enable their archive mailbox. Auto-expanding or unlimited archiving also supports shared mailboxes. An Exchange Online P2 license or an Exchange Online P1 license with the Exchange Online Archiving license is required to enable the archive for a shared mailbox.
You must be a global administrator in your organization or a member of your Exchange Online Organization Management role group to enable auto-expanding archiving for your entire organization or specific users. Alternatively, you must be a member of a role group assigned the Mail Recipients role to enable auto-expanding archiving for particular groups.
Enable Archive Mailboxes
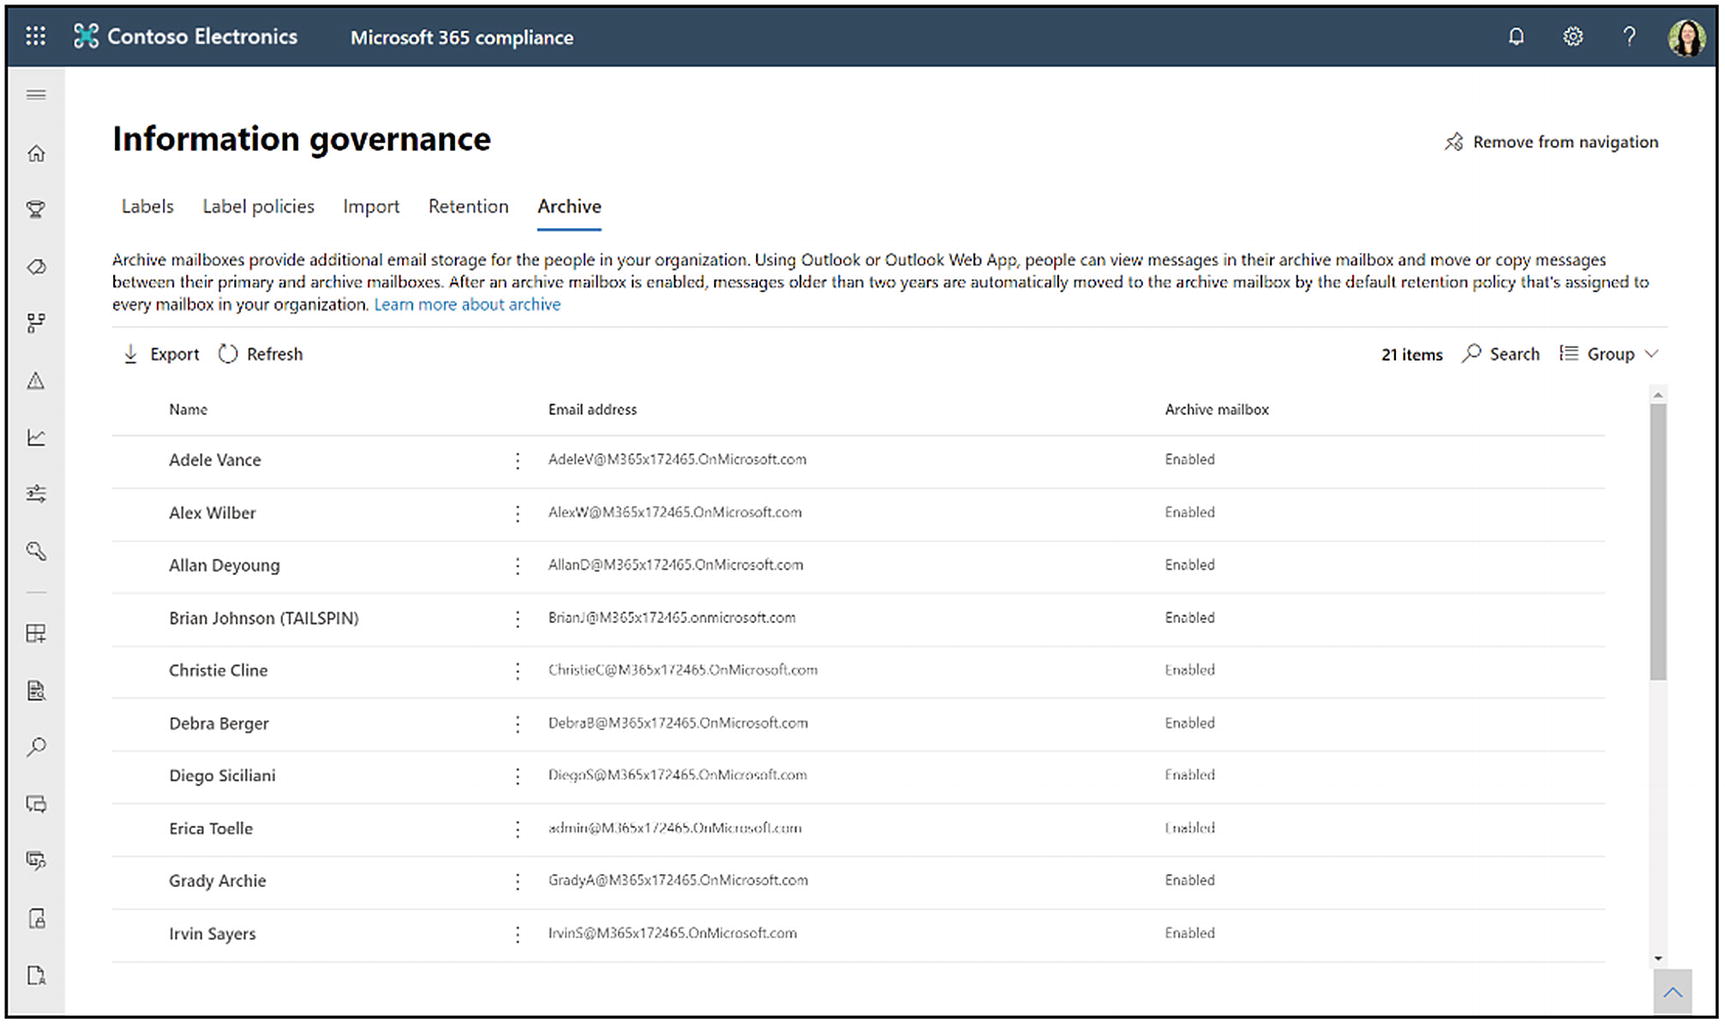
The Archive tab in the information governance solution
Here you see a list of the organization’s users, their email address, and whether their archive mailbox is enabled or disabled, shown in Figure 8-21. The Export button downloads a report of all the users and whether their archive mailbox is enabled or disabled. You can refresh or search the list. Lastly, you can group the list by whether the archive mailbox is enabled or disabled.
If you would like to enable the archive mailbox, select one or more of the people in the list and click the toolbar’s Enable archive text. A warning will appear saying, “If you enable this person’s archive mailbox, items in their mailbox that are older than two years will be moved to the new archive. Are you sure you want to enable this archive mailbox?” Click Enable. You can also enable the archive through PowerShell.
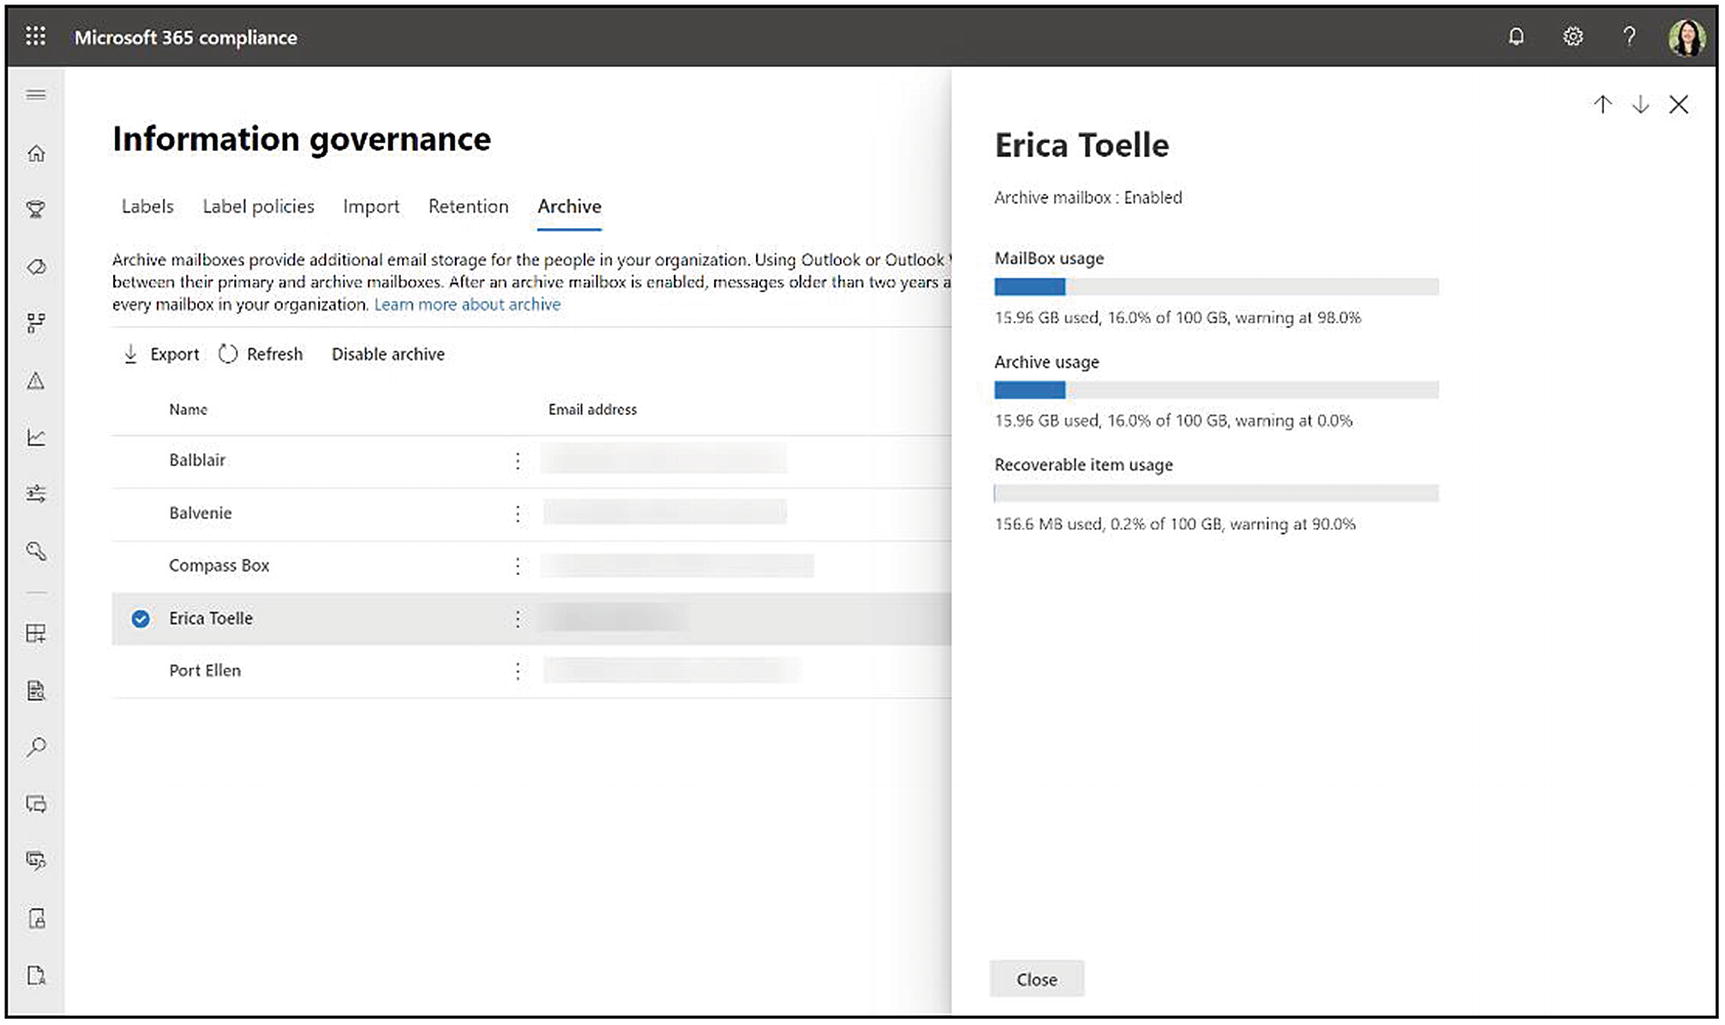
Mailbox details in the archive solution
You can also view mailbox information for each of the users to decide whether you should enable their archive. To do this, click a user from the archive location. A pane will open, shown in Figure 8-22. Here you can see their mailbox usage, including their quota information. If they already have an archive mailbox, you can see usage information for that too. Lastly, you can see their recoverable item usage.
Users can access the archive folder in Outlook client or web app . They cannot access the archive folder in the Outlook mobile client on a phone. Users can move content to and from the archive. When using content or eDiscovery search, it will automatically search both the archive and primary mailboxes for a user. The archive mailbox honors hold and retention policies.
There is a Default Exchange MRM Policy automatically assigned to the mailbox when the archive is enabled. This policy moves items older than two years to the archive. It also moves items in the Recoverable Items folder after 14 days to the archive Recoverable Items folder. You can replace this default policy with a custom MRM policy with any duration from the Exchange admin center.
Unlimited Archiving
After you enable archiving on a mailbox, the admin can also turn on an unlimited or auto-expanding archive. You will see the terms unlimited and auto-expanding used interchangeably in this section, Microsoft documentation, and other information, but they mean the same thing. Archive mailboxes start with a 100 GB quota, with a warning at 90 GB. Suppose a mailbox is placed on hold or assigned to a retention policy. In that case, the storage quota for the archive mailbox increases to 110 GB with a warning at 100 GB.
Once you have enabled unlimited archive, when the archive mailbox plus the Recoverable Items folder reaches 90 GB, it converts the mailbox to an unlimited archive. This conversion can take up to 30 days. Once that is achieved, the system automatically adds additional storage in 10 GB increments.
Sometimes the system moves folders and items in these folders to the auto-expanding archive. This move is so Microsoft can optimize storage. If it moves the whole folder, the folder name will remain the same. If it only moves a portion of the folder, the system will modify the folder name to be <folder name>_yyyy (Created on mmm dd, yyyy h_mm), for example, Project Falcon_2020 (Created on Dec 01, 2020 8_02).
Access the Unlimited Archive
You can access the unlimited archive using Outlook 2016, Outlook 2019 for Mac or Windows, or Outlook on the Web. You cannot access it from Outlook on mobile devices. If you want to search the unlimited archive, you need to search each folder separately. Do this by clicking the folder and choosing the current folder as the search scope. Item counts and read/unread counts might not be accurate. You can delete items in a folder, but not the folder itself. And you cannot use the Recover deleted items feature to recover an item that a user removed from an auto-expanded storage area.
Here are some warnings about the unlimited archive. Microsoft only supports the auto-expanding archive for mailboxes used for individual users or shared mailboxes with a growth rate that does not exceed 1 GB per day. A user’s archive mailbox is intended just for that user. Using journaling transport rules or auto-forwarding rules to copy messages to an archive mailbox is not permitted. Microsoft reserves the right to deny unlimited archiving and instances where someone uses a user’s archive mailbox to store archive data for other users or, in other cases, for inappropriate use.
eDiscovery: When you use an eDiscovery tool such as content search, it also searches the additional storage areas in an auto-expanded archive.
Retention: When you manage the mailbox with a retention policy, it also manages the unlimited archive.
Messaging Records Management or MRM: If you use MRM deletion policies in Exchange Online to permanently delete expired mailbox items, it also removes expired items in the auto-expanded archive.
Import service: You can use the Microsoft 365 import service discussed in the previous section to import PST files to a user’s auto-expanded archive. You can import up to 100 GB of data from PST files to the user’s archive mailbox.
Enable Unlimited Archiving
To enable unlimited archiving, you need to use PowerShell. You can allow unlimited archive for the entire organization or just for specific people. After you turn it on, the system enables an auto-expanding archive for existing user mailboxes and newly created user mailboxes. When you create user mailboxes, be sure to allow the user’s primary archive mailbox, so the auto-expanding archiving feature works for the new user mailbox. After you turn on auto-expanding archiving, you cannot turn it off. Instead of enabling auto-expanding archiving for every user in your organization, you might only allow it for specific users. You might do this because only some users require a large archive storage capacity.
- 1.
Connect to Exchange Online PowerShell.
- 2.
To enable unlimited archive for everyone, run the following command:
- 3.
To enable unlimited archive for specific users, run the following command:
In this chapter, we covered the information governance solution. We started by discussing retention policies, including Preservation Lock and inactive mailboxes. Then we reviewed retention labels and how end users can manually apply them to emails and documents. We also covered the principles of retention and how retention deletion works in Exchange, SharePoint, and OneDrive.
Next, we discussed how to import PST files into Microsoft 365. You can either upload them through the browser or via drive shipping. Lastly, we covered archive mailboxes and the unlimited archive.
In the next chapter, we will discuss records management. This overview includes file plans, record labels, regulatory record labels, disposition approval, and event-based retention. I also include advanced compliance features such as the auto-application of retention labels and advanced records versioning.