Organizations use eDiscovery for many purposes. One is for litigation, when you need to gather information or evidence for a legal case. People also use eDiscovery for internal investigations, such as employee misconduct or another matter where you need content to understand what happened. You might need to understand the scope and impact of data leaks, such as when someone shares a confidential document accidentally and you need to locate all the copies. Finally, another purpose is to find customer data for a data subject request or similar privacy request.
There are two versions of eDiscovery available in Microsoft 365. The first is Core eDiscovery. This tool allows you to accomplish the basic requirements of the scenarios listed in the preceding text. You can put custodians on hold, which will prevent their information from being modified or deleted for the duration of the case until you release them from the hold. Next, you can collect case data by performing a search across all Microsoft 365 data. This search functionality is the same content search functionality that we discussed in Chapter 12. Finally, you can export that content in various ways into a different eDiscovery system either for review and analysis or some other purpose.
The second tool in Microsoft 365 is Advanced eDiscovery. Advanced eDiscovery builds on the capabilities available in Core eDiscovery, but adds more powerful tools around processing data, searching, running pre-case analysis and analytics, using machine learning to determine relevancy, and more. These tools reduce the cost and time needed to review the information in a case. If you have access to Advanced eDiscovery through your licensing, I recommend looking at that tool instead of Core eDiscovery. We cover Advanced eDiscovery in Chapter 14.
Licensing and Permissions
Office 365 E3
Office 365 E5
Microsoft 365 E3
Microsoft 365 E5
Exchange Online Archiving (for Exchange data only)
To use Core eDiscovery, you will need to be a member of either the eDiscovery Administrator or eDiscovery Manager compliance role group. eDiscovery managers can view and manage the Core eDiscovery cases they create or those that include them as a member. If another eDiscovery manager makes a case but does not add a second eDiscovery manager as a member of that case, the second eDiscovery manager will not be able to view or open the case from the Core eDiscovery page in the Compliance Center.
eDiscovery administrators can perform all case management tasks that an eDiscovery manager can do. Additionally, an eDiscovery administrator can view all the cases listed on the Core eDiscovery page, manage any case in the organization after they add themselves as a member of the case, and access and export case data for any case in the organization.
In general, you can add most people in your organization to the eDiscovery Manager role group. Because of the broad scope of access, an organization should have a limited number of eDiscovery administrators. I also recommend creating custom role groups if you have more than a few eDiscovery managers. For example, if you have different eDiscovery managers for the United States vs. Canada, create a custom role group for each geography. We covered how to create custom role groups in Chapter 1.
Create a Case
Core eDiscovery case list
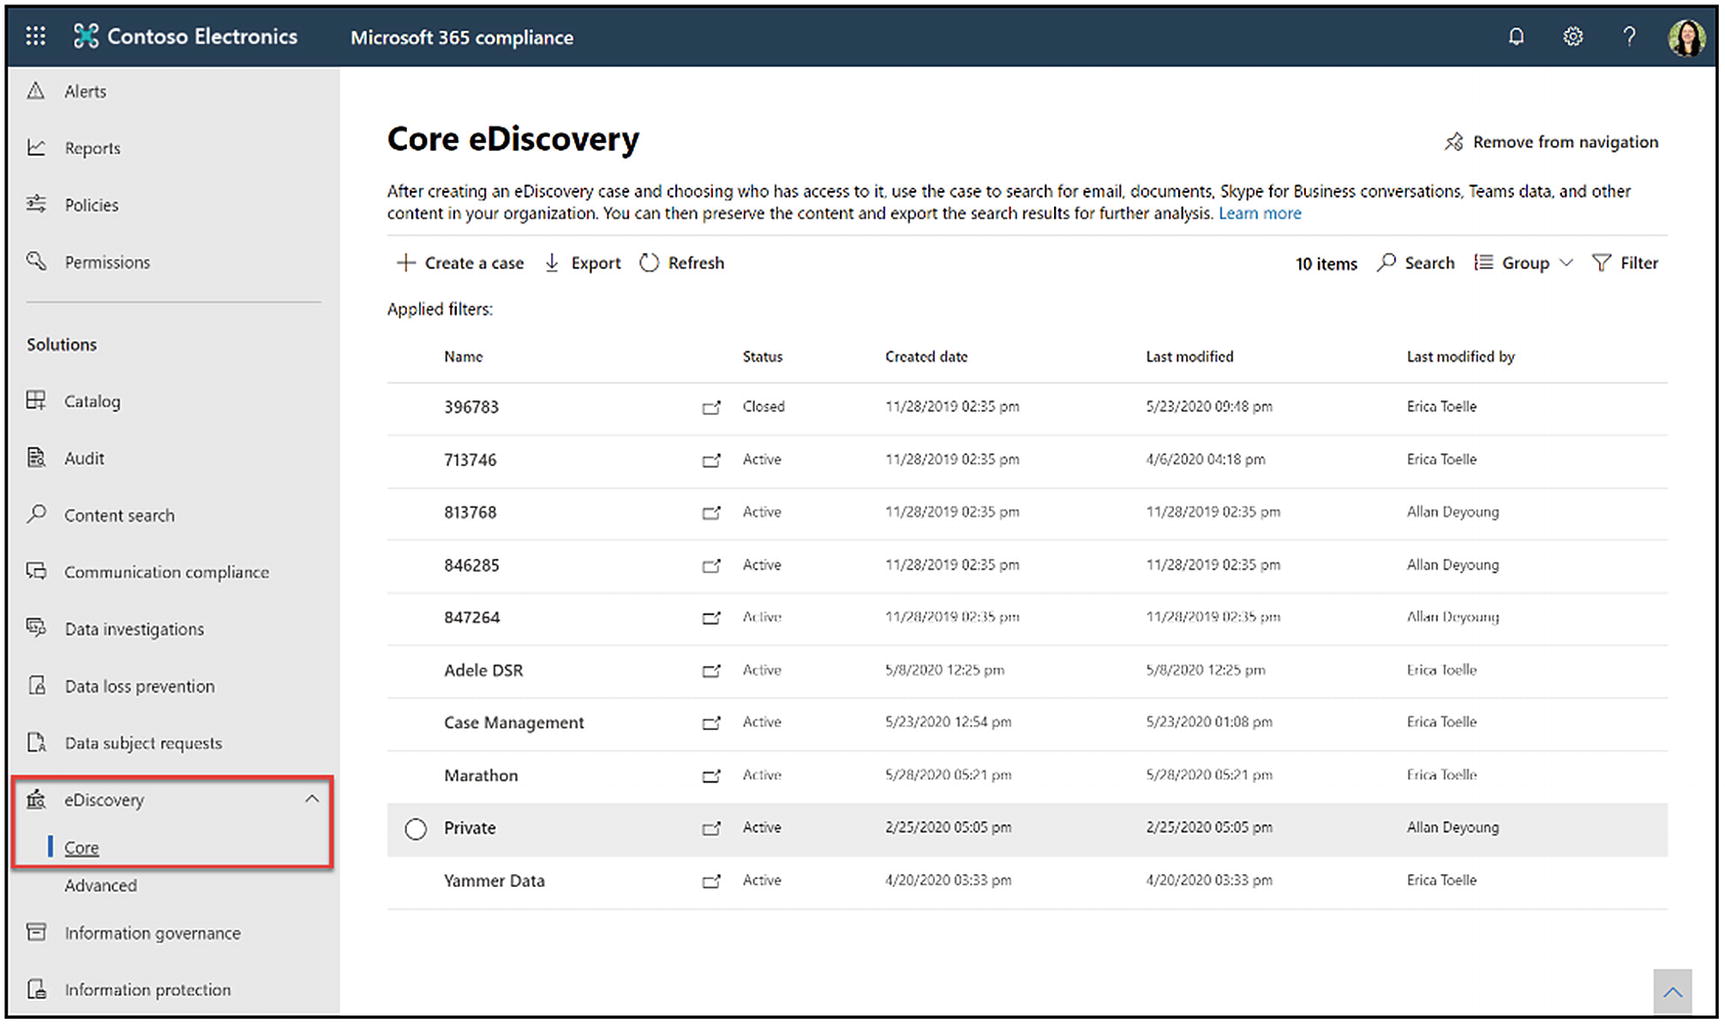
Here you can see a list of all of the cases in your organization; the status, whether they are active or closed; the case creation date; the date they were last modified; and then who last modified the cases. Remember that eDiscovery administrators will see all the organization’s cases, while eDiscovery managers will only see the cases where they are a member.
Manage this case screen
This click will bring you back to the list of all cases. To access the area to manage case settings, click the case name. Manage this case options will appear in a sidebar, shown in Figure 13-2. Here you can manage case members or manage role groups for the case. You can change the name or the description, and you can close or delete the case. Once you have made your changes, click Save.
Again, it brings you back to the list of all cases. To access the case details, click the Open case button, which looks like a square with the arrow to the case name’s right. The case will open in a new tab.
When you open a specific Core eDiscovery case, it will bring you to the Home tab. The Home tab displays some basic information about the case. This information includes the case name; the case creation date; the status, whether it is active or closed; and a description.
In the next section, we will investigate how to apply a legal hold on custodians and locations to ensure content related to the case cannot be deleted or modified.
Place Custodians and Locations on Hold
Now, let us look at legal holds. Holds allow you to preserve data related to the Core eDiscovery case. When you place data on hold, it cannot be modified or deleted. You might put data on hold to preserve it for a legal case or an internal investigation. Please do not use legal holds to retain information as a part of a normal business process. Instead, use retention labels and policies, which we cover in Chapter 8.
You can put custodian information on hold, such as an individual’s email mailbox, OneDrive, and Microsoft Teams chats. You can also put locations on hold, such as a SharePoint site, a group mailbox, or an entire Microsoft Team.
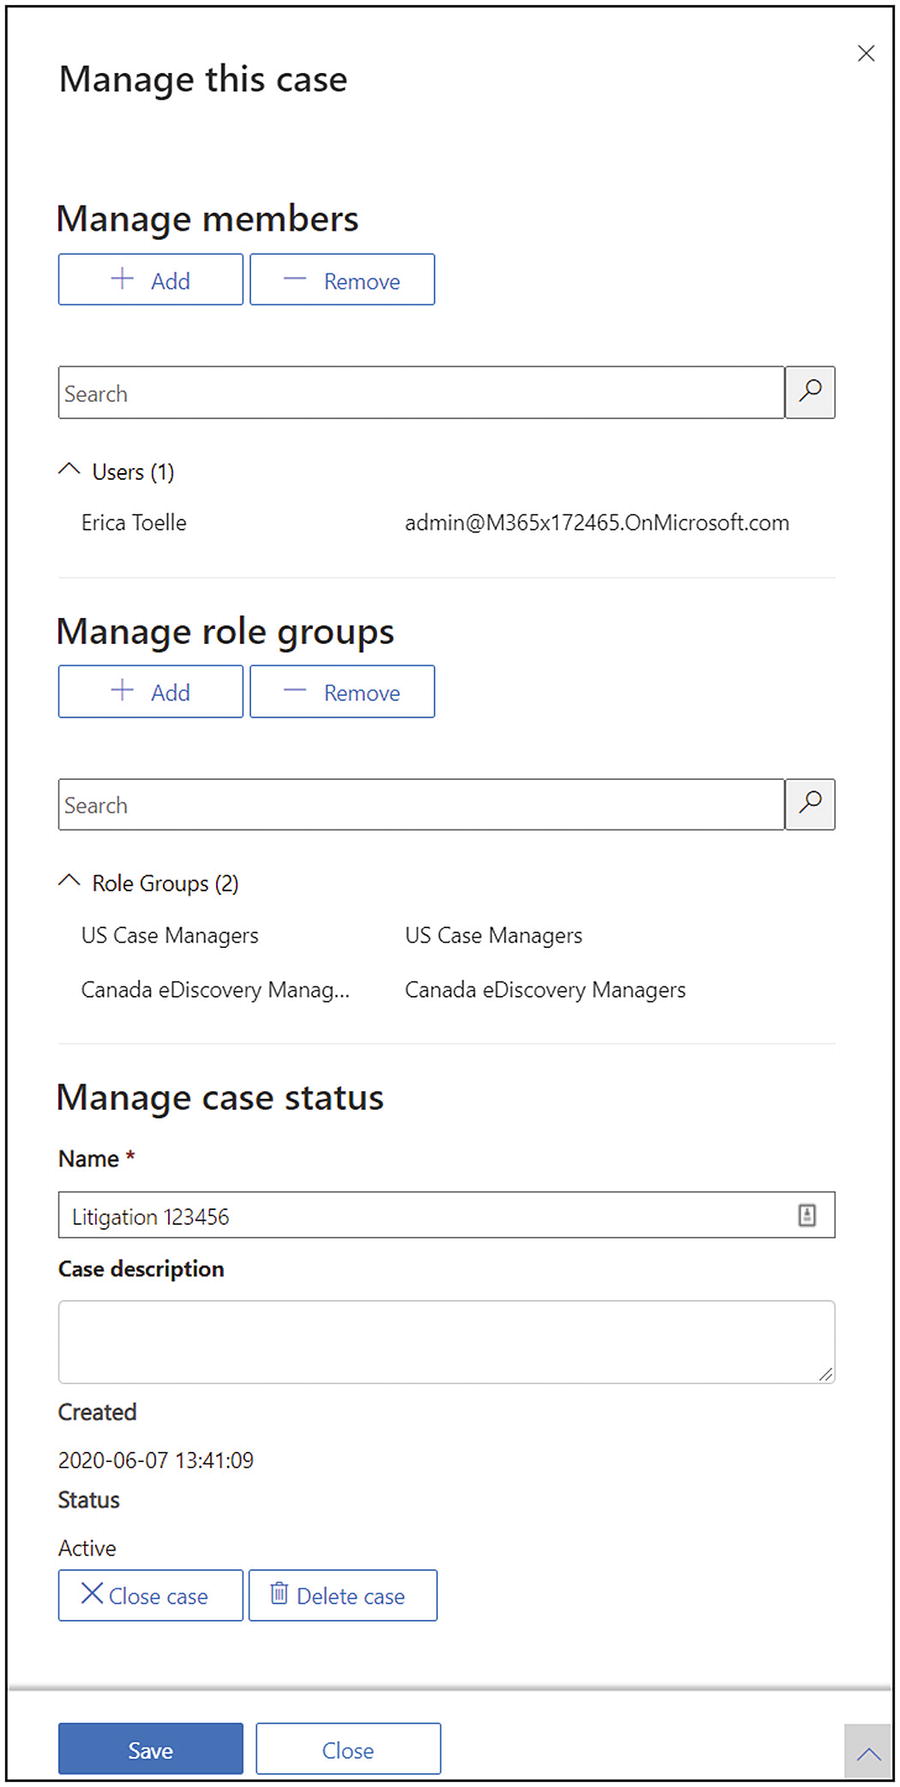
Choose locations for the hold
- 1.
Users, groups, or teams: This option is where you select Exchange email locations. Remember that Microsoft 365 stores a copy of Teams chats for compliance purposes in Exchange.
- 2.
Sites: This option is where you select SharePoint locations. Microsoft stores all files in Microsoft 365 in SharePoint. Remember that under the covers, OneDrive is a SharePoint site.
- 3.
Exchange public folders: You can only choose to put all Exchange public folders on hold.
First, let us choose a user, group, or team to add to the hold. To do this, we will click Choose users, groups, or teams. This click will open a dialogue box that says Exchange email. Click Choose users, groups, or teams again. Here you will need to type a minimum of three characters to get a mailbox list.
You can add people using a distribution list or a mail-enabled security group, and it will expand so that it creates an in-place hold for the mailboxes in the list or group. It will only include the mailboxes that are currently members of the list or group in the hold. Mailboxes added to or removed from the group or list later will not be added or removed to or from this hold.
Check the boxes next to the individual users, distribution lists, or Microsoft 365 group mailboxes that you want to include. Click Choose. You will see a list of all users, groups, or teams that you added on the next screen. Click Done.
Next, let’s add some SharePoint site locations. Click Choose sites. Click Choose sites again. On the screen that appears, you will enter the URL for the SharePoint site or OneDrive account that you would like to add, one by one. You will need to get this URL from some other source, such as browsing to the SharePoint site to copy the URL or by running a PowerShell script to generate this list. Enter the URL for one site, click the plus button, and repeat until you have added all the sites and OneDrive accounts. Click Choose and then Done.
You also have the option to put all Exchange public folders on hold. You cannot choose specific public folders to put on hold. You must put them all on hold or nothing. This situation is the same for Yammer networks. You can set your entire Yammer network on legal hold, but you cannot put individual Yammer groups on hold.
When users add new documents and emails to the hold locations, the system will put them on hold.
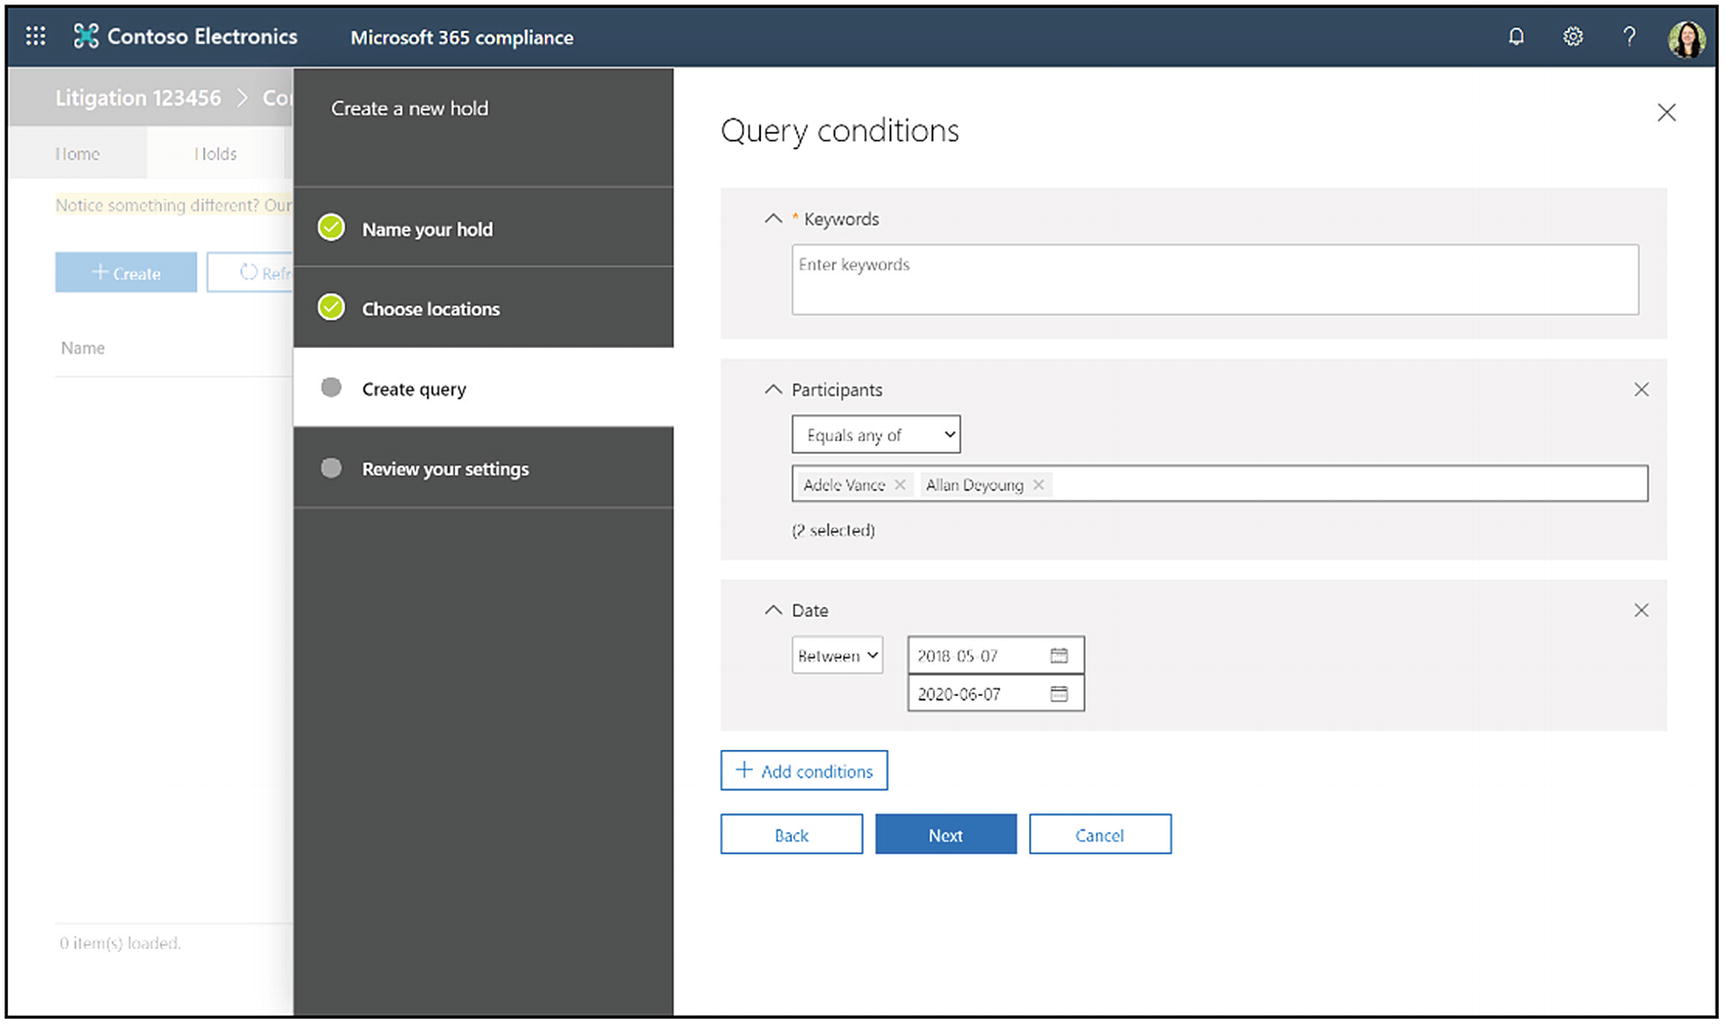
Query conditions for a hold
However, if you want to narrow the hold’s scope, you can do that by either entering keywords to search for or conditions. The conditions available are the same as the ones we went over in Chapter 12. Let us use this example as a reminder. We want only to find emails where the participants are Adele or Allen, which were sent or received between May of 2018 and June of 2020, shown in Figure 13-4. We accomplish this query by using the participants condition and selecting Adele and Allen. We would then add the date condition and set a date range of May 2018 to June 2020. Once you complete the query, click Next. Now review the hold settings and click Create this hold.
The hold description
How many mailboxes and sites are in the hold
Hold statistics, including the number of items and the volume of data, and when the statistics were last run
The date the hold was last modified
Who last modified the hold
Whether the hold is on or off
You could also edit or delete the hold from the details screen. When you finish with the information, click Close.
In the next section, we will search for content related to the case to export it for a relevancy review or other purposes.
Search for Case Content
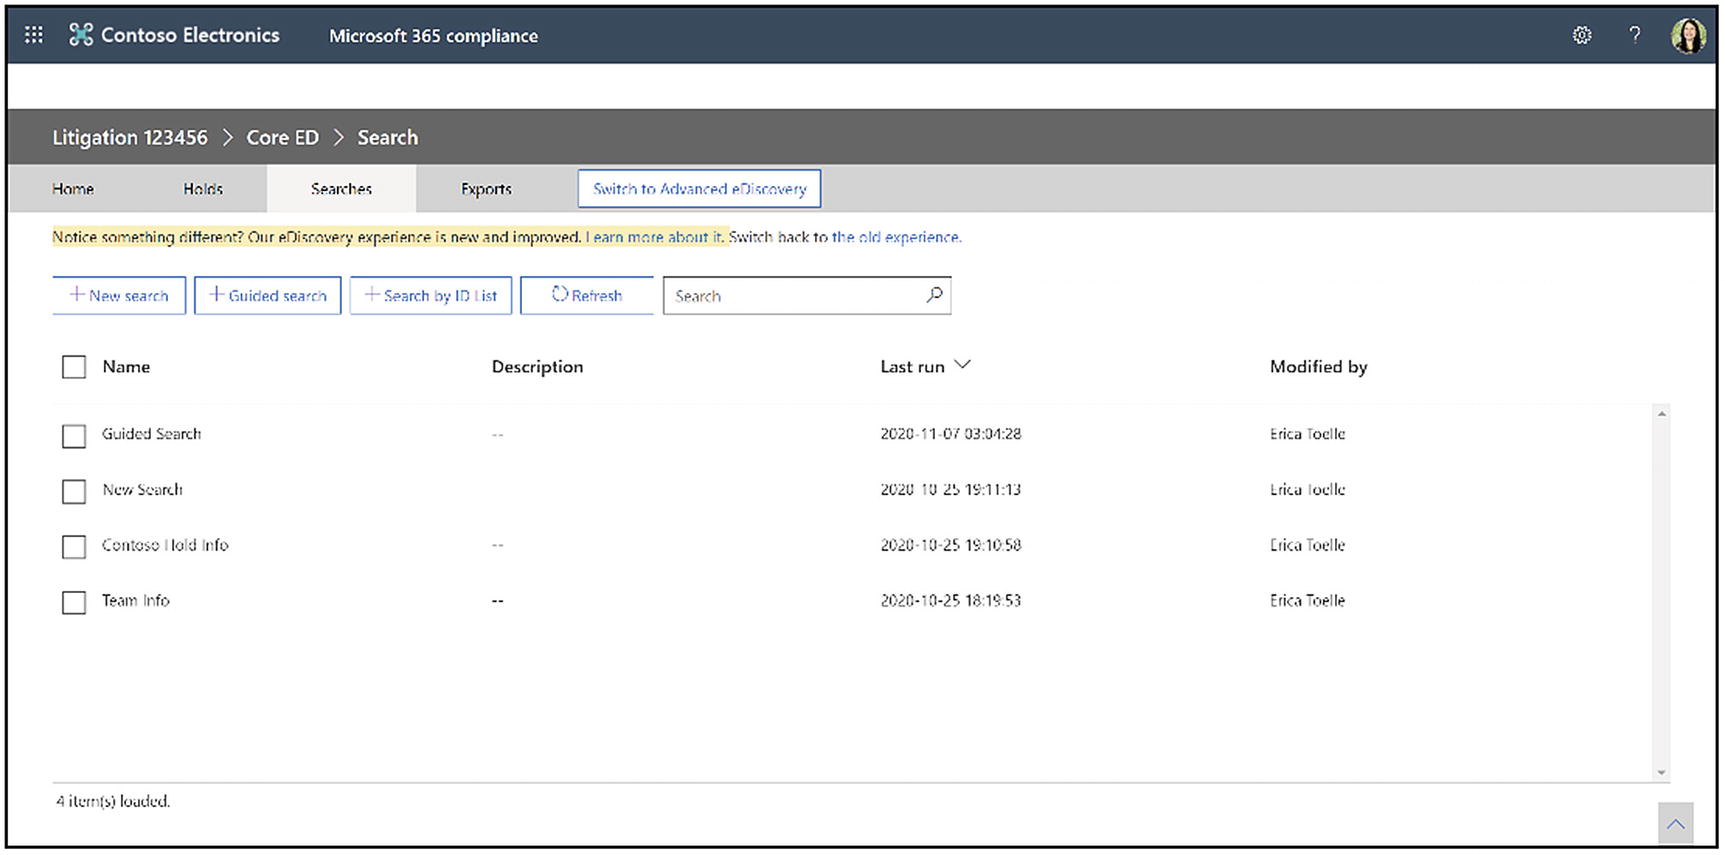
A list of searches in a Core eDiscovery case
To run a search, click the Searches tab in your eDiscovery case. This click brings you to a screen that shows you all the saved searches for the case, their descriptions, the date they were last run, and who last modified them, shown in Figure 13-5.
This search UI and features are the same as the content search solution. Please see Chapter 12 for an in-depth discussion on performing a search. I am only going to review the basics in this section quickly.
- 1.
New search
- 2.
Guided search
- 3.
Search by ID list
First, we will create a new search. To do that, click the New search button. This click will bring you to a screen where you can create a new search query. This functionality works exactly like the search queries that we just did in the previous section and queries in the content search solution. In this case, we can add keywords, a list of keywords, and our usual list of conditions.
All locations: Searches everything in our Microsoft 365 environment.
Only search locations we put on hold: Scopes the search to only locations on hold in our case.
Specific locations: Choose the locations to search.
For example, I often see people creating one search query for email mailboxes and a different, second search query for SharePoint and OneDrive files. This method is because you usually use other conditions and search queries for different types of data. Separating locations with different queries allows you to get more specific, making it easier to see how to refine your queries.
People will also often create a broader search than the hold locations. This decision is because they want to err on including too much information in the investigation. Including extra information reduces the risk of missing content in discovery.
Once you set up your query, click Save and Run. It will ask you to name your search query, and then the search will appear in the list on the Searches tab.

Use a keyword list in a Core eDiscovery guided search
Now we are going to create our search query for the guided search. Here we have the option to use a keyword list, shown in Figure 13-6. A keyword list allows you to enter one keyword or keyword phrase on each line. Core eDiscovery will build out the query where each line is an “OR” statement. The result of placing one keyword per line would be a query like keyword one OR keyword two OR keyword phrase three. In addition to adding keywords or a keyword list, you can add conditions as usual. When you complete the query, click Finish.
Lastly, we can use search by ID list. We covered this option in depth in Chapter 12, so we will not repeat the instructions here.
Delete selected searches
Edit locations
Edit conditions
Search statistics
Export results
Export report

Search details in Core eDiscovery
Now that we have reviewed all the options to create a new search, let us talk about the search results preview. From the list of searches, click the name of a search. A window appears that contains information about the search, shown in Figure 13-7. The status details give us an idea if our search results returned what we expected. You can see the search description and the date the search was last run. You can also view the name of the person who ran the search and the search query. Under Search statistics, you can see whether the search is complete or in progress, the number of items and volume of information, and the number of mailboxes, sites, and public folders in the search.
View results: Brings you to a page displaying the search results.
Delete: Delete the search.
Prepare for Advanced eDiscovery: This button does not do anything. It is a legacy feature that they should remove from the UI.
Export results: Create an export of all search results.
Export report: Create a summary report of the search results.

View search results in Core eDiscovery
New search: Choose from the three search options described in the preceding text.
Save or Save as: Allows you to save the current search or save any changes as a new search.
Open: Open a different saved search.
Prepare for Advanced eDiscovery: Ignore this option; it does not do anything.
More ➤ Export report: Create a summary report of the search results.
More ➤ Export results: Create an export of all search results.
Sort the results by date, document type, sender author, or subject title.
View individual results or search statistics. Individual results are the default view and show the individual files. Search statistics show you more detailed statistics about the search.
Let us discuss the item preview. Here you can browse through the items and see some of their metadata. You can click an item, a full fidelity document, and download the original item.
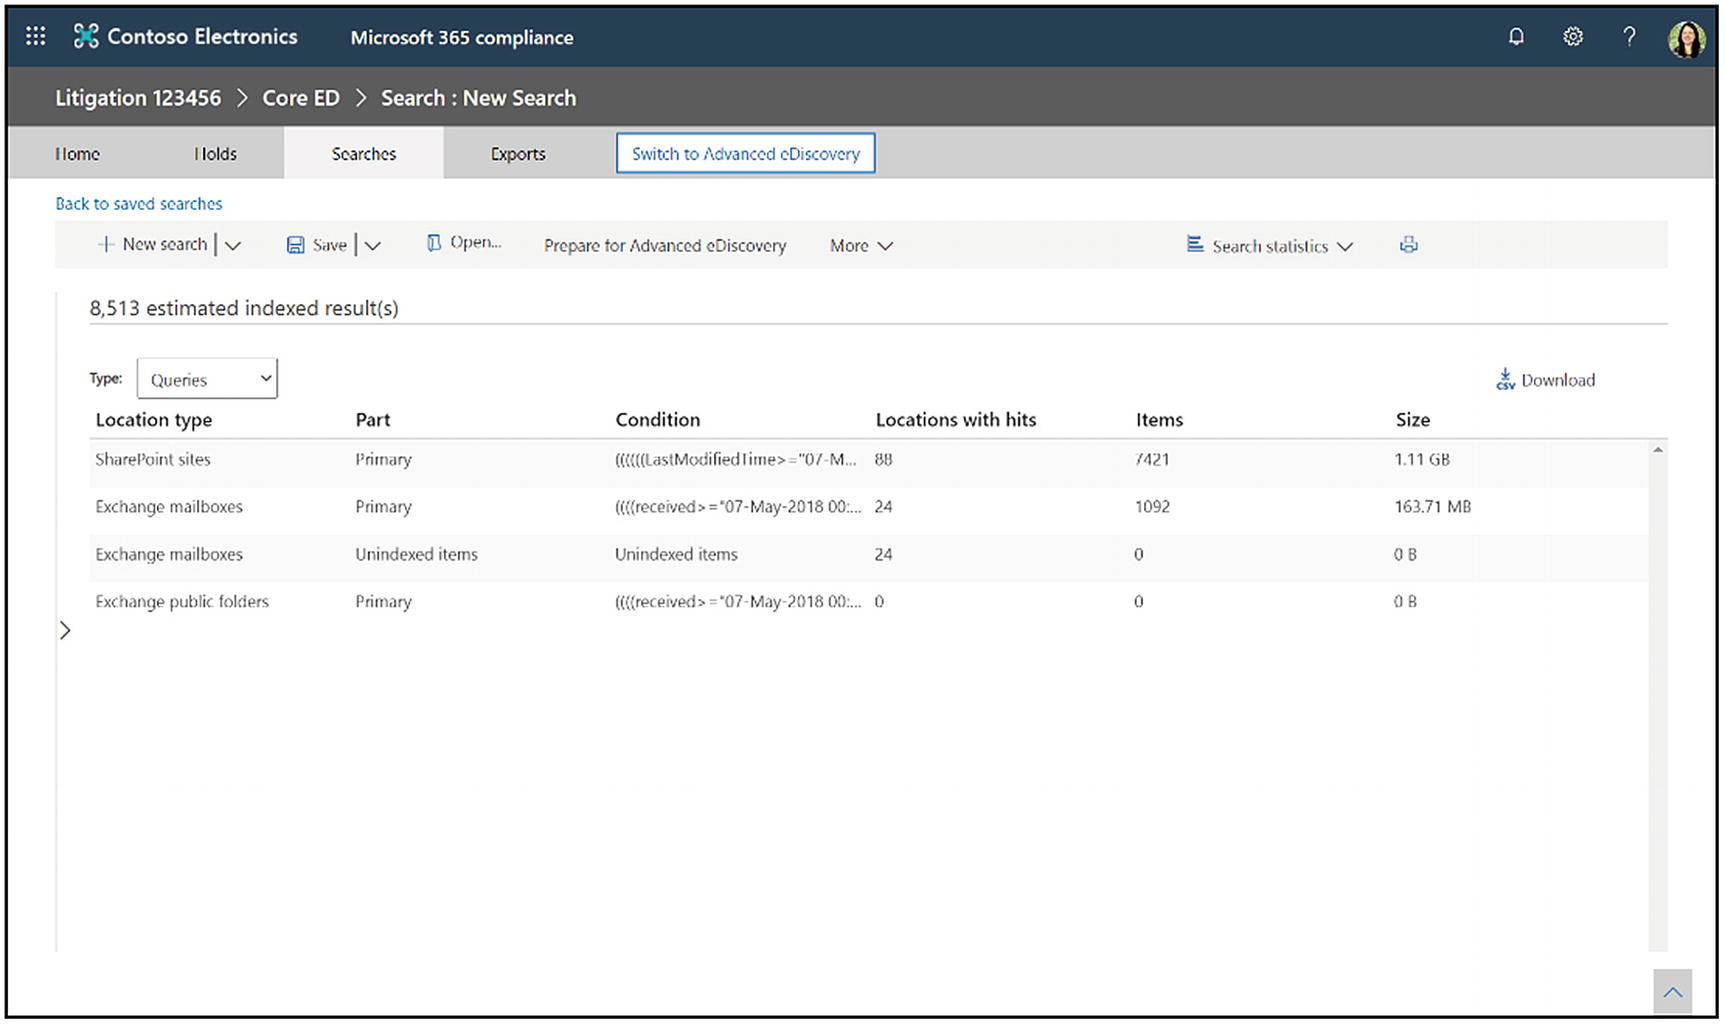
Search statistics for each query
By choosing the Type dropdown, you can also see the queries you used and the individual hits, items, and size for each query. This view, shown in Figure 13-9, is beneficial for refining your queries to get the search results that you want.
Finally, you can see the individual sites and mailboxes with the most items in the top locations. This view displays how many items are in each location and the total size or volume. You can also download any of these search statistics reports to a CSV file for further analysis.
Finally, when you are happy with your search results, click More. Here you have two export options. First, you can export a report of the results, which is a summary. Second, you can export all your results. We will cover both these options in the next section.
Export Core eDiscovery Data
Core eDiscovery allows you to get content out of Microsoft 365 through an export. These are two types of exports available in Core eDiscovery. First, you can export content from a single search. Second, you use one export for multiple searches in your case at the same time. You can export all the content or a summary report about the content for both export types.
Let us start by exporting content from a single search. Go to the Searches tab in your Core eDiscovery case. Click the case name. From the hold details screen, click Export report or Export results. Alternatively, go to the search results page and click More ➤ Export report or Export results.

Export a report in Core eDiscovery
- 1.
All items, excluding ones that have unrecognized format, are encrypted, or were not indexed for other reasons
- 2.
All items, including ones that have unrecognized format, are encrypted, or were not indexed for other reasons
- 3.
Only items that have an unrecognized format, are encrypted, or weren’t indexed for other reasons
As you can see, the main difference between these options is how we handle files with an unrecognized format, are encrypted, or were not indexed for other reasons. We cover these items in depth in Chapter 12, in the “Unindexed or Partially Indexed Items” section. As a reminder, the system could not index these items for some reason, so the system cannot read the file contents.
You will need to decide if you are concerned about unindexed items for your scenario. If you are unsure if they matter, I recommend choosing the preceding option #3 to get a list of the files and their metadata. You can then examine the list to see if the items are related to your case.
Our last option is to enable the de-duplication of Exchange content. This option will remove duplicate emails, such as when there are multiple people on an email thread. If you do not check this box, each participant in the thread will have a copy of every email in their mailbox. If you check it, the system will include only one copy of that email in the export.
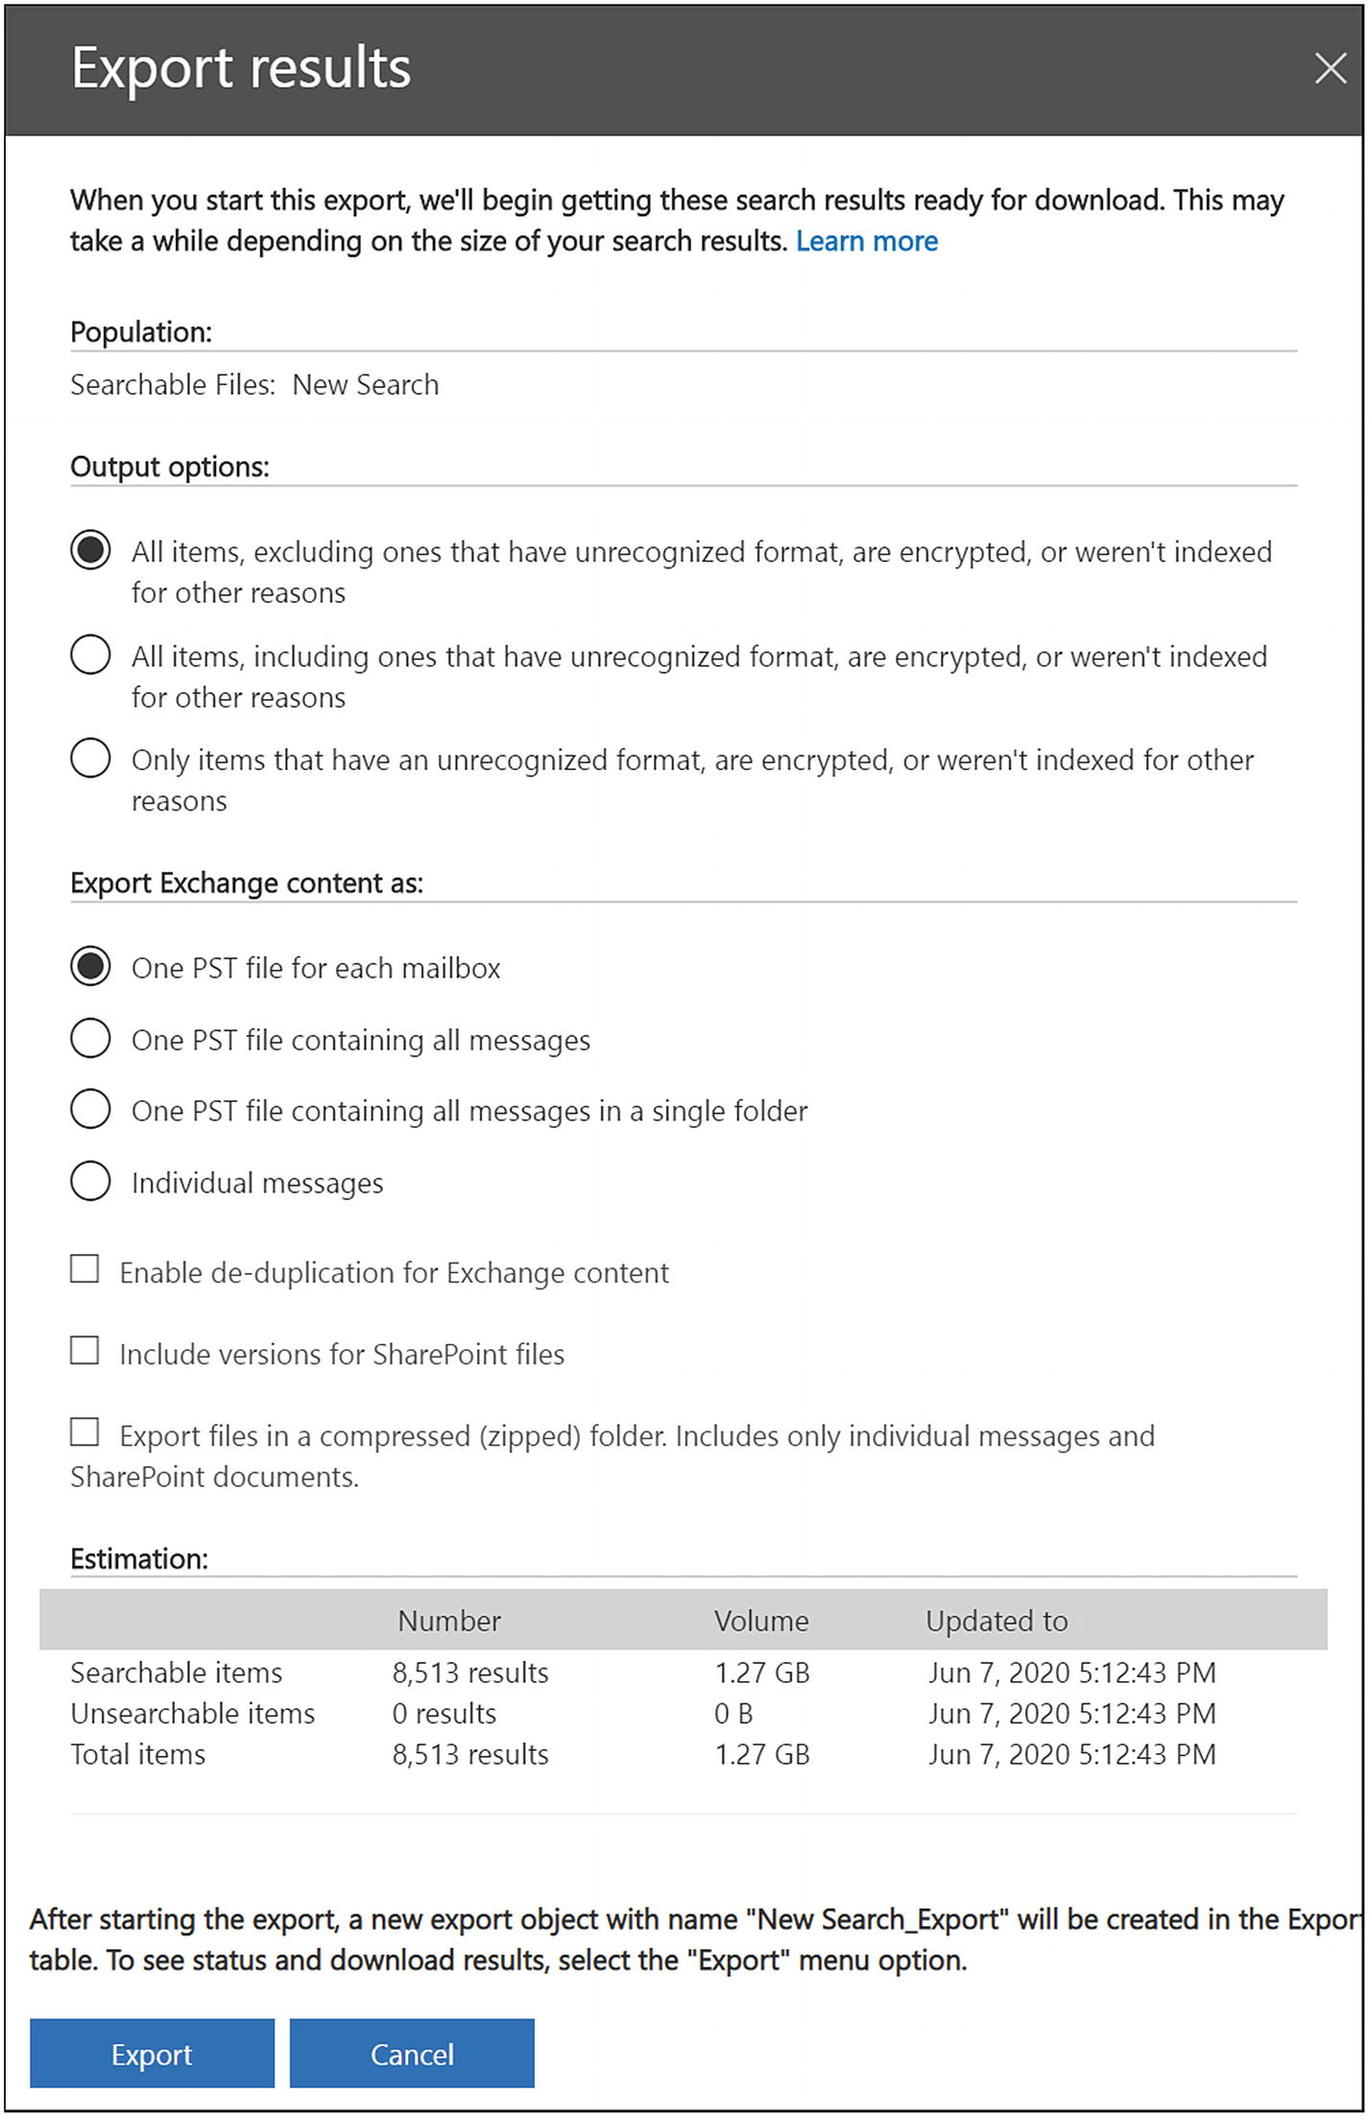
Export results options in Core eDiscovery
- 1.
One PST file for each mailbox
- 2.
One PST file containing all messages
- 3.
One PST file containing all messages in a single folder
Usually, this option will depend on how you will use the files after export, especially if you are going to import them into another system. They will usually be a format that you need to use to get the content into the other eDiscovery system successfully.
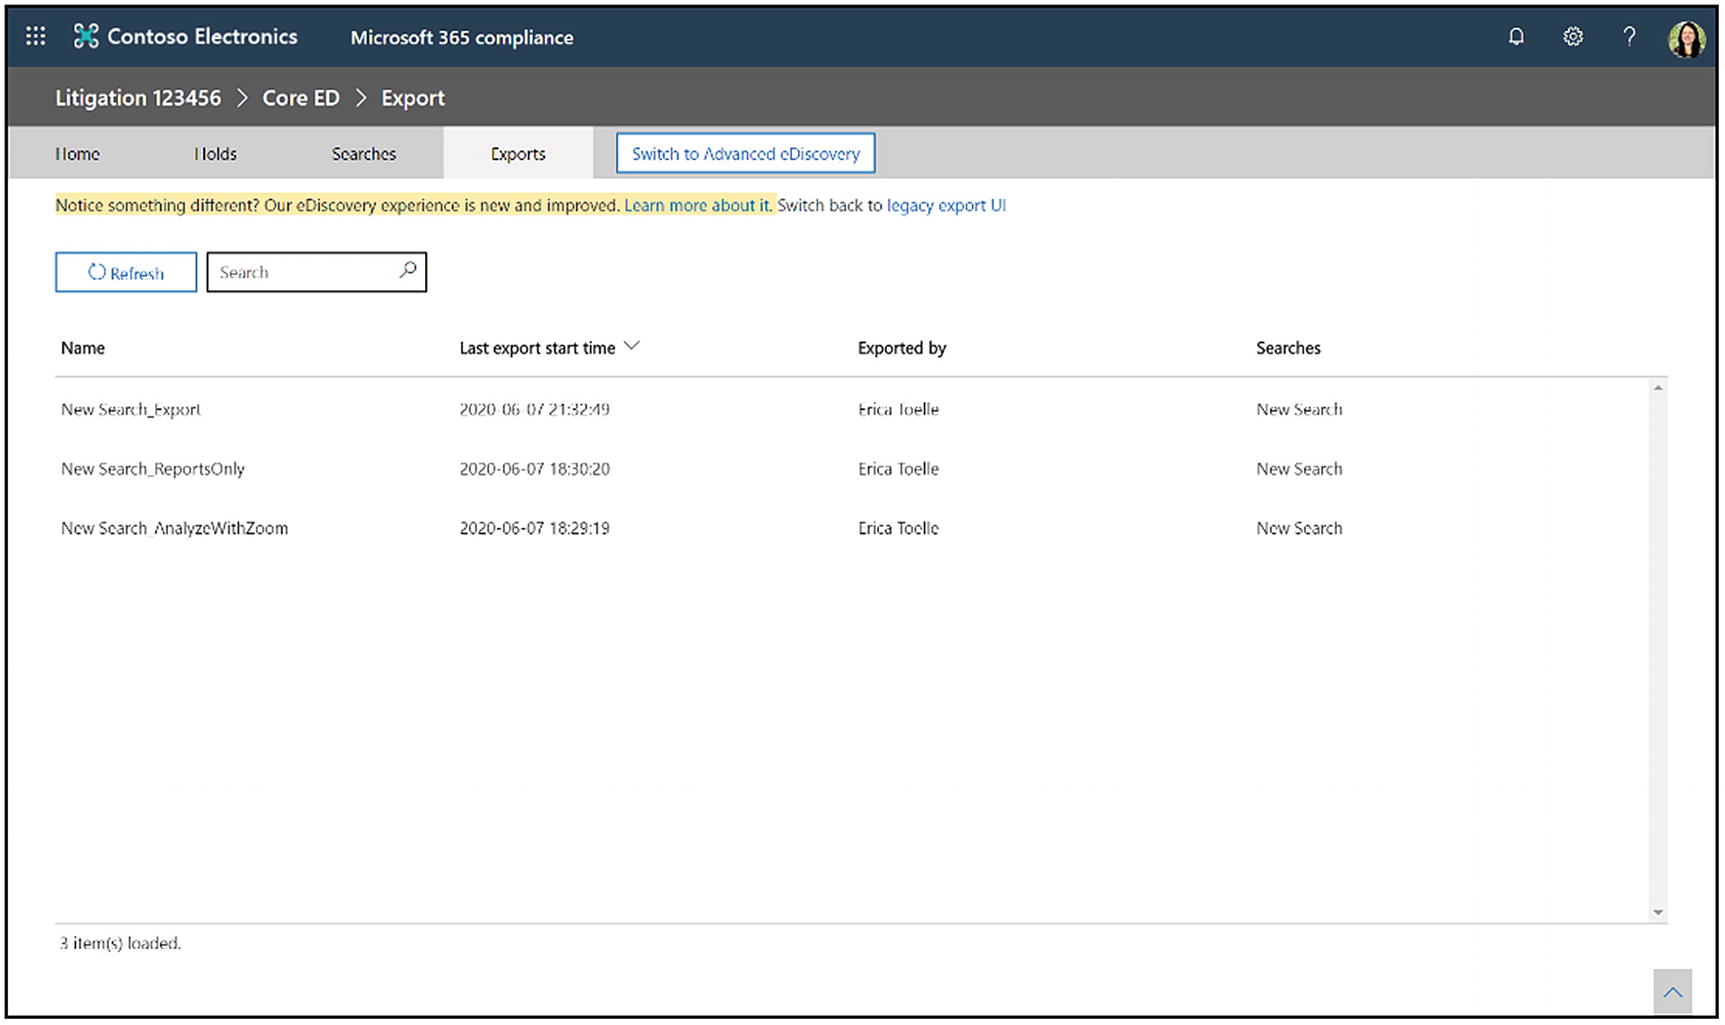
The list of exports in Core eDiscovery
You can view your list of exports in the Exports tab of your Core eDiscovery case, shown in Figure 13-12. These exports will work for 14 days, after which it will ask you to update the search and restart the export to make sure you have the latest information included.

Core eDiscovery export download settings
If you haven’t already, the system will prompt you to install the Microsoft Office Client Discovery Unified export tool. Follow the prompts to install the tool. If you run into any errors, pay attention to the error information, which usually has to do with your browser settings. A window will pop up asking you to enter your export key and designate where to download the files, shown in Figure 13-13. Paste the export key that we copied in the previous step and choose a place to store the download. If you click Advanced options, you can choose to rename the folder for your PST files. Click Start to begin the export.
The location for the download needs to be on your local machine. You can’t save your export to a network share, for example.
The export tool opens a window that shows you the status of your export. This status includes how many items are in the export and how many items remain. It also has an estimate of the time remaining and the speed. Let the process run until it’s complete. Once the export completes, open the export folder to view the files. The next section reviews the contents of this folder.
Export Results
The export summary
A manifest
The results
A trace file
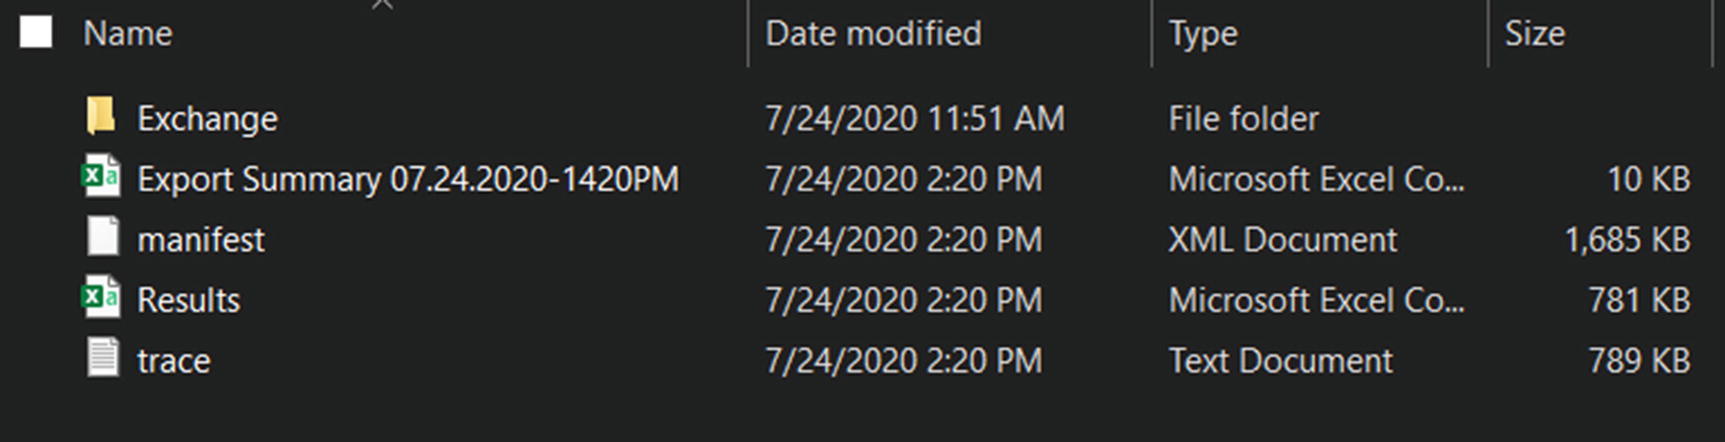
The file and folder structure of a results export
First is the export summary. This summary will show you essential information about your export, including the number of locations, estimated items from the locations and size, folders, list items, and then a manifest of every place included in the export, the number of items, the size, and so on. This report can be useful if you want to get more detailed statistics about your export before spending the time to download all the individual items.
Next, we have the manifest. The manifest is an XML representation of your data, and you can use it to import files into another eDiscovery system.
Then, we have a results spreadsheet. It contains information about each item, including the item’s unique identifier, whether it is a duplicate, and all the file’s metadata about the item. This inventory can help you double-check your export and make sure it contains what you would like.
Finally, we have the trace file. This file is a log for your export. If you get any errors or anything unusual, you can look here in the trace file to figure out what is going on and solve it.
Next , if you export the results, you will have a folder for Exchange and another for SharePoint. If you click into the Exchange folder, you will see a list of your files. These may be structured as one PST for each mailbox, one PST file for all emails, or all PST files in one folder, depending on your export settings.
If you look at the SharePoint folder, it will have one subfolder for each site and additional site subfolders for each library.
This chapter discussed why you would want to use the Core eDiscovery functionality instead of other discover and respond tools in the Compliance Center. Then we talked about creating a new case, putting items and locations on legal hold, searching for information to add it to a case, and then exporting the results of those searches.
In the next chapter, we will dive into Advanced eDiscovery, which has many useful tools for reviewing your search results to cull the data. You are only exporting data relevant to your case, and you have additional tools to add locations more efficiently, such as viewing a list of teams where the custodian is a member. We can also use machine learning to search for themes in our case, as a part of early case analysis or to develop a relevancy model.