In this chapter, we will be going over everything to do with finishing the integration. We are not adding any new sensors to the Pi or any drastic functionality. What we are adding is the ability to interact with these components as a unit. This chapter becomes very important, because without it, we have many random one-off applications. This will tie all these pieces into a more cohesive unit.
What pieces are we talking about? The core pieces of the Pi, the temperature sensor, and the video camera which also can double as a motion sensor. We are going to tie functionality between the Pi, the cloud, and an iPhone. This will be accomplished in three ways:
1.
Uploading saved videos to the cloud; we need to upload the videos to the cloud in a way that can withstand loss of backend connectivity.
2.
Calling commands from the cloud. For recording, we want to be able to control from the backend our ability to start and stop recordings.
3.
Integrating our device with HomeKit to monitor the temperature and to act as a motion sensor.
First is saving recordings; if you recall in Chapter 3, we wrote code for our cloud backend that is used to accept video and image data, analyze the metadata, and save the file. In the last chapter, we set up the code to write to the Pi’s hardware itself; it’s time we send that data to the cloud to be stored in our upload_svc backend.
Next in Chapter 4, we had the MQ on the backend send recording commands to the mqtt_service. To tell the system when to stop recording, start recording, since by default, we are recording always. However, there are times you may not want to have your cameras record. There are many reasons from privacy to space. In addition, we will create the ability to have resilient solutions for sending to the cloud to handle cloud downtimes or no Internet services on the Pi.
And finally, one last tie in; we are going to integrate the application with Homekit. We will allow the device to communicate back the temperature as well as use the face recognition as motion sensor to inform the Homekit user when there is motion.
This will all be done by some code and techniques you’ve seen before and by some new frameworks and techniques. Let’s begin.
Uploading Video
We have the video stored on the Pi and ready for upload; all we need to do is upload it now, which in itself is a relatively simple task as long as the videos are small enough, but there are other factors we have to worry about. For the most part, IoT applications can communicate like most other backend applications would. However, one of the biggest issues is the resilience of the Internet connectivity. While two backend servers (at least network wise) have very high uptime availability, the service-level agreement (SLA) for a home network is nowhere near the same. In addition, you are also dealing with home hardware for the modems and routers. And finally, you can have power outages which disrupt connections. Bottom line, we don’t want to lose video uploads.
The way we are going to solve this is the same way many IoT devices solve the issue of wanting to send data over but have intermittent networks. This is very often the case for vehicles that send driver and other data back to servers, since vehicles often move into areas of no connectivity like garages or tunnels. And that is to use SQLite database.
Be aware there are other issues that in a bigger book we could tackle like the size of the video. You could send each file in asynchronous chunks and then put them back together again on the upload_svc. Also there are other ways to solve this without using SQLite; however, SQLite is a commonly used database on micro hardware, and I wanted to make sure we at least discussed its use in the book.
SQLite
SQLite was originally designed to work as a database with damage control systems aboard missile destroyer. It is a RDBS/ACID-compliant database system written in C that it is designed to be used by embedded system, as opposed to your standard client-server that most database you are used to. This means it’s designed to be accessed by applications on the same system as the database as opposed to remote applications. SQLite has been in use since 2000, and while it does perform quite a bit of the same functions of a database, the database does not guarantee domain integrity. In addition, there is no user/password access since it’s not designed to be accessed remotely; instead, access is based on file system permissions.
The SQLite system implements most of the standard SQL-92 features; the big difference comes in assigning and adding column values. It is not strongly typed; therefore, you can insert integers into strings and strings into integers. This of course can cause unexpected behavior if you do it incorrectly. So take care when you are designing your application; luckily, our needs are relatively basic.
We are going to use it to store all videos and images that we have created and are ready for upload, in addition, an indicator flag on whether the video has been uploaded or not. The SQLite database will have many of the same SQL calls that you are used to; of course, for our needs it’s very basic of one table that is easily updatable and insertable.
Another use case that is often used in conjunction with the SQL databases is in use with the message queues, so that whenever a message fails to send for whatever reason, it gets stored in the SQLite database for sending later.
After it’s inserted, we will run a background job to upload it to our servers at a set interval. If this fails, we can then try again later. The retry count will be stored in that database, and we can add code later to notify the user for quick uploading. This will make the video availability not in real time, but that is OK for our needs.
Design
With SQLite, we will create our database on initialization of the application. This will store all the necessary information as well as a bit of metadata about the entry. We are going to create two modules to handle the uploading: a db module that will handle all the querying of data and updating on failures and then the send module that will upload the file to the server. In order to code this, we are going to make use of SQLite crates as well as crates for uploading the file to the server. In Listing 11-1, we have the four crates needed.
# Database Items
rusqlite = "0.21.0"
# this version is needed to work for rusqlite
time = "0.1.38"
# Used for sending the file to our server
reqwest = { version = "0.10.4", features = ["blocking"] }
## Needed for linux bindings
openssl-sys = "0.9.54"
Listing 11-1
Defining the SQLite and reqwest crates, in Cargo.toml file
The final crate, openssl-sys, is needed in order to create secure connections to the upload application. In addition, we will need to install SQLite and OpenSSL to our docker container in order to cross compile the application. In Listing 11-2, we have the additional apt-get needed for the application.
RUN apt-get install -y libsqlite3-dev:armhf
# Install Open SSL needed for communication back to the UploadService
RUN apt-get install -y libssl-dev:armhf
Listing 11-2
Defining the SQLite and OpenSSL, in Dockerfile
This will give us the necessary libraries to create the application interfaces needed.
To run this on the Pi, you will need to install SQLite on there; you can do that with sudo apt-get install -y sqlite3 command. In addition, in our db.rs file, we have defined a constant location of /var/database for our database.
We won’t be creating a complex database system for keeping record of our videos; instead, we will have one table that will store the metadata for our recordings. In Table 11-1, I’ve listed out the fields that we will have in the database table.
Table 11-1
Database fields for our video entries
Name
Description
file_name
The name of the file that was stored by the video recorder.
uploaded
Saved as an integer, but a boolean value of whether it’s updated.
retry_count
The amount of times we’ve attempted to upload the video.
upload_time
The time of successful upload.
recording_start
Passed by the video module of the time the video recording started.
recording_end
Passed by the video module of the time when the video recording ended.
Creating the Interactions with the Database
Let’s start by creating the code to initialize the database. In Listing 11-3, this code will create the initialization for the database, and we will also set up the struct to match the database out.
use rusqlite::{params, Connection, OpenFlags, Result, MappedRows};
use time::Timespec;
use chrono::{DateTime,Utc};
use crate::errors::{DbResult, MyResult};
use log::{warn, error, info};
#[derive(Debug)]
pub(super) struct VideoEntry {
file_name: String,
uploaded: bool,
retry_count: i32,
upload_time: Option<Timespec>,
recording_start: Timespec,
recording_end: Timespec,
}
const PATH : &str = "rust-iot.db";
pub(super) fn initialize() -> bool {
let conn = create_conn(OpenFlags::SQLITE_OPEN_READ_WRITE | OpenFlags::SQLITE_OPEN_CREATE).unwrap();
Creating the struct and initializing the database, in src/camera/db.rs
We will run this each time the application is restarted and should be resilient to failures. While it returns true/false, we will not do anything with the result. Next, let’s go on a few application pieces that we will need to be able to make the app work. There are really a few functions we need to code for:
Adding an entry to the database; this is called from the video module.
Uploading the video file.
Marking an entry when successfully uploaded.
Incrementing a counter when not successfully uploaded.
Adding Entry to the Database
The first step is to add entries to the database; whenever we run the writer.release() on the video module, we want to record an entry to the database to have the application upload. In Listing 11-4, we code the database addition in the video module.
writer.release()?;
db::add(&file_name, *start_time, Utc::now());
Listing 11-4
Add a video entry to the database when a file descriptor is released, in src/camera/video.rs
Now let’s code the method in Listing 11-5. The method will insert into video_entry a reference to the file and defaulting upload to false and retry count to zero.
let conn = create_conn(OpenFlags::SQLITE_OPEN_READ_WRITE).unwrap();
let start_ts = Timespec {
sec: start.timestamp_millis(),
nsec: start.timestamp_subsec_nanos() as i32,
};
let end_ts = Timespec {
sec: end.timestamp_millis(),
nsec: end.timestamp_subsec_nanos() as i32,
};
let result = conn.execute(
"INSERT INTO video_entry (file_name, recording_start, recording_end, uploaded, retry_count)
VALUES (?1, ?2, ?3, 0, 0)",
params![name, start_ts, end_ts],
);
match result {
Ok(_) => {
info!("Added {:?} to database", name);
},
Err(e) => {
error!("Error Trying to insert into database :: {:?}", e);
}
}
}
Listing 11-5
Add the video entry to the database, in src/camera/db.rs
Uploading the Video File
Now that we have entries in the database, we will have to upload the files. We will write code to upload the files on an hourly basis. On each hour, it will try to upload all the files in the database, which includes files that failed previously. Once uploaded, the files will then be available in the cloud.
In case of continuous failures or extremely slow uploads, there could be an issue where the file system runs out of space, or those uploads due to slowness are trying two at the same time. I have no program for these edge cases but should be thought of.
Let’s start with the code for the hourly upload; the code in Listing 11-6 will be called from the main::run and will spawn a thread that hourly will call a function that sends non-uploaded files to the server.
use tokio::time::{Duration, interval_at, Instant};
db::initialize();
tokio::spawn(async move {
// every other minute duration
let mut interval = interval_at(Instant::now(), Duration::from_secs(BI_MINUTE));
loop {
interval.tick().await;
info!("Upload to the Server");
let entries = db::retrieve_entries(device_id.as_str(), url.as_str(), VIDEO_DIR);
info!("Received entries : {:?}", entries);
match db::send_to_server(entries.unwrap(), device_id.as_str(), url.as_str(), VIDEO_DIR).await {
Ok(_) => {},
Err(e) => {
error!("Error Sending to the Server {:?}", e);
}
}
}
});
}
Listing 11-6
Code to upload hourly to the server, in src/camera/mod.rs
You will notice why there is an interval delay; we start the timer now; that is because we do not need it to upload on the hour, just want to space out the file upload. This function calls send_to_server which is the main workhorse for the application; this will query the database for entries and attempt to upload them. In Listing 11-7, we have the code to query all the non-uploaded files and attempt to upload them to the backend server.
Code to send to the server, resetting the entries when not uploaded, in src/camera/db.rs
① Selects from the database all the file metadata that has not been uploaded.
② Reads the data from the database and stores into a Result<MappedRows> of VideoEntry structs.
③ Calls the method to send the entry to the upload_svc for storage.
④ Called on successful upload will mark in the database this entry is uploaded.
⑤ Removes the underlying video file from the Pi to conserve space.
⑥ If the file is not uploaded successfully, it will increment our counter in the database. This occurs if the server status was anything but 200.
⑦ This will also increment, but this will be triggered if there are any other errors unassociated with the status returned by upload_svc.
Currently, the counter just keeps getting incremented on failures with nothing happening. If you were going to implement this, you may want to break the file up or simply send an error to the server so the user is aware that a video file exists on the Pi but is having upload issues. Without manual intervention, you will only have a few options.
Sending to the Server
Sending the file to the servers uses the same reqwest crate that we used in Chapter 3 to receive the uploaded file. The reqwest crate does have the ability to do asynchronous processing, but for the multipart crate, we are going to run it synchronously. The crate will upload with the device_id as a URL parameter and the file sent. The device_id is used to store into the database the correct file referencing the correct device so that we later will be able to tie the right video to the right device from the backend databases. In Listing 11-8, we have the send_to_backend.
Implementation of send_to_backend to send the file to the backend, in src/camera/send.rs
① The path on the server to upload; it’s the URI we referenced in Chapter 3.
② Start of our multipart form request.
③ Attaching the absolute file to the multiple part form.
④ Creating the URL with the format of api/url/<device_id>.
⑤ Sending the multipart form synchronously.
⑥ Returning true on a successful status.
On bullet 6, you saw that we return true or false depending on whether the file is successfully uploaded. Whether it was successful or not depends on the next course of action.
Marking Entry Successfully Uploaded
If a video is successfully uploaded, we will mark it uploaded in the database, so it doesn’t get uploaded again, and we will delete the file. In Listing 11-9, we mark the file as uploaded.
fn mark_uploaded(name: String) -> bool {
let conn = create_conn(OpenFlags::SQLITE_OPEN_READ_WRITE).unwrap();
let size_result = conn.execute(
"UPDATE video_entry
Set uploaded = 1
Where name = ?1",
params![name]
);
// Determine the result
match size_result {
Ok(size) => {
if size > 0 {
info!("Marked {:?} as uploaded", name);
true
}
else {
false
}
},
Err(_) => {
false
}
}
}
Listing 11-9
Marks the file as uploaded, in src/camera/db.rs
In there, we just set the uploaded to 1 to mark that it has been uploaded.
Marking Entry when Not Successful
For entries that aren’t successful, in Listing 11-10, we increment the current retry_count by one.
let conn = create_conn(OpenFlags::SQLITE_OPEN_READ_WRITE).unwrap();
let size_result = conn.execute(
"UPDATE video_entry
Set uploaded = 0,
retry_count = ?1
Where name = ?2",
params![current_count + 1, name]
);
// Determine the result, of course not much one can do with it
match size_result {
Ok(size) => {
if size > 0 {
true
}
else {
false
}
},
Err(_) => {
false
}
}
}
Listing 11-10
Increments upload attempt, in src/camera/db.rs
While we are not doing anything with the code, you can add extra logic later based on the retry_count; this could be dividing the file into smaller chunks or to even give up trying to upload file and notify the user. The options are up to the reader.
Sending Commands
One of the keys of any IoT application is to push commands from the server via a UI or mobile to the device. There are a few ways this can be accomplished. Depending on the proximity of the device to the mobile, they may use Bluetooth or Wi-Fi; this allows a speedier uptake. However, many devices, since they are designed to work when you are on the network and outside the network, have to go through a backend that then routes the communication to the device. We have already set up the infrastructure in previous chapters on both the backend and the Pi to use the MQTT.
In Chapter 4, we went over how to publish to a recording topic; that topic pushed to the message queue a command to tell a device whether to start or stop the recording. In addition, if you recall, the MQ application on our Pi is a separate application from our master application which communicates with the camera. In addition to connecting our MQ to retrieve the commands from the MQ, we will need to set up communication between the applications; we will be using inter-process communication (IPC) to perform it. In Figure 11-1, I have diagramed the interaction between all these parts.
Figure 11-1
Diagram of the interaction of our application
IPC
Our applications on the Pi each have their own processes, and often we need to share data between the two. There are a number of ways of how to do this in an operating system; IPC is the way we are going to implement those communications for this book. Inter-process communication is a technique by operating systems to allow communication of shared data between processes. With IPC, each application is either a client or a server, and you can send as many or as little communication over each of those channels. In general with IPCs, you can have multiple clients and one server, although in the crate we are using, this is limited to the server accepting only one client at a time.
One of the features of IPC is that the applications can communicate asynchronously if they choose to, allowing you to not have the communication active at the time. Your operating system depends on how the IPC channel will communicate; in addition, this also depends on your IPC implementation. IPC can talk over sockets, file descriptors, message queues, shared memory, memory-mapped files, or more. The precise implementation may affect performance but won’t affect the underlying concept.
Packet IPC
The crate we are using for our implementation is packet-ipc (https://github.com/dbcfd/packet-ipc). Packet IPC wraps crossbean-channel and ipc-channel to create easy-to-use code code to create our IPC channel. The use of both of these underlying crates was my driving force into using packet IPC. The ipc-channel is a Rust native implementation of communicating sequential processes; it is a multi-process drop in replacement for Rust channels. This uses file descriptors for Unix and Mach ports for Mac as its underlying implementation of the channels. (Note: There is no Windows support right now.) Using this wrapper will make our application a bit easier to write.
Application
Let’s dive into writing the code for this section. I have divided it up into essentially four areas:
Receiving – Recording commands from the MQ
MQ app – Setting up IPC server
Main app – Setting up IPC client
Communicating IPC client with camera module
Once all of these four are wired up, we will be able to control the cameras recording from the backend servers. In order to use the IPC channel, we will add the crate definition in both our applications. In Listing 11-11, we have the import defined.
packet-ipc = "0.9.0"
Listing 11-11
Defining the crate to use, in Cargo.toml file
Subscribing to the Message Queue
Much of the code we wrote to subscribe to publish on the MQ is the same set of code we wrote for our microservices. The code that is the same we won’t duplicate here, but the newer code we will write. We’ve added the publishing code when we wrote the heartbeat, but not the subscribing code. For the monitor_notifications and subscribe function we wrote in Chapter 4, we can cut and paste them into our necessary modules.
What’s left is to create a recording module that subscribes to the topic and allows us to retrieve the recording and then send it to the IPC server. In Listing 11-12, we will copy and paste to reuse the struct we decomposed from.
#[derive(Serialize, Deserialize, Debug)]
pub enum RecordingType {
Start,
Stop
}
#[derive(Serialize, Deserialize, Debug)]
struct Recording {
uuid: Uuid,
rtype: RecordingType
}
Listing 11-12
Defining the struct for our Recording, in src/actions/recording.rs file
In here, we will have a recording type, which tells the device whether to start or stop the application. In Listing 11-13, we will subscribe to the topic recording/<uuid>; the UUID is the device id. This is the differentiator that allows the device to ONLY receive communication for that particular device and not every device there is. The JSON is brought back decoded, and the Start/Stop recording type is sent to the IPC.
While we are not going to do it here, in a real application, you should apply quite a bit more authentication at the cert level that makes sure that ONLY that cert can access that device id. This is because you don’t want a user to pop the Pi and then use the certs to subscribe to every recording command there is. That could be quite the privacy issue.
let (mut mqtt_client, notifications) = create_client(&config, MOD_NAME).unwrap(); ①
info!("Subscribe to recording monitor ...");
let topic = format!("recording/{:?}", device_id); ②
subscribe(&mut mqtt_client, topic.as_str(), QoS::AtMostOnce); ③
debug!("Monitor the notifications ... ");
monitor_notifications(notifications, process); ④
}
/**
* Submit the recording to the otherapplication
*/
pub fn process(topic: String, pl: Vec<u8>) { ⑤
use serde_json::{Value};
info!("Process Recording :: {}", topic);
let pl = String::from_utf8(pl); ⑥
match pl {
Ok(payload) => {
let mut recording: Recording = serde_json::from_str(payload.as_str()).unwrap(); ⑦
crate::ipc::send(recording.rtype) ⑧
},
Err(error) => {
error!("Error sending the payload: {:?}", error)
},
};
}
Listing 11-13
Defining the subscription to the recording, in src/actions/recording.rs file
① The instantiation of the client with the unique module name.
② The topic name to subscribe to which is recording plus the device id.
③ Subscribing to the topic.
④ Using the return of the notifications to monitor and pass to the process function to handle the notifications response.
⑤ The function that will be called when a message is sent to the topic.
⑥ Decomposing the messages into a string.
⑦ Translating the string into our Recording struct.
⑧ Calling the yet-to-be-built ipc handler sending in just the command to Start or Stop.
You will notice that we are handling JSON here instead of Protobuf; the reason for this is we only converted the heartbeat code to Protobuffers and not the recording. But as you can see, copying the message is cleaner than copying the struct. Realize here that we are only dealing with two commands; if we wanted to expand or have an entire command module, we could have placed that here.
We are decomposing the string here; as you will see in a bit, we send a string over on the IPC, and thus if the command was a more complex JSON, we could have decomposed the message on the client side of the IPC.
IPC Server Side
The IPC server creates a server but cannot send any data till a client connects to it. We will have on the MQ side set up the server and then send our data as a packet. When the client creates a server connection, it creates a unique file descriptor; this file descriptor is what the client needs to know in order to retrieve the packet. This allows us to have multiple client/server architecture on the same system (even though we are using just one). In order to determine this architecture, we will write the file location to a file descriptor that our client can then retrieve later and use to subscribe to the client.
In Listing 11-14, we create our server connection, convert the string to byte array, and send the packet on the server, awaiting the client to connect and retrieve it.
const file_location: &str = "/tmp/pi_upc_server_name_file"; ①
pub fn send(recording: RecordingType) {
// lock server and use
let mut server_tx = init().expect("Failed to accept connection"); ②
① Define the location of the file that has our file descriptor.
② Create the connection to the server.
③ Convert the string to array bytes to be used for the payload.
④ Send the packet from the server, setting the timestamp to the current time.
⑤ Create a new server connection.
In bullet 4 where we send the packets, we could send multiple packets here. This can work well in a scenario where you are stacking commands to be sent to the client or need to parse into individual strings to send. Now that we have the Pi MQ working, we will turn our attention to the client side.
Client Side
On the client side, we are going to need to update the video module in order to monitor the ipc channel to know how to update the recording. Let’s go over what we need to do and how to make this work. We already have created the code to do a continuous loop over the video. This video records and saves the file. Here are the steps then to integrate the concept of starting and stopping the video:
1.
Create a variable that tells whether we are recording.
2.
Create another variable that tells whether we should be recording (i.e., a message from the IPC saying to stop recording).
3.
Spawn a loop to monitor that IPC client.
4.
Act on the recording variables in the loop.
The dual variables will become apparent later, but using them allows us to infinitely write out the video to file in case of a stop command, since if we didn’t, the video may get lost due to a reboot or may never get uploaded.
Let’s start with the public-facing function we created in the previous chapter, run_face_detect. Right before we start our video loop that we made, we will create two variables. The first will be wrapped in an Arc<Mutex<String>. This will allow us to create a thread-safe wrapper around a string. Now we are going to need to have multiple threads access it, and in addition, we will need to update that outside of the main recording loop. In order to do so, we will clone the Arc<Mutex<String>>; cloning it allows us to preserve a reference to the underlying String but cloning the Arc wrapper. In Listing 11-15, we have an excerpt from the run_face_detect.
let recording_execute: Arc<Mutex<String>> = Arc::new(Mutex::new(START.to_string())); ①
let recording_monitor = recording_execute.clone(); ②
monitor_controls(recording_monitor); ③
match handle_video(face, show_window, ④
writer, frames_per_file, last_face_detect_time,
face_tx, size, window, fps,
cam, &recording_execute) {
// Only returns if there is an error
Ok(_) => {},
Err(e) => {
error!("Error handling the video :: {:?}", e);
}
};
Listing 11-15
Update to run_fac_detect for our video monitoring, in src/camera/video.rs file
① Create the Arc<Mutex<String> wrapper around the string variable defaulting to starting the video recording.
② Clone that variable, which we can use when we want to monitor the IPC server and update with.
③ Call out to a function that will create the IPC client to connect to the server.
④ The function that handles the recording passing a reference to the recording_execute that we can use to test if we’ve recorded.
Now we just need to code the monitor_controls and update a section in handle_video that checks if it’s recorded.
IPC Client
Let’s start with coding the IPC client. The client will spawn a thread that will continuously attempt to connect to the server and receive the packets from the server. If a packet is retrieved, we set the contents of the package to the recording_monitor variable we just discussed. Oftentimes, we won’t have anything to connect to, so the client connection will fail; this is a normal thing to happen, and we will let the error fall out gracefully. Since we want this to happen in virtual real time, we will be checking the thread every second; we could increase this based on performance, and in reality, we could put the length even longer and just trim the video on the Pi before storing.
Connecting to the client and receiving packets is a two-step process:
1.
We connect our client to the server and receive the packets from it, pushing each packet onto a stack and then returning that stack.
2.
We join all the packets together to have a vector of results and then process the packets.
The first part deals with the client connection and retrieval, and the second deals with performing actions on the packets. For us, the actions are simply returning the value stored since we are only expecting and allowing one packet per one message from the MQ. We mentioned that the server can send multiple packets; thus, in the client code, we could expect to receive multiple packets at a time and push all those packets to the awaiting asynchronous processor. In Listing 11-16, we define the monitor_controls function as well as connect and process the packets.
use packet_ipc::{AsIpcPacket, Client, Error, IpcPacket, Packet, Server};
use std::{thread, time};
let one_second = time::Duration::from_secs(1);
thread::spawn(move || { ①
loop {
thread::sleep(one_second); ②
let server_name = fs::read_to_string(file_location.to_string()).unwrap(); ③
let client_res = Client::new(server_name.clone()).map(|mut cli| { ④
let mut packets = vec![];
// Pushes a packet
// This contains the information received from the client
let val = cli.recv(1); ⑤
info!("Push a packet! :: {:?}", val);
// can keep receiving till you get No packets back
packets.push(val); ⑥
packets
});
match client_res {
Ok(res) => {
info!("Await ...");
let res: Result<Vec<_>, Error> = res.into_iter().collect(); ⑦
let res = res.expect("Failed to get packets");
let packets = res[0].as_ref().expect("No message"); ⑧
let data = packets[0].data();
info!(">> {:?}", str::from_utf8(data).unwrap());
let value = str::from_utf8(data).unwrap();
let mut guard = recording_monitor.lock().unwrap(); ⑨
*guard = value.to_string(); ➉
},
Err(e) => {}
}
}
});
}
Listing 11-16
Defining the IPC client, in src/camera/video.rs file
① Spawns a continuous thread to loop creating a client to connect to a server to check if there have been any packets pushed.
② Sleeps the thread for one second so that we are not trying to kill the process.
③ Retrieves the server file descriptor to know what to connect to.
④ Creates the client connection based on the server file descriptor name.
⑤ Receives the packet from the client that is connected.
⑥ Uses the value from the received connection and pushes the returning string on to our packet.
⑦ Iterates over the packets that are received by the client.
⑧ Retrieves the first packet and will be subsequently the only packet we have.
⑨ On the Arc<Mutex<String>> will lock the value so we can write to it.
⑩ Writes the value from the packet to the dereferenced location.
Writing the packet to the dereferenced location will then allow the recording_execute the ability to retrieve that value and process. This thread will run continuously and only update the command to start or stop when a new value is received.
Integrating on the Video Loop
Finally, we will integrate the use of the recording_execute into the video loop to determine when to start and stop recording. There are a few different scenarios we need to code against. While this loop is running, you have the current state on whether we are recording and then you have a state on whether we should be recording, and we need to reconcile these two situations in multiple scenarios; these scenarios are these:
1.
Application is currently recording and application should be recording. This is a normal recording state; don’t change anything from what we coded before. In here, you should only check if the frames_per_file has been reached and if it has started a new recording. If not, continue.
2.
Application is currently recording and application should NOT be recording. In this situation, you need to stop the loop from recording, and release the file so it writes the file out to the Pi.
3.
Application is NOT recording and the application should be recording. In this case, start the recording and set the recording state to true.
In Listing 11-17, we implement these rules wrapping around the existing video write code.
Updating the record function with the recording_exercise variable, in src/camera/video.rs file
① Handles the first use case of application recording and should be recording.
② Second use case of application is recording and should not be recording.
③ Third use case of application is not recording but should be.
Now at this point, the backend servers can communicate with our Pi and start and stop the camera recording.
HomeKit
If you aren’t familiar with HomeKit, it’s probably because you don’t have an iPhone. HomeKit is Apple’s software to connect smart home appliances. HomeKit was started as an impressive and ambitious project to connect devices all in a secure way. When the project was first released, any hardware device would require an encryption co-processor in order for it to connect and be used. This guaranteed secure communication between devices and allowed for greater privacy. We obviously don’t have an encryption co-processor, but in iOS 11, this was changed to allow for so encrypted software authentication instead. Homekit works by connecting between devices and a hub via Bluetooth or Wi-Fi. The hub is what consolidates all the information about the devices and allows you to not only control them but create scenarios to activate or deactivate them all via timers, rules, and so on.
What makes the Apple HomeKit unique compared to its competitors, Google and Amazon, is the hub to device interaction. While other systems have a hub, they often serve as a passthrough back to backend servers. All your data and recordings then get sent to those servers, and all your actions are recorded; thus, other providers are able to track you. This is also why they can build and learn your interactions, when your comings and goings are, and so on much easier. With HomeKit, it’s an entirely secure world. For the privacy minded, this is appealing in that it still gives you solid good UI and ecosystem, without giving up your security.
Generally, to create a fully stable commercially sellable system, you will have to go through more Apple hoops. However, they do allow for testing and individual use of their own set of tools. And we will make use of this to add HomeKit to our Raspberry Pi.
As we touched on earlier, we will be using HomeKit to add temperature and motion sensor readings. The temperature comes from our Pi, the same temperature that we display on the LED screen. The motion sensor is a bit trickier. While we could have added some code to determine changes in the frames from frame to frame or even from frame to the fifth frame, we are going to use the motion sensor indicator to indicate when there is face detection. This provides an interesting use case, but also allows us an easier intercept in code that is already written.
HomeKit Accessory Protocol (hap-rs)
The hap-rs is mostly a pure rust-built project that is used to communicate Rust code with a HomeKit device over Wi-Fi (via IP). The Bluetooth protocol is not supported currently. I say mostly a pure Rust application because while the crate is written in Rust, it does use ring as a dependency to perform all the encryption/decryption necessary to communicate between the code and the HomeKit hub. And ring uses a hybrid of Rust, C, and assembly language under the covers. The current version of the crate (https://github.com/ewilken/hap-rs) does use ring 14.x; I have since forked the repo and updated the code to ring 16.x so we can use the code inside our existing Pi application. We can use the dependency via Listing 11-18.
hap = "0.0.10"
Listing 11-18
Defining the hap-rs, in Cargo.toml file
The code uses a combination of custom code and auto-generated code. Much of the custom code is for the configuration and communication, while the auto-generated code deals with defining the accessories and characteristics for them. In the hap-rs code base, there are currently 31 accessories that are supported via that code generation. All but four of them are fully supported with their full characteristics. The accessories that are defined but not currently supported are these:
IP camera
Light sensor
Thermostat
Video doorbell
The main reason these aren’t fully supported is because their implementation would require more than auto-generated code can provide. If you are curious, there is an issue to track this at https://github.com/ewilken/hap-rs/issues/11, or you can even submit your own patches to it. You will notice IP camera is one, which is why we are using a motion sensor as a device instead of IP camera for our Pi interaction.
Accessories
I’ve mentioned accessories a few times here; it’s good for us to talk about how HAP works and the interface points we have to communicate with it. In the documentation, each accessory is composed of multiple services which in turn are composed of multiple characteristics. This can get a bit confusing, in that what we call an accessory in abstract is manually defined in the code, and what we call a service here is called an accessory in the code. Let’s take a look at an example of a thermostat like the Ecobee. The Ecobee thermostat is composed of two accessories: a thermostat and a motion accessory, each of which will show up as a separate device on the Homekit. Each of these accessories will be composed of multiple characteristics themselves. These characteristics are used for display and control of the device. In Table 11-2, we have the characteristics for thermostat.
Table 11-2
Characteristics for a thermostat
Name
current_temperature
cooling_threshold_temperature
current_relative_humidity
heating_threshold_temperature
target_heating_cooling_state
target_relative_humidity
target_temperature
temperature_display_units
All of these units will be accessible; in addition, the characteristics of motion sensors are in Table 11-3.
Table 11-3
Characteristics for a motion sensor
Name
motion_detected
status_active
status_fault
status_low_battery
status_tampered
These characteristics each interact with the HomeKit application and are the rust crates’ way of interacting with the application. Each one can have two methods defined: an on_read and an on_update. The on_read is used whenever the Homekit needs to read the current state from the code. An example would be the temperature; when it needs to read the temperature, the on_read on the Homekit will access the method and return the value. The on_update is used whenever the Homekit needs to send a value to the rust code. For example, on a thermostat, you want to set the temperature; the temperature you set from the Homekit will be sent to the rust code. The use of these in conjunction allows us to create a complete loop of interactions with the rust code and the Homekit.
Creating Our HomeKit
For our Homekit Pi device, we are going to implement the motion sensor and temperature sensor in a new homekit module. In order to create the homekit integration, in Listing 11-19, we will need to define each of the accessories and then a configuration file to define the Pi.
let config = Config { ①
name: "Rasp Pi".into(),
category: Category::Thermostat,
..Default::default()
};
debug!("What's the pin :: {:?}", config.pin);
// Adds our transport layer to start
let mut ip_transport = IpTransport::new(config).unwrap(); ②
ip_transport.add_accessory(thermo).unwrap(); ③
ip_transport.add_accessory(motion).unwrap(); ④
// Spawn the start of the homekit monitor
tokio::spawn(async move {
debug!("IP Transport started");
ip_transport.start().unwrap(); ⑤
});
Listing 11-19
Defining the Pi configuration, in src/homekit.rs file
① Create the overall config defining the name that the device will show up when adding on Homekit.
② Create an IP transport layer with that configuration.
③ Add the thermostat accessory.
④ Add the motion accessory.
We will define those two accessories in a bit, but the first part of the config is interesting; there is also a field for the pin that is used when connecting to the device. When not set, the default is 11122333. We haven’t set it here because it doesn’t work (it’s mentioned briefly at https://github.com/ewilken/hap-rs/issues/15). So just use the default for now.
Implement Generic Temperature Sensor
We haven’t normally done this throughout the book; normally, we jump into the code for the section, but this time we are going to break it up a bit due to the complexity of the moving parts. Let’s take a look how a temperature sensor functionality works. All of your available accessories will be in hap::accessory.
We can start in Listing 11-20 by instantiating a temperature sensor struct from that accessory.
let mut thermo = temperature_sensor::new(Information {
name: "Thermostat".into(),
..Default::default()
}).unwrap();
Listing 11-20
Defines the temperature sensor
This creates the thermostat sensor, and with the code in the previous listing, it gets wired up to show in the Homekit. But that’s all; there are no values being set or transmitted. In order to interact with the Homekit, you will need to implement one of two traits:
hap::characteristic::Readable – For any events that are read from Homekit
hap::characteristic::Updatable – For any events that are updated by Homekit
In Listing 11-21, we are going to create a struct that holds the temperature reading and allows it to be set and updated by the two traits we mentioned.
#[derive(Clone)]
pub struct Temperature {
temp: f32, ①
}
impl Readable<f32> for Temperature { ②
fn on_read(&mut self, _: HapType) -> Option<f32> { ③
println!("On updated temp from {} to {}.", old_val, new_val);
if new_val != old_val { self.temp = *new_val; } ⑥
}
}
Listing 11-21
Defines the temperature structure
① Sets a struct to hold a temperature value as float 32.
② Implements the Readable trait using f32 type value.
③ Implements the one function that reads the temperature and reads the structs value.
④ Implements the Updatable trait using f32 type value.
⑤ Implements the one function that reads the temperature and updates the structs value.
⑥ The function only updates the value if it’s been altered and changes the self.temp to the new value.
The one thing of note is the f32; why f32? This is all dependent on the type of object we are going to apply the trait to. Temperatures are used for f32; if this had been a motion sensor, we would have used a boolean. The final step is to wire this up with the configuration we initially created. In Listing 11-22, we wire up the application.
Integrates our temperature struct with the homekit
We instantiate the struct with a default value. The set_readable and set_updatable each take as a parameter a struct that implements the Readable and Updatable trait, respectively, which in our case, the Temperature struct we created satisfies both.
With this, we would have a temperature gauge that updates and displays a default value. If you look deeper into this code, there is one question you may be asking yourself: how are we going to set it? The motion detection is based off the face detection in our video code, and the temperature is based off of the atmospheric sensor that we apply to our manager module. In order to accomplish that, we are going to make use of more tokio channels to create interactions with, so that basically we can create sending and receiving commands.
Implementing Temperature Sensor
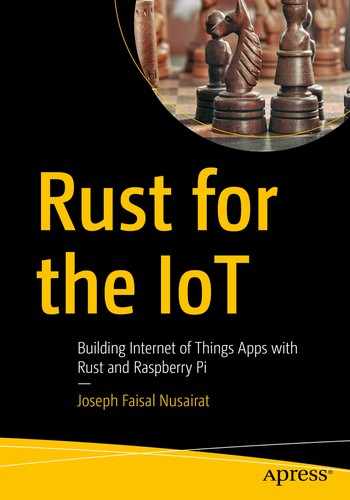
Let’s start with the temperature accessory and implement that code first. In order to make the accessory work, we are going to in the on_read call out to the manager to request it find the data for us. For this, we are going to make use of the existing channels and add an additional command. But we are also going to create a new set of channels that will allow the manager to broadcast data back to the homekit (when it’s been requested). I’ve diagramed this interaction in Figure 11-2.
Figure 11-2
Diagram of the interaction of the homekit with the atmospheric temperature
We will send to the manager its own transmitter specifically for the temperature and send its corresponding receiver to the homekit so those two channels can communicate. Since this is a one-off communication channel, we don’t need anything as heavy as the mpsc; instead, we will use a different channel, the toko::sync::watch; this single-producer, multi-consumer channel only retains the last value sent, which is fine for us since we only care about the most recent temperature reading. In your main.rs, you will add to the run function the code in Listing 11-23.
let (temp_tx, mut temp_rx) = watch::channel(25f32);
Listing 11-23
New channel with a default value of 25, in file src/main.rs
You will then need to pass the temp_rx to the homekit module and the temp_tx to the manager module. Inside of homekit, we won’t need the on_update, since updates do not get driven from the homekit device; instead, we will just need an on_read, and in addition, the struct will not retain any value state of the temperature since we do not need to receive that information. What the struct will need to maintain is the rx and tx values that allow the cross communication. In Listing 11-24, we create the struct and our on_read call.
The Temperature struct and the Readable implementation, in file src/homekit.rs
① Instantiate the struct with the sender and receiver.
② Call out to our method to receive the temperature.
③ Send to the manager our request of sending the temperature.
④ Receive the value back, unwrapping and returning.
The send is the same send we used in previous sections which sends an action command. This allows us to have cross-thread communication without violating any borrowing rules and thus preserving thread and memory safety. In addition, we will need to insatiate the struct in our initialize in Listing 11-25.
let thermometer = Temperature::new(temp_cmd_tx, temp_rx);
Instantiating the temperature struct, in file src/homekit.rs
Recall in a previous listing, we had already used thermo to add the accessory. The last thing to finish would be to implement the manager. This will require two updates, one creating the send_temperature method in Listing 11-26.
Creation of send_temperature function, in file src/homekit.rs
And now in our matcher we created before, create a catch for the SendTemperature action calling the function we just created in Listing 11-27.
Action::SendTemperature => {
send_temperature(&atmospheric, &temp_tx)
},
Listing 11-27
Creation of send_temperature function, in file src/homekit.rs
With this, your homekit will be able to get the temperature from the Pi and return it to the homekit app on your iOS device.
Implementing Motion Sensor
Let’s move on to the motion sensor; the motion sensor will detect any face motion that the camera picks up. So when it detects motion, it is because you are looking at the camera, and when it doesn’t, you aren’t. This code will look much like the temperature code, and as you can see in Figure 11-3, it has the same basic skeleton for the call.
Figure 11-3
Diagram of the interaction of the homekit with motion detection
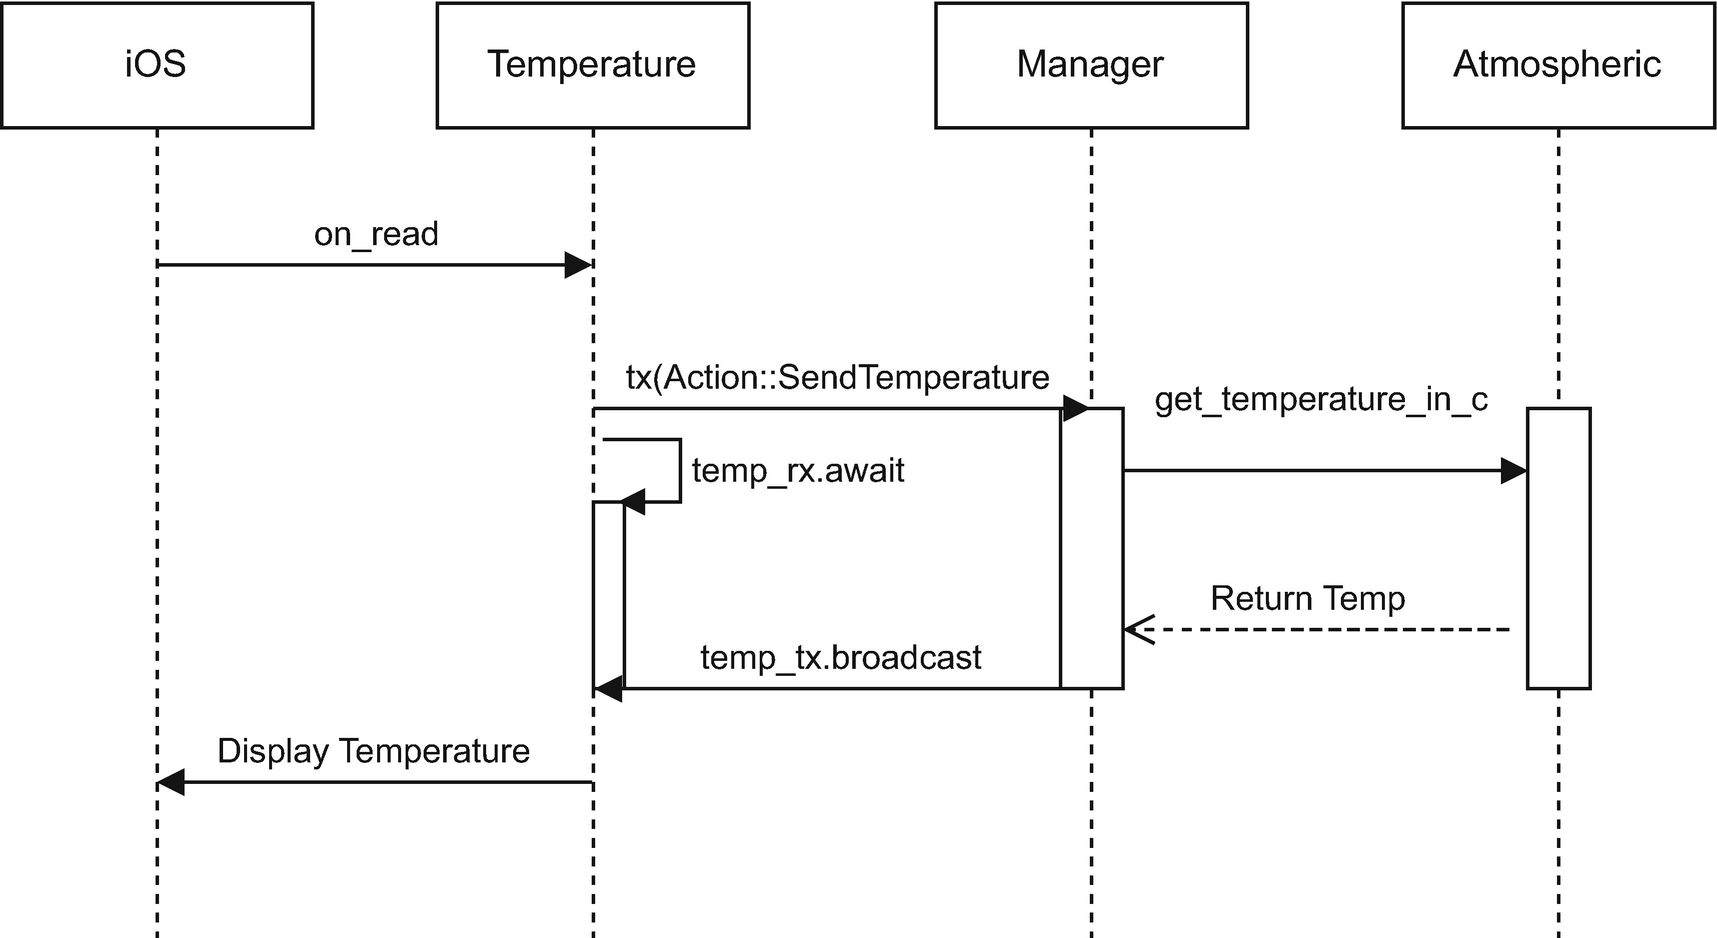
The bigger difference comes in the manager itself. The manager does not have access to other modules that it can query if there is face detection. Instead, face detection is handled in the video loop. To solve this in the video loop, we will add another channel that allows communication from the sensor back to the manager to tell the manager if a face is currently detected. In Figure 11-4, we have this loop displayed.
Figure 11-4
Diagram of the signalling of a face detection
This will require us in the main to define two more channels:
1.
For notifying the manager a face is detected
2.
For homekit to request knowing if a face is detected
// basically like a watcher but we needed features that watcher didn’t provide
// Single producer/ consumer for this setup
let (face_tx, face_rx) = mpsc::channel(1);
// Face detector, for single producer single consumer
// One shot cannot be used in loops it’s designed for one shot
// let (motion_tx, motion_rx) = oneshot::channel::<bool>();
let (motion_tx, motion_rx) = watch::channel(false);
Listing 11-28
Adding two additional channels to communicate face and motion, in file src/homekit.rs
You will notice we do use the mpsc::channel for the face detection; this had to do with certain traits that were needed for it to work that weren’t in the watch::channel; we did keep it as only a channel with a count of one since we only care about the most recent request. With this, we will also pass the variables to the these:
face_tx – Face sender to the video module so we can send face detection updates.
face_rx – Face receiver to the manager module to receive face detection status from the video.
motion_tx – Motion transmitter to the manager to send back to homekit the motion status.
motion_rx – Motion receiver to the homekit module to receive motion information from the manager.
Video Module
Starting with the video module, we will on every loop send an asynchronous request back to the manager on whether a face is detected. In Listing 11-29, we have a partial of the handle_video function.
face.detect_multi_scale(
...
// If any faces are detected send the face detection here
if faces.len() == 0 { ①
send(&mut face_tx, false);
} else {
send(&mut face_tx, true);
}
Listing 11-29
Adding two additional channels to communicate face and motion, in file src/camera/video.rs
① If we do not detect faces, send false, and if we do, send true.
Manager Module
This code will feed directly into the manager module, but not within the same loop as our action. We will instead take a page out of how we used the command object by setting a variable to be used in two loops. Before we run our normal manager receiver, we will in the run function span a thread that waits for the face sender and updates the motion variable accordingly. In Listing 11-30, we have that set of code that will go at the top of run.
let motion = Arc::new(Mutex::new(false)); ①
let motion_set = motion.clone();
// Receives the motion
// Spawn a task to manage the counter
tokio::spawn(async move {
while let Some(movement) = face_rx.recv().await {
let mut m = motion_set.lock().unwrap(); ②
*m = movement;
}
});
Listing 11-30
In the manager checking for movement, in file src/manager.rs
Sets the two variables: one to be used by the face receiver and the other for motion detection.
Sets the motion variable to know if a face is detected or not.
Now that we have the motion detected, let’s go ahead while we are in the manager module and add the code similar to SendTemperature to return the motion detection. I won’t go into much detail since we already covered it previously with the temperature. In Listing 11-31, we have the motion action as well as the send_motion function.
In the manager receiving the motion request and sending it, in file src/manager.rs
Homekit Module
Now onto the final piece is the homekit module update. In here, we will have to implement the Readable trait for our struct and receive the motion detection back. This code is virtually identical to the temperature one except for slightly different names, and we are using a boolean instead a float 32. In Listing 11-32, we have the motion code.
The implementation of motion for the homekit, in file src/homekit.rs
That includes the motion code and the instantiation for the motion. At this point, we have all the code and pieces together to create our homekit environment; next up is to connect it to our homekit.
Adding to Homekit
Finally, let’s incorporate this with Homekit; I will step you through some screenshots on how to do it. To start with, either start up your app locally or deploy to the Pi and start up from there.
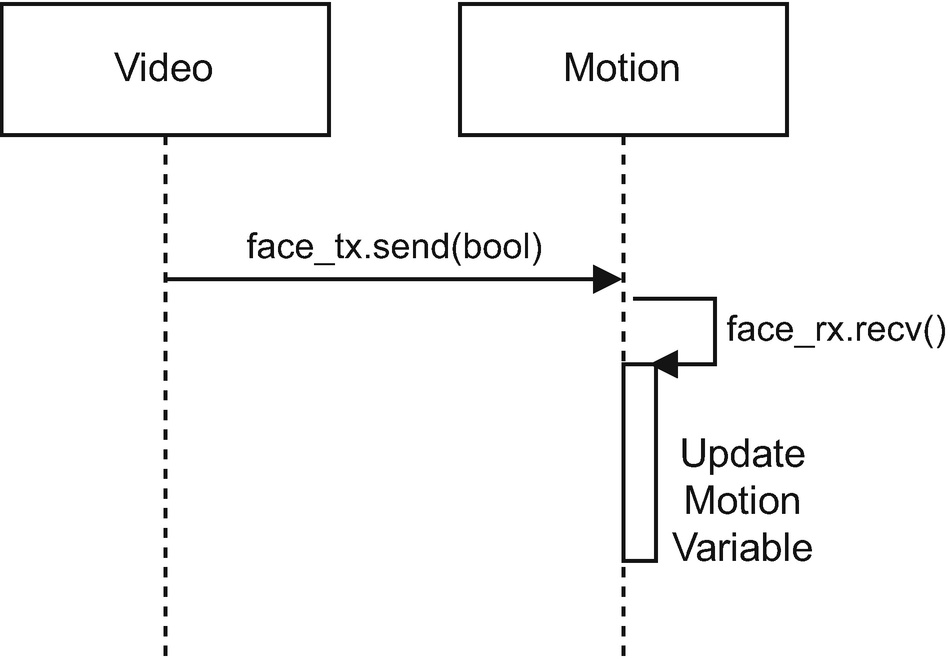
Open homekit up, and on the top right-hand side, click the “+” button; you will receive options to “Add Accessory” or “Add Scene” like in Figure 11-5.
Figure 11-5
Screenshot of the screen with add accessory
Click “Add Accessory”; this will take you to a screen giving you multiple options. In our case, since this is a custom non-certified device, we don’t have a code to scan; click “I Don’t Have a Code or Cannot Scan” like in Figure 11-6.
Figure 11-6
Screenshot to add your accessory
Here you will display multiple options that are being broadcast from the local network. Make sure your iOS device is on the same network as the Pi, and it should show up. In Figure 11-7, you will see the “Rasp Pi”.
Figure 11-7
Available devices to add
You will notice it has a thermostat symbol; this is decided by the category we choose in the config. Once you click it, you will get a warning that it is an “Uncertified Accessory”, which is because it is a homegrown application.
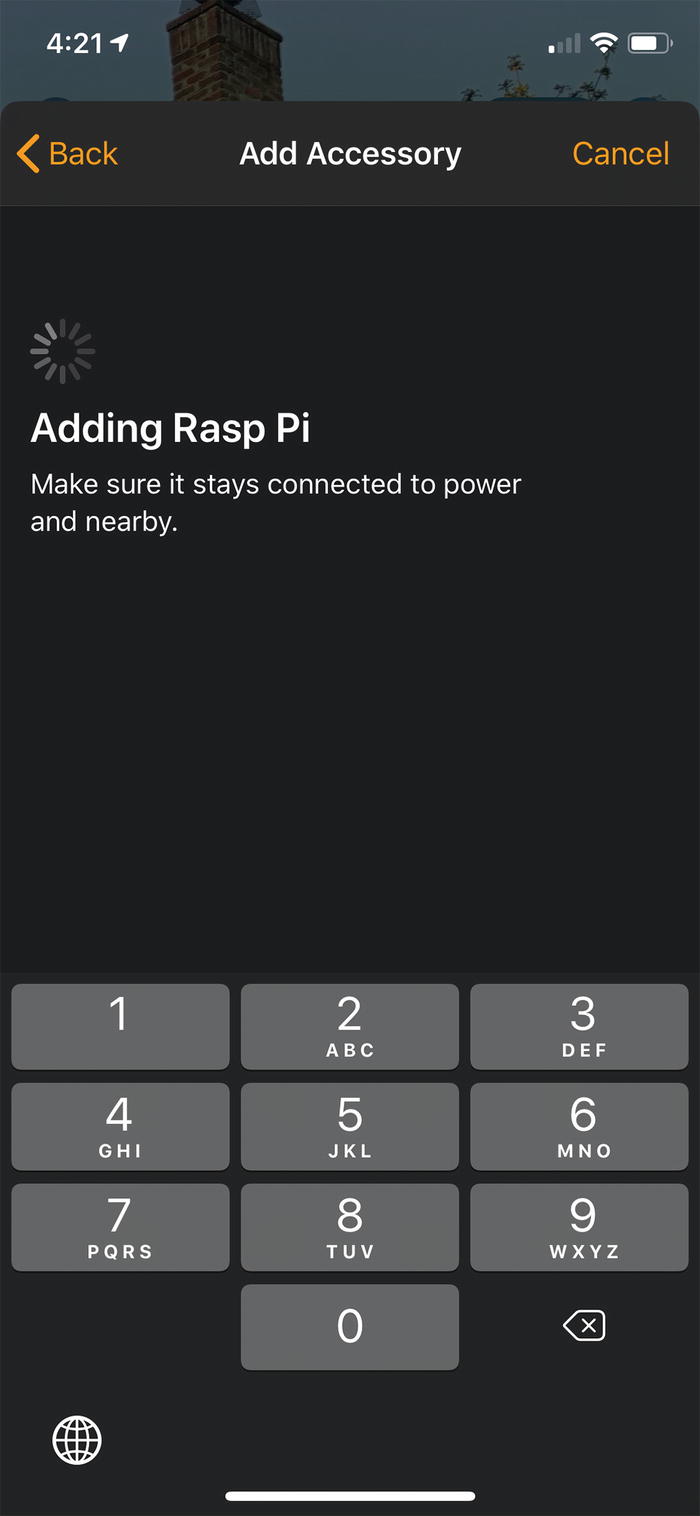
Once added, you will see a message saying the Pi is being added in Figure 11-8; this is when the communication between our Pi and the Homekit starts to go up (if you run the app in debug mode, you will see messages for this).
Figure 11-8
Adding Rasp Pi display message
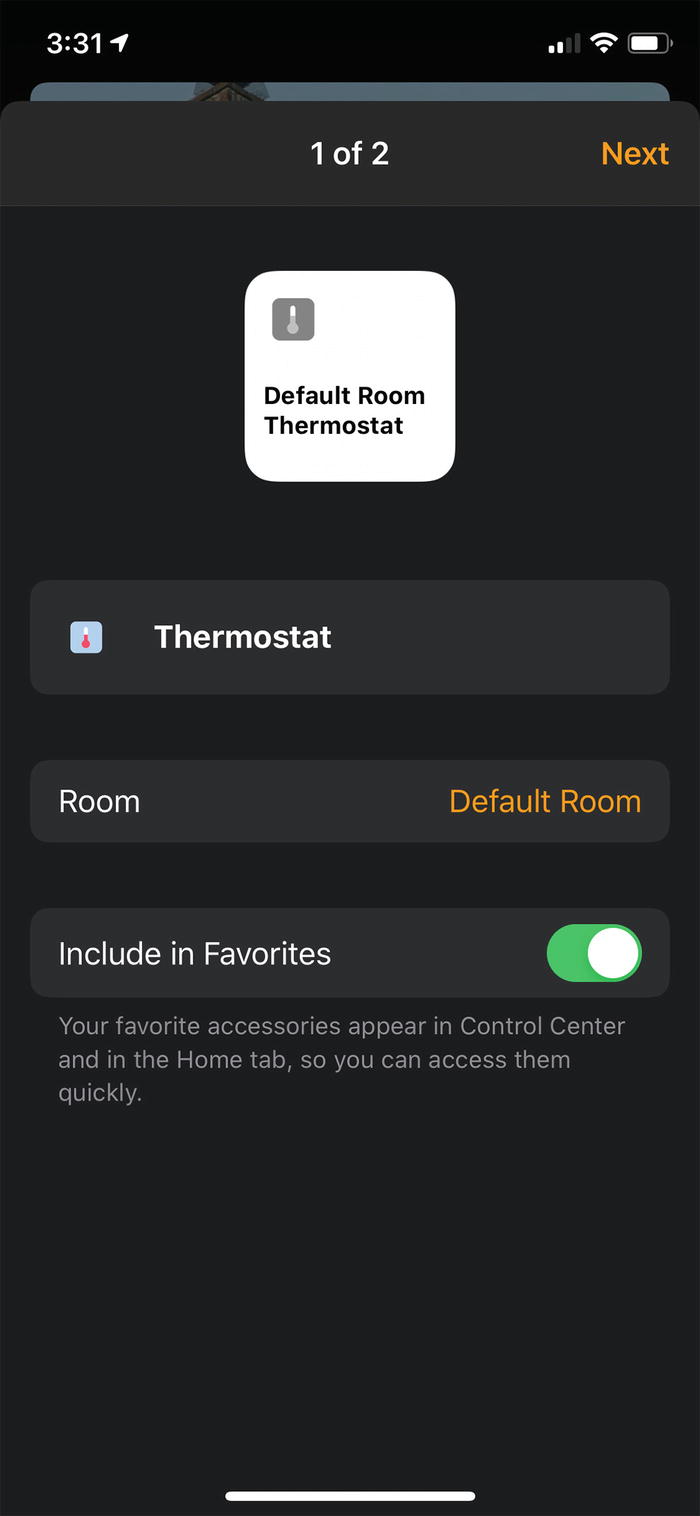
Once accepted, you will get two screens that prompt adding the sensors and to what room you want to add the sensors. In Figure 11-9, we are adding the thermostat sensor.
Figure 11-9
Adding Rasp Pi thermostat sensor
And in Figure 11-10, we are adding the motion sensor.
Figure 11-10
Adding Rasp Pi motion sensor
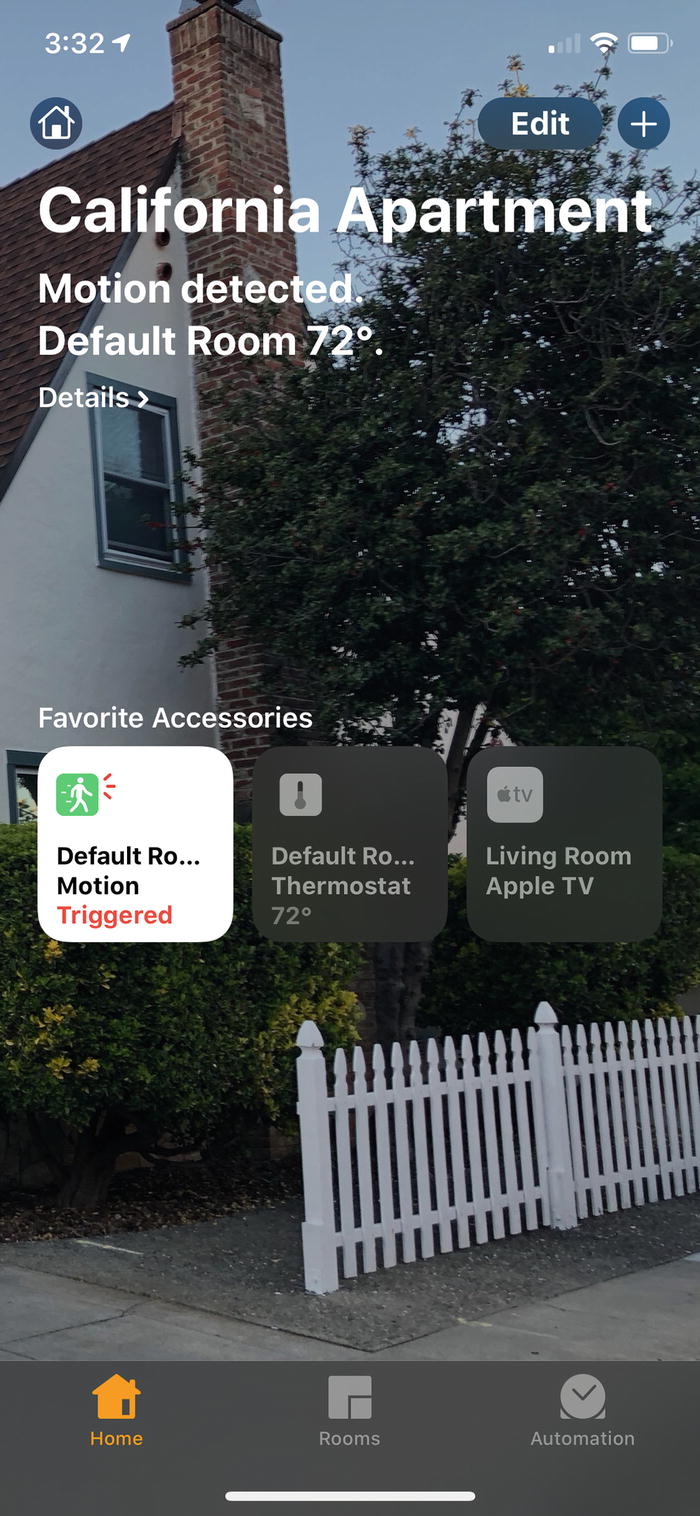
Figure 11-11
Our Rasp Pi sensors added the homekit application
Finally, the sensors will now show up in Figure 11-11 showing the rest of your homekit application; this will now be interactive and talking to your Pi whenever returning.
One note, at the time of this writing, some users have noticed on disconnect (i.e., the device is restarted) the communication between the homekit and the Pi will cease and you have to re-add it. This is a known bug that is being looked at; however, this project is a side project for the user, so I am sure they’d appreciate any help. While I wouldn’t necessarily consider this production ready, for hobbyists, it works well enough and helps you extend the functionality of your Pi.
Summary
In this chapter, we mostly integrated the components we have created in the previous chapters with our cloud backend, both synchronously by sending files to an http endpoint in the upload_svc and asynchronously by processing commands for the Pi via our message queue. Using the MQ allows us to receive those commands even if the Pi is offline at the time. Finally, we provided a mechanism outside of the Pi to view our sensors for our Raspberry Pi via Homekit.