Over the last few chapters, we talked about build and release pipelines in Azure DevOps. We have looked at the classic as well as YAML pipelines. For the pipeline capabilities we discussed, there is REST API support for us to handle many actions programmatically. Further, the command-line interface (CLI) for Azure DevOps is providing several commands, which can be used for programmatic management of build and releases.
Programmatic access to the build and release pipelines is useful to generate reports, manipulate pipelines behavior, or even implement extensibility to pipelines. In this chapter, let’s look at how we can utilize the REST API and CLI and what the prerequisites are. Next, we discuss how to build extensions using programmatic access to the build and release pipelines.
Lesson 11.01: Using Build and Release REST APIs
REST API for the Azure DevOps build is provided with several APIs. You perform operations such as run a build, update build definition, get details about a build, tag a build, and many more with the REST API.
A REST API request/response pair can be identified with five components as listed below.
where instance defines the Azure DevOps organization or Azure DevOps server as dev.azure.com/{organization} or {server:port}/tfs/{collection} respectively.
The resource path should be in the form of _apis/{area}/{resource}for example, _apis/build/builds. The API version should be defined to denote the version of the REST API to use in the format of {major}.{minor}[-{stage}[.{resource-version}]]for example, api-version=5.0 or api-version=5.0-preview or api-version=5.0-preview.1
HTTPS Request Header
A mandatory request header/verb/operation such as GET, POST, PUT, PATCH, or HEAD. Optionally you can provide an authorization header as a bearer token.
Message Request Body
To support the POST, PUT operations, you can provide a body such as JSON with the content type specified as application/json.
Response Message Header
HTTP response code with 2xx for success and 4xxx, 5xx for errors. Optionally a response header such as Content-type to support request/response.
Response Message Body
JSON or XML response body.
The authorization header to access the REST API should be provided with each request. You can use a Personal Access Token (PAT) generated in Azure DevOps with the required scope of access (We have described PAT in more detail in the Hands-On Azure Boards book).
To create the required authorization header in PowerShell, you can use the code segment below.
The usage of REST API to implement functionality, which is not available out of the box in Azure DevOps, is something worth discussing. For example, take a scenario where you are using build policies to protect your version (release) branches. If you want to copy over branch protection build policies in one version branch to another, there is no out-of-the-box way to do it. You have to manually create the branch protection build policies in a new branch. However, you may use REST API and implement a PowerShell script by getting the policies of one branch and applying it to another.
One other example would be that you may want to generate a release note out of your builds’ associated changes and work items, at the time of releasing to a given target. The release to the given target has to consider previous releases done to the target and then check all in-between releases and builds from the last release to the target to identify all the changes coming in with the current release. REST API would come in handy in this situation for you to implement the required functionally in PowerShell and execute it in the release pipeline itself to generate a release note.
Let’s have a quick look how you can queue a build using the REST API to understand how it works.
POST https://dev.azure.com/{organization}/{project}/_apis/build/builds?api-version=5.1
You have to provide the body for this post request for the REST API. The json body provided should contain the build definition id as a minimum requirement. Additionally, you can provide more information such as the source branch. Note that build definition id 48 is hard-coded below, and it can be parameterized.
{
"definition": {
"id": 48
},
"sourceBranch": "master"}
A sample script for this type of a request can be identified as shown below.
In this lesson, we discussed the possibilities of using REST API for perform actions on build and release. Further, a couple of useful scenarios explained where REST API can be used and we had a look at a sample to understand how it works with PowerShell.
Lesson 11.02: Using the Azure Pipeline CLI
Similar to the REST API, we can use the Azure DevOps CLI for programmatic access and perform actions on Azure pipelines. Azure DevOps CLI is an extension to the Azure CLI. As a prerequisite, you need to have Azure CLI installed.
You can check currently installed extensions to Azure CLI by executing az --version in a PowerShell window or in a command prompt. See Figure 11-1.
Figure 11-1
Installed az extensions
To set up the az devops extension, you can execute the az extension add --name azure-devops in a PowerShell, Command Prompt, or Terminal window. See Figure 11-2.
Figure 11-2
Install az devops extension
To understand the available commands in az devops extension, execute az devops --help. You can see there are several commands available. Out of that let’s focus on the pipeline commands. See Figure 11-3.
Figure 11-3
az devops commands
You have to execute the az devops login--org orgname and then provide the PAT as the token when prompted to get the CLI authenticated with the Azure DevOps organization. You can also set the environment variable using $env:AZURE_DEVOPS_EXT_PAT = 'yourPAT' in Windows and using export AZURE_DEVOPS_EXT_PAT=yourPAT in Linux or macOS, and log on. See Figure 11-4.
Figure 11-4
Login to Azure DevOps with CLI
Let’s take the same example as with REST APPI and try to queue a build to see how it can be done with CLI. To understand the build queue command, you can run an az pipelines build queue –help, and it will give all the help information. To queue a build, you can run a command, for example, az pipelines build queue -p 'Project X' --definition-id 48 and the build will be queued. See Figure 11-5.
Figure 11-5
Queue build with CLI
You can use the CLI inside PowerShell scripts or batch scripts and then use them as steps in pipelines or for other purposes.
In this lesson, we discussed how the Azure DevOps CLI can be used for programmatic access to Azure pipelines.
Lesson 11.03: Developing and Distributing Extensions
You can develop extensions for Azure pipelines if the existing out-of-the-box functionality or available extensions in the marketplace are not satisfying your required action for the pipeline.
You have options to set up pipeline extensions with typescript based or PowerShell based ones. However, only windows agents are able to run PowerShell-based tasks. It is advisable to use typescript for developing pipeline extensions if you intend to run it on all agent platforms.
You need to run an npm init in a folder from PowerShell or in a Terminal window to get the npm initialization done for the extension. Provide required information when prompted, and the initial package.json will be created in the folder. See Figure 11-6.
Figure 11-6
npm init to create package.json
Then you can run npm install azure-pipelines-task-lib –save to add the task library to create pipeline tasks. See Figure 11-7. This installs required node modules to your extensions folder.
Figure 11-7
Add pipeline task lib
Then you need to add typescript typings by executing the following commands.
npm install @types/node --save-dev
npm install @types/q --save-dev
Run the tsc –init to make sure typescripts are compiled to javascripts when the extension is built. If typescript is not already set up in your machine, you need to install it globally with the npm install -g typescript command.
With this all necessary structure to develop, your extension is created in the folder. Next, you need to add the task json to the extension task folder. You can use the template shown below and replace the {{placeholder}} with the required values. This template is available in the Microsoft documentation, and it is advisable to copy the latest one from the documentation. Inputs in the below file content are intended for the sample task, and you may have to use inputs depending on your task requirements.
tl.setResult(tl.TaskResult.Failed, 'Bad input was given');
return;
}
console.log('Hello', inputString);
}
catch (err) {
tl.setResult(tl.TaskResult.Failed, err.message);
}
}
run();
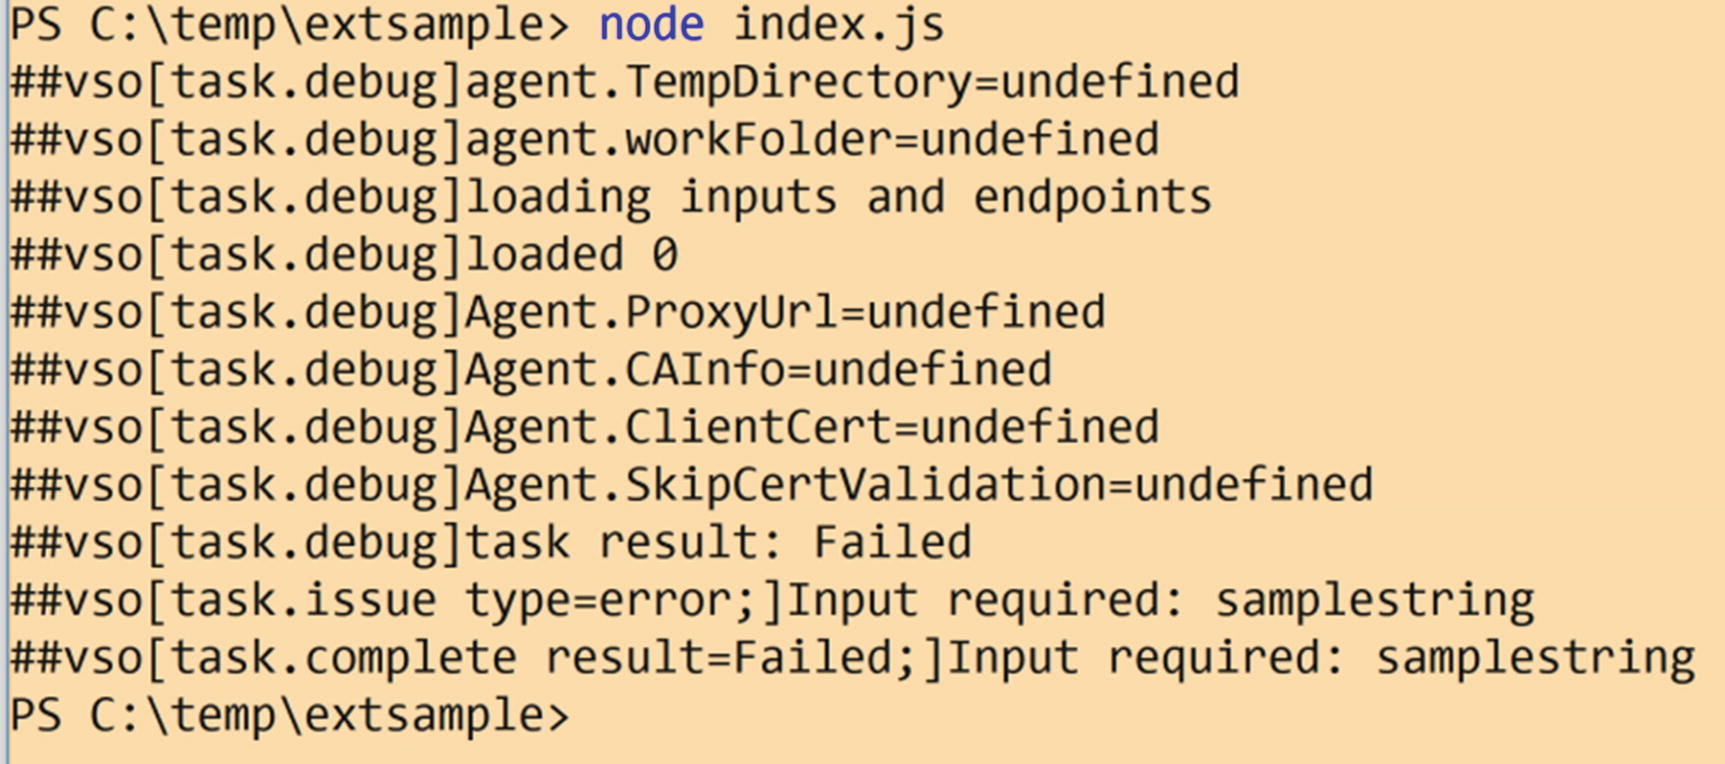
Then you can execute tsc from the extension folder to compile the typescript as a javascript. Now if you run node index.js, it will test the extension locally; however, it will fail since no input is provided. See Figure 11-8.
Figure 11-8
Test the extension task
You can provide an input string with $env:INPUT_SAMPLESTRING="Chaminda" and test it as well to check the successful execution. See Figure 11-9.
Figure 11-9
Test function providing input parameter value
To deploy the extension, you need to package it. But before packaging it, you need to create a manifest file for it. For the example we used, you can create a file named vss-extension.json and add the content below.
{
"manifestVersion": 1,
"id": "build-release-task",
"name": "Chamidac Build and Release Tools",
"version": "0.0.1",
"publisher": "chamindac",
"targets": [
{
"id": "Microsoft.VisualStudio.Services"
}
],
"description": "Tools for building/releasing with chamindac. Includes one build/release task.",
"categories": [
"Azure Pipelines"
],
"icons": {
"default": "images/extension-icon.png"
},
"files": [
{
"path": "buildAndReleaseTask"
}
],
"contributions": [
{
"id": "custom-build-release-task",
"type": "ms.vss-distributed-task.task",
"targets": [
"ms.vss-distributed-task.tasks"
],
"properties": {
"name": "buildAndReleaseTask"
}
}
]
}
To package your extension you need to have tfx CLI, which can be installed with the npm i -g tfx-cli command. You have to create a folder named buildAndReleaseTask in the extension folder and move all the files and folders except the vss-extension.json file. You can add more folders in the extension and add more tasks to create an extension with multiple tasks. Then from the extension folder, run tfx extension create --manifest-globs vss-extension.json command to package the extension.
To create a publisher you have to sign into https://marketplace.visualstudio.com/manage and set up your publisher profile. Then you can publish your extension, sharing to your organization with the tfx extension publish --manifest-globs vss-extension.json --share-withhttps://dev.azure.com/yourorgname command.
Once published, your extension can be shared to other organizations or shared publicly. See Figure 11-10.
Figure 11-10
Extensions
In this lesson, we discussed how to build an extension for Azure pipelines.
Summary
We discussed programmatic access to Azure pipelines using the REST API and command-line interface in this chapter. Further, we have talked about basic steps required to build an extension for pipelines.
In the next chapter, we look at test automation integration options with Azure pipelines.