In the first two chapters, we discussed the concepts around Continuous Integration and Delivery and briefly explored concepts and features of Azure Pipelines. This has set the background for us to dive into each feature of Azure Pipelines, which will enable us to understand how to utilize Azure Pipelines to automate the software delivery process.
In this chapter, we are going to look at the agents in Azure Pipelines. As we already have discussed, we have two types of pipelines that can be used in Azure DevOps. One is Azure Pipelines, which is having Windows, Linux, and Mac agents hosted in Microsoft servers, facilitating and building many types of software projects. The next type is self-hosted agents, which can be used to add your own machine’s virtual or physical components to agent pools that you can create in Azure DevOps.
The major advantage of having a self-hosted agent would be to facilitate a couple of needs that we would not be able to satisfy with Azure-hosted Pipelines. One such need is having custom versions of software requirements to build your software projects, such as if you need a particular SharePoint version and have a dependency on SharePoint libraries to your projects. Azure-hosted agents will not have this type of specific needs, and this is one of the situations where self-hosted agents come in handy as you can set up whichever software you want in your machines.
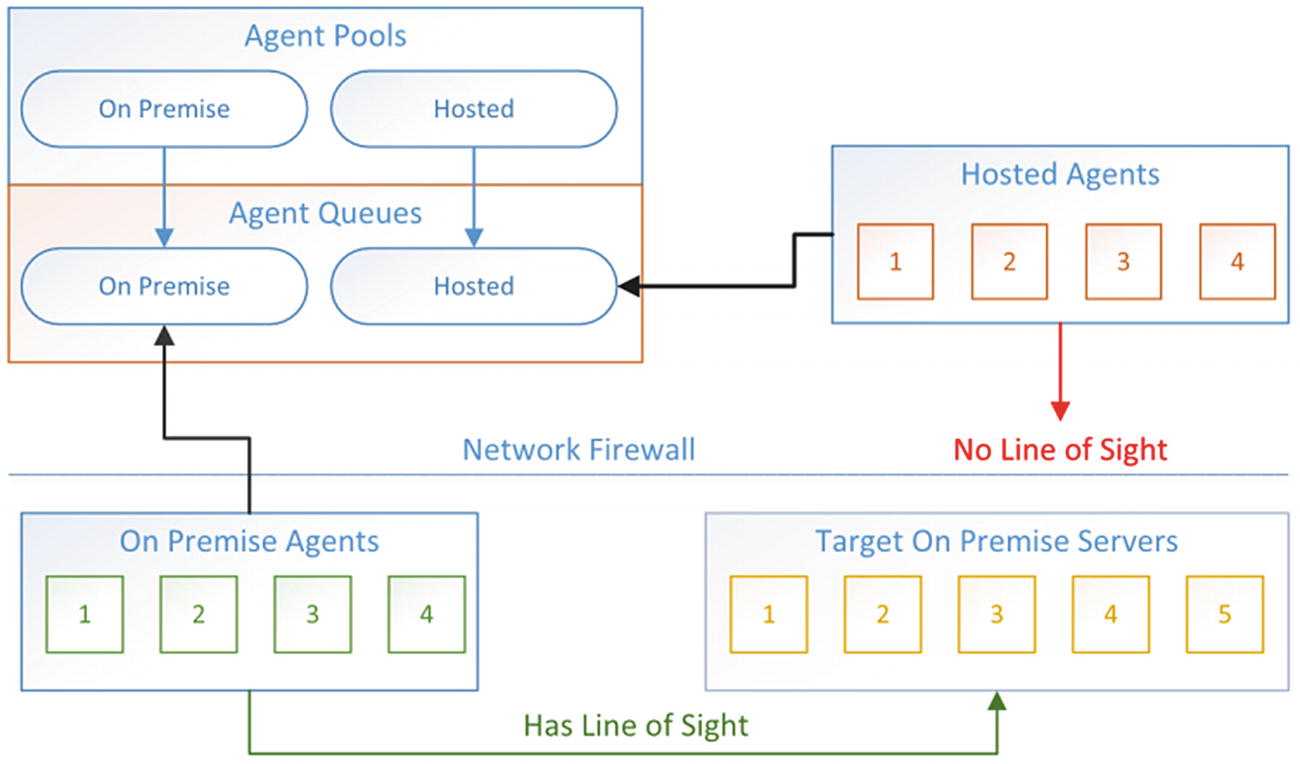
Another good use of self-hosted (on premises – could be even cloud VMs) agents would be when you try to deploy to on-premises environments where the machines sit behind cooperate firewalls. In this scenario the Azure-hosted agent does not have a line of sight to the machines behind cooperate firewalls. Another situation in which you will not have a line of sight from Azure-hosted Pipelines would be when you use Azure App Service Environments (ASE) for total isolation and security. All these scenarios of self-hosted agents can help as they can reside within the cooperate network or inside ASE and perform the deployment jobs assigned by the Azure Pipelines, using local network accessibility to the required targets. See Figure 3-1.
Figure 3-1
Line of Sight
First, let’s look at how to create agent pools and set up the permissions in them. Then, using a couple of lessons, let’s get agents added to the pools we create to understand how we can use them in this chapter.
Lesson 3.01: Setting Up Pools and Permissions
As already discussed, we can set up self-hosted, on-premises machines, virtual machines, or cloud virtual machines as agents. Before setting up an agent we need to define agent pools to keep agents as a group. One agent pool can have multiple agents with the same capabilities assigned to it to enable the consuming build or release pipeline to get facilitated with the service of an available agent at a given point in time.
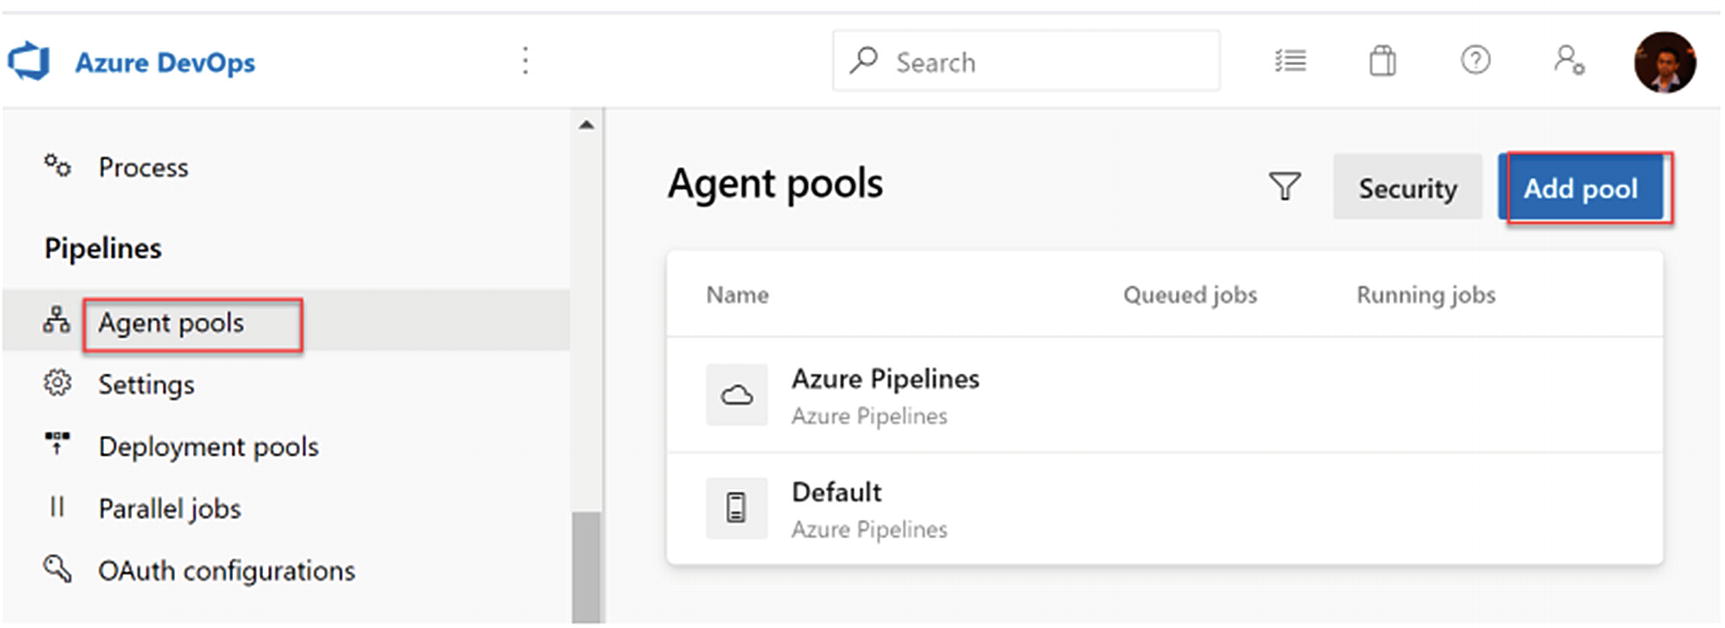
Pools can be defined on two levels. First, you can define a pool at the Azure DevOps organization and have it added to all existing team projects. To do this, click on the organization setting in your Azure DevOps organization and click on Agent Pools ➤ Add Pool. You can see the default self-hosted pool named Default, if also available, for you to set up agents. See Figure 3-2.
Figure 3-2
Add pool
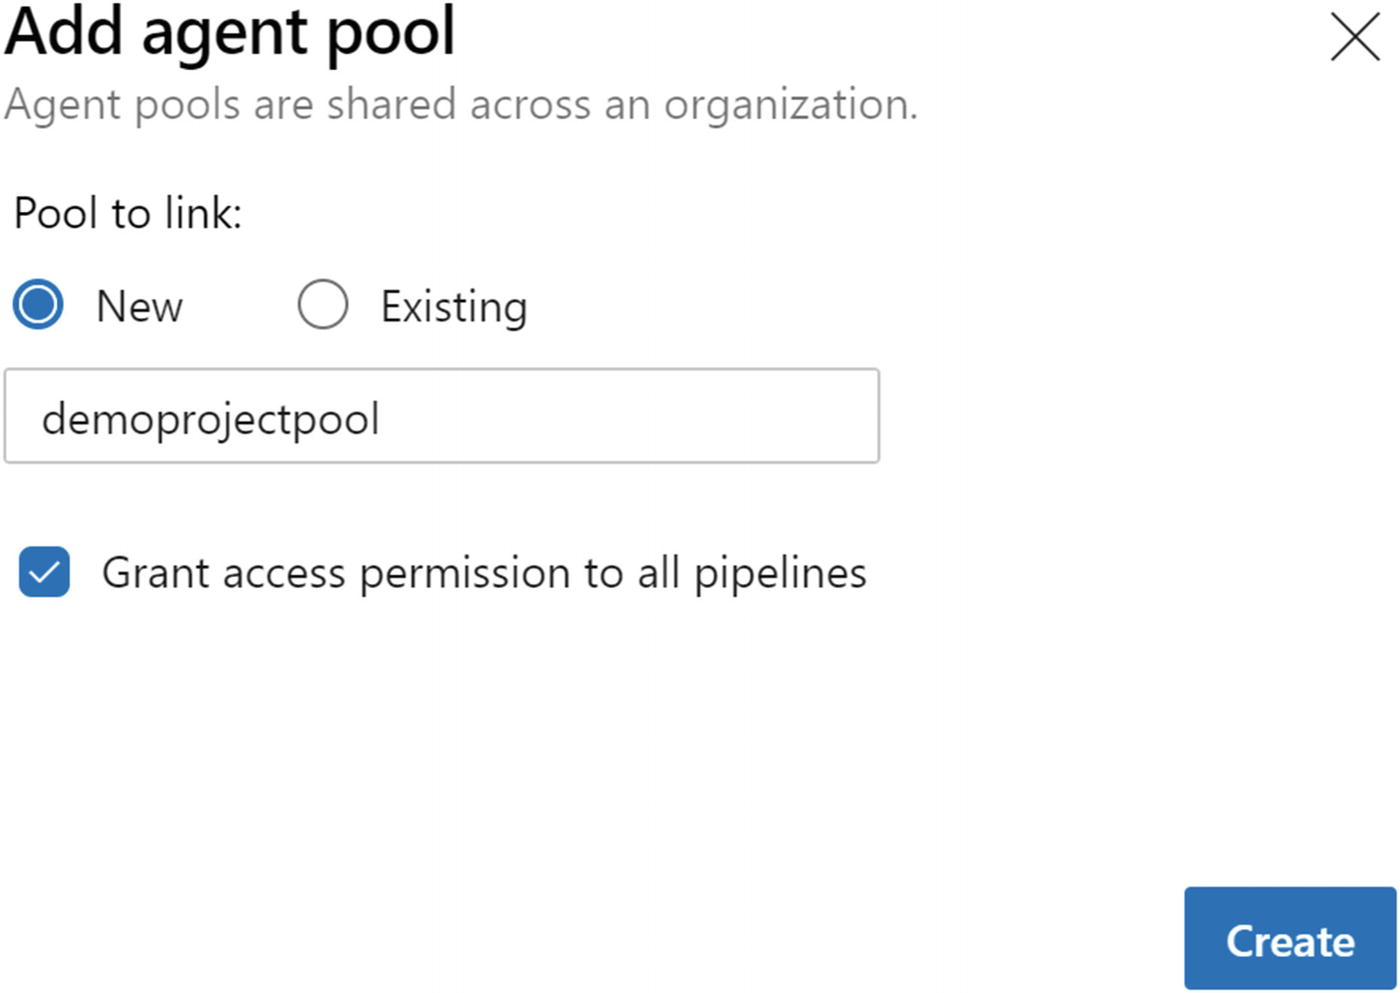
A pane will appear allowing you to provide a name for the new pool. You can allow all pipelines to use the agents in the new pool by granting permissions. The option to make the new pool available for all team projects is deselected if you want to add the new pool to only the required team project later on from the team project settings. See Figure 3-3.
Figure 3-3
Add a pool
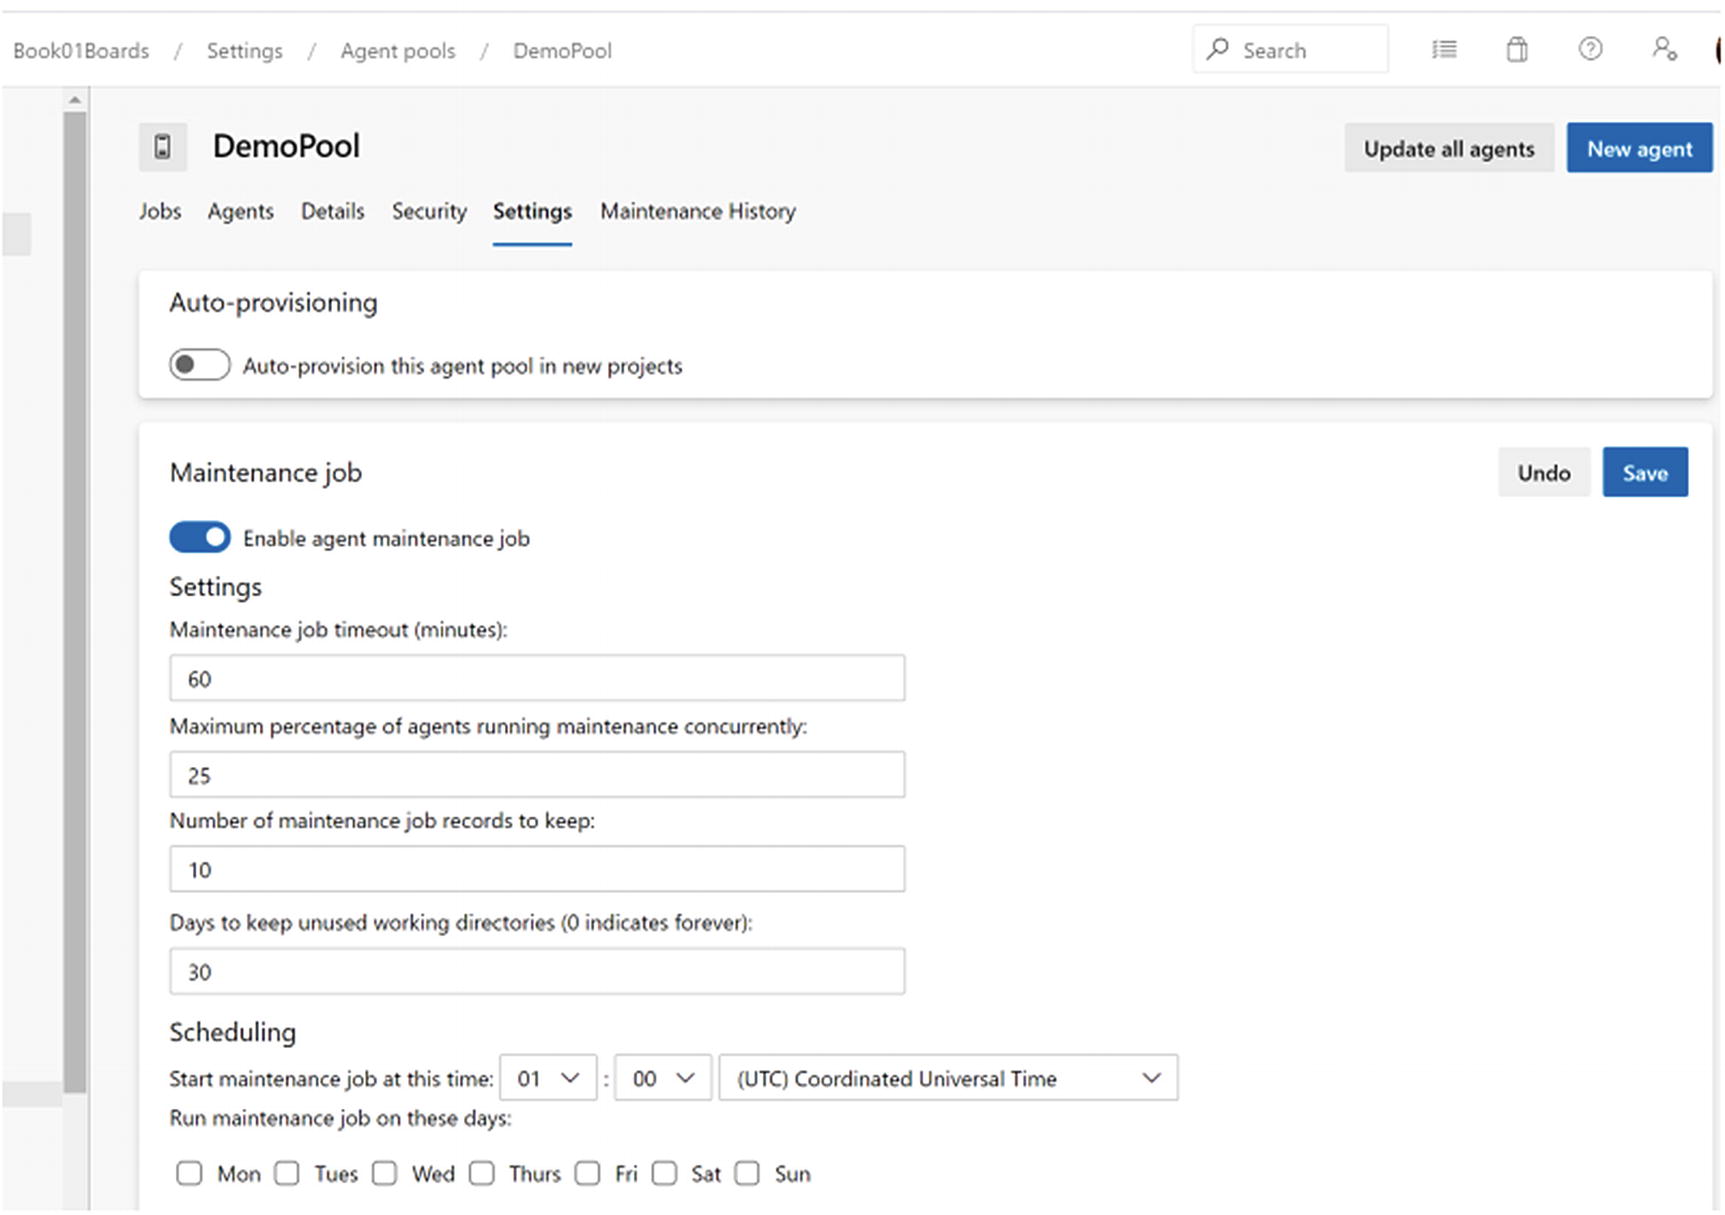
Once the pool is added, you can click on the pool name to navigate to its jobs page, which shows running and queued jobs of the agent pool. You can click on the settings page and in the settings page, there are options to enable applying the pool as available to any new team project getting created in the organization. However, this setting will not provision the already created agent pool for any existing project. See Figure 3-4. You can only add the pool to existing projects at the time of the creation of the pool (see Figure 3-3) or by going to an individual team project and adding the existing pool. You can set up a maintenance schedule for the agents in the pool as well in the settings page. See Figure 3-4.
Figure 3-4
Pool settings
Maintenance history will show any maintenance activities performed for agents in the pool. The agent tab allows you to add the agents to the pool, and in the details tab, you can view details such as description and owner of the pool.
In the security tab, you can define the permissions for the created agent pool. As mentioned in Chapter 2, there are three types of permissions you can assign in the agent pool. The reader will be allowed to view the agent pools. The service account permissions will grant permissions to view agents, create sessions, and listen to jobs assigned by the pool. The administrator can administer and manage the pool and view and use it. See Figure 3-5.
Figure 3-5
Agent pool permissions
Go to a team project and click on project settings ➤ Agent Pools to navigate to the project settings agent pool page to add an agent pool to a team project. You can add an existing pool that is not provisioned for the team project or add a new pool from the team project settings page. When you add a pool from the team project, it only gets added to the current team project. If you want it to be added to another team project, you can do so by adding an existing pool to the other team projects. See Figure 3-6.
Figure 3-6
Add agent pool to a team project
In this lesson we have explored options to add an agent pool to the Azure DevOps organization and team projects. Custom agent pools are useful for setting up self-hosted agents and using different pools to let you have a set of agents serving the same purpose to be grouped together as a pool. We discussed the usefulness of having agent pools in detail at the beginning of this lesson.
Lesson 3.02: Adding Agents to Pools
You can set up virtual machines or physical machines as self-hosted agents. These agents can be added to either a pool named Default, which is the default self-hosted agent pools; or as discussed in the previous lesson, you can add custom pools to team projects. We can use those pools to add agents. To add an agent to a pool, you need to have the Administrator role assigned in the pool where you are adding the agent. You can go to the pool in the project or organization’s settings.
There are three types of machines – Windows, Linux, and Mac –that you can set up as agents in a self-hosted agent pool. The instructions for setting up each type of agent can be found in the panel loaded by clicking on the project/organization settings ➤ Agent pools, and clicking on a pool name ➤ New agent Button. See Figure 3-7.
Figure 3-7
New agent
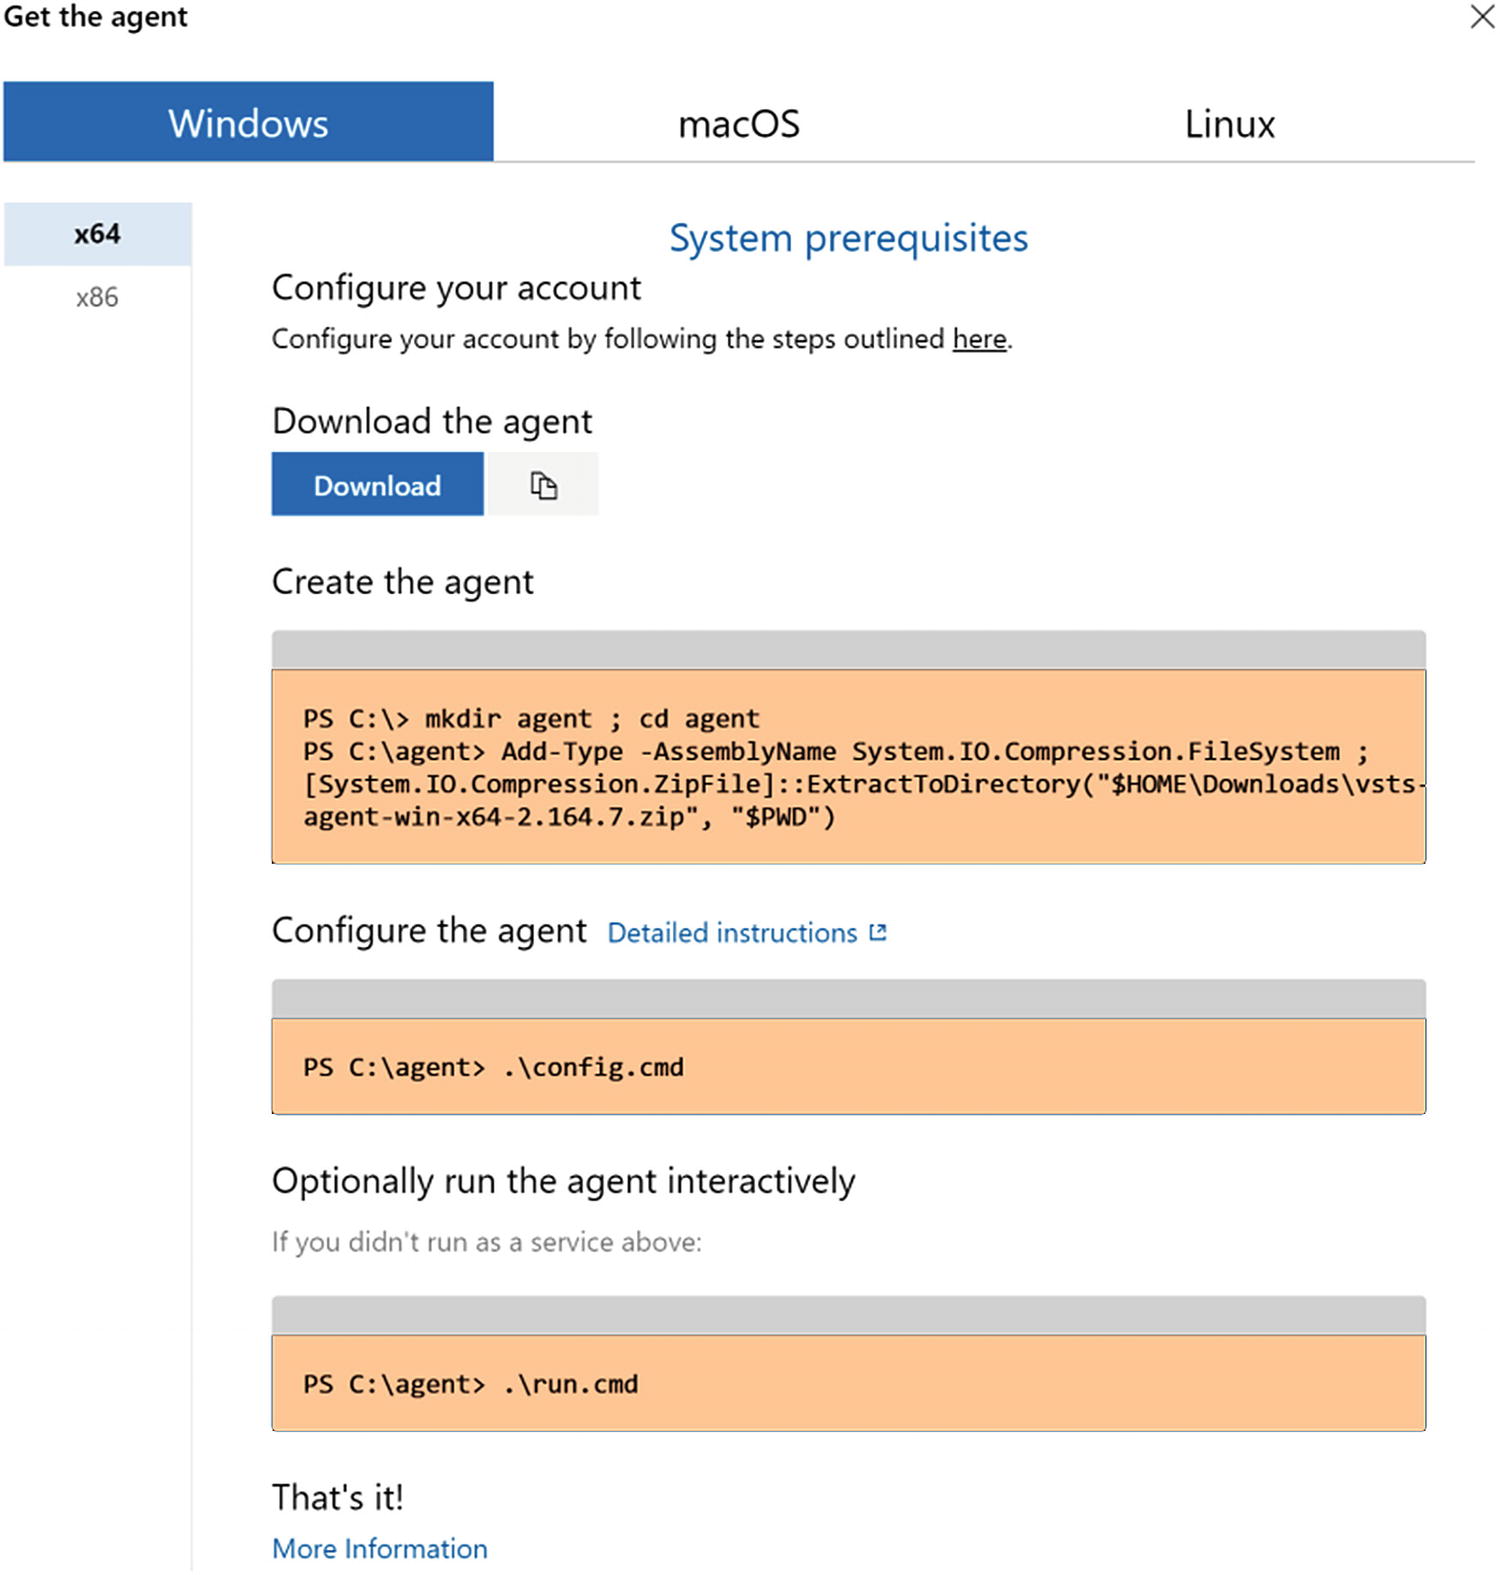
Let’s start by adding a Windows machine as an agent to a pool. You can simply follow the instructions in the loaded panel Windows tab. See Figure 3-8.
Figure 3-8
Windows Agent setup instructions
You can also manually download the agent zip file by clicking the download button shown in Figure 3-8. Then extract it to a folder. Use a command prompt or PowerShell window and run the config.cmd and follow the prompts. You have to provide the Azure DevOps organization url. Then you need to provide a Personal Access Token (PAT), and we have discussed how to create one in the Hands-On Azure Boards book of this book series. The PAT needs to have the Agent pool Manage and Read scope defined. Instead of a PAT, you can use negotiate or alt as an authentication option and provide the username and password to register the agent, or use an integrated authentication type to use logged-on windows credentials. The credential you use only needs to set up the agent and it would not be the credentials used to maintain the connectivity of the agent to Azure DevOps. Hence, it is not required for you to keep a PAT or other credentials active after setting up an agent as the agent and Azure DevOps communicate using a different secret token setup at the time of setting up the agent, which is not visible to you. You can get detailed information from the Detailed instructions link shown in Figure 3-8. You can provide a name of the agent pool that the agent needs to join. Running an agent as a service is advisable as long as it doesn’t need to perform any interactive activity. In scenarios where you need to run a UI test that requires desktop interaction, you can configure it as interactive with auto login options. See Figure 3-9.
Figure 3-9
Configure agent
More or less, in a similar manner you can set up agents in Mac or Linux as per instructions available in the tabs in the panel shown in Figure 3-8. Once the agent is registered, it will become available in the agent pool, agents tab, and can execute jobs assigned by the pool. An agent can be enabled or disabled so that it allows the pool to assign jobs to it. See Figure 3-10. This would be useful if you are performing a maintenance task on a given agent in a pool, for example, applying security patches, installing software, or even applying Windows updates, etc.
Figure 3-10
Agents in the pool
You can click on an agent to view its jobs and capabilities. The jobs tab will show executed and in-progress jobs of an agent. The capabilities tab will show the system capabilities of an agent, and you can add manual capabilities as key and value so that these can be used to demand agents in the build and release pipelines. How these demands work will be discussed in Chapter 4. See Figure 3-11.
Figure 3-11
User capabilities
This concludes the lesson on adding agents to pools, where we explored the place where we can find the instructions to set up an agent in a pool for all platforms. Additionally, we discussed the important information of setting up an agent using a Windows-based agent as an example. Further, how to define user capabilities for a self-hosted agent and view the system capabilities were explained in this lesson.
Lesson 3.03: Setting Up Deployment Groups
Deployment groups can be used for the purpose of keeping deployment targets in machines. A deployment group can have multiple machines registered in it, and a deployment agent can be set up in these machines tagged with different roles such as webserver, dbserver, etc., denoting the purpose of the machine in the deployment group.
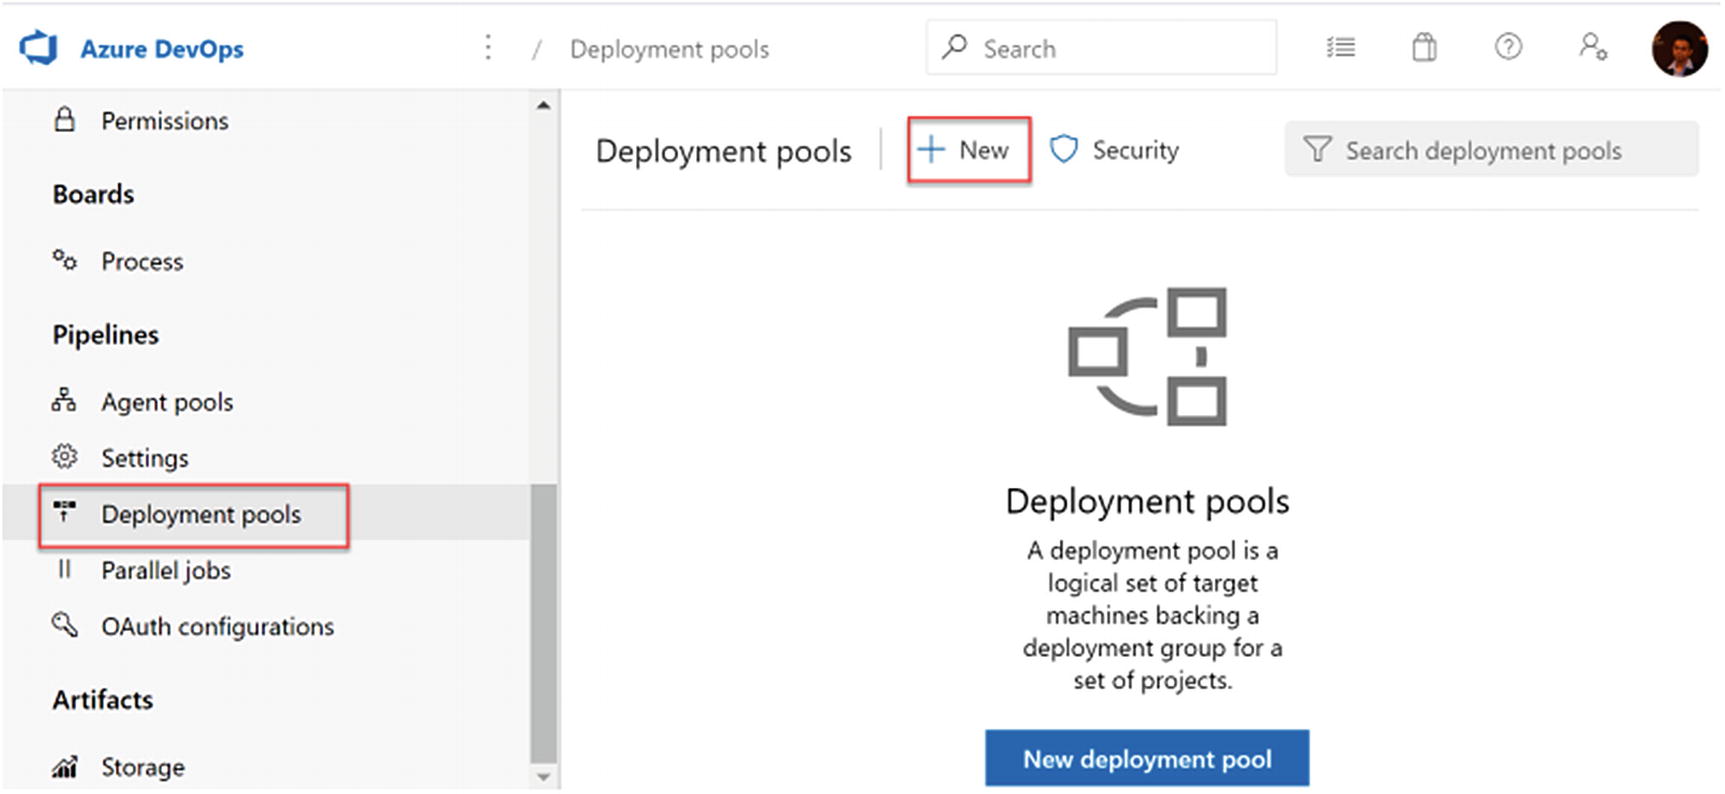
In the Azure DevOps organization level, you can find deployment pools in the settings. The deployment pool allows you to share a deployment group with multiple team projects. From organization settings, you can define new organization pools. See Figure 3-12.
Figure 3-12
Create new deployment pool
The deployment pool can be provisioned as a deployment group in selected project(s) at the time of the creation of the deployment pool, if required. See Figure 3-13.
Figure 3-13
New deployment pool
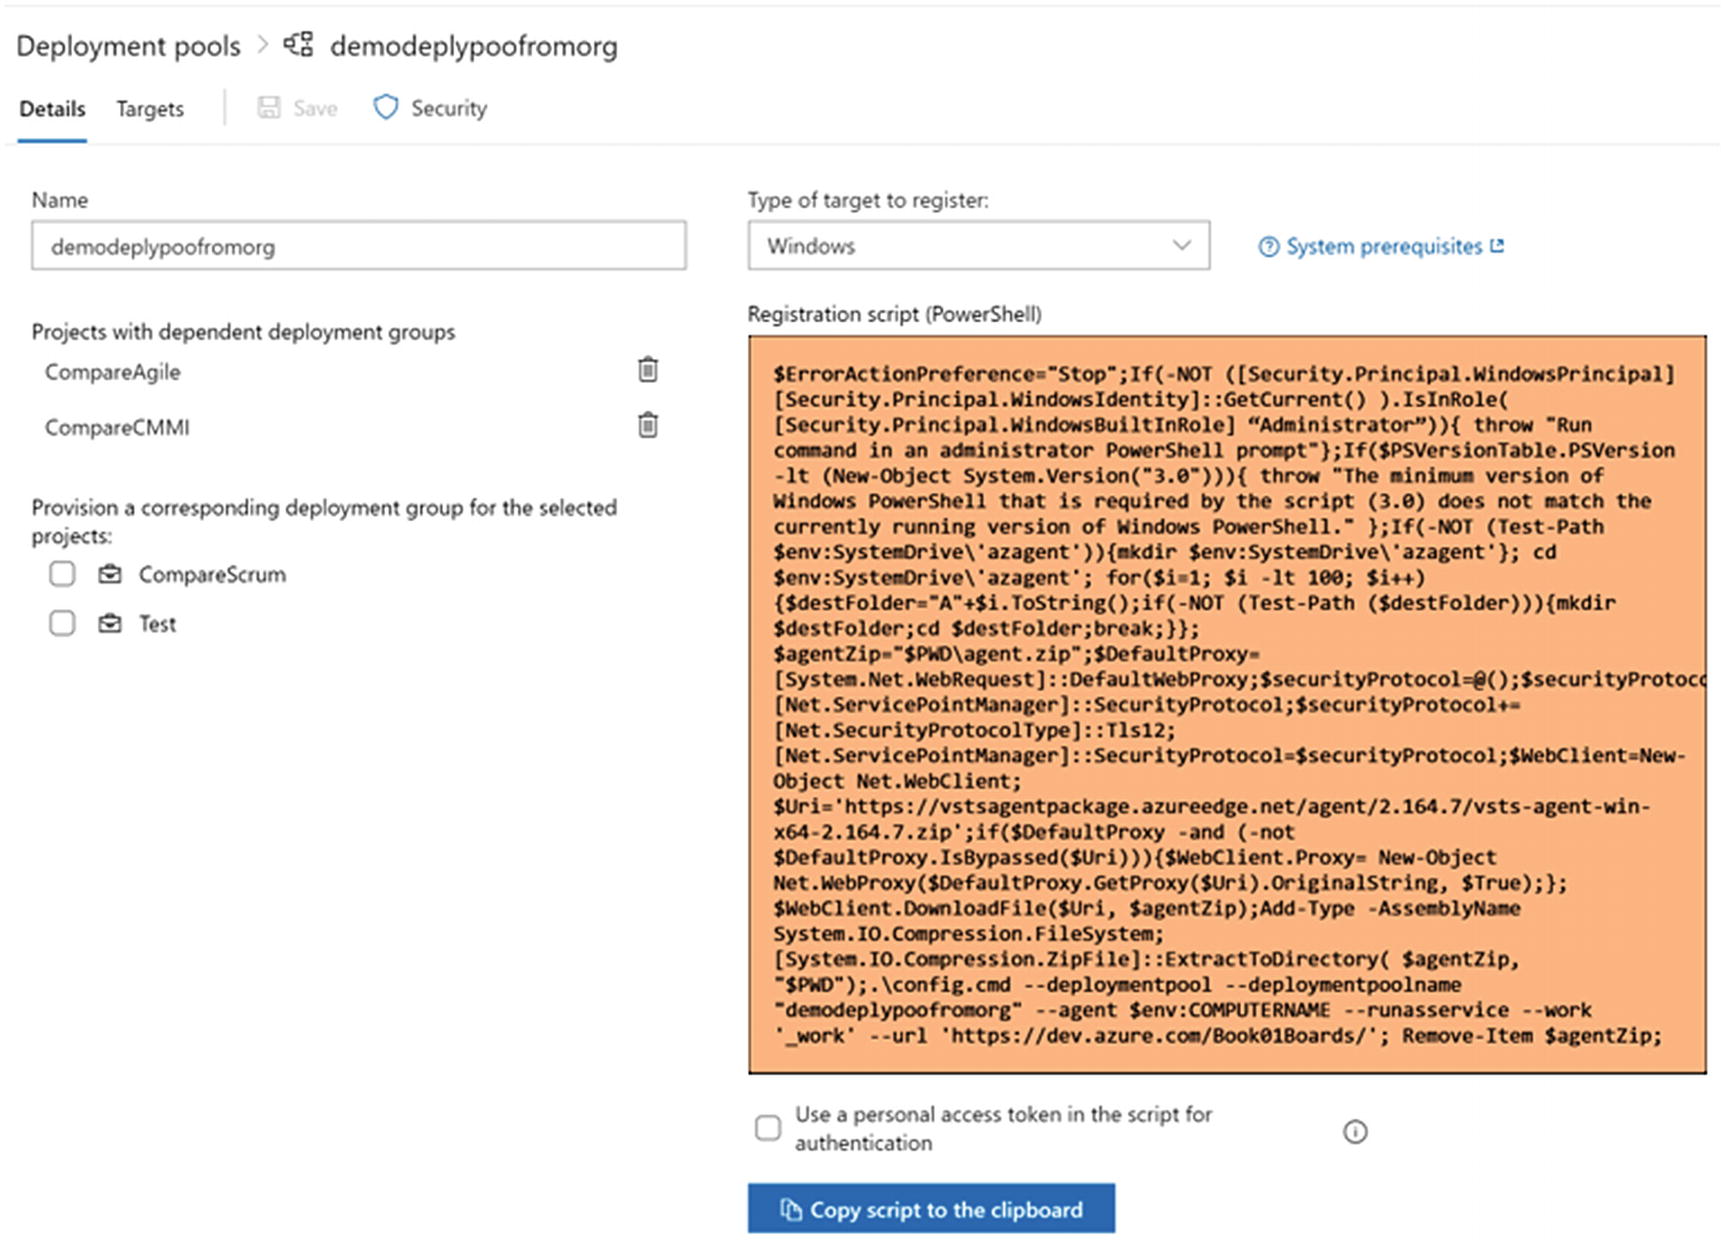
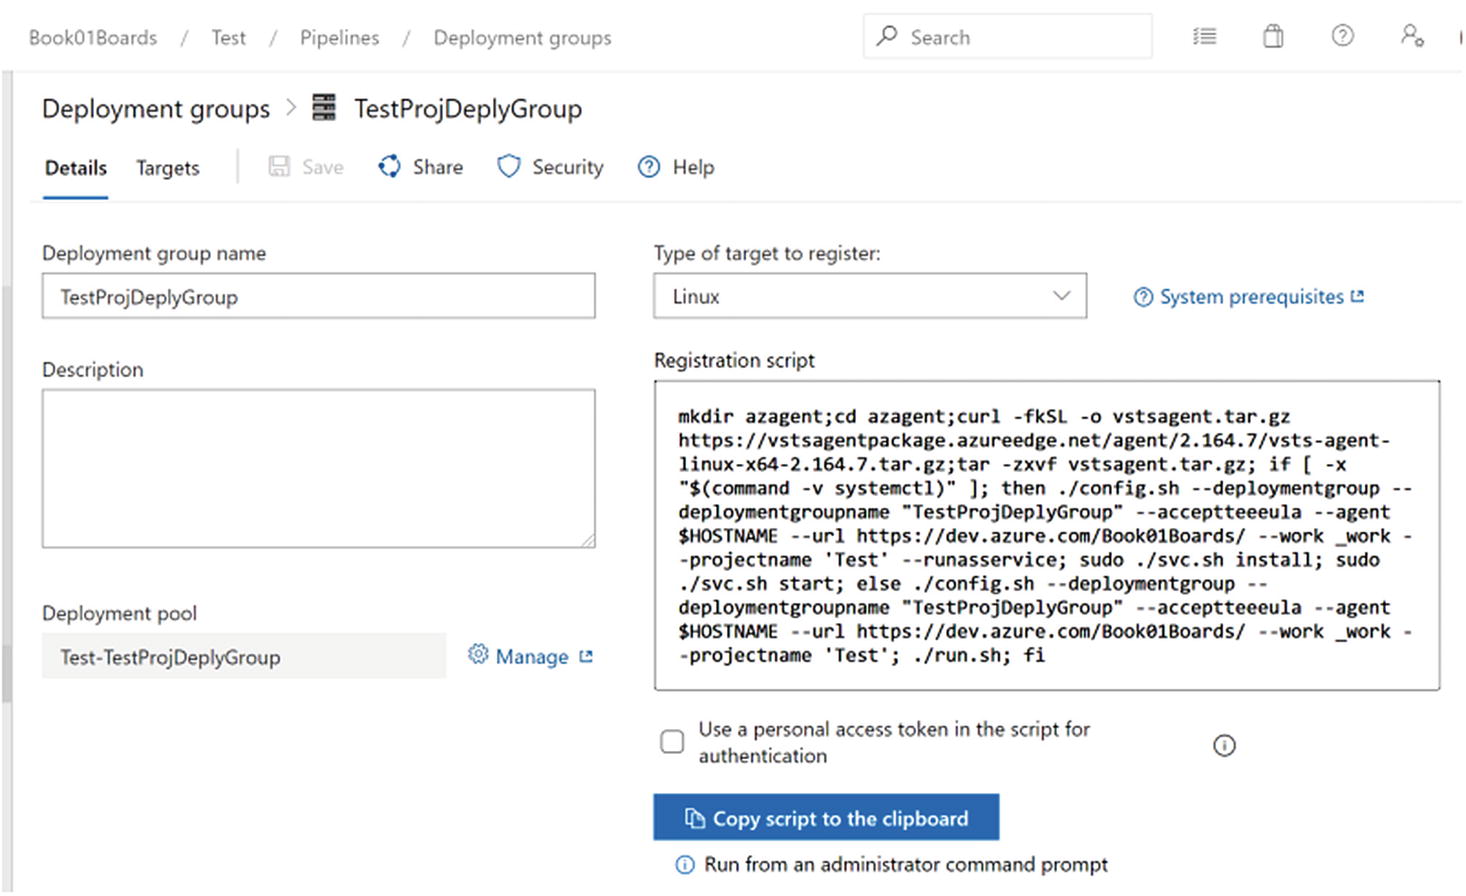
Once the deployment pool is created, you can click on the pool name and add the machines to the pool by executing the script available for Windows and Linux machines. The drop-down lets you select the operating system and available script changes depending on the machine type. You can click on Use a personal access token option to enable embedding a PAT to the script so that it can automatically execute, with minimal interaction, to set up a machine as a target in the deployment group. You can provision the deployment group/pool in the other existing team projects in the Azure DevOps organization, and even remove the deployment group from the current provisioned team projects. See Figure 3-14.
Figure 3-14
Deployment pool details
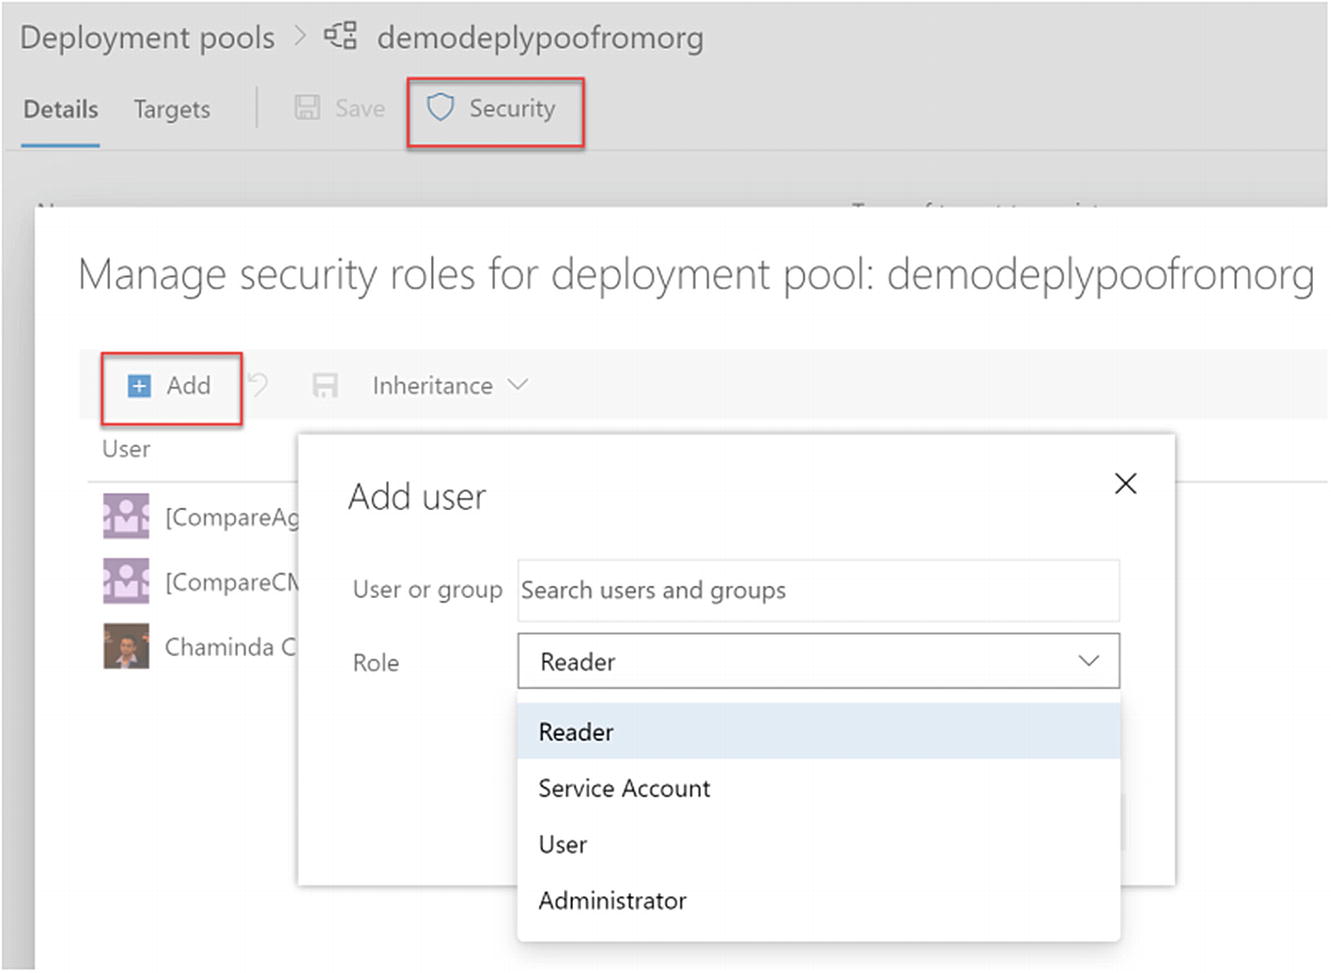
In the security tab, you can define security for the deployment tool. You can define four types of roles and add users or groups to the pool permissions. Administrators can view, manage, administer, and use the deployment pools. The user role can use the pool to create a deployment group in team projects and view the pool. Service accounts can view agents/targets in a deployment pool and listen to the jobs from the pool. A reader can only view the pool. See Figure 3-15.
Figure 3-15
Deployment pool security
You can expand the Azure Pipelines left menu, and there you can find the deployment groups submenu, where you can create deployment groups or provisions already available in the deployment pool as a deployment group. See Figure 3-16.
Figure 3-16
Deployment groups
When adding a new deployment group, you can provide a name and description to it. See Figure 3-17.
Figure 3-17
Create deployment group from project
Once a deployment group is created in the project, you have the capability to provision it in other team projects by sharing it with them. See Figure 3-18.
Figure 3-18
Sharing deployment group
In the deployment group, you can set up security for the roles reader, who can just view the group; the user who can use the group in pipelines; and for the administrator role who can manage and use the group. Similar to the deployment pool window, the deployment group inside the team project lets you copy and use the script to create targets in the desired operating system, Windows, or Linux. See Figure 3-19. In the targets tab, you will be able to see the targets of the deployment group.
Figure 3-19
Deployment group details
The deployment group created in the project is available in the organization settings as a deployment pool where you can provision it for projects, targets, or set up security. See Figure 3-20.
Figure 3-20
Deployment pools
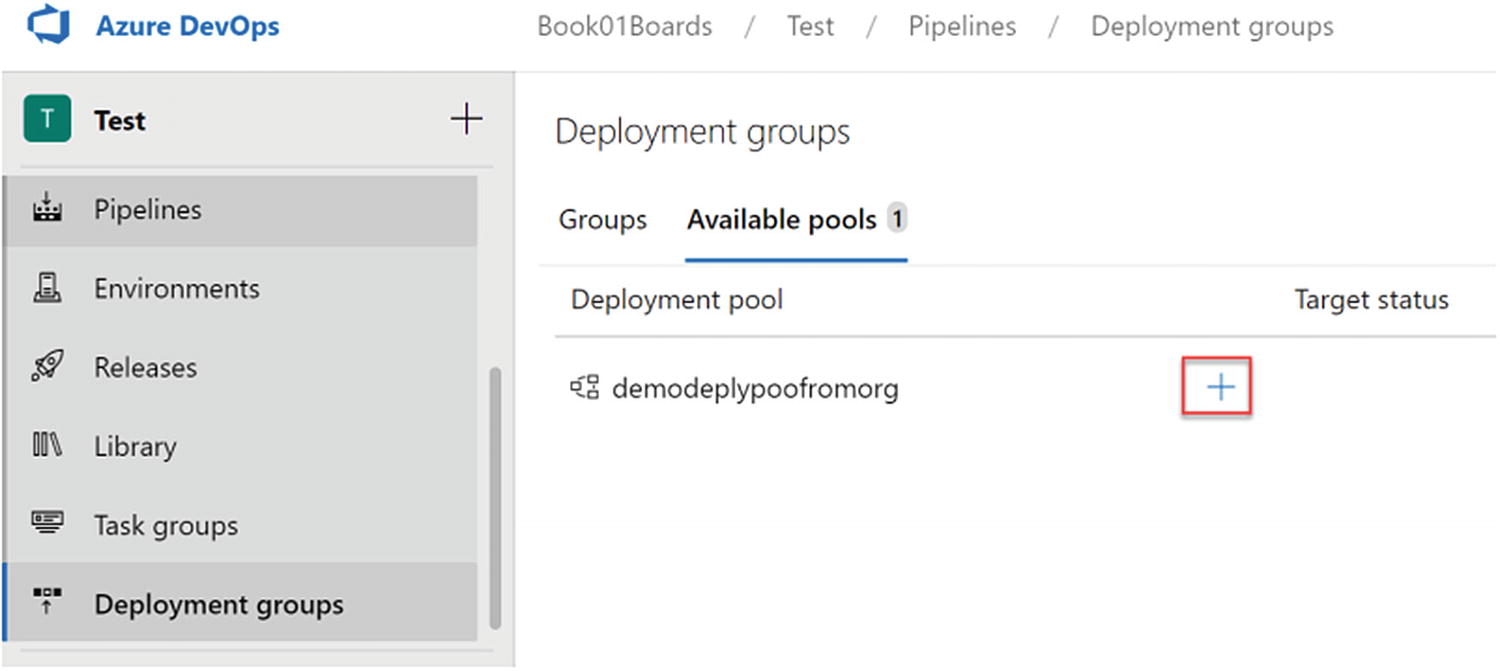
In a team project, you can use the existing deployment pool of the organization to provision a deployment group. See Figure 3-21.
Figure 3-21
Provision an available pool as a group
In this lesson, we looked at how we can create deployment groups that can be used in Azure Pipelines to do the deployments.
Lesson 3.04: Adding Targets to Deployment Groups
Targets in deployment groups are targets machines that you can set up to participate as deployment, destinations, or targets that can be used in Azure Pipelines. You can set up Windows or Linux machines as deployment targets, which would be really useful when your software system is on premises or an infrastructure virtual machine set up on a cloud platform.
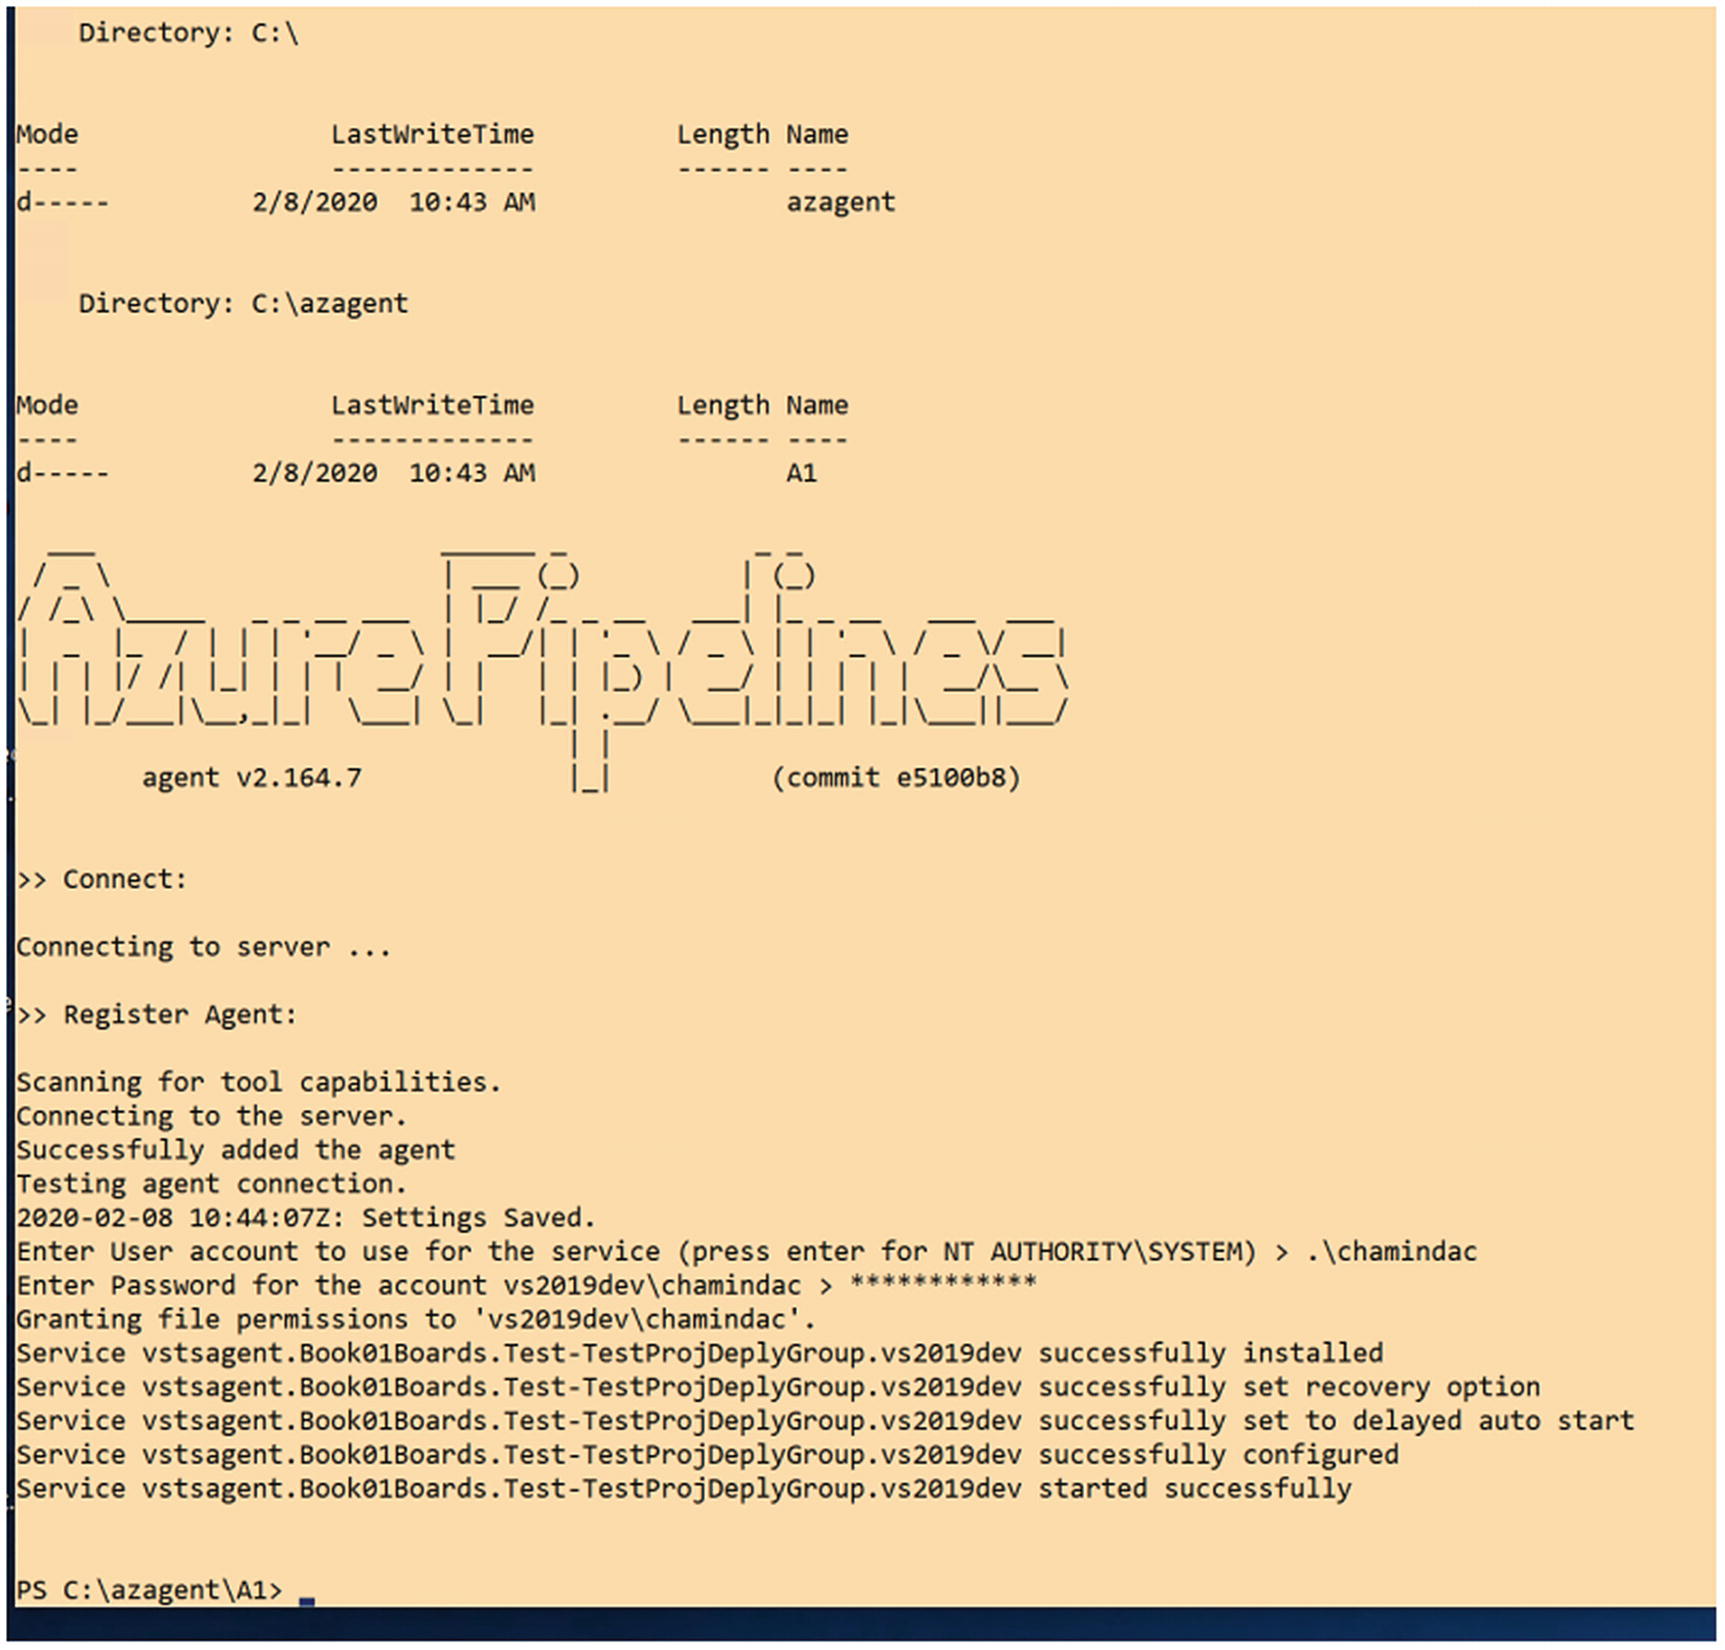
To add a deployment target, you can go to the deployment pool in organization settings or to a deployment group in the team projects. Once you open up the deployment details, you can find the script that can be copied for a Windows or Linux machine. Select a personal access token option to embed a PAT in the script so that it can authenticate with the Azure DevOps to set up the deployment target. By copying the script as shown in the previous lesson and executing it in the target machine PowerShell or Terminal windows with administration privileges, this will set up an agent and add the target machine as a deployment group. See Figure 3-22.
Figure 3-22
Register target machine to a deployment group/pool
Similar to agent pool agents, communication between the target and the deployment group is maintained with a different token from the PAT that you use to set up, so there is no need for the PAT to be active to keep the targets available to the deployment group.
Once the target is added in the pool/group, it will be available to the projects provisioned with deployment groups using the same pool. See Figure 3-23.
Figure 3-23
Deployment pool is added with a target
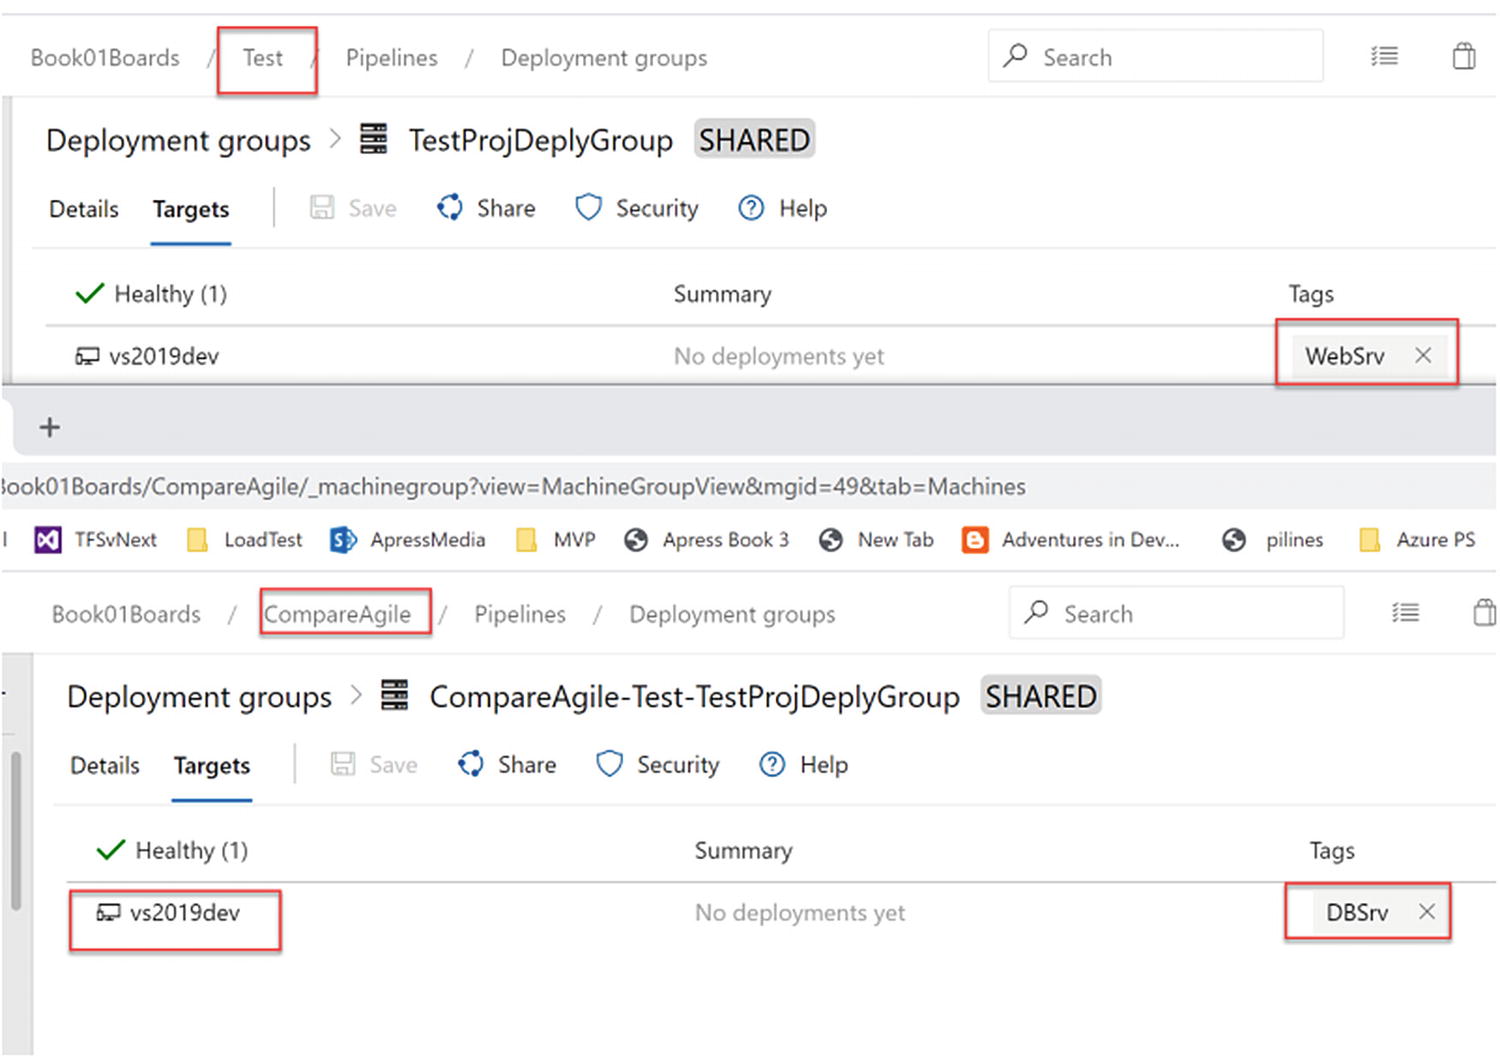
You can add tags to the target to define its role in the deployment process. See Figure 3-24.
Figure 3-24
The target is tagged with WebSrv
However, when you use the deployment pool in multiple projects to provision deployment groups, you can define different tags for the same target in a different team project deployment group. Simply, this means the same machine can be in the same deployment pool as a target but can be used in a different team project deployment group as a different deployment target role. See Figure 3-25.
Figure 3-25
Same deployment pool is used with a deployment target in different projects
We have discussed the options to set up targets in deployment groups in this lesson, which will be useful in deploying to targets of your own infrastructure on premises or cloud.
Summary
In this chapter, we explored how we can create a self-hosted agent that can facilitate a custom-build pipeline execution with special software needs that can be satisfied with Azure Pipelines agents hosted by Microsoft. Further, if you have spare machines or your own datacenters with virtual machines, you might prefer to use them as build agents by registering them on your own agent pools. In addition, we discussed deployment groups and targets and how to set them up to facilitate software deployment on your own infrastructure.
In the next chapter, we will be exploring the options of creating Azure build Pipelines using the classic editor.