Now it’s time to really get into the meat of the book—computer security! This chapter covers the topics that most people probably associate most with security: Macs vs. PCs, antivirus software, and operating system security settings. This chapter will cover those topics and more, with a slew of top-notch tips to make sure your desktop or laptop is locked down tight.
Macs Are Safer Than PCs
Let’s start this chapter by stirring up some controversy: Macs are safer than PCs. That’s right, I said it. However, I had to seriously resist the urge to put “air quotes” around the word safer. So, let me be a little more specific. Macs are “safer” than PCs…because most people who write malware are looking for the largest market, and that would be Windows. Despite the recent resurgence in popularity of Macintosh computers, they still make up only a small percentage of the computers on the Internet. According to NetMarketshare, Macs account for just under 9 percent of all desktop operating systems as of March 2018, while Windows holds about 88 percent. If you were going to try to design some sort of computer virus, which operating system would you focus on?
This is a form of what we call security through obscurity , which I mentioned in Chapter 2. Macs are more “secure” because they are more “obscure.” Security through obscurity means that you try to lie low and not draw attention. If they don’t see you, they won’t attack you. As a security practice, it’s horrible. It’s sorta like hiding the key to your house under your door mat. Sure, your house is technically locked, but if someone goes to the trouble of looking around for a key, then it may as well not be locked.
Modern operating systems have included lots of great security features over the last decade or so, and I think you’d be hard-pressed to argue that the latest Mac OS is significantly more secure than the latest Windows OS. However, there are a lot more PCs out there running very old versions of Windows than there are Macs running really old versions of Mac OS. According to GlobalStats statcounter, as of the writing of this book, one in five Windows PCs are still running Windows 7, which was released in 2009 and cut off from all support in 2020. Despite a period where Microsoft offered free updates to Windows 10, that version of the OS is on 71 percent of all PCs. If you’re one of those people still running Windows 7, you need to upgrade to Windows 10. (You can still do this for free.1)
In 2013, Apple shifted to a policy of free upgrades for its operating system, which is a huge plus for Mac users and their security—and it allows Mac users to upgrade to the latest OS as soon as the new version is available.
So, on some level, you’re marginally safer with a Mac than with a PC. But I’m not going to leave that to chance. Let’s talk about the things you can do to really make yourself safer, regardless of what operating system you’re running.
Non-admin Accounts
One of the basic principles of security is the practice of least privilege . This is sorta like the “need to know” that we’re familiar with in our spy novels and movies (and of course, it’s a real thing in security agencies). Benjamin Franklin once said, “Three can keep a secret, if two of them are dead.” The idea here is that the fewer people who have access to the truly important stuff, the more likely it is that the important stuff will remain safe.
Let’s look at the castle analogy again. You might give everyone on your guard the keys to the front gate, but you would give the keys to the castle only to your special castle guard. Why? Because the guard at the front gate doesn’t need access to the castle. Likewise, the king might keep the keys to the gold vault on his person, not even trusting the castle guard with that level of access, because at the end of the day, the only person who really needs to access the coffers is the king. If every member of your castle guard had a copy of the castle and vault keys, then what happens when one of the guards is knocked over the head and his keys are stolen? All of a sudden, your most precious items are at risk. Guards don’t have any need to access the gold in the vault to do their job. They just need to protect it. So, guards don’t get that key.
Who has a key to your house? Probably everyone in your family. Maybe you will give a key to a house sitter or pet sitter while you’re away because for that limited period of time, they actually need to be able to get into your house. When you get back, you take back your keys. Who has keys to your safe deposit box, though? Probably just you. You would probably never lend that key to anyone else, at any time, because the only person who needs to get in there is you.
The principle of least privilege says that people should be allowed to access only those things they need to access to do the things they’re supposed to do, and no more. If necessary, you can grant temporary access and revoke it later.
You may already know that your computer allows you to set up multiple user accounts. You’ve probably never used it, but you probably know that it’s possible. What you may not know is that each of these user accounts can have different levels of privilege. That is, you can restrict the level of access—the power to make important changes—for each account. At first you might think that this feature is mainly for parental control, preventing kids from doing stuff they shouldn’t be doing. Actually, it’s for all users—even you! But wait…surely if you can trust anyone, you can trust yourself! Turns out you can’t. It’s not about trusting yourself, it’s about preventing malware that gains access to your account from acting on your behalf. If you accidentally click a bad link, download a virus, or hit a website that installs malware, then whatever you are allowed to do, the malware can also do.
Let me drive this home with some chilling statistics. According to a 2017 report by a company called Avecto, 80 percent of all Windows security vulnerabilities that were considered “critical” could have been prevented or significantly mitigated if the user had not had full administrator (admin) privileges. Furthermore, removing admin rights could have mitigated 95 percent of the critical vulnerabilities in Edge.
Great. Now I can’t even trust myself! Now what?
The solution to this problem is to always create at least two accounts on your computer: an admin account, which you use only when necessary, and a regular, non-admin account for everyday use. When you first pull your shiny new computer out of the box, you’re going to need that admin account to install your software and tweak all your system settings. But after that, you need to create and use a more restricted account for day-to-day stuff.
I would go further, however. I believe strongly that each person in the household should have their own account. It’s easy to set up, and there’s really no excuse for not doing this. It’s not about keeping secrets—everyone deserves their own space, their own settings and preferences, and some basic privacy. It lets everyone express their individuality and also compartmentalizes any risks. This will also allow you to use parental controls to restrict access for young children, without affecting your ability to…uh…do parent things. And if something goes horribly wrong with one of the user accounts, you can just delete it and create a new one without affecting anyone else or having to completely wipe and reinstall everything on your computer.
There are other interesting reasons to have multiple accounts. If you’re a hard-core gamer or have some other intense application that requires some system tweaks to be efficient, you can create a second account for this purpose. This other account will be stripped down and dedicated to the special task at hand.
If you regularly give presentations for work using your computer, you can log into a special account for when you’re presenting. You can have a special desktop picture, avoid sharing your cluttered desktop, and also avoid annoying pop-up notifications from all your personal accounts.
You can also set up a special guest account so that when someone just wants to check their mail or look something up on your computer, you don’t have to worry about giving them access to your personal stuff (including your password vault).
Microsoft has announced a new feature for Windows 10 called “Controlled folder access.” The purpose of this feature is to restrict access to your personal files to only a few authorized applications. You select the files as well as the approved applications. While this may seem odd, it’s really just another form of least privilege. If configured properly (and I’ll walk you through this later in the checklist for this chapter), this tool would prevent ransomware from encrypting your irreplaceable files and demanding money to unlock them.
Likewise, Apple has added several security features to Mac OS, including restricted access to key folders, as well as access to your computer’s location, camera, microphone, contacts, photos, and much more.
I expect that we’ll see more and more features like this as time goes on from both Apple and Microsoft. As things get worse out there, the balance between security and convenience will necessarily move in the direction of security.
iCloud and Microsoft Accounts
Get ready for a big dose of “good news, bad news.” In the old days (like 2004), your computer was more likely to access the Internet via dial-up modem than always-on broadband. Around this same time, smartphones came on the scene, and suddenly people had not one but two devices that were always connected to the Internet. It was only a matter of time before people wanted their address book, web bookmarks, calendars, and to-do lists to be the kept in sync across their various devices.
Apple and Microsoft heard the call and launched services to meet this growing need. The current versions of these services are iCloud and OneDrive,2 respectively. While these services offer limited Internet-based file storage and sharing, in this chapter I’m focusing on the data synchronization aspects. You can’t argue with the convenience factor here. When you update your vagabond sister’s home address for the umpteenth time or add little Johnnie’s complete Little League spring schedule to your PCs calendar, it’s really nice to have those changes automagically appear on your smartphone and your work computer. Oh, and you can probably also access all of this info from the Web by logging into your cloud account, even from a computer or device you don’t own. Finally, you can use these same services to share this information with the rest of your family. What’s not to like?
Well, that was the good news—arguably great news. It’s a killer feature. Here’s the bad news: you’re not just sharing that all that juicy information with all your devices and your family members, you’re also sharing it with Apple or Microsoft. Here’s the worse news: you’re probably sharing that information with many other companies, too. Apple and Microsoft will argue that this is a feature, not a bug—they’re giving you the opportunity to access this information from within other applications, saving you the trouble of having to manually transfer things like contacts and calendar events to some third party. But you need to stop and think about what all that data is revealing about you. Your address book probably contains more than friends and family. It may also contain embarrassing contact information—maybe your AA sponsor, herpes doctor, or mistress. And if you’re like most other people I know, you put lots of other info in your address book like Social Security numbers, PINs and passcodes, account numbers, and who knows what else.
That said, it’s almost impossible to avoid signing up for these services today. Both Apple and Microsoft have deeply embedded these services into their products to the point where many key features simply won’t function without them. Furthermore, you pretty much need to have one account for each person in your family, not just one shared account. These services are not just about synchronizing data across your devices, it’s about personalization of the experience on these devices for each individual. For example, it allows parents to control what each of their children can access—what’s right for your elementary school son is different than what’s right for your teenage daughter.
Of course, all of these hyper-personalized settings are a gold mine for marketers. If you dig around in the end-user license agreements (EULAs) you “sign” by clicking that “Agree” button, I’m sure you’ll find references to how you consent to sharing some of your information with “partners.” I guarantee you’ll find language about how Apple and Microsoft will hand over this information to law enforcement authorities “in accordance with the law,” too. That may or may not require a warrant, by the way.
This is the world we live in now. We’re offered enticing and often very valuable services, usually at no (monetary) cost—we just have to sign away our privacy. And this is increasingly becoming unavoidable as these services are tightly integrated with our computer and mobile operating systems. In Chapter 9, I’ll show you how to enhance the privacy settings for these accounts .
Built-in Security Features
Computers are meant to make our lives easier and richer by offering all sorts of valuable functions, taking over the drudgery of tedious tasks, helping us to organize our increasingly complex lives, and giving us powerful tools to create documents, presentations, greeting cards, images, and so on. In the early days, before the advent of the Internet, computers were wide open—they were ready and willing to accept instructions from other computers on the home or work network. Our operating systems and software applications were happy and naive, gladly offering their help to anyone who asked. Then came the Internet. It was like transporting Mary Ann from Gilligan’s Island to the Island of Dr. Moreau. The cheerful eagerness to help without question went from being an asset to a serious security liability.
Modern computers have lots of built-in security features, though until recent years, many features were not enabled by default. Security is frequently at odds with convenience, and both Microsoft and Apple want to avoid causing their customers undue grief. Thankfully, however, as computer security has become more important, computer and software makers are finally enabling these features right out of the box.
One of the most important features in modern home computer networks is the firewall. Firewalls keep out unsolicited connections from outside your network but allow you to initiate connections from inside your home to the broader Internet. They also allow you to set up specific rules that explicitly allow certain types of connections from outside your home. It’s sort of like a phone that can only call out by default but will let you give it a list of people who you allow to call you. (Why no one sells such a phone is beyond me. I’d buy it in a heartbeat.) You probably have multiple firewalls in your network. Your ISP’s modem might have a built-in firewall. If you have a Wi-Fi router, it almost surely has a firewall function, enabled by default. Finally, your operating system also has a built-in firewall. These firewalls do an excellent job of protecting your computer.
Another aspect of your Wi-Fi router that helps protect you is a feature called Network Address Translation (NAT). As we discussed earlier in the book, communication with the Internet is like mailing letters: the information you send is chopped up into a letter-sized payload, stuffed in an envelope called a packet , and shipped out with a destination and return address written on it. But to the outside world, every smart device on your home Wi-Fi network looks the same—that is, all the communications appear to come from the same address. This is because your router acts as a sort of local mail delivery system. Think of a large company. When you send a package to someone in that company, you probably just address it to the person at the general company address. You don’t know the specific building and/or mail slot within the company; you just trust the company’s internal delivery service to find them. This also means that the company can filter incoming packages. Your router performs a similar function. This means computers outside your home network have no direct way to contact an individual entity (computer, smartphone, or other Internet-connected device) within your home, even if there was no firewall in place. This is one form of security through obscurity that actually benefits you.
These features may sound nice on paper, but you’d be surprised how well they work—all by themselves—to thwart Internet attackers. Because unprotected computers are so vulnerable, hackers and other bad guys are constantly scanning the Internet for computers without these basic protections. Multiple studies3 have shown that unprotected computers (particularly older models without these modern, built-in protections) connected directly to the Internet are routinely and easily hacked. In fact, if you connect an older, unprotected Windows machine directly to the Internet, it will be subverted, on average, within ten minutes. Before this computer can even download the system updates that would probably protect it, it will be hacked4 by some automated bot. The firewall and NAT functions serve as an excellent first line of defense, and luckily these features are standard in home networks now.
So far, we’ve talked only about features that are already in place and working for you right now, and these features tend to be enabled by default. But there are other built-in security features in modern operating systems that are just sitting there, waiting to be used.
Full hard drive encryption is a feature that’s been built into recent versions of Mac OS and Windows. While Apple’s drive encryption utility (FileVault) is available on all of its recent OS variants and enabled by default, Microsoft’s encryption utility (BitLocker) is unfortunately only available on the Pro and Enterprise versions of Windows 10. Encrypting your entire hard drive might seem like overkill, but it’s so easy to do; there’s just no reason not to do it. As a user, you won’t even notice it. The operating system takes care of decrypting all the files (and applications and even the OS itself) on the fly and in the background. What this means is that if someone were to have physical access to your hard drive, they would be unable to read any of the data, unless they were somehow able to guess your encryption password. While this may not be that important for desktop computers that stay inside your house, it can be important for laptops and other devices that you carry around with you—particularly if you travel to foreign countries5 with these devices. If your laptop were to be lost or stolen, you’ll be happy to know that your data is perfectly safe, even if they were to pry open the case and attempt to directly access the hard drive.
One last free feature deserves special mention: Apple’s “Find My” service, which works with a Mac, iPhone, or iPad. Offered with Apple’s iCloud service, this feature allows a person to track the location of all their devices and control them from afar. When you register your device with the Find My service, Apple uses the various wireless technologies (mainly Wi-Fi and cellular signals) on the device to help you communicate with the lost device, send remote control commands to it, and, as a last resort, remotely erase the data from the device. It’s truly a marvelous feature, and everyone with an Apple product should take advantage of it.
Let me demonstrate the usefulness of this feature with personal story. My family and I went to Los Angeles a couple years ago for a big family vacation, and part of our trip included Universal Studios. I normally carry my iPhone in my shirt pocket, and I do not normally ride theme park rides. However, on this day, we rode several—and at one point when I went to pull my iPhone out to take some pictures, I realized it was gone. It must have fallen out, but I had no idea where. This park is massive, and it could be anywhere. I alerted our tour guide, and she said she would put in a call to their lost-and-found department but that they probably wouldn’t be able to look for it until after the park closed at 10 p.m. We got home around 9 p.m., and I jumped on my laptop to check Find My iPhone on iCloud…and there it was, in the Jurassic Park ride building! As it hit 10 p.m., I was able to actually send signals to my iPhone to make alerting noises and post a message on the main screen with contact information. As I watched the map update, I finally saw it move! Someone had found it! It stopped moving at the building where the lost-and-found office was. I went first thing the next morning and retrieved it!
The Pros and Cons of Antivirus Software
When people think of computer security, they invariably think of antivirus (AV) software. That’s no accident. Companies that make this software spend lots of money marketing their wares and convincing you that you’d be foolish not to buy them. Most Windows PCs come preloaded with all sorts of trial software that claims to protect you from the big bad Internet—for just a small (ongoing, hard-to-quit) service fee! This is a perfect example of what we call FUD, which stands for “fear, uncertainty, and doubt.” Computer malware is a very real problem—don’t get me wrong—but in many cases today, the cure can be worse than the disease. Let me explain.
In simpler times, AV software did a good job at finding malware on your computer. Generally speaking, the core function of AV software is to recognize known malware and automatically quarantine the offending software. Some AV software is smart enough to use heuristic algorithms to recognize malware that is similar to the stuff it already knows is bad or recognize suspicious behavior in general and flag it as potentially harmful. A popular new feature for a lot of AV software is to monitor your web traffic directly, trying to prevent you from going to malicious websites or from downloading harmful software.
That all sounds good, but the devil (as always) is in the details. First, in the ever-connected world of the Internet, malicious software is produced so frequently and is modified so quickly that it’s really hard for AV software to keep a relevant list of known viruses. Also, the bad guys have moved to other techniques like phishing and fake or hacked websites to get your information, attacking the true weakest link: you. AV software just isn’t as effective as it used to be.
But the problem is much worse than that. In many cases, the AV software itself is providing bugs for hackers to exploit. Not long ago, Symantec/Norton products were found to have horrendous security flaws6 (which it claims to have since fixed). Increasingly, AV products are offering to monitor your web traffic directly, but this means inserting themselves into all of your encrypted (HTTPS) communications, which has all sorts of ugly security and privacy implications.
So, I strongly believe you don’t need to pay for an antivirus service today. That is, I don’t personally believe that the benefits of the various for-pay services warrant their cost for most people. There are totally free alternatives from the operating system creators that do a good job (which I will be helping you install later in this chapter). Furthermore, if you just do the things I outline in this book, you will significantly reduce your risk. It’s like debating the value of buying a bulletproof vest. While walking around in a bulletproof vest is inarguably safer than walking around without one, it’s actually more important to just avoid war zones and disputed gang turf.
How to Properly Delete a File
Did you ever wonder what happens when you delete a file on your computer? On Windows and Mac OS, this is represented by putting the file or folder in the “Trash.” Most of you probably realize that the file isn’t actually deleted until you “empty the trash.” What you may not realize is that even then, the data associated with that file is not really gone. It’s still there on your hard drive. While your file system no longer shows it to you, the actual bits and bytes are still there, and special software can be used to recover that information.
This is sort of like the difference between throwing away a document and shredding it. Just because you threw your old legal will into the garbage and the trash collector took it away doesn’t mean that it can’t be salvaged and read. You can’t see it anymore, but it still exists in a landfill somewhere. It will slowly decay over time, but until then, someone could dig around and find it. This is why document shredders were invented. When your operating system “deletes” a file on your hard drive, all it really does is forget about it. It treats that part of the hard drive as if it were empty. When you want to save a new file, the operating system will put that file in the space on your hard drive that is marked as empty. Someday it will eventually overwrite part or all of your old “deleted” file, but until that day, the data is actually still there and capable of being read by special tools.
So, if you really want to delete a file from your computer, you need to digitally “shred” it. I’ll show you how to do this in the checklist for this chapter.
Summary
Macs are targeted less often than PCs by hackers and malware makers, mostly because Windows is a lot more common than Mac OS. Apple computers are also much more likely to be running the latest version of the operating system than their Windows counterparts, largely because Apple has been giving away all updates to its OS for years. Because major security features are added with each OS release, Macs tend to be more secure because they are more likely to be running an OS that has these new features.
Modern computers and Wi-Fi routers come with firewalls built in and turned on by default. Likewise, Wi-Fi routers come with Network Address Translation (NAT) turned on by default. These two features alone are very good at protecting your computer from evildoers on the Internet.
Having a separate non-admin account on your computer can significantly reduce the damage done by malware, particularly on PCs. It also makes sense to have separate user accounts for each person in the family—to provide a personalized space for everyone and also to compartmentalize exposure to malware.
Cloud-based storage and data synchronization services have become ubiquitous and nearly impossible to avoid. It’s important to understand what information you’re sharing and do what you can to reduce your exposure.
While there are many for-pay services and software tools out there to protect your computer from malware, they’re probably not worth the money. There are free alternatives that do a very good job, especially if you follow the other tips in this book.
To truly delete a file, you need to do more than just “empty the trash/recycle bin.” You need to digitally “shred” it.
Checklist
This chapter covers some key things you can do on your computer to reduce your “attack surface” and practice the policy of “least privilege.” That is, you need to reduce unnecessary risks, turn off features you don’t need that might be exploited, and set up some reasonable boundaries on who can do what on your computer.
Many of the items in this checklist will require you to choose a password. In some cases, you will need a really strong password; in others, you will just need something moderately strong. I will make a recommendation in each case. But I want to be clear what I mean by “strong” and “moderate.”
Use LastPass to generate a crazy, random password. It should be at least 20 characters long and include all the various types of characters. These passwords are used to protect really important things, specifically things that might be subject to a computerized (offline) attack.
Use the techniques described in Chapter 4 for master passwords to come up with something at least ten characters long that you can easily remember. These passwords will be used to protect your computer login and less important things and/or things that will require a human to sit there and guess them by hand (i.e., online attack).
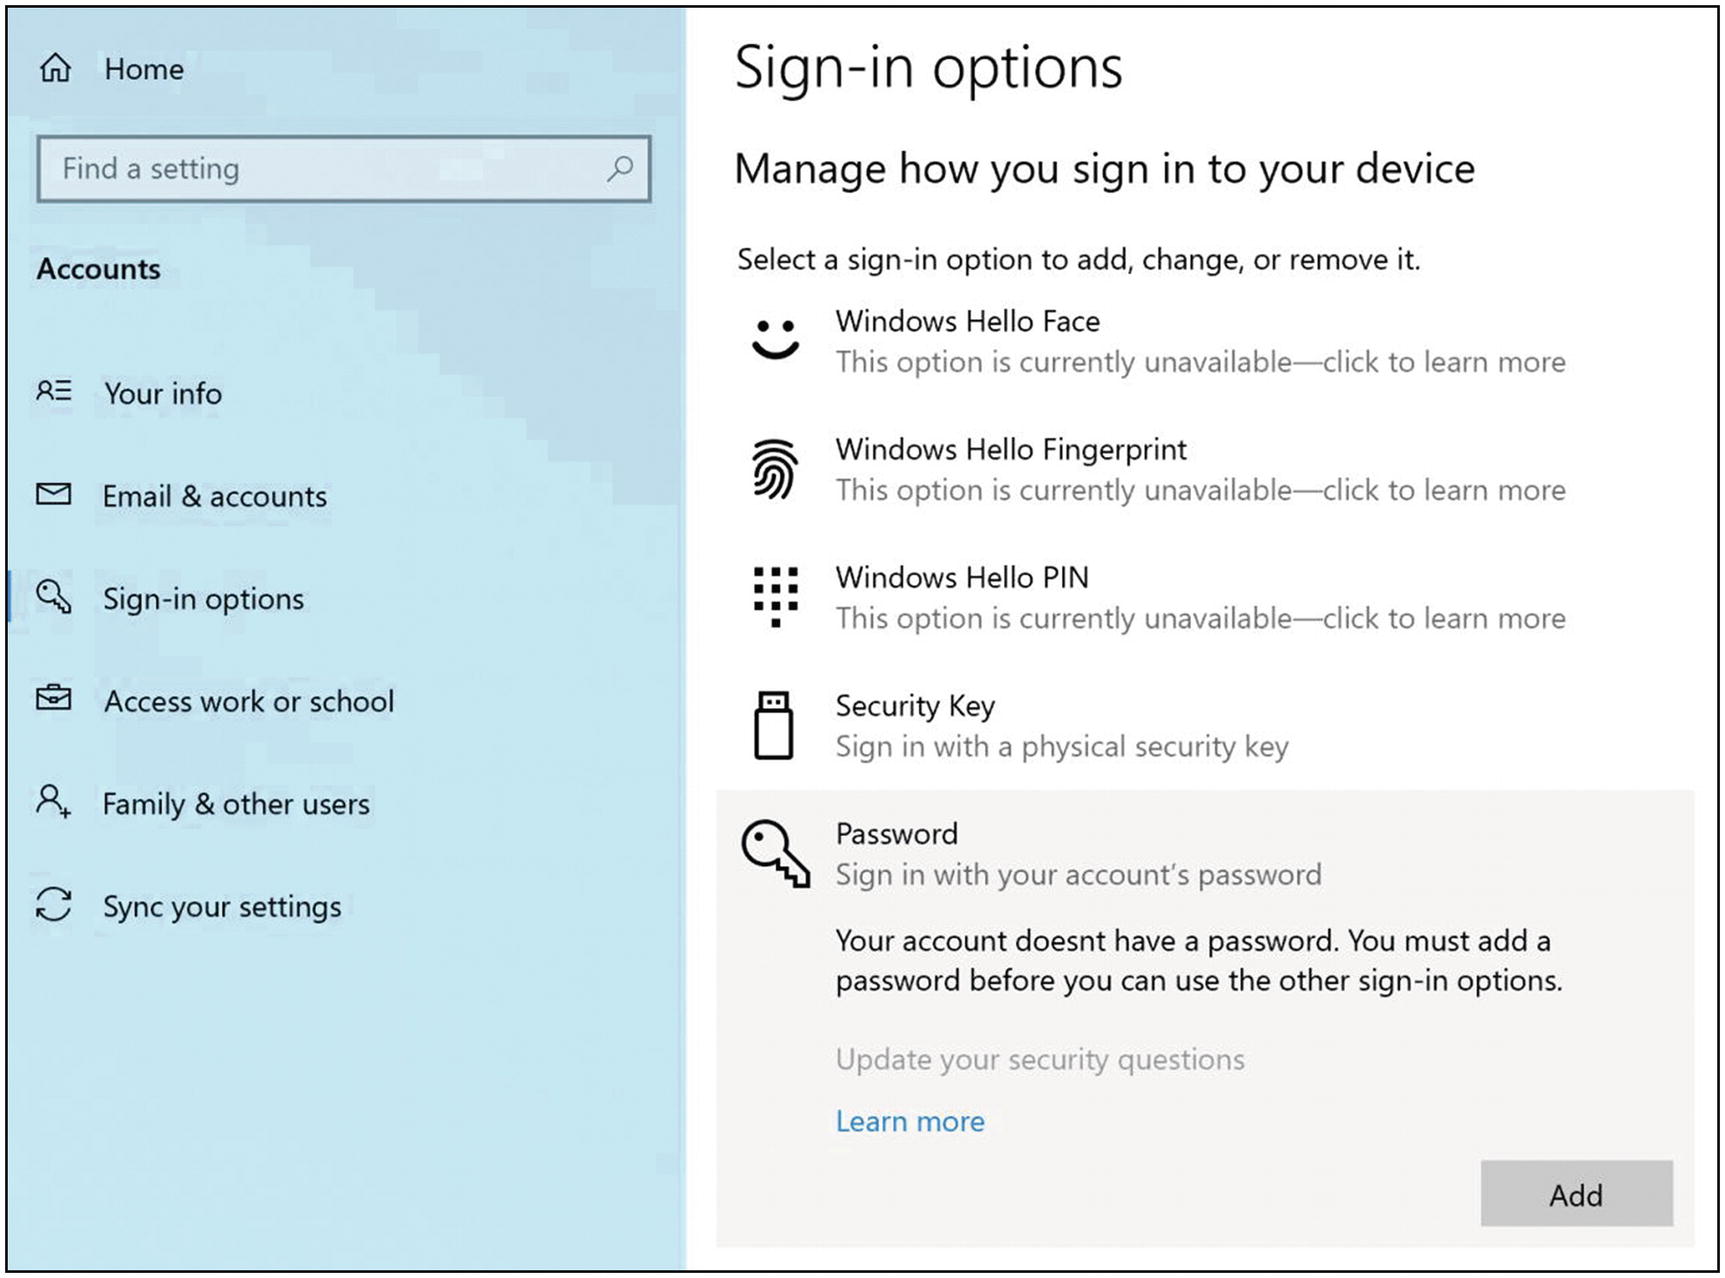
If you have the option to specify a “password hint,” just use the phrase LastPass or even LP. All of these passwords should be stored there, even the “moderately strong” ones that you should be able to memorize. You don’t actually want to give someone a hint that might allow them to make educated guesses.
Finally, note that many settings and changes on a PC will require admin access. I sometimes explicitly say this in the steps, but I’m sure I missed some. So be prepared periodically to be challenged for an admin ID and password. On Macs, you’ll often see padlock icons on settings—you’ll need to click this icon to unlock some settings, which will also require admin credentials.
Tip 5-1. Choose a New Computer: Think Different
If you are a PC user, you might want to at least consider switching to a Mac the next time you upgrade your computer. While it’s debatable whether Macs are inherently more secure than PCs, it’s a fact that Macs are generally targeted less often by hackers—mostly because there are way more PCs out there than Macs. If you just use your computer for email and web browsing, you would probably not notice the difference. If you’re a hard-core gamer or if you have some very specific applications you use that run only on Windows, then you’re probably stuck with a PC.
If all you do on a computer is surf the Web and check email and you like the portability of a laptop, you might want to consider getting a Google Chromebook. A Chromebook is essentially a laptop that runs only Google Chrome (web browser) and some Google Play apps. They’re affordable and not nearly as susceptible to malware.
The downside to using a Chromebook is that you have to assume that Google pretty much knows everything you do on it. So another thing you may wish to consider is using a tablet like Apple’s iPad. You can even use a wireless, physical keyboard with an iPad, if you prefer that to the on-screen keyboard. As of iPadOS 13.4, you can even use a wireless mouse or trackpad on an iPad.
Tip 5-2. Require Passwords for Computer Accounts
I know this will seem like overkill, especially for desktop computers in your own home, but you should require a password to log in. If you live alone and never have other people in your house, I suppose you can let this slide. But if you have kids, guests, maids, contractors, or any other visitors, you should set your computer to require a password to unlock.
Some newer computers may have the option to sign in with a fingerprint scan or face recognition. This is better than not having any authentication at all and can be very convenient. However, I personally feel that a password is still the most secure way to go.
Tip 5-2a. Microsoft Windows 10
- 1.
Open Settings and search for “sign-in requirements” (Figure 5-1). Select “Change the sign-in requirements”.

Windows 10 sign-in requirements search
- 2.
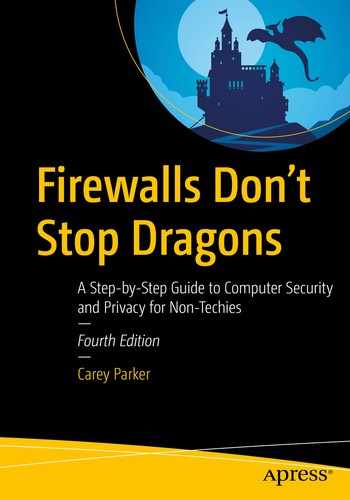
Click “Password” to open the password options. Then click the “Add” button (Figure 5-2). Note that if, under Password, it says you already have a password set, then you’re done (assuming you know what that password is).
Windows 10 sign-in options settings
- 3.
Choose a moderately secure password that you can remember. This password does not have to be crazy strong like Internet account passwords. Nevertheless, I recommend saving this password in LastPass, in case you forget it. I usually put LastPass as my hint, so I know that I saved it there. Click Finish on the next screen (Figure 5-3).
Windows 10 create password settings
- 4.
Return to Sign-in options in Settings (as earlier). Scroll down and look for “Require sign-in”. Make sure “When PC wakes from sleep” is selected (Figure 5-4).

Windows 10 lock screen settings search
- 5.
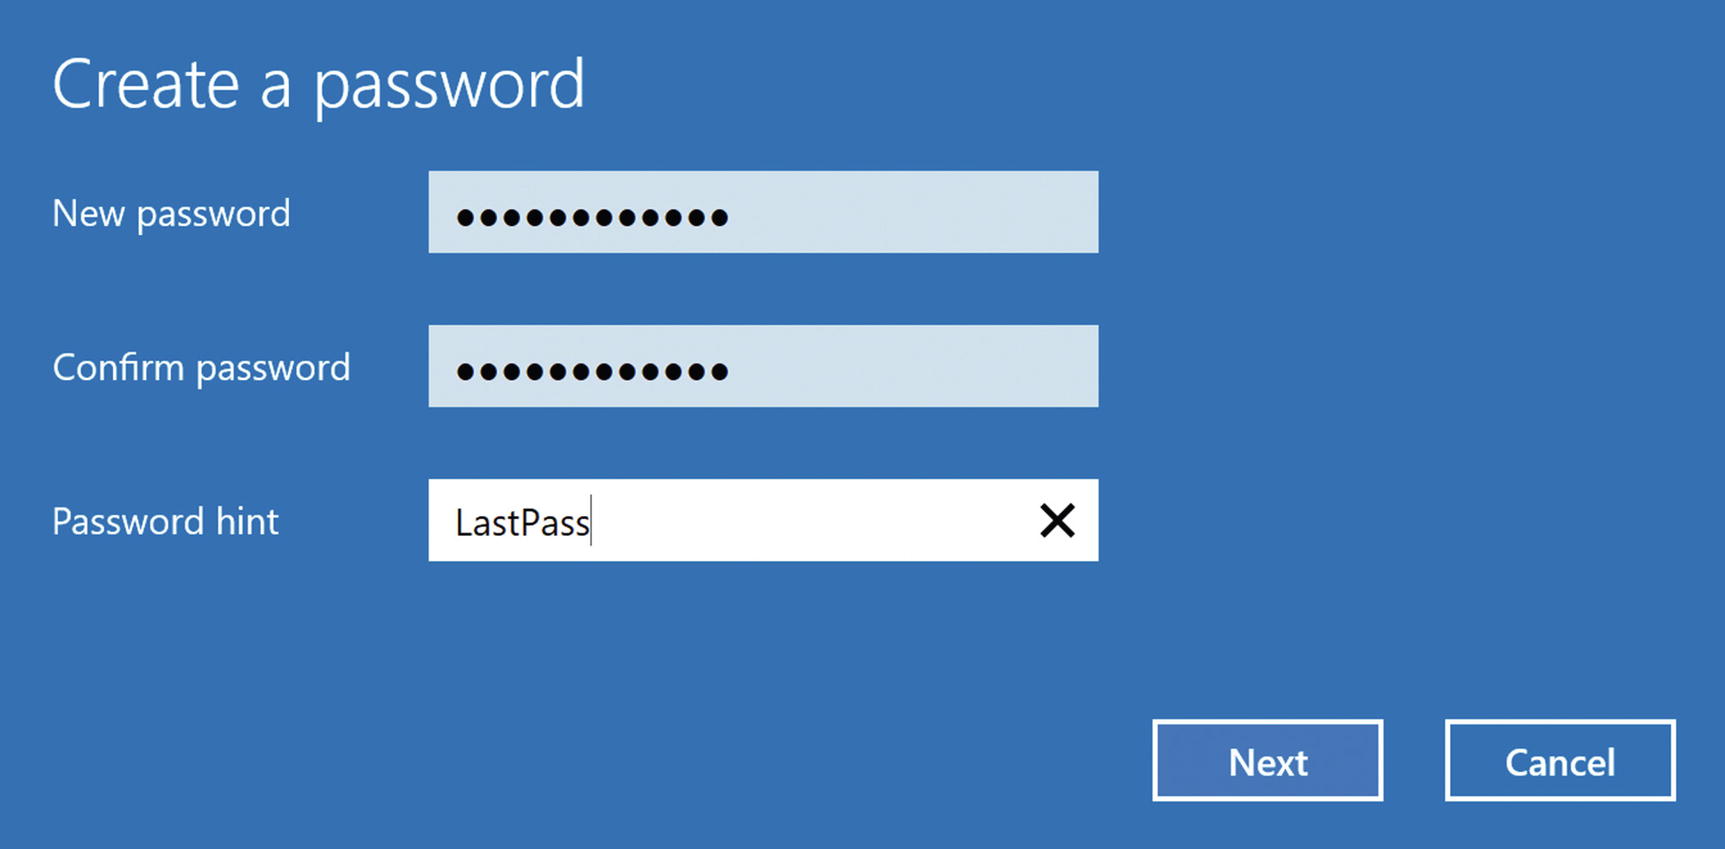
Return to Settings and now search for “power”. Select “Power & sleep settings” (Figure 5-5).
Windows 10 power settings search
- 6.
On the Power & sleep settings screen, look for the Sleep settings. You’ll want to set these to some reasonable values that aren’t too long—maybe 10–20 minutes for a desktop computer and 1–5 minutes for laptops (Figure 5-6).

Windows 10 sleep settings
Tip 5-2b. Mac OS
- 1.
From the Apple menu, open System Preferences. Select Users & Groups (Figure 5-7).

Mac OS users and groups preferences
- 2.
If the lock icon at the lower left is locked, click the icon and enter your password to unlock these settings.
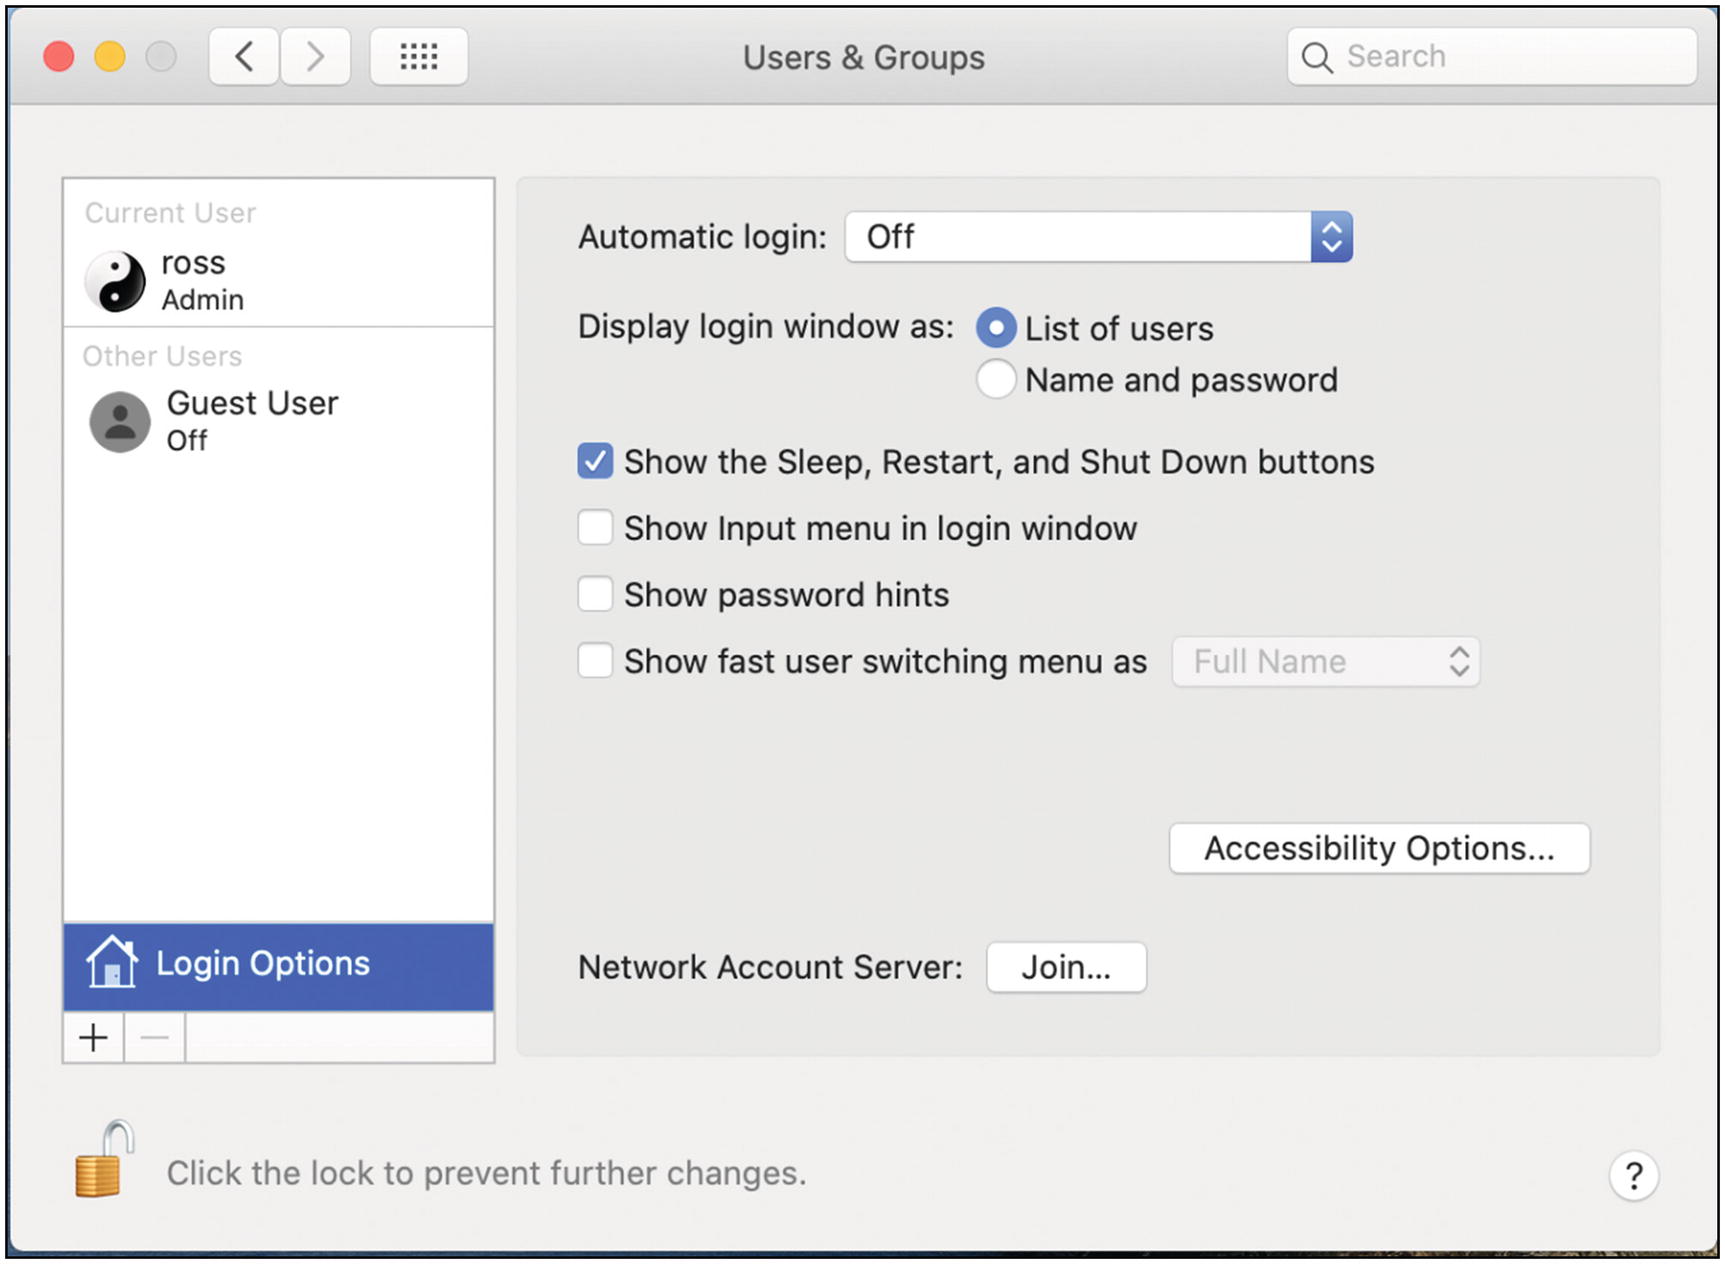
- 3.
Select Login Options at the lower left, just above the lock icon. Make sure that “Automatic login” is set to Off (Figure 5-8).
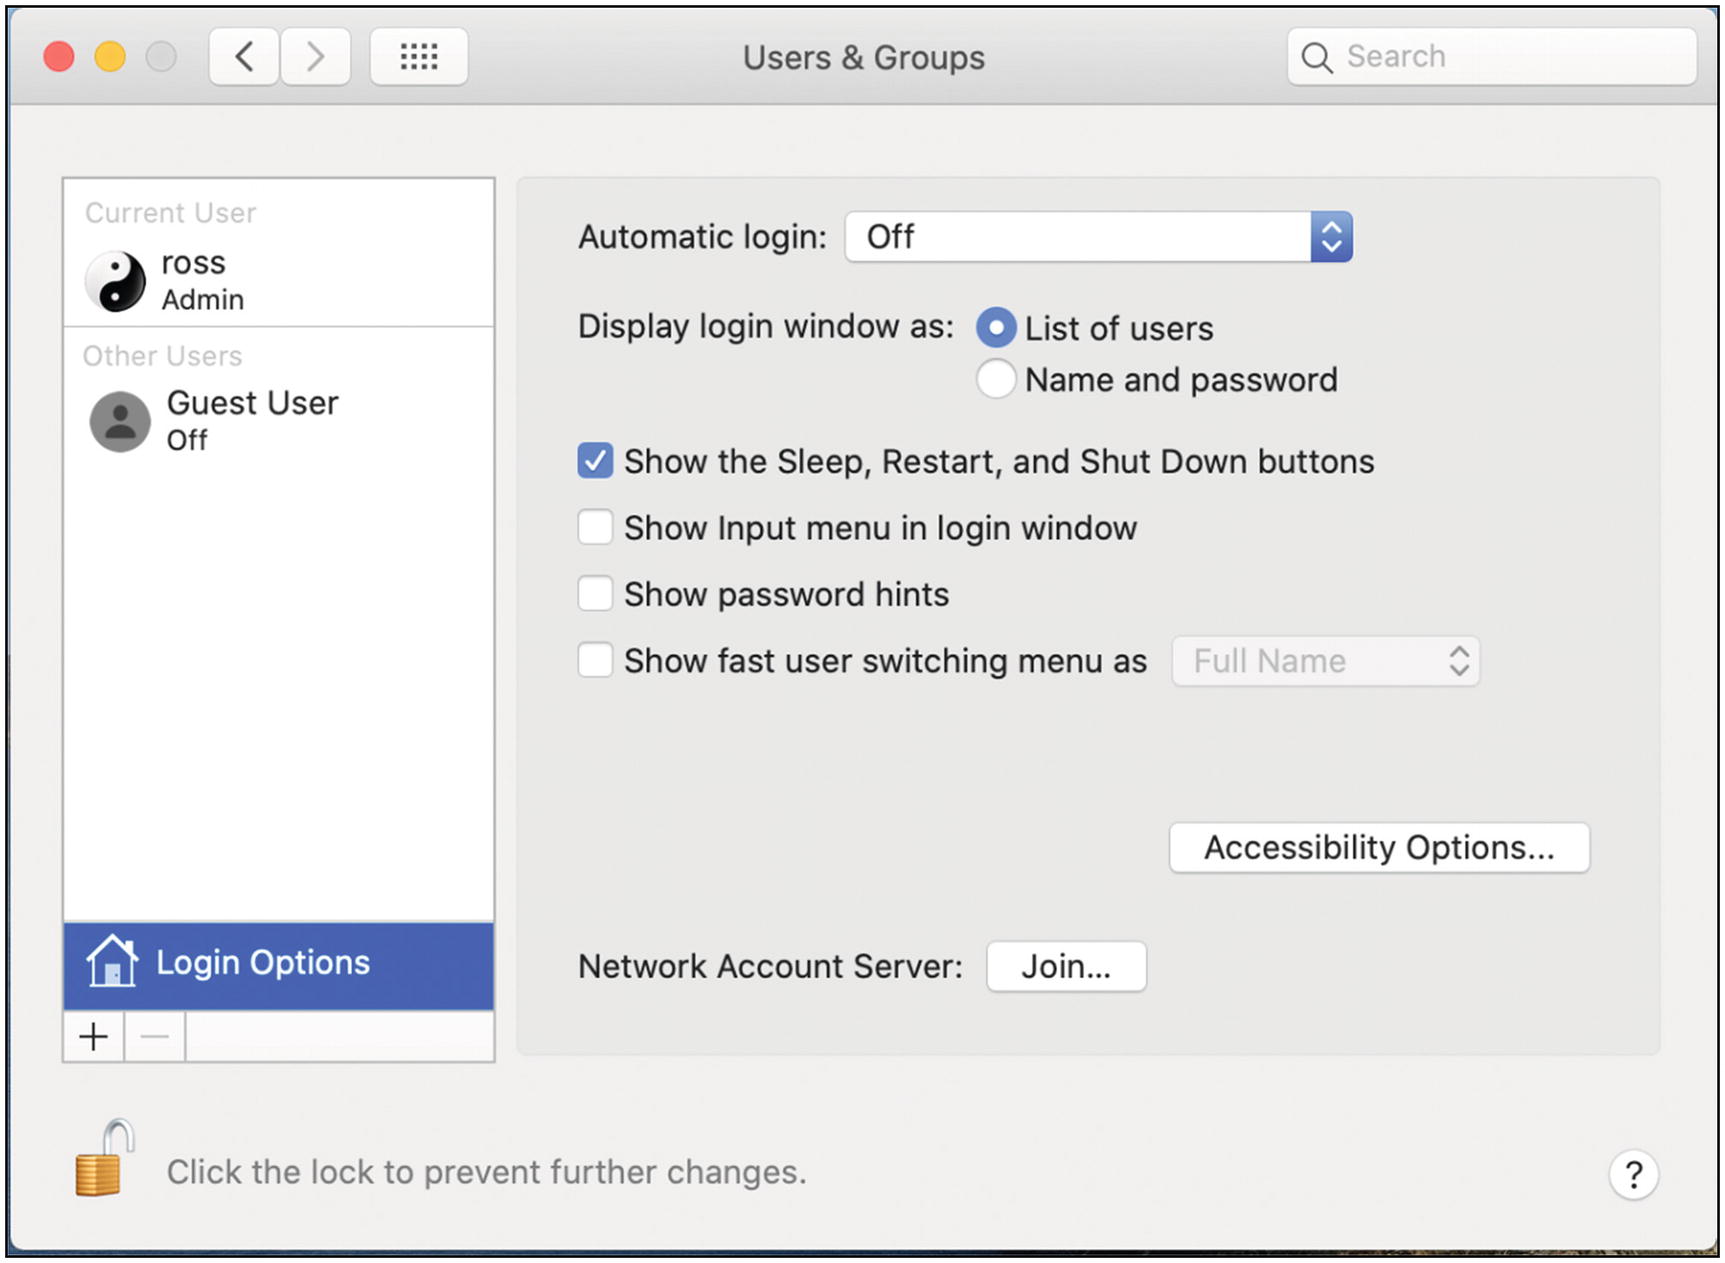
Mac OS users login options
Tip 5-3. Create a Separate Admin Account
One of the best ways to limit the damage that can be done by malware is to limit yourself. Malware running on your computer can do whatever you can do. More accurately, malware running on your account will have the same permissions as your account does. Therefore, it’s best to have at least two accounts on your computer: an admin account for installing software and making system changes and a non-admin account for regular, day-to-day stuff.
- 1.
Create a new “admin” account with administrative (full) privileges.
- 2.
Using this new admin account, we’ll reduce the privileges of your regular, day-to-day user account.
After you make these changes, you will need to enter the admin credentials whenever you install software or make certain system changes. (On Macs, this may mean clicking the padlock icon on some settings and then entering your admin creds to enable changes.) The key here is that malware will not be able to use your non-admin privileges to do anything really nasty without your operating system prompting you first.
These accounts will require you to choose a password. While you could use LastPass to generate a strong password, you really need something you can easily remember and type in. So, you should generate a moderately strong password here using the techniques we discussed in the previous chapter. If this computer is a desktop computer that will be used only within your home, you really don’t need a crazy long password here—eight characters is probably enough. If this is a laptop or if for some reason many strangers might have easy physical access to this computer, then you should make it 10 to 12 characters. Note that for almost all of my “password hints,” I just use LastPass or even just LP—because I store all these passwords as secure notes in my LastPass vault.
Tip 5-3a. Microsoft Windows 10
- 1.
Open Settings and search for “accounts”. Select “Add, edit, or remove other users” (Figure 5-9).
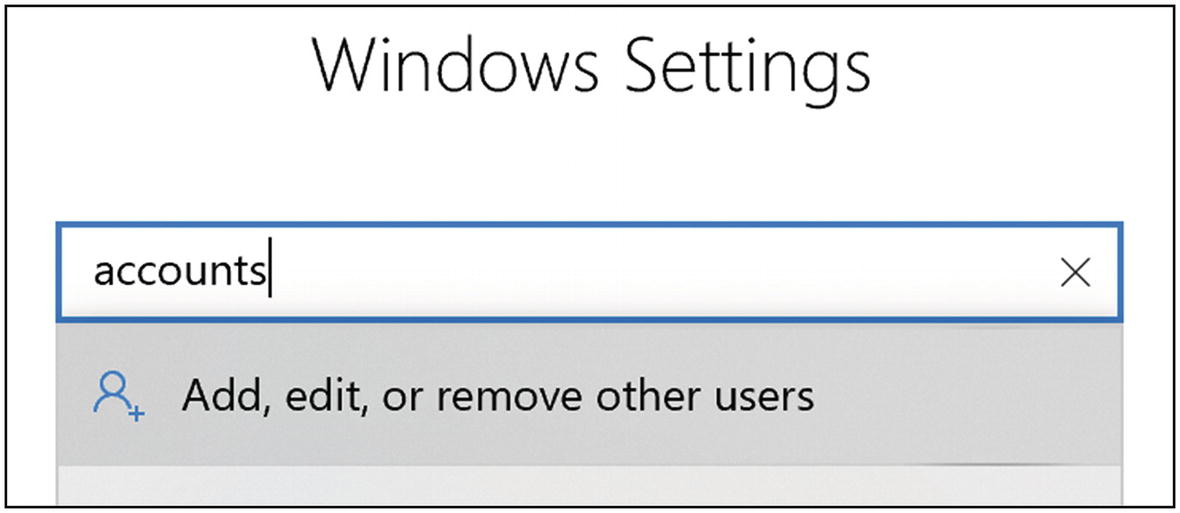
Windows 10 accounts search
- 2.
Under “Other users”, click the plus sign next to “Add someone else to this PC” (Figure 5-10).
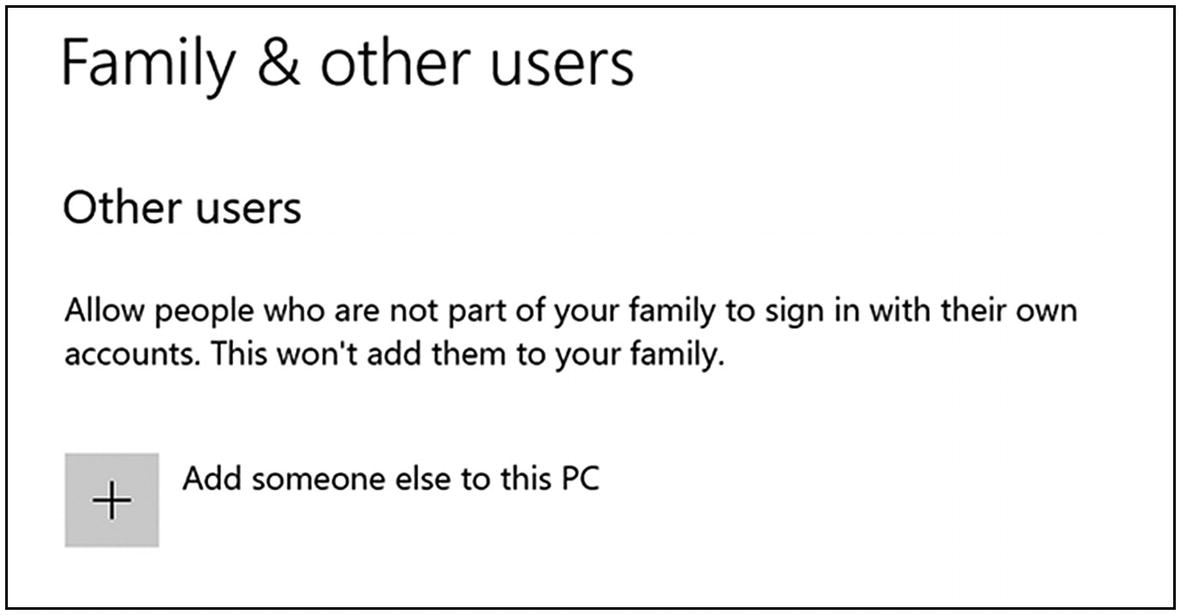
Windows 10 family and other users settings
- 3.
They make it hard to add a purely local account. Click the link at the bottom that says “I don’t have this person’s sign-in information” (Figure 5-11).
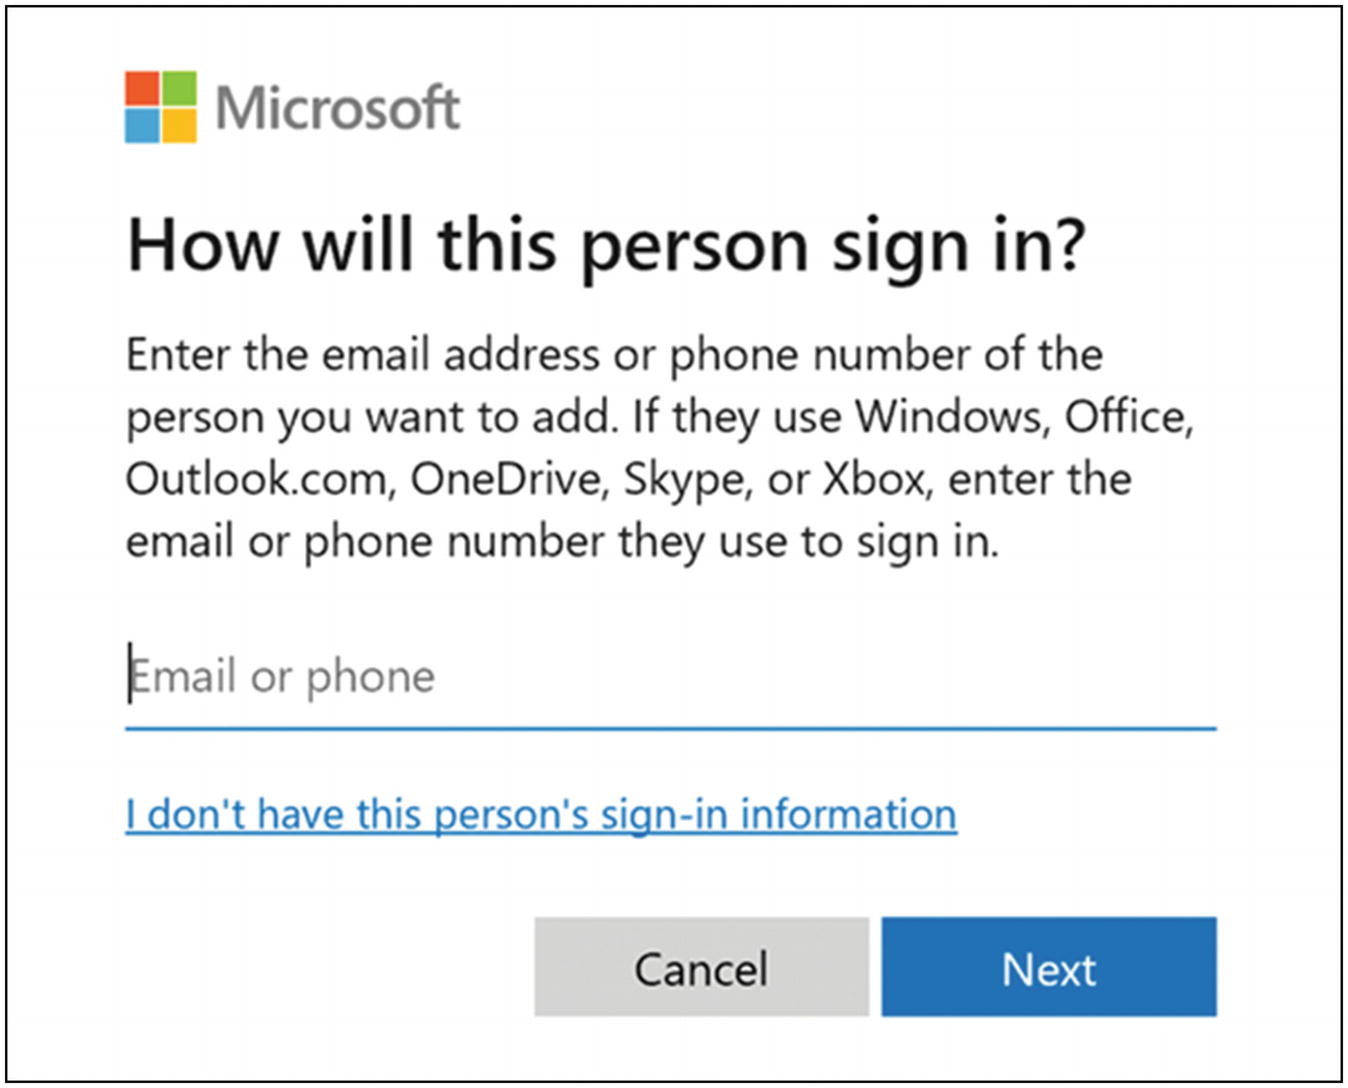
Windows 10 create local account
- 4.
At the bottom of the next page, click “Add a user without a Microsoft account” (Figure 5-12).
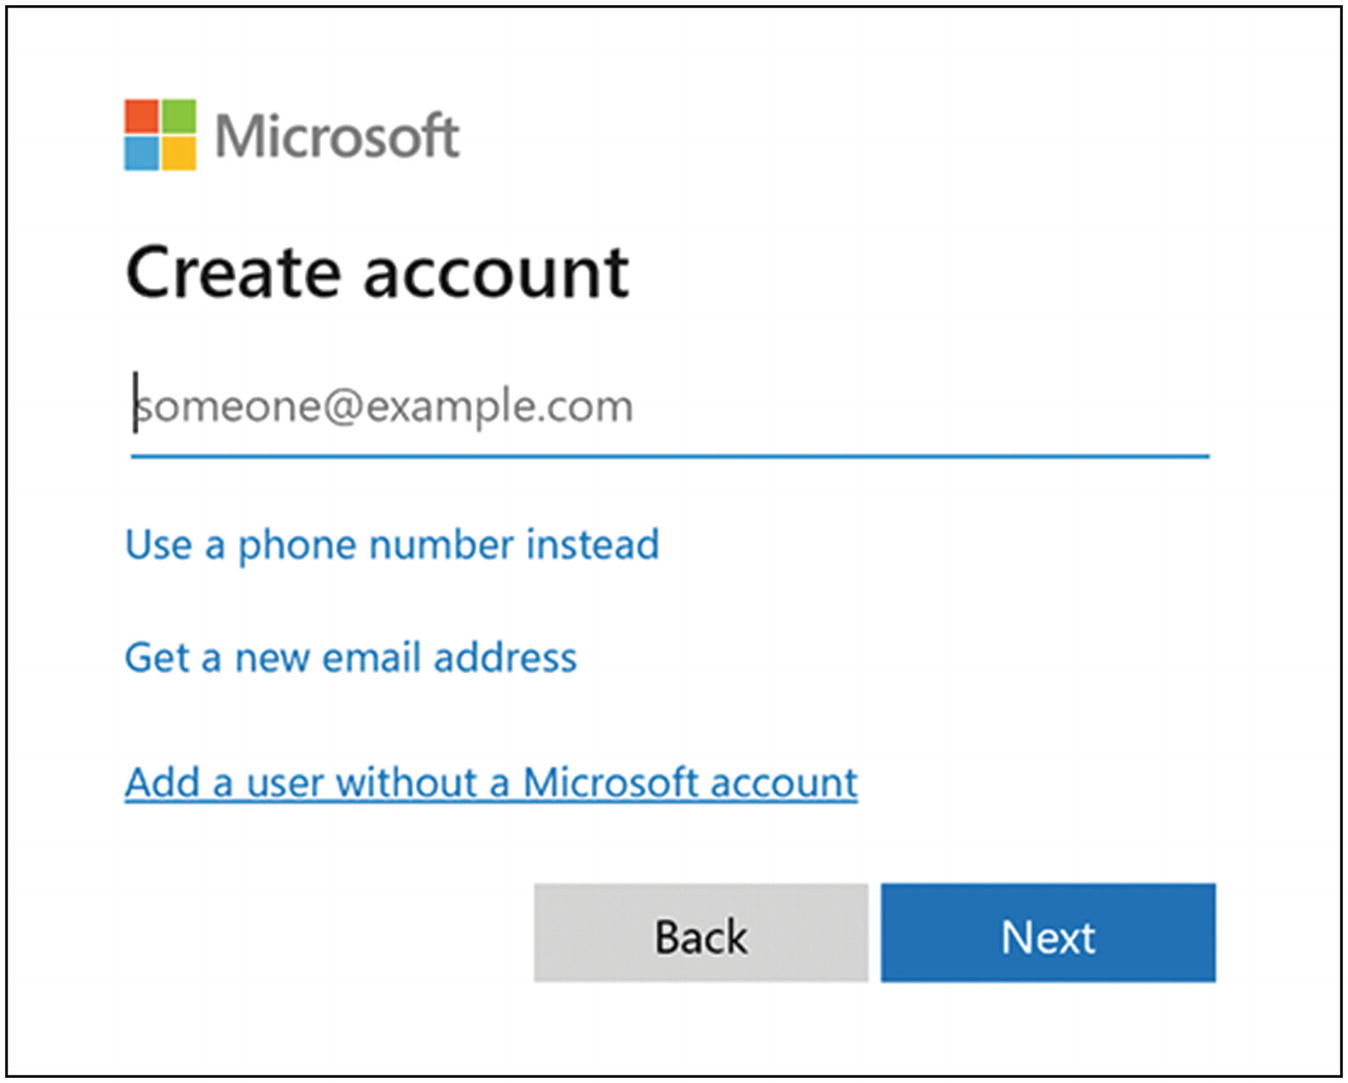
Windows 10 add user with Microsoft account
- 5.
Create your account name. I personally prefer admin—short and to the point. Choose a moderately strong password and create a secure note in LastPass, so you won’t forget it (Figure 5-13).

Windows 10 create account dialog
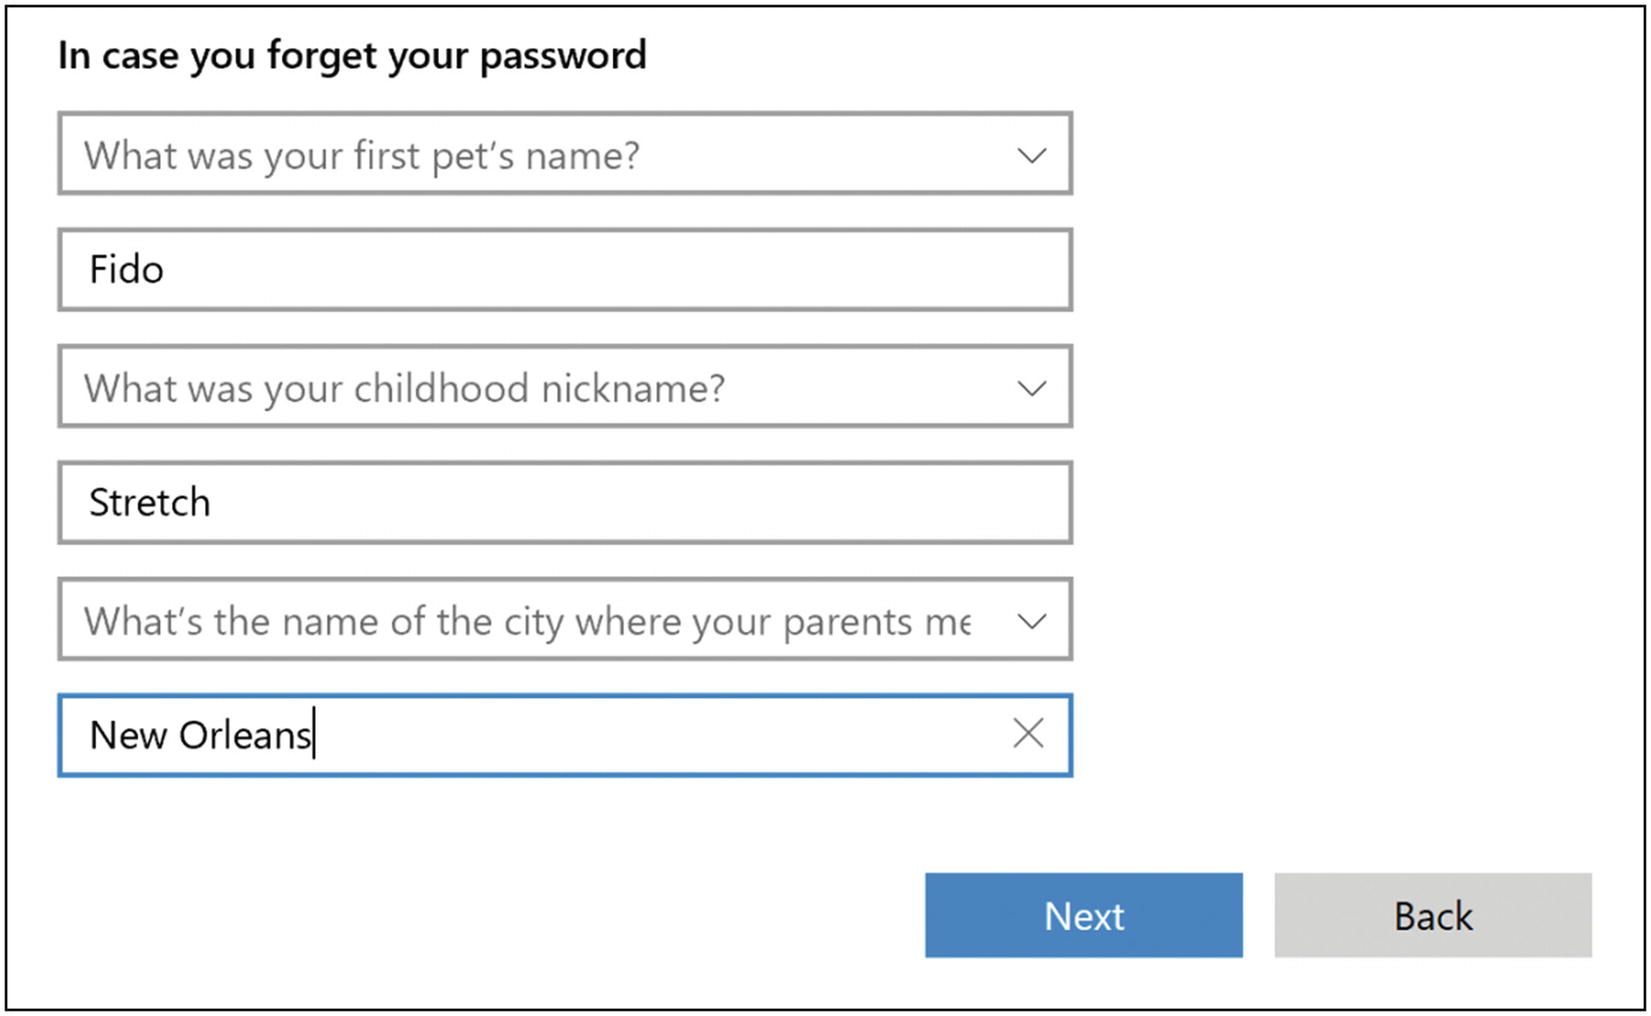
- 6.
Below the name and password, Microsoft requires you to answer some security questions in case you forget your password. Choose your questions and enter your answers.7 I would also copy these questions and answers into the same LastPass secure note as you saved the admin password in the previous step. Then click “Next” (Figure 5-14).
Windows 10 answer security questions
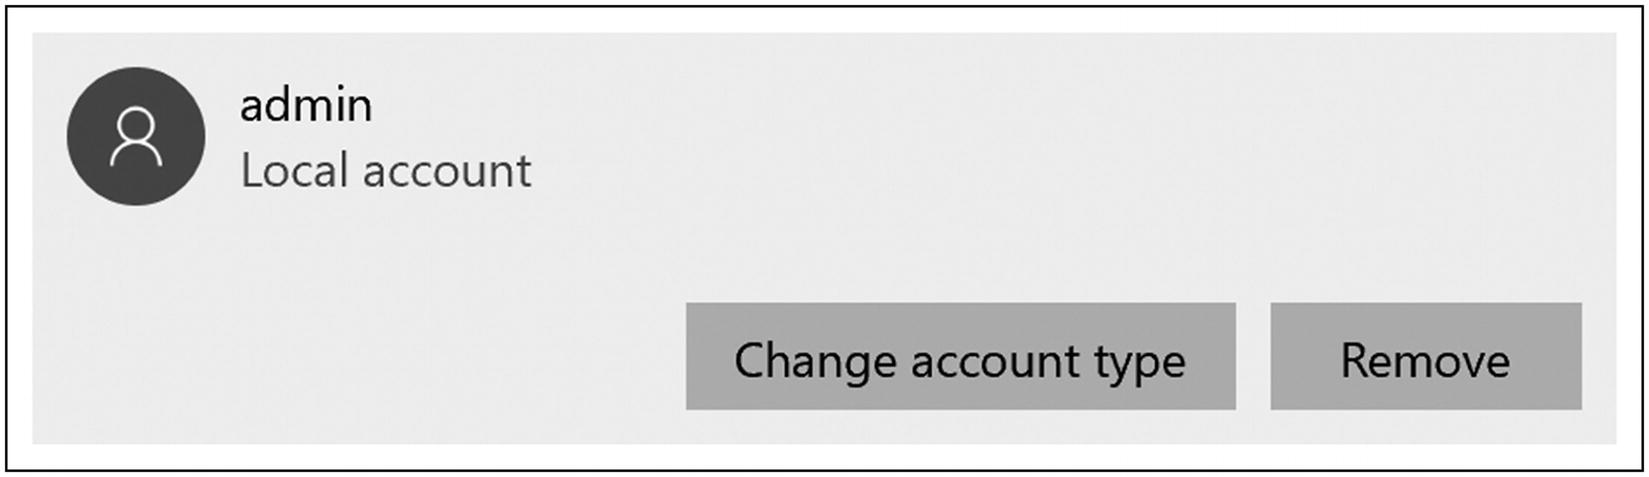
- 7.
You need to now enable admin privileges for this account. Once again, select “Family & other users” and then click the new admin account. When you click it, you should see the options as in Figure 5-15.
Windows 10 change account type dialog
- 8.
Click “Change account type”. On the next dialog, set the account type to Administrator. (Figure 5-16).

Windows 10 change account type to administrator dialog
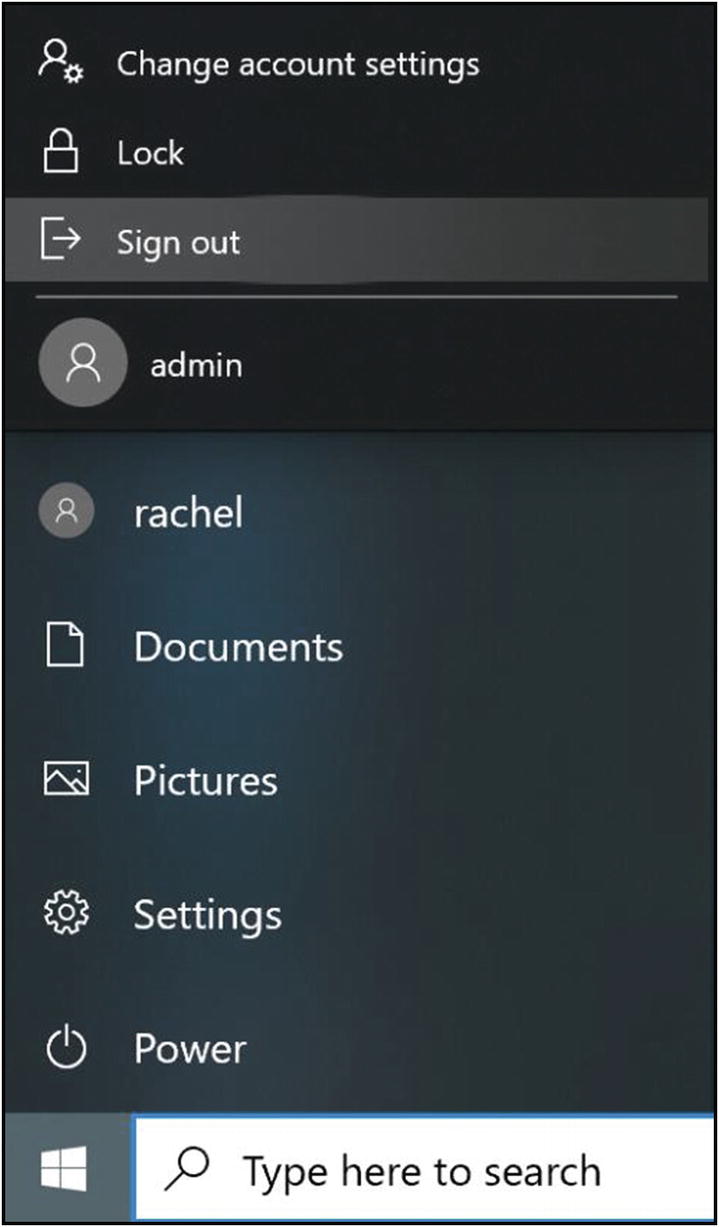
- 9.
Log out of your current account, and log back in to your new admin account. Do this by clicking the Windows icon at the lower left and clicking your current account name. From this new menu, select “Sign out”. (Note: Don’t just switch directly to the new admin account—you need the current account to be logged out for the changes to take effect.) See Figure 5-17.
Windows 10 sign-out menu
- 10.
Now sign in to your new admin account. Click “admin” on the login screen at the lower left (Figure 5-18).
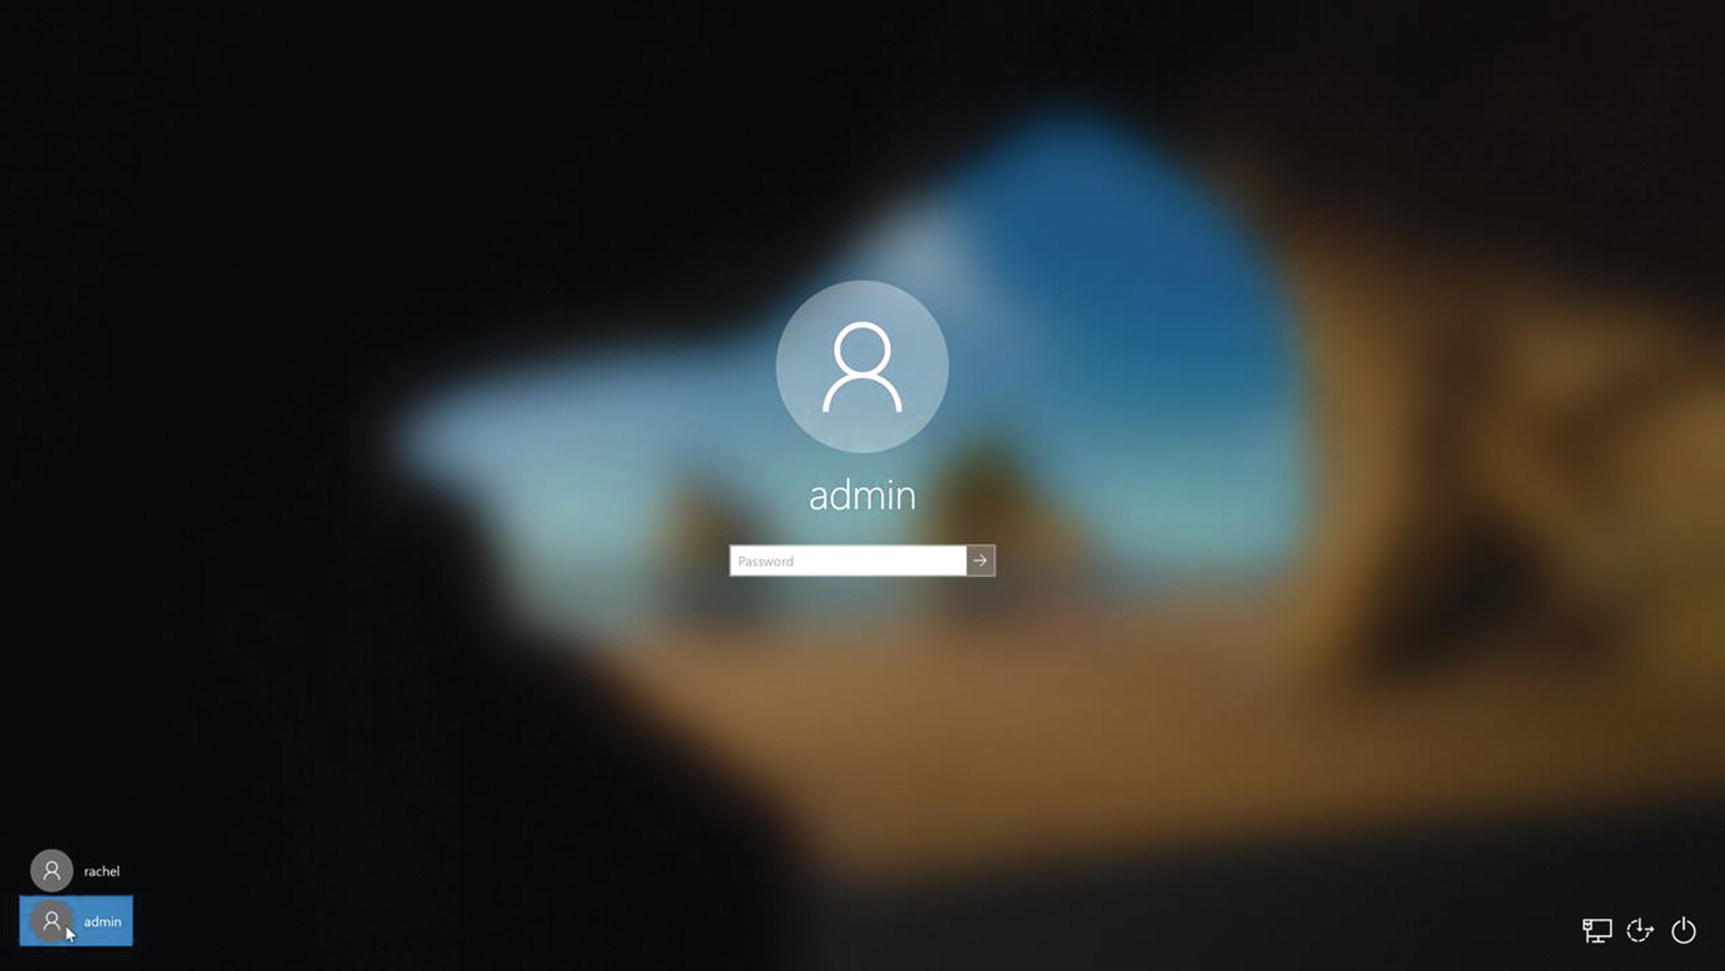
Windows 10 login screen
- 11.
You’ll have to sit through some welcome messages while your new account is set up. When this completes, open Settings and go to Accounts and then “Family & other users” (as we did earlier). This time click your personal account (“rachel” in our example). Then click “Change account type” (Figure 5-19).

Windows 10 change account type dialog
- 12.
Change the account type to Standard User and click “OK” (Figure 5-20).
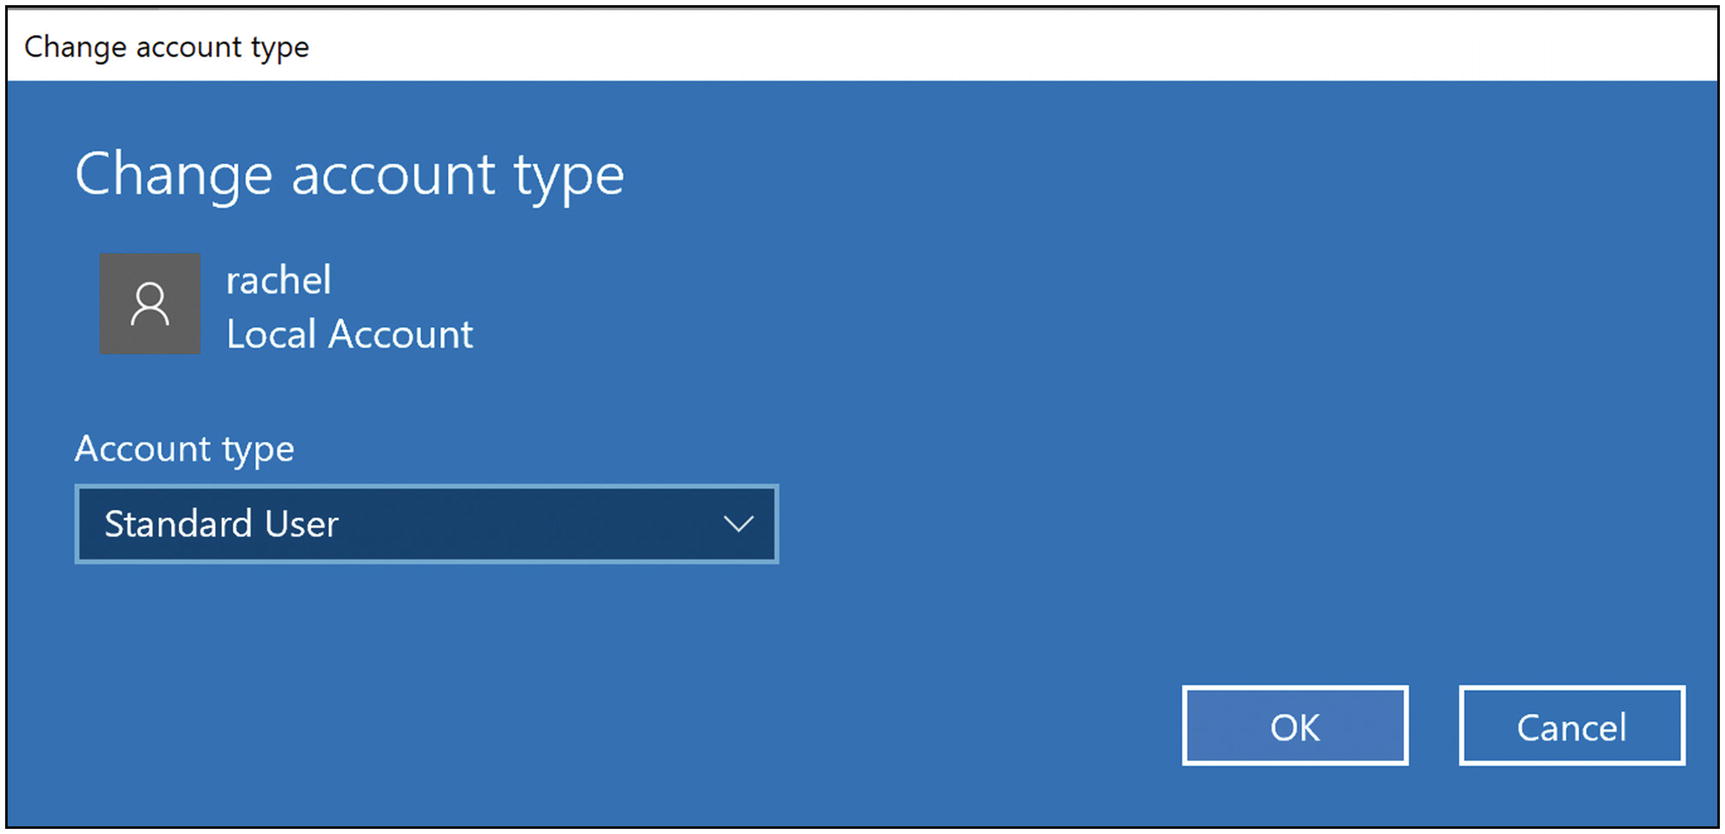
Windows 10 change account type to standard user dialog
- 13.
Repeat the logout and login procedure, switching back to your regular account. Your regular account is now restricted, which will prevent malware that gets by your other defenses from doing too much harm. If you run into a situation where you need admin privileges, you can log in to your admin account or simply enter the admin account credentials when asked.
Tip 5-3b. Mac OS
- 1.
From the Apple menu, open System Preferences. Select Users & Groups (Figure 5-21).

Mac OS users and groups preferences
- 2.
If the lock icon at the lower left is locked, click the icon and enter your password to unlock these settings (Figure 5-22).
Mac OS users login options
- 3.
Click the little + (plus) sign under the list of accounts to create a new account. Choose an account name. I personally prefer admin—short and to the point. You can add a password hint. I usually just use LastPass because that’s where I’ll store a copy of this info for future reference. Click Create User to finish (Figure 5-23).
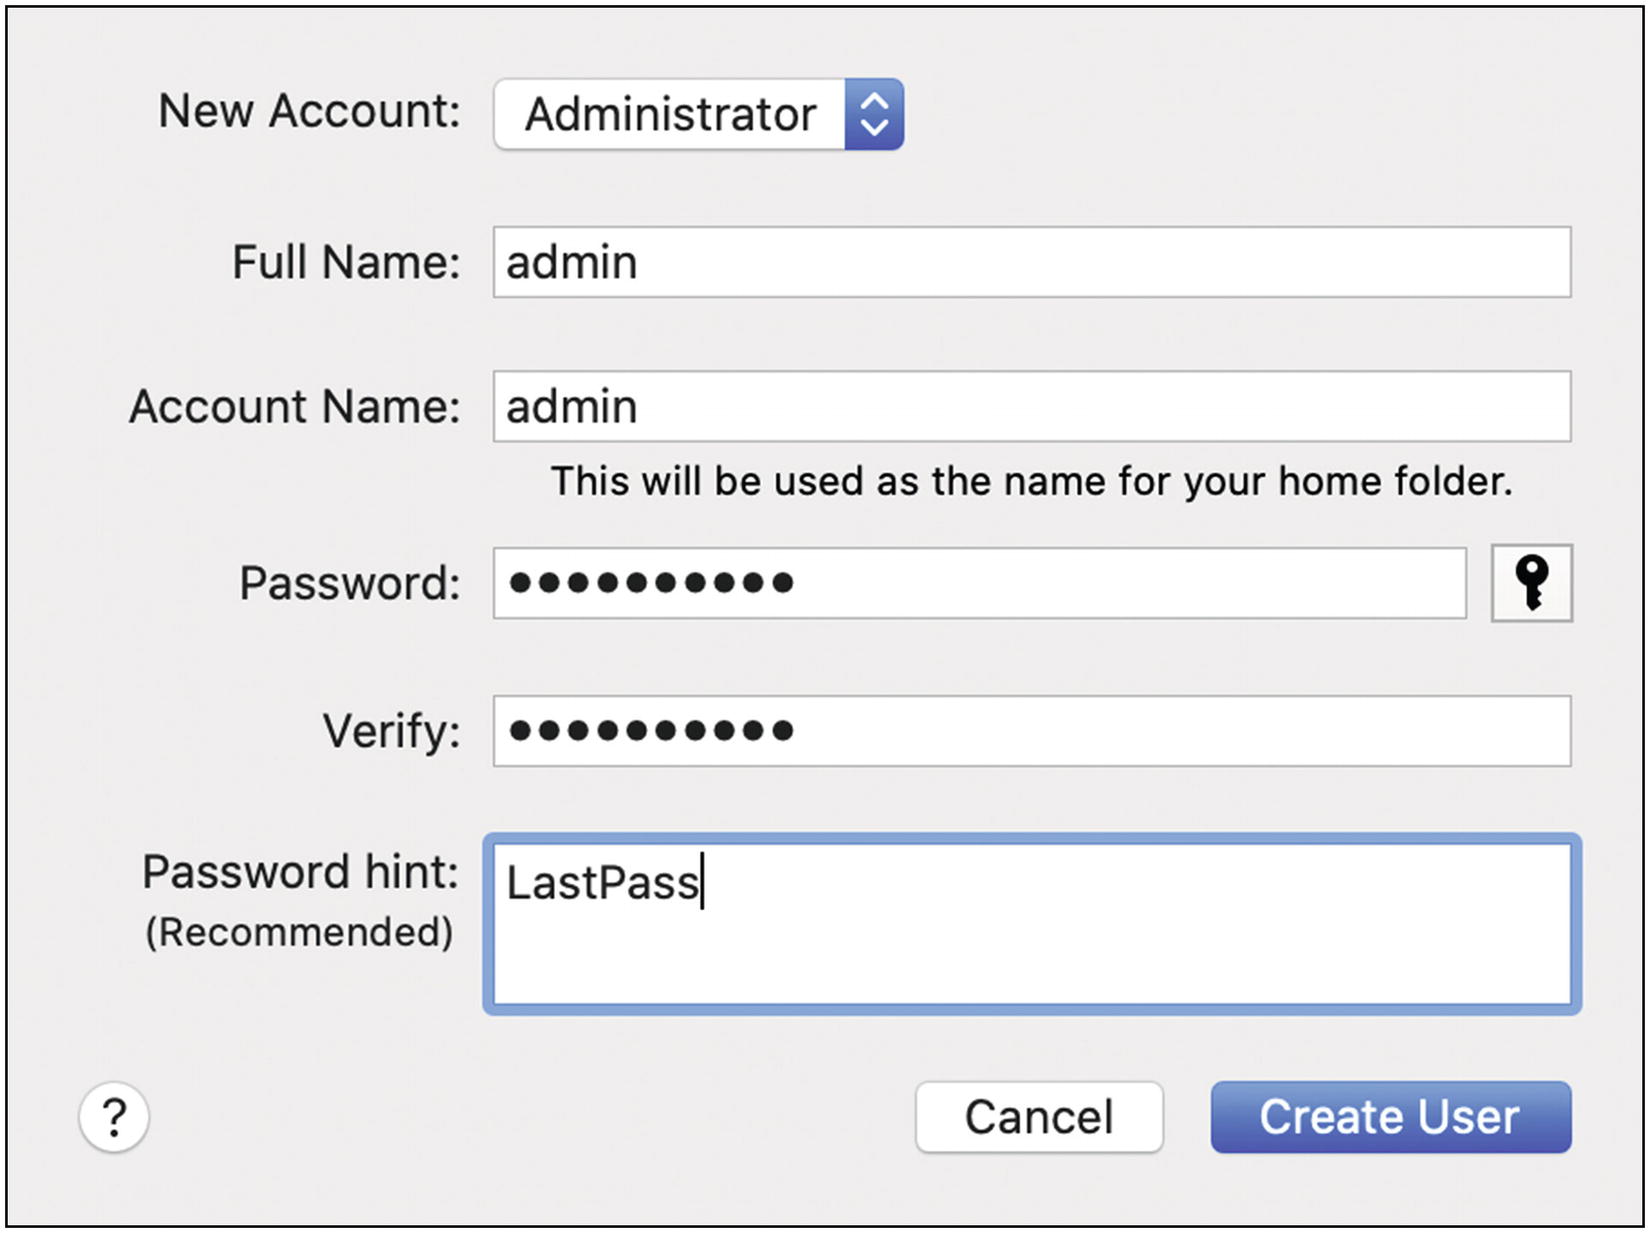
Mac OS administrator password dialog
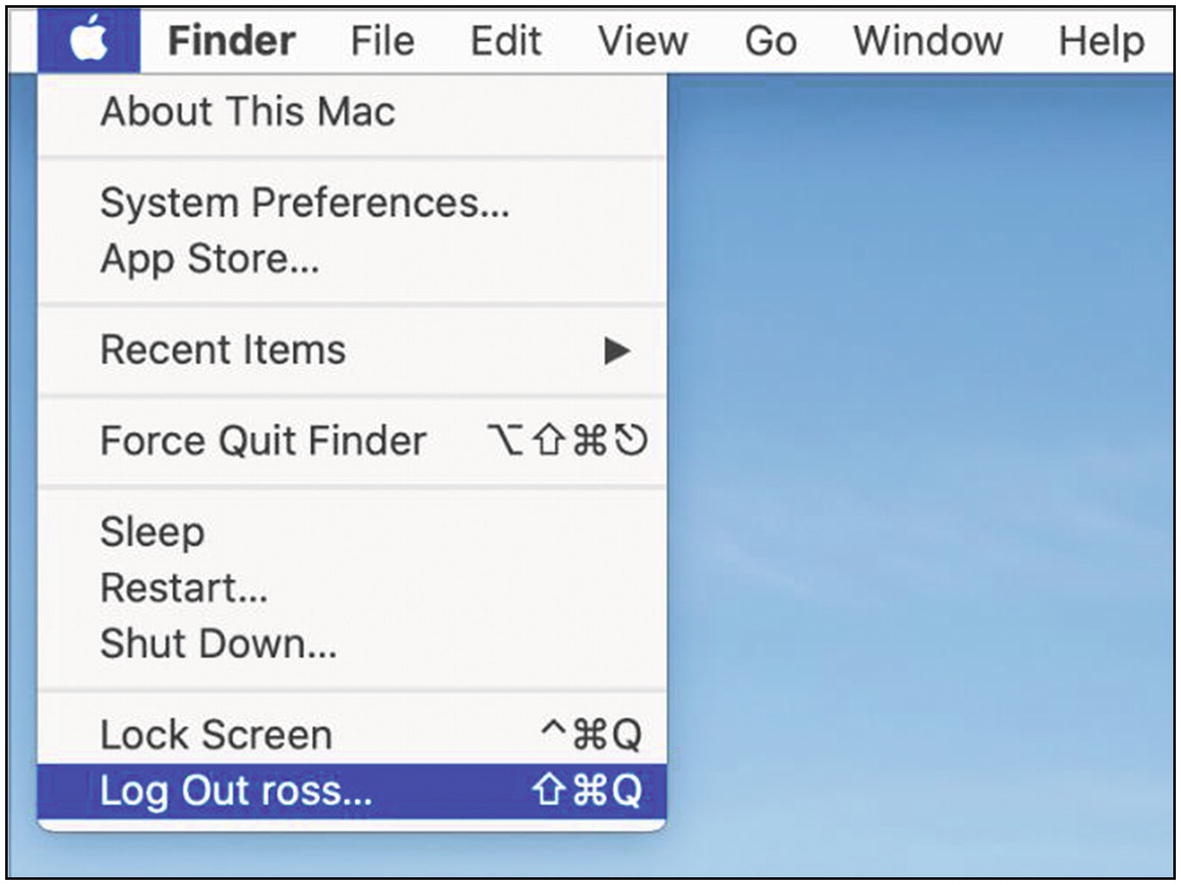
- 4.
Now we need to remove admin privileges from your regular account. To do this, you need to log out of your current account and log back in as the admin account. In the Apple menu, select “Log Out <user>” (Figure 5-24).
Mac OS logout menu
- 5.
You should now see a list of your accounts. Select your admin account and log in using the password you just chose. You will have to go through some initial account setup questions. You can skip most of these by clicking the “Set Up Later” link toward the top of each window. The rest are up to you.
- 6.
Go back to the Users & Groups settings, as we did earlier. Again, click the lock icon to unlock the settings.
- 7.
Click the entry for your original Mac account at the left. Then uncheck the “Allow user to administer this computer” box. You should get a dialog like Figure 5-25. Click OK.
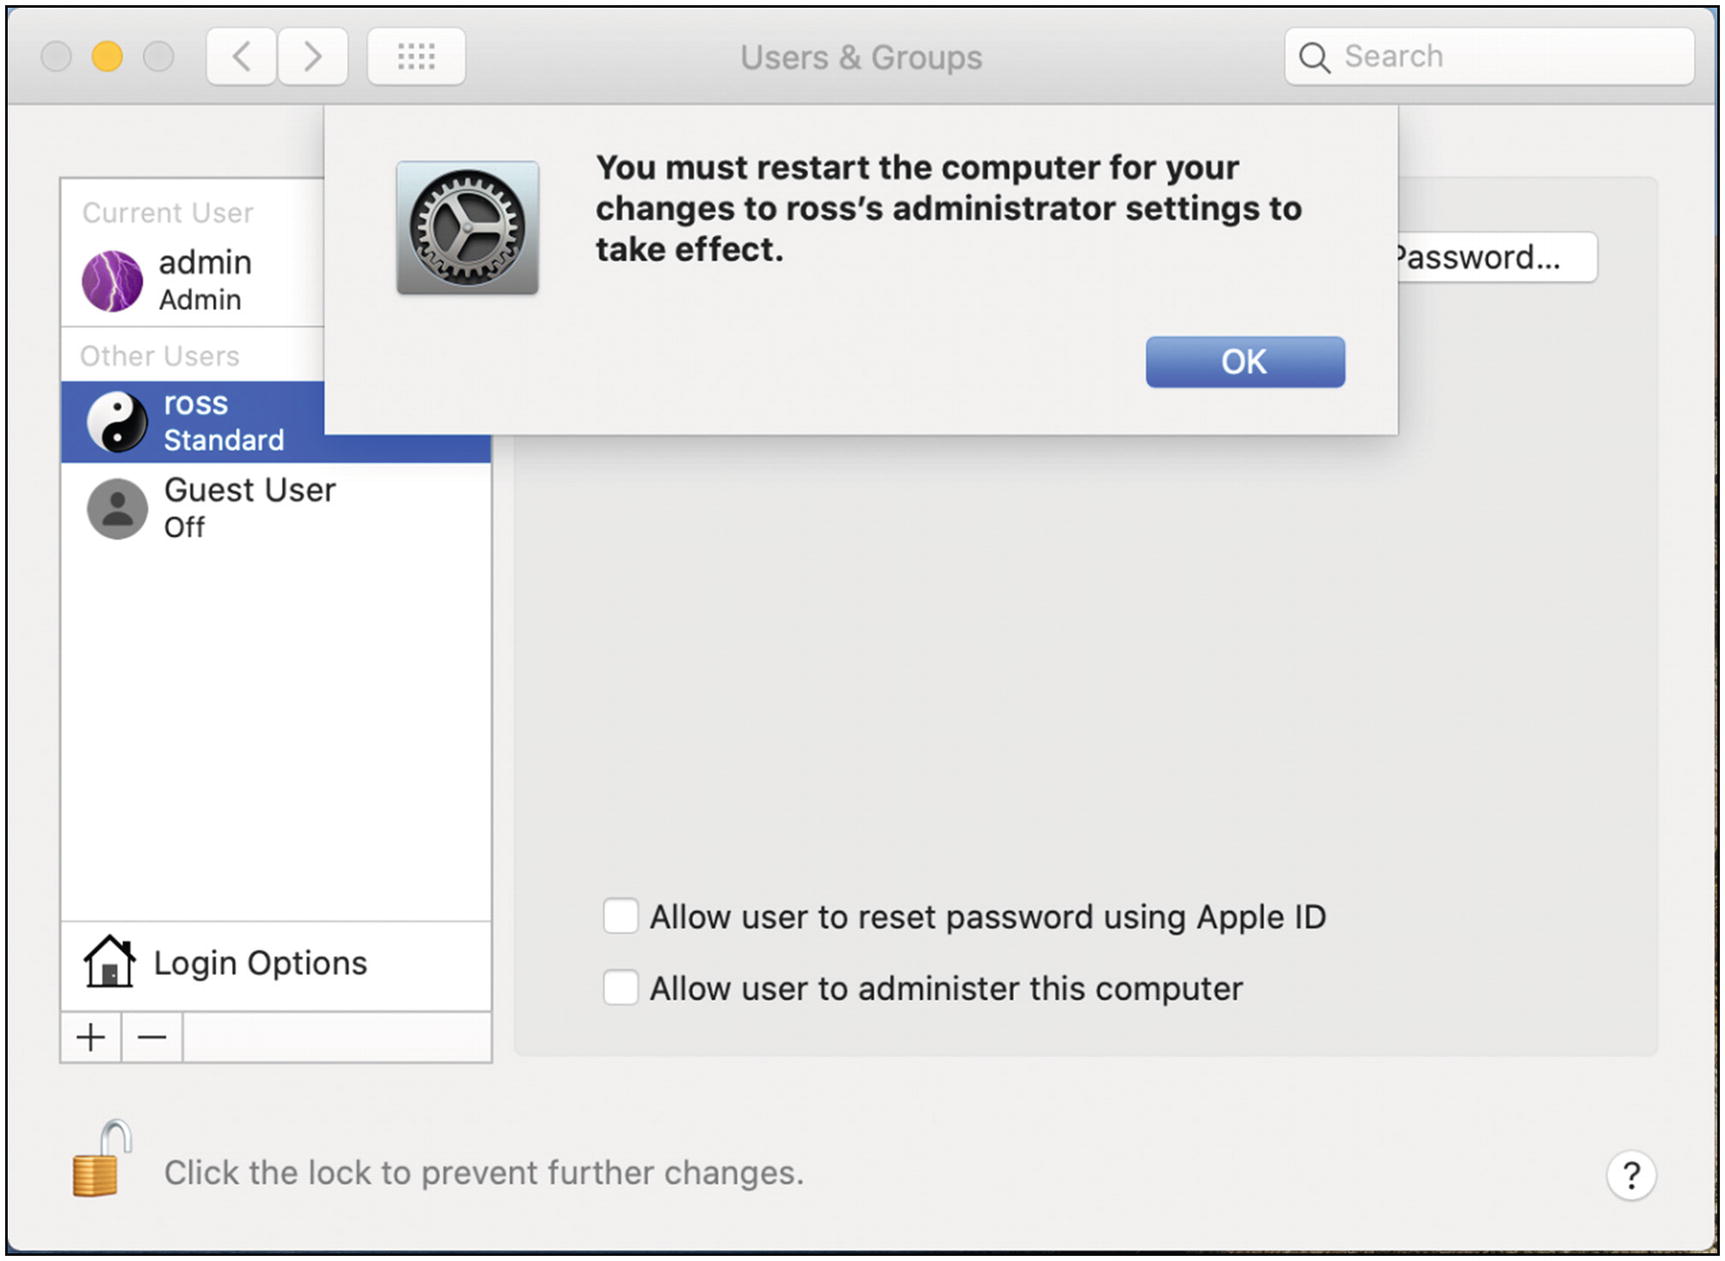
Mac OS remove administrator confirmation dialog
- 8.
From the Apple menu, restart your computer to make the changes take full effect. See Figure 5-26.
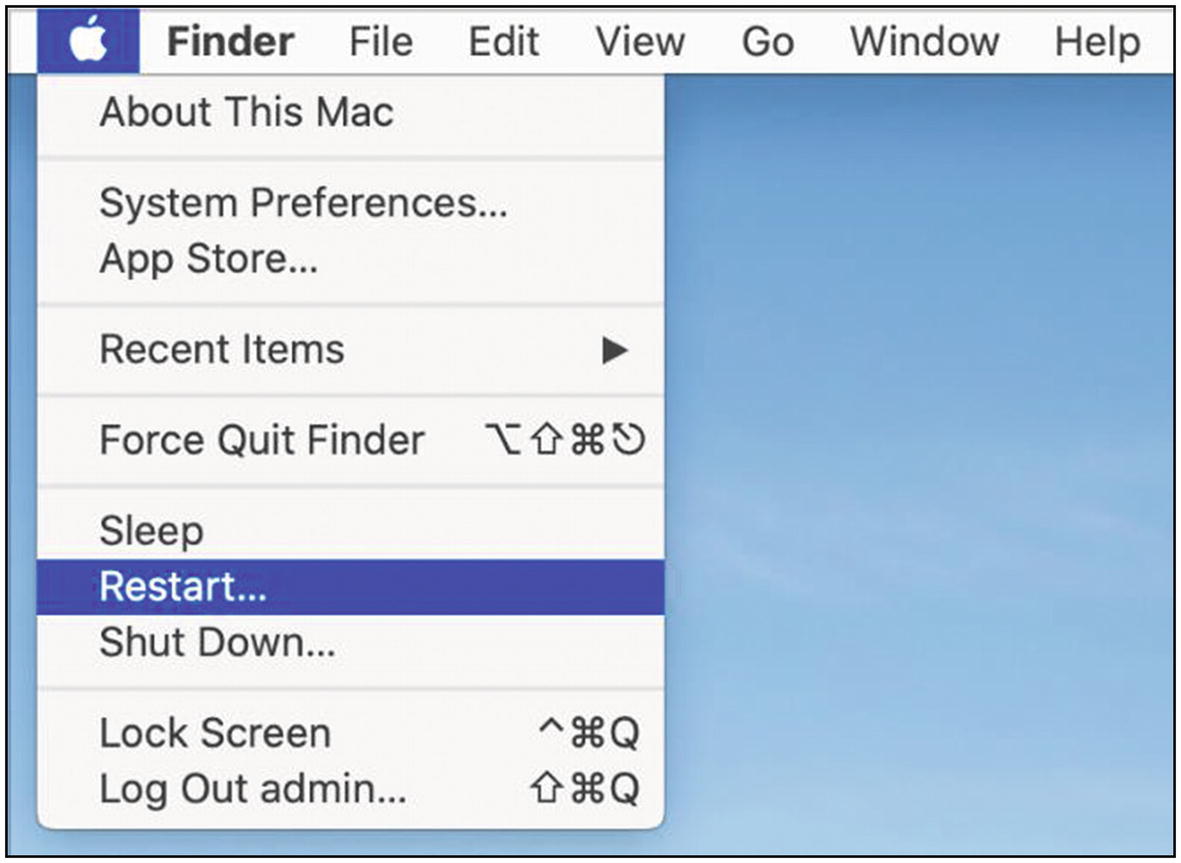
Mac OS restart menu
- 9.
You can now log back in as your original user (“ross” in our example). If you try to install new software or change key system settings, you will be prompted for the administrator credentials.
Tip 5-4. Install Free Antivirus Software
Antivirus (AV) software used to be a must for any computer owner. But lately, the effectiveness of AV software has become questionable. Furthermore, many AV products have become rather overzealous in their protection schemes by embedding themselves deeply into your operating system so that they can monitor network traffic and inspect all files. However, in doing this, they often do more harm than good—in some cases, it’s been shown that AV software itself is either causing problems or creating new vulnerabilities for hackers to exploit.
For these reasons, I feel that most people should forego expensive antivirus software products. You’ll do a better job protecting yourself using all the other tips in this book. However, there are good and totally free software utilities for protecting your computer that I can recommend, if you feel you’d like to have some sort of AV software installed. (If you have a teenager in the house, it’s probably best to have AV software installed at least for their account.)
If you already have another antivirus program installed, you should disable and remove it before installing new AV software.
Tip 5-4a. Microsoft Windows 10
- 1.
Open Settings and search for “security settings”. Select “Windows Security settings” (Figure 5-27).
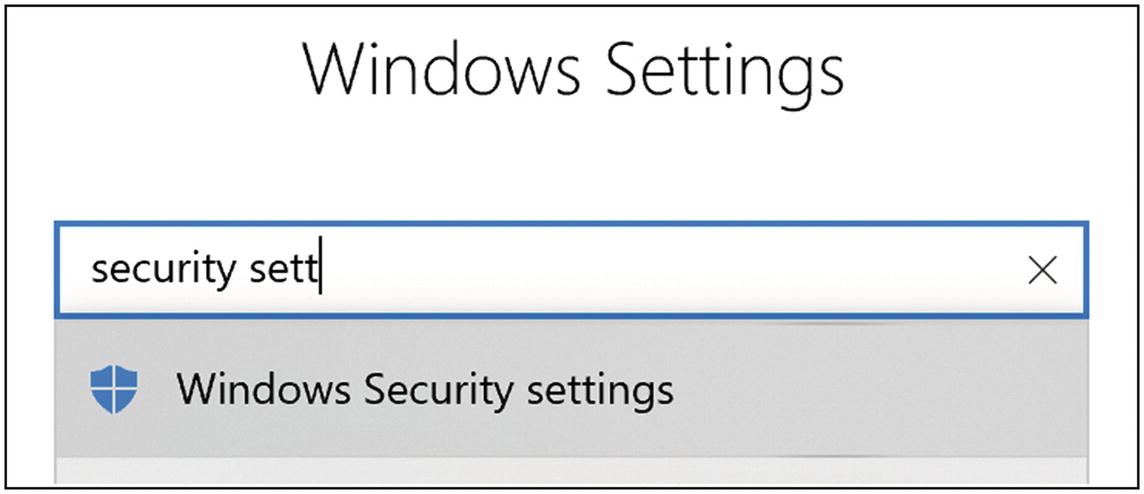
Windows 10 Security settings search
- 2.
Click the “Open Windows Security” button (Figure 5-28).
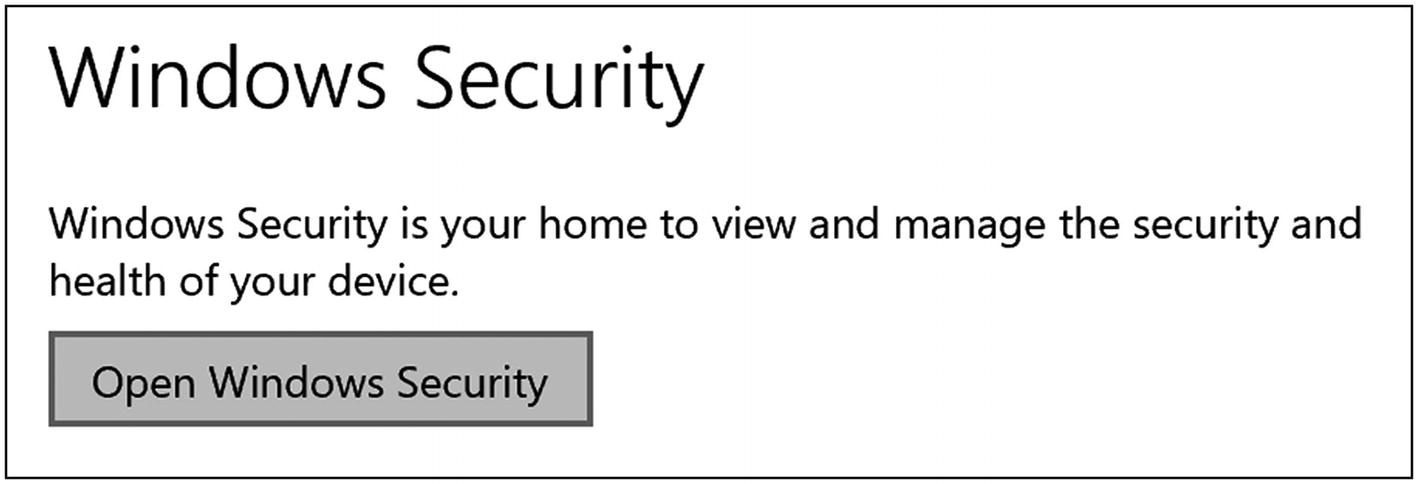
Windows 10 Open Windows Security button
- 3.
You want to see green check marks on all of these, as shown in Figure 5-29. In particular, right now we’re concerned with “Virus & threat protection”. If this item doesn’t have a green check mark, click it and check the settings. (Note that if there’s a yellow warning sign asking you to set up OneDrive, you can click “Dismiss”. We’ll discuss better options later.)
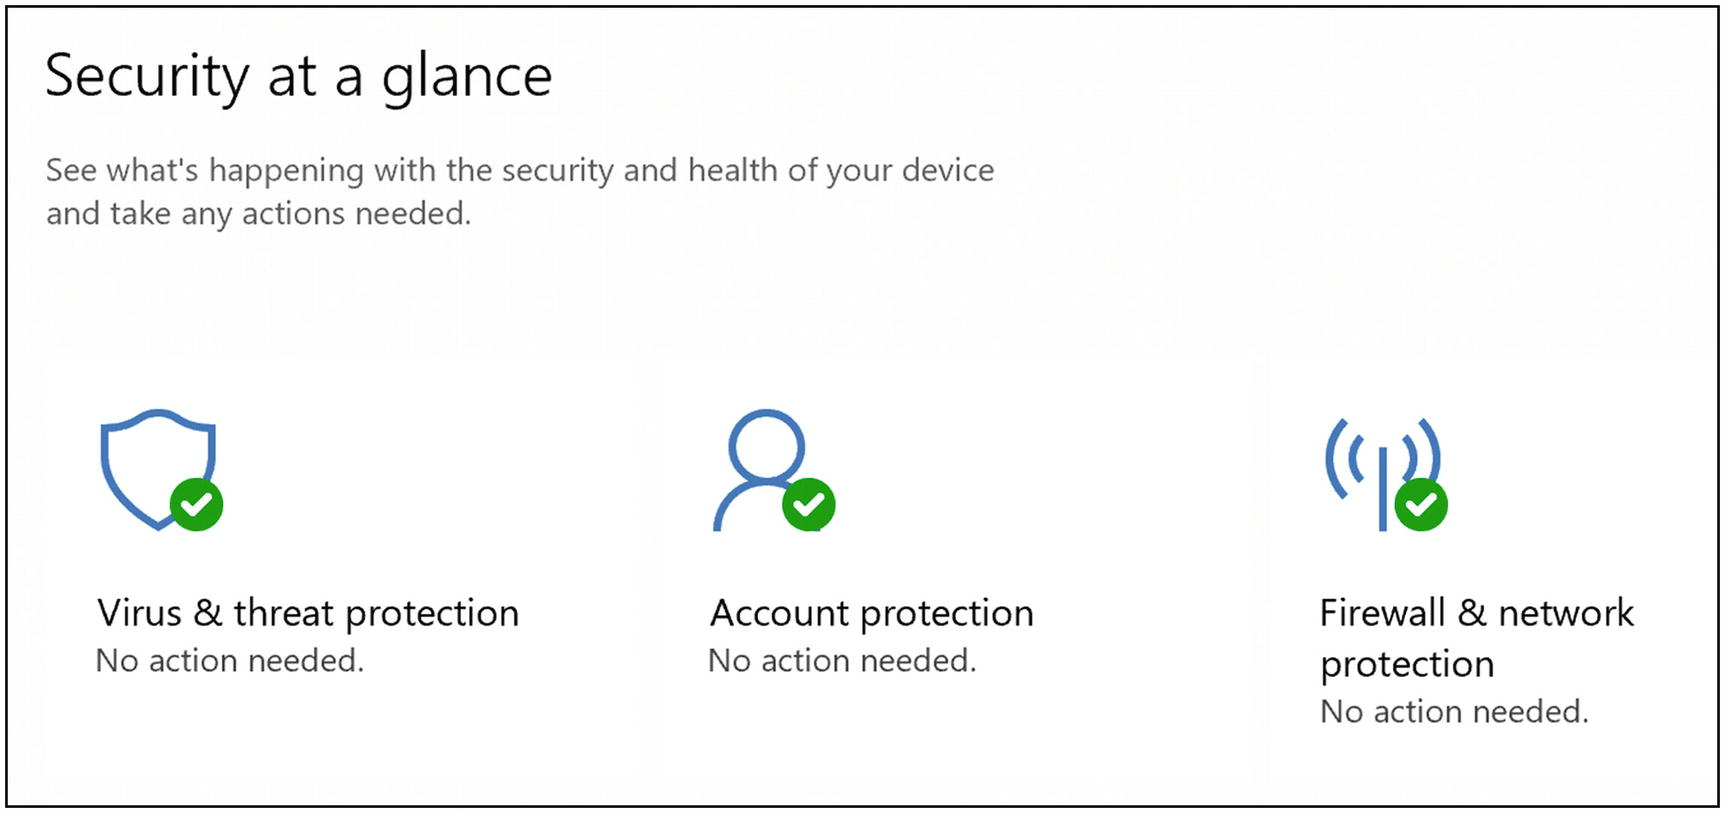
Windows 10 security status
- 4.
Click “Virus & threat protection”, and click “Virus & threat protection settings”. Make sure the top four items are on, as shown in Figure 5-30. (We’ll talk about “Controlled folder access” in the next tip.)
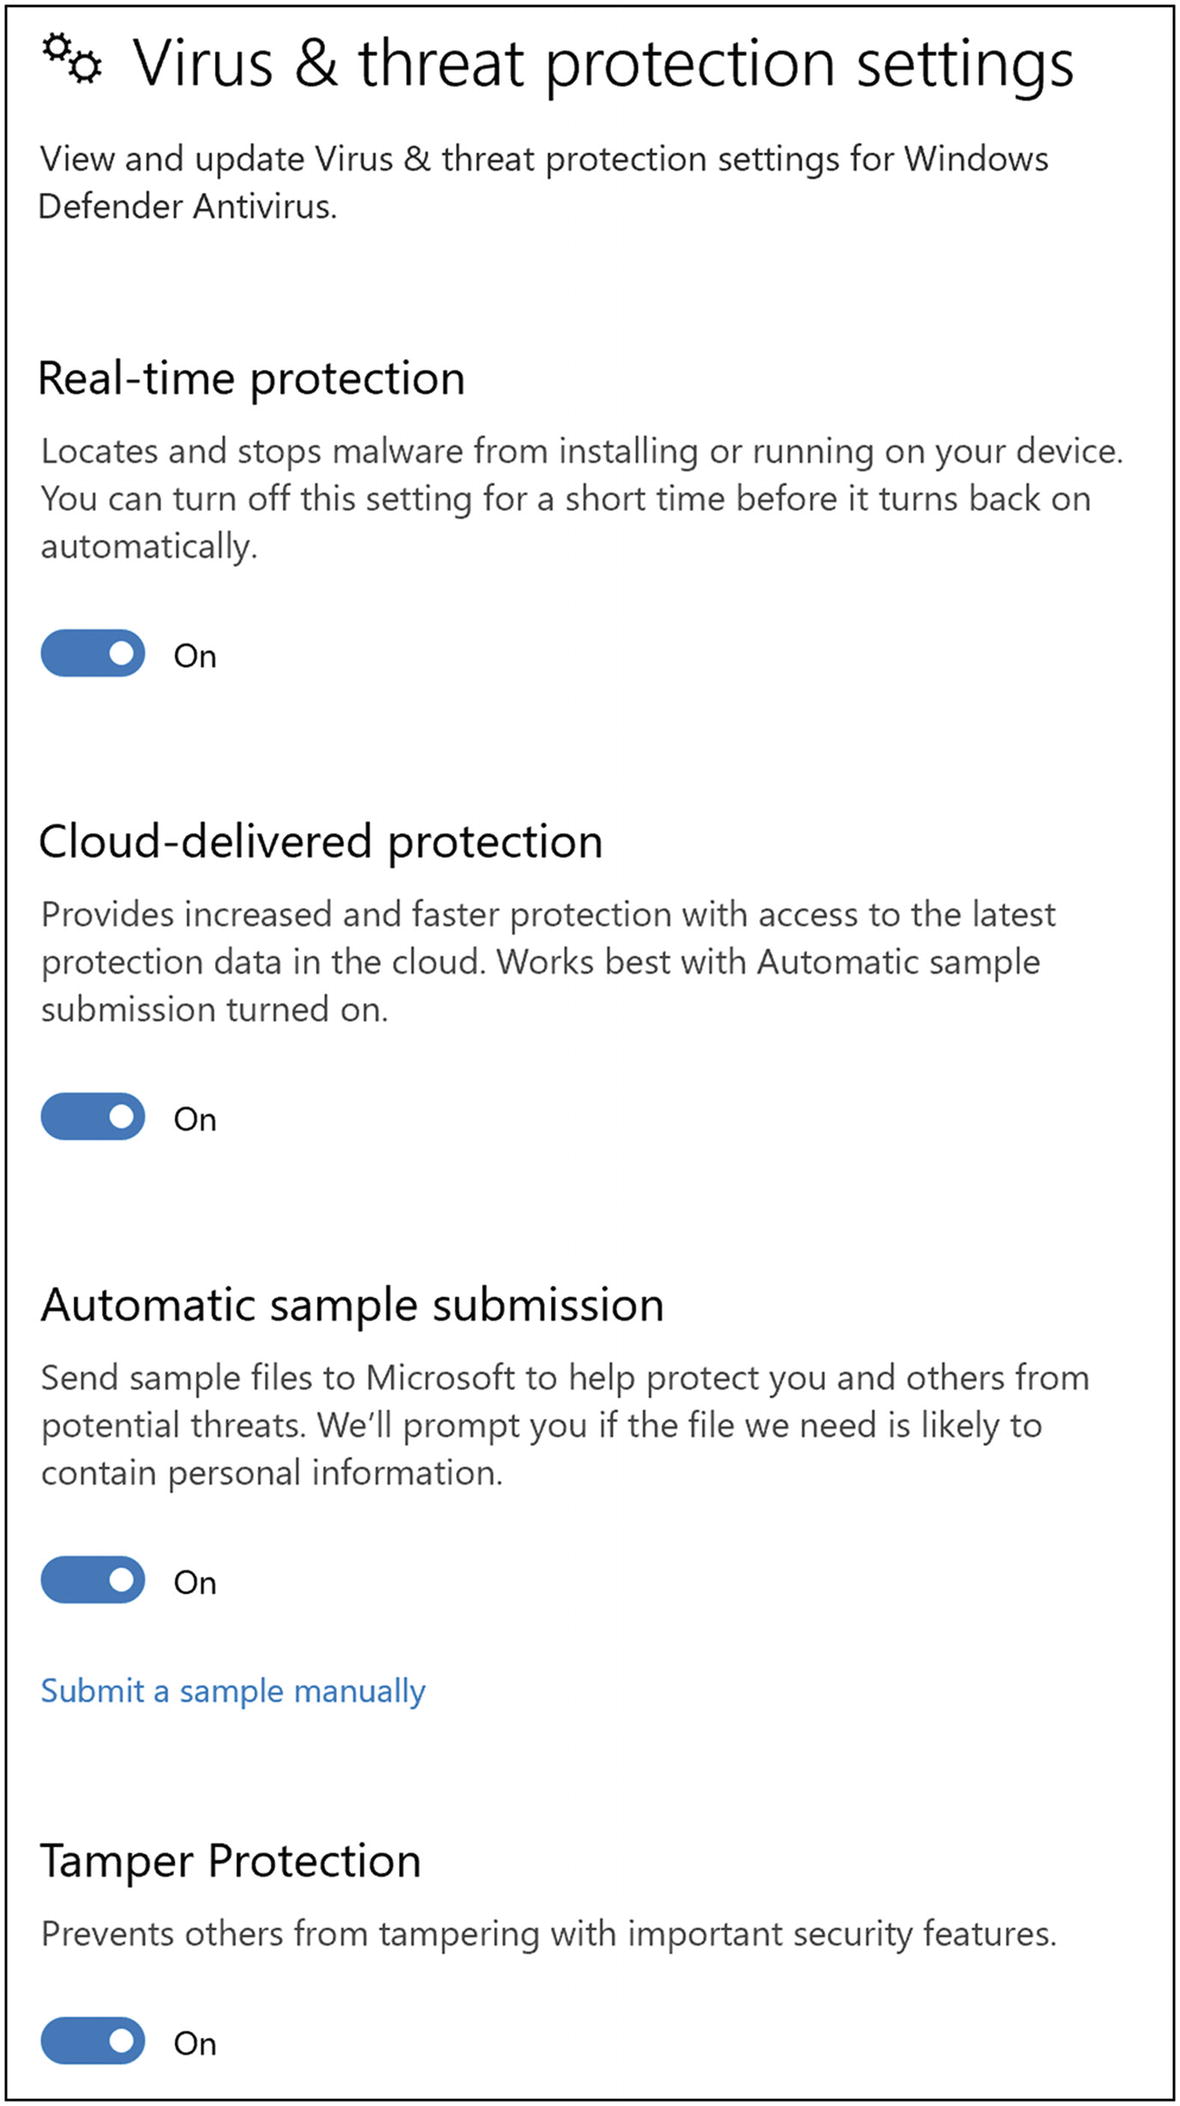
Windows 10 virus and threat protection settings
Tip 5-4b. Mac OS
Modern Mac computers come with some basic anti-malware protection built into the operating system, but it’s not a full-fledged antivirus program. There are a few decent, free antivirus applications for Mac. Unfortunately, the capabilities and efficacy of these applications change constantly. These third-party programs are often adding features that break your encrypted Internet connections in an attempt to see everything you’re doing. These techniques are dangerous and can lead to some severe vulnerabilities. Honestly, I’ve personally decided not to install AV software at all on my Macs.
- 1.
Go to the Sophos website and download the free version for Mac:
- 2.
It will ask you to create an account. I know…it’s a pain. But go ahead and sign up. They will send you an email confirmation with a button—click that button to complete your sign up and log in to your new account. It should then offer you a download button. There will also be a link at the bottom of the page—if you have other computers in your house that you’d like to protect with Sophos, use this link to email yourself the download link.
- 3.
Download and run the installer. You will need to enter your administrator account credentials.
- 4.
You may see a scary pop-up dialog about a system extension being blocked. It’s just Mac OS trying to protect you from malware, which is a good thing! But in this case, we want to allow it, so click Open Security Preferences.
- 5.
In Security Preferences, unlock the lock with your password and then click the Allow button for Sophos (Figure 5-31).

Mac OS security extension warning dialog
- 6.
Somewhat annoyingly, Sophos will be opening windows at the same time you’re trying to do the preceding process. Click the “Get Started” button and follow the instructions to complete your Sophos setup.
Tip 5-5. Restrict Access to Important Files
Both Microsoft and Apple now have built-in mechanisms to restrict access to key folders and files. In both cases, the feature is aimed at blocking ransomware (and other malware) from adding, changing, or deleting files in selected folders and system files. Some already-trusted applications (like the built-in apps) will automatically be given access, but other applications will need to be explicitly “whitelisted” in order to access your files. This will probably mean you’ll get some pop-up messages asking whether to allow this or that app access to your protected folders, but you should only have to do this once per application. In my opinion, with ransomware as prevalent and devastating as it is, I think this is a good trade-off of security over convenience.
Tip 5-5a. Windows 10
- 1.
Enable “Controlled folder access” (Figure 5-32).
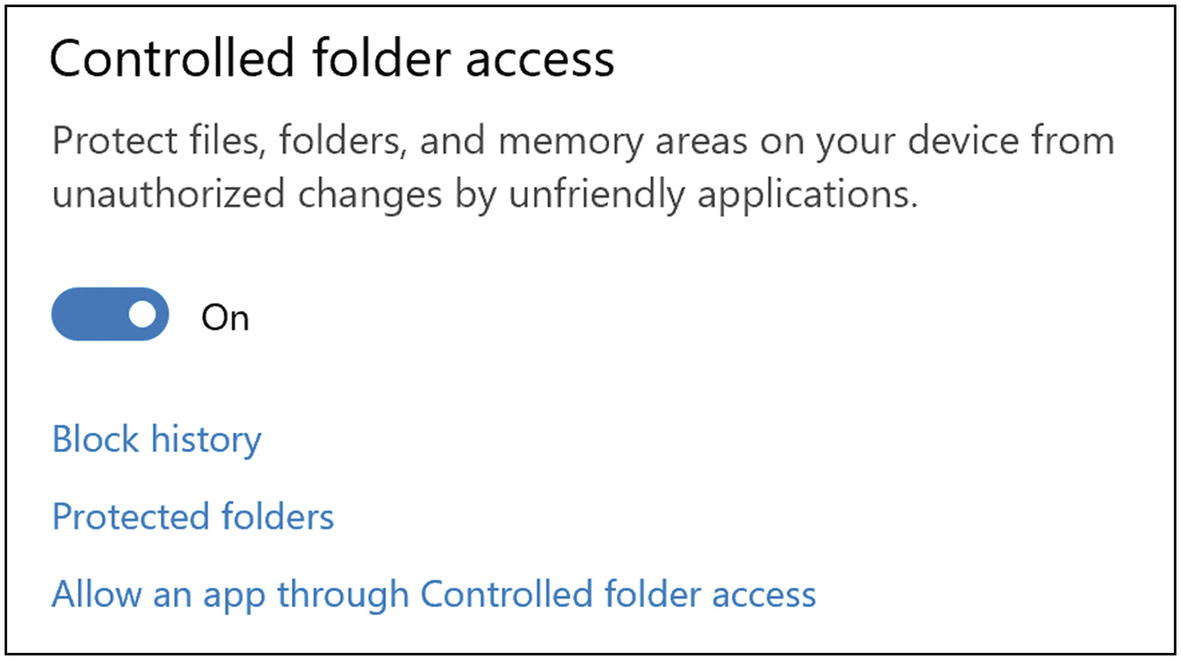
Windows 10 “Controlled folder access” setting
- 2.
You can see what folders are protected and add other folders by clicking “Protected folders”.
- 3.
If you already know of some applications you want to add to the approved list, you can add it using the “Allow an app through Controlled folder access” here. Otherwise, you will be prompted to approve each application when they try to access your files.
Tip 5-5b. Mac OS
- 1.
Open System Preferences and then Security & Privacy.
- 2.
Click the lock icon and enter your administrator account credentials.
- 3.
Under the Privacy tab, you’ll find a long list of security and privacy settings. It’s good to periodically review these settings to make sure that you haven’t accidentally granted permission to some application or you want to rescind your permission (Figure 5-33).
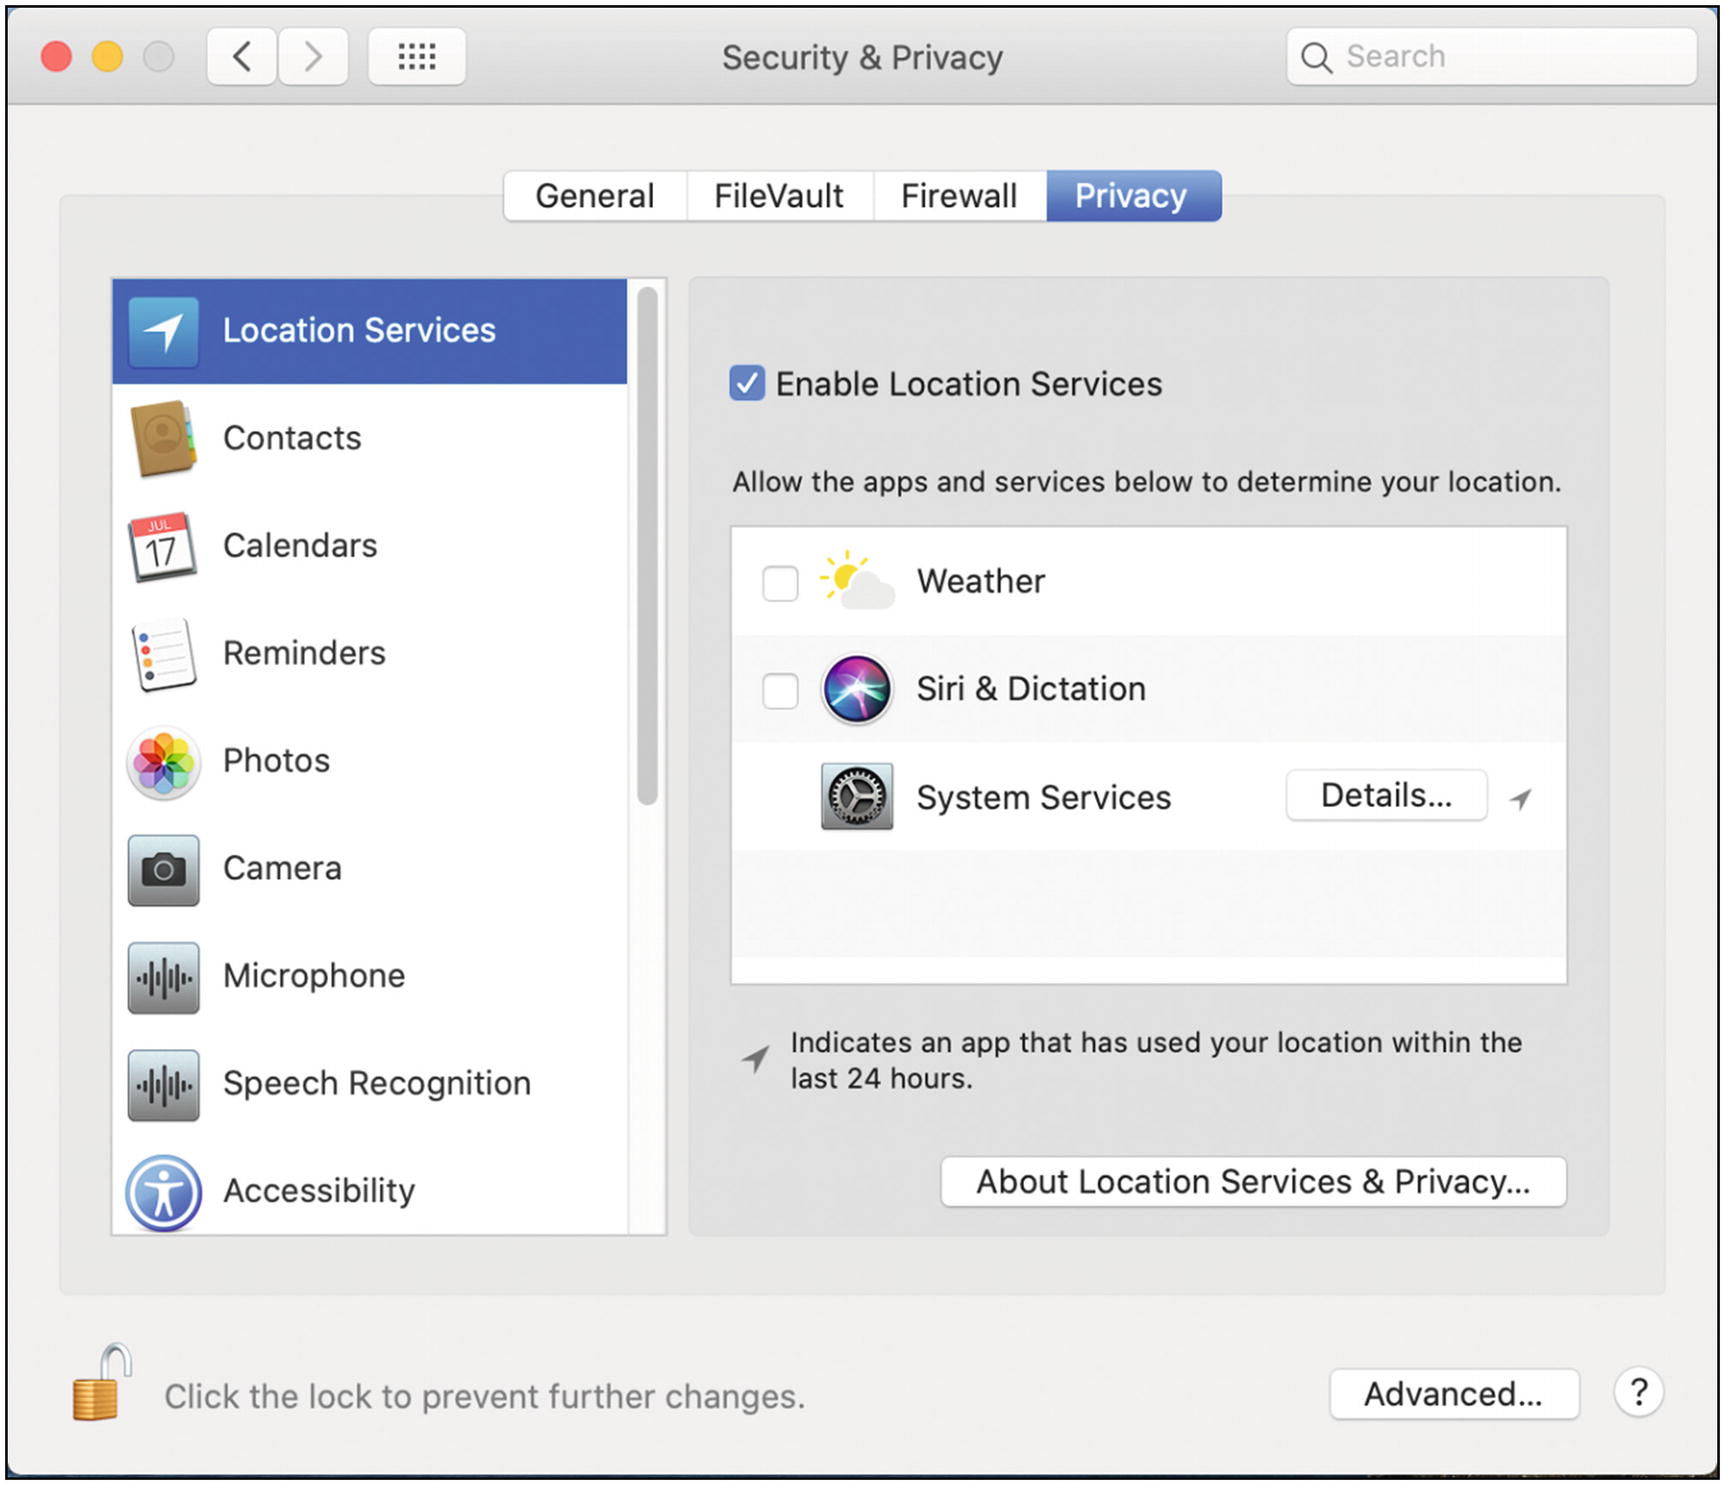
Mac OS Security and Privacy settings
Tip 5-6. Turn on Disk Encryption
Turning on full-disk encryption is an easy step to protecting your precious data, and you won’t even notice it. The process itself can take quite a long time, but you can use your computer while the encryption is going on in the background. There’s basically no reason not to do this (if you can). If your computer is ever stolen, the data on the drive will be unreadable unless they can guess your password.
But the more common case is when you sell, donate, or recycle your computer, you want to make sure any remaining data is totally scrambled. A recent study8 found that most people aren’t taking the time to properly wipe data off their hard drives before they resell them. The researchers bought 200 used hard drives and found that a whopping 59 percent of the drives still had data that was accessible, including “employment and payroll records, family and holiday photos (along with intimate photos and sexualized content), business documents, visa applications, lists of passwords, passport and driver’s license scans, tax documents, bank statements, and lists of students attending senior high schools.” While this study was rather limited, I have no doubt that people are not properly scrubbing data from the devices they trade in, recycle, resell, or throw away.
Tip 5-6a. Windows 10
Windows 10 Pro and Enterprise have a built-in tool called BitLocker that will encrypt your entire hard drive. Unfortunately, BitLocker is not available in Windows 10 Home, which is frankly ridiculous (and will hopefully change some day).
Windows 10 Home edition does come with an option called “Device Encryption”, but there are two key drawbacks. First, it’s not available for all Windows computers—it requires certain support hardware, which you may or may not have. Second, it requires a Microsoft account and Microsoft gets to keep the encryption keys—you have no other choice (currently). This is probably billed as a convenience feature for average users who don’t want the responsibility of securely storing the encryption key. (Mac OS does this by default, too, but at least gives you the option to control the key yourself.)
If you have put your user account home directory on a Windows drive partition other than the standard C: partition (for example, a new D: partition), you should not encrypt the partition with the user account. One reader warned me that doing this prevented him from logging into that user account - and that it was quite difficult to remedy.
- 1.
First, we need to see if your computer supports device encryption. In the search area at the lower left, next to the Start button, search for “system information.” Click “System Administration” to reveal the options (Figure 5-34). The click “Run as administrator”. Enter your admin password, if asked.

Windows 10 system information search
- 2.
This information can be hard to read, but look for “Device Encryption Support”. If you see “Meets prerequisites”, then you can continue; otherwise, your PC doesn’t support it.
- 3.
Go to Settings and search for “Update & Security”.
- 4.
Select “Device Encryption” at the left. If device encryption isn’t turned on, click the “Turn on” button.
Tip 5-6b. Mac OS
- 1.
Open System Preferences and then Security & Privacy.
- 2.
Click the lock icon and enter your administrator account credentials.
- 3.
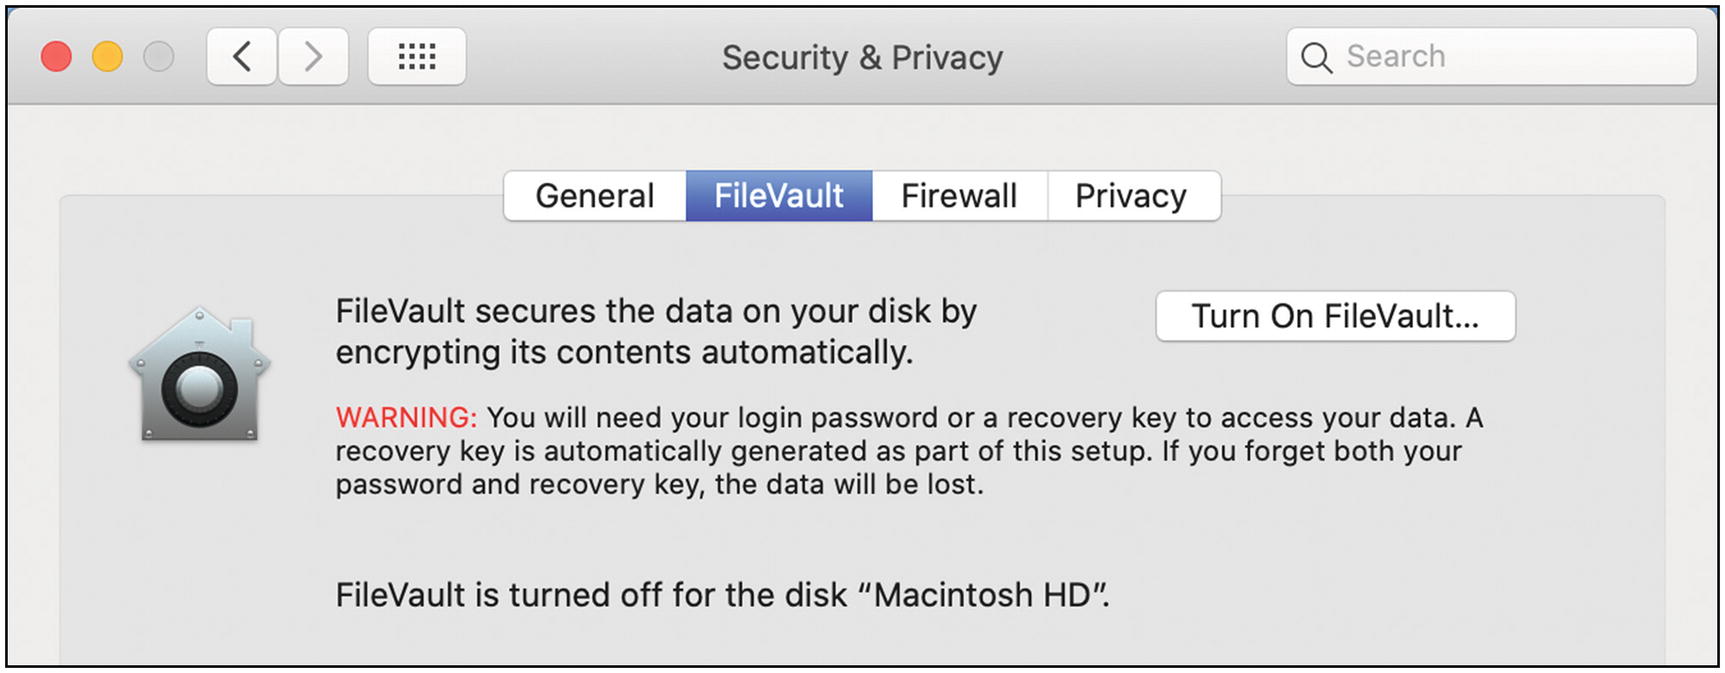
Then select the FileVault tab (Figure 5-35).
Mac OS Security & Privacy FileVault settings
- 4.
Click the button “Turn On FileVault”. At this point you may be asked to enter the passwords of any other users on this Mac who wish to use disk encryption. I would do this for all users, but it’s up to you. When done, click “Continue”.
- 5.
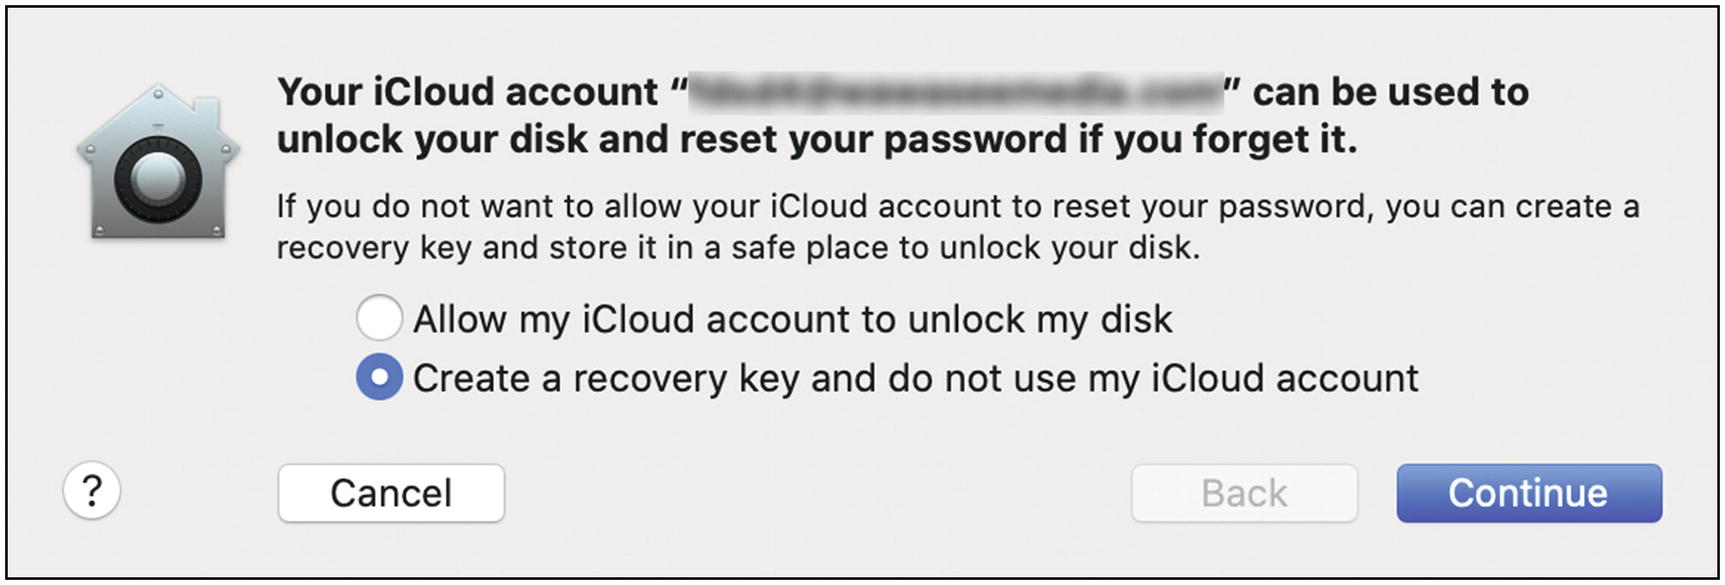
You will then be asked where you want to store your recovery key. You can elect to store this with your iCloud account, but personally I prefer to save it myself—in LastPass (Figure 5-36).
Mac OS recovery key location options
- 6.
Once you click Continue, you will be shown your recover key. This step is absolutely crucial! If you lose this key, you will not be able to recover any of your files if there’s some problem with your computer down the road. Carefully select the text from the screen and copy it and then paste it to a secure note in LastPass (see the previous chapter for instructions). You might want to also paste this key into a text file and print it off and then save it somewhere very safe (like a safe deposit box). Triple-check it to be certain you copied the entire key faithfully. Then click Continue (Figure 5-37).

Mac OS recovery key
- 7.
FileVault will then start encrypting your drive in the background. You can close the System Preferences window at any time (you don’t have to wait for it to complete).
Tip 5-7. Encrypt Your Backups (Mac OS Only)
- 1.
Open System Preferences from the Apple Menu, and then open Time Machine Preferences (Figure 5-38).

Mac OS System Preferences
- 2.
If necessary, click the lock icon at the lower left and enter your password. Click the Select Disk button (Figure 5-39).

Mac OS Time Machine preferences
- 3.
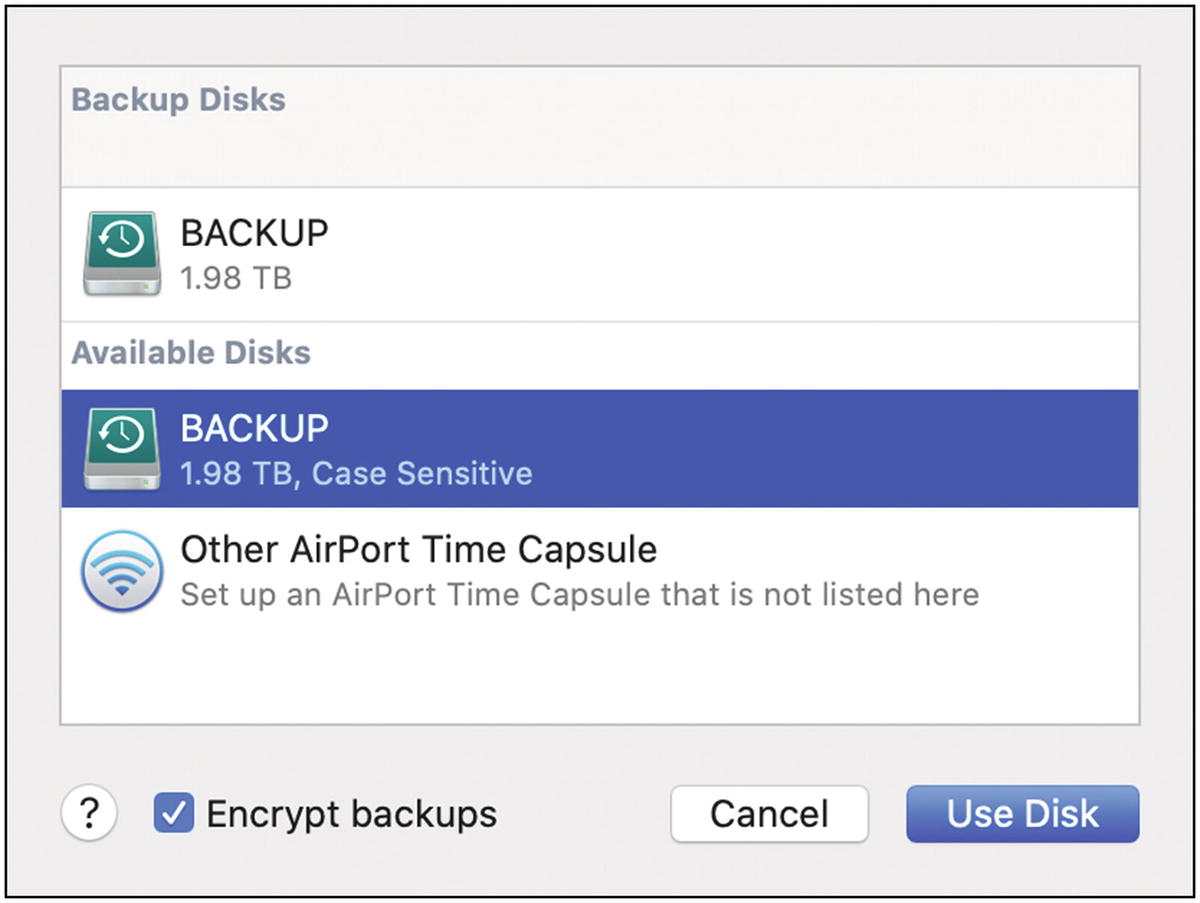
Select your disk in the “Available disks” list and then check the “Encrypt backups” box at the bottom. Click “Use Disk” (Figure 5-40).
Mac OS Time Machine disk selection dialog
- 4.
You will be asked to enter a password and a hint. Use the steps in the previous chapter to generate a kick-butt password and save it in a secure note in LastPass. Then paste that password here (twice). For the password hint, you can just use LastPass so that you know where you’ve saved this password (Figure 5-41).
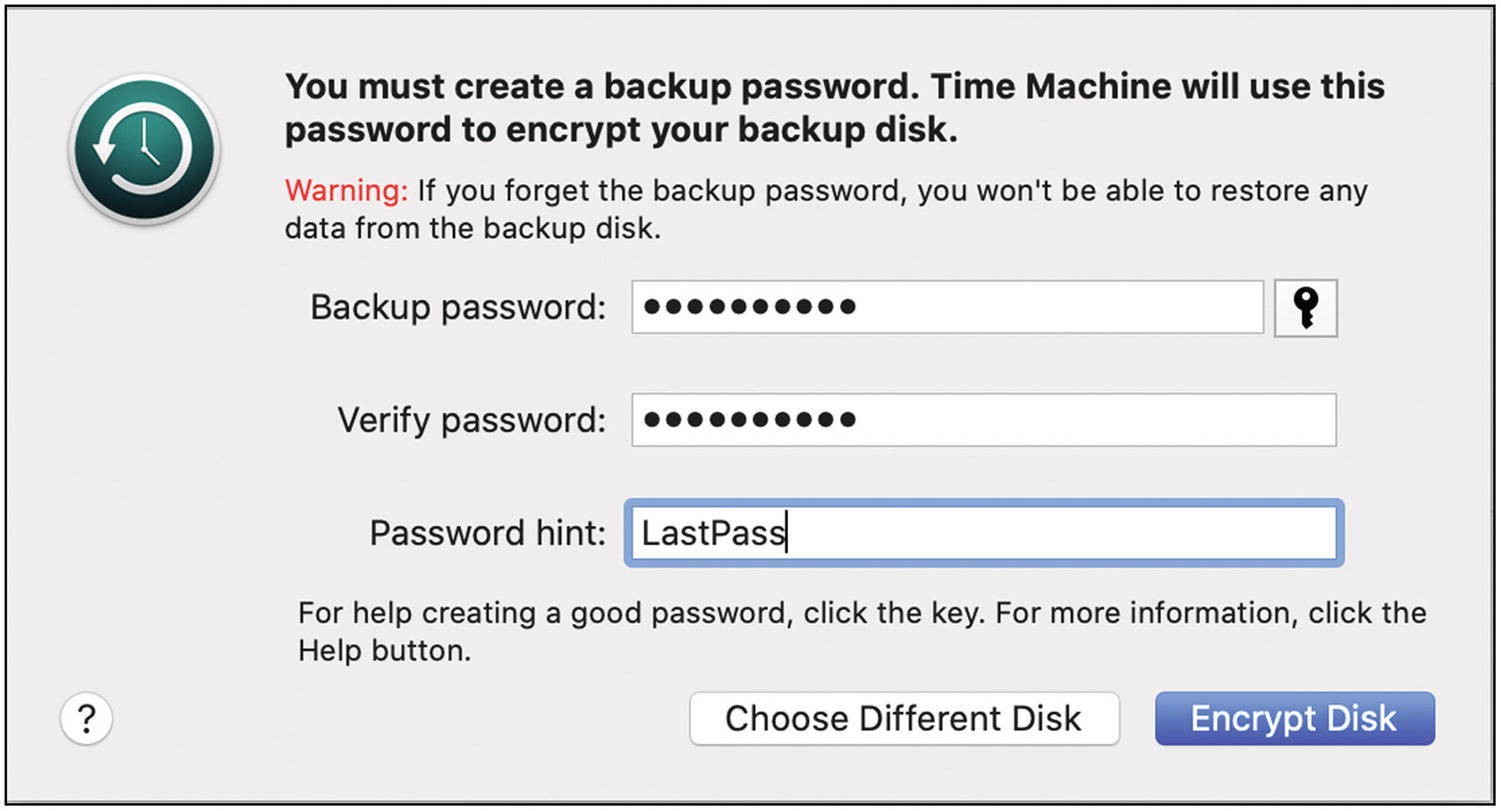
Mac OS Time Machine backup password dialog
- 5.
Now you can click the “Encrypt Disk” button. Once you’ve started this, it will take a long time, possibly more than a day. Just let it go. You don’t have to wait for it to complete, it will happen in the background.
Tip 5-8. Securely Erase Sensitive Files
If you want to throw away a sensitive file, you need to do more than simply put it in the virtual trash/recycle bin and “empty” it. As discussed in this chapter, when the operating system “deletes” a file, it doesn’t actually erase the bits and bytes; it just forgets about them. That means that the file’s data is technically still there, until it’s eventually overwritten by new files. With the right software tools, these files are recoverable. So, if you really want sensitive files to be erased, you have to take some extra precautions.
There’s one gotcha, though…modern computers that use solid-state drive (SSD) technology for their hard drive don’t really have a way to properly delete a file. Because of the way SSD drives work, your files are actually moved around constantly to improve performance and balance the usage of the memory sectors. That means there are potentially several places on the drive where copies of your file’s bits and bytes may be lying around, waiting to be overwritten. So, in this case, your best protection is just encrypting your entire drive (the previous two tips). Even if there are remnants of the file floating around the disk, they’re not readable by someone who’s not logged into the computer.
Unfortunately, neither Windows nor macOS has a way to securely erase a single file (possibly due to the odd nature of SSD file storage). Your only option is to securely erase all the “free” space on your hard drive. This will effectively “shred” any and all files that have already been deleted. Note that this process can take quite a while, so it’s not something you will do often. If you’re not worried about someone getting into your account and trying to resurrect deleted files, then you can skip this step. Just make sure your drives are fully encrypted (previous tips).
Tip 5-8a. Microsoft Windows
- 1.
Put any files you want to delete in your Recycle Bin. Then right click the bin and select “Empty Recycle Bin” (Figure 5-42).
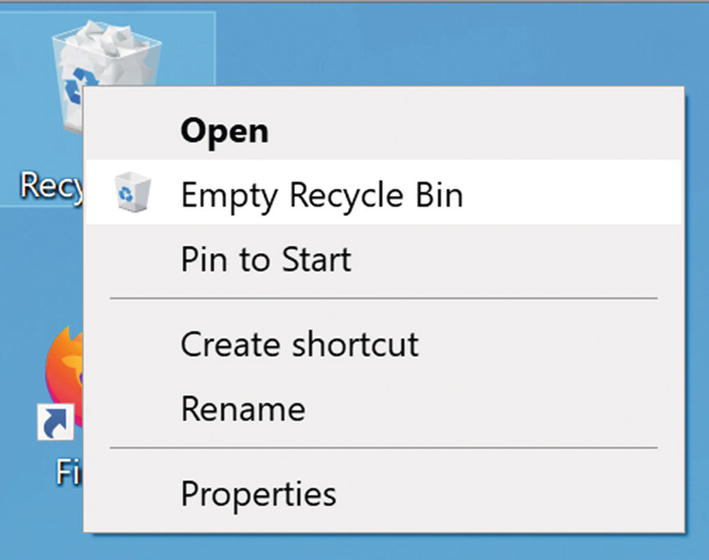
Windows 10 Empty Recycle Bin
- 2.
To get the most out of this procedure, you should quit all other applications. This allows any temporary files created by applications to also be cleaned up.
- 3.
From the Windows search bar, type in “powershell”. Select “Run as administrator” and enter your admin password when prompted (Figure 5-43).
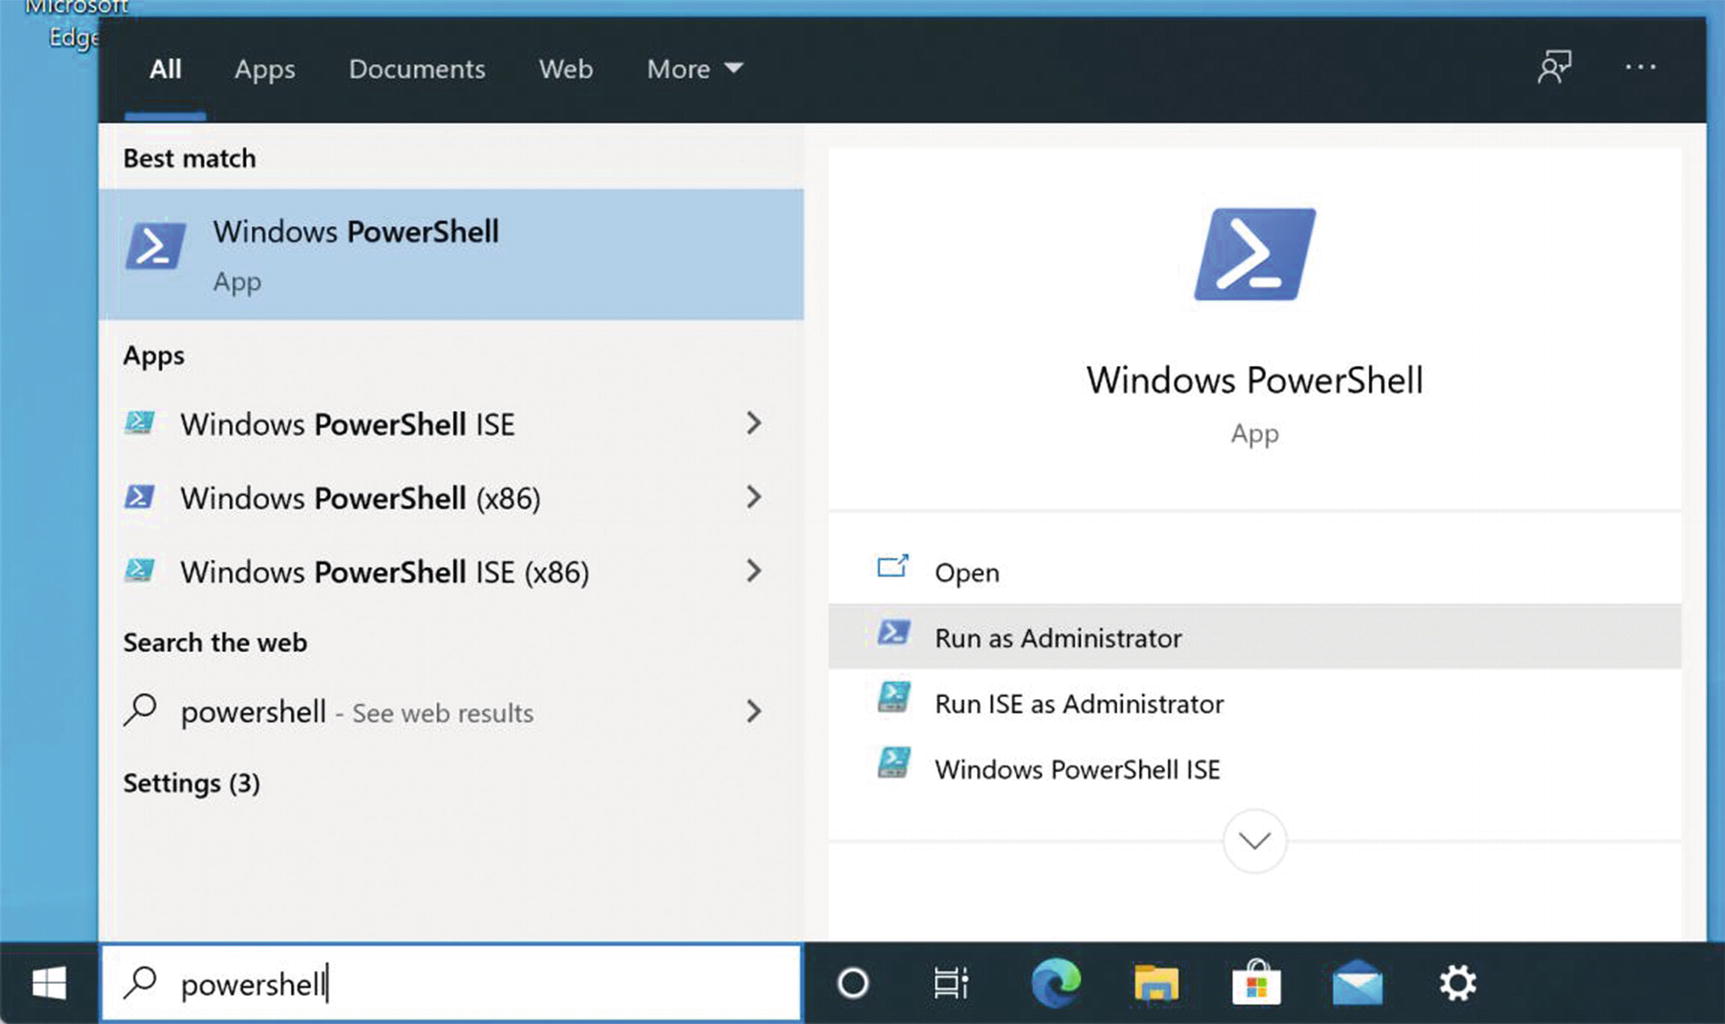
Windows 10 PowerShell search
- 4.
In the PowerShell window, type the following at the prompt and hit Enter. Again, this may take a long time to complete, but when done, all your deleted files will be securely erased from your hard drive (Figure 5-44).
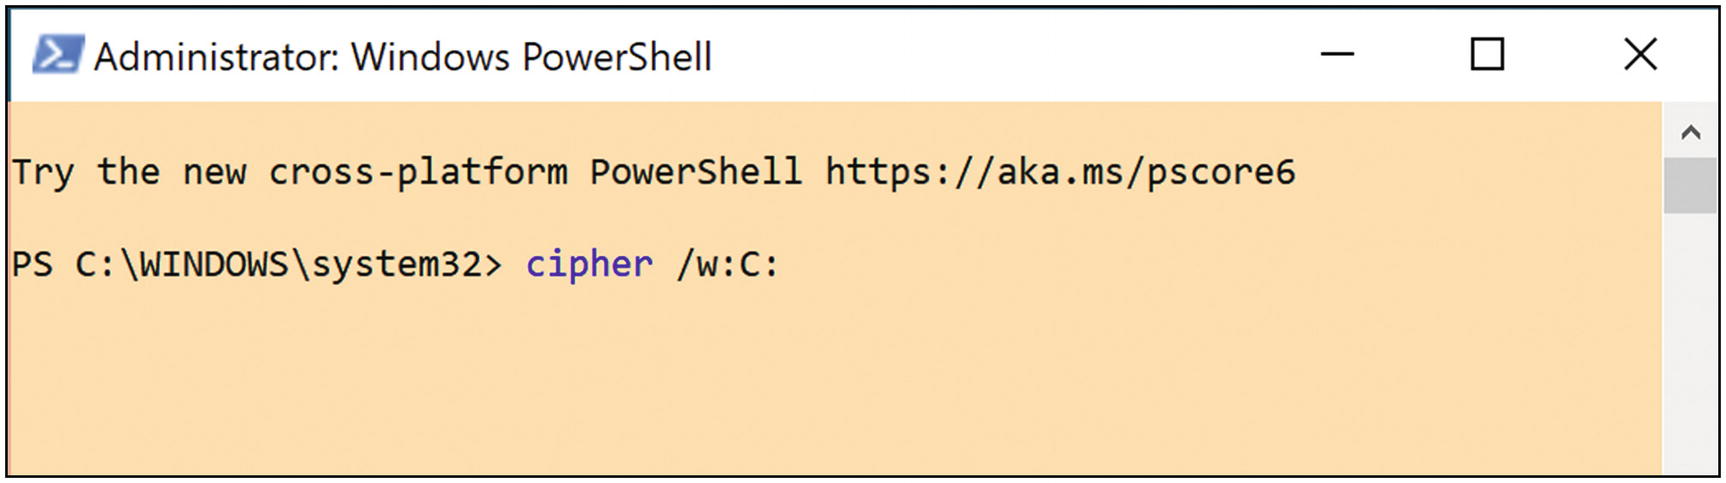
Windows 10 securely erase all free space
Tip 5-8b. Mac OS
- 1.
Put any files you wish to delete in the Trash. Empty the Trash by right-clicking the trashcan icon and selecting Empty Trash (Figure 5-45).
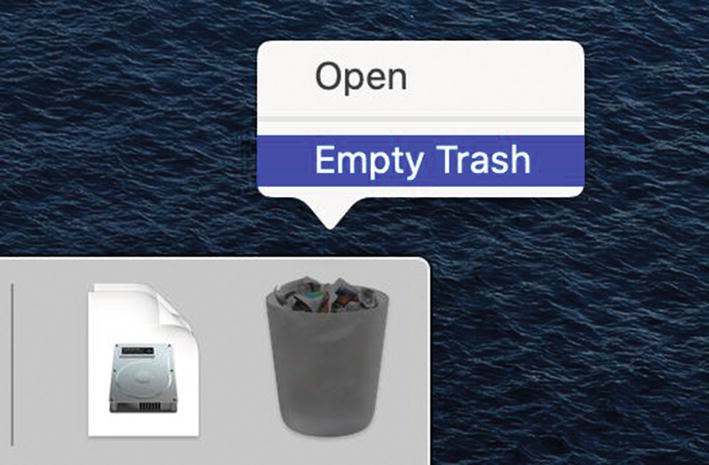
Mac OS Empty Trash
- 2.
Run the Terminal app. The easiest way to do this is to click the little magnifying glass at the upper-right corner of your screen (Spotlight) and search for “terminal”. When found, click “Terminal” to launch the app (Figure 5-46).
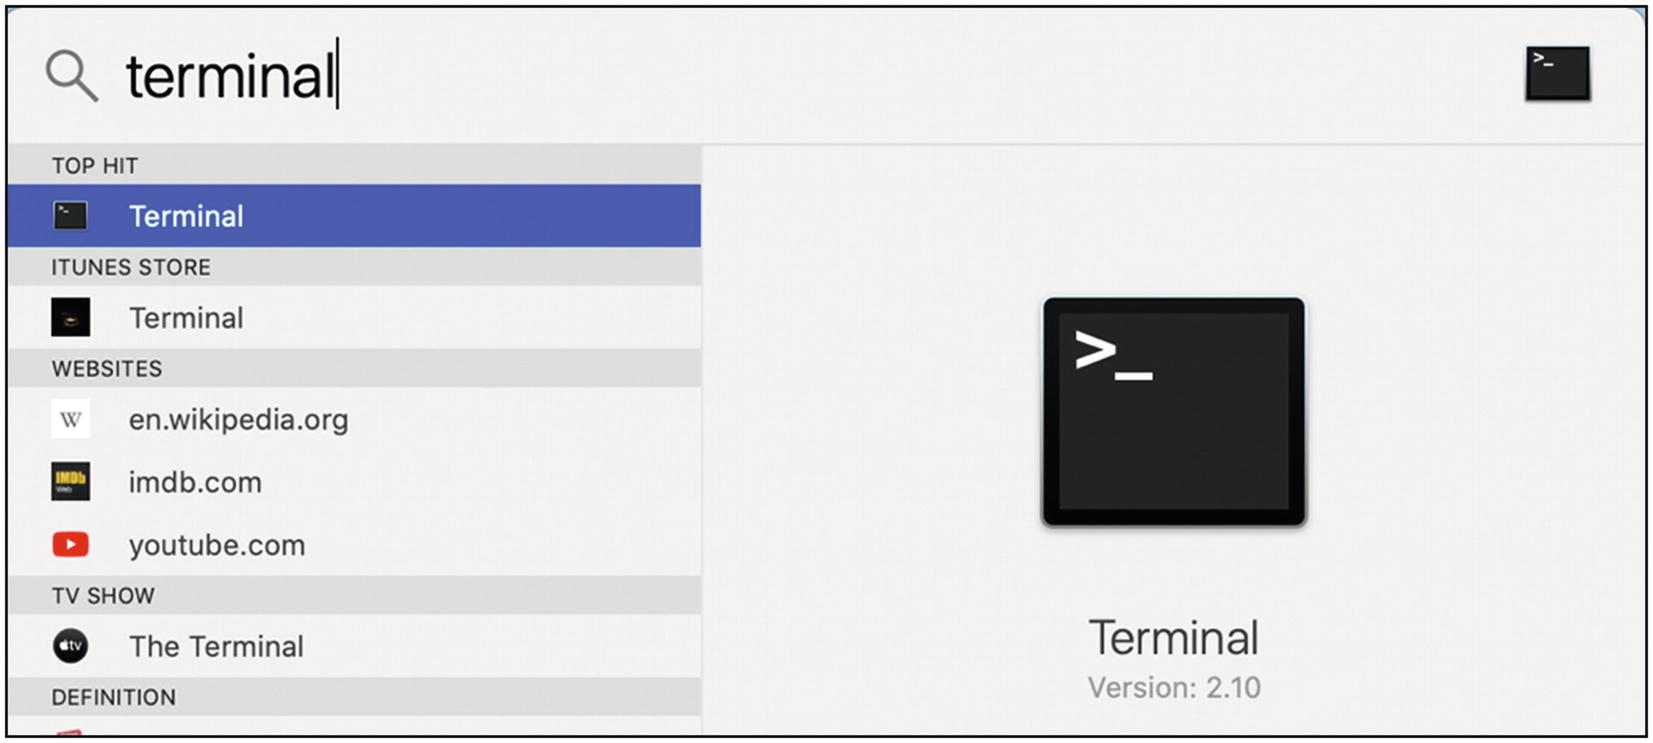
Mac OS terminal search in Spotlight
- 3.
At the Terminal prompt, type the following. The spaces are important. Note that this assumes your main drive has the default name “Macintosh HD” (Figure 5-47).
diskutil secureErase freespace 0 /Volumes/Macintosh HD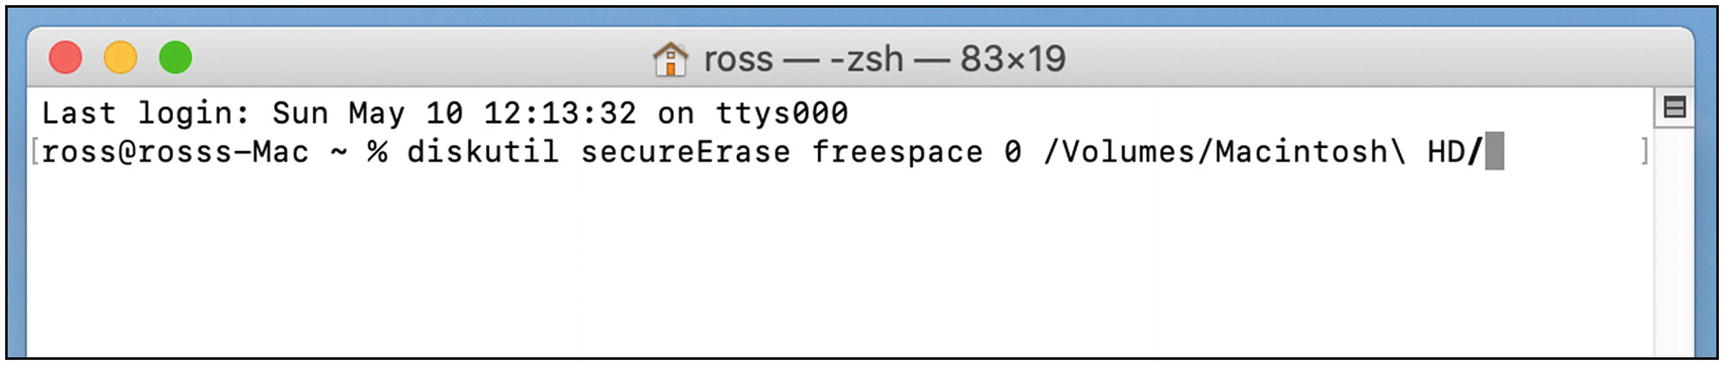 Figure 5-47
Mac OS secureErase command
- 4.
You can try higher levels of security by increasing the 0 to 1 or 2. This will also take more time. When ready, hit Return.
Tip 5-9. Prepare a Computer for Sale, Donation, or Recycle
Your computer probably contains a lot of juicy information about you. Before you get rid of it (sell, give, or even recycle), you should make sure that no one else can get to your data. Now, if you’ve fully encrypted your hard drive like I’ve recommended, then you don’t need to bother trying to erase everything. Your data is completely inaccessible—total gibberish, even to the NSA. All you need to do is delete your accounts. (If you really want to be sure, look at the final chapter of the book for tips on how to securely wipe any hard drive.)
Tip 5-9a. Microsoft Windows
Here’s how to prepare a Windows computer for selling or donation. Obviously, before you do this, you’re going to want to back up any and all files first. Once you follow these steps, all that data will be gone. So, make sure you’ve backed everything up before you do this!
- 1.
Open Settings and then Update & Security.
- 2.
Click Recovery.
- 3.
Under “Reset this PC”, click “Get started” button.
- 4.
Click “Remove everything”.
- 5.
On the next screen, click “Change settings”.
- 6.
Turn on the “Data erasure” switch. Click “Confirm”. Then click the “Next” button.
- 7.
Finally, click the “Reset” button.
Once this is complete, it will start the process to set up the PC, as if you had just pulled it out of the box. There’s no reason to complete this—you can leave this to whoever buys the computer. Simply shut down the PC.
Tip 5-9b. Mac OS
Here’s how to prepare an Apple computer for selling or donation. Obviously, before you do this, you’re going to want a full backup of your computer. If you use the Time Machine method, you can easily use this back up to transfer all your data to your new computer. But once you follow these steps, all the data on the computer will be gone. So, make sure you’ve backed everything up first!
- 1.
Go the System Preferences and click the Apple ID button at the top right.
- 2.
Select the iCloud tab from the left side. Scroll down to “Find My Mac”. If this is enabled, uncheck the box. You will need to enter your iCloud password.
- 3.
Click “Overview” at the left. Then click the “Sign Out” button at the bottom. A dialog will ask you whether you want to keep a copy of your iCloud data—go ahead and click “Keep A Copy” (we’ll be wiping the drive later).
- 4.
Sign out of Messages. Within the Messages app, go to Preferences and then the iMessage tab. Click “Sign Out”.
- 5.
If you have any other cloud service accounts tied to this computer (like Dropbox, Backblaze, Google Drive, etc.), be sure to sign out of them, as well.
- 1.
Repeat the previous steps.
- 2.
Open System Preferences and select Accounts.
- 3.
Delete all the other accounts on the computer.
- 1.
Shut down your Mac. Then turn your Mac back on and immediately press and hold the Command and R keys simultaneously. When you see the Apple logo, you can release the keys.
- 2.
You should be presented with a “macOS Utilities” dialog. (If not, repeat the previous step.) Select Disk Utility.
- 3.
Choose “Show All Devices” from the “View” menu at the upper left of the Disk Utility window. Select the top drive in the list.
- 4.
Then click the “Erase” button. Choose the “APFS” format and “GUID Partition Map” options.
- 5.
Click “Erase”. This will take some time. If asked, enter your administrator password.
At this point, you may wish to reinstall Mac OS. Follow the preceding steps to get back into recovery mode. This time, select “Reinstall macOS”. (If it asks, you don’t need to erase/format the disk because you just did that.) Follow the instructions and allow the installation to finish. At this point, you can just turn off the Mac and let the new owner answer all the setup questions.
Tip 5-10. Set Up Find My Mac (Mac OS Only)
- 1.
Go the System Preferences and click the Apple ID button at the top right.
- 2.
Select the iCloud tab from the left side. Scroll down and check the box next to “Find My Mac”. (If this is already checked, you’re done.)
- 3.
You can now use your iCloud account (in a web browser on another computer, or using the “Find My” app on an iPhone or iPad) to locate this Mac if it’s lost or stolen.
Tip 5-11. Don’t Trust Other Computers
Whenever you’re using a computer that is not your own, you need to be careful what you do. Sometimes bad guys will install software on public computers that can record every single keystroke from the keyboard—these are called key loggers . Some malware can also take snapshots of everything shown on the screen. If you’re just doing some web searches and accessing websites that don’t require you to log in, then you don’t need to really worry because you’re not typing in or viewing anything that’s secret. However, you should never enter sensitive data like passwords, Social Security numbers, and credit card numbers on any computer you don’t own. It doesn’t matter if the website is secure; the information is being captured before it even gets to the form on the web page.
Tip 5-12. Avoid Strange USB Devices and Ports
We don’t think much about all the USB peripherals we attach to our computers—mice, keyboards, printers, webcams, thumb drives, and so on. These devices seem simple enough, but every USB device can contain software—and often, our computers will automatically read and run that software when the device is first plugged in. The point of this is for these devices to have built-in driver software, allowing most devices to “just work” when we plug them in.
To save money, many manufacturers will make this software updatable after manufacture. That is, instead of making this software read-only, they give themselves the option to retroactively change the software—so that if there’s a problem with it, they can simply change the software without having to throw away the hardware and start over.
The bottom line is that it’s possible to install malware on a USB device. Therefore, you should be suspect of any USB device you plug into your computer.
- 1.
Never pick up a USB flash drive that you find lying around and plug it into your computer.
- 2.
Get your USB devices from a reputable retailer. Make sure they’re new and unopened.
- 3.
Don’t buy used USB devices.
- 4.
Don’t use USB devices from other people.
- 5.
Set your computer screen to lock right away and require a password to unlock. Don’t leave it alone with others present while it’s unlocked. It’s already been shown that bad guys can completely hack your computer in less than a minute by plugging in a bad USB device. You’ll never even know they were there.
Note that this also applies to charging your smart device on a public USB ports (charging stations, airplane USB ports, etc.). See Chapter 11 for how to protect yourself.
Tip 5-13. Don’t Use Adobe Reader to Read PDF Files
Most web browsers can open PDF files now. So, you can try opening the file with Chrome or Edge (or better yet, Firefox!).
If you just want a simple, quick application for reading PDF files, try Sumatra PDF reader:
If you would like a full-featured PDF reader that will also let you create PDFs, try Nitro PDF reader. You’ll get a free trial of Nitro Pro, and then it will revert to the (perfectly useful) free version:
Tip 5-14. Unplug or Cover Webcams When Not in Use
This is going to sound paranoid, but it’s for real. It’s actually possible to remotely enable some webcams and watch what people are doing, in some cases even without turning on the little light that indicates that the webcam is active. This would usually require that your computer has already been compromised with malware—which is to say that if you have this problem, you probably have others, too. Nonetheless, I would unplug webcams if you’re not using them or put a sticky note over the lens if the webcam is built-in. (Mark Zuckerberg, CEO of Facebook, was famously seen doing this.)
Tip 5-15. Beware Cold Calls for Computer Support
If someone calls you out of the blue and tells you that your computer is having problems and offers to remotely debug your computer for you, just hang up. Real computer support companies will never do this. While this company may actually offer computer support services (at a low, low subscription cost of $199/year), you probably don’t need them.
Likewise, if you’re getting a weird pop-up on your computer warning you that you’re infected (from something other than the antivirus program you’ve already installed) or your computer’s performance could be optimized or even that some scanner has detected illegal materials on your hard drive, just close the window without doing anything. This is almost surely a scam.
If the pop-up messages continue or you’re just worried that something really is wrong, contact a tech-savvy friend or relative and get their advice. If that’s not an option, call a reputable computer store or call your computer’s support line (even if you’re out of warranty).
Tip 5-16. Buy a Paper Shredder
Okay, so this isn’t really a computer tip—but it’s hard to talk about securely deleting computer files and securely wiping your computers before selling them without thinking about physical file security, too. Many people don’t realize this, but once you throw something away, it’s fair game for anyone to take. Legally, once you “abandon” your trash and place it off your property (at the curb), you give up any expectation of privacy.
At a high level, you want to shred anything that’s private and personal. That would include financial, medical, and legal papers. It also includes any documents that you’re your Social Security number, credit card number, financial account numbers, medical insurance account numbers, and even your birth date. Maybe that seems obvious, but I’ll bet you still throw away a lot of stuff that you should be shredding.
You’re going to want to buy a decent shredder for this work. The main feature you want is cross-cutting. Strip-cutting shredders that just cut paper into long, thin strips are not good enough. Even cross-cut paper can be painstakingly reassembled, but it’s a lot harder—especially if it’s mixed up with a bunch of other shredded documents.
You can also buy shredders that can handle credit cards and optical disks (CDs and DVDs) in addition to paper, which is handy. We don’t use CDs and DVDs much anymore to store data—which is possibly why you might be throwing them away. When you get rid of old credit cards or when some company sends you a “starter card” as part of a mailed offer, you definitely want to shred them before you throw them out.
The last thing to consider is the size of the output bin. I would just get yourself the biggest one that fits your needs—it means having to empty it less often and mixes a lot more stuff up together. You can find shredders at office supply stores or online.