Passive security refers to the practice of logging user activity in order to avoid the threat of nonrepudiation. This is important because if an attack is launched by a privileged user, it allows for appropriate disciplinary or even legal action to be taken. SQL Server provides SQL Server Audit to assist with implementing passive security. SQL Server 2022 also introduces Ledger, which uses blockchain technology to make data tamper-evident, which allows for streamlined auditing processes. In this chapter, we will discuss the new ledger functionality, how to implement it and how to use it to discover who has changed data. We will also explore the concepts involved in auditing before demonstrating how to implement SQL Server Audit, including the creation of custom audit event.
Ledger
Any DBA who has been involved in a regulatory audit will know how troublesome and laborious proving the authenticity of your data can be. SQL Server 2022 addresses this issue by introducing a blockchain technology, which can not only provide a change history for your data, but also prove that your data has not been tampered with and avoid nonrepudiation in the event that tampering has occurred—even by accounts with administrative access. Because ledger functionality is built on blockchain technology, it can also be used to fulfill use cases such as secure supply chain processes between companies.
SQL Server 2022 introduces two types of ledger table, to provide this functionality: append-only ledger tables and updateable ledger tables. These table types, along with ledger databases, digest management, and ledger management will be discussed in the following sections.
Append-Only Ledger Tables
Append-only ledger tables do not allow any UPDATE or DELETE statements to be issued against them. Therefore, they are perfect for tables that store data such as transactional information against a credit account, for example.
Create an Append-Only Ledger Table
Attempt to Modify Data in Table

Result of trying to modify data in append-only table
Discover Who Inserted Data

Results of row insertion discovery
Once a table has been configured as append-only, it cannot be turned off. This prevents a highly privileged user from turning the feature off, inserting rows and then turning the feature back on.
Ledger Database
As previously mentioned, it will usually be the responsibility of a developer to create tables and there is a risk of human error, where a developer may forget to configure a table as a ledger table. This risk can be mitigated for databases where all tables should be ledger tables, with the use of a ledger database.
When a ledger database is used, all tables within the database will automatically become ledger tables, even if LEDGER = ON is not specified when creating the table. The default behavior is for tables to be created as updateable ledger tables, but developers can use the WITH(LEDGER = ON (APPEND_ONLY = ON)) syntax and specify the table should be an append-only table. Developers can also specify the LEDGER = ON syntax explicitly to control the names of ledger columns, the ledger view, or the history table. If you attempt to create a table in a ledger database with the LEDGER = OFF syntax, the table creation will fail.
Create a Ledger Database

Ledger tables in SSMS
Return Ledger Status Information
Database Ledger and Digest Management
Ledger works using blockchain technology to incrementally capture the state of a database over time. When DML statements are executed against ledger tables, the query engine extends the execution plan to record the transaction ID, ordinal sequence number of the operation within the transaction for the INSERT and/or DELETE operations. The new version of the row is then serialized and a hash of the serialized content is appended, at the transaction level, to a Merkle Tree. A separate Merkle Tree is created for each table updated within the transaction, and as well as the row versions, metadata is also stored about the updated columns (such as datatype, ordinal column position, etc.) and the transaction (such as transaction ID, timestamp, etc.).
A deep discussion of Merkle Trees is beyond the scope of this book, but further detail can be found at https://en.wikipedia.org/wiki/Merkle_tree.
These Merkle Trees are added to a tamper-evident data structure called a block. A block is a hashed representation of all hashed transactions that have occurred since the block was opened. The most recent block is known as the database digest.
A database digest is automatically generated.
A database digest is manually generated.
The block contains 100,000 transactions.
All transactions of both the sys.database_ledger_transactions catalog view (which was discussed in the previous section) and the in-memory queue of transactions that have not yet been flushed to the catalog view.
The Merkle Tree of the transactions within the block and the hash of content is calculated.
The block is persisted to the sys.database_ledger_blocks catalog view.
It is very important to note that the trustworthiness of the database depends on the trustworthiness of the digests. Therefore, generated digests should always be stored on trusted WORM (write once read many) storage devices.
To assist with this, SQL Server 2022 provides integration with Azure Confidential Ledger and Azure Blob Storage with immutability. Automatic digest generation can only be configured if this Azure integration is used. When digests are generated automatically with Azure integration, the digest will be generated every 30 seconds, providing that there has been at least one transaction impacting ledger tables within that time. To configure this, you will need to create a CREDENTIAL that uses the URL of the Blob storage as its name, the shared access signature as the identity, and the shared access signature key as the secret.
You should develop a (ideally automated) process for rotating the shared access signature key simultaneously in both Azure and SQL Server.
Generate a Digest and View Persisted Block
Generated JSON
The script in Listing 11-8 compares two digests to verify the Chapter11Ledger database and ensure that the data has not been tampered with.
You will notice that the first activity of the script is to turn on Snapshot isolation. This is a requirement for database verification. Transaction isolation levels are discussed in Chapter 19.
Verify a Database

Successful database verification
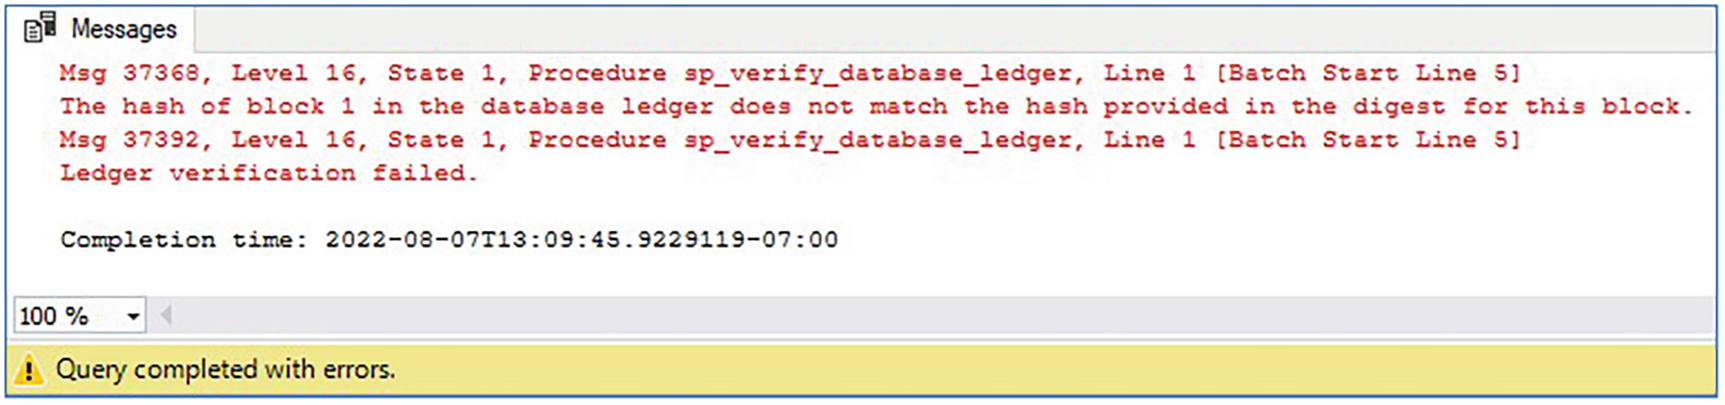
Failed database verification
Verify a Database from Automatically Generated Digests
It is very important that you schedule database verification to happen on a regular basis. Doing so will alert you promptly to an attack. Details of using Server Agent to automate maintenance can be found in Chapter 23.
Server Audit
SQL Server Audit provides DBAs with the ability to capture granular audits against instance-level and database-level activity and save this activity to a file, the Windows Security log, or the Windows Application log. The location where the audit data is saved is known as the target. The SQL Server Audit object sits at the instance level and defines the properties of the audit and the target. You can have multiple server audits in each instance. This is useful if you have to audit many events in a busy environment, since you can distribute the I/O by using a file as the target and placing each target file on a separate volume.
Choosing the correct target is important from a security perspective. If you choose the Windows Application log as a target, then any Windows user who is authenticated to the server is able to access it. The Security log is a lot more secure than the Application log but can also be more complex to configure for SQL Server Audit. The service account that is running the SQL Server service requires the Generate Security Audits user rights assignment within the server’s local security policy. Application-generated auditing also needs to be enabled for success and failure within the audit policy. The other consideration for the target is size. If you decide to use the Application log or Security log, then it is important that you consider, and potentially increase, the size of these logs before you begin using them for your audit. Also, work with your Windows administration team to decide on how the log will be cycled when full and if you will be archiving the log by backing it up to tape.
The SQL Server Audit can then be associated with one or more server audit specifications and database audit specifications. These specifications define the activity that will be audited at the instance level and the database level, respectively. It is helpful to have multiple server or database audit specifications if you are auditing many actions, because you can categorize them to make management easier while still associating them with the same server audit. Each database within the instance needs its own database audit specification if you plan to audit activity in multiple databases.
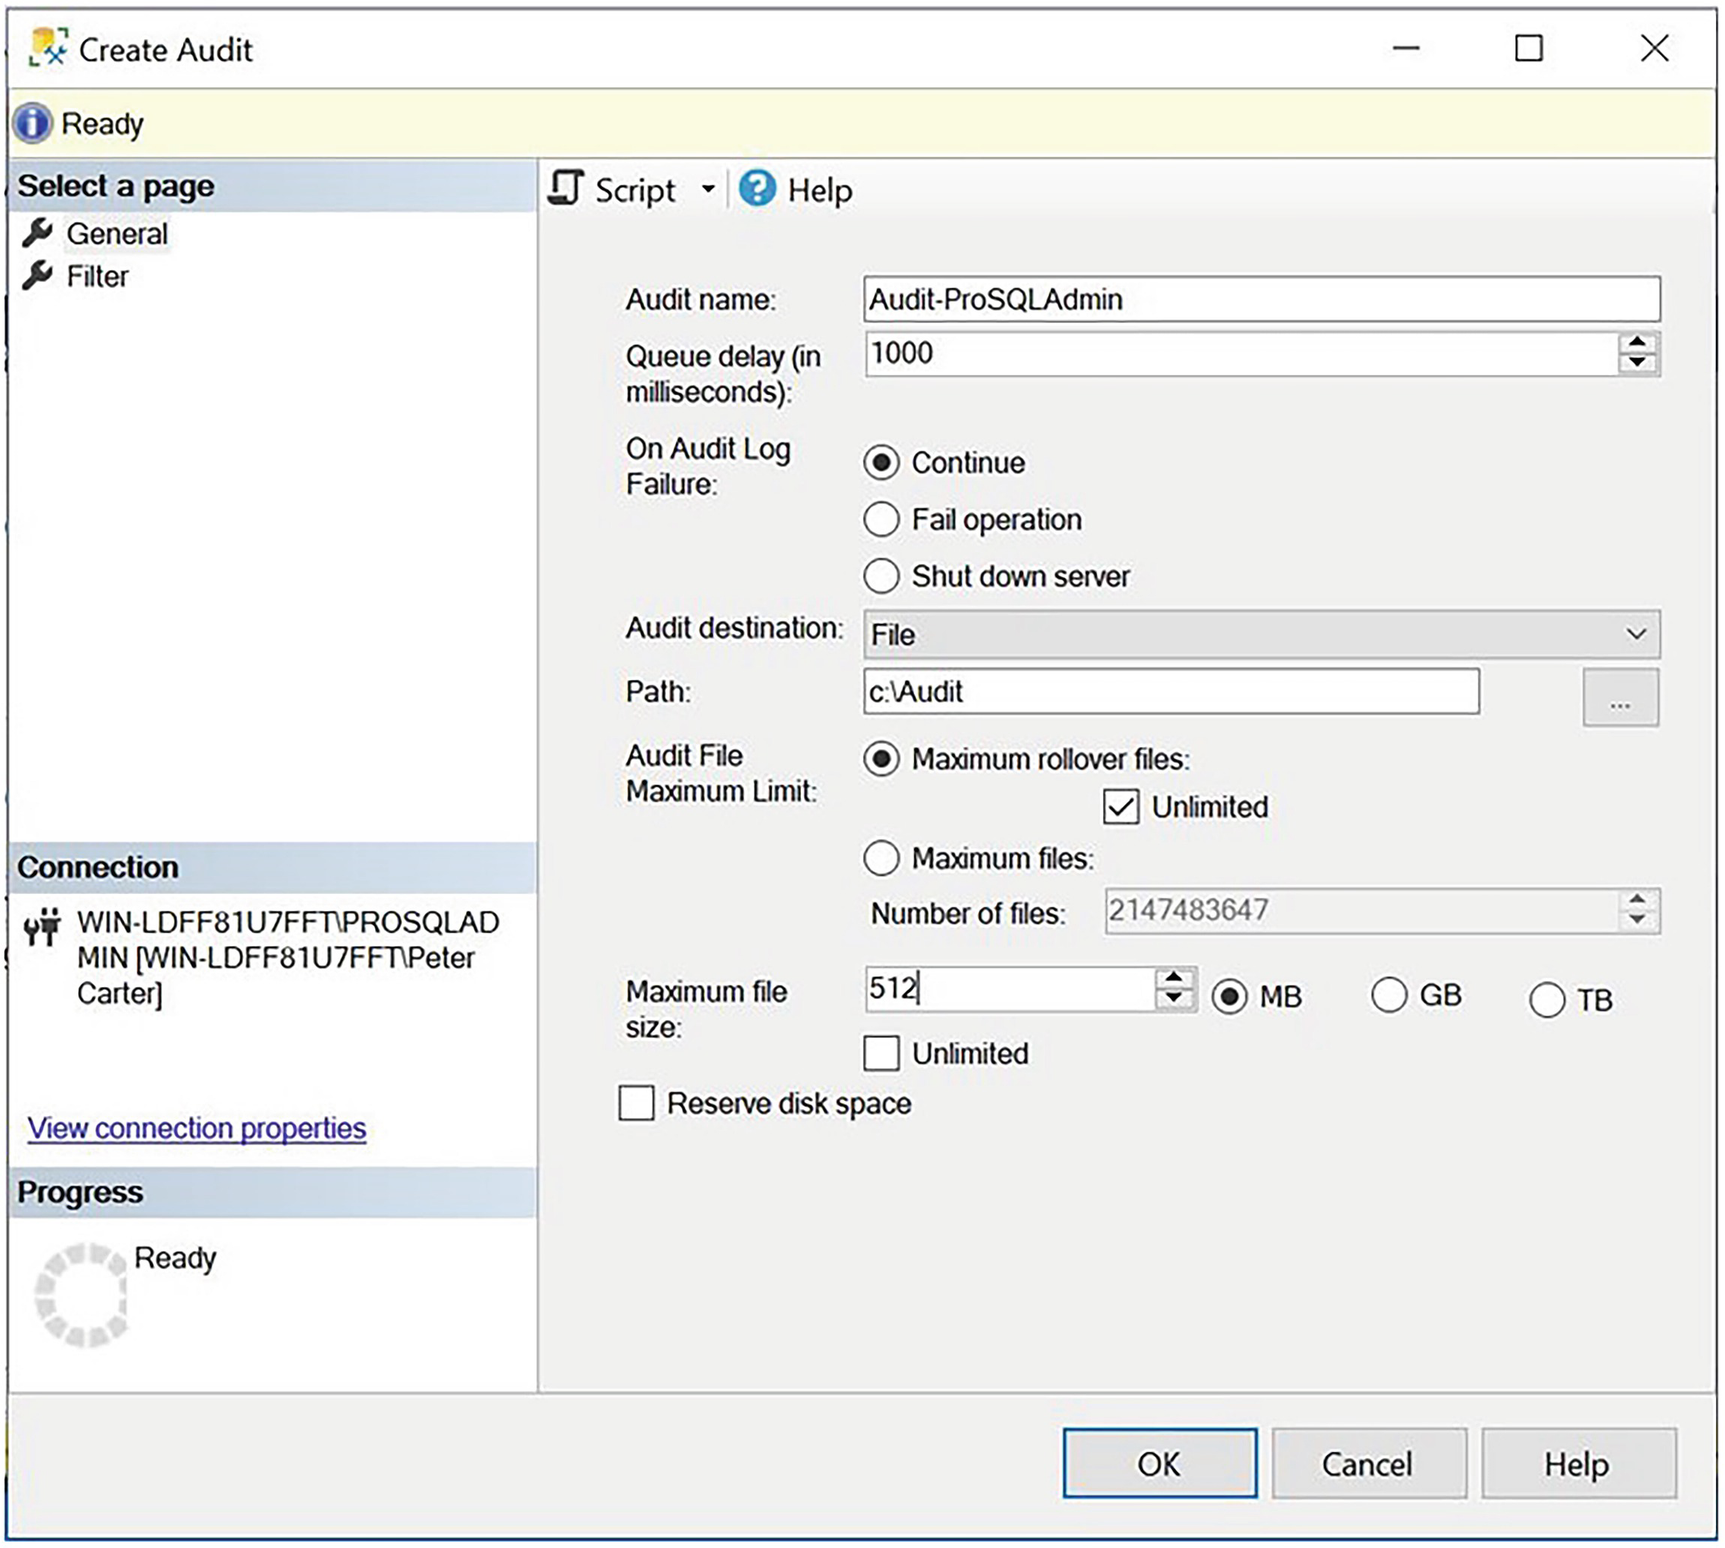
Creating a Server Audit
Server Audit Options
Option | Description |
|---|---|
FILEPATH | Only applies if you choose a file target. Specifies the file path, where the audit logs will be generated. |
MAXSIZE | Only applies if you choose a file target. Specifies the largest size that the audit file can grow to. The minimum size you can specify for this is 2MB. |
MAX_ROLLOVER_FILES | Only applies if you choose a file target. When the audit file becomes full, you can either cycle that file or generate a new file. The MAX_ROLLOVER_FILES setting controls how many new files can be generated before they begin to cycle. The default value is UNLIMITED, but specifying a number caps the number of files to this limit. If you set it to 0, then there will only ever be one file, and it will cycle every time it becomes full. Any value above 0 indicates the number of rollover files that will be permitted. So, for example, if you specify 5, then there will be a maximum of six files in total. |
MAX_FILES | Only applies if you choose a file target. As an alternative to MAX_ROLLOVER_FILES, the MAX_FILES setting specifies a limit for the number of audit files that can be generated, but when this number is reached, the logs will not cycle. Instead, the audit fails and events that cause an audit action to occur are handled based on the setting for ON_FAILURE. |
RESERVE_DISK_SPACE | Only applies if you choose a file target. Preallocate space on the volume equal to the value set in MAXSIZE, as opposed to allowing the audit log to grow as required. |
QUEUE_DELAY | Specify if audit events are written synchronously or asynchronously. If set to 0, events are written to the log synchronously. Otherwise, specify the duration in milliseconds that can elapse before events are forced to write. The default value is 1000 (1 second), which is also the minimum value. |
ON_FAILURE | Specify what should happen if events that cause an audit action fail to be audited to the log. Acceptable values are CONTINUE, SHUTDOWN, or FAIL_OPERATION. When CONTINUE is specified, the operation is allowed to continue. This can lead to unaudited activity occurring. FAIL_OPERATION causes auditable events to fail, but allows other actions to continue. SHUTDOWN forces the instance to stop if auditable events cannot be written to the log. |
AUDIT_GUID | Because server and database audit specifications link to the server audit through a GUID, there are occasions when an audit specification can become orphaned. These include when you attach a database to an instance, or when you implement technologies such as database mirroring. This option allows you to specify a specific GUID for the server audit, as opposed to having SQL Server generate a new one. |
It is also possible to create a filter on the server audit. This can be useful when your audit specification captures activity against an entire class of object, but you are only interested in auditing a subset. For example, you may configure a server audit specification to log any member changes to server roles; however, you are only actually interested in members of the sysadmin server role being modified. In this scenario, you can filter on the sysadmin role.
The General tab
You can see that we have decided to save our audit to a flat file, as opposed to a Windows log. Therefore, we need to specify the file-related parameters. We set our file to roll over and enforce the maximum size for any one file to be 512MB. We leave the default value of 1 second (1000 milliseconds) as a maximum duration before audit entries are forced to be written to the log and name the audit Audit-ProSQLAdmin.
On the Filter tab of the Create Audit dialog box, you should specify that we wish to filter on the object_name and only audit changes to the sysadmin role.
Creating a Server Audit
Creating a Server Audit Specification

Server Audit Specification dialog box
You can see that we have selected the SERVER_ROLE_MEMBER_CHANGE_GROUP as the audit action type. This audits any additions or removals of the membership of server roles. Combined with the filter that we have put on the Server Audit object, however, the new result is that only changes to the sysadmin server role will be logged. We also selected the Audit-ProSQLAdmin audit from the Audit drop-down box to tie the objects together.
Creating the Server Audit Specification
Enabling and Invoking Audits
Enabling Auditing
Triggering the Audit
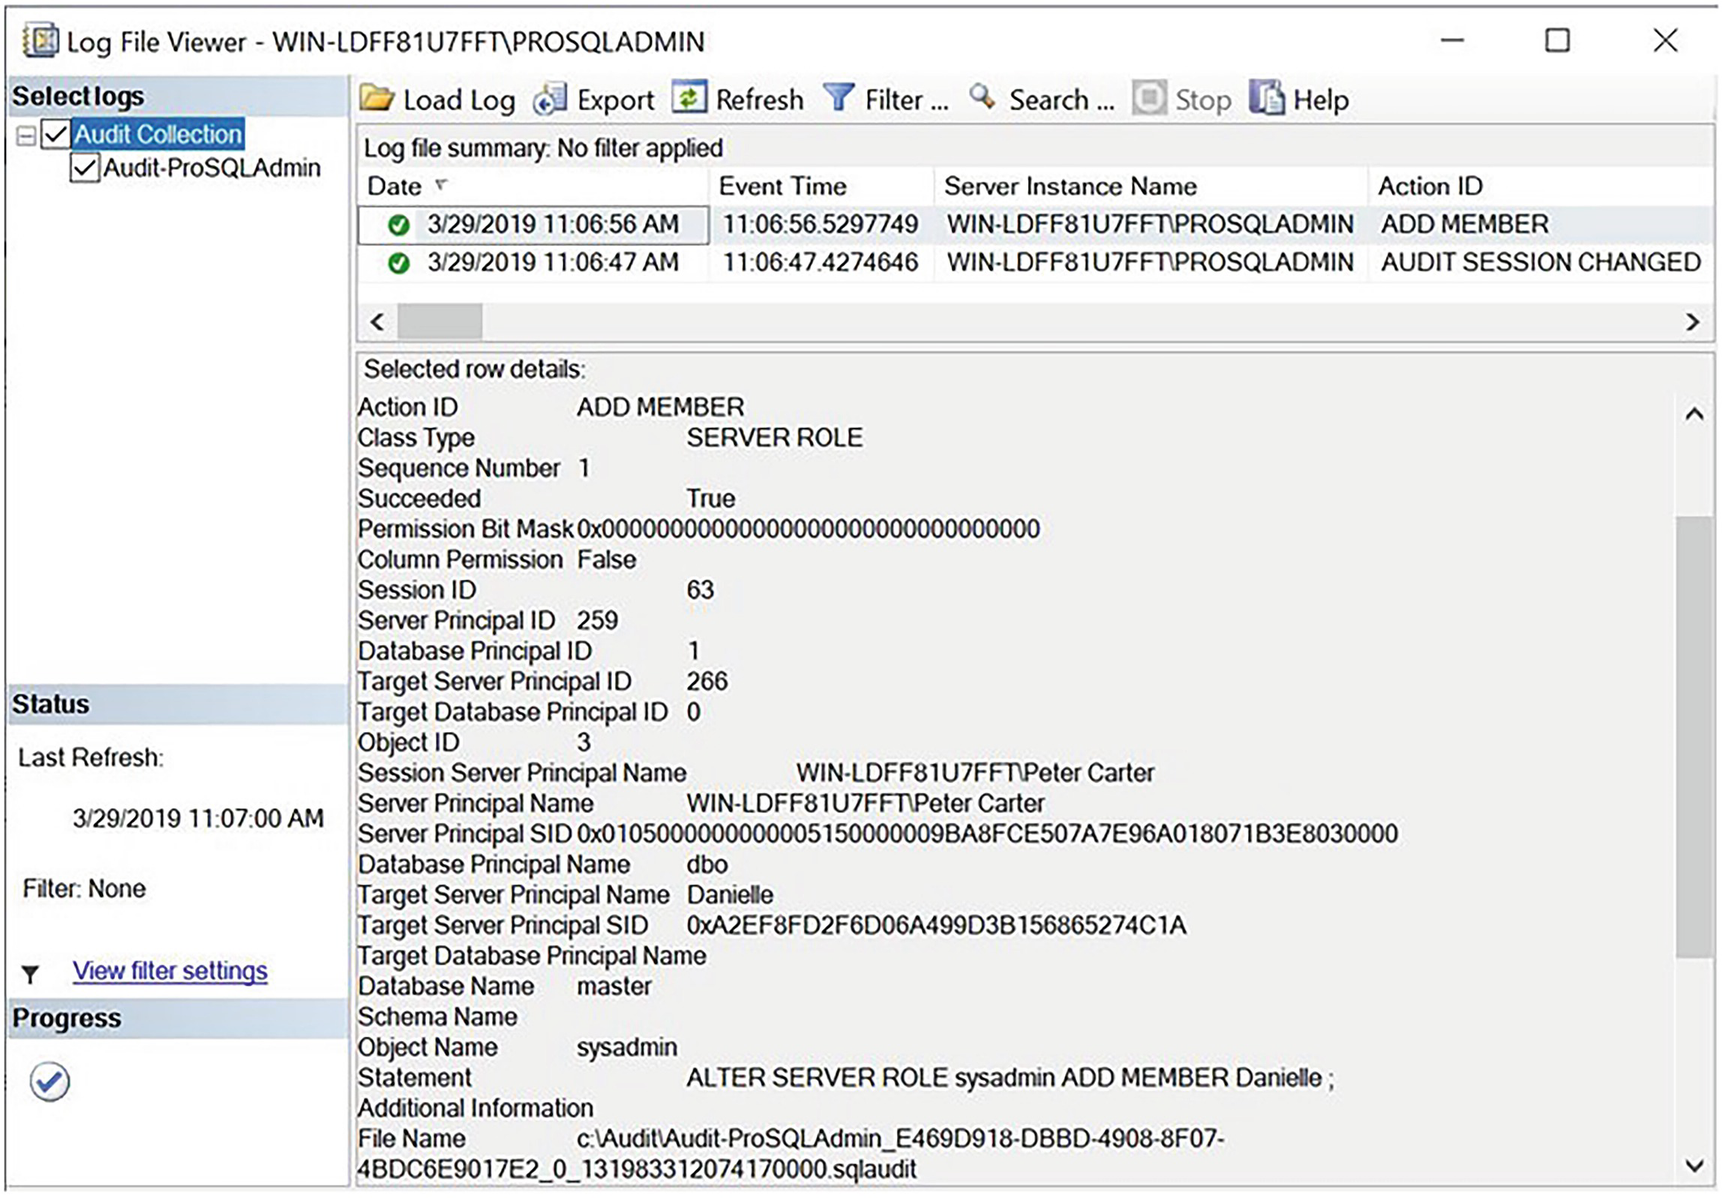
Audit Log File Viewer
We can see that a granular level of information has been captured. Most notably, this information includes the full statement that caused the audit to fire, the database and object involved, the target login, and the login that ran the statement.
Updateable Ledger Tables
Just like append-only ledger tables, updateable ledger tables also provide nonrepudiation and table history. The difference is that they allow INSERT and UPDATE statements to be made against the table. To make the table versions available, they use a history table, which records every DML statement that was made against the table. A custom name can be provided for this history table, on creation of the updateable ledger table. If a custom name is not provided, then it defaults to the format MSSQL_LedgerHistoryFor_[Object_ID], where Object_ID is the object ID of the updateable ledger table.
For consistency, history tables are also created for append-only ledger tables. Because UPDATE and INSERT statements are prohibited, however, they have limited value.
SQL Server also provides a view, for each ledger table created, which provides a simple view of your table history. Once again, a custom name can be provided for the view when the ledger table is created. If a custom name is not provided, then it will be created with the naming convention [TableName]_Ledger, where TableName is the name of the ledger table.
The ability to provide custom names for the history table and view also allows you to place them in a different schema. This can be helpful from a security perspective, to grant your Cyber team or Legal team access to table history. Further information around schemas and security can be found in Chapter 10.
Columns Required for Updatable Ledger Tables
Column | Data Type | Description |
|---|---|---|
ledger_start_transaction_id | BIGINT | The transaction ID of the transaction that inserted the row |
ledger_end_transaction_id | BIGINT | The transaction ID of the transaction that deleted the row |
ledger_start_sequence_number | BIGINT | The operation sequence number, within the transaction, that created a row version |
ledger_end_sequence_number | BIGINT | The operation sequence number, within the transaction, that deleted a row version |
The script in Listing 11-14 creates an updateable ledger table within the Chapter11 database and inserts some initial data, before making modifications to the data. In this example, we specify custom names for the ledger view and history table, but we omit the ledger columns. This means that they will be created automatically, with default names. You will notice that the table also specifies SYSTEM_VERSIONING = ON. This is a requirement and must always be set, when creating an updateable ledger table.
Different activities are simulated as being run by different users, using the EXECUTE AS clause. This creates an interesting repudiation point that we will discuss a little later.
To run the script in Listing 11-14, you will need Logins and Users called Andrew and GoodsInApplication. These users will need permissions to perform INSERT, UPDATE, and DELETE operations against the ledger tables. Please see Chapter 10 for information on how to create Logins and Users. Alternatively, you could change the EXECUTE AS clauses to use any other Logins which exist and have the appropriate permissions to the ledger tables.
Create an Updateable Ledger Table
Discover Ledger View and History Table Names
This query could be expanded to meet your needs. For example, if you decide to store history tables in a different schema, you could join to sys.schemas to include the schema name.
View Updateable Ledger Table, Ledger View, and History Table

Results of viewing ledger table objects
You can see from the results that the history table contains one row for each transaction or batch that has modified the table. In our example, we did not use explicit transactions. Therefore, the demarcation is by batch. Because of our use of the EXECUTE AS clause, the updates are divided into three batches and, hence, three transactions.
The ledger view provides a view of the data within the table as it has changed over time. There is no UPDATE operation recorded. Instead, for updates, two rows appear in the view: one for the insert of the new version of the row and another for the deletion of the old row version. For example, there are two rows with the Transaction ID 1073 containing rows for the “before” and “after” versions of the row that was updated by Andrew.
Discover Who Modified the Table
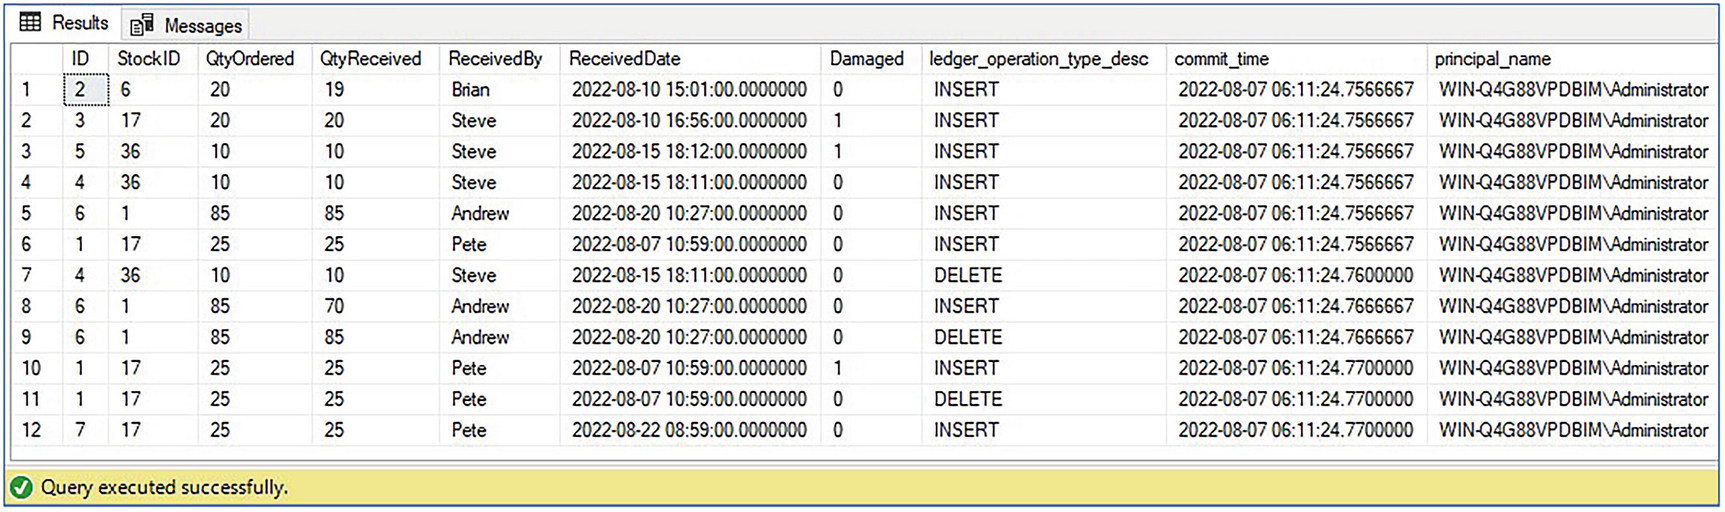
Results of viewing who modified data
Dropping Ledger Objects

Viewing dropped ledger objects
This does not stop an entire database from being dropped and modified data being copied back in.
Database Audit Specifications
Creating the Chapter11Audit Database
We now look to create a database audit specification that captures any INSERT statements made against the SensitiveData table by any user but also captures SELECT statements run specifically by Danielle.

Database Audit Specification dialog box
You can see that we named the database audit specification DatabaseAuditSpecification-Chapter11-SensitiveData and linked it to the Audit-Chapter11 server audit using the drop-down list. In the lower half of the screen, we specified two audit action types, INSERT and SELECT. Because we specified an object class of OBJECT, as opposed to the other available options of DATABASE or SCHEMA, we also need to specify the object name of the table that we want to audit. Because we only want Danielle’s SELECT activity to be audited, we add this user to the Principal field for the SELECT action type, but we add the Public role as the principal for the INSERT action type. This is because all database users will be members of the Public role, and hence, all INSERT activity will be captured, regardless of the user.
You can display a complete list of audit class types by running the query SELECT * FROM sys.dm_audit_class_type_map. You can find a complete list of auditable actions by running the query SELECT * FROM sys.dm_audit_actions.
Creating the Database Audit Specification
Enabling the Database Audit Specification
Testing Security with Impersonation
Auditing the Audit
With the auditing that we have implemented up to this point, there is a security hole. If an administrator with the permissions to manage server audit has ill intent, then it is possible for them to change the audit specification before performing a malicious action and then finally reconfiguring the audit to its original state in order to remove reputability.
Server audit allows you to protect against this threat, however, by giving you the ability to audit the audit itself. If you add the AUDIT_CHANGE_GROUP to your server audit specification or database audit specification, then any changes to the specification are captured.
Adding AUDIT_CHANGE_GROUP
After executing this command, any changes we make to the auditing are captured. If you view the audit log, you can see that the Administrator login has been audited, removing the INSERT audit on the SensitiveData table.
Summary
SQL Server 2022 introduces Ledger, which uses blockchain technology to prove the trustworthiness of your data. This can fulfill use cases such as satisfying audit requirements and creating supply chain management processes between companies.
There are two types of ledger table available: append-only ledger tables and updateable ledger tables. Append-only tables only permit INSERT statements and do not permit UPDATE OR DELETE statements. Nonreputability is ensured by logging the time and security principal which made each insert.
Updateable ledger tables allow INSERT, UPDATE, and DELETE statements. They use a history table to store each row version, and again, nonreputability is ensured by logging the time and security principal of each transaction.
The latest block is known as a database digest. Digests can be generated automatically, if you integrate with Azure or can be generated manually. However, once your digests are generated, you should ensure that they are used to regularly verify the trustworthiness of your database.
Server audit allows a fine-grain audit of activity at both the instance and database levels. It also includes the ability to audit the audit itself, thus removing the threat of a privileged user bypassing the audit with malicious intent. You can save audits to a file in the operating system and control permissions through NTFS. Alternatively, you can save audits to the Windows Security log or Windows Application log.