
Chapter 6. Interceptors, Channel Selectors, Sink Groups, and Sink Processors
As we discussed in previous chapters, the most important Flume agent components are sources, channels, and sinks. In addition to these, a Flume agent has a few more components that make Flume even more flexible. In this chapter, we will discuss interceptors, channel selectors, sink groups, and sink processors.
Interceptors
Interceptors are simple pluggable components that sit between a source and the channel(s) it writes to. Events received by sources can be transformed or dropped by interceptors before they are written to the corresponding channels. Each interceptor instance processes events received by only one source. Interceptors can remove events or transform them based on any arbitrary criteria, but an interceptor must return only as many (or as few) events as originally passed to it.
Any number of interceptors can be added to transform events coming from a single source, in a chain. The source passes all events in one transaction to the channel processor, which in turn passes it to the interceptor chain, which passes the events to the first interceptor in the chain. The list of events resulting from the transformation of events by this interceptor gets passed to the next interceptor in the chain, and so on. The final list of events returned by the last interceptor in the chain gets written out to the channel.
Since the interceptors must complete their transformations before the events get written to the channel, RPC sources (and any other sources that may have timeouts) will respond to the client or the sinks that sent the events only after the interceptors have successfully transformed the events. Therefore, it is a not a good idea to do a lot of heavyweight processing in interceptors. If the processing being done in the interceptors is heavy and time-consuming, timeouts should be adjusted accordingly.
The only configuration parameter common to all interceptors is the type parameter, which must be the alias of the interceptor or the FQCN of a Builder class that can build the interceptor. As mentioned previously, there can be an arbitrary number of interceptors connected to a single source.
Interceptors are named components, and an interceptor instance is identified by a name. To add interceptors to a source, list the names of the interceptors that the source should be connected to as the value of the interceptors parameter in the configuration of the source. Any values prefixed in the source configuration with interceptors. followed by the name of the interceptor and the parameter are passed to the interceptor. The following configuration shows an example of how to configure interceptors:
agent.sources.avroSrc.interceptors = hostInterceptor timestampInterceptor
agent.sources.avroSrc.interceptors.hostInterceptor.type = host
agent.sources.avroSrc.interceptors.hostInterceptor.preserveExisting = true
agent.sources.avroSrc.interceptors.timestampInterceptor.type = timestamp
agent.sources.avroSrc.interceptors.timestampInterceptor.preserveExisting = false
There are several interceptors that come bundled with Flume, with more being added regularly. In this section, we will discuss a few of the most commonly used interceptors that are built into Flume.
Timestamp Interceptor
One of the most commonly used interceptors, the timestamp interceptor inserts the timestamp into the Flume event headers, with the timestamp key, which is the header that the HDFS Sink uses for bucketing. If the timestamp header is already present, this interceptor will replace it unless the preserveExisting parameter is set to false. To add a timestamp interceptor, use the alias timestamp. This interceptor is commonly used on the first-tier agent that receives the data from a client, so that the HDFS Sink can use the timestamp for bucketing. The configuration parameters for the timestamp interceptor are shown in Table 6-1.
| Parameter | Default | Description |
|---|---|---|
|
|
- |
The type name is |
|
|
|
If set to |
An example of an agent with a source connected to a timestamp interceptor is shown here:
agent.sources.avro.interceptors = timestampInterceptor
agent.sources.avro.interceptors.timestampInterceptor.type = timestamp
agent.sources.avro.interceptors.timestampInterceptor.preserveExisting = false
Host Interceptor
The host interceptor inserts the IP address or hostname of the server on which the agent is running into the Flume event headers. The key to be used in the headers is configurable using the hostHeader parameter, but defaults to host.If the header that this interceptor is configured to use exists in the event, it will be replaced if preserveExisting is false (or is not specified). To insert the hostname instead of the IP address, set useIP to false. The configuration parameters for the host interceptor are outlined in Table 6-2.
| Parameter | Default | Description |
|---|---|---|
|
|
- |
The type name is |
|
|
|
The key for the header in which to insert the IP address/hostname. |
|
|
|
If set to |
|
|
|
If set to |
The following example shows the configuration of a host interceptor configured to write the hostname in the event headers, and not replace the value of the header if it already exists in the event:
agent.sources.avro.interceptors = hostInterceptor
agent.sources.avro.interceptors.hostInterceptor.type = host
agent.sources.avro.interceptors.hostInterceptor.useIP = false
agent.sources.avro.interceptors.hostInterceptor.preserveExisting = true
Static Interceptor
The static interceptor simply inserts a fixed header key and value into every event that it intercepts. The header key and value are configurable, though they default to key and value, respectively. The interceptor also has the preserveExisting parameter, which preserves the existing key-value pair in the headers if the key already exists in the headers. This parameter has a default value of true (unlike in the timestamp and host interceptors). The configuration parameters for the static interceptor are shown in Table 6-3.
| Parameter | Default | Description |
|---|---|---|
|
|
- |
The type name is |
|
|
|
The key to use for the header. |
|
|
|
The value to insert for the specific key. |
|
|
|
If set to |
The following configuration causes every event processed by the interceptor to have a header with the key book with the value usingFlume:
agent.sources.avro.interceptors = staticInterceptor
agent.sources.avro.interceptors.hostInterceptor.type = static
agent.sources.avro.interceptors.staticInterceptor.key = book
agent.sources.avro.interceptors.staticInterceptor.value = usingFlume
agent.sources.avro.interceptors.staticInterceptor.preserveExisting = false
Regex Filtering Interceptor
The regex filtering interceptor can be used to filter events passing through it. The filtering is based on a regular expression (regex) supplied in the configuration. Each regex filtering interceptor converts the event’s body into a UTF-8 string and matches that string against the regex provided. Once matched, it can either allow the event to pass through or drop the event. The interceptor can be configured to drop events matching the regex or allow events matching the regex to pass through.
Several such interceptors can be added to a single source to perform more complex filtering, with only events matching certain patterns being written to the channel, while if they also match another pattern, they can be dropped. Regex filtering interceptors can be used to make sure only important events are passed through Flume agents to reduce the volume of data being pushed into HDFS or HBase. Table 6-4 lists the regex filtering interceptor configuration parameters.
| Parameter | Default | Description |
|---|---|---|
|
|
- |
The type name is |
|
|
.* |
The regex to match the event body against. |
|
|
|
If set to |
The excludeEvents parameter decides what is to be done when the event body matches the regex. If this parameter is set to true, all events that match the regex are dropped and all the remaining events are let through. If this is set to false, events matching this regex are the only ones that are let through, and all others are dropped.
The following configuration shows a set of two regex filtering interceptors that allow through any events with the word “flume” in them, but not if the word “DEBUG” appears anywhere in the messages. Such combinations can be used to ensure that only messages that come from a particular source and that match some other criteria are let through:
agent.sources.avroSrc.interceptors = include exclude
agent.sources.avroSrc.interceptors.include.type = regex_filter
agent.sources.avroSrc.interceptors.include.regex = .*flume.*
agent.sources.avroSrc.interceptors.include.excludeEvents = false
agent.sources.avroSrc.interceptors.exclude.type = regex_filter
agent.sources.avroSrc.interceptors.exclude.regex = .*DEBUG.*
agent.sources.avroSrc.interceptors.exclude.excludeEvents = true
Morphline Interceptor
We discussed the Morphline Solr Sink in “Morphline Solr Sink”, in which we also described how morphlines can be used for processing events and then loading them into Solr. It is also possible to use the same morphline commands to make event transformations. This interceptor simply takes information about which morphline file to use and which morphline from that file to use for processing the events.
If heavyweight processing is required, it is better to use the Morphline Solr Sink, as time taken in processing in the interceptor should not cause timeouts for the source or the Avro Sink writing to the source. Complex morphlines like loadSolr should not be used from the interceptor. For more details on how to use morphlines, refer to the Kite SDK documentation [morphlines_ch6]. Table 6-5 outlines the configuration parameters for the morphline interceptor.
| Parameter | Default | Description |
|---|---|---|
|
|
- |
The FQCN of the |
|
|
- |
The file containing the morphline to use. |
|
|
- |
The ID of the morphline to use if there are multiple morphlines in the file. |
The morphlineFile parameter specifies the full path to the file containing the morphline that is to transform the event. The morphlineId parameter specifies the ID of the morphline in that file that should be used to transform the event.
An example of a morphline interceptor configuration that loads the morphline with ID usingFlume from the file /etc/flume/conf/morphline.conf to process events passed to it is shown here:
agent.sources.avroSrc.interceptors = morphlineInterceptor
agent.sources.avroSrc.interceptors.morphlineInterceptor.type =
org.apache.flume.sink.solr.morphline.MorphlineInterceptor$Builder
agent.sources.avroSrc.interceptors.morphlineInterceptor.morphlineFile =
/etc/flume/conf/morphline.conf
agent.sources.avroSrc.interceptors.morphlineInterceptor.morphlineId = usingFlume
As with the Morphline Solr Sink, the morphline configuration file and the JARs containing the morphlines used must be deployed using the plug-in deployment framework described in “Deploying Custom Code”.
UUID Interceptor
Systems like Solr require each document written to them to have a unique ID. The UUID (universally unique identifier) interceptor can be used to generate such unique identifiers for every event. The UUID generated can be set as the value of a configurable parameter. It can be optionally prefixed with a preconfigured prefix string as well. Table 6-6 lists the configuration parameters for the UUID interceptor.
| Parameter | Default | Description |
|---|---|---|
|
|
- |
The FQCN of the |
|
|
|
The key for the header whose value the UUID should be inserted as. |
|
|
- |
The prefix to be added before the UUID. |
|
|
|
If set to |
An example of a UUID interceptor that adds UUIDs (prefixed with usingFlume-) as the value of the header eventId and replaces any existing eventId is shown here:
agent.sources.avroSrc.interceptors = uuidInterceptor
agent.sources.avroSrc.interceptors.uuidInterceptor.type =
org.apache.flume.sink.solr.morphline.UUIDInterceptor$Builder
agent.sources.avroSrc.interceptors.uuidInterceptor.headerName = eventId
agent.sources.avroSrc.interceptors.uuidInterceptor.prefix = usingFlume-
agent.sources.avroSrc.interceptors.uuidInterceptor.preserveExising = false
UUID Generated by the UUID Interceptor
This interceptor generates version 4 UUIDs, which are pseudo-random in nature. For applications that require very strong guarantees of UUID uniqueness, it might be better to write a custom interceptor that gives these guarantees.
Writing Interceptors*
Interceptors are among the easiest Flume components to write. To write interceptors, the implementor needs to simply write a class that implements the Interceptor interface. The interface itself is fairly simple, though Flume mandates that all interceptors must have a Builder class that implements the Interceptor$Builder interface. All Builders must also have a public no-argument constructor that Flume uses to instantiate them. Interceptors can be configured using the Context instance that is passed to the builder. Any required parameters should be passed through this Context instance.
Interceptors are commonly used to analyze events and drop events if needed. Often, interceptors are used to insert headers into the events, which are later used by the HDFS Sink (for timestamps or for header-based bucketing), HBase Sink (for row keys), etc. These headers are often also used with the multiplexing channel processor to bifurcate the flow into multiple flows or to send events to different sinks based on priority—which is analyzed by the interceptor. This way string processing to do regex matching and detect the priority (based on things like log levels) can be offloaded from the application that is creating the data.
Example 6-1 shows the Interceptor interface that all interceptors must implement.
Example 6-1. Interceptor interface
package org.apache.flume.interceptor;
public interface Interceptor {
  public void initialize();
  public Event intercept(Event event);
  public List<Event> intercept(List<Event> events);
  public void close();
  /** Builder implementations MUST have a no-arg constructor */
  public interface Builder extends Configurable {
    public Interceptor build();
  }
}
When implementing an interceptor, there are two methods that process events, both called intercept, that take different arguments and also vary in return value. The first variant of this method takes just one event and returns one event (or null), and the second variant takes in a list of events and returns a list of events. In both cases, this is what comprises one transaction with the channel. Both these methods must be thread-safe, since these methods can be called from multiple threads if the source runs several threads.
If the variant that takes in one event is called, then the transaction will have exactly one event and is called by the channel processor’s processEvent method, which is called by the source for processing the event. When the second variant is called, the channel processor’s processEventBatch method is called by the source, and all events in the list returned by the interceptor are written in a single transaction. See “Writing Your Own Sources*” to understand the difference between processEvent and processEventBatch.
Example 6-2 shows a simple interceptor that illustrates how an interceptor works. The channel processor instantiates the builder and then calls the builder object’s configure method, which it passes the Context instance that contains the configuration parameters to be used to configure the interceptor. The channel processor then calls the build method, which returns the interceptor. The channel processor initializes the interceptor by calling the initialize method of the interceptor instance. It is usually a good idea to pass the configuration to the interceptor via the constructor, so the interceptor can make all state based on configuration final, as is done in the CounterInterceptor class.
Example 6-2. A simple interceptor
package usingflume.ch06;

public class CounterInterceptor implements Interceptor {
  private final String headerKey;
  private static final String CONF_HEADER_KEY = "header";
  private static final String DEFAULT_HEADER = "count";
  private final AtomicLong currentCount;

  private CounterInterceptor(Context ctx) {
    headerKey = ctx.getString(CONF_HEADER_KEY, DEFAULT_HEADER);
    currentCount = new AtomicLong(0);
  }

  @Override
  public void initialize() {
    // No op
  }

  @Override
  public Event intercept(final Event event) {
    long count = currentCount.incrementAndGet();
    event.getHeaders().put(headerKey, String.valueOf(count));
    return event;
  }

  @Override
  public List<Event> intercept(final List<Event> events) {
    for (Event e : events) {
      intercept(
        e); // Ignore the return value; the event is modified in place
    }
    return events;
  }

  @Override
  public void close() {
    // No op
  }

  public static class CounterInterceptorBuilder
    implements Interceptor.Builder {

    private Context ctx;

    @Override
    public Interceptor build() {
      return new CounterInterceptor(ctx);
    }

    @Override
    public void configure(Context context) {
      this.ctx = context;
    }
  }
}
CounterInterceptor’s intercept methods are thread-safe, because the only variable that is accessed by the instance is either final (all variables initialized on the basis of configuration) or uses thread-safe classes (the AtomicLong instance used as a counter). The intercept method that processes a list of events simply calls the variant of the intercept method that processes one event in a loop. It is advised that all custom interceptors follow this pattern. In this case, since the events are just transformed in place, a new list is not created and the original list is simply returned with the modified events. It is also possible to create a new list and add new events to that one, if required. Events can be dropped by either removing them from the original list if that is being returned, or by not adding the event to the new list being returned.
How Many Events Can an Interceptor Return?
An interceptor is not allowed to return more events than originally passed to it, though it may return fewer events. The logic behind this is that interceptors adding more events can cause more events to be written to the channel than its transaction capacity, even if the Avro Sink sending data to the Avro Source is sending fewer events per batch than the transaction capacity. If an interceptor drops all events passed to it, the interceptor must still return a list, which may be empty if all events are dropped.
Custom interceptors can be deployed in the plugins.d directory, as explained in “Deploying Custom Code”.
Channel Selectors
Channel selectors are the components that decide which channels a specific event received by the source is to be written to. They inform the channel processor, which then writes the events to each channel.
Since Flume does not have two-phase commits, events are written to a channel, then committed before events are written to the next channel. If writes to one of the channels fail, writes of the same events that may have happened to other channels cannot be rolled back. When such a failure happens, the channel processor throws a ChannelException and fails the transaction. If the source tries to write the same events again (in most cases it will; only sources like Syslog, Exec, etc. cannot retry since there is no way of producing the same data again), duplicate events will get written to the channels where the previous commit was actually successful. This is one of the ways in which duplicates can occur in a Flume pipeline.
Channel selector configuration is done via the channel processor, though the configuration looks like configuration for a subcomponent of a source. All parameters to be passed to the channel selector are passed as parameters in the source context, with the selector suffix. For each source, the selector is specified by using a configuration parameter, type. Channel selectors can specify a set of channels as required and another set as optional, as described in Chapter 2. The one parameter common to all channel selectors is shown in Table 6-7.
| Configuration parameter | Default | Description |
|---|---|---|
|
|
|
The alias or FQCN of the channel selector to use for the source. |
Flume comes packaged with two channel selectors: replicating and multiplexing. If a source does not specify a selector in the configuration, then the replicating channel selector is automatically used. An example of a channel selector configuration is shown here:
agent.sources.avroSrc.selector.type = multiplexing
agent.sources.avroSrc.selector.header = priority
agent.sources.avroSrc.selector.mapping.1 = channel1
agent.sources.avroSrc.selector.mapping.2 = channel2
agent.sources.avroSrc.selector.default = channel2
Replicating Channel Selector
If no selector is specified for a source, the replicating channel selector is used for that source. The replicating channel selector replicates every event to all channels specified by the channels parameter for that source.
In addition to the parameter specified in Table 6-7, the replicating selector takes only one configuration parameter, optional, which takes a list of space-separated channel names. This parameter is optional. All channels specified in this parameter are considered optional, so if event writes to any of these channels fail, the failure is simply ignored. Any failure to write to any other channel will cause an exception to be thrown to the source, indicating failure and asking the source to retry.
The following source configuration shows the use of a replicating channel selector with no optional channels:
agent.sources.avroSrc.type = avro
agent.sources.avroSrc.channels = c1 c2 c3
This configuration causes every event received by the Avro Source to get written to all three channels, c1, c2, and c3. If any one of them is full, or cannot be written to for any other reason, the Avro Source gets a ChannelException, which causes the source to inform the previous hop (the Avro Sink or RPC client that sent the message) of the failure, causing it to retry (a retry is guaranteed in the case of the Avro Sink, though how the application using the RPC client behaves is application-dependent).
If this configuration is changed to make c3 optional, as shown next, a failure to write to c3 will not cause a ChannelException to be thrown to the source, and the source will inform the previous hop that the write was successful:
agent.sources.avroSrc.type = avro
agent.sources.avroSrc.channels = c1 c2 c3
agent.sources.avroSrc.selector.optional = c3
Optional channels also must be listed in the source’s channels parameter, but they must be marked optional using the optional parameter passed to the selector. Note that even though we did not have to specify the selector’s type here (since it is the default), the configuration parameters are still passed in. The replicating channel selector does not do any other processing or bifurcation of the flow; it simply replicates the data. This allows events to be written to more than one destination, by having sinks going to different destinations read from each of the channels.
Multiplexing Channel Selector
The multiplexing channel selector is a more specialized channel selector that can be used to dynamically route events by selecting the channels an event should be written to, based on the value of a specific header. Combined with interceptors, it is possible to do some sort of analysis on the event and then decide which channels it should get written to.
The multiplexing channel selector looks for a specific header, specified by the configuration for the selector. Based on the value of this header, the selector returns a subset of channels the event is to be written to. The list of channels to be written to is specified in the configuration for each of the header values. If the value of the header in a specific event is not specified in the configuration, the event is written to the default channels for the channel selector.
Figure 6-1 shows the flow of an event to one or more channels based on the value of a header. In this case, the selector checks the value of the priority header. Events with either priority 1 or 2 are written to HDFS, while events with priority 1 are also written to HBase. Such routing can be done even on tiers where the data is received, to send higher-priority events via a faster, unreliable flow (using Memory Channels) for lower latencies while sending all events (including the high-priority ones) over slightly slower but reliable flows (using File Channels) and later de-deduping, if necessary.
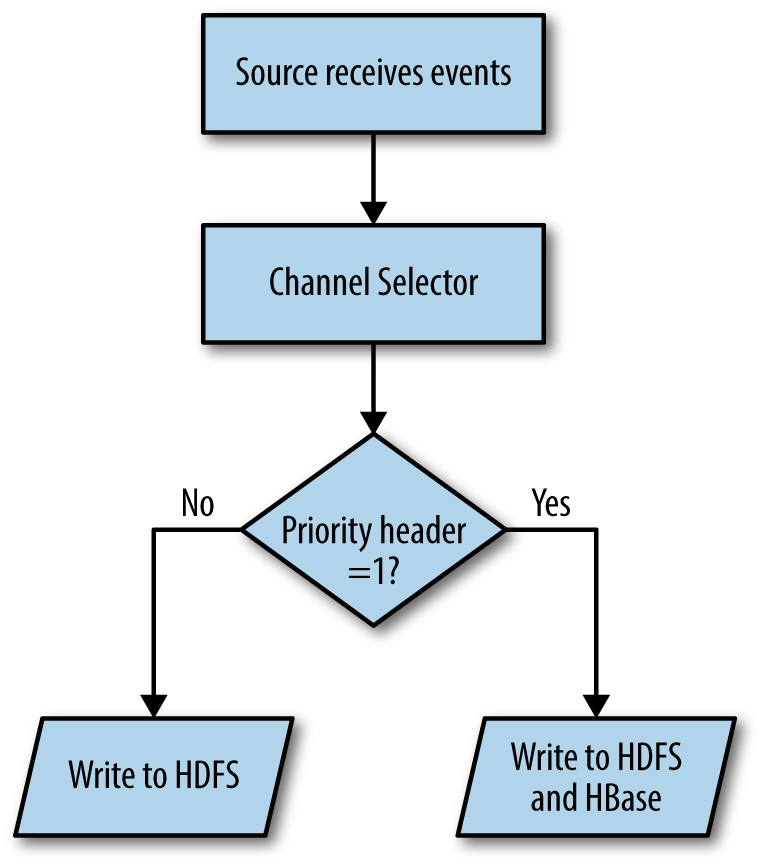
Figure 6-1. Multiplexing channel selector
Table 6-8 shows the configuration parameters for multiplexing channel selectors. Note that all configuration parameters shown here must be prefixed with selector. in the source context.
| Configuration parameter | Default | Description |
|---|---|---|
|
|
- |
|
|
|
|
The header whose value must be checked for routing the event. |
|
|
- |
The list of mappings for the header. Each mapping is a list of channels the event must be written to, if the value of the header matches the value (<hdr-value>) in this parameter. |
|
|
- |
Same as |
|
|
- |
The list of channels the event must be written to if the header is not present or its value does not have a specified mapping. |
Configuring a multiplexing channel selector is quite a bit different from configuring a replicating selector. As usual, all channels the source writes to must be specified in the source’s channels parameter. To enable the multiplexing channel selector for a source, the source’s selector.type parameter must be set to multiplexing. All parameters to be passed to the channel selector are passed with the source prefix for that source followed by selector., as shown here:
agent.sources.avroSrc.type = avro
agent.sources.avroSrc.channels = c1 c2 c3
agent.sources.avroSrc.selector.type = multiplexing
agent.sources.avroSrc.selector.default = c3
For each event, the selector looks for the header with the key specified by the header parameter in the configuration. Next, it checks if the value of the header is any one of the values specified in the configuration with the mapping. prefix. If one of the mappings matches, then it writes the event out to the channels specified by the mapping. Optional mappings can also be specified using the optional. prefix instead of the mapping. prefix. Any write failures to the list of channels specified as optional for a value are simply ignored. If the selector does not find a match or the header itself does not exist, then it writes the event to the channels specified in the default parameter. If an event doesn’t map to any required channel, but does map to one or more optional channels, the event is written out to the optional channels and the default channel(s). Any failure to write to the default channel will cause a ChannelException to be thrown.
The following shows an example of configuration of a source configured with a multiplexing channel selector:
agent.sources.avroSrc.type = avro
agent.sources.avroSrc.channels = c1 c2 c3 c4 c5
agent.sources.avroSrc.selector.type = multiplexing
agent.sources.avroSrc.selector.header = priority
agent.sources.avroSrc.selector.mapping.1 = c1 c2
agent.sources.avroSrc.selector.mapping.2 = c2
agent.sources.avroSrc.selector.optional.1 = c3
agent.sources.avroSrc.selector.optional.2 = c4
agent.sources.avroSrc.selector.optional.3 = c4
agent.sources.avroSrc.selector.default = c5
In this example, the Avro Source writes events to four channels. Unlike with the replicating channel selector, though, not all events get written to all the four channels. For each event, the channel selector looks for the header with the priority key.
For each event with priority 1, the events are written to three channels, c1, c2, and c3, of which c3 is marked as optional. So, if writes to c1 or c2 fail, the source gets an exception from the channel processor’s processEvent or processEventBatch method and the source has to retry. But since c3 is marked optional, if a write to c3 fails, the source does not get an exception and is unaware of the failure, as this failure is ignored by the channel processor.
Similarly, any event with priority 2 gets written to c2 and optionally c4. As is clear, channels can appear in multiple mappings, like c2 in this example. Channels with priority 1 or 2 are written to c2—this is how the example shown in Figure 6-1 is achieved.
Events where the priority header is missing or has a value other than 1 or 2 get written to the default channel(s)—in this case, c5. If there are no required channels found for an event, the event will get written to the optional channels for that event and the default channel. In this example, an event with priority 3 would get written to channels c4 and c5. If the write to c4 fails, it is simply ignored, but if the write to c5 fails, the source gets an exception and the event has to be rewritten.
Custom Channel Selectors*
It is possible to write and deploy a custom channel selector, allowing you to use deployment-specific logic to control the flow of events. To implement a custom channel selector, the selector needs to implement the ChannelSelector interface or inherit from the AbstractChannelSelector class. The AbstractChannelSelector class is shown in Example 6-3.
For every event, the channel processor calls the getRequiredChannels and getOptionalChannels methods of the channel selector, which return the list of required and optional channels the event is to be written to. If writes to any of the required channels fail, the channel processor throws a ChannelException, causing the source to retry. Any failure to write to any of the optional channels is ignored.
Example 6-3. AbstractChannelSelector class that can be inherited by custom selectors
package org.apache.flume.channel;

public abstract class AbstractChannelSelector implements ChannelSelector {

  private List<Channel> channels;
  private String name;

  @Override
  public List<Channel> getAllChannels() {
    return channels;
  }

  @Override
  public void setChannels(List<Channel> channels) {
    this.channels = channels;
  }

  @Override
  public synchronized void setName(String name) {
    this.name = name;
  }

  @Override
  public synchronized String getName() {
    return name;
  }

  protected Map<String, Channel> getChannelNameMap() {
    Map<String, Channel> channelNameMap = new HashMap<String, Channel>();
    for (Channel ch : getAllChannels()) {
      channelNameMap.put(ch.getName(), ch);
    }
    return channelNameMap;
  }

  protected List<Channel> getChannelListFromNames(String channels,
          Map<String, Channel> channelNameMap) {
    List<Channel> configuredChannels = new ArrayList<Channel>();
    if(channels == null || channels.isEmpty()) {
      return configuredChannels;
    }
    String[] chNames = channels.split(" ");
    for (String name : chNames) {
      Channel ch = channelNameMap.get(name);
      if (ch != null) {
        configuredChannels.add(ch);
      } else {
        throw new FlumeException("Selector channel not found: "
                + name);
      }
    }
    return configuredChannels;
  }

}
The channel processor calls the setChannels method, to which it passes all the channels from which the selector must select the channels for each event. This class implements the Configurable interface, so the configure method is called when the selector is initialized. The getRequiredChannels and getOptionalChannels methods are called by the processor when each event is being processed. The getAllChannels method must return all the channels that were set by the channel processor during setup.
This class also provides a couple of convenience methods—one that returns a map of channel names to the actual channel instances and another that returns a list of channel instances given a list of channel names represented as a space-delimited string. A custom channel selector can be deployed using the FQCN:
agent.sources.avroSrc.type = avro
agent.sources.avroSrc.channels = c1 c2 c3 c4 c5
agent.sources.avroSrc.selector.type = com.usingflume.selector.RandomSelector
agent.sources.avroSrc.selector.default = c5
agent.sources.avroSrc.selector.random.seed = 4532
Custom selectors get all configuration parameters that are passed in with the agent.sources.avro.selector. in this case, just like any other component. In this example, the selector will get a Context instance in the configure method with keys default and random.seed with values c5 and 4532, respectively.
Custom channel selectors should be dropped into the plugins.d directory as described in “Deploying Custom Code”.
Sink Groups and Sink Processors
In Chapter 5, we discussed how sinks work and the various sinks that come bundled with Flume. We also briefly discussed sink groups and sink processors. As we discussed before, the Flume configuration framework instantiates one sink runner per sink group to run a sink group. Each sink group can contain an arbitrary number of sinks. The sink runner continuously asks the sink group to ask one of its sinks to read events from its own channel. Sink groups are typically used for RPC sinks to send data between tiers in either a load-balancing or failover fashion.
Since RPC sinks are designed to connect to exactly one RPC source, sending data from one Flume agent to a set of agents in the next tier requires at least as many sinks as the agent is sending events to. To make sure each agent sends events to several destination agents in the next tier, and each tier on one tier sends data to all next-tier agents without overwhelming the network or those agents, each agent can load balance between all the machines in the next tier.
Note
It is important to understand that all sinks within a sink group are not active at the same time; only one of them is sending data at any point in time. Therefore, sink groups should not be used to clear off the channel faster—in this case, multiple sinks should simply be set to operate by themselves with no sink group, and they should be configured to read from the same channel.
Each sink group is declared as a component in the active list, just like sources, sinks, and channels, using the sinkgroups keyword. Each sink group is a named component, since each agent can have multiple sink groups. Sink groups are defined in the following way:
agent.sinkgroups = sg1 sg2
This configuration shows two sink groups being defined: sg1 and sg2. Each sink group is then configured with a set of sinks that are part of the group. The list of sinks in the active set of sinks takes precedence over the lists of sinks specified as part of sink groups. Therefore, all sinks that are part of a sink group must also be separately defined in the active set of sinks for them to be active. The following shows sg1 and sg2 being configured with a set of sinks:
agent.sinks = s1 s2 s3 s4
agent.sinkgroups.sg1.sinks = s1 s2
agent.sinkgroups.sg2.sinks = s3 s4
Each sink in a sink group has to be configured separately. This includes configuration with regard to which channel the sink reads from, which hosts or clusters it writes data to, etc. If the sink group represents a set of RPC sinks meant to communicate to the next tier, each host to connect to must have one sink configured to send data to it. Presumably, they all read from the same channel, since this is tier-to-tier communication. Ideally, if several sinks are set up in a sink group, all the sinks will read from the same channel—this helps clear data in the current tier at a reasonable pace, yet ensure the data is being sent to multiple machines in a way that supports load balancing and failover.
For cases where it is important to clear the channel faster than a single sink group is able to do, but it is also required that the agent be set up to send data to multiple hosts, multiple sink groups can be added, each with sinks that have similar configuration. For example, sg1 and sg2 in the previous example have sinks s1, s2 and s3, s4, respectively. s1 and s3 could have the same configuration (pushing data from the same channel to the same host and port), while s2 and s4 could have a similar configuration. This ensures that more connections are open per agent to a destination agent, while also allowing data to be pushed to more than one agent if required. This allows the channel to be cleared faster, while making sure load balancing and failovers happen automatically.
Thus far, we’ve discussed how sink groups can be used to set up flows to load balance and fail over, but we have not discussed how to actually tell the sink groups that they should load balance or fail over. This is done using the sink processor. Sink processors are the components that decide which sink is active at any point in time.
Note that sink processors are different from sink runners. The sink runner actually runs the sink, while the sink processor decides which sink should pull events from its channel. When the sink runner asks the sink group to tell one of its sinks to pull events out of its channel and write them to the next hop (or to storage), the sink processor is the component that actually selects the sink that does this processing. Flume comes bundled with two sink processors: the load-balancing sink processor and the failover sink processor.
A sink processor is configured using the processor.type suffix for the specific sink group it is part of. Configurations can be passed to sink processors using the processor. prefix. Here is an example of how this configuration looks:
agent.sinks = s1 s2
agent.sinkgroups = sg1
agent.sinkgroups.sg1.sinks = s1 s2
agent.sinkgroups.sg1.processor.type = load_balance
agent.sinkgroups.sg1.processor.backoff = false
Load-Balancing Sink Processor
Suppose you have a topology in which the first tier receives data from thousands of application servers and the second tier receives data from the first via Avro RPC, before pushing the data into HDFS. For simplicity, let’s assume that the first tier has 100 agents and the second tier has 4. In the simplest possible topology, each first-tier agent would have four Avro Sinks pushing data to each of the second-tier agents. This works fine until one of the second-tier agents fails. At this point, the sink configured to send data will not send any data until the second-tier agent that failed comes back online.
Apart from the fact that this sink uses up a few threads on the agent (one for the sink runner and another for the thread pool used by Netty to send the data), thus wasting CPU cycles until the second-tier agent is up and running, the sink also causes additional stress on the channel by creating transactions removing the events and then rolling them back. For the File Channel, even though the transaction does not get committed, a number of takes get written to the file (takes are written to the file even if the transaction is not committed), which carries an I/O cost and a disk space cost. This is shown in Figure 6-2.
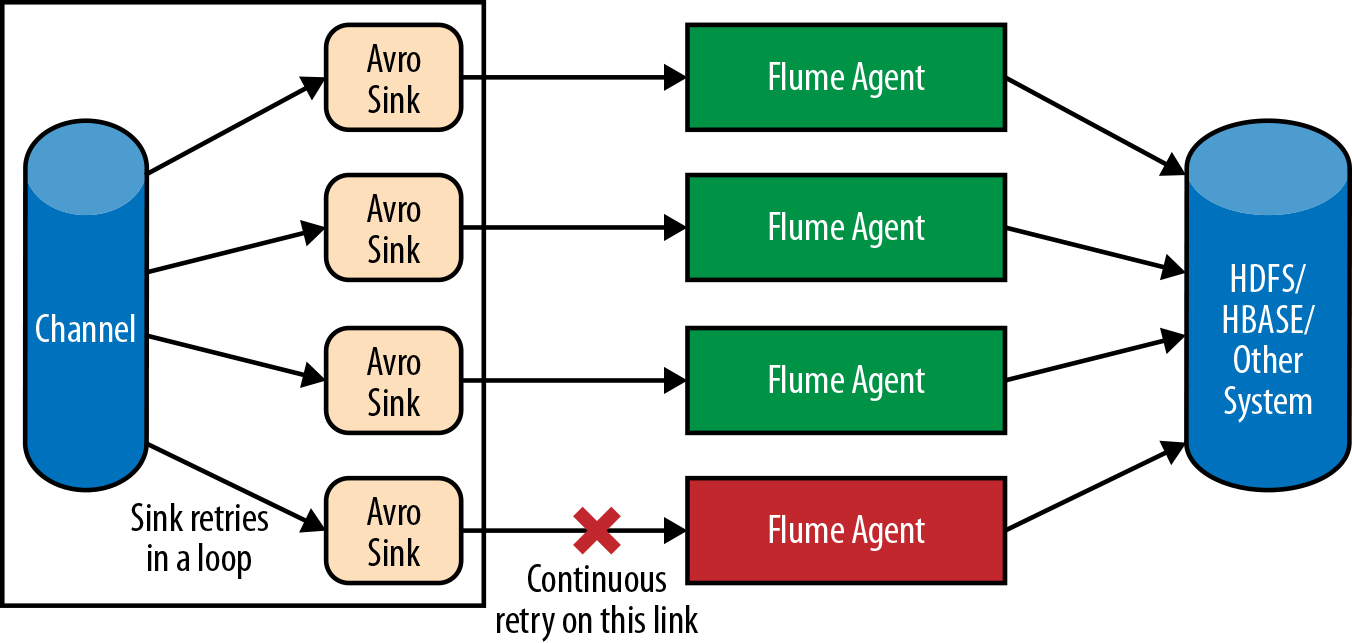
Figure 6-2. Why we need a load-balancing sink processor
As you can see, having such a topology can lead not only to an underutilized network, but also unnecessary wastage of CPU cycles and a higher I/O cost. To avoid such a problem, it is a good idea to use a sink group with a load-balancing sink processor, which will select one among all the sinks in the sink group to process events from the channel.
The order of selection of sinks can be configured to be random or round-robin. If the order is set to random, one among the sinks in the sink group is selected at random to remove events from its own channel and write them out. The round-robin option causes the sinks to be selected in a round-robin fashion: each process loop calls the process method of the next sink in the order in which they are specified in the sink group definition. If that sink is writing to a failed agent or to an agent that is too slow, causing timeouts, the sink processor will select another sink to write data.
The sink processor can be configured to blacklist a failed sink, with the backoff period increasing exponentially until an upper limit is reached. This ensures that the same sink is not retried in a loop and resources are not wasted, until the backoff period has expired.
The configuration parameters for the load-balancing sink processor are shown in Table 6-9. All parameters must be prefixed with the sink group prefix followed by processor. to ensure that the sink processor gets the correct parameters.
| Configuration parameter | Default | Description |
|---|---|---|
|
|
- |
Has to be set to |
|
|
|
Can be set to |
|
|
|
If set to |
|
|
|
The time, in milliseconds, after which the blacklist time period is not increased. |
The load-balancing sink processor is configured in the following way:
agent.sinks = s1 s2 s3 s4
agent.sinkgroups = sg1
agent.sinkgroups.sg1.sinks = s1 s2 s3 s4
agent.sinkgroups.sg1.processor.type = load_balance
agent.sinkgroups.sg1.processor.selector = random
agent.sinkgroups.sg1.processor.backoff = true
agent.sinkgroups.sg1.processor.selector.maxTimeOut = 10000
This configuration sets the sink group to use a load-balancing sink processor that selects one of s1, s2, s3, or s4 at random. If one of the sinks (or more accurately, the agent that the sink is sending data to) fails, the sink will be blacklisted with the backoff period starting at 250 milliseconds and then increasing exponentially until it reaches 10 seconds. After this point, the sink backs off for 10 seconds each time a write fails, until it is able to write data successfully, at which point the backoff is reset to 0. If the value of the selector parameter is set to round_robin, s1 is asked to process data first, followed by s2, then s3, then s4, and s1 again.
This configuration means that only one sink is writing data from each agent at any point in time. This can be fixed by adding multiple sink groups with load-balancing sink processors with similar configuration. Note that there may be several agents attempting to write data to each second-tier agent.
Risks of Having Too Many Sinks Sending Data to the Same Agent
Since each Avro Sink keeps persistent connections open to the Avro Source, having multiple sinks writing to the same agent does add more socket connections and takes up more resources on the second-tier agents. This must be carefully considered before adding too many sinks connecting to the same agent.
Writing sink selectors*
It is possible to have the load-balancing sink processor use custom logic to select which sink to activate each time the sink runner calls the process method. Custom selectors must implement the LoadBalancingSinkProcessor$SinkSelector interface that is shown here:
public interface SinkSelector extends Configurable, LifecycleAware {
  void setSinks(List<Sink> sinks);
  Iterator<Sink> createSinkIterator();
  void informSinkFailed(Sink failedSink);
}
When the sink processor starts up, the sink selector is instantiated and the setSinks method is called, to which the list of sinks is passed in. This list is in the same order specified by the configuration file. Each time a sink processes events, the createSinkIterator method is called. This method must return an iterator that returns sinks in the order the sinks must be asked to pull data in.
Once a sink is successfully able to process events and return success, the current iterator is discarded and this method is called again to get a new iterator, which could potentially return sinks in a different order. When a sink fails to send events (indicated by an exception being thrown), the informSinkFailed method is called. This can be used to blacklist the sink temporarily, if needed.
To build a custom sink selector, include the flume-ng-core artifact in your pom.xml file’s dependency section as shown in Example 3-6.
Failover Sink Processor
The same problem shown in Figure 6-2 can be solved in a slightly different way. The problem with the load-balancing sink processor is that since each sink group decides which sink is active on a large number of agents, it is possible that the second-tier agents won’t all receive the same amount of data, though on average they should when round-robin is used. However, it is possible to configure the sink groups to use hard-wired writes, as described earlier, until a failure actually occurs. By allowing the sink groups to write data consistently to the same sinks most of the time, it is possible to predict how much data is being written to each agent. This can be achieved using the failover sink processor.
The failover sink processor selects a sink from the sink group based on priority. The sink with the highest priority writes data until it fails (failure of the sink could even be because the downstream agent died in the case of RPC sinks), and then the sink with the highest priority among the other sinks in the group is picked. A different sink is selected to write the data only when the current sink writing the data fails. This ensures that all agents on the second tier have one sink from each machine writing to them when there is no failure, and only on failure will certain machines see more incoming data.
The failover mechanism, though, does not choose a new sink until and unless the current sink fails. This means even though it is possible that the agent with highst priority may have failed and come back online, the failover sink processor does not make the sink writing to that agent active until the currently active sink hits an error. Figure 6-3 shows the workflow of the failover sink processor.
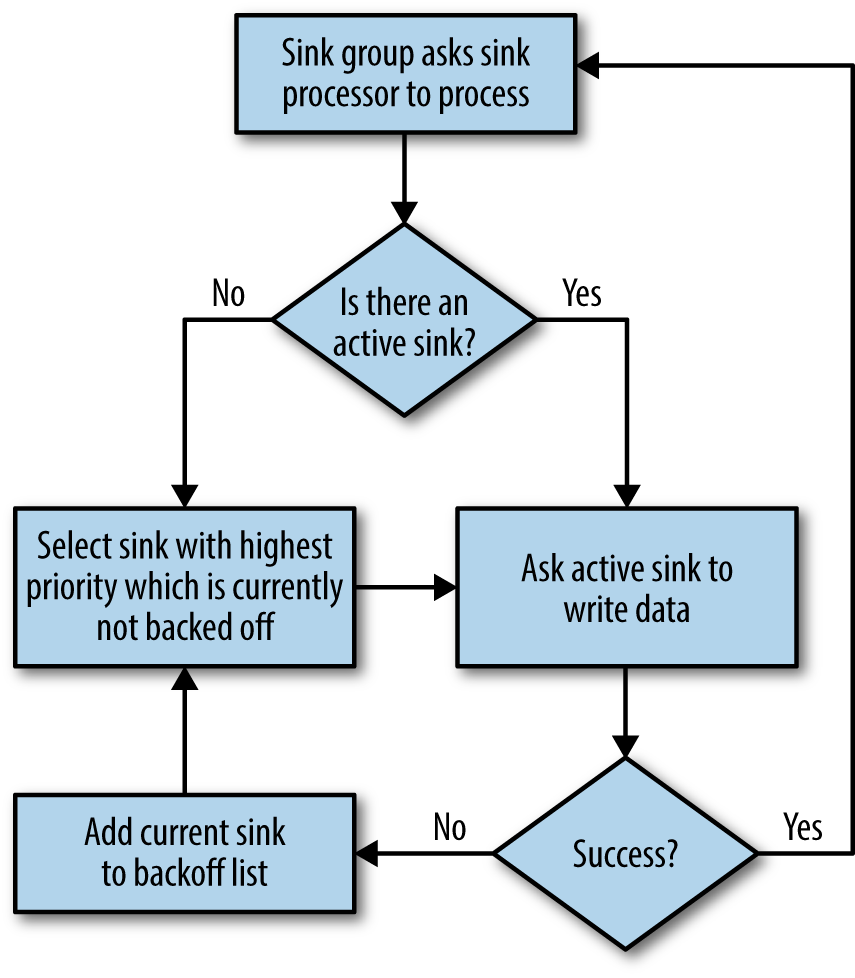
Figure 6-3. Failover sink processor workflow
Table 6-10 shows a list of configuration parameters that can be used to configure the failover sink processor. All parameters must be prefixed with the sink group prefix processor. to make sure the parameters are passed in to the sink processor.
| Configuration parameter | Default | Description |
|---|---|---|
|
|
- |
Has to be set to |
|
|
- |
A list of priorities for each sink in the sink group. |
|
|
|
The maximum backoff period for failed sinks. |
As shown in Table 6-10, the type parameter for the failover sink processor is failover. Since each sink processor activates sinks in priority order, the sinks’ priorities must be set in the configuration using the priority. prefix followed by the sink name, with the value set to the desired priority. Note that the priorities are considered in increasing order, which means higher the absolute value of the priority is, the earlier the sink is activated.
For example, a sink with priority 100 is activated before a sink with priority 90. If no priority is set for a specific sink, the priority of the sink is determined based on the order of the sinks specified in the sink group configuration. Each time a sink fails to write data, the sink is considered to have failed and is blacklisted for a brief period of time. This blacklist time interval (similar to the backoff period in the load-balancing sink processor) increases with each consecutive attempt that results in failure, until the value specified by maxpenalty is reached (in milliseconds). Once the blacklist interval reaches this value, further failures will result in the sink being tried after that many milliseconds. Once the sink successfully writes data after this, the backoff period is reset to 0. Take a look at the following example:
agent.sinks = s1 s2 s3 s4
agent.sinkgroups.sg1.sinks = s1 s2 s3 s4
agent.sinkgroups.sg1.processor.type = failover
agent.sinkgroups.sg1.processor.priority.s2 = 100
agent.sinkgroups.sg1.processor.priority.s1 = 90
agent.sinkgroups.sg1.processor.priority.s4 = 110
agent.sinkgroups.sg1.processor.maxpenalty = 10000
In this configuration, four sinks are used in a failover configuration, with sink s4 having the highest priority, followed by s2 and s1. No priority is set for sink s3. For sinks whose priority is not specified, the first sink with no priority set is given priority 0, the next is given priority –1, the next is given –2, and so on. These priorities are only assigned to sinks with no priority set. Therefore, the sample configuration shown here implicitly assigns sink s3 priority 0, so the sinks are tried in the order s4, s2, s1, s3. Note that if two sinks have the same priority (implicitly or explicitly assigned), the sink specified first in the sink group is the only one activated. Also note that if explicit and implicit priorities are set in the same range, then their values are used as is. For example:
agent.sinks = s1 s2 s3 s4
agent.sinkgroups.sg1.sinks = s1 s2 s3 s4 s5 s6
agent.sinkgroups.sg1.processor.type = failover
agent.sinkgroups.sg1.processor.priority.s2 = 0
agent.sinkgroups.sg1.processor.priority.s4 = 110
agent.sinkgroups.sg1.processor.priority.s5 = -5
agent.sinkgroups.sg1.processor.priority.s6 = -2
agent.sinkgroups.sg1.processor.maxpenalty = 10000
In this configuration, sink s4 has the highest priority, so s4 is activated first. Sink s1 will be assigned a priority of 0—the same as s2—which means s2 is not activated. s3 gets priority –1, so the order of activation will be s4, s1, s3, s6, s5. Even though s3’s priority is not specified in the configuration, its implicitly specified priority is higher than s5’s and s6’s, so s3 is activated before either of them.
Summary
In this chapter, we covered interceptors, channel selectors, sink groups, and sink processors. They can be deployed using the plugins.d framework, which we will discuss in Chapter 8.
References
-
[morphlines_ch6] Morphlines: Kite SDK, http://bit.ly/1AS0g5I