
Chapter 7. Getting Data into Flume*
So far, we’ve discussed the internals of Flume agents and how to configure the various components that make up an agent. In this chapter, we will look at the various methods by which data can be sent to one or more Flume agents from a client application. Flume has two programmatic ways through which data can be sent to Flume agents: the Flume SDK and the Embedded Agent API. Flume also comes bundled with log4j appenders that can be used to send data from applications to Flume agents.
Building Flume Events
Before we discuss the API that is used to send data to Flume agents, let’s look at how Flume events are created. As we discussed in Chapter 2, events are the basic form of representation of data in Flume. Each Flume event contains a map of headers and a body, which is the payload represented as a byte array. The Event interface is shown in Example 7-1.
Example 7-1. Event interface
package org.apache.flume;
public interface Event {
  public Map<String, String> getHeaders();
  public void setHeaders(Map<String, String> headers);
  public byte[] getBody();
  public void setBody(byte[] body);
}
As is evident, the internal representation of data within different implementations of the Event interface might differ as long as it exposes the headers and body in the format specified by the interface. In general, most applications build events using Flume’s EventBuilder API. The EventBuilder API provides a few static methods to build events. In all cases, the API itself makes no modifications to the actual event data submitted—either the headers or the body. There are four methods that the EventBuilder API provides that are commonly used to create Flume events. They are shown here:
public class EventBuilder {
  public static Event withBody(byte[] body, Map<String, String> headers);
  public static Event withBody(byte[] body);
  public static Event withBody(String body, Charset charset,
                              Map<String, String> headers);
  public static Event withBody(String body, Charset charset);
}
The first method simply takes the body as a byte array and the headers as a map, while the second takes the body as a byte array, but does not set event headers. The third and fourth methods can be used to create events from Java String instances, which are converted into a byte array encoded using the supplied character set and then used as the body of the Flume event. The third method also takes in the event headers as an argument.
Now that we know how to create Flume events, we can send these events to Flume agents using the Flume SDK or the Embedded Agent API.
Flume NG SDK Artifact
To use any of the RPC clients or the Event and EventBuilder APIs, make sure you include the Flume Client SDK in your application. The artifacts are available from the Maven central repository. You can include the flume-ng-sdk artifact in your pom.xml file by adding the following to the dependencies section:
    <dependency>
      <groupId>org.apache.flume</groupId>
      <artifactId>flume-ng-sdk</artifactId>
      <version>1.5.0</version>
    </dependency>
Flume Client SDK
Once an application knows what data is to be sent to HDFS via Flume, the application somehow needs to send the data to a Flume agent. We already discussed the HTTP Source and its pluggable handler in “HTTP Source”. We also covered the JSON-formatted events the HTTP Source accepts. This is one way of getting data to Flume—use an HTTP Source as the receiving source and have the application use HTTP-friendly formatted data (or JSON-ified data if the default handler is used). The issue with this is that it’s more inefficient than it needs to be, with the additional HTTP and the encoding/decoding overhead.
Since the format of Flume events is fixed, the best way to send data to Flume is via RPC calls in one of Flume’s supported RPC formats: Avro or Thrift. In general, Avro RPC should be preferred, as this is more mature and better tested by use in production in Flume’s case. The downside of using Avro RPC is that the version of Avro RPC used by Flume supports only Java and other JVM languages. Non-JVM languages are supported via Thrift RPC, though in Flume’s case, Thrift RPC may lack some features that are available in Avro RPC. In this section, we will discuss the Flume SDK and how to write programs that use this SDK to send data to Flume.
Building Flume RPC Clients
We’ll begin by looking at how to create RPC clients in Java. RPC client instances are created via the RpcClientFactory class. This class provides methods to create the various RPC client instances. All classes that are used to create RPC clients accept a Properties instance. This Properties instance contains configuration information that is used to configure the RPC client. All RPC clients can be created using the following methods:
public static RpcClient getInstance(Properties properties);
public static RpcClient getInstance(File properties);
The Properties instance is basically a map that contains the configuration parameters. The second method takes a File instance that represents the configuration in the properties file format, as explained in “Configuring Flume Agents”. There is only one mandatory parameter required by the factory class—the client.type parameter, which specifies the type of RPC client to create. This parameter must be set to one of default, default_failover, default_loadbalance, or thrift. Once the RPC client is created, the Properties instance is passed to it. Before we look at the various RPC clients available, let’s take a look at the RPC client interface that the application developer must program against.
RPC Client Interface
The RPC client interface is extremely simple and minimalistic. Since RPC clients are themselves configured during creation, the application writer does not need to worry about configuring the RPC clients explicitly. The RPC client interface is shown in Example 7-2.
Example 7-2. Flume RPC client interface
package org.apache.flume.api;
public interface RpcClient {
  public int getBatchSize();
  public void append(Event event) throws EventDeliveryException;
  public void appendBatch(List<Event> events) throws EventDeliveryException;
  public boolean isActive();
  public void close() throws FlumeException;
}
To send events to a Flume agent using an RPC client instance, the application program must call the appendBatch or append method. These methods accept the event(s) that have to be sent to the Flume agent and send them over the wire before returning. If the method returns successfully, it means that the events were successfully written to the destination agent’s channel(s). If the destination agent could not write the events out to one or more of the source’s required channels, or if there was a network issue or any other problem that caused the events to not be successfully written out, these methods throw an EventDeliveryException. If an EventDeliveryException is thrown, it is up to the application that is using the RPC clients to decide how to proceed. Applications could back off and retry, or even drop the events based on their own internal logic.
If the number of events passed in the list to appendBatch is greater than the batch size, the RPC client will split the list into multiple batches and write them out one after another, and will return only if all events were successfully written out. The method throws an exception as soon as one batch fails. If some batches succeed and another fails, this could cause duplicates in the final destination if the application retries. Therefore, it is usually a good idea to pass as many events as the batch size, or fewer. The getBatchSize method returns the maximum size of a batch that this RPC client uses.
Before each RPC call, it is a good idea to check if the RPC client is still active and ready for action, by calling the isActive method. Once the RPC client is no longer required, or if isActive returns false, the RPC client must be closed by calling the close method to clean up resources and avoid any resource leaks. This is described by the following snippet:
if (client == null) {
    client = RpcClientFactory.getDefaultInstance(host, port);
} else if (!client.isActive()) {
    client.close();
    client = RpcClientFactory.getDefaultInstance(host, port);
}
Configuration Parameters Common to All RPC Clients
There are several configuration parameters that are common to all RPC clients. We will discuss how these are passed to the RPC clients in the following sections. Table 7-1 lists the common RPC client configuration parameters.
| Parameter | Default | Description |
|---|---|---|
|
|
- |
This must be set to |
|
|
|
The maximum number of events to be sent per batch. |
|
|
- |
A list of names that can be used to specify the host parameters. |
|
|
- |
The configuration of the hosts in hostname:port format. |
The client.type parameter specifies the RPC client type to use. This can be one of default, default_loadbalance, default_failover, or thrift. We will discuss each of these clients in the following sections.
The maximum number of events to be sent per batch can be set using the batch-size parameter. If more than this number of events are passed in to a single appendBatch method call, multiple batches, each of the specified batch size or below, are sent.
The hosts parameter lists the aliases that will be used to identify hosts to which the client must connect (in the case of the default RPC client, all except the first host in the list are ignored). The hostname information must be passed using the hosts.<hostname> parameter for the first host in the list, in the hostname:port format. An example of such a configuration is shown here:
hosts = h1 h2 h3
hosts.h1 = usingflume1.oreilly.com:5545
hosts.h2 = usingflume2.oreilly.com:5545
hosts.h3 = usingflume3.oreilly.com:5545
RPC clients are created using the RpcClientFactory#getInstance method, as explained in “Building Flume RPC Clients”. When an RPC client is returned to the application by the RpcClientFactory, it is fully configured and ready to be used. RPC clients can send either a single event or an entire batch of events in an RPC call. The batch size is configurable via the Properties instance that was passed to the RpcClientFactory when this RPC client instance was created. Example 7-3 shows a simple class that generates events using random strings and then writes batches of events via RPC to a Flume agent. We will use UsingFlumeRPCApp as the base class when we discuss the various RPC Clients.
Example 7-3. Flume RPC client usage example
package usingflume.ch07;

public abstract class UsingFlumeRPCApp {

  private static final Logger LOGGER = LoggerFactory.getLogger(
    UsingFlumeRPCApp.class);

  private RpcClient client;
  private final Properties config = new Properties();
  private final ExecutorService executor
    = Executors.newFixedThreadPool(5);
  private int batchSize = 100;

  protected void parseCommandLine(String args[])
    throws ParseException {
    setClientTypeInConfig(config);
    Options opts = new Options();

    Option opt = new Option("r", "remote", true,
      "Remote host to connect " +
        "to");
    opt.setRequired(true);
    opts.addOption(opt);

    opt = new Option("h", "help", false, "Display help");
    opt.setRequired(false);
    opts.addOption(opt);

    opt = new Option("b", "batchSize", true, "Batch Size to use");
    opt.setRequired(false);
    opts.addOption(opt);

    opt = new Option("c", "compression", false, "If set, " +
      "data is compressed before sending");
    opt.setRequired(false);
    opts.addOption(opt);

    opt = new Option("l", "compression-level", false,
      "The compression level " +
        "to use if compression is enabled");
    opt.setRequired(false);
    opts.addOption(opt);

    opt = new Option("s", "ssl", false,
      "If set, ssl is enabled using keystore supplied by argument k");
    opt.setRequired(false);
    opts.addOption(opt);

    opt = new Option("k", "keystore", true,
      "Keystore to use with SSL");
    opt.setRequired(false);
    opts.addOption(opt);

    opt = new Option("d", "keystore-password", true,
      "Password for keystore");
    opt.setRequired(false);
    opts.addOption(opt);

    opt = new Option("t", "keystore-type", true,
      "Type keystore");
    opt.setRequired(false);
    opts.addOption(opt);

    opt = new Option("i", "maxIoWorkers", true,
      "Set the maximum number of " +
        "worker threads to use for network IO");
    opt.setRequired(false);
    opts.addOption(opt);

    opt = new Option("o", "backoff", false,
      "Backoff failed clients?");
    opt.setRequired(false);
    opts.addOption(opt);

    Parser parser = new GnuParser();
    CommandLine commandLine = parser.parse(opts, args);

    if (commandLine.hasOption("h")) {
      new HelpFormatter().printHelp("UsingFlumeDefaultRPCApp", opts,
        true);
      return;
    }

    parseHostsAndPort(commandLine, config);

    if (commandLine.hasOption("b")) {
      String batchSizeStr = commandLine.getOptionValue("b", "100");
      config.setProperty(CONFIG_BATCH_SIZE, batchSizeStr);
      batchSize = Integer.parseInt(batchSizeStr);

    }

    if (commandLine.hasOption("c")) {
      config.setProperty(CONFIG_COMPRESSION_TYPE, "deflate");
      if (commandLine.hasOption("l")) {
        config.setProperty(CONFIG_COMPRESSION_LEVEL,
          commandLine.getOptionValue("l"));
      }
    }

    if (commandLine.hasOption("s") && commandLine.hasOption("k") &&
    commandLine.hasOption("d")) {
      config.setProperty(CONFIG_SSL, "true");
      config.setProperty(CONFIG_TRUSTSTORE, commandLine.getOptionValue("k"));
      config.setProperty(CONFIG_TRUSTSTORE_PASSWORD, commandLine.getOptionValue("d"));
      if (commandLine.hasOption("t")) {
        config.setProperty(CONFIG_TRUSTSTORE_TYPE, commandLine.getOptionValue("t"));
      }
    }

    if (commandLine.hasOption("i")) {
      config.setProperty(MAX_IO_WORKERS,
        commandLine.getOptionValue("i"));
    }
    backoffConfig(commandLine, config);
  }

  protected abstract void setClientTypeInConfig(Properties p);

  protected abstract void parseHostsAndPort(CommandLine commandLine,
    Properties config);

  protected abstract void backoffConfig(CommandLine commandLine,
    Properties config);

  @VisibleForTesting
  protected void run(String[] args) throws Exception {
    parseCommandLine(args);

    final UsingFlumeRPCApp app = this;

    for (int i = 0; i < 5; i++) {
      executor.submit(new Runnable() {
        final int total = 100;
        @Override
        public void run() {
          int i = 0;
          while (i++ < total) {
            app.generateAndSend();
          }
        }
      }).get();
      app.closeClient();
    }

    // Set a shutdown hook to shutdown all the threads and the
    // executor itself
    Runtime.getRuntime().addShutdownHook(new Thread(new Runnable() {
      @Override
      public void run() {
        executor.shutdown();
        try {
          if (!executor.awaitTermination(60, TimeUnit.SECONDS)) {
            executor.shutdownNow();
          }
        } catch (InterruptedException e) {
          LOGGER.warn(
            "Interrupted while attempting to shutdown executor. " +
              "Force terminating the executor now.", e);
          executor.shutdownNow();
        }
        app.closeClient();
      }
    }));

  }

  private synchronized void reconnectIfRequired() {
    if (client != null && !client.isActive()) {
      closeClient();
    }
    // If client is null, it was either never created or was closed by
    // closeClient above
    if (client == null) {
      try {
        client = RpcClientFactory.getInstance(config);
      } catch (Exception e) {
        e.printStackTrace();
        LOGGER.warn("Client creation failed. Source may not have been started yet");
      }
    }
  }

  protected synchronized void closeClient() {
    if(client != null) {
      client.close();
    }
    client = null;
  }

  protected void generateAndSend() {
    reconnectIfRequired();
    List<Event> events = new ArrayList<Event>(100);
    for (int i = 0; i < batchSize; i++) {
      events.add(EventBuilder.withBody(
        RandomStringUtils.randomAlphanumeric(100).getBytes()));
    }
    try {
      client.appendBatch(events);
    } catch (Throwable e) {
      e.printStackTrace();
      LOGGER.error(
        "Error while attempting to write data to remote host at " +
          "%s:%s. Events will be dropped!");
      // The client cannot be reused, since we don't know why the
      // connection
      // failed. Destroy this client and create a new one.
      reconnectIfRequired();
    }
  }
}
As you can see, the UsingFlumeRPCApp is an abstract class, whose concrete implementations will be presented in following sections. The same class will be used to write data to more complex RPC clients, like the load-balancing RPC client by implementing the setClientTypeInConfig method, which will set the required parameter in the configuration to instantiate the correct type of RPC client. Implementations of the parseHostsAndPort method converts the hostname parameter into the required format for each RPC client, and the backoffConfig method enables backoff based on the command-line input.
The parseCommandLine method reads several arguments, including the hostname(s) and port(s) to connect to, whether to use compression and SSL, whether to backoff on failure, etc., as command-line arguments. The arguments are then mapped to the corresponding configuration parameters for the RPC client and inserted into a Properties instance that is passed to the getInstance method to create the client. A safe way to correctly specify the parameters is to use the RpcClientConfigurationConstants class that defines all configuration parameters as static final strings. In this example, these strings are imported statically and used to specify the configuration parameters when they are passed to the Properties instance.
The RPC client methods are thread-safe, though multithreaded applications are likely to do some thread synchronization by themselves to ensure that one thread does not close a client, or set it to null while allowing another thread to try to write data, leading to a NullPointerException.
In the application shown in Example 7-3, if any thread hits an exception while writing data to the remote host, the client is immediately closed and a reconnect is forced. If at this point there are other threads using this client, they will also hit an exception—which is fine, because Flume’s default RPC client is considered dead as soon as it throws an exception.
At this point, one of the threads has to create a new connection. Having all threads reconnecting will lead to multiple clients being created one after the other, even though only one is needed. Therefore, we create the new connection in a synchronized method, reconnectIfRequired, that forces the reconnect only if the client is no longer active or is null (by virtue of never having been created). By doing this, we ensure that once a new RPC client is created and is available for use, the other threads will not create fresh connections. When asked to shut down, in addition to shutting down the executor and the threads, the application also closes the RPC client instance to clear up resources.
The run method generates a fixed number of events and sends them in batches to remote Flume agent(s) using the RPC client instance. For simplicity, this example simply uses byte array representations of randomly generated strings as the event body.
Default RPC Client
The default RPC client instance uses the Avro RPC protocol and can connect to exactly one Avro Source. For Java programs writing data to exactly one Flume agent, this is the recommended client. To create the default RPC client, the RpcClientFactory provides a couple of convenience methods that can be used:
public static RpcClient getDefaultInstance(String hostname, Integer port);
public static RpcClient getDefaultInstance(String hostname, Integer port,
Integer batchSize);
Since the default RPC client writes to exactly one Avro Source, the parameters required to connect to this Avro Source are only the hostname and port information, which can be passed in to the first method shown here as the first and second parameters, respectively. The second method takes an additional parameter, which is the batch size—the maximum number of events this client sends out in a single RPC call. Since the first method does not take a batch size, the RPC client created by that method simply uses the default batch size of 100 events per batch. No further configuration of the RPC client is required before using it.
In addition to the parameters discussed in “Configuration Parameters Common to All RPC Clients”, there are several more parameters that can be used to encrypt data being sent to the agent or to compress it. Table 7-2 describes these parameters.
| Parameter | Default | Description |
|---|---|---|
|
|
|
The timeout, in seconds, to wait for the initial connection to complete. |
|
|
|
The timeout, in seconds, to wait for a batch to successfully complete writing a batch of events. |
|
|
- |
The compression algorithm to use. The value can be |
|
|
|
The compression level to be used if compression is enabled using the |
|
|
|
If set to |
|
|
|
If set to |
|
|
- |
The trust store to use. This is a required parameter if SSL is enabled. |
|
|
- |
The password to use to open the trust store. |
|
|
|
The type of trust store that is being used. |
|
|
|
The maximum number of threads to use for communication with the remote machines. |
Many of the parameters shown here are common to the Avro Sink and the RPC client. The reason for this is that the Avro Sink is actually a channel- and transaction-aware wrapper around the default RPC client. Therefore, all features supported by the default RPC client may be supported by the Avro Sink (though they may not be exposed to the user).
To pass in these parameters, the RpcClientFactory methods that accept the Properties instance (shown in “Building Flume RPC Clients”) must be used.
To use the default RPC client with more advanced configuration, the value of the client.type parameter must be set to default in the Properties object (or use RpcClientConfigurationConstants.DEFAULT_CLIENT_TYPE).
The batch-size parameter specifies the maximum number of events that should be sent per RPC call. If the number of events passed to a single appendBatch call is greater than the batch size, then the events are sent in multiple RPC calls.
The connect-timeout parameter specifies the time period to wait for the initial connection setup to complete; if this is exceeded, the client will throw an EventDeliveryException. This is done only when the first batch of events is being sent. The request-timeout parameter specifies the time period to wait before a single RPC call is assumed to have failed. If an RPC call takes more than the number of seconds specified by this parameter, an EventDeliveryException is thrown.
The RPC client can compress data while sending data to agents that are expecting compressed data. To send compressed data, set compression-type to deflate. The compression level can be set using the compression-level parameter, whose value can range between 1 and 9. As the compression level increases, the compression ratio also improves, as does the time taken to compress the data. You can read about deflate compression and compression levels in the zlib manual [zlib-manual].
Compression Type Mismatches
If the RPC client is configured to use compression, the Avro Source receiving the events must have compression-type set to deflate.
To enable SSL, set ssl to true. The client can be set to trust all SSL certificates by setting trust-all-certs to true—this should not be done in production, to avoid security issues. A trust store is a file that contains information about which public keys to trust. Unless instructed otherwise, Flume will use Java’s default JSSE certificate authority files, jssecacerts/cacerts, to determine if the Avro Source’s SSL certificate should be trusted.
If a custom trust store is to be used, set the value of the truststore parameter to the path to the respective trust store file [truststore]. The user running the agent should have read access to the file. The truststore-password parameter must be set to the password that can be used to open the trust store. The truststore-type parameter is optional and can be set to an alternate keystore type, if needed [truststore-type].
It is possible to limit the number of worker threads that the RPC client spawns by setting the value of the maxIoWorkers parameter. By default, this is set to 10, which means a maximum of 10 workers are used to perform network I/O.
To configure UsingFlumeRPCApp to use the default RPC client, we override the setClientTypeInConfig, parseHostsAndPort, and backoffConfig methods as shown in Example 7-4.
Example 7-4. Default Flume RPC client usage example
package usingflume.ch07;

public class UsingFlumeDefaultRPCApp extends UsingFlumeRPCApp {
  private String remote;

  @Override
  protected void setClientTypeInConfig(Properties p) {
    p.setProperty(CONFIG_CLIENT_TYPE, DEFAULT_CLIENT_TYPE);
  }

  @Override
  protected void parseHostsAndPort(CommandLine commandLine,
    Properties config) {
    config.setProperty(CONFIG_HOSTS, "h1");

    remote = commandLine.getOptionValue("r").trim();
    Preconditions.checkNotNull(remote, "Remote cannot be null.");
    // This becomes hosts.h1
    config.setProperty(CONFIG_HOSTS_PREFIX + "h1", remote);
  }

  @Override
  protected void backoffConfig(CommandLine commandLine,
    Properties config) {
    // No op
  }

  public static void main(String args[]) throws Exception {
    // Outsource all work to the app.run method which can be tested
    // more easily
    final UsingFlumeDefaultRPCApp app = new UsingFlumeDefaultRPCApp();
    app.run(args);
  }
}
For the default RPC client, the client.type is set to default in the setClientTypeInConfig method. The parseHostsAndPort method simply reads the host and port from the command line and then sets the hosts parameter with value h1, to indicate that the host is identified by the alias h1. The value of hosts.h1 parameter is set to the hostname and port in the hostname:port format.
To enable SSL or compression, or specify the batch size, connection timeout, request timeout, etc., all parameters for the default RPC client can be passed in to the load-balancing RPC client or the failover RPC client.
Load-Balancing RPC Client
The load-balancing RPC client works similarly to the load-balancing sink processor. The load-balancing RPC client can be configured to send events to several clients. For each append or appendBatch call, the load-balancing RPC client selects one of the agents it is configured to send data to, in either random or round-robin order based on configuration.
When the application calls append or appendBatch, the load-balancing RPC client attempts to send events to Flume agents one after another, until the data is actually sent out successfully. If a remote agent fails and this RPC client tries another host, the application will not know of the failure or get an exception until all hosts have been tried and all of them have failed. If all remote agents have failed, then append and appendBatch will throw an EventDeliveryException.
All parameters that can be passed to the default RPC client (shown in Table 7-2) can also be passed to the load-balancing RPC client, which results in the same behavior as the default RPC client. For example, SSL and compression can be enabled using the same parameters as the default RPC client.
To configure load-balancing RPC clients, the parameters in Table 7-3 can be passed in via the Properties instance (in addition to the ones shown in Table 7-1 and Table 7-2).
| Parameter | Default | Description |
|---|---|---|
|
|
|
If set to |
|
|
- |
The maximum time, in milliseconds, to back off a failed agent. |
|
|
|
The order in which to select hosts to send data to. |
As we discussed earlier, the load-balancing RPC client can select one of many hosts to write events to. When a host it is connected to has failed and is not accepting data (or is too slow, or the network connection has failed), the load-balancing RPC client can blacklist this host for an exponentially increasing backoff period (similar to the load-balancing sink processor). Each time the backoff period expires, the load-balancing RPC client tries to write to that host, and if it fails the backoff period is doubled; otherwise, it is reset to zero and the host is considered active. If the backoff parameter is set to true, this exponential backoff is enabled. There is no default maximum ceiling for the backoff period, but this can be set using the maxBackoff parameter. Once the backoff period for a host has reached this value, the backoff period for trying the host is not increased any further.
The host-selector parameter specifies the policy by which the client selects hosts to send events to. If this is set to random, a host that is not backed off is selected at random. If set to round_robin, active hosts are selected in round-robin order based on the order in which they are specified in the hosts list. This can also be set to the FQCN of the class that implements LoadBalancingRpcClient$HostSelector. “Writing your own host selector*” explains how to write a custom host selector.
Example 7-3 can be easily modified to use the load-balancing RPC client by changing the way hosts are accepted into the application and then parsing this host list and setting them as hosts named h1, h2, h3, etc. For each of these aliases, the address of the host is specified in hostname:port format, which is set as the value of parameters named hosts.h1, hosts.h2, hosts.h3 etc.
The client is set to default_loadbalance. To switch to the load-balancing RPC client, the setClient method should be modified to the following:
protected void setClientTypeInConfig(Properties p) {
  p.setProperty(CONFIG_CLIENT_TYPE, "default_loadbalance");
}
This is shown in Example 7-5.
Example 7-5. Load-balancing Flume RPC client usage example
package usingflume.ch07;

public class UsingFlumeLBRPCApp extends UsingFlumeRPCApp {

  private String host;
  private String port;

  @Override
  protected void setClientTypeInConfig(Properties p) {
    p.setProperty(CONFIG_CLIENT_TYPE, "default_loadbalance");
  }

  protected void parseHostsAndPort(CommandLine commandLine,
    Properties config) {
    host = commandLine.getOptionValue("r").trim();
    Preconditions.checkNotNull(host, "Remote host cannot be null.");
    StringBuilder hostBuilder = new StringBuilder("");

    String[] hostnames = host.split(",");
    int hostCount = hostnames.length;

    for (int i = 1; i <= hostCount; i++) {
      hostBuilder.append("h").append(i).append(" ");
    }
    config.setProperty(CONFIG_HOSTS, hostBuilder.toString());

    for (int i = 1; i <= hostCount; i++) {
      config.setProperty(
        CONFIG_HOSTS_PREFIX + "h" + String.valueOf(i),
        hostnames[i - 1]);
    }
  }

  @Override
  protected void backoffConfig(CommandLine commandLine,
    Properties config) {
    if (commandLine.hasOption("o")) {
      config.setProperty(CONFIG_BACKOFF, "true");
    }
  }

  public static void main(String args[]) throws Exception {
    // Outsource all work to the app.run method which can be tested
    // more easily
    final UsingFlumeLBRPCApp app = new UsingFlumeLBRPCApp();
    app.run(args);
  }
}
Since the load-balancing RPC client supports backing off failed hosts, the backoffConfig method sets this in the Properties instance based on the command line configuration.
As mentioned earlier, the load-balancing RPC client also accepts the parameters that are passed to the default RPC client. Therefore, all of the parameters passed to the default RPC client in the parseCommandLine method are also used in the configuration of the load-balancing RPC client.
Writing your own host selector*
Round-robin or random selectors satisfy most use cases for selecting the sink that should be chosen to pull data out of the channel. But there are always cases where it might make sense to write your own algorithm to select the sink that should be active. To write a selector, the LoadBalancingRpcClient$HostSelector interface must be implemented. The interface is shown in Example 7-6.
Example 7-6. HostSelector interface
public interface HostSelector {
  void setHosts(List<HostInfo> hosts);
  Iterator<HostInfo> createHostIterator();
  void informFailure(HostInfo failedHost);
}
When Flume starts the sink processor, it creates the host selector and calls the setHosts method, to which it passes a list of HostInfo instances [hostInfo] that contain information about hosts to which events should be sent. For each append or appendBatch call coming from the client, the load-balancing RPC client calls createHostIterator, which must return an iterator of HostInfo instances that must return the hosts in the order in which the client should try to send events. When the events can be sent successfully to one of the hosts, this iterator is discarded and createHostIterator is called again. If a host has failed or sending data to that host fails, the RPC client calls the informFailure method, passing in a HostInfo instance describing that host. This can be used to temporarily blacklist the host.
When building a host selector, add the flume-ng-sdk artifact to your project’s pom.xml file’s dependency section as shown earlier.
Failover RPC Client
The failover RPC client works exactly like the failover sink processor, connecting to agents based on priority. The RPC client connects to the agent with the highest priority first. If this agent fails, the client connects to the agent with the next highest priority. Unlike the failover sink processor, the failover RPC clients don’t need priorities to be set explicitly. Instead, the priority is based on the order of hosts in the hosts parameter. The host specified first in the hosts parameter has the highest priority, followed by the second host in the list, and so on. Table 7-4 lists the failover RPC client configuration parameters.
| Parameter | Default | Description |
|---|---|---|
|
|
|
|
|
|
|
The maximum number of hosts to attempt to connect to before throwing an exception. |
The client.type for the failover RPC client is default_failover. The only parameter in addition to the ones specified in Table 7-1 and Table 7-2 is the max-connections parameter. This is the number of times the RPC client must fail over within a single append or appendBatch call. For example, if this is set to 5, then up to five connections are attempted if there are five or more hosts. If there are fewer hosts, only that many attempts are made.
The setClientTypeInConfig method from Example 7-3 must be overriden to use the failover sink processor:
protected void setClient(Properties p) {
  p.setProperty(CONFIG_CLIENT_TYPE, "default_failover");
}
Thrift RPC Client
Apache Thrift is a data serialization and RPC framework that can be used to serialize and deserialize data from various languages. Thrift supports this by having a language-neutral specification of the data format. The Thrift compiler can then generate the code in various languages that can be used to read and write this data. To send data from applications in different languages to Flume, the Flume Thrift spec [flume-thrift] can be used to generate the code that can be used in the specific language. The Flume Thrift spec is shown in Example 7-7.
Example 7-7. Flume Thrift specification
namespace java org.apache.flume.thrift

struct ThriftFlumeEvent {
  1: required map <string, string> headers,
  2: required binary body,
}

enum Status {
  OK,
  FAILED,
  ERROR,
  UNKNOWN
}

service ThriftSourceProtocol {
  Status append(1: ThriftFlumeEvent event),
  Status appendBatch(1: list<ThriftFlumeEvent> events),
}
More details on generating Thrift code for different languages can be found in the Apache Thrift tutorial [thrift-doc].
We will not discuss the Thrift RPC client in detail, since this client should only be used when there is a Thrift Source already running on the agent to receive data from applications written in another language (simply to avoid running an Avro Source as well). If the data being sent is only Java, then the Avro Source should be used with the default, load-balancing, or failover RPC clients.
Embedded Agent
One very obvious issue with using Flume RPC clients in applications is that the applications have to buffer the data in the case of failures and retries. This means that downstream failures can have a direct impact on the applications, even if load-balancing or failover RPC clients are used (which may impact latency as well). Applications that cannot afford to lose messages would now have to buffer events. Buffering events in such a way that they survive process or machine failure is time-consuming and painful to implement. Buffering, sending data without affecting the application—sounds like a problem already solved, doesn’t it? Flume was designed to solve this very problem!
To solve this issue, Flume provides the embedded agent. The embedded agent is a very restricted Flume agent that can be deployed within a third-party application. The advantage of using an embedded agent rather than an RPC client is that an agent has a channel—a buffer that the application does not need to manage—which can be on disk as well. This allows the application to survive failed downstream agents for longer; basically, until the channel is full.
Embedded agents also allow the application to buffer events while waiting for a downstream HDFS failure and the resulting full Flume channels to get resolved, by buffering data within the application. Since each application process often produces only a small fraction of the data being handled by a first-tier Flume agent, having a much smaller Flume channel size within each application’s embedded agent will suffice.
Figure 7-1 shows a typical embedded agent architecture. The embedded agent is configured and then started by the application. Since the agent is embedded within the application, it resides within the application’s process address space and creates and runs threads within the application. Therefore, the application will consume more resources than if it simply used the RPC client. That is the cost to be paid for the additional buffering time that the embedded agent provides.
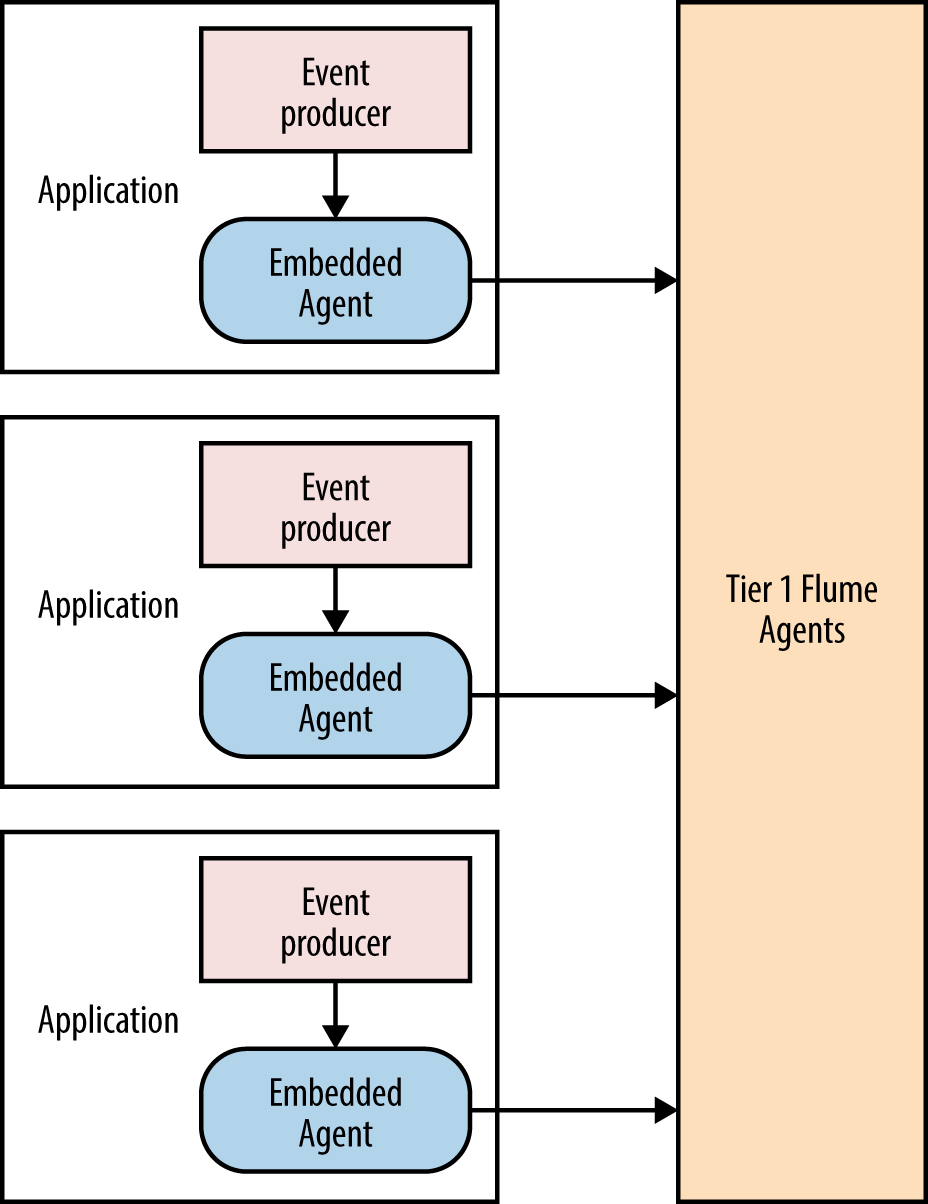
Figure 7-1. Embedded agent architecture
Embedded agents also support using the File Channel, which can help persist events even if the application dies or the machine is restarted. This can increase the I/O performed by the application and can lead to more load on the machine, and specifically the disks that are being used by the File Channel. Also, as discussed in Chapter 4, File Channels perform well when there are no other processes using the disks. In this case, even the application embedding this agent should preferably not be using the same disk, to avoid unnecessary seeks.
The embedded agent exposes a very simple API that starts the agent and then operates by itself until it is stopped. It is represented by a class aptly named EmbeddedAgent. An embedded agent has the same lifecycle as any other Flume agent. It is first created by creating an instance of the EmbeddedAgent class via the public constructor that takes a name, which is the name used to refer to this specific agent. Exceptions and log messages will contain the name of this agent, so the user can identify the agent that is in trouble if more than one embedded agent is being deployed within a single application instance.
Whitespaces in Embedded Agent Name
Be aware that the name of an embedded agent cannot currently contain whitespaces. Whitespaces in the name will cause the embedded agent to not start throwing an Exception stating that the configuration is bad.
Once it is created it is configured using the configure method, which is passed a Map containing the configuration of the agent. If configuration fails, this method will not return, but will throw a FlumeException.
The agent can then be started using the start method. A failed start will result in a FlumeException being thrown by this method. This method initializes all the configured components and starts them.
Events can be written to the agent using the put or putAll methods, which accept individual events and event batches, respectively. If the events cannot be written to the channel for any reason, including but not limited to the channel being full, an EventDeliveryException will be thrown.
When the agent is ready to be shut down, it can be stopped using the stop method, which may throw a FlumeException if the stop fails. The Embedded Agent API is shown in Example 7-8.
Example 7-8. Embedded Agent API
public class EmbeddedAgent {
	public EmbeddedAgent(String name);
	public void configure(Map<String, String> configuration) throws
	FlumeException;
	public void start() throws FlumeException;
	public void put(Event event) throws EventDeliveryException;
	public void putAll(List<Event> events) throws EventDeliveryException;
	public void stop() throws FlumeException;
}
Configuring an Embedded Agent
An embedded agent can contain only one source, one channel, and one sink group (technically, the limit is on the number of sink runners), though the sink group may contain multiple sinks. Table 7-5 list the configuration parameters for an embedded agent.
| Parameter | Default | Description |
|---|---|---|
|
|
|
The only source that an embedded agent can use is the |
|
|
- |
The channel type to use. |
|
|
- |
The configuration parameters to pass to the channel. |
|
|
- |
Names of the sinks in this agent. This is equivalent to the |
|
|
- |
Embedded agents can contain only Avro Sinks, so this must be set to |
|
|
- |
The configuration parameters to pass to each sink. |
|
|
- |
If there are multiple sinks specified, the sink processor to use for selecting the active sink. |
|
|
- |
The configuration parameters to pass to the sink processor. |
It is not required to specify the source to be used—the agent is automatically set to use the embedded source. Even if the source is set through the configuration, it must be set to embedded. No configuration is necessary for the embedded source.
Each embedded agent can have only one channel, either the File Channel or the Memory Channel, so the channel.type parameter accepts file or memory as its value. Any parameters to be passed to this channel can be passed using the channel. prefix.
An embedded agent can have multiple sinks. If an embedded agent has multiple sinks, the sinks will be grouped into a single sink group, as an embedded agent has only one sink runner. Since the embedded agent can have multiple sinks, they are named using the sinks parameter, where their names are specified. Any parameters are passed in to the sinks using the sink’s name as a prefix. Only Avro Sinks can be used in an embedded agent, so the type parameter for all sinks must be set to avro. If there are multiple sinks specified, the sinks are automatically grouped into a sink group, whose sink processor can be configured by the processor.type; any configuration can be passed to it via the processor. prefix.
Since there is only one channel in an embedded agent, the source and sinks do not have to specify the channels or channel parameter explicitly—the agent will automatically set the source to write to the only channel and the sinks to read from it. Example 7-9 shows an application that uses the Embedded Agent API and can write data to several Flume agents via load balancing.
Example 7-9. Embedded agent example
package usingflume.ch07;

public class UsingFlumeEmbeddedAgent {
  private static final Logger LOGGER = LoggerFactory.getLogger
    (UsingFlumeEmbeddedAgent.class);
  private final EmbeddedAgent agent = new EmbeddedAgent(
    "UsingFlume");
  private int batchSize = 100;

  public static void main(String args[]) throws Exception {
    UsingFlumeEmbeddedAgent usingFlumeEmbeddedAgent = new
      UsingFlumeEmbeddedAgent();
    usingFlumeEmbeddedAgent.run(args);
    int i = 0;
    while (i++ < 100) {
      usingFlumeEmbeddedAgent.generateAndSend();
    }
  }

  public void run(String args[]) throws Exception {
    Options opts = new Options();

    Option opt = new Option("r", "remote", true,
      "Remote host to connect " +
        "to");
    opt.setRequired(true);
    opts.addOption(opt);

    opt = new Option("p", "port", true, "Port to connect to");
    opt.setRequired(true);
    opts.addOption(opt);

    opt = new Option("b", "batchSize", true, "Batch Size to use");
    opt.setRequired(false);
    opts.addOption(opt);

    Parser parser = new GnuParser();
    CommandLine commandLine = parser.parse(opts, args);

    if (commandLine.hasOption("h")) {
      new HelpFormatter().printHelp("UsingFlumeEmbeddedAgent", opts,
        true);
      return;
    }

    Map<String, String> config = new HashMap<String, String>();
    parseHostsAndPort(commandLine, config);
    config.put("source.type", "embedded");
    File dcDir = Files.createTempDir();
    dcDir.deleteOnExit();
    config.put("channel.type", "file");
    config.put("channel.capacity", "100000");
    config.put("channel.dataDirs", dcDir.toString() + "/data");
    config.put("channel.checkpointDir", dcDir.toString() + "/checkpoint");
    agent.configure(config);
    agent.start();
    Runtime.getRuntime().addShutdownHook(new Thread(new Runnable() {
      @Override
      public void run() {
        agent.stop();
      }
    }));
  }

  private void generateAndSend() {
    List<Event> events = new ArrayList<Event>(100);
    for (int i = 0; i < batchSize; i++) {
      events.add(EventBuilder.withBody(
        RandomStringUtils.randomAlphanumeric(1024).getBytes()));
    }
    try {
      agent.putAll(events);
    } catch (Throwable e) {
      LOGGER.error(
        "Error while attempting to write data to remote host at " +
          "%s:%s. Events will be dropped!");
      // The client cannot be reused, since we don't know why the
      // connection
      // failed. Destroy this client and create a new one.
    }
  }

  private void parseHostsAndPort(CommandLine commandLine,
    Map<String, String> config) {
    String host = commandLine.getOptionValue("r").trim();
    Preconditions.checkNotNull(host, "Remote host cannot be null.");

    String port = commandLine.getOptionValue("p").trim();
    Preconditions.checkNotNull(port, "Port cannot be null.");

    String[] hostnames = host.split(",");
    int hostCount = hostnames.length;
    final String sinkStr = "sink";
    StringBuilder stringNamesBuilder = new StringBuilder("");
    for (int i = 0; i < hostCount; i++) {
      stringNamesBuilder.append(sinkStr).append(i).append(" ");
    }
    // this puts sinks = sink0 sink1 sink2 sink 3 etc...
    config.put("sinks", stringNamesBuilder.toString());
    final String parameters[] = {"type", "hostname", "port",
                                 "batch-size"};
    final String avro = "avro";
    for (int i = 0; i < hostCount; i++) {
      final String currentSinkPrefix = sinkStr + String.valueOf(i) +
        ".";
      config.put(currentSinkPrefix + parameters[0], avro);
      config.put(currentSinkPrefix + parameters[1], hostnames[i]);
      config.put(currentSinkPrefix + parameters[2], port);
      config.put(currentSinkPrefix + parameters[3],
        String.valueOf(batchSize));
    }

    if (hostnames.length > 1) {
      config.put("processor.type", "load_balance");
      config.put("processor.backoff", "true");
      config.put("processor.selector", "round_robin");
      config.put("processor.selector.maxTimeout", "30000");
    } else {
      config.put("processor.type", "default");
    }
  }
}
This application reads the hostnames and port from the command line in the parseHostsAndPort method, and configures Avro Sinks to connect to each of them. If several hosts are specified on the command line, a load balancing sink processor is added to the configuration to make sure data is sent to all hosts that this application connects to. It also configures a File Channel with a capacity of 100,000 and the checkpoint and data directories to use. These parameters are all set in a Map, which is then passed to the configure method of the EmbeddedAgent class.
Once configured, the agent is started by calling the start method, after which the agent can accept events from the application via the put and putAll methods. In this case, a predefined number of randomly generated events are passed to the agent using the putAll method.
When the application is done sending data, the agent is shutdown by calling the stop method.
The Embedded Agent API is contained in the flume-ng-embedded-agent artifact, which can be added to your application’s pom.xml file’s dependency section as follows:
    <dependency>
      <groupId>org.apache.flume</groupId>
      <artifactId>flume-ng-embedded-agent</artifactId>
      <version>1.5.0</version>
    </dependency>
log4j Appenders
Apache log4j is an extremely popular logging system that supports plugging in custom loggers. Flume provides two log4j appenders that can be plugged into your application: one that can write data to exactly one Flume agent and another that can choose one of many configured Flume agents in a round-robin or random order. To use Flume’s log4j appenders, flume-ng-log4jappender-1.5.0-jar-with-dependencies.jar [flume-log4j] should be put in the classpath of your application. It is not required when building your project, but during deployment.
log4j appenders are configured via the log4j.properties files. To learn more about log4j configuration, please refer to the log4j documentation [log4j-doc]. The log4 appenders support log4j layouts, which can be specified using the layout parameter in the appender configuration.
Both of the log4j appenders accept the parameters in Table 7-6.
| Parameter | Default | Description |
|---|---|---|
|
|
|
If set to |
|
|
|
If set to |
|
|
- |
The URL where the Avro Schema is stored. |
The UnsafeMode parameter can be set to true to ignore failure when log messages sent to the Flume agents fail. This should only be set if it is acceptable to lose log messages quietly. If this is not set or is set to false, and log messages time out or fail to be committed to the Flume agent’s channel(s), logging methods may throw an exception.
Both log4j appenders can serialize data using Avro serialization. If the incoming data is an instance of an Avro Generic Record or Specific Record, the log4j appender will serialize it using Avro serialization. If AvroReflectionEnabled is set to true, the appender serializes any arbitrary data to Avro as well. Note that this should be used only when the data must be serialized to Avro. If the AvroSchemaURL parameter is set, then the appender sets in the Flume event with key flume.avro.schema.url whose value is the value of the AvroSchemaURL parameter. If this is not set, then the entire JSON-ified schema is written to a header with the key flume.avro.schema.literal.
Both log4j appenders insert additional headers into Flume event headers, which give additional information about the events. They are shown in Table 7-7.
| Header | Description |
|---|---|
|
|
The name of the logger instance that inserted the event. |
|
|
The level at which this message was logged. |
|
|
The encoding of the message (currently it is always UTF-8). |
|
|
The timestamp at which the message was appended. |
The log4j appender takes two additional configuration parameters, listed in Table 7-8.
| Parameter | Default | Description |
|---|---|---|
|
|
- |
Must be |
|
|
- |
The hostname where the Flume agent is running. |
|
|
- |
The port where the Flume agent’s Avro Source is listening. |
The name of the appender is the key for specifying the FQCN of the log4j appender. In this case, it must be set to org.apache.flume.clients.log4jappender.Log4jAppender. The Flume log4j appender referred to as flumeAppender can be configured by using the following line in your log4j.properties file:
log4j.rootLogger = INFO, flumeAppender
log4j.appender.flumeAppender =
org.apache.flume.clients.log4jappender.Log4jAppender
log4j.appender.flumeAppender.Hostname = usingflume-srv-1.domain.com
log4j.appender.flumeAppender.Port = 3343
log4j.appender.flumeAppender.UnsafeMode = true
This configuration writes any messages at INFO level or above to the flumeAppender and passes the data to the Flume agent at usingflume-srv-1.domain.com:3343.
Load-Balancing log4j Appender
Similar to RPC clients, log4j appenders also can be configured to load balance between multiple Flume agents, using a round-robin or random strategy. This is configured using the additional parameters in Table 7-9.
| Parameter | Default | Description |
|---|---|---|
|
|
- |
Must be |
|
|
- |
A list of hosts specified in hostname:port format, where Flume Avro Sources are listening. |
|
|
|
Can be |
|
|
- |
The maximum time (in milliseconds) to back off while connecting to a Flume agent that may have failed. |
The load-balancing log4j appender can load balance over several hosts, similar to the load-balancing RPC client. The list of hosts must be specified as a comma-separated list in the format hostname:port as the value of the key Hosts.
Just like the load-balancing RPC client, this log4j appender can select the hosts in round-robin or random order by setting ROUND_ROBIN or RANDOM as the value of the Selector parameter. To use a custom strategy, the FQCN of a class implementing LoadBalancingRpcClient$HostSelector can be specified. Also like the load-balancing RPC client, a log4j appender can blacklist a failed Flume agent for an increasing period of time up to a maximum backoff using the MaxBackoff parameter:
log4j.rootLogger = INFO, flumeAppender
log4j.appender.flumeAppender =
org.apache.flume.clients.log4jappender.LoadBalancingLog4jAppender
log4j.appender.flumeAppender.Hosts = usingflume-srv-1.domain.com:5545,
usingflume-srv-2.domain.com:3133,usingflume-srv-3.domain.com:4454
log4j.appender.flumeAppender.UnsafeMode = true
log4j.appender.flumeAppender.Selector = RANDOM
log4j.appender.flumeAppender.MaxBackoff = 120000
This configuration uses a LoadBalancingLog4jAppender that connects to three different hosts in a random order and blacklists failed Flume agents for 120 seconds.
Summary
In this chapter, we covered the APIs Flume provides to get the data out from applications to Flume agents reliably. We also covered the log4j appenders that come bundled with Flume that allow the user to send data to Flume without actually writing any code, using some simple configuration.
In the next and final chapter, we will look at how to plan and deploy Flume, and how to monitor a Flume cluster once it’s deployed.
References
-
[truststore] Oracle trust store documentation, http://bit.ly/1oprwQn
-
[truststore-type]
KeyStoretypes, http://bit.ly/1wxll6y -
[thrift-doc] Apache Thrift tutorial, http://thrift.apache.org/tutorial/
-
[flume-thrift] Flume Thrift specification, http://bit.ly/1oprwjc
-
[hostInfo]
HostInfoclass, http://bit.ly/1opryrq -
[zlib-manual] zlib manual, http://www.zlib.net/manual.html
-
[log4j-doc] log4j manual, http://logging.apache.org/log4j/1.2/manual.html
-
[flume-log4j] Flume log4j appender on Maven Central, http://bit.ly/1oprCav