Chapter 12. Selections
Your first taste of a D3 selection was simple, and involved only one element: d3.select("body"). Then you learned about selectAll() for selecting multiple elements. When we introduced binding data to elements, you learned about the now-familiar selectAll/data/enter/append pattern for creating new elements. Later, you saw how to use merge() to combine selections (such as when applying updates to a chart) and exit() to select elements on their way out. In Chapter 11, you saw examples of how datum() could be used to bind data to a single element, bypassing the usual data join process.
For many visualizations, that’s all you’ll need to know. But as you begin to dream up more complex and interactive pieces, a deeper understanding of selections and how you can manipulate them will make your life a lot easier.
Let’s explore some of the possibilities.
A Closer Look at Selections
What is a selection, really? I am here to demystify this concept for you. (Does that make me a demystic?)
Let’s look closely at a very simple selection. Note the result of d3.select("body") in Figure 12-1.

Figure 12-1. A simple selection
So, a selection contains two arrays, _groups and _parents. We can disregard _parents and also the __proto__ object, which is an essential feature of JavaScript’s prototype-based structure and also way beyond the scope of this book.
Let’s expand _groups, as in Figure 12-2.
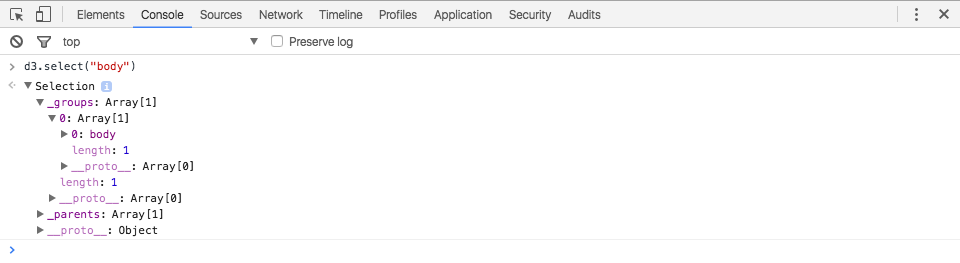
Figure 12-2. Revealing _groups
Ah, _groups contains yet another array, which itself contains a list of elements—only one in this case: body. Let’s expand that further, as in Figure 12-3.

Figure 12-3. body, expanded
In there we see lots of properties associated with body, most of which we’ll never need to know about.
Okay, that’s all well and good, but I’ll ask it again: what is a selection, really?
Let’s try this:
typeofd3.select("body")//Returns "object"
Ah, selections are objects! We already know about objects! It turns out there’s nothing mysterious or mystical here at all. Selections are just very special objects generated and interpreted by D3. You will never manipulate a selection yourself—don’t bother trying to reach into _groups—as that’s what all of D3’s selection methods are for. Still, it’s instructive to use the console to look more closely. At some point, while debugging a project, you’ll need to peek into your selections to figure out what’s going on, so you may as well get comfortable doing so now.
Let’s revisit a line chart from Chapter 11 and try a slightly different selection, d3.select("path"), as shown in Figure 12-4.

Figure 12-4. Selecting a path
This returns a selection of our single path, to which the bound data is stored in the __data__ property, an array of 707 values, in this case. Remember, you can expand __data__ to verify your bound data appears as expected, as in Figure 12-5.

Figure 12-5. Revealing the bound data
What do selections look like when they contain more than one element? Let’s revisit a scatterplot from Chapter 8 and try d3.selectAll("circle"), as shown in Figure 12-6. Remember, select() returns only the first matching item it finds, while selectAll() returns all matching items.
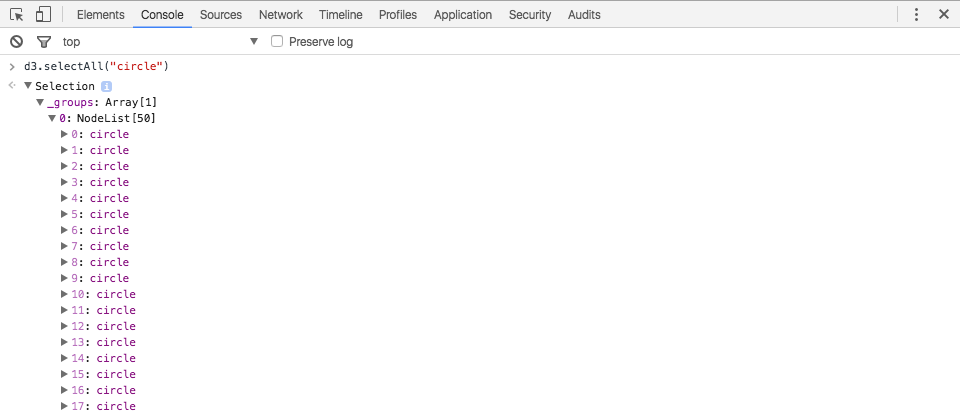
Figure 12-6. Selecting all the circles
As expected, the selection array now includes all 50 circles. Mousing over an element in the selection highlights the corresponding DOM element up above, as shown in Figure 12-7.

Figure 12-7. Mousing over an element to identify it
This is also extremely useful for debugging, as you can manually verify whether or not the values stored in any given element’s __data__ property are expressed visually as you intended.
Getting More Specific
Typically, you use selections in D3’s chained syntax, not as one-off commands in the console. You can leverage this chain syntax to get very specific and select exactly the elements you want.
d3.select() and d3.selectAll() operate at the page level, so we have to start with one of those.
varbody=d3.select("body");varsvg=d3.select("svg");varpaths=d3.selectAll("path");vargroups=d3.selectAll("g");
select() and selectAll() can be chained together, in which case they operate on the preceding selection, instead of the whole page. For example:
varallGroups=d3.selectAll("g");varallCircles=d3.selectAll("circle");varallCirclesInGroups=d3.selectAll("g").selectAll("circle");
Now allCirclesInGroups would store a selection to all circle elements on the page that are contained within (“descendant elements of”) g elements.
You could simplify that as:
varallCirclesInGroups=d3.selectAll("g circle");
While it’s possible to string together adjacent select() and selectAll() statements like this, doing so isn’t common. What’s more common (and more useful) is to modify related elements in succession, starting with those highest on the DOM tree and getting more specific at each step. For example:
d3.select("svg")//Select the first SVG on the page.attr("width",500)//Set its width.attr("height",300)//Set its height.selectAll("circle")//Select all circles *within* that SVG.attr("cx",250)//Set each circle’s cx attribute.attr("cy",150)//Set each circle’s cy attribute.selectAll("title")//Select all title elements *within* circles.text("Circles rock!");//Set the text of those titles
Note that the active selection changes at three different points along this chain.
d3.select("svg")//Select the first SVG on the page.attr("width",500).attr("height",300).selectAll("circle")//Select all circles *within* that SVG.attr("cx",250).attr("cy",150).selectAll("title")//Select all title elements *within* circles.text("Circles rock!");
The select() and selectAll() statements create new selections, and hand those new selections off to the subsequent methods.
Also note, however, that many methods leave the active selection intact. They modify associated DOM elements (such as by setting or changing attribute values), but then merely relay the same selection they received to the following method.
d3.select("svg").attr("width",500)//Receives SVG as selection, hands off SVG.attr("height",300)//Receives SVG as selection, hands off SVG.selectAll("circle").attr("cx",250)//Receives circles as selection, hands off circles.attr("cy",150)//Receives circles as selection, hands off circles.selectAll("title").text("Circles rock!");//Receives titles as selection, chain ends
Thus, when chaining methods together, you must be very careful to pay attention to which methods generate new selections, or you could inadvertently modify the wrong DOM elements.
To minimize this confusion, Mike Bostock recommends using an indentation convention of four spaces when the selection is unchanged, but only two when a new selection is returned. Here is an example from Mike, taken from the d3-selection documentation:
d3.select("body").append("svg").attr("width",960).attr("height",500).append("g").attr("transform","translate(20,20)").append("rect").attr("width",920).attr("height",460);
Let me annotate that, to explain:
d3.select("body")// New selection.append("svg")// New selection.attr("width",960)// Acts on svg.attr("height",500)// Acts on svg.append("g")// New selection.attr("transform","translate(20,20)")// Acts on g.append("rect")// New selection.attr("width",920)// Acts on rect.attr("height",460);// Acts on rect
select() and append() are methods that return new selections. attr() does not, but merely relays whatever selection it just acted on. Note that this example only works because of these elements’ parent/child relationships: body is the parent of svg, which is the parent of g, which is the parent of rect.
Mike uses this indentation convention consistently—you will see it in all of his thousands of examples—and many others in the D3 community have followed suit. So now you know what it means.
I made a conscious decision to not use Mike’s space-based indentation in this book, primarily because, based on my observations teaching D3, it can cause unnecessary confusion to the uninitiated. (“Why are the code blocks wiggling in and out?”) It wouldn’t have made sense to explain the convention until now, 12 chapters in. Also, I’m a tabs guy.
Storing Selections
One more important point from the d3-selection documentation: “Selections are immutable. All selection methods that affect which elements are selected (or their order) return a new selection rather than modifying the current selection.”
That is, once you make a selection, you can’t modify it. You can only make a new one, which could be a subset of the original, and overwrite it (if you like). For example:
//Store new selection in zvarz=d3.select("svg");//Returns a new selection, based on elements in z,//but doesn’t modify the value of zz.selectAll("rect");//Returns the same new selection as above, but then//overwrites z with the newly returned selectionz=z.selectAll("rect");
Also remember that, when you’re storing results in a variable, the selection returned by the last link in the chain is what will be captured. For example, if I were to store the results of my earlier example:
vartitles=d3.select("svg").attr("width",500).attr("height",300).selectAll("circle").attr("cx",250).attr("cy",150).selectAll("title").text("Circles rock!");
…titles would contain a selection of all title elements inside circle elements inside the SVG, which is not particularly useful. It’s more likely I’d want to save a reference to the circles, so I could act on them (and their enclosed titles) later, in which case I could write:
varcircles=d3.select("svg").attr("width",500).attr("height",300).selectAll("circle").attr("cx",250).attr("cy",150);circles.selectAll("title").text("Circles rock!");
That is exactly equivalent to:
varcircles=d3.select("svg").attr("width",500).attr("height",300).selectAll("circle");circles.attr("cx",250).attr("cy",150);.selectAll("title").text("Circles rock!");
Selections are very flexible; I recommend you make and store them in whatever sequence makes the most sense to you, for your project, coding style, and way of working.
Enter, Merge, and Exit
The data join is D3’s essential feature. We discussed it in Chapter 9, but now we can more closely explore the role selections play in this process.
We finished up Chapter 9 with this dynamic bar chart and functions to add and remove values, as shown in Figure 12-8.

Figure 12-8. Bar chart with options to add and remove values
In 01_enter_merge_exit.html, I have added several console.log() statements so we can see what’s going on with each selection change. I recommend uncommenting each statement, one at a time, and exploring them in the console. In case you don’t have your computer handy, I’ll walk you through the most important parts here.
Note
You’ll never modify D3 selections directly, so don’t let the following complexity freak you out. Still, a peek under the hood will deepen your own understanding of D3’s inner workings. Just use D3’s built-in selection methods, and everything will be fine.
The Enter Selection
You’ll remember that we created the bars using the standard selectAll/data/enter/append pattern:
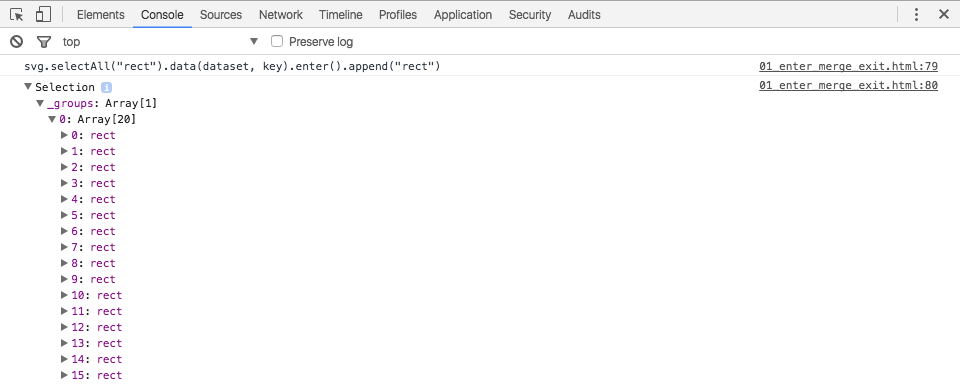
//Create barssvg.selectAll("rect").data(dataset,key).enter().append("rect")…
Let’s look at that first selection, svg.selectAll("rect"):
This looks like a normal, empty selection. (Remember, no rects exist yet!) _groups contains a NodeList array with a length of zero.
Now let’s uncomment svg.selectAll("rect").data(dataset, key):

Interesting! The selection returned from a data join includes both the _enter and _exit subselections. So this is where those things live!
Let’s expand each of those, plus _groups:

_exit contains an empty array, as expected, but look: _enter contains an array with 20 positions. (Confusingly, _groups, despite being empty, has a set length of 20. Please suspend your disbelief for just a moment.) Let’s expand that further:

Aha! Each one is an EnterNode. These are the magical placeholder elements to which data is bound, to be replaced shortly by actual DOM elements.
Let’s expand the first EnterNode:

Fantastic: there is our __data__, bound to the placeholder element, as expected.
Let’s now log the results of using enter() to grab just the enter selection, as with svg.selectAll("rect").data(dataset, key).enter():

Okay, this looks like a normal selection again. Let’s expand _groups:

There are those EnterNodes again! This is not super exciting, but it’s nice to validate that, as promised, enter() merely grabs the enter subselection from a data join and hands that off.
In the final step of the selectAll/data/enter/append pattern, we use append() to add new rectangles, as in:
svg.selectAll("rect").data(dataset,key).enter().append("rect")

This, too, looks like a normal selection. Let’s expand _groups:
Fun! The 20 elements formerly known as EnterNodes are now fully realized rects. D3 has appended a new rect for each placeholder, and here is returning the resulting selection, after the append. We can even verify that the joined data values have transferred over:

You can see the __data__ attached to the first rect. Success!
Merging Selections
The limited interaction for this chart enabled us to add and remove values. Everything described hereafter happens post-click.
After clicking, we log out svg.selectAll("rect") and, as expected, see a selection containing a NodeList array of 20 items:

We bind the new dataset, and, as before, data() returns a selection that includes the enter and exit subselections. Here’s svg.selectAll("rect").data(dataset, key):

Let’s expand the _enter and _exit subselections.

When adding a value (such as by clicking “Add a new data value” in our example), the length of the _enter selection is increased by one. Note that the array’s length is now set to 21, even though the array itself contains only a single EnterNode. D3 is tracking both the total number of elements needed (21) as well as the number of placeholders for new elements (only 1).
At this point, our _exit selection contains an array with a length of 20, despite being empty. This sort of makes sense, because we have only 20 bars so far, and none of them are exiting, so the exit selection is empty.
_groups contains an array with a length of 21, although it actually contains only 20 elements—references to the existing rects. Scrolling down, you can see the final rect has a position value of 19 (the “20th” rect):

As mere mortals, we don’t have to fully understand, let alone agree with, the apparent discrepancies between length values and actual array contents. I’m only pointing this out to show you that D3 is, indeed, tracking what’s going on. As long as you use D3’s built-in methods to manipulate selections and don’t try to alter anything manually, the math will work out.
Now, let’s illustrate how these selections would be different if we had instead removed a data value. Note a numerical shift in the opposite direction; the _enter selection now contains an array of 19 (not 21) items.

Back to adding data values. In the next step, we grab bars.enter():

That’s just the enter subselection from earlier. Again, note the array with a length of 21, but actual contents of a single EnterNode in position 20.
We then append a rectangle for the one placeholder element, using bars.enter().append("rect"):
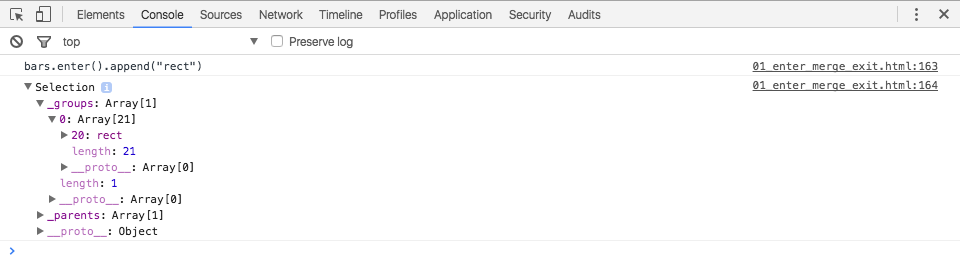
Boom! The EnterNode has blossomed into a beautiful rect.
Having created a new rectangle, we now need to create a selection that includes all the rectangles (the new one plus the existing ones), so we can update all of their visual attributes—x, y, width, height—at the same time. We accomplish that by taking the preceding selection and merging in bars, a selection containing references to the preexisting rects. By convention, this is called the “update” selection, and we create it using bars.enter().append("rect").merge(bars):

There you have it: an array containing all 21 rects. (And yes, if you scroll down, there are actually 21 rects and the length of the array is set to 21. Isn’t is nice when things work out?)
The Exit Selection
Upon clicking “Remove a data value,” after all the data binding, entering, and updating is done, we look at the exit selection, bars.exit():

We see an array containing a single rect. Don’t be misled by the length of 20; there’s only one outgoing rectangle because we only removed a single data value. (Sorry to see you go, little guy.)
Finally, it’s time to say goodbye, so we call bars.exit().remove():

That single rect has been deleted from the DOM, never to be seen again. Yet, interestingly, D3 still returns a selection to the deleted element. If you wanted to, you could store this selection somewhere, in case you needed to access its bound data values or perform some other operation, like put it in a box in your attic.
If any of this is confusing (and how could it not be?), open 01_enter_merge_exit.html, uncomment those log statements one at a time, and step through them at your own pace.
Filtering Selections Based on Data
It’s often very useful to filter selections based on data values.
You might remember the example of conditionally formatted paragraphs from Chapter 5, as shown in Figure 12-9.

Figure 12-9. Conditionally formatted paragraphs
The code driving this is as follows:
vardataset=[5,10,15,20,25];d3.select("body").selectAll("p").data(dataset).enter().append("p").text(function(d){return"I can count up to "+d;}).style("color",function(d){if(d>15){//Threshold of 15return"red";}else{return"black";}});
Note how the conditional logic resides in the style() method. If the value of d exceeds 15, then the color is set to red; otherwise, it’s set to black. This is not a bad approach, but if you wanted to apply any other modifications to the red paragraphs, you’d have to repeat the same logic within each attr() or style() method.
We could rewrite this using filter() to filter the initial selection of all paragraphs. This is equivalent to the preceding approach:
d3.select("body").selectAll("p").data(dataset).enter().append("p").text(function(d){return"I can count up to "+d;}).filter(function(d){//Filter current selection of all paragraphsreturnd>15;//Returns true only if d > 15})//New selection of filtered elements is handed off here.style("color","red");//Applies only to elements in the filtered selection
filter() takes a selection and an anonymous function. If the function returns true for a given element, then that element is included in the new selection returned by filter(). You can see how I’ve maintained the same d > 15 logic from the earlier style() statement, although here it’s tucked next to the return keyword.
We could rewrite that again to store each of these selections separately:
varallParas=d3.select("body").selectAll("p").data(dataset).enter().append("p").text(function(d){return"I can count up to "+d;});varredParas=allParas.filter(function(d){returnd>15;}).style("color","red");
See that code in 02_paragraphs.html. Type allParas and redParas into the console, and you’ll see that allParas includes references to all five paragraphs, while redParas includes only the last two.
Also note that when we create redParas, we start with allParas, and then apply the filter to that selection. There’s no need to be redundant and reselect all the paragraphs with d3.selectAll("p").
For a more visual example, see 03_slider.html, in which we can drag a slider up and down to specify the threshold value used for the filter, as in Figure 12-10.

Figure 12-10. Dragging a slider to filter by value
Yes, that’s our old bar chart with a slider on the side. Here’s the most relevant snippet of code:
//On change, update stylingd3.select("input").on("change",function(){varthreshold=+d3.select(this).node().value;svg.selectAll("rect").attr("fill",function(d){return"rgb(0, 0, "+(d.value*10)+")";}).filter(function(d){returnd.value<=threshold;}).attr("fill","red");});
Whenever you drag and release the slider, the change event is fired. We then grab the current value of the slider, select all rects, set their fill as before, filter that selection based on the threshold value, and make any qualifying rectangles red.
I’ve employed the same principle in 04_radios.html, using radio buttons and a scatterplot, as shown in Figure 12-11.

Figure 12-11. Using radio buttons to set the filter threshold value
But what if we used these radio buttons to apply slightly more complex conditions than simply highlighting values below a simple threshold?
See 05_combinations.html, as shown in Figure 12-12.

Figure 12-12. Using radio buttons to set different conditions on filters
In this example, we can choose None (the default), Center, Edges, or Quadrants. Each case introduces a little more complexity in its filtering logic, but the core principle—start with all circles, then filter to narrow the selection—is the same.
To each() Their Own
The most common purpose of creating a selection is ultimately to modify it in some way, such as by using attr() or style(). But it can be useful to define your own functions, especially for custom calculations or modifications that will be repeated.
Fortunately, we can use each() to run an arbitrary function once for each element in a selection. each() takes whatever selection it’s given and calls the specified function once for each item in the selection.
You can pass in an anonymous function, as in:
selection.each(function(d,i){//The 'this' context is now set to//the element on which you’re acting.////Do something with 'this', d, and/or i here.});
Or pass the name of a function you’ve already defined, as in:
selection.each(zoomAndEnhance);
If you include d and i within your function definition, D3 will hand off those values, as you’d expect.
See an example of this in 06_each.html. I’ve created a simple button, which you can see in Figure 12-13.

Figure 12-13. Scatterplot, prior to calling each() on each circle
This code listens for a button click:
//On button click, execute a function for each circle in the allCircles selectiond3.selectAll("input").on("click",function(){allCircles.each(freakOut);//Hold on to your hats!});
When the button is clicked, all the circles just, like, totally freak out! In a more technical sense, the allCircles selection is passed into each(), which calls the freakOut() function on each element in the selection (i.e., each individual circle on the chart).
As I’ve said, each() is used to run an arbitrary function on a selection. Well, you can’t get any more arbitrary than freakOut():
//Define the freakOut functionvarfreakOut=function(d,i){//Since this function will be called by 'each()',//it will be aware of each element on which it operates.//The 'this' context will be updated, and d and i will//be populated with the associated values.varcolors=d3.schemeCategory20;varcolorIndex=Math.round(Math.random()*20);d3.select(this).transition().delay(i*25).duration(2000).ease(d3.easeElasticOut).attr("fill",colors[colorIndex]).attr("r",25);};
Can you picture in your mind’s eye what this code will do?
Before we get to the big reveal, there are a few serious points to note:
-
Since the
dandiarguments are specified in the function definition, D3 will populate them for you. -
The value of
thiswill also be set by D3 to reflect “the element upon which we’re currently acting.” Sod3.select(this)will create a selection with whatever that element is. -
In
delay()or any other function withinfreakOut(), we can reference the valuesdandidirectly—no need to writefunction(d, i)…, although it has become part of our muscle memory at this point.
Ready to see that in action? I really recommend running 06_each.html yourself—it’s much more fun—but you can get the gist of it in Figure 12-14.
