Appendix D. Sharing Your Code
The D3 community is big on sharing code, whether for showing off new projects and techniques or for asking for help. And let me tell you: people want to help you! But when asking questions, it’s essential to share your code. (Have you ever tried to debug a project without the project itself?)
You are free to publish and share your code however you like, but the most common venues are:
-
bl.ocks.org
-
Bl.ock Builder
-
Gistup
-
Codepen, JS Bin, or similar
-
Normal web server
I’ll walk through each of these options.
bl.ocks.org
Mike Bostock is a big fan of examples. He can’t get enough of them. In 2013, he even gave a great talk making the case for examples titled, yes, “For Example”.
In fact, to encourage us all to create and share our own examples, he built a web service called bl.ocks.org. The blocks service (as I will refer to it, because it is so annoying to type the period in “bl.ocks”) makes it very easy to share your D3 code and projects with others. You can use it to share any kind of code, not just JavaScript and D3, but because Mike built it, it’s sort of optimized for D3 purposes.
Thus, blocks are very popular in the D3 community. Posting a block and sharing the link is a great way to show off your latest project, share a work-in-progress with others, or—most importantly—to get help troubleshooting when you’re at your wit’s end. Before you even begin writing your question on StackOverflow or the D3 Google Group, post a block! Because the very first questions that will be asked in response to your question are “Where is your code? Can you share the blocks link?” Sigh.
The front page of bl.ocks.org showcases the most popular blocks. This is like the leaderboard of the D3 world, as seen in Figure D-1.

Figure D-1. The bl.ocks.org home page
Everyone who contributes gets their own personal blocks page at your_github_username. This updates automatically to show all of your blocks. Unsurprisingly, Mr. Bostock’s blocks page is a fantastic resource, as seen in Figure D-2.

Figure D-2. Mike Bostock’s personal blocks page
Visiting any individual block page displays that block in a 960 × 500 pixel frame, followed by all of the code that went into the block down below. For example, Figure D-3 (ha!) shows one of my blocks.

Figure D-3. A block, majestically titled “Fade to Front”
The sneaky thing is that the actual code for each block lives on GitHub, and is hosted by GitHub’s Gist service. Gists are great for sharing snippets of code, and because gists are Git repositories, they can be cloned, forked, downloaded, and updated in all the usual ways. (If you’re not familiar with Git, don’t worry about this.) Figure D-4 shows the GitHub Gist page for my block.
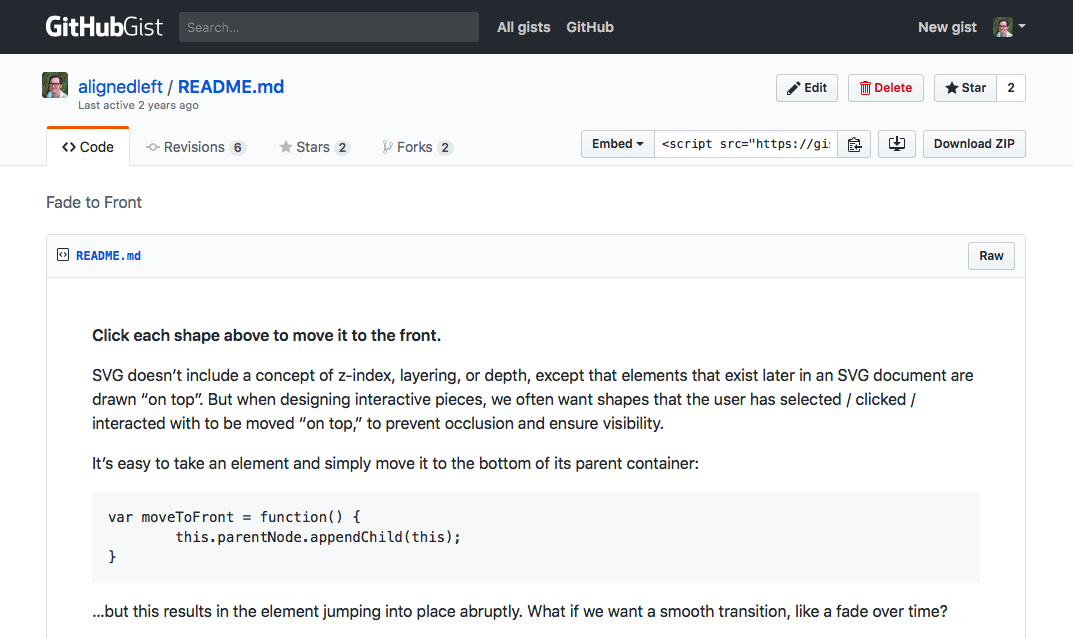
Figure D-4. The gist source code for “Fade to Front”
You can see how the blocks service just takes all that content, packages it more nicely, and hosts it. You could accomplish the same thing yourself by uploading everything to your own web server, but then your personal blocks page would feel so empty. Oh, also, making a gist can be easier.
The URL for any block page is just the gist’s URL (which includes a GitHub username and the gist’s ID), but modified to point to bl.ocks.org. For example, my gist lives here:
https://gist.github.com/alignedleft/9612839
…and its corresponding block page is here:
https://bl.ocks.org/alignedleft/9612839
So, to make a block, you:
-
Make a gist containing index.html and (optionally) a README and thumbnail image.
-
Change the URL.
Let’s step through that in a bit more detail.
Making a Block
First, prepare the files that you want to share as part of the block.
Prepare Your Files
Your files must include at least one HTML file (obviously), but they could also include any external datafiles (such as JSON or CSV files) and anything else referenced by your page. Here are the requirements:
Your HTML file must be named, precisely, index.html.
Seriously, you can’t call it Index.html (with a capital “I”), index_2.html, indexFINAL.html, or anything else. Just name it index.html.
There’s no need to include d3.js as part of your gist; instead, just edit the src path in your document’s <head> to reference the copy hosted on d3js.org. For example, in your local copy, you are most likely referencing a local copy of D3:
<script type="text/javascript" src="d3.js"></script>
Make sure to change that to something like this:
<script type="text/javascript" src="https://d3js.org/d3.v4.js"></script>
Or, save Mike a few bytes of bandwidth by referencing the minified version:
<script type="text/javascript" src="https://d3js.org/d3.v4.min.js"></script>
It’s nice if your example fits within a 960 × 500 pixel frame, as that’s what the service will use to display your content. If your graphic is larger than that, visitors can always click the “Open in a new window” link to see the entire thing.
Optionally:
-
Include a file called README.md that tells us a bit about what we’re looking at. That should be a Markdown-formatted file.
-
Include a 230 × 120 pixel PNG image named thumbnail.png, and that image will appear on your personal blocks page.
Upload Your Files
Go to https://gist.github.com.
If you don’t already have a GitHub account, create one and then log in.
Technically, you can create gists and blocks anonymously, but I don’t recommend it. It is always much harder to find anonymous blocks again later, they can never be deleted, and you won’t get the benefit of seeing all your blocks on your personal blocks page.
Now you should be on the “new gist” page, which appears as shown in Figure D-5.

Figure D-5. Ready to make a new gist
Find your files on your desktop and drag them directly onto the browser window to upload them. Or, open each file individually in your code editor, and copy and paste the contents into the gist window. Click the “Add file” button to create space for pasting in additional files.
Enter a brief description, if you like. This will appear as the page title on the blocks page.
Finally, click the “Create public gist” button!
Note the URL in the address bar, which will look something like:
https://gist.github.com/alignedleft/9612839
In the address bar, replace the gist.github.com portion with bl.ocks.org, and hit Enter. Now you should be looking at:
https://bl.ocks.org/alignedleft/9612839
…and your first block!
Gist-to-Blocks Browser Extensions
If this last step of tweaking the URL annoys you, install one of the browser extensions for Chrome or Firefox. These extensions simply add a clickable bl.ocks.org link to every gist page, to spare you the hassle of changing the URL yourself. For example, Figure D-6 shows my gist as it normally appears.

Figure D-6. The normal appearance of a gist page
…and Figure D-7 shows it after the browser extension is installed.

Figure D-7. My gist page after I install the blocks browser extension
Can you spot the difference? (See Figure D-8.)

Figure D-8. Highlighting the subtle shortcut added by the blocks browser extension
Revising Your Blocks
Revising your block later is simple: it’s just a matter of revising your gist.
Note the Edit button at the top of each gist page. Click that, paste in your updated files, and choose Update Gist. (Or, see hereafter for a more Git-friendly method.)
Warning
When you revise a gist, there may be about a five-minute delay before changes are visible on the blocks service, due to caching. So don’t make a change, then refresh the page a million times until your change shows up. Instead, save your changes, casually make a cup of coffee or tea, then hit reload. Mike built this thing, and he pays for the hosting and bandwidth out of his own pocket. Be nice!
When you make changes to a gist, you can view its version history in the Revisions tab. You can see the most recent changes I’ve made to this gist in Figure D-9.

Figure D-9. Revision history of a gist
By default, GitHub and the blocks service show the most recent version of a gist. But once in a while, you may want to share a link to an earlier version. If that’s the case, just click the View button next to any one of the revisions shown. Note the added identifier in the URL, such as:
https://gist.github.com/alignedleft/9612839/dd2d3c8828f03b03223674cdb4c0b2ef6bf0406e
To link to a block showing this version, simply tweak the URL as just described, taking care to leave the version identifier in place. (Or, just click the bl.ocks.org browser extension link.)
Bl.ock Builder
You’re not alone if you read the preceding section and thought, “That’s too many steps!”
Ian Johnson, creator of Tributary and D3 community organizer, recently built Bl.ock Builder, a new tool that streamlines the process of creating, forking, and editing blocks.
It is so simple to use, it hardly requires explanation. But here are the steps:
-
Click the “Start coding” or “New” buttons.
-
Write some code.
-
Click “login” to link the service to your GitHub account.
-
Click “Save.”
Easy, easy, easy! Thank you, Ian, and thank you to everyone who contributed to Ian’s successful Kickstarter campaign, so he could get paid to create this!
Bl.ock Builder extends the URL convention established by the blocks service, so you can load any block into Bl.ock Builder by simply modifying the domain in the URL. For example, my block from earlier can be found here:
http://blockbuilder.org/alignedleft/9612839
See how it appears in Figure D-10.

Figure D-10. My block, as viewed on Bl.ock Builder
Let’s consider what this means. You could take any of the thousands of D3 examples out there and be coding on your own copy within seconds, all in the browser. The simplicity of this interface belies the depth of magical infrastructure behind the scenes.
As if that weren’t enough, Bl.ock Builder’s search feature lets you search all the D3 blocks by everyone. It’s especially useful to search by the API method you want to see examples for (such as d3.geoPath()). Then, in seconds, you can be editing your own copy, exploring, figuring out how the darn thing works.
Making a Block with Gistup
Sometimes after spending the entire workweek crafting gorgeous data visualizations, you are just so tired of, well, looking at beautiful visuals. (I know I am.) On those days, when you crave an old-school interface, you may want to check out Gistup, a command-line tool that lets you create and update gists (and, by extension, blocks) directly from the terminal. Surprise, surprise: Gistup was developed by Mike Bostock.
The Gistup README is quite clear, so I will refer you there for all the gory details. But once you’ve installed and set up Gistup, it’s quite easy to create a new gist. In the terminal, navigate to the directory whose files you want in the gist, then type:
$ gistup
Even I can remember that.
Gistup will post all the files in the working directory to a new gist, and then magically open your web browser and take you directly to the page for that new gist. From there, of course, you can modify the URL (swapping gist.github.com for bl.ocks.org) or click the bl.ocks.org button (if you installed the handy browser extension).
To revise your gist (and block) later, use regular Git commands. (I won’t introduce Git here, but if you’ve used it before, the following will be familiar.) For example:
$ git commit -am "Made an update"
$ git push
A Normal Web Server
Lastly, you can always upload your files to a regular web server somewhere, and then share the URL with others, just like publishing a regular web page. This means you don’t have to rely on anyone else’s tools, but the potential downside is it’s harder for others to duplicate (fork) your code to suggest helpful changes. Really, when you share your code asking for help and someone doesn’t just answer your question but actually fixes the problem for you—well, that is just the best feeling.