
Chapter 3. Getting Started
In this chapter, you will create a prototype of the vacation statement, which is the application main page. You will also create the first version of the diagram for the process that is at the heart of the vacation management application.
Create the Application Prototype
In this section, you will create a prototype of the main page of the vacation management application. This is a critical step in validating the design with Helen, so it is good to do this right at the start of development. You can create a prototype page that uses dummy data but behaves like the final page.
Review “Example Application: Vacation Management” in the previous chapter before you begin.
You need a title for the page, so first you can address Helen’s requirement to give the application a cool name...
Hi Helen, this is Fred from the IT development group. I’ve been looking at your requirements for the Vacation Management Application. I agree it’s important to give it a cool name so everyone wants to use it. Something that says holidays, a sunny beach, blue ocean...Tahiti. Let’s call it Tahiti!
A page is constructed from widgets, each widget corresponding to an item displayed on the screen. A widget has properties that determine its behavior. You can group widgets into a container and set some properties on the container. You can drag and drop widgets and containers to arrange them on the page.
The Tahiti application page has three sets of information:
- An introduction, which identifies the page and the current user.
- My vacation, showing the current user the details of their vacation requests and availability
- Team vacation, which is only displayed to managers, showing the current user the details of their team’s vacation availability and a list of requests to review.
The following sections explain how to create the page with these sets of information, and how to create the variables and dummy data to test the page structure.
Create the Page and Add the Introduction
To create the prototype page, follow these steps:
-
In the Bonita BPM Studio Welcome page, click the UI Designer icon. This opens the UI Designer in your browser (Figure 3-1).
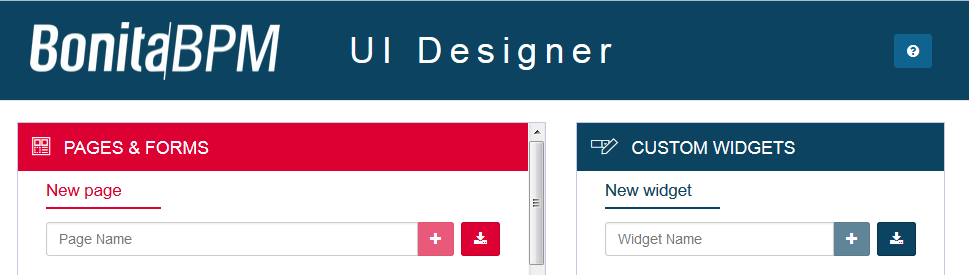
Figure 3-1. UI Designer home page
- In the “New page” box, enter the name of the page you want to create, TahitiVacationManagement, and press Return. This opens the Page Editor with an empty whiteboard.
- Drag a Container widget from the Widgets panel on the left side onto the whiteboard in the center of the screen. This will contain the page introduction, which is the name of the current user, the application title and logo, and some introductory text.
- Drag a Text widget into the container. In the properties panel on the right of the whiteboard, change value of the Width property to 2 and change the Text property to IMAGE. This is a placeholder for a logo that you will add later.
- Drag a Title widget into the container to the right of the IMAGE placeholder. Set the Width to 7. Set the Title level to Level 1. Set the Text to Tahiti Vacation Management.
- Drag a Text widget into the container to the right of the title. Set the Text property to username.
- Drag a Text widget into the container, below the title. This will create a new row. Set the Text property to a welcome message, something like this: Welcome to the Tahiti Vacation Management Tool. Here you can see how many days of vacation you have available, see the status of your vacation requests, and submit a new vacation request.
- Drag another Text widget below the one that you just added. Set the Text property to a welcome message for managers, something like this: If you are a manager, you can see the vacation status for your team and review pending requests. Managers will see both welcome messages.
- Click Save, and then click Preview. You will see something like Figure 3-2:
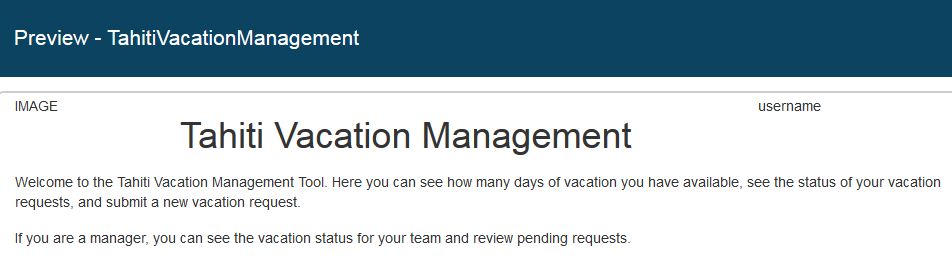
Figure 3-2. Preview of the Tahiti page prototype introduction
Add My Vacation Information
To add the information about the current user’s vacation, first you will need to create variables. Variables are used to define the initial values of widgets. Variables are also used to store information such as the vacation request selected by the user, or to implement some logic in order to hide or display widgets.
We use JSON variables in the prototype to match the data format that will be used later when we will switch to API calls to set variable initial values from real data. You can learn more about JSON on json.org.
-
Create a JSON variable for the number of days of vacation available to the user. Follow these steps:
- In the Variables tab below the whiteboard, click “Create a new variable.”
- Set the Name to
myVacationAvailable. - Set the Type to JSON.
-
In the Value field, remove the braces that are added by default and enter the following:
[{"daysAvailableCounter":8}]
-
Create a JSON variable called
myVacationwith the following content:[{"requesterId":"3","startDate":"2015-08-21T00:00:00.000Z","numberOfDays":2,"returnDate":"2015-08-22T00:00:00.000Z","status":"pending"},{"requesterId":"3","startDate":"2015-09-01T00:00:00.000Z","numberOfDays":4,"returnDate":"2015-09-07T00:00:00.000Z","status":"approved"},{"requesterId":"3","startDate":"2015-12-21T00:00:00.000Z","numberOfDays":4,"returnDate":"2015-12-28T00:00:00.000Z","status":"pending"},{"requesterId":"3","startDate":"2016-03-01T00:00:00.000Z","numberOfDays":4,"returnDate":"2016-03-04T00:00:00.000Z","status":"approved"},{"requesterId":"3","startDate":"2016-07-13T00:00:00.000Z","numberOfDays":1,"returnDate":"2016-07-22T00:00:00.000Z","status":"refused"}]This is an array of five vacation requests that you can use an as example in previews of the application page.
- Add a JSON variable called
selectedRowwith an empty value (do not enter a value; just leave the proposed Value field as it is, with empty braces, {}). This variable will be used to store information about the selected vacation request. It is also used to initialize thecopySelectedRowvariable, which you will create next. -
When a user edits a vacation request we need to be sure that the original request information is left unchanged in the table. To do this, we need to have a copy of the selected row information. We create this copy by adding a JavaScript expression variable called
copySelectedRowwith the following value:if($data.selectedRow.original!==null){$data.selectedRow.copy=angular.copy($data.selectedRow.original);$data.selectedRow.original=null;}
Now you can use the variables you have created in some page widgets:
- Add a Container widget below the introduction container, to hold the information about the current user’s vacation.
- In the container, add a Title widget with Title level set to Level 2 and Text set to My vacation.
- Below the title (but still inside the container), add an Input widget. Check the radio button to make this field read-only. Set the Label to Vacation days available. Set the Label position to left. Set the Value to point to
myVacationAvailable[0].daysAvailableCounter.myVacationAvailableis an array that contains a single object; this object has one attribute nameddaysAvailableCounterthat stores the number of vacation days available for the current user. When you start typing, the matching variable names are displayed and you can selectmyVacationAvailableNumberfrom the list. Note that completion is not available for the attributes of variables. - In the same row as the Input widget, add a Link widget. Set the Style property to primary, which makes the link look like a button. Set the Width property to 4. Set the Text property to Create new vacation request. You can ignore the other properties, because in this prototype the link is not clickable. In the real application, the user will click this button to go to the form to create a new vacation request.
-
Add a Table widget with the following properties:
Property Setting Headers Start date, Number of days, Return date, Status Content Bind (click fx button) to the variable myVacationColumn keys startDate | date, numberOfDays, returnDate | date, status Selected row Bind to the variable selectedRow.original - Below the table, add two Date picker widgets, labeled Start date and Return date. Set the width for each to 4 so they are in the same row. Set the Value properties to selectedRow.copy.startDate and selectedRow.copy.returnDate, respectively. These widgets should be hidden if no row is selected, so set the Hidden property for each one. To do this, go to the property, click fx, and in the field that appears, enter this expression: !selectedRow.copy. This is called binding the property to the value of the expression.
- Beside the Return date widget add an Input widget. Set the Label to Number of days. Set the Value to selectedRow.copy.numberOfDays and the Type to number. Bind the Hidden property to
!selectedRow.copy. -
On a new row add two Button widgets, labeled Cancel selected vacation and Modify selected vacation. Set the width for each to 6 so they are in the same row. Set the alignment of the Cancel button to right. These buttons are hidden unless a relevant vacation request is selected in the table, so you need to set conditions that control when to display the buttons, as follows:
- For the “Modify selected vacation” button, bind the Hidden property to
selectedRow.copy.status!=="pending". This means that if the status of the selected request is not pending, or if no request is selected, the button is hidden. For the “Cancel selected vacation” button, bind the Hidden property to:
!(selectedRow.copy&&selectedRow.copy.status=="refused")This means that the button is hidden if no request is selected, or if the selected request was refused.
- For the “Modify selected vacation” button, bind the Hidden property to
- If you are using Bonita BPM 7.0.* or 7.1.*, you need to add a workaround to initialize the
copySelectedRowvariable. Add an Input widget and set the Value to copySelectedRow. Hide the widget by setting the CSS classes property to visibility: hidden. - Click Save, and then click Preview. The “Cancel selected vacation” and “Modify selected vacation” buttons are only displayed when a relevant vacation request is selected in the table. For example, if you select the first pending request, you will see something like Figure 3-3.
In the Preview, if you select an approved request, the “Cancel selected vacation” button is displayed, but the “Modify selected vacation” button is not because you cannot modify an approved request. If you select a request that was refused, no buttons are displayed.
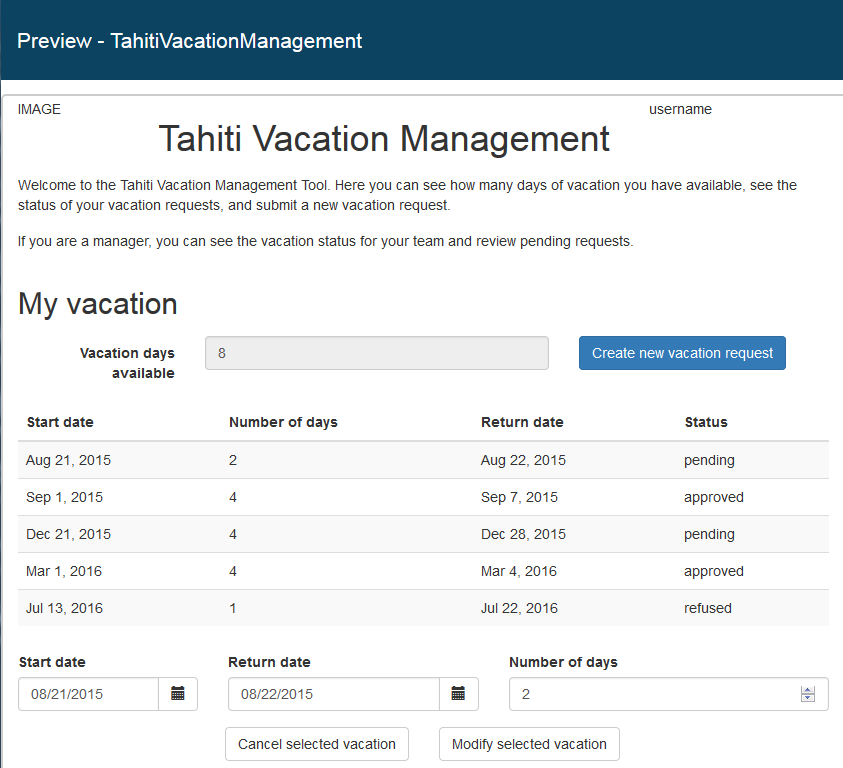
Figure 3-3. Preview of the Tahiti page prototype introduction and My vacation
Add Team Vacation Information
Before you can add the vacation information about the current user’s team members you need to create two new variables:
-
Create a JSON variable called
managerTeamInfowith the following content:{"isManager":true,"employeesVacationRequests":[{"firstName":"April","lastName":"Sanchez","startDate":"2015-12-09T00:00:00.000Z","returnDate":"2015-12-11T00:00:00.000Z","numberOfDays":2,"status":"approved","taskId":"123"},{"firstName":"April","lastName":"Sanchez","startDate":"2015-09-01T00:00:00.000Z","returnDate":"2015-09-07T00:00:00.000Z","numberOfDays":4,"status":"pending","taskId":"456"},{"firstName":"Walter","lastName":"Bates","startDate":"2015-11-09T00:00:00.000Z","returnDate":"2015-11-12T00:00:00.000Z","numberOfDays":2,"status":"pending","taskId":"789"}],"employeesVacationAvailable":[{"firstName":"Walter","lastName":"Bates","daysAvailableCounter":6},{"firstName":"April","lastName":"Sanchez","daysAvailableCounter":18}]}This is a complex JSON object that stores all the information about team vacation for a manager:
isManagerindicates whether the current user is a manager based on organization information. This variable attribute will be used in conjunction with the Hidden property to determine whether to show or hide the information that is only relevant for managers. In the real application page, the value will be set by referencing information about the current user, but in the prototype, you will set the value to true or false as a shortcut.employeesVacationRequestsprovides the list of vacation requests for employees managed by the current user.employeesVacationAvailableprovides the list of vacation available for the employees managed by the current user.
- Create a JSON variable called
teamSelectedRowwith no content (just empty {} braces).
Now you can use these variables you have created in some page widgets.
First, use the managerTeamInfo.isManager variable to set a condition on the manager welcome message that you have already created, by configuring the Hidden property. When managerTeamInfo.isManager is false, Hidden evaluates to true and the manager welcome message is not displayed. Follow these steps:
- Select the manager welcome message widget and go to the Properties panel on the right of the whiteboard.
-
In the Hidden property, click the bind icon at the right of the field, then enter this value:
managerTeamInfo.isManager==false -
Check that the condition on the manager welcome message is defined correctly:
- Edit the
managerTeamInfovariable by clicking the Edit icon in the Variables tab and setting theisManagerattribute value to false. - Save the page and preview it. The manager welcome message (You can also see...) should not be displayed.
- Edit the
managerTeamInfovariable again and set theisManagerattribute value back to true.
- Edit the
Now add new widgets to display the team vacation requests information:
-
At the bottom of the page add a Container widget. In the container properties, bind the Hidden property to the same value that you used for the manager welcome message:
managerTeamInfo.isManager==falseThis means that the container will be displayed to users who are managers, but will be hidden otherwise.
- Add a Title widget with Title level set to Level 2 and Text set to Team vacation.
- Add a Tabs container inside the container. By default, two tabs are created. Click each tab in turn and change the Title property, so that the tabs are labeled Vacation available and Vacation requests.
-
Configure the Vacation available tab by adding a Table widget with the following properties:
Property Setting Headers First name, Last name, Days available Content Bind to the variable managerTeamInfo.employeesVacationAvailable Column keys firstName, lastName, daysAvailableCounter Save and preview the page. The team vacation available information will look something like Figure 3-4.

Figure 3-4. Preview of the Tahiti page prototype team vacation availability
-
Configure the Vacation requests tab by adding the following:
-
A Table widget with the following properties:
Property Setting Headers First name, Last name, Start date, Number of days, Return date, Status Content Bind to the variable managerTeamInfo.employeesVacationRequests Column keys firstName, lastName, startDate | date, numberOfDays, returnDate | date, status Selected row Bind to the variable teamSelectedRow -
A Link widget with the following properties:
Property Setting Hidden Bind to teamSelectedRow.status!=="pending” Text Review selected vacation request Alignment center Style primary You can ignore the other properties because in the prototype page the button is not clickable.
-
-
Click Save, then click Preview. In the preview, you can switch to a tab by clicking the tab title. The team vacation requests information will look something like Figure 3-5:
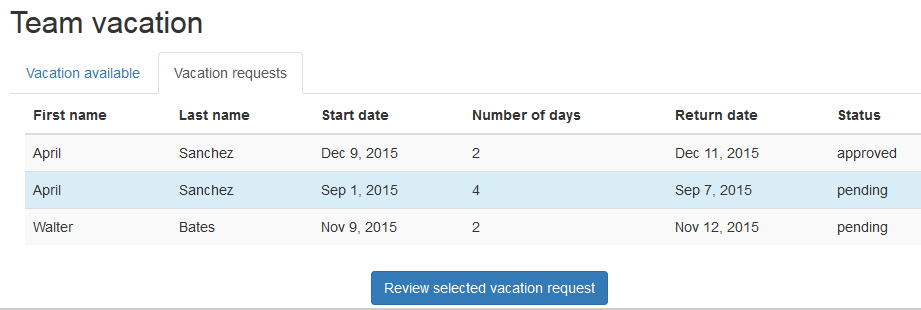
Figure 3-5. Preview of the Tahiti page prototype team pending vacation requests
- Go to the Variables tab and temporarily change the value of the
managerTeamInfo.isManagervariable to false. Preview the page again and verify that the manager welcome message and the team vacation container are hidden.
When you have configured all the information in the page, the whiteboard view of the page in the Page Editor will look something like Figure 3-6.
You have now completed the prototype page for the Tahiti application. You can validate the design with Helen, then start work on the process diagrams.
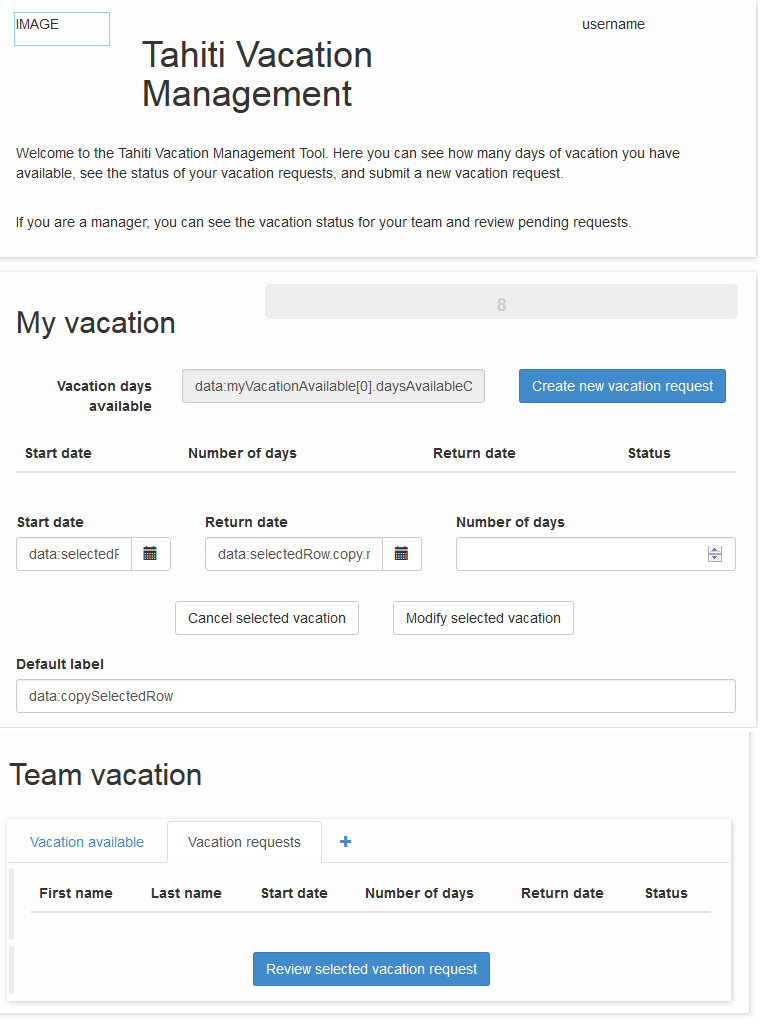
Figure 3-6. Tahiti page prototype in the Page Editor whiteboard
Create Your First Process Diagram
In this section, you will create your first process diagram. This is just the first iteration, and the diagram will be updated and refined in subsequent chapters as you learn what the components mean. For now, though, your goals are to get used to using the Studio, and to get a quick visual representation of the process that is at the heart of the application, without worrying about the details.
When you update a process definition or other information in the Studio, save your work from time to time by clicking the Save icon in the top bar or by typing Ctrl-S.
Follow these instructions to create a BPMN diagram that is equivalent to Figure 2-1:
-
In the Bonita BPM Studio Welcome page, click the New Diagram icon. This creates the beginning of a new process diagram and opens it for edit (see Figure 3-7).

Figure 3-7. New diagram in Bonita BPM Studio
-
Give your diagram a name (instead of the default, MyDiagram):
-
Click on the whiteboard outside the diagram, then go to the Details panel and click the Edit button next to the Name field. A popup opens, as shown in Figure 3-8.
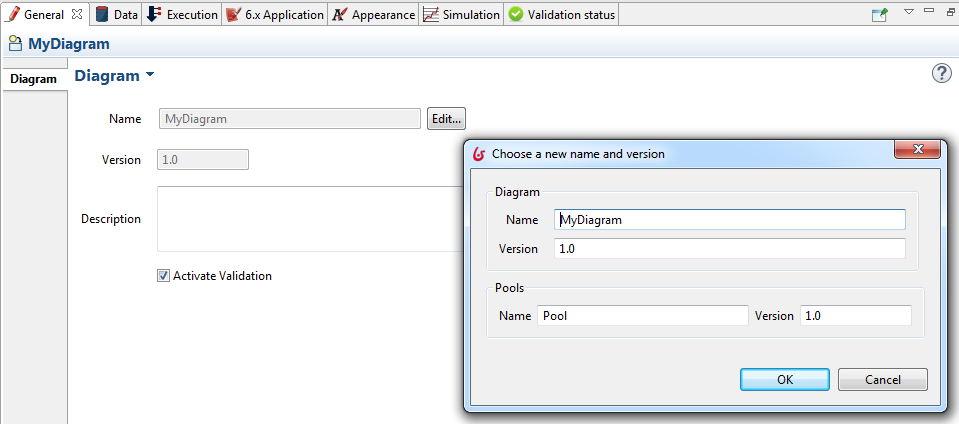
Figure 3-8. Renaming a diagram in Bonita BPM Studio
-
In the popup, enter the name for the diagram, Tahiti-NewVacationRequest, and a new name for the Pool, New Vacation Request. You will find out more later about pools and lanes and why they are useful. For now, just change the name from the default, Pool, so you can identify it later. Now your diagram looks like Figure 3-9:
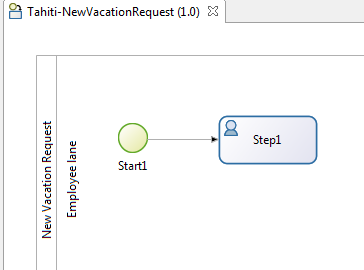
Figure 3-9. Renamed diagram in Bonita BPM Studio
-
-
Create the task where an employee submits a vacation request. The diagram already contains a human task, called Step1, so you can just rename it:
- Click Step1 to select it, and go to the Details panel.
- In the Name field, enter the new name for the step, Submit vacation request. The new name appears on the step in the whiteboard.
This task is a placeholder for a form that you will add later.
-
Add the task where the employee’s manager reviews the request:
- Go to the BPMN elements palette on the left of the whiteboard, click the icon for a human task, and drag it to the whiteboard. When you drop the icon, it creates a new task and selects it.
- Go to the Details panel and enter the name for the step, Review request.
-
Connect the request step to the review step:
-
Click the request step to select it. You will see some icons at the edge of the selected area. This is called the context palette (Figure 3-10).

Figure 3-10. The selected step is highlighted
- Click the link icon (the arrow on the right of the task) and drag it to the review task. This creates a link between the two tasks.
-
-
There is one more task in the process, but it applies only if the manager refuses a request, so first you need a branch point to represent this condition. Branch points are known as gateways, and here you need an exclusive (XOR) gateway. You will come back to gateways in more detail in Chapter 8. To add the gateway:
- Go to the BPMN elements palette and find the icon for an XOR gateway.
- Drag the icon to the whiteboard and drop it after the review step.
- Connect the review step to the gateway by selecting the step and dragging the link arrow to the gateway.
- Change the name of the gateway by selecting the gateway in the whiteboard and entering the name in the Details panel. Call the gateway Request approved?.
- Add a task for informing HR when a request is refused. This is an automatic task that sends an email message. It is done by the system, not a person. The procedure for adding the service task is the same as for the review task (step 4), but this time you need to select the service task icon. Name this task Notify HR request refused.
-
Connect the gateway to the HR task. Then add a label, no, to the link, by selecting the link and entering the label in the Name field in the Details panel. Now your diagram looks something like Figure 3-11:

Figure 3-11. The diagram contains all the steps
-
To finish the diagram, all you need to add are the ends. There are two ways this process ends: after the manager approves the request, and after the manager’s refusal is logged with HR.
- First, add the end after approval. To do this, find the terminate end event icon in the BPMN elements palette, drag it to the whiteboard, and drop it below the gateway. Then add a link from the gateway to the end point, and label it yes.
- Now add the end after the HR notification task. To do this, drag the terminate end event icon from the palette to the whiteboard and drop it beside the task, and add a link from the task to the end point.
Now the first version of the diagram is finished, and looks like Figure 3-12:
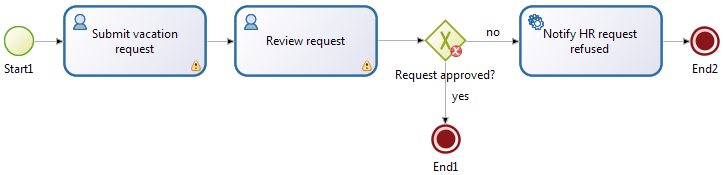
Figure 3-12. The first iteration of the diagram is complete
Notice the dot on the gateway. This indicates that there is an error in the gateway configuration, because the condition test for which branch to take is not yet defined. You will complete this in Chapter 8. The triangles are warnings; they indicate that some required information is not specified, so it is normal to see warnings at this stage when the diagram is incomplete. You can ignore them for now, but remember to check that there are no warnings in your final process diagram.
Run the Process
At any time while you are developing a process diagram, you can run the process by clicking the Run icon on the top bar. You can run the process now to check for errors, even though at this early stage it does not display any useful forms or produce any results. It is a good idea to run the process after each change to make sure that no errors have been introduced.
Summary
You have created a prototype of the vacation statement, which is the application main page. You have also created the first version of the diagram for the process that is at the heart of the vacation management application. Even at this early stage, the diagram is the key reference for everyone involved in the application development, to make sure that the process specification is correct and clear.
The next chapter looks at how this process is started and stopped, and how it fits into the Tahiti application as a whole.