Chapter 6. Tackling More Complex Objects

BY NOW, YOU’RE GETTING to know your way around a marker or two. Give yourself a congratulatory fist bump on the shoulder—well done! You can start to bring figures and faces into your presentations now, and I’ll bet that anything you draw on the whiteboard in meetings will already be improving, even with just a few frames and separators.
It’s time to take it up a gear and tackle some more complex—and more interesting—objects. For this, we’ll look at drawing “inside out,” not “outside in” like you might already have been doing, and then applying that technique to objects that come up in the world of products and services.
In particular, we’ll focus on sketching hands, in various positions and holding products (such as mobile phones).
Let’s Go Inside Out
Want some good news? If you can draw the objects in the previous chapter, based on one shape (like a rectangle or circle), you can draw just about any object you want. It’s all a matter of seeing those basic shapes within whatever it is that you want to draw and then drawing those shapes as foundation lines to help you sketch the entire thing.
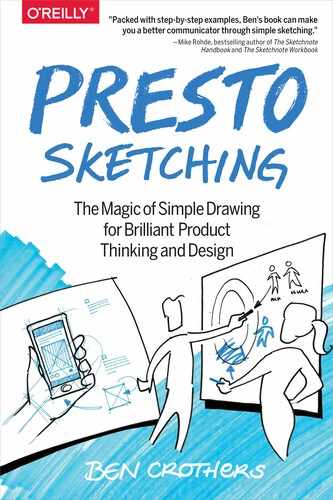
Let’s break it down. Figure 6-1 shows a picture of a pair of headphones on the left. On the right is another picture for which I’ve turned on my mental X-ray machine, showing the simple shapes that I see. Do you see the two semicircles for the speaker bits? Do you see how the soft parts that go against the ears are sort of like rectangles?
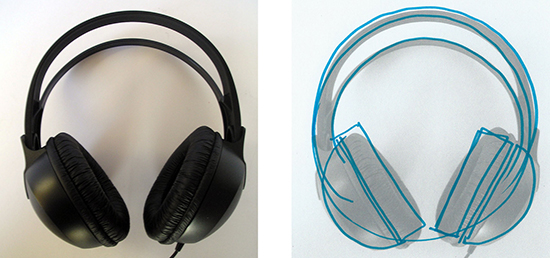
Figure 6-1. See the shapes within the object: A pair of headphones (left), and my foundation lines over the top (right), picking out simple shapes in the form of the headphones. (Photo credit: Alvimann, from morguefile.com).
I then sketch those shapes in pencil or a light color (such as the blue I used here), because, as you’ll see, I’m going to then sketch over the top of the foundation lines.
In Figure 6-2, the image on the left shows the foundation lines by themselves, just like I would have drawn them on a piece of paper. The foundation lines are quite rough, but they won’t really be seen much in the final picture.
Now I can grab my black marker and draw over the top of those foundation lines, using them as a guide (Figure 6-2, right). As you can see, as soon as black is added over the top of the blue color (or light gray if you’re using pencil), the foundation lines visually recede to the background, and the black jumps forward. Nice, eh? It gives drawings a bit of architectural panache, too.

Figure 6-2. Draw the shapes within the object: Foundation lines of the headphones by themselves (left), and then my black marker drawing over the top of the foundation lines.
The foundation lines technique is a really forgiving way of sketching something, and having the “guidelines” underneath is good for building up your confidence when it comes to sketching the final version. In this way, you’re sketching “inside out.”
When most people try to sketch something, they tend to sketch “outside in”; they look at the perimeter of the object—the overall shape—and try to sketch that first. That’s the difficult way. You’ll find you get much more satisfying results if you sketch inside out, by looking for those internal shapes and then drawing them as foundation lines.
Let’s go through it again, this time with two other objects that are a little more visually complex (Figure 6-3). Here are the steps again:
Look. Look at what it is you’re sketching.
See the shapes. Look “into” the object and break it into several simple shapes.
Sketch the shapes. You can do a rough sketch; it doesn’t matter.
Sketch over the top. Sketch the object using your foundation lines as a guide.

Figure 6-3. Can you see the shapes in Albert and Floyd? Sketching objects from observation using the foundation lines technique.
Notice with the flamingo example in Figure 6-3 that you can use foundation lines to describe just certain parts of the object, like the S-shaped neck. I really like this technique. It makes sketching so much more fun, and in the end, I always end up with something nicer than if I hadn’t use foundation lines. Rest assured, though, we’re still doing Presto Sketching here; we’re still aiming to sketch the essence of each object, not all of it.
This technique has a second and more powerful benefit, that’s going to become more important later on in this book: seeing simple shapes inside objects helps us to tap into our natural pattern-seeking behavior and hones our observation skills. Right now, it’s helping us look at things better; later, it’s going to help us listen and synthesize better, too. Excited much?
Let’s try the foundation lines technique again. This time, we’ll use the technique to help us sketch objects from memory (Figure 6-4). Here’s how we’ll proceed:
Think. See the object in your mind’s eye and break it into several shapes.
Sketch the shapes. Sketch those shapes. You can do a rough sketch; it doesn’t matter.
Sketch over the top. Sketch the object using your foundation lines as a guide.
Finish up. Add a bit of detail if you think it will help bring out the essence.

Figure 6-4. Exercising the mind’s eye: Sketching objects from memory using the foundation lines technique.
Over time, you’ll see those foundation lines with your mind’s eye already on the paper, tablet, or whiteboard, and you’ll be more confident in drawing the object without needing to draw the foundation lines first. Magic!
Some Object Libraries for You to Sketch
Let’s get into some other objects that are fun and rewarding to sketch. I’ve grouped these into various domains, and each domain has a variety of shapes to try. Some are easier than others, but it’s a good idea to try sketching all of them; it will increase the number of objects in your own visual library, and as we’ll find out, the more you have the more you can combine them to make new meaning.
Take a look at the collections of objects in the following groups:
Figure 6-5: Business and work objects
Figure 6-6: Home objects
Figure 6-7: Nature objects
Figure 6-8: Hipster objects

Figure 6-5. Business and work objects: A set of business and work objects, and things going places.
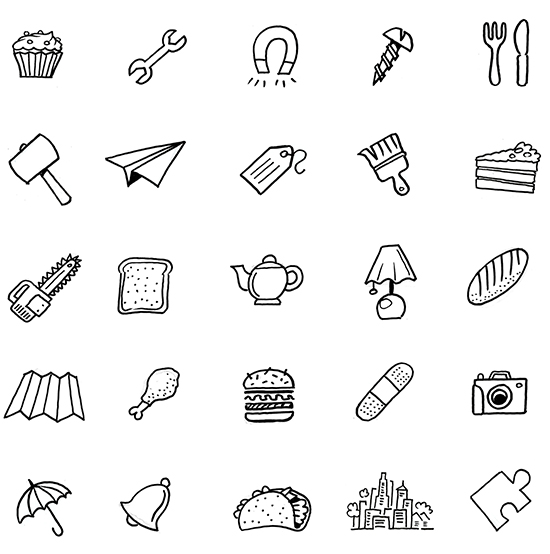
Figure 6-6. Home objects: A set of household objects, and things you might find around the house.

Figure 6-7. Nature objects: A set of nature objects, with a variety of animal and vegetable, and a bit of mineral.
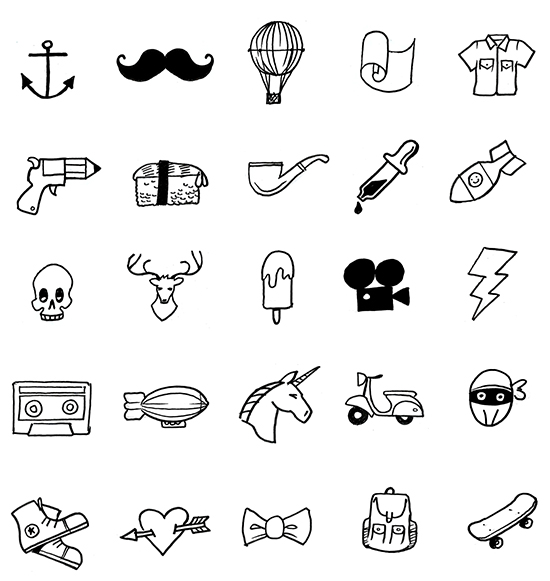
Figure 6-8. Hipster objects: A set of hipster objects—but I bet you were sketching these things before they became cool, right?
Exercises
 Exercise 6-1: Find the shapes in an image near you
Grab an existing picture of something you like, perhaps from a photo (printed) or a magazine. Try seeing “into” the picture; break it into simple shapes, and draw those shapes over the top of it. But make sure that you don’t draw over the top of your uncle’s super rare and expensive first edition copy of something. He probably won’t appreciate your simple shapes over the top of that.
 Exercise 6-2: Draw that image using foundation lines
Use that same existing picture of something you like, but this time reproduce the shapes you drew onto a fresh sheet of paper or in your sketchbook as foundation lines. Make sure that you use something light, like a pencil or a tint marker. Now, grab your black marker and complete your sketch of the object using your foundation lines as a guide. Go ahead and show it off to anyone around; I’ll bet it looks pretty ace.
Exercise 6-3: Sketch your favorite objects
Look back over the examples of objects in Figure 6-5 through Figure 6-8, and have a go at drawing 10 of your favorites. Use shapes and foundation lines as your guide, and fill a page. Remember, please don’t be hard on yourself if your sketches don’t look like mine. What’s important is that you practice, and that you think about capturing the essence of the object.
Exercise 6-4: Treasure hunt
Take a look around you, and have a go at sketching some objects you find. This is as much about practicing observation as it is about developing sketching dexterity. Go easy on yourself and pick an object based on a basic shape first (like a rectangle or circle), before you pick a more complex object. Remember: essence.
Exercise 6-5: Sketch how to make a pizza again
Just like you did for Exercise 1-1 in Chapter 1, draw how you make a pizza, except this time, take a little longer and pay more attention to how you render each part of your sketch. Use the foundation lines technique, and go for something a little more ambitious. How does your sketching now compare to your first sketch of how to make a pizza?
Sketching Hands and Products
Just as figures and faces are important for conveying scale, interest, and empathy in our sketching, hands are also important for conveying scale, interest, and context. For example, as Figure 6-9 so ably demonstrates, we could sketch a mobile interface by itself, but sketching it within a mobile phone being held and used brings it to life and lets us provide a lot more context.
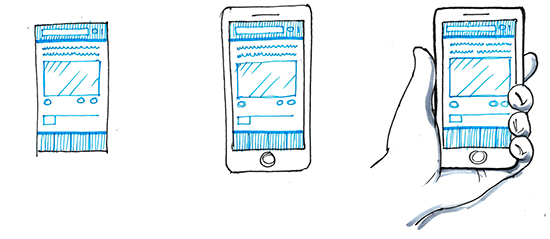
Figure 6-9. Sketch hands to show your products in context: Rather than just sketching the user interface (left), include the device around it as well (middle). Or better yet, include a hand holding the phone (right), for even more interest and context.
Now, when it comes to sketching hands, what we don’t want is to do a quick curly thing that looks like broccoli. This says, “I’m not really in command here, and I’m not really that confident about my idea.” And just like before, we don’t need to go overboard with adding too much detail either. So, go for something like the third hand from the left in Figure 6-10.
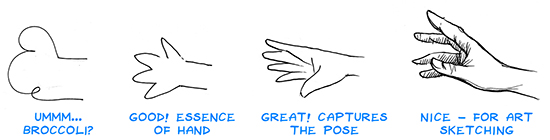
Figure 6-10. Remember to sketch the essence of “hand”: Broccoli, anyone? We can do better than the head of broccoli on the far left, without going overboard. The hand second from the left is OK, but the hand third from the left is better.
Let’s use the foundation lines technique to draw hands. Take a look at the foundation lines in Figure 6-11, how the basic hand shape is broken into a rough square, a triangle for the thumb area, and a “garden gate” shape for the fingers. Begin by drawing the basic shapes in your lighter color (I’m using a tint marker again here) and then follow up with your dark marker, using the foundation lines as a guide. The trickiest part is the thumb; think of it as two long backward “S” shapes.
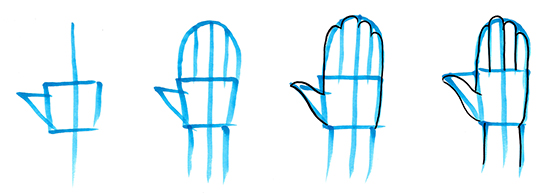
Figure 6-11. Foundation lines of a hand: To draw a basic hand, begin with a (sort of) square with a line through the middle, and a triangle for the thumb. Follow that up with a “garden gate” shape for the fingers. Now trace around your foundation lines in black to show the hand.
Now that we’ve conquered that basic hand shape, let’s get into some more natural positions that hands tend to use. After all, it’s pretty rare to find people going around with their hands held rigid in the shape shown in Figure 6-11. Except maybe for people doing karate. Best not to make fun of them.
For drawing a “thumbs-up” hand, imagine the triangle lifting up and the “garden gate” shape of the fingers folding forward, as shown in Figure 6-12.
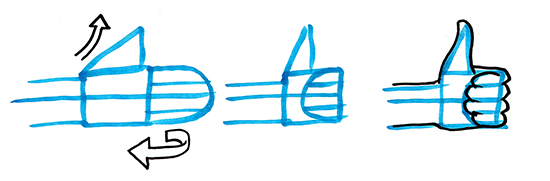
Figure 6-12. Foundation lines for “thumbs-up”: When you can see the triangle of the thumb lifting upward, and the garden gate of the fingers folding forward, it’s easier to draw a convincing thumbs-up hand.
Now try a similar hand, but with the triangle of the thumb and the garden gate folding inward, for a fist shape (Figure 6-13). This shape also works well for drawing hands holding things.
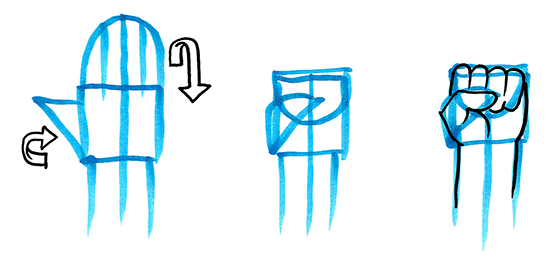
Figure 6-13. Foundation lines for “fist”: This is similar to the “thumbs-up” hand shape, but with the triangle shape of the thumb folded in, in front of the garden gate.
Not all hand shapes we need to sketch quickly are with hands front-on; we also need to tackle hands side-on, as if pointing. To do this, think of that basic square of the palm as a thin box. Take a look at your own hand, and visualize the thin box that’s living just underneath the skin. See it? Now, look at your hand side-on, and you’ll see a thin side of that box now at the front. That’s what we’ll draw next (Figure 6-14).
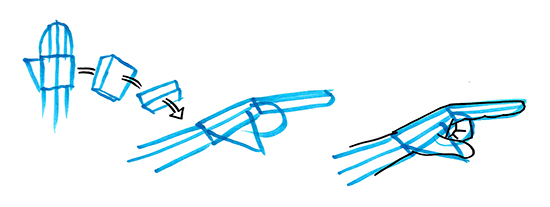
Figure 6-14. Foundation lines for “pointing”: Turning the “box” of the palm shape side-on, makes it easier to see the box, garden gate, and triangle shapes working together to make a pointing hand.
Drawing a pointing hand from the front is pretty tricky, but if we can see that box of the palm and the garden gate and triangle shapes folded in, it makes it a bit easier (Figure 6-15). It’s also worth drawing the pointing finger a little bit in front of the rest of the fingers, to help with the illusion.
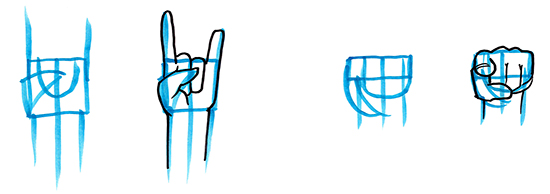
Figure 6-15. Foundation lines for “rock salute”: Let’s see that rock salute! A pointing hand from the front is probably the trickiest hand shape to draw, but seeing the garden gate and triangle shapes folded in will help a bit.
It’s worth combining the hand shape with other shapes, to practice poses in which the hand is holding something in different ways. Figure 6-16 and Figure 6-17 show my take on hands holding mobile phones. Try using your X-ray vision to see the shapes in the hand behind the object, moving around it, and the garden gate shape curling around it.
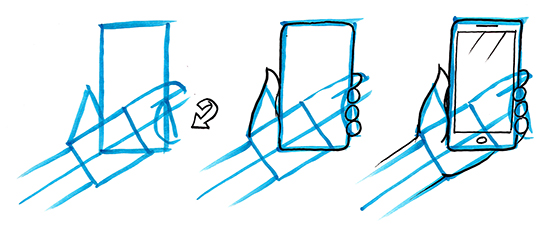
Figure 6-16. Foundation lines for holding a phone: Take your time in drawing the shapes that you see in a hand holding an object, like this hand holding a mobile phone.

Figure 6-17. Foundation lines for more hands holding phones: Here are two poses with a phone and two hands. The first has the right hand pointing and tapping the screen, whereas the second has two hands holding the phone in a landscape position. Keep thinking about what the triangle of the thumb and the garden gate of the fingers are doing, as they curl around the rectangular shape of the phone.
Hands holding other hands get pretty tricky too, like the hands shaking in Figure 6-18. Remember that we don’t have to be anatomically accurate in our sketches, just convincing enough to make them recognizable. Use your X-ray vision again, and think about how the fingers curl under each box shape of the palms.

Figure 6-18. Foundation lines for shaking hands: The foundation lines get pretty messy in this one, but use these to help your X-ray vision in seeing the fingers of one hand curl under and grip the other palm.
Granted, none of these hands will ever win any art prizes, but after all we’re capturing the essence of the position of the hand, enough to signify what it’s doing, and enough to instill confidence in our audience.
As with all foundation lines, over time you’ll be able to see these lines in your mind’s eye and use them as a convenient shorthand to sketch the hands that you want. With practice, you can simplify your hand sketches to become more like those shown in Figure 6-19.
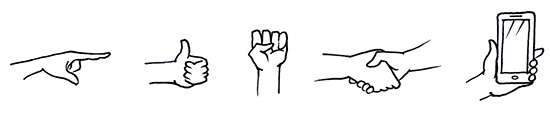
Figure 6-19. Sketching simple hands comes with practice: With practice, you will see the shapes and foundation lines in your mind’s eye, and be able to use them as convenient shortcuts to produce nicer-looking hands.
Exercises
Exercise 6-6: Give yourself a hand #1
Use your own hand as a model and practice some basic hand shapes using foundation lines and ink-over. Try an open hand with fingers spread, then pointing, and then a thumbs-up.
Exercise 6-7: Give yourself a hand #2
Again using your own hand as a model, sketch some hands holding objects, like a phone, a piece of paper, and something round like a ball. Think about what the box shape of your palm, the triangle of your thumb, and the garden gate of your fingers are doing in each pose.
Some Questions for You
What does your product look like being used?
If you work at a company that makes products or provides services, sometimes it’s easy to forget what those products and services are like when they’re actually used by customers. What might it look like if you sketched your product in the hands of your customers? Does that give you a fresh perspective?
What other products do your customers use?
It’s always useful to remember the contexts in which your customers use your product or service, and especially what other products they use to get their jobs done. What other products can you sketch, that you know your customers use? Does that help you to communicate different contexts to others?
Interview with Andrew On Yi Lai
From the conference to the classroom, Andrew has used sketchnoting to improve the experiences of teachers and students alike. And he’s only just getting started.
AL: I’m a teacher at Northern Beaches Secondary College (Sydney, Australia), Freshwater Senior Campus, and I’m currently teaching Industrial Technology Multimedia and Visual Arts. I also teach part time at Bradfield College, a senior high school specializing in the creative industries.
I first got into sketchnoting—or visual note-taking—when I saw a close friend post a batch of sketches on Twitter, so I thought I’d give it a try too at a GAFE (Google Apps For Education) Summit in Melbourne. I had so many attendees fascinated by what I was doing and taking photos of my sketches, that I thought: “This has some serious value!”
That was about a year and a half ago. Initially, I sketchnoted for my own learning purposes as a visual summary of presentations, but that has transformed significantly over time. My sketchnoting began to become more structured, and rather than trying to capture every detail, I started to focus on the key ideas.
I started sketching visual summaries of all sorts of things. One time, I sketchnoted the key ideas from a 50-page document on the NSW Quality Teaching Framework, as part of my preparation for an interview. I was offered the job, and when I showed my colleagues the sketchnote, they printed a large-scale version which now sits in the front of the staff room! The staff were very curious about what it was, and it opened opportunities for discussion about education and visual thinking. Witnessing colleagues appreciating my visual notes inspired me to continue to improve my craft.
I’ve also incorporated sketchnoting into my teaching practice. Initially I run one or two sessions to take the students through the different elements of sketchnoting (typography, symbols, layouts, and so on). That equips them with the individual elements, and then I show them how those elements can be combined to create a sketchnote for learning. Lately in my multimedia class, I’ve utilized sketchnoting to engage students with the “industry study” part of the course, as it is commonly viewed by students as lengthy and difficult to digest. Those topics have now been transformed into one-page sketchnotes with interactive links to related YouTube videos, which appears to be much more learner-friendly.
I also get my students to create their own version. This provides an opportunity for their own creative input into visualizing the content as we discuss collaboratively what is required to create an effective one-page summary of the topic so that they can later recall what they have learned.
Sketchnoting is a creative and engaging method of note-taking which I feel has definitely improved my teaching practice and the learning process for my students. I’m very confident with what my students have achieved and what they will achieve down the track; I’ve received positive feedback from my students, like: “Thank you for teaching me how to sketchnote Sir. This is how I feel like I learn best.” The most awesome thing to see is when my colleagues show me sketchnotes from students who I haven’t even taught, yet are sketchnoting in their class because they saw another student sketchnote and thought they’d give it a try, too!

Figure 6-20. Andrew on the power of visual thinking and communication in teaching: “My hope is to bring more value to public education and improve the teaching and learning experience of educators and students alike through visual thinking.”
Sharing my sketchnotes on Twitter and Instagram has brought up many inconceivable opportunities: from famous podcasters resharing my content, working with best-selling authors to collaborating with other sketchnoters on educational masterclasses. Sketchnoting has taken me to places I never thought I’d reach. My hope is to bring more value to public education and improve the teaching and learning experience of educators and students alike through visual thinking. That’s my vision.
I get great feedback from students, like: “Thank you for teaching me this, Sir. This is how I feel like I learn best.”