Chapter 3. Prototyping Methods
Methods to explore, challenge, and evolve your ideas in reality
Prototyping service processes and experiences Investigative rehearsal
Prototyping physical objects and environments Cardboard prototyping
Prototyping digital artifacts and software Rehearsing digital services
Prototyping ecosystems and business value Service advertisements
This Chapter provides extensive step-by-step descriptions of selected prototyping methods. While it is certainly not complete, this selection still serves as an effective starting point which allows you to prototype a broad range of services or products, whether physical or digital. As service design strives to provide a common language and support co-creation between different disciplines, we have chosen prototyping methods that do not require specialist skills and can be picked up quickly within a workshop setting. While this might sound limiting at first, it allows you to push almost any concept to a point where you can make a safer decision on which experts you actually need to involve in later iterations of the project. Of course, many more methods exist and should certainly be included in the planning and execution of your prototyping activities later on.
As a rule of thumb, you might want to consider including at least a few methods to account for method triangulation; e.g., an experience prototyping approach to validate the core value proposition, some methods that allow the exploration and assessment of a holistic/end-to-end perspective, and some methods that focus on key elements or touchpoints within the holistic perspective.
Since many prototyping methods can be adapted to answer different prototyping questions, the prototyping methods selected for this Chapter are structured in five simpler categories, loosely following the components that need to be made or built:
 Prototyping methods for service processes and experiences: Investigative rehearsal, subtext, desktop walkthrough
- Prototyping methods for physical objects and environments: Cardboard prototyping
- Prototyping methods for digital artifacts and software: Rehearsing digital services, paper prototyping, click modeling, wireframing
- Prototyping methods for ecosystems and business value: Service advertisements, desktop system mapping, Business Model Canvas
- General methods: Mood boards, sketching, Wizard of Oz approaches
Planning prototyping methods checklist
As a rule of thumb we suggest using at least one method from each of the following categories to account for method triangulation:
Validate the core value proposition
 —————————–——————————–––——————————–––———
- —————————–——————————–––——————————–––———
- —————————–——————————–––——————————–––———
Choose experience prototyping approaches.
Explore and assess holistic/end-to-end perspective
- Desktop walkthrough
- Investigative rehearsal (end-to-end)1
- Business Model Canvas
- Desktop system mapping
- —————————–——————————–––——————————–––———
Explore and assess single key elements
- Investigative rehearsal (focused)
- Rehearsing digital services
- Theatrical methods: Subtext
- Cardboard prototyping
- Wireframing
- Paper prototyping
- Sketching
- Wizard of Oz approaches
- Mood boards
- —————————–——————————–––——————————–––———
Extra: Theatrical Methods – an Introduction
Theater offers many methods which can be used to investigate, ideate, prototype, and roll out both physical and digital services. They are powerful tools to investigate emotion, timing, tone of voice, and practicalities of the use of space.
Why?
Services, as co-created value exchanges, are fundamentally human interactions. They are often human-to-human exchanges, like in retail, medical, hospitality, or advisory services. But even in many digital or machine-based services, the technological platform essentially mimics the functions of a human being as it processes your order, connects you, gives you information, or sells you a ticket.
Theater offers perhaps the ultimate toolkit to model, prototype, and play around with human–human or human–digital interactions. It’s important to think not only of the theater stage, but of the rehearsal room, technical desk, prop studio, backstage areas, and everything else which enables a theater to both develop and deliver experiences. With thousands of years of history, theater – or more generally, the performing arts2 – enjoys a uniquely mature, highly creative, and utterly practical toolset which is fast, effective, and fun. Unlike almost every other prototyping method, the tools of show business focus on emotion, the core of a great experience. And once you have gotten past the initial inhibitions of your team, they are easy to use as everyone understands the terminology. There is no need to introduce confusing new terms like touchpoints, personas, processes, and tangibles when everyone can already talk about scenes, characters, stories, and props.
The relevance of theatrical thinking and practice to services has been explored for many years, starting perhaps with Goffmann’s dramaturgical examination of human life in the 1950s,3 and becoming more explicit with Grove and Fisk since the 1980s.4 They point out many further parallels between the worlds of service and performing arts – such as the observation that services and theater performances share a transitory nature and “must be experienced in real time if they are to be appreciated.” Important themes are staging, actors/audience, performance, and improvisation – all considerations which apply to both worlds, and where theater can be a reference for service designers.
What are the techniques?
Theatrical techniques in service design should not be confused with business theater. This is the performance, usually by a visiting troupe of professional actors, of small playlets that have been developed to carry a message to a particular audience on a certain theme. Business theater can help develop empathy for users, get buy-in for a service design project, and spread awareness of the need for or results of a service design project, but it is not in itself truly a design technique.
Yet there are other theatrical techniques and lenses that can be applied or adapted as service design techniques, especially in the prototyping phase. Empathy techniques, storytelling, character work, improvisation, Forum Theater, storywriting, scripts, subtext, message, status, direction, an actor’s interpretation of a script or role, dramatic arcs, surprise, staging (especially considerations of the use of space and of backstage and frontstage boundaries) – all these concepts and tools can be used in the practical creation of a new service.
Theater offers perhaps the ultimate toolkit to model, prototype, and play around with human–human or human–digital interactions.
Prototyping Service Processes and Experiences: Investigative Rehearsal
Investigative rehearsal is a theatrical method to deeply understand and explore behaviors and processes through iterative rehearsal sessions.
| Duration | Varies with the depth and complexity of the scene – from 20 minutes to a few hours per scene |
| Physical requirements | A flexible, private space, furniture, whatever objects are at hand, a flipchart, a starting point |
| Energy level | High |
| Researchers/Facilitators | 1 or more |
| Participants | 12–30 |
| Research techniques | Use-it-yourself (autoethnography), participant observation, co-creative workshops |
| Expected output | Research data (specifically a list of bugs, insights, and new ideas), raw video footage and photos, more questions and hypotheses |
Rehearsal is a key theatrical technique in service design. Unfortunately, most people misunderstand the word, and think it means doing something over and over again until it is perfect and unvarying. In theater, we call that “practice,” and save the term “rehearsal” for the far more interesting explorative process of developing and trying many options, experimenting with different ways of working together, investigating different types of timing and rhythm. To emphasize this explorative aspect, we use the phrase investigative rehearsal.5 Similar techniques include bodystorming, service walkthrough, service simulation, and role-play.
Investigative rehearsal is a structured, constructive, full-body way to examine interactions and develop new strategies. It is a powerful technique based on Forum Theater,6 and can be used to examine, understand, and try out behavior or processes. It clarifies the emotional side of an experience and can reveal many practicalities of the use of physical space, language, and tone of voice.
It can be used at many stages of the design process, to design the research questions or even as an approximation of real research (using frontline staff, for example). It can also be used for ideation, prototyping, and testing, and even for training the staff for rollout of a new service system, helping the staff find their own interpretation of the process.
Step-by-step guide PREPARATION
Decide or reflect on purpose and prototyping or research questions: Before you start, decide or reflect on the purpose and the prototyping or research questions. What do you want to learn? Do you want to test the whole or just a part of the experience? Which part are you most interested in? How detailed do you need or want to get?
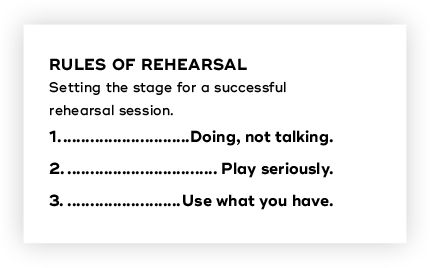
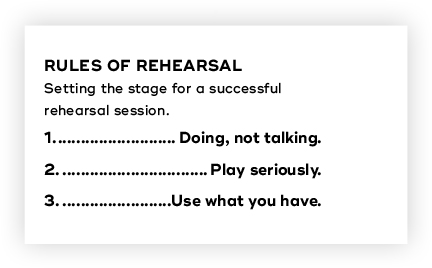
Create safe space: An investigative rehearsal is an unusual tool, so it needs to take place in a situation of safe space.7 For a newer team, you will need some time to create that mental and physical setting. Consider doing some warm-up activity (see #TiSDD Chapter 4, Facilitating workshops, for examples) and establish the Rules of Rehearsal to agree on how to work:
Find a starting point: The rehearsal will also need a starting point – and finding that starting point can be part of creating the safe space. For a project based on existing services or experiences, the starting point might be a set of stories generated from research or assumptions by the workshop participants (e.g., created through storytelling games). Extreme stories of emotional customers or difficult situations are most productive. You can quickly turn these into storyboards to help people get them straight and to act as a reference during the rehearsal. For a very new service, you can start with some future-state customer journey maps instead.
Set up teams, room, and initial story: Depending on the group size, divide the room into several teams of about 4–7 people each. Each team starts with one story or one version of the prototype journey. They will need a little time to prepare a (key) scene of the story, but don’t give them too long – the longer they have, the more nervous they will be. Tell them you only expect a rough draft as a starting point and give them no more than a few minutes. If anyone in the team was part of the original story being played, they should not play themselves in this re-creation.
Step-by-step guide USE/RESEARCH
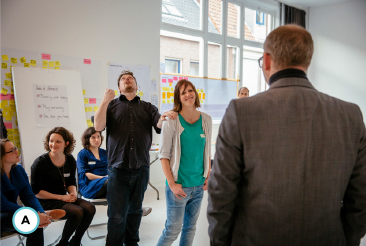
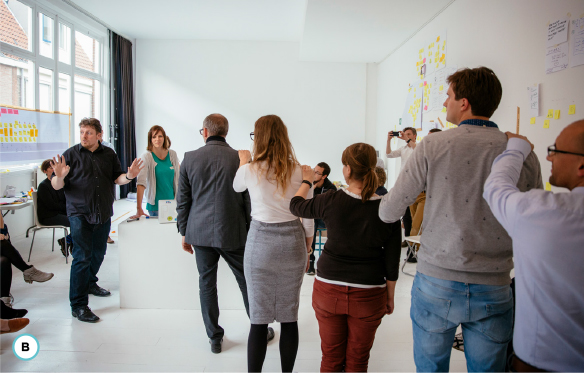
Rehearse to investigate: The investigative rehearsal process itself has three phases. With inexperienced groups, it is wise to stick to this quite rigid structure, or else the creativity can get out of hand and the work will become unfocused and trivial.
Watch: First, ask each team to play through their scene in just a couple of minutes, to give everyone an overview of what happens. Ask them to use the whole set, entering and leaving the room as a real person would (they should use a real door as the entrance if possible). Do not comment on the scene, but applaud when it is done. You might look at all the teams’ scenes quickly, then decide which one to explore first.
Understand: Now ask a team to start again, and ask people outside the scene to call “stop” when they notice anything interesting. This might be a physical challenge, an odd process step, a particular choice of words, or revealing body language. There might be a “stop” every few seconds – as a facilitator, try stopping after just three seconds of the scene and asking, “What do we know already? How do we know that?”
The goal of this phase is a deep understanding of what is happening on a physical and motivational level. Ask questions like “How is he feeling?” or “What’s happening right now?” You might want to help participants by encouraging them to be specific. If they say, “I see the clerk being open and honest,” ask them, “How exactly is the clerk being open and honest? What is she doing which makes her seem open and honest?” Note the insights and move on – do not change the scene. If the scene is a long one, you might not need to run through all of it in detail – just keep going as long as is meaningful. End with applause.
Change and iterate: Now ask the team to play the scene again, but this time the audience should call “stop” when they have an idea of what could be different on the service side. Ask for alternatives, not improvements. When a “stop” comes, tell them not to describe the idea, but to show it by taking over a role in the scene (Rule 1: “Doing, not talking”). If possible, change only one thing at a time and let the changed scene run for a while, so the group have a chance to see the effect of each change before stopping again.
When you have had enough time to see the effects (if any) of a change, stop the scene again and ask the audience – not the volunteer who suggested the change – what the volunteer’s tactics were (“What did they change?”) and what they noticed (“What happened then? How did it feel?”). You might then ask the other people inside the scene how they experienced the change. Sometimes – quite rarely – it can be helpful to ask the volunteer to explain their intention. In your discussion of the changes, try to avoid judgment – a change is neither good nor bad, it simply has a certain effect which you might be able to use. Try to pinpoint what the effect was, and record the idea (and perhaps its effect in this scene) on the flipchart. Then decide if you want to follow it up by continuing the scene from there, look at alternatives, or return to the original version. Iterate, iterate, iterate.
At all times, keep a concise list of bugs, insights, ideas, and questions: It is key to keep track of everything you learn during any part of the rehearsal session. After each step, ask the team to take a few moments to reflect on what worked, what didn’t work, what they would like to change or try next. Document the results on a flipchart with separate sections for insights, bugs, ideas, and new questions.
Decide on a next scene and repeat: After the current scene has been finished, switch to the next team or revisit your original starting points and decide on which part to try next. Then go again. Stop when either the set time for your workshop is up or the group have hit a roadblock that requires them to switch to other core activities next – for example, doing some more research, more intensive ideation, or switching to other prototyping methods.
Document: Document and finalize your work. Use customer journey maps, photo storyboards, or a video to document the latest version of the service experience from your rehearsal. Briefly reflect on your documentation flipcharts and identify key insights, ideas, bugs, and questions. Try to agree on potential next steps to advance the project based on your new learnings.
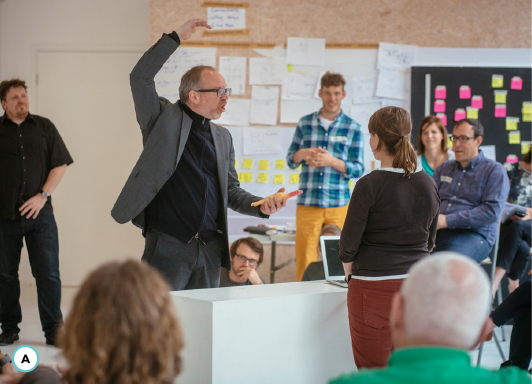
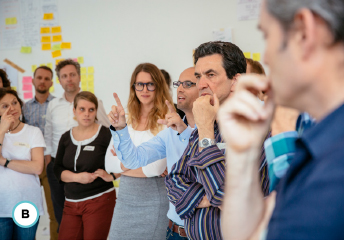
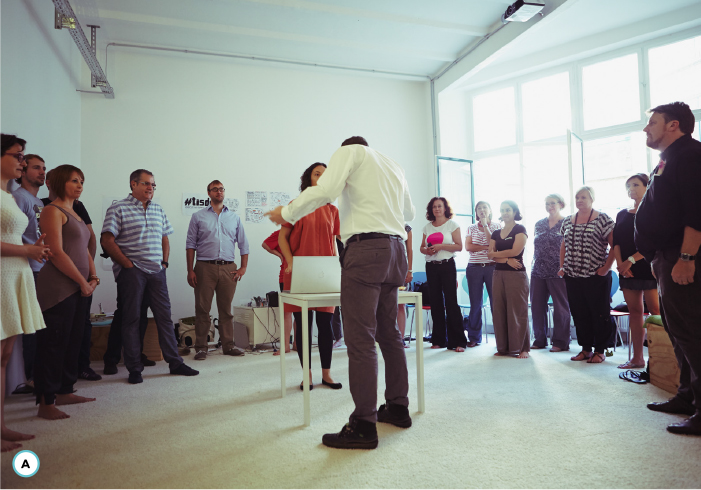
A team “stress testing” the returns procedure of a retail service using investigative rehearsal. Two team members simulate the encounter, while others are ready to step in with alternatives to process, setting, systems, or behavior. The designer behind the laptop represents a human being in the original scene – but she could easily represent (or become) a digital system.
After each step the team reflect on what worked, what didn’t work, what they would like to change or try next. Keep it brief. Then move on, sticking to “Please don’t tell me, show me!”
Method notes
Keep them focused and moving: The facilitator will need to keep the team focused, moving, and honest. At the same time, they must keep the team realistic, making sure they are not creating a perfect world where everyone really needs their service and is enthused about it. Experience shows it’s better to demonstrate a problem or advantage within the scene than to talk about it, so they will often have to say, “Please don’t tell me, show me!”
Explorative or evaluative – studio or contextual: The investigative rehearsal as described here is a great explorative prototyping activity. In its most basic form it only requires people, an empty room, and an inspiring prototyping question. However, if you decide to run the session in context – perhaps at the actual workplace of your users with real staff taking over the roles, or in a very good simulated environment – investigative rehearsal can produce real and valid learnings to support your decision making.8
Keeping track: As you go through the scene, you will quickly build up a long list of tested ideas, generated by the participants themselves from their own real stories or their prototype. You can reflect on these later, and decide which ones to incorporate in your next prototype, future-state customer journey map, or implementation.
Don’t call it “role-play”! The term is unpopular because it is misused in many training courses. Technically, investigative rehearsal is not role-play, but it looks very similar. So, call it rehearsal, simulation, bodystorming, a service walkthrough, or don’t call it anything – just say “show me.”
Variants: Partial rehearsals or walkthroughs
Based on the investigative rehearsal, there are several more types of often accelerated partial rehearsals or walkthroughs. They are intended to help people who are designing or delivering a service become familiar with the sequence, connections, and intentions of an interaction without (for the moment) considering their presence or own effect on others – their body language, tone of voice, facial expressions, etc. In the following rehearsal variants, the communication is usually directed inward at the team, not outward toward a customer or audience:
Sitzprobe or seated investigative rehearsal or talkthrough: The Sitzprobe usually is a spoken rehearsal9 – the team speak through a service scene, e.g. seated in a circle. They do not worry about timing, movement, or technicalities. They simply go through the verbal element of the service, perhaps with quick descriptions of the actions which cannot now be seen, such as “Then I give him the envelope …” Variants include speaking through the service very fast, taking on each other’s roles, or even running the service scene backwards. Seated rehearsals can involve customers as well as frontstage and backstage staff and are great to get a first impression of the bigger context, allowing us to explore the generic flow of conversations across the holistic service experience.
Blocking rehearsal: During a blocking rehearsal, the team move through the actions of a service scene, if possible in the real context or a simulated environment. There are no verbal elements, or verbal elements are reduced to the beginning and end of each statement, such as, “So let me explain how you open … blah blah blah … and now you can see the reading.”
Technical rehearsal: The team move through all the technical aspects of a service scene, making sure that every single technical action is performed – flipping the switch, starting the software, packing the envelope. Everything non-technical (movements in the room, spoken elements) is abbreviated or skipped. The technical rehearsal is sometimes combined with the blocking rehearsal.
Partial rehearsals are flexible tools that can be used all across the design process. During research, they can help to elicit and document existing service processes. Try getting all stakeholders of a business process in one room and doing a seated rehearsal. Have them simulate a typical case, talking through each individual step, and record the results. Later, during prototyping, these techniques can help you to choose the best lens to efficiently move your prototypes forward. Moving toward implementation, these types of rehearsal are often employed when the structure of a service scene is already quite well developed, but the participants need to become more familiar with it and understand the structure, content, and connections better – until they become internalized and automatic.
Variant: Rehearsal for rollout
An employee’s demeanor and behavior are a crucial part of the service experience for customers. Just like an actor playing a role, a staff member needs to appear professional, show appropriate emotions, and master a complex “script” (the service process) while still being their authentic self, not an automaton. Like actors, too, they need to be able to use stage, costume, and technology to support their performance, and must be able to read their audience and adjust their actions appropriately. When will they have the chance to explore their options, share their discoveries, and find their own voice within the service? Rehearsal during rollout, and indeed during the regular running of a service, can be this opportunity.
Prototyping Service Processes and Experiences: Subtext
Subtext is a theatrical method that can reveal deeper motivations and needs by focusing on unspoken thoughts in a rehearsal session.
| Duration | 5 to 30 minutes, as a deepening segment of a rehearsal session |
| Physical requirements | A flexible, private space, furniture, whatever objects are at hand, a flipchart, a starting point |
| Energy level | High |
| Researchers/Facilitators | 1 or more |
| Participants | 4+ (as part of the rehearsal session) |
| Research techniques | Use-it-yourself (autoethnography), participant observation, co-creative workshops |
| Expected output | Research data (specifically documentation of the subtext chains, new insights and ideas), raw video footage and photos, more questions and hypotheses. |
Subtext is a theatrical concept which can enrich a rehearsal and give deeper insight and inspiration. The term has several interlocking meanings in theater, but we can think of subtext as the unspoken thoughts of a character, which might be implied by their actions. Put another way, subtext is what we mean, but don’t say. Bringing subtext into an investigative rehearsal can reveal deeper motivations, help us understand needs, and illuminate many new opportunities to create value.10
In theater rehearsal, subtext is usually only talked about as part of an actor’s “notes” or in initial readings of the play. But there are some rehearsal techniques and games (and even a few plays) where subtext is made audible so it can inspire new understanding and directions. In service design, we mostly use rolling subtext and subtext chains.
Step-by-step guide ROLLING SUBTEXT
Introduce subtext: In your rehearsal session, choose a key scene you want to understand more deeply. Make sure everybody already has at least a basic understanding of the scene before diving into the subtext activity. Run the key scene one last time, then stop the rehearsal for a moment and quickly explain the concept of subtext (“Subtext is what we mean, but don’t say”).
Add subtext actors to your service scene: Add new actors to the rehearsal and ask them to speak the unspoken thoughts of the people in the scene as it runs. It’s easiest to have one subtext actor for each character, and they can either sit offstage or (more fun) be inside the scene, with their hand on the character’s shoulder. This is simply a visual shorthand for “I am not here, I am invisible,” but it seems to help each pair of actors coordinate.
Play through with live (“rolling”) subtext: The character actors play the scene as usual – or perhaps a little slower – and the subtext actors simply speak what they believe their characters are thinking at any moment, using “I” or “me” statements when possible. For example, the character actor might say, “Can you prioritize that?” and the subtext actor might rage, “For f*ck’s sake! Help me before I lose my job, you idiot!”
To make it possible to follow the action, you might want to start by giving subtext to only one or two characters, then shift focus to others in the scene. It is usually most interesting if the subtext actor and the character actor do not discuss this beforehand – sometimes the character actor will be surprised by the subtext, and this can be revealing.
Iterate: Run the scene a few times with variations on the subtext. What do they suggest? Document your key insights, ideas, bugs, and questions, and return to your rehearsal session.
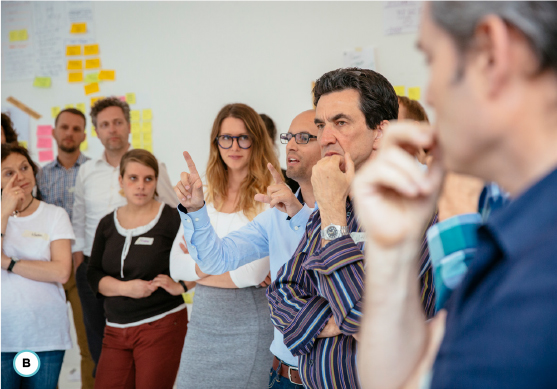
Rolling subtext: as two actors play characters in a scene, another actor (wearing a black shirt) speaks aloud the unspoken thoughts of one character. Subtext is what we mean, but usually don’t say. Bringing it into an investigative rehearsal can reveal deeper motivations, needs, and many new opportunities to create value.
Step-by-step guide SUBTEXT CHAINS
Identify a starting statement: In a rehearsal session, hold the scene at one key statement by a customer or employee, and ask the team, “What would be the subtext of that statement?”
Build the chain: Continue by asking, “What would be the subtext of that subtext?” Repeat. As you go deeper, it might be easier to ask, “Why is that important?”
Document and/or build a physical chain: Document the different levels of subtext on a flipchart. If you have enough people it can also be helpful to create a physical subtext chain of people in the room. Standing in a line behind the key character, each person represents one level of subtext.
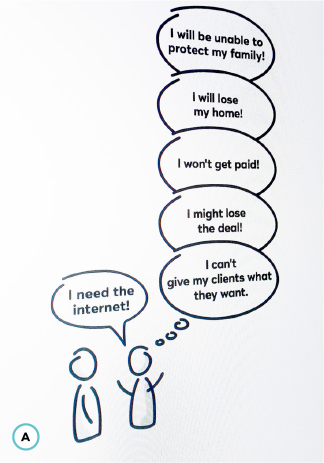
Explore emotional and practical chains: After several steps, you will get deeper and deeper into the motivations and emotional lives of the character. For example, a group working on stories from a telecommunication shop might decide that the statement “Look, I really need the internet!” has a possible subtext of “I can’t get the information I need.” Investigating the subtext chain, they might decide it goes like this:
Statement: “Look, I need the internet!”
1st-level subtext: “I can’t give my clients what they want.”
2nd-level subtext: “I might lose the deal!”
3rd-level subtext: “I won’t get paid!”
4th-level subtext: “I will lose my home!”
5th-level subtext: “I will be unable to protect my family!”
This is a rather emotional chain. A more practical one for the same situation might be:
Statement: “Look, I need the internet!”
1st-level subtext: “I need to get online.”
2nd-level subtext: “I need to download a movie.”
3rd-level subtext: “I need to show a movie to my client.”
4th-level subtext: “I need to show my client what I offer.”
5th-level subtext: “I need to help my client make a choice.”
Iterate: Explore a few chains with variations on the subtext. What do they suggest? Document your key insights, ideas, bugs, and questions, and return to your rehearsal session.
Method notes
Assumption-based vs. research-based: This tool supports the deeper analysis of service situations. Often the subtext levels you identify are based on assumptions, but they can still be valuable as they generate great questions that feed back into explorative research or guide your prototyping. However, when used with research data, the method becomes a fuller-bodied way of reflecting on and analyzing that data.
Basic needs: Usually after 5–7 levels on the emotional chain we get down to very basic human needs like protection, family, acceptance, and love – and these deep levels explain why the customer values our service or is angry about the problem.
Middle steps: The middle steps of a subtext chain suggest potential offerings we could make. For example, from the practical chain we could ask ourselves: How else could we help the speaker get online? Can we offer them an internet stick, a tablet, a WiFi dongle? How else could we get the movie to them, or help them show it to the client? Could we offer a downloading service, burn a disc, rent out a screening device or location? How else could we help them show the client what they can do? And so on. The emotional chain also offers potential value: How can we help the speaker give the client what they need? Get more deals? Handle cashflow? And so on.
A visual sketch of a subtext chain.
Building a subtext chain works like a deep dive into the motivations and needs of a stakeholder in a rehearsal session.
Prototyping Service Processes and Experiences: Desktop Walkthrough
Desktop walkthroughs can be seen as interactive mini-theater plays that simulate end-to-end customer experiences.
| Duration | Preparation: Anywhere from a few minutes to a couple of hours Use/research: 1–2 hours (set clear timeboxes for iterations) up to a day |
| Physical requirements | Pens, scissors, glue, paper, cardboard, plasticine, toy figurines, flipchart paper, sticky notes, digital camera |
| Energy level | Medium |
| Researchers/Facilitators | Minimum 1 |
| Participants | 3–6 |
| Research techniques | Participant observation, interviews, co-creative workshops |
| Expected output | Documentation of processes and stakeholder journeys, shared understanding about criticality of elements |
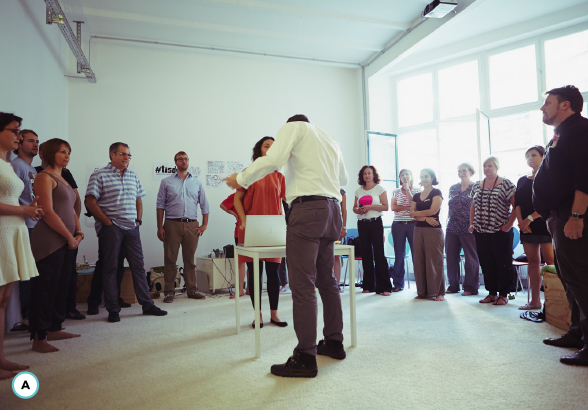
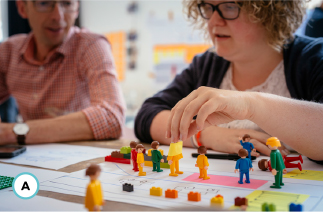
A desktop walkthrough helps the design team to quickly simulate a service experience using simple props like toy figurines on a small-scale stage (often built from LEGO bricks or cardboard), and test and explore common scenarios and alternatives.11 The critical deliverable is not the model of the map/stage but the experience of playing through the service experience step by step.
The desktop walkthrough is one of the signature methods of service design. It helps to make the experiential process nature of a service – a story unfolding over time – tangible. Compared to paper tools like customer journey maps, desktop walkthroughs allow service concepts to be iterated at a much faster pace. New ideas can be instantly identified, tried, and tested. The service concepts get refined quickly. On the other hand, walkthroughs are very engaging as well as easier to do for a lot of participants.12
They especially help:
To get a shared understanding within your team about the end-to-end customer experience
To identify the critical steps in the journey
To identify any other key elements or problem areas that need to be addressed
This makes it a great method to do before you invest too much time and effort on creating a beautiful visualization of a customer journey.
Step-by-step guide PREPARATION
Review scope and clarify prototyping questions: Briefly reflect. What is your scope? What do you want to learn from this prototyping activity? Do you want to test the whole experience or just a part? What are the aspects and details you want to test for later? Also think about who you want or need to involve in this walkthrough. Is it just for within the project team, or are you planning to involve potential users or other stakeholders?
Prepare workspace and materials: Pick up your desktop walkthrough materials and a couple of big sheets of flipchart paper. Set up the paper on a table. Make sure the table is not too big so everybody can stand around it and contribute at the same time.
Brainstorm an initial journey draft: Select a customer/persona and do a brief brainstorm: looking at your new service concept, what are possible steps in the customer journey? Then, quickly sort your sticky notes in chronological order. There is no need to create a full-fledged customer journey yet. Do just enough to get a sh!tty first draft of what the journey could look like.
Create maps and stages: Based on your initial journey, what locations are important? Start by creating a big overview map that contains all the relevant locations of the service experience. Then, decide if and where you need to zoom in on certain locations for some part of the service (e.g., zooming in on the interactions that happen in one store inside a shopping mall). If necessary, create a detailed stage plan for each of these locations.
Create roles, set, and props: Which roles need to be cast? What needs to be built? Pick a figurine for each of the roles/key stakeholders in your service and quickly build the essential set and props, using paper, cardboard, plasticine, or LEGO bricks to set the stage.
Set up roles: Find your actors. Who is going to play which role? Also, it can be helpful to assign someone to keep track of the bugs, insights, and ideas queue during the walkthrough.
Step-by-step guide USE/RESEARCH
Do a first walkthrough: Who or what has to move at each step in the journey? Does everything fit together? Put all the actors and props onto their starting positions and, loosely following the events from your journey draft, play through the service from beginning to end. Move your figures around on the map/stages. Act out all necessary dialogue and do all the interactions with other actors, devices, and so on.
Keep a list of bugs, insights, and ideas: After each run-through, take a few moments to reflect on what worked, what didn’t work, what you would like to change or try next. Document the results on a flipchart, noting insights, bugs, new ideas, and questions.
Decide on the next variation and iterate: Check off the idea that has just been simulated and, in your team, quickly decide (show of hands, simple majority) which of the still open changes and ideas you want to try next. Then go again. If you think that last walkthrough was a real cracker, create a quick, less-than-60-second video pitch of the walkthrough to capture it for later. Stop iterating either when the set time for your workshop is up or when the group have hit a roadblock that requires them to switch to other core activities next – for example, doing some more research or more intensive ideation.
Document: Document and finalize your work. Use customer journey maps, photo storyboards, or videos to document the latest version(s) of the service experience from your walkthroughs. Briefly reflect on your documentation flipchart and identify the critical steps in this journey, other key elements, as well as problem areas or questions that need to be addressed in the next steps in the design process.
Present (optional): Using a storytelling approach, present your last iteration and key learnings to other stakeholders and gather feedback. It is often useful to also capture the presentation and the final feedback rounds on video and add them to your documentation.
Method notes
Introduce an observer: Try having at least one observer for each walkthrough to balance judgment and counter the bias of the active players. The observer takes an independent view of the resulting experience and gives feedback to the team.
See it through: Always force yourself to play a walkthrough all the way to the end. Especially in early iterations, ideas come in abundance and can disrupt the flow. To address that, ask everybody to write their ideas and reflections down and wait to discuss them at the next step. Otherwise, you will never see one idea through.
Keep the flow: Watch out for talking in the groups, as the method can quickly trigger deep discussions. Encourage the group to simulate their talking points instead by doing different versions.
Avoid teleporting: Watch out for teleporting. How did that person get here? How did that object get here? Where did they go afterwards?
Handling too many bugs: If the group are stuck with too many bugs, ask them to step back and do a brief brainstorming session to generate potential solutions. Then go back to simulating these solutions using the desktop walkthrough.
Introduce a director: If you have trouble in your group making decisions or juggling too many wildly different ideas, introduce the role of a director. Only the director can stop the walkthrough to discuss questions or make changes to the other actors. The changes or ideas are then played through. The learnings are documented. After a set number of iterations (e.g., 3–5), another member of the group gets to be director.
Simply moving figures around on the map and acting out the dialogue allows the design team to quickly simulate a service experience, test, and explore alternatives.
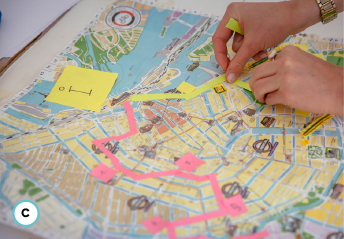
The base of a walkthrough is an overview map that contains all the relevant locations of the service experience. If necessary, create a detailed stage plan for each of these locations.
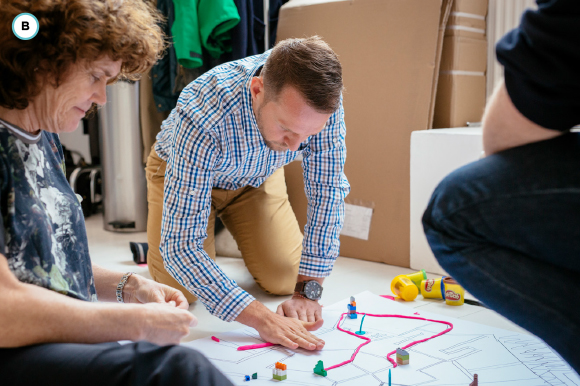
Overview plans help to keep track of interconnected locations across a wider geography.
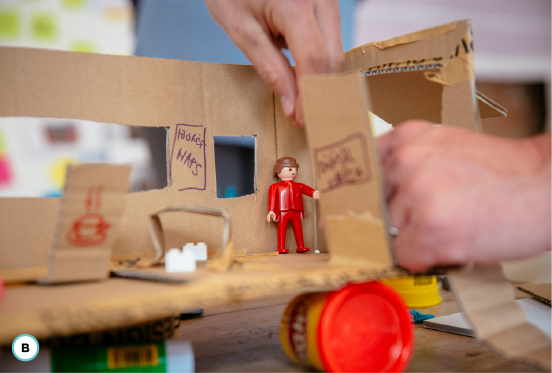
Prototyping Physical Objects and Environments: Cardboard Prototyping
Cardboard prototyping refers to prototyping 3D mock-ups of almost any physical object or environment out of cheap paper and cardboard.
| Duration | Varies with the depth and complexity of the prototyping questions – from 1–2 hours to a few days |
| Physical requirements | A flexible space with good lighting (and enough room to build and also simulate interactions with the model), people, sheets of corrugated cardboard or foam board, X-ACTO knives, scissors, tape, hot glue guns, paper, sticky notes, overhead foil, foil markers, digital camera, cutting mats |
| Energy level | High |
| Researchers/Facilitators | 1 or more |
| Participants | 1 or more; 4–8 is a good group size |
| Research techniques | Use-it-yourself (autoethnography), participant observation, interviews |
| Expected output | Research data (specifically bugs, insights, and new ideas), raw video footage and photos, documentation of the tested variants |
Cardboard prototyping is a common low-fidelity method to prototype and test physical objects and environments that are part of a service experience – for example, the interior of a shop environment, a ticket machine, furniture, devices and smaller props, and so on.13 The prototypes are built quickly, using cheap paper and cardboard mostly. Other equally easy-to-use materials like foamcore, plasticine, or duct tape often complement the mix of materials.
Depending on the scope, the prototypes can be small-scale, actual size, or even bigger than life. To further explore and validate core functionality and the role of these objects in the context of the future service, cardboard prototyping is often used in conjunction with or as part of walkthrough approaches (e.g., desktop walkthrough or investigative rehearsal).
Prototypes made from cardboard are cheap and easy to make. Cardboard prototyping indeed has one of the lowest entry barriers of any of the prototyping methods. Almost everybody has done this before, either as a kid or as an adult helping children. Just like paper prototypes, cardboard prototypes are clearly created to be thrown away. This makes it easier for those who created the prototype to let go and embrace necessary changes. Also, actual users taking part in the test tend to feel more comfortable about suggesting changes.
The most important part of cardboard prototyping is the process of prototyping itself. It helps to concretize the initial concept and explore its details, strengths, and weaknesses. A great way to start is to build many smaller-scale versions before switching to full size, for the simple reason of speed.14
Scale models also set the stage for small-scale experience prototyping techniques like desktop walkthroughs, as you literally build the space and key artifacts to enrich the walkthrough experience.
Full-size models help to set the stage for immersive experiences like investigative rehearsal or process walkthroughs.15 They encourage and enable a deeper exploration and iteration of the design. A great example for this comes from Chick-fil-A, which uses cardboard prototyping to test the setup of a whole restaurant. New setups are built in foamcore (including walls, tables, coffee machines), then rehearsal techniques are used to test the flow and the experience with the design team, operators, and architects.
Cardboard prototyping follows similar steps to paper prototyping, replacing the paper prototypes of mostly 2D interfaces with more generalized 3D physical models (that in fact might contain paper prototypes within). Just like a paper prototype, a cardboard prototype is used by a test user to accomplish given tasks while an operator manipulates the different parts of the prototype to simulate the functionality of the object.
Step-by-step guide PREPARATION
Choose a user: Who should test this cardboard prototype? Choose a persona, a specific user type, or a key stakeholder.
Review scope and clarify prototyping questions: What do you want to learn? Do you want to test the whole or just a part of the object or environment? Which part (literally) are you most interested in? What are the tasks that you expect the user to do there? Think about the context: in which step of the customer journey does the object or environment play a role? Make a list of the tasks you want to test for later.
Build the necessary parts: Use simple materials to build the objects/environments or the parts thereof you have chosen to focus on. If the object is interactive, build everything you need to act out any activities.
Assign roles and prepare: Split your team to take on the roles of users, operators, and observers, and ask them to prepare their parts. Apart from you as the facilitator, all roles can be played by one or more people. If you are not working with actual users, give the person or people who will act as the user(s) a few minutes to familiarize themselves with and empathize with the needs, motivations, and context of the chosen persona or user type. Allow the operators to practice how to organize all the different parts so they can quickly manipulate and simulate the object’s or environment’s interactions. Finally, ask the person who is going to act as a researcher to prepare the observation session.
Step-by-step guide USE/RESEARCH
Test the prototype: Now conduct your test. Ask the user to perform a selected task. As the user starts to use the interface or carefully uses the object (i.e., handling it, pressing buttons, typing on keyboards, pulling handles, etc.), the operators react and simulate the reaction of the object or environment by manipulating, replacing, or adding parts. Iterate until the user has completed the task or failed.
Keep a list of bugs, insights, and ideas, and review issues: Make sure that during the whole test the observers record their observations, and create a list of the issues that you discover. After each testing session take a few moments to reflect on what worked, what didn’t work, and what you would like to change or try next. Briefly discuss the issues you discovered and prioritize them.
Revise your prototype (optional): Are there any changes you can or should make right now? Remember that changes to cardboard prototypes can be made very easily and quickly. Do them now.
Decide on the next task and iterate: Check off the task that has just been simulated and quickly decide which you want to try next. Then go again.
Document: Document and finalize your work. Use photos or videos of your prototypes as well as key interactions to document the latest version from your prototyping session. Briefly reflect on your documentation and identify critical issues as well as problem or opportunity areas that need to be addressed in the next steps in the design process.
Present (optional): Use a storytelling approach to present your last iteration and key learnings to other stakeholders and gather feedback. It is often useful to also capture the presentation and the final feedback rounds on video and add them to your documentation.
Method notes
Speak out loud: Encourage users to think out loud while they go through the given tasks.
Silent operators: The operators are usually silent. Ask them to refrain from explaining how the prototype should work. The rule of thumb is: if the device or computer would not say/print/bleep it, the operators should not either.16
How to build: Start by building the basic forms (e.g., the body of a vending machine or the body of a convertible). Then add some of the moving parts. Moving parts can either be roughly built or simply be added or replaced during the simulation to cater for a certain functionality (e.g., the robot arm of the vending machine or the convertible top for the car). Finally, add paper prototypes of software/interface elements (e.g., displays, keyboards, control lamps).
Use what you have: Cardboard prototyping can get you carried away. People start prototyping everything just because it is fun. However, if you have a tablet lying around, avoid creating a cardboard tablet. Use what you have.
Early cardboard prototypes are cheap and easy to make. This has one of the lowest entry barriers of all the prototyping methods.
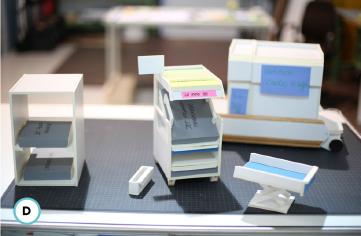
The prototypes can be small-scale, actual size, or even bigger than life, depending on their scope.
Contextual full-scale cardboard prototyping for a citizen-centric council office.17
Conceptualizing three material delivery units and building 1:5 scale models.
Prototyping Digital Artifacts and Software: Rehearsing Digital Services
Rehearsing digital services is a variant of investigative rehearsal that helps to prototype digital interfaces as if they were human conversations or interactions.
| Duration | Varies with the depth and complexity of the service – from 20 minutes to a few hours |
| Physical requirements | A flexible, private space, furniture, whatever objects are at hand, a flipchart, a starting point |
| Energy level | High |
| Researchers/Facilitators | 1 or more |
| Participants | 3–7 per team |
| Research techniques | Use-it-yourself (autoethnography), participant observation, co-creative workshops |
| Expected output | Insights, ideas, often also more questions and hypotheses, raw video footage and photos |
Theatrical methods like investigative rehearsal can be surprisingly useful for prototyping digital offerings. These techniques allow tech and UI experts to see beyond interface questions and discover other opportunities and alternatives for their projects.
As a first prototype, even before sketching any wireframes, a rehearsal session is set up and a human plays the app or web page. Instead of thinking digitally, the scene is played as a conversation with a human friend or knowledgeable (invisible?) “butler” to see where the encounter goes. Only afterwards, the team considers how to digitize the experience. For example, a dating app can be rehearsed by one person playing a human matchmaker (or “genie in a bottle”) who interviews people, introduces them according to their interests, suggests a location for a date which suits both and responds to their reactions, or whispers in their ears on the date to suggest conversation topics. Similarly, a landing page can be simulated by a concierge asking, “What are you looking for?” and then evolving the conversation naturally. How might that affect your digital design?
Investigative rehearsal for digital services is a theatrical method to enable deep understanding and exploration of interaction patterns, behaviors, processes, and user motivations through iterative rehearsal sessions. Based on Forum Theater, it is a structured, full-body way to clarify the use context and emotional side of an experience and reveal practicalities around physical space, language, and tone of voice – insights which are then turned into exciting user interfaces within the digital arena.
This technique has also proven to be useful when prototyping with very technical teams. Some of those teams tend to think in flow charts or old interface patterns rather than considering the human side. Rehearsing digital services challenges them to step away from wireframes and technical aspects and play the app as a human conversation. It allows them to discover that their solution space is far wider than they might have initially thought, and they can often add much more value to the app in a second iteration based on the rehearsal.
Step-by-step guide PREPARATION
Decide or reflect on purpose and prototyping or research questions: Before you start, decide or reflect on the purpose and the prototyping or research questions. What do you want to learn? Do you want to test the whole or just a part of the experience? Which part are you most interested in? How detailed do you need or want to get?
Create safe space: An investigative rehearsal is an unusual tool, so it needs to take place in a situation of safe space.18 For a newer team, you will need some time to create that mental and physical setting. Consider doing some warm-up activity and establish the Rules of Rehearsal to agree on how to work (see box).
Find a starting point: Choose a starting point – e.g., a raw idea, or some context based on user stories from research – and prepare props and a space. Then, quickly familiarize yourselves with the chosen story.
Step-by-step guide USE/RESEARCH
Watch: Run through the story and have a human play the app or web page. Don’t think digital – be a full human being, but one with superhuman access to knowledge and media, like a knowledgeable butler or “genie in a bottle.” Remember: Don’t play a robot – be a full human being.
Understand: Now ask the team to start again, and ask people outside the scene to call “stop” when they notice anything interesting. This might be a physical challenge, an odd process step, a particular choice of words, or revealing body language. There might be a “stop” every few seconds. The goal is a deeper understanding of what would happen on a physical, emotional, and motivational level, if it was an inherently human interaction. Encourage participants to be specific. If they say, “I see the concierge being open and honest,” ask them, “How exactly are they being open and honest? What are they doing that makes them seem open and honest?” Note the insights and move on – do not change the scene just yet. If the scene is a long one, you might not need to run through all of it in detail – just keep going as long as is meaningful. End with applause.
Change and iterate: Now ask the team to play the scene again, but this time the audience should call “stop” when they have an idea of what could be different on the service side. Ask for alternatives, not improvements. When a “stop” comes, tell them not to describe the idea, but to show it by taking over a role in the scene (Rule 1: “Doing, not talking”). If possible, change only one thing at a time and let the changed scene run for a while, so the group have a chance to see the effect of each change before stopping again. Try to pinpoint what the effect was, and record the idea (and perhaps its effect in this scene) on the flipchart. Then decide if you want to follow it up by continuing the scene from there, look at alternatives, or return to the original version. Iterate, iterate, iterate.
Digitize the experience: After a few iterations, consider how you would digitize the experience. Ask the team to pick out key ideas from your documentation flipchart and start to sketch out the interfaces. For example, how can an app appear to be “open and honest”? Do a quick sharing round and capture your feedback.
At all times, keep a concise list of bugs, insights, and ideas: It is key to keep track of everything you learn during any part of the rehearsal session. After each step, ask the team to take a few moments to reflect on what worked, what didn’t work, what they would like to change or try next. Document the results on a flipchart with insights, bugs, and new ideas/questions.
Decide on a next scene and repeat: After the current scene has been finished, revisit your original starting points and decide on which part to try next. Then go again. Stop either when the set time for your workshop is up or when the group have hit a roadblock that requires them to switch to other core activities next – for example, doing some more research, more intensive ideation, or switching to other prototyping methods.
Document: Document and finalize your work. Use paper prototyping, wireframes, interactive click-models, customer journey maps, photo storyboards, or a video to document the latest version of the service experience from your rehearsal. Briefly reflect on your documentation flipcharts and identify key insights, ideas, bugs, and questions. Try to agree on potential next steps to advance the project based on your new learnings.
A team “stress testing” the returns procedure of a retail service using investigative rehearsal. Two team members simulate the encounter, while others are ready to step in with alternatives to process, setting, systems, or behavior. The designer behind the laptop represents a human being in the original scene – but she could easily represent (or become) a digital system.
After each step the team reflect on what worked, what didn’t work, what they would like to change or try next. Keep it brief. Then move on, sticking to “Please don’t tell me, show me!”
Method notes
Don’t play a robot – be a full human being: Especially at the start of a session, it is important to remind actors they’re not trying to be a technical system. It can be helpful to remind them that between 20 and 50 years ago, any of the jobs you might discuss right now as part of an app would have been done by a human being. What would that human have done? How would they have behaved?
Keep them focused and moving: The facilitator will need to keep the team focused, moving, and honest. At the same time, they must keep the team realistic, making sure they are not creating a perfect world where everyone really needs their service and is enthused about it. Experience shows it’s better to demonstrate a problem or advantage within the scene than to talk about it, so they will often have to say, “Please don’t tell me, show me!”
Explorative or evaluative, studio or contextual: The rehearsal as described here is a great explorative prototyping activity. In its most basic form it only requires people, an empty room, and an inspiring prototyping question. However, if you decide to run the session in context – perhaps at the actual workplace of your users with real staff taking over the roles, or in a very good simulated environment – investigative rehearsal for digital services can produce real and valid learnings to support your decision making.19
Don’t call it “role-play”! The term is unpopular because it is misused in many training courses. Technically, investigative rehearsal is not role-play, but it looks very similar. So, call it rehearsal, simulation, bodystorming, a service walkthrough, or don’t call it anything – just say “show me.”
Prototyping Digital Artifacts and Software: Paper Prototyping
In paper prototyping, the screens of a digital interface are hand-sketched on paper and presented to a user to quickly test interfaces.
| Duration | Preparation: 1–2 hours to a couple of days, depending on the complexity of the prototype Testing: Approximately 1–2 hours per user/group |
| Physical requirements | Space (in context or in the studio), pens, scissors, glue, paper/cardboard, sticky notes, overhead foil, foil markers, digital camera |
| Energy level | Low |
| Researchers/Facilitators | 1 or more |
| Participants | 4–8 is a good group size |
| Research techniques | Use-it-yourself, participant observation |
| Expected output | Research data (specifically bugs, insights, and new ideas), raw video footage and photos, documentation of the tested variants, and, of course, the paper prototypes themselves |
Paper prototyping is a common low-fidelity method to prototype and test software and interfaces using interactive paper mock-ups.20 The different screens of the interface are hand-sketched on paper and presented to a user. The user can then use the interface by “clicking” with their finger, indicating what they want to do. A researcher simulates the operation of the computer or device simply by replacing the screen page with the next one or by adding details on smaller pieces of paper onto the sketch (e.g., to add pop-ups).
Paper prototyping has been part of the toolset for prototyping software and interfaces since the early 1990s and rightfully earned its place. The main reason for the success of this method is that – especially early in the process – the interfaces are much faster to build on paper than using digital mock-ups, let alone programming. Plus, they are easy to change, even during the test of the prototype itself. Try this with code.
In addition, research comparing low-fidelity paper prototypes against computer-based, high-fidelity prototypes has found that “low- and high-fidelity prototypes are equally good at uncovering usability issues.”21 Even though a paper prototype is quite lo-fi in its basic appearance, it can be high-fidelity in other aspects, like the navigational structure or the actual set of features, thus delivering deep insights for these areas early on.
Of course, there are limitations. Medium-specific problems, for example, cannot be tested. Many paper prototypes also deliberately leave out most of the look and feel. However, paper prototypes are still especially helpful when exploring different design directions. High-fidelity prototypes, on the other hand, play to their strengths when it comes to actual look and feel, true performance data (responsiveness or latency of the application), or presenting the prototype to management or other stakeholders who are not familiar with low-fidelity prototypes.
Sketches of wireframes are a great starting point for paper prototypes. Wireframes give you a good overview of the layout of the site or application – but they often do not contain real content, and use placeholders rather than real images or copy. This makes it harder for the audience to use them in test scenarios since a lot of (too many?) gaps are left for the user to fill in. So, start with the wireframes and quickly add key content.
Another intriguing aspect is the impact of this method on decision making. Paper prototypes are a minor investment and clearly created to be thrown away. This makes it easier for those who created the prototypes to let go and embrace necessary changes. Similarly, actual users taking part in the test tend to feel more comfortable about suggesting changes.
Step-by-step guide PREPARATION
Choose a persona or user type: What user are you going to test this paper prototype with? Choose a persona or a specific user type.
Review scope and prototyping questions: Review the scope and the prototyping questions for this prototyping activity. What do you want to learn? Do you want to test the whole or just a part of the interface? What are the tasks that you expect the chosen user to do? How detailed do you need or want to get? Make a list of the tasks you want to test for later. Also think about who you want or need to involve. Is it just for within the project team, or are you planning to involve potential users or other stakeholders?
Sketch necessary parts: Create hand-sketched versions of everything the user will deal with while using the interface. Make sure this includes not only windows, menus, dialog boxes, pages, pop-up windows, and the like but also actual key content and/or plausible data.
Assign roles and prepare: Split your team to take on the roles of user, (computer) operator, and observer. Apart from you as the facilitator, all roles can be played by one or more people. Give them some time to prepare and practice their roles for the test and subsequent steps. Specifically, give the person or people who will act as the user(s) a few minutes to familiarize themselves with and empathize with the needs, motivations, and context of the chosen persona or user type.
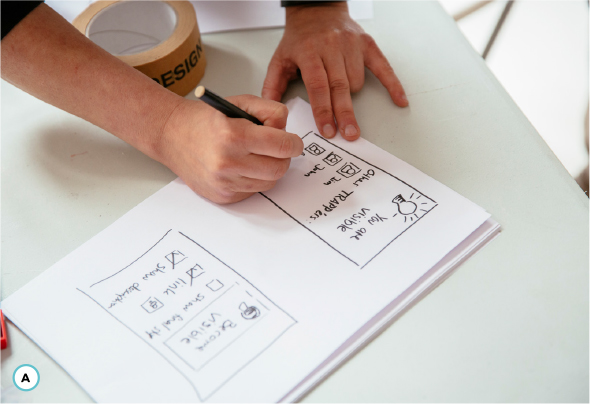
Creating hand-sketched versions of the interface: windows, menus, dialog boxes, pages, pop-ups, and so on.
Conducting the test: a user “clicks” (i.e., touches the buttons with a finger). As the user starts to use the interface, the operators react and simulate the changes in the interface by replacing or adding parts of the interface.
Step-by-step guide USE/RESEARCH
Test the prototype: Now conduct your test. Introduce the project and the context of your prototype and ask the user to perform a certain task from your list. Briefly explain how they can “click” (i.e., touching a button or a link with a finger) or “type” (i.e., writing data in appropriate fields using a pen). As the user starts to interact with the interface, the operators react and simulate the changes by replacing or adding parts of the interface. Iterate until the user has completed the task or failed horribly.
Keep a list of bugs, insights, and ideas, and review issues: During the whole test the observers will record their observations and create a list of the issues that they discover. After each testing session take a few moments to reflect on what worked, what didn’t work, what you would like to change or try next. Briefly discuss the issues you discovered and prioritize them.
Revise your prototype (optional): Changes to paper prototypes can be made very easily and quickly. So, are there any changes you should make right now?
Decide on the next task and iterate: Check off the task that has just been simulated and quickly decide which you want to try next. Then go again.
Method notes
Speak out loud: Encourage users to think out loud while they go through these tasks.
Silent operators: The operators are usually silent. Ask them to refrain from explaining how the prototype should work. The rule of thumb is: if the device or computer would not say/print/bleep it, the operators should not either.22
Discuss if necessary: You can consciously decide to enable a team discussion if this becomes necessary during the process – for example, over a roadblock that cannot be solved right away.
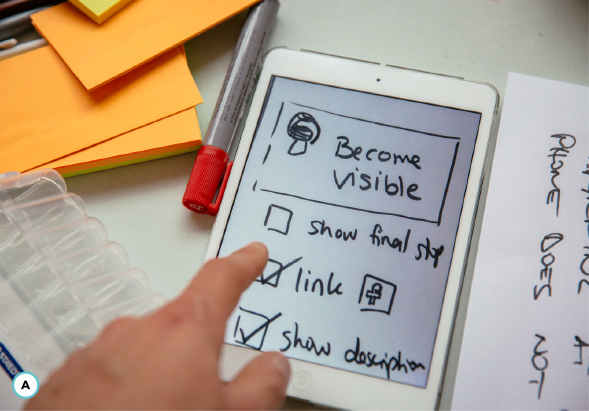
Prototyping Digital Artifacts and Software: Interactive Click Modeling
Interactive click modeling is a popular lo-fi method to create a first working digital prototype.
| Duration | Preparation: 1–2 hours to a couple of days, depending on the complexity of the prototype Testing: Approximately 1–2 hours per user/group |
| Physical requirements | Space (in context or in the studio), pens, scissors, glue, UI templates, sticky notes, prototyping apps |
| Energy level | Low |
| Researchers/Facilitators | 1 or more |
| Participants | 4–8 is a good group size |
| Research techniques | Use-it-yourself, participant observation |
| Expected output | Research data (specifically bugs, insights, and new ideas), raw video footage and photos, documentation of the tested variants, and the click-models themselves |
Over the years a variety of apps have been published that allow you to create digital click-models from simple paper prototypes. The flow of your prototyping session is the same as in paper prototyping, but now using a mixture of paper sketches and app magic.23
In a first step, you create hand-sketched versions of all the screens your users will deal with while using the interface. Using a prototyping app, you then take photos of all those screens, define buttons, and link them to matching other screens. After you have finished linking all the screens, you now have an interactive click-model of your interface that you can use for testing or storytelling.
Some of the prototyping apps are amazingly simple to use. Even people with no prior technical knowledge are able to pick them up within 20–30 minutes. Teaching the use of prototyping apps instead of only relying on written requirements can make a huge difference in the way your subject matter experts talk to developers.
Step-by-step guide PREPARATION
Choose a persona or user type: What user are you going to test this paper prototype with? Choose a persona or a specific user type.
Review scope and prototyping questions: Review the scope and the prototyping questions for this prototyping activity. What do you want to learn? Do you want to test the whole or just a part of the interface? What are the tasks that you expect the chosen user to do? How detailed do you need or want to get? Make a list of the tasks you want to test for later. Also think about who you want or need to involve. Is it just for within the project team, or are you planning to involve potential users or other stakeholders?
Sketch necessary parts: Create hand-sketched versions of everything the user will deal with while using the interface. Make sure this includes not only windows, menus, dialog boxes, pages, pop-up windows, and the like but also actual key content and/or plausible data.
Import into prototyping app: Set up the prototyping app. Take photos of your hand-sketched interfaces and import them into the prototyping app. In the app you can now define click areas that link between sketches – effectively creating a working interface.
Assign roles and prepare: Split your team to take on the roles of users and observers. Give them some time to prepare and practice their roles for the test and subsequent steps.
Step-by-step guide USE/RESEARCH
Test the prototype: Now conduct your test. Introduce the project and the context of your prototype and ask the user to perform a certain task from your list. Briefly explain how they can interact with the click-model and observe how they react to the interface. Iterate until the user has completed the task or failed horribly.
Keep a list of bugs, insights, and ideas, and review issues: During the whole test the observers will record their observations and create a list of the issues that they discover. After each testing session take a few moments to reflect on what worked, what didn’t work, what you would like to change or try next. Briefly discuss the issues you discovered and prioritize them.
Revise your prototype (optional): Changes to your prototypes can still be made very easily and quickly. So, are there any changes you should make right now?
Decide on the next task and iterate: Check off the task that has just been simulated and quickly decide which you want to try next. Then go again.
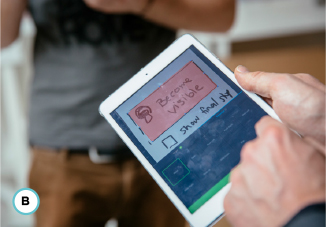
Special prototyping apps allow anyone (even without prior knowledge) to create interactive click-models of an interface by taking photos of hand-sketched screens, and then defining buttons and linking them to other screens. They can be shown to potential users for testing or storytelling to gather valuable feedback.
Method notes
Speak out loud: Encourage users to think out loud while they go through these tasks.
Discuss if necessary: You can consciously decide to enable a team discussion if this becomes necessary during the process – for example, over a roadblock that cannot be solved right away.
Show and tell: Instead of letting the users operate the click-model themselves, an operator might show them how the app works. This can be useful to elicit feedback without having to create all the otherwise necessary variants.
Film it: Filming the use of the click-model while speaking out loud what you are doing with the app is a great way to communicate the intent of your design.
Prototyping Digital Artifacts and Software: Wireframing
Wireframing uses nongraphical schematics of digital interfaces and their structure to show how they fit together and create alignment within the design team.
| Duration | 1–2 hours to a couple of days, depending on the complexity of the prototype |
| Physical requirements | Space, pens, paper, sticky notes for annotation, whiteboard, digital camera |
| Energy level | Low |
| Researchers/Facilitators | 1 or more |
| Participants | 2–10 |
| Research techniques | Use-it-yourself, participant observation |
| Expected output | Research data (specifically bugs, insights, and new ideas), raw video footage and photos, documentation of updated wireframes and annotations |
Wireframes are nongraphical schematics of the layout or arrangement of a web page or a software/app interface, including navigational structures as well as content elements.24 Most of the elements, however, are more hinted than explicit, which makes early wireframes fast to create, requiring less specialized skills and resources.
Wireframes are often used to align the different disciplines within a design team. Connecting the underlying conceptual structure (including available functions or information architecture) to the visual design, wireframes help the team to understand and explore how the different parts of the software work together. They can also be used to map out user journeys or act as the starting point for a paper prototype or interactive click-model. Wireframes are like a versatile blueprint for digital interfaces and can also be used to define user interface specifications, transitions, and gestures, as well as to map many other important aspects.
Step-by-step guide PREPARATION
Choose the user: What user are you going to test the wireframes with? Choose a persona or a specific user type.
Review scope and clarify prototyping questions: Briefly reflect. What is your scope? What do you want to learn from this prototyping activity? Do you want to test the whole experience or just a part? Which parts are you most interested in? Do you want to address one target group or more? Is the high-level structure clear? Do you need to separate landing pages? Do you only want to identify the right structure or do you also want to test the storyline? And so on. Also think about who you want or need to involve. Is it just for within the project team, or are you planning to involve potential users or other stakeholders?
Prepare wireframes: Sketch rough versions of the different screens of the interface on paper, on whiteboards, or in a special wireframing app. Don’t use color or specific fonts. Leave out aesthetics as much as possible. Use placeholder content.
Step-by-step guide USE/RESEARCH
Present the wireframes to your audience: Establish the context in which the presented wireframes will be used in the future application. Then introduce the wireframes, explain visual conventions, and present key elements.
Solicit feedback: Discuss with the team or a selected audience.
Document as you go along: Add annotations to capture changes and new ideas about the behaviors of interface elements. You might also add details about the content or the context in which the system might be used.
Wireframes help the design team to understand and explore how the different parts of software work together. They connect the conceptual structure, functions, or information architecture to the visual design.

Prototyping Ecosystems and Business Value: Service Advertisements
Service advertisements are prototype advertisements that allow us to (re)focus on the core value proposition and test the desirability and perceived value of a new offering.
| Duration | From 15 minutes to a few hours (for advertisement posters – other formats can take longer to prepare and produce) |
| Physical requirements | Flipchart paper and a selection of flipchart markers, A4 paper for initial sketches, sticky notes, digital camera, tape |
| Energy level | Medium to high |
| Researchers/Facilitators | 0 or 1 |
| Participants | 1 or more (4-8 is a good group size) |
| Research techniques | Participant observation, interviews, co-design |
| Expected output | Research data (specifically bugs, insights, and new ideas), raw video footage and photos, quotes from the test audience, and the advertisements themselves (e.g., posters or video prototypes of enacted advertisements) |
Developing service advertisements as prototypes can help you quickly explore and capture potential core value propositions that are inherent in a design concept. In the design team, creating service advertisements can also help the team to (re)focus on the core value proposition of a prototype or idea. Later, they can be used to test if the target audience understands and values the innovation.
The most widely adopted form for a service ad is the simple advertisement poster (or ad poster) – a fairly big A1 or A0 poster that uses concise slogans, engaging visuals, and text to communicate or sell in public places like bus stops or shopping centers. Further into the project, service advertisements can also be created as online ads, web landing pages, or TV or video advertisements – including in-depth documentary-style variants.
When taken to a wider audience for testing and research, service advertisements have proven to be very effective in implementing a “fake it before you make it” approach to prototyping. Online shoe retailer Zappos did not start by prototyping expensive and complex distribution or warehousing systems. Instead, the founder created a prototype which focused on exploring and evaluating the core value proposition: will customers be willing to actually buy shoes online? He set up a lightweight web shop to sell shoes. Anytime someone ordered a pair, he would pop over to one of the local stores, buy them at full price, and mail them. Thankfully, he discovered that there actually was a demand. In 2008, Zappos hit $1 billion in annual sales, and it was sold to Amazon in 2009 for $1.2 billion.25
Effectively, many campaigns on crowdfunding platforms can also be seen as advertisement prototypes trying to sell (a) the service or product and (b) trust in the team that they will be able to implement when the funding campaign is successful.
When creating an advertisement prototype, it can be useful to remember Elmer Wheeler’s famous quote: “Don’t sell the steak, sell the sizzle. It’s the sizzle that sells the steak and not the cow. Hidden in everything you sell in life is a sizzle. The sizzle is the tang in the cheese, the crunch in the cracker, the whiff in the coffee and the pucker in the pickle.”26 This implies that you need to go beyond simply describing the facts about your new product. Take a family car, for example. It might be nice to know (for some) that it features a steel cage made from hot-formed boron steel (“steak”). But what matters more is that this thing (“boro … WHAT?”) keeps your family safe (“sizzle”).27 On the other hand, only talking about the benefits – the sizzle – won’t work either. Nobody will buy “a mystery product that will make you rich” without knowing at least roughly what they are buying.
For prototyping purposes, it is key to go for a balance. Your service advertisement needs to explain enough facts and details (“steak”) that the audience can understand what the new service or product actually is, but it also needs to convey enough emotion (“sizzle”) that they can also understand why they should care. With this combination, there is a good chance of valuable feedback from your research audience.
Step-by-step guide PREPARATION
In this example, we will assume the service ad is to be a poster. Other media can be developed in a similar way.
Choose an audience: Who is the target audience for this advertisement? Choose a persona, a specific user type, or a key stakeholder and familiarize yourself with the audience.
Briefly review scope and clarify prototyping questions: Briefly reflect. What is your scope? What do you want to learn? Do you want to test the concept or just a part? Which part are you most interested in? Also think about the context: in which step of the customer journey will the advertisement play a role?
Brainstorm potential content: Do a brief brainstorming on ideas for emotional (“sizzle”) and factual (“steak”) content as input for the poster. What do you want to communicate in the advertisement? What could be suitable emotional hooks or narratives? What are the facts?
Sketch out the advertisement: On flipchart paper, individually create multiple quick sketches to advertise your service. Remember, ads must be quick and easy to understand, so use images and very few words, and choose them carefully. Most people will look at advertisement posters for no more than a few seconds. It is therefore key to focus on the core messages. Select the ones you want to take forward and test with an audience.
Step-by-step guide USE/RESEARCH
Test the advertisement: Show your advertisements to people who do not yet know your project and collect their feedback: What do they think the advertisement is for? What are the hard facts they have learned about the product? What are the emotional aspects? Would they want to learn more? Would they want to buy?
Keep a list of bugs, insights, and ideas, and review issues: Make sure to record your observations over the whole test and create a list of the issues that you discover. After each testing session, discuss what worked, what didn’t work, what you would like to change or try next. Prioritize.
Revise your advertisements (optional): Are there any changes you can or should make right now? Remember that changes to an advertisement poster can be made very easily and quickly. Do them now.
Decide on the next steps and iterate: Check off what you just tested and quickly decide what to do next. Then go again.
Document: Document and finalize your work. Use photos or videos of your advertisement and its variations as well as key interactions to document the latest version(s). Briefly reflect on your documentation and identify the critical issues, problems, or opportunity areas that need to be addressed in the next steps in the design process.
Present (optional): Using a storytelling approach, present your last iteration and key learnings to other stakeholders and gather feedback. It is often useful to also capture the presentation and the final feedback rounds on video and add them to your documentation.
Method notes
Use advertisement-specific ideation cards: If there are no ad specialists in the team, consider using specific ideation cards like Mario Pricken’s Creative Sessions cards.28 Those card sets are based on a surprisingly manageable number of creativity patterns that emerged through an in-depth analysis of a broad range of successful advertisements. These patterns can be used in your ideation and significantly enhance the quality of the resulting advertisements.29
Act out the advertisement: Play with the format. Also use theatrical techniques like investigative rehearsal to improvise and quickly act out a TV ad. Simulate a quick sales pitch in the shop.
Consider your brand: When discussing the scope of the prototyping session, be aware that advertisements always are very much interlinked with your brand. If you have to work with an existing brand, you can choose to follow the given corporate identity, or you can explicitly go beyond or even ignore it altogether. This allows you to explore the mutual influence of your brand on your service or product and helps you assess a potentially necessary brand stretch. “Will people buy this?” is quite different to “Will people buy this from (insert your startup/multinational/nonprofit organization/public sector organization/…)?”
Service advertisement posters are a fast and engaging way to quickly explore, clarify, and test your value proposition.
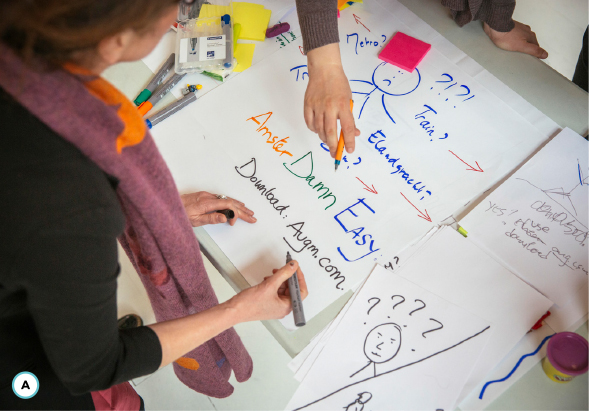
Prototyping Ecosystems and Business Value: Desktop System Mapping (Aka Business Origami)
Desktop system mapping is an approach which helps us to understand complex value networks using simple paper cutouts representing key people, locations, channels, and touchpoints.
| Duration | Approximately 2–3 hours (depending on group size) |
| Physical requirements | Space, Business Origami kits, scissors, pens, tape, camera, a set of new service concepts that need to be explored |
| Energy level | Medium |
| Researchers/Facilitators | 1 or more |
| Participants | 5–15 people who have a sound knowledge of your current service system or want to explore a future service system around new concepts (select a good mix from all levels of your organization to capture the service system holistically) |
| Research techniques | Participant observation, co-design |
| Expected output | Wireframes, insights, ideas, questions, documentation |
Prepared paper cutouts representing key people, locations, channels, and touchpoints can be quickly placed, moved, and reconfigured on a table or horizontal whiteboard until the team are happy with the model. Relationships and value exchanges can be easily visualized by grouping or drawing connections between different elements directly on the whiteboard. Since most systems are not static by nature, many projects will also look at the development of the model over time (the “service system journey”) or compare alternative systems.30
The interaction with the Business Origami setup is straightforward and invites everybody into the process – without any prior technical knowledge. Due to the businesslike look and feel of the cutouts, this is a great tool to introduce. The simplicity of the components and the ability to rapidly experiment with different setups is key here. It triggers focused conversations among the participants, quickly uncovering assumptions and contributing to a shared understanding of the inner workings of the complex service ecosystem. It is important to remember that the critical deliverable is not the model itself, but the experience of modeling the service system in the team.
As a technique, Business Origami can be applied throughout the service design process. During research, it can be used to map and understand the existing business or service system. Later, during ideation and prototyping, it can help to continually explore what kind of business system your newly created future service concepts might imply.
“Business Origami creates a miniature movie set, with props and actors to tell stories,” says Jess McMullin.31 In that sense, Business Origami is to system mapping what the desktop walkthrough is to journey mapping, though the boundaries can sometimes be blurry (i.e., you can simply use elements of the Business Origami kit to do a proper desktop walkthrough). We suggest you keep the methods separate, though. Use a desktop walkthrough to focus on the experience of a stakeholder over time. Use Business Origami to look at a more holistic service system and how its different parts play together (over time).
Step-by-step guide PREPARATION
Review scope and prototyping questions: Review the scope and the prototyping questions for this activity. What do you want to learn? Do you want to test the whole system or just a part? How detailed do you need or want to get?
Split into groups: Split the participants into teams of 2–3 people. Each team chooses a new service concept to explore using Business Origami.
Set up workspace and materials: Each team gets its own set of Business Origami materials and a whiteboard. For convenience, the whiteboard can also be replaced by laminated plotter paper or static-cling dry erase sheets.
Briefing: Brief the participants on what service system or which part of a given service system they need to model.
Create the key elements: Ask the teams to create, cut out, fold, and label the key elements of their service system using the paper. Who are the important people or groups of people? Which channels or communication tools/devices do they use? What locations are important?
Step-by-step guide USE/RESEARCH
Create a first draft of the service system: Ask participants to place key elements onto the map. Add the prepared elements for important people or organizations, channels or communication tools, and important locations.
Then, connect them. Reflect on relationships, value exchanges, (inter)actions, or basic material/money/information flows. Add those connections as arrows between the respective elements. Make sure to label the arrows as you draw them.
If necessary, group elements using boxes or circles. Again, do not forget to label each group.
Improve: Is the model complete? Ask the teams to add missing elements and update the relationships and/or groupings if necessary.
Keep a bug list/idea sheet: Remind the teams to keep a bug list and an idea sheet to note their insights and ideas as they explore the service system.
Feedback: Do a short presentation round. The groups get 2 minutes each to present their work in progress. After each presentation, they receive feedback from the other groups. Use red/green feedback.32 Make sure the teams capture the feedback on their bug lists/idea sheets. Give the groups some time after the presentations to consolidate their models.
Simulate the service system over time: Service systems are dynamic. Ask the teams to choose a meaningful time frame and walk the system through this system journey. Who or what has to move at each step in the journey? How stable are the relationships? Do they have to change over time? What are the critical moments in this service system? Does everything fit together?
Document: Ask the teams to finalize and document their models. Ask them to use annotated photo storyboards, stop motion video, or video “fly-throughs” to document.
Present: Let the teams present their models. Remind them that it is not about the static system, but how the different elements play out over time – the journey of the service system. Ask them to use a storytelling approach to talk the group through their models. Optionally, you can also capture the presentations and the final feedback rounds on video.
Reflect: In the plenary, give some more time to reflect. Let the whole group identify elements or relationships within any of the models that should be worked on in the next steps. Ask the participants to add potential next steps on sticky notes (e.g., doing further research, prototyping, testing of specific elements, etc.).
Method notes
Doing, not talking: Watch out for talking in the groups – the method can quickly trigger deep discussions. Instead of just talking, encourage the teams to simulate their talking points using the models on the table.
Business Origami first looks at the whole system, taking a holistic approach. Like with many other service design tools, the critical deliverable is not the model itself but the experience of modeling the service system in the team.
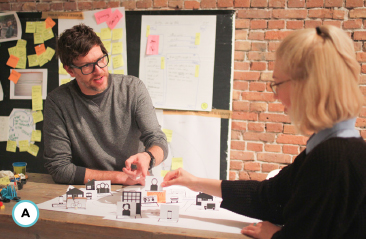
The setup of the workspace is not predefined and follows the structure of the service system. The clear set of preprepared elements is helpful if participants are new to the method.
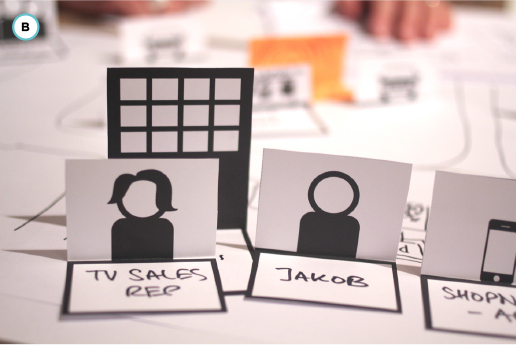
Paper cutouts are the playing figures in Business Origami. There are prepared elements for stakeholders, things, channels, places, and more.
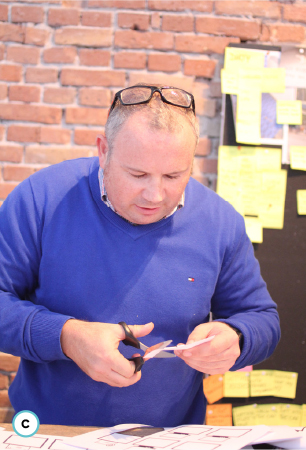
Prototyping Ecosystems and Business Value: Business Model Canvas
The Business Model Canvas is a high-level approach to co-create and visualize the key components of a business model that allows you to iteratively test and refine various options.
| Duration | Approximately 3–4 hours (depending on group size) |
| Physical requirements | Space, Business Model Canvas templates, pens, camera |
| Energy level | Low |
| Researchers/Facilitators | 1 or more |
| Participants | 5–15 people who have a sound knowledge of the different parts of the service concept (select a good mix from all levels of your organization to capture the business case holistically) |
| Research techniques | Co-creative workshops, interviews |
| Expected output | Research data (specifically bugs, insights, and new ideas), photos, pitch(es) for new business models |
Considering business models is an inherent part of any service design process. Any changes of organizational structures, processes, software, products, services, stakeholder relationships, or customer groups affect different parts of a business model – in return, most changes of a business model affect the employee or customer experience, and therefore shouldn’t be done without an accompanying service design process.
However, the process of writing a complete business plan to define a business model is a bad match for the quick and iterative working style of service design. Instead, you need tools to quickly visualize a business model so you can iteratively test and refine various options. These tools should not be a substitute for a classic business plan, which you often still need – for example, for investment decisions by external stakeholders. Instead, such tools can complement a business plan: prototyping and testing various scenarios can help you understand the impact of various options on the employee and customer experience as well as on the business. Based on a refined and tested business model, you can then easily detail out an extensive business plan.
With the Business Model Canvas, you can quickly sketch out the business model of existing services or products, whether physical or digital, or prototype the business model of new concepts. It is intended to be used as a tool in an iterative design process. The template was developed by Alexander Osterwalder based on his scholarly work on the ontology of business models. In his PhD thesis, he compared different business model conceptualizations and identified their similarities. These became the building blocks of his Business Model Canvas:33
Value Propositions: Summarizing what value a company delivers to its customers.
Customer Segments: Describing the company’s most important customers.
Channels: Highlighting through which channels customers want to be reached and which ones work best and are most cost-efficient.
Customer Relationships: Visualizing what type of relationship each customer segment expects the company to establish and maintain with it.
Key Activities: Showing the key activities that value propositions, channels, customer relationships, revenue streams, and so on require.
Key Resources: Illustrating the key resources that value propositions, channels, customer relationships, revenue streams, and so on require.
Key Partners: Describing the closer ecosystem in which a company operates.
Cost Structure: Outlining the most important cost drivers of a business model.
Revenue Streams: Identifying potential revenue sources of a business model.
The good news is, you often do not have to start from scratch. The upper seven building blocks of the Business Model Canvas are directly connected to key service design tools like journey maps, personas, system maps, prototypes, and service blueprints (see image A on the following page).
Considered a strategic management tool, the Business Model Canvas helps to connect and balance customer-centric tools with “hard facts” such as resources, revenue streams, and cost structures. Hence, this framework creates a common ground for designers and managers to talk about new service concepts within any organizational structure.
The lower blocks (cost structure and revenue streams) help you to estimate the potential financial impact of a business model. These financial blocks themselves depend on the estimation of costs related to key partners, key resources, and the key activities needed to offer a value proposition, as well as revenues derived from the value proposition when it is offered to customer segments, through channels, and in a defined customer relationship.
Business Model Canvas and connected service design tools.
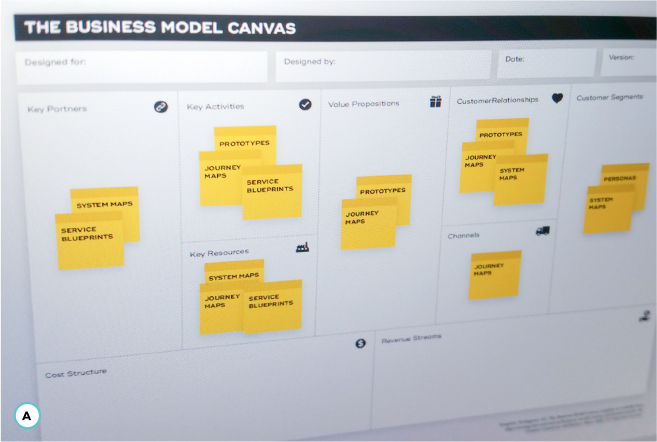
Step-by-step guide PREPARATION
The Business Model Canvas is a very flexible tool, and there is not one prescriptive way to use it. However, as a start, following these simple steps might help:
Review scope and clarify prototyping questions: Briefly reflect. What is your scope? What do you want to learn from this prototyping activity? Do you want to test the whole experience or just a part? Which parts are you most interested in?
Who to invite: Invite the right people to work beside your core team for the exercise (this might include people who know the background, people with no preconceptions, experts, representatives of the implementation team, people who will deliver the service, users, controllers, management, etc.).
Prepare the Business Model Canvas template (and other service design tools you already have): If you can’t print a large one on paper, simply sketch the template on a large sheet of paper. It helps if you have personas, stakeholder maps, customer journeys, and prototypes at hand as well.
Step-by-step guide USE/RESEARCH
Fill in the upper seven boxes: If available, use information from other service design tools to fill in the blocks about the value proposition, customers (customer segments, channels, customer relationships), and infrastructure (key processes, key resources, key partners). See the image on the previous page for a basic mapping of key service design tools onto those blocks.34
Using the Business Model Canvas, you can quickly sketch out the business model of existing services or products, whether physical or digital, or prototype the business model of new concepts.

Using information from other service design tools helps fill in many of the blocks in the Business Model Canvas – or an existing Business Model Canvas can kick-start many service design tools. The discussion of the cost and revenue streams that follows is an important milestone and can change the direction of a concept considerably.
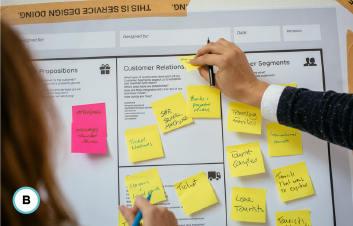
Fill in the lower two boxes: Go through the infrastructure blocks to identify cost drivers and go through the customer blocks to find potential revenue streams. Once you have both cost and revenue structures, put numbers to them and estimate costs and revenues.
Create alternatives, iterate, and refine: Search for missing information and try to fill these gaps. Prototype and test if your business model is sustainable. Then start creating alternative business models and test potential options you have for the infrastructure blocks (change partners, processes, or resources) as well as for revenue streams (other customer segments, channels, customer relationships). Compare different models, iterate, and combine and refine them.
Method notes
Use of sticky notes: We recommend using a large paper template, sticky notes, and thick felt tip pens. Using sticky notes helps you to focus on the most important aspects and minimizes the risk of getting lost in detail. Rule of thumb: if you cannot fit any more sticky notes into one of the boxes, your discussion is already too detailed.
Working with multiple customer segments: If you are delivering different value propositions to different customer segments within one canvas (e.g., a hotel booking platform has at least two core customer segments, the hotel guests and the hotels themselves), try to use one color of sticky notes for each customer segment and their respective value propositions and a different color for the other customer segment.
Compare to competition, market, and trends: The business model also needs to be analyzed and challenged with respect to competition, market forces, industry forces, and future trends. For example, it can be very useful to also fill in a couple of canvases for your main competitors and compare your strengths and weaknesses.
General Methods: Sketching
Sketching refers to methods of visualization or representation of design ideas that support fast and flexible exploration.
| Duration | From a few minutes to a couple of hours |
| Physical requirements | Sketching tools (e.g., pens and paper), cardboard, scissors, glue; creative programming environments, creative hardware tinker kits, or similar; camera, flipchart, sticky notes and pens to document and capture feedback |
| Energy level | Low to medium |
| Researchers/Facilitators | 1 or more |
| Participants | 3 or more |
| Research techniques | Studio interviews, focus groups, concept tests/discussions |
| Expected output | Research data (specifically bugs, insights, and new ideas), raw video footage and photos |
Sketches are flexible, quick, and inexpensive visualizations or representations. Their explorative nature makes them a good first step in the prototyping process. In their most common form, sketches are prepared using pen and paper: they are low-fidelity visualizations of an initial idea or concept made in seconds or minutes. However, you are not limited to these tools. Sketches can be created using almost any medium as long as they are quick to produce, inexpensive, and support exploration. For example, Processing – an easy-to-learn programming environment for designers and artists – explicitly calls its programs sketches.35 Open hardware prototyping platforms like Arduino – which brought hardware tinkering to the masses – often use the term sketching in hardware.36 Similarly, bodystorming and early-stage walkthrough techniques are very efficient lo-fi ways to sketch (inter)actions using simplified forms of re-enactment, or sketching with our bodies.
Step-by-step guide PREPARATION
Review scope and clarify prototyping questions: What do you want to learn or explore? Look at your starting point and consider if and how you will bring previous knowledge into the room (for example, as a research wall, via artifacts for inspiration, or as key insights).
Decide who to invite: Invite the right people to work beside your core team for the exercise (this might include people who know the background, people with no preconceptions, experts, representatives of the implementation team, people who will deliver the service, users, management, etc.).
If you chose to do sketching with specific materials, code, or hardware, make sure you have the required skillsets in the team. Balance your teams so everybody can contribute during the sketching process. For example, when sketching in code, not everybody needs to be a coder; some can contribute by creating graphical elements, writing copy, or working out scenarios and information structures.
Decide on quantity or deeper investigation: Decide if you will be aiming for quantity, or for a more considered investigation or “deep dive” into particular themes or ideas. This decision will depend on where you are in your development process and will affect, for example, how much time you allow for the task.
Prepare sketching tools: Set up and prepare your sketching tools and your working environment. When working with pen and paper, just put them on a table. When working with code or hardware, it can be highly beneficial to take a bit of time to carefully select and prepare only a limited set of tools and platforms, optimizing for speed of sketching.
Create sketches: After you have given the group a design challenge (e.g., a “How might we …?” question), ask them to sketch varied concepts that address the challenge. If you are aiming for quantity, you might ask participants to resist the urge to discuss the ideas, but instead to concentrate on producing many sketches. (If it fits the sketching method, they might even work in silence, placing finished sketches in a visible place for others to see and build upon.) If you are looking for more depth, you might promote discussion and co-creation of the sketches as they are developed.
Sketches using pen and paper provide a quick and low-fidelity visualization of an initial idea or concept.
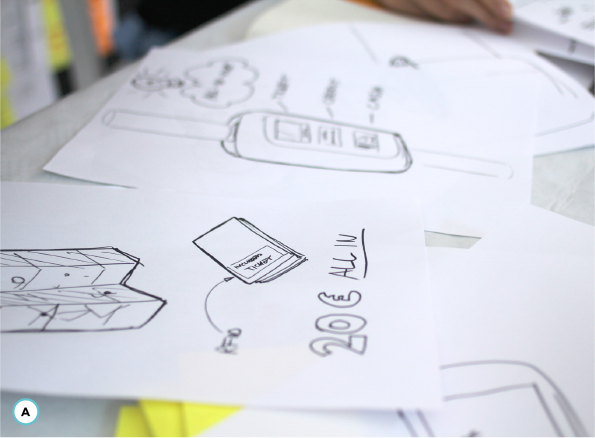
Open source prototyping platforms like Arduino allow you to sketch in hardware, creating first working prototypes of interactive devices.
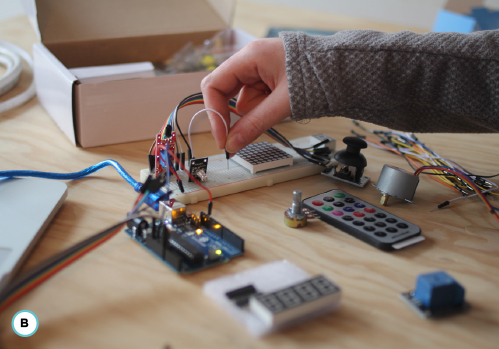
Early exploratory sketches often are for yourself only, and if not you will be able to explain them anyway. Therefore, go for inspiration, not perfection. Learn from children, who are experts in doing just that.
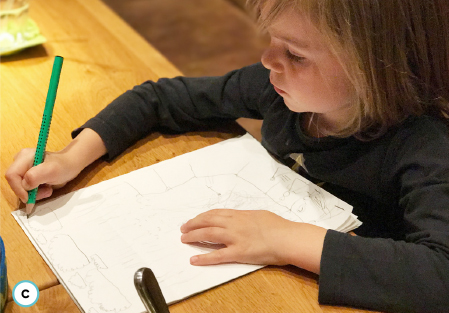
Step-by-step guide USE/RESEARCH
Present and elicit feedback: Present sketches either to each other within the design team or to an external audience to receive feedback and ignite discussions. During these sessions, you can directly work on existing sketches (e.g., by adding annotations or changing them on the spot) or easily add new ones with the new ideas already included. One alternative method is for the sketchers to present their work without explanation, and ask the people viewing the sketch to describe what they see and what it might be useful for.
Keep a list of bugs, insights, and ideas: After each session take a few moments to reflect on what you have learned, and what you would like to change or try next. Briefly discuss the issues you discovered and prioritize them.
Revise your sketches and iterate (optional): Are there any changes you can or should make right now? Do them quickly, then iterate from step 1.
Document: Document and finalize your work. Use photos or videos of your sketches as well as key interactions to document the latest version from your sketching session. Briefly reflect on your documentation and identify critical issues as well as problem or opportunity areas that need to be addressed in the next steps in the design process.
With the right prototyping platform, sketching in code lets you explore working prototypes early.
Bodystorming is a very efficient lo-fi way to sketch (inter)actions using re-enactment – or “sketching with our bodies.”
General Methods: Mood Boards
Mood boards are collages that help to visualize and communicate intended design direction.
| Duration | From 30 minutes to a couple of hours |
| Physical requirements | Wall space/printer/scissors/glue or whiteboard/projector; access to photos, images, and artifacts; flipchart, sticky notes and pens to annotate and record feedback |
| Energy level | Low to medium |
| Researchers/Facilitators | 1 or more |
| Participants | 3 or more |
| Research techniques | Studio interviews, focus groups, concept tests/discussions |
| Expected output | Research data (specifically bugs, insights, and new ideas), photos, collages |
Mood boards are collages of existing or specially created text, sketches, visualizations, photos, videos, or any other media to communicate an intended design direction. Often used for but certainly not limited to look-and-feel prototyping, mood boards are a way to communicate target experiences, style, or contexts by leveraging analogies of already known concepts.
Step-by-step guide PREPARATION
Review scope and clarify prototyping questions: Briefly reflect. What is your scope? What do you want to learn from this prototyping activity? Also think about who you want or need to involve. Is it just for within the project team, or are you planning to involve potential users or other stakeholders?
Collect inspiration: Start to collect inspiration and raw material from all the sources you have available. This might include physically going through relevant newspapers or magazines, digging through online repositories like stock photo libraries or photo or video sharing sites, selecting materials from your own media library, or – last but not least – quickly creating new material yourself by going out and taking photo and video footage.
Organize and refine: Organize that material and set up a first collage. Then, fill in gaps and reshuffle the deck until you are happy with the mood board. Your mood board can be a physical one where you print out everything and glue it on, or it can be a digital mood board, which is a more practical solution if you are working with video or interactive media.
Step-by-step guide USE/RESEARCH
Present and collect feedback: Present your mood boards either to each other within the design team or to an external audience to receive feedback and ignite discussions.
Annotate and revise: During these presentation sessions, you can work on existing boards by adding annotations or adding, reshuffling, or removing media, or even create completely new boards from a pool of data. Then iterate.
Mood boards are collages of existing media to communicate an intended design direction.

General Methods: Wizard of Oz Approaches
In Wizard of Oz approaches, you fake it using invisible puppeteers.
| Duration | From a few hours to a couple of days |
| Physical requirements | A flexible, private space, prototypes of physical or digital interfaces (e.g., cardboard prototypes, paper prototypes, click-models, etc.), camera, flipchart, sticky notes and pens to document and capture feedback |
| Energy level | Medium |
| Researchers/Facilitators | 1 or more |
| Participants | 5 or more |
| Research techniques | Participant/non-participant observation, contextual interviews |
| Expected output | Research data (specifically bugs, insights, and new ideas), raw video footage and photos, observations and interview transcripts |
In Wizard of Oz techniques, the responses from people, devices, apps, or the context/environment are manually created by invisible operators (“wizards”) behind the scenes. The users are working under the assumption that they are dealing with an actual working prototype. Wizard of Oz approaches can help to efficiently test user reactions before investing time and effort into more complex working prototypes.37 All relevant parts of the service or system are carefully prepared and rigged to allow the “wizards” to create realistic responses on the spot. Think of the operator as an invisible puppeteer for those objects and service elements, simulating the operation of backstage processes, devices, or the environment. The core functionality and value are explored and evaluated.
Step-by-step guide PREPARATION
Review scope and clarify prototyping questions: What do you want to learn or explore? Look at your starting point and consider if and how you will bring previous knowledge into the room (for example, as a research wall or as key insights). Do you want to test the whole or just a part of the interface? What are the tasks that you expect the chosen user to do? How detailed do you need or want to get? Make a list of the tasks you want to test for later.
Identify participants: Based on your research question, define criteria for selecting suitable test subjects. Use sampling techniques to select your test users and consider including internal experts or external agencies for recruitment.
Prepare scenarios and create interface elements: Use digital service or investigative rehearsal sessions to generate a set of key scenarios. Then use suitable techniques to prepare the key elements the users will interact with (e.g., leveraging cardboard prototyping, paper prototyping, wireframing, or sketching in code).
Rig ’em, assign roles, and practice: Rig all the relevant parts of the service or system to allow the “wizards” to control the interaction and appropriately react to the actions of the user. Then split your team to take on the roles of operators (“wizards”) and observers. Allow the wizards to practice until you achieve the intended experience.
Set up the test space: Set up your test space. You might want to establish a video link or a mirror wall so the wizard is hidden from the user while still being able to observe the user.
Step-by-step guide USE/RESEARCH
Test the prototype: Conduct your test. Introduce the project and the context of your prototype and ask the user to perform a certain task from a selected scenario. As the user starts to use the prototype, the operator simulates the operation of backstage processes, devices, or the environment by manipulating the objects and environment behind the scenes.
Keep a list of bugs, insights, and ideas, and review issues: During the test the observers will record their observations and create a list of the issues that they discover. After each testing session take a few moments to reflect on what worked, what didn’t work, what you would like to change or try next. Briefly discuss the issues you discovered and prioritize them.
Revise and iterate: Check off the task or scenario that has just been simulated and quickly decide which one you want to try next. Revise the reactions of the “wizard” and consider changes to the respective elements if necessary. Then go again.
At the end of your testing session, reveal the wizards and do a final debrief with the users.
In Wizard of Oz techniques, the responses from people, devices, apps, or the context/environment are manually created by invisible operators (“wizards”) behind the scenes. Think of the operator as an invisible puppeteer controlling those objects and service elements.
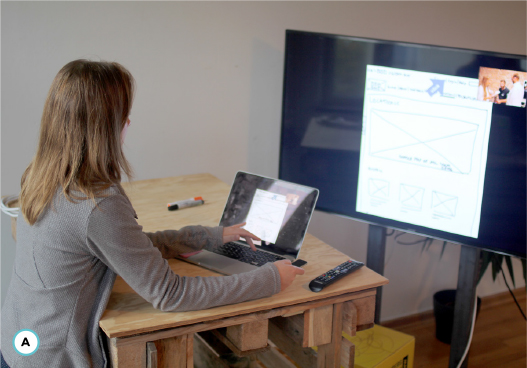
1 If going through the whole service using a full-blown investigative rehearsal is too complex, focus on lightweight end-to-end variants like the seated investigative rehearsal or blocking rehearsal.
2 We will use the term “theater” here for simplicity, but you can always think of other performing arts as well, like opera, film, music, and dance.
3 See Goffman, E. (1959). The Presentation of Self in Everyday Life. Anchor Books.
4 See Fisk, R. P., & Grove, S. J. (2012). “A Performing Arts Perspective on Service Design.” Touchpoint, 4(2), 20–25.
5 Lawrence, A., & Hormess, M. (2012). “Beyond Roleplay: Better Techniques to Steal from Theater.” Touchpoint, 3(3), 64–67.
6 Forum Theater is a well-known technique from the “Theater of the Oppressed” by influential Brazilian theater director Augusto Boal; see, for example, Boal, A. (2000). Theater of the Oppressed. Pluto Press. Investigative rehearsal uses participants’ own experiences, ideas, or prototypes as a starting point, and goes beyond Forum’s focus on behavioral strategies to also examine and challenge the basic process, the architectural setting, support tools, and more.
7 See #TiSDD Chapter 4, Facilitating workshops, for more on safe space and an example workshop plan using investigative rehearsal.
8 Oulasvirta, A., Kurvinen, E., & Kankainen, T. (2003). “Understanding Contexts by Being There: Case Studies in Bodystorming.” Personal and Ubiquitous Computing, 7(2), 125–134.
9 Or singing rehearsal, as the Sitzprobe originates from musical theater, where singers would sit next to the orchestra to rehearse. In service design, singing is very much niche and rarely used, unfortunately.
10 See Moore, S. (1984). The Stanislavski System: The Professional Training of an Actor. Penguin Books. For a film where subtext becomes explicit for comedic effect, see Annie Hall (Woody Allen, 1977, MGM).
11 See Blomkvist, J., Fjuk, A., & Sayapina, V. (2016). “Low Threshold Service Design: Desktop Walkthrough.” In Proceedings of the Service Design and Innovation Conference (pp. 154–166). Linköping University Electronic Press.
12 While we experience a lot of reservations in participants toward sketching or drawing, there are less objections to building and playing through. The focus on visualization that is present in many publications in the design field might be a bias that stems from the fact that designers are traditionally trained in these fields. To be able to use the skills and talents of all participants in a co-creative setting, there should be a balance across any media that are useful and available (written/spoken word, acting, building, sketching, etc.).
13 For example, see Hallgrimsson, B. (2012). Prototyping and Modelmaking for Product Design. Laurence King Publishing.
14 For example, early in the process, a 6-hour prototyping session could push a team of 3–5 people to produce 20+ sketches and 3–5 desktop-sized cardboard prototypes before making a decision and building one full-sized one in the last 2 hours.
15 For an example where service designers set up a cardboard hospital, see Kronqvist, J., Erving, H., & Leinonen, T. (2013). “Cardboard Hospital: Prototyping Patient-Centric Environments and Services.” In Proceedings of the Nordes 2013 Conference (pp. 293–302). The Royal Danish Academy of Fine Arts. A video is available at https://vimeo.com/46812964.
16 Of course, you can always temporarily lift that rule to have the operators help the user. You can consciously decide to enable a team discussion if this becomes necessary during the process – for example, over a roadblock that cannot be solved right away.
17 Photo: We Question Our Project.
18 See #TiSDD Chapter 4, Facilitating workshops, for more on safe space and a detailed example of building safe space for an investigative rehearsal session.
19 Oulasvirta, A., Kurvinen, E., & Kankainen, T. (2003). “Understanding Contexts by Being There: Case Studies in Bodystorming.” Personal and Ubiquitous Computing, 7(2), 125–134.
20 See Snyder, C. (2003). Paper Prototyping: The Fast and Easy Way to Design and Refine User Interfaces. Morgan Kaufmann.
21 See Walker, M., Takayama, L., & Landay, J. A. (2002). “High-Fidelity or Low-Fidelity, Paper or Computer? Choosing Attributes When Testing Web Prototypes.” In Proceedings of the Human Factors and Ergonomics Society Annual Meeting (vol. 46, no. 5, pp. 661–665). SAGE Publications.
22 Of course, you can always temporarily lift that rule to have the operators help the user.
23 See for example marvelapp.com.
24 See, for example, Brown, D. M. (2010). Communicating Design: Developing Web Site Documentation for Design and Planning. New Riders.
25 Adapted from Ries, E. (2011). The Lean Startup: How Today’s Entrepreneurs Use Continuous Innovation to Create Radically Successful Businesses. Crown Books.
26 See Wheeler, E. (1938). Tested Sentences That Sell. Prentice Hall.
27 Another version compares “sausage” to “sizzle.” You can’t sell a sausage by describing it – “a cleaned-out animal intestine filled with unsellable waste meat” is accurate but unappetizing. You have to sell it with the sizzling sound of “zzzzzsh.”
28 A great card set (in German) for ideating advertisements is Klell, C., & Pricken, M. (2005). Kribbeln im Kopf: Creative Sessions. Schmidt. It is based on the book Pricken, M. (2008). Creative Advertising: Ideas and Techniques from the World’s Best Campaigns. Thames & Hudson. Also see Using cards and checklists in #TiSDD 6.4, Ideation methods.
29 Goldenberg, J., Mazursky, D., & Solomon, S. (1999). “The Fundamental Templates of Quality Ads.” Marketing Science, 18(3), 333–351.
30 See Hitachi Ltd. (n.d.). “Experiential Value: Introduce and Elicit Ideas,” at http://www.hitachi.com/rd/portal/contents/design/business_origami/index.html. See also McMullin, J. (2011). “Business Origami,” at http://www.citizenexperience.com/2010/04/30/business-origami/.
31 McMullin, J. (2011) “Business Origami - UX Week 2011 Workshop.” Retrieved January 4, 2016, from http://de.slideshare.net/jessmcmullin/business-origami-ux-week-2011-workshop.
32 See method description Red and green feedback (Chapter 4).
33 You can find more on the Business Model Canvas in Osterwalder, A., & Pigneur, Y. (2010). Business Model Generation: A Handbook for Visionaries, Game Changers, and Challengers. John Wiley & Sons.
34 See #TiSDD 3.6, Business Model Canvas, for a more detailed description of this mapping.
35 See Reas, C., & Fry, B. (2004). “Processing.org: Programming for Artists and Designers.” In ACM SIGGRAPH 2004 Web Graphics (p. 3). ACM.
36 For a first discussion see Holmquist, L. (2006). “Sketching in Hardware.” Interactions, 13(1), 47–60. But it is possibly best to find a local makerspace, get your hands dirty and make things!
37 Go watch The Wizard of Oz (Victor Fleming, 1939, MGM). Only then, get some more popcorn and read the seminal publication on Wizard of Oz techniques in design: Kelley, J. F. (1984). “An Iterative Design Methodology for User-Friendly Natural Language Office Information Applications.” ACM Transactions on Information Systems (TOIS), 2(1), 26–41.