
Set Up Reminders
Setting up the Reminders app involves specifying where your lists are stored and creating any additional lists that you need, plus telling Reminders which list to add items to by default.
Specify Where Your Lists Will Live
You can store reminders locally (just on your Mac) or connect them to an account on a cloud service—say, iCloud. If you keep reminders on your Mac, they remain private, but you can access them only there. Use a cloud service, on the other hand, and you can access reminders from any iPhone, iPad, Mac, HomePod, or Apple Watch that uses that account. (If you’re using iCloud, you can also see your reminders at iCloud.com.) Edits and notifications show up everywhere, so you’re always in the know.
One thing worth considering: Local reminders and those that use internet accounts other than iCloud can’t take advantage of all of the new Reminders app’s features. For example, you can’t flag local or Yahoo! reminders or include a clickable URL or image in one.
To use a cloud service for Reminders on your Mac:
Go to Apple > System Preferences > Internet Accounts.
Select the account type—choices with a Reminders checkbox include AOL, Exchange, Yahoo, and, of course, iCloud. The checkbox does not appear if you choose Google or Other CalDAV account.
Click Continue and then sign in to the account at the prompts.
Select the Reminders checkbox (Figure 51). If you don’t see a Reminders box for a service, that provider doesn’t offer reminders.

Figure 51: Select a service in the list and then check the Reminders box to include reminders from that service. (I’ve redacted email addresses.)
To stop using an account for reminders on your Mac, choose Apple > System Preferences > Internet Accounts, select the service in the list, and uncheck the Reminders box.
Create Different Lists for Different Things
If you use Reminders primarily to remind yourself of miscellaneous tasks, you might not need additional lists. The default one, Reminders, will probably do. However, lovers of to-do lists are likely to want to organize theirs by topic—Books to Read, Story Ideas, Groceries, Places I Want to Visit. In that case, you’ll need to create new lists.
In the Reminders app, click the Add List ![]() icon at the bottom of the sidebar, type in a name for your list, and then press Return.
icon at the bottom of the sidebar, type in a name for your list, and then press Return.
Change Your Default Reminders List
By default, new reminders appear in the list named Reminders. To change the default list, go to Reminders > Preferences and choose one from the Default List pop-up menu (Figure 52).
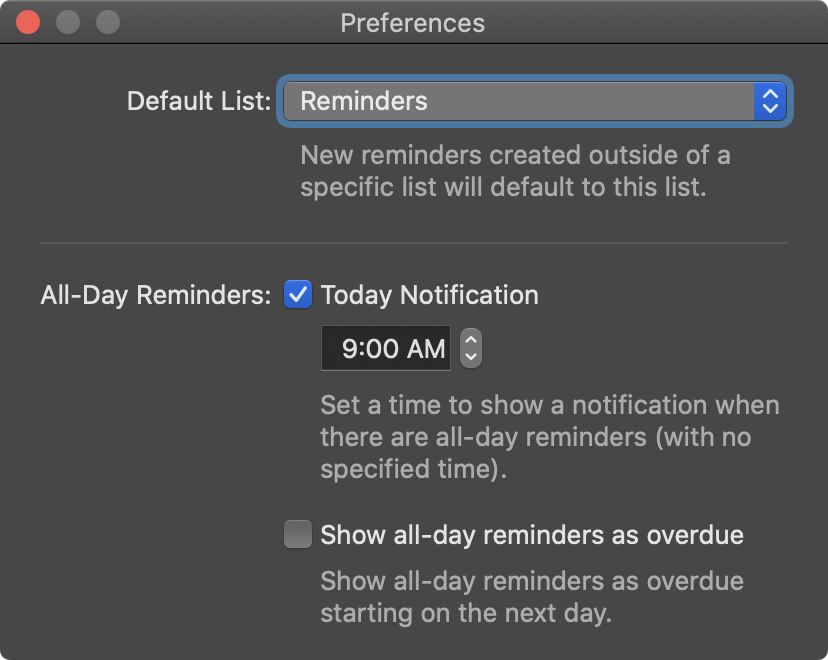
From now on, all new reminders are appended to your default list, unless you choose another one (or specify it by voice with Siri).
Manage Your Lists
Projects come and go, and so do the lists you make to track them. It’s easy to Rearrange Lists, Rename Lists, or Delete Lists after the fact, with the exception of the Smart Lists. Now you can Group Related Reminder Lists, too, as well as Customize Your Lists’ Look and Share Lists with Others.
Rearrange Lists
You’ll find a lot of advice online about how to organize to-do lists, such as Lifehacker’s Back to Basics: How to Simplify Your To-Do List and Make It Useful Again. If you decide you want to organize yours, you can. For example, you might want to arrange them in alphabetical order, or by time involved or priority (see Set Other Options).
Reminders can’t arrange lists automatically, at least not for now, but you can do so manually. To change a list’s place in the sidebar, drag it and drop it where you want it. Note that you can’t drag a list out of its category and into another (say, from Yahoo! to iCloud).
Rename Lists
Groceries list or Grocery list? If you change your mind about a list’s name, give it a new one. Control-click (right-click) a list in the sidebar and choose Rename. Type in the new name.
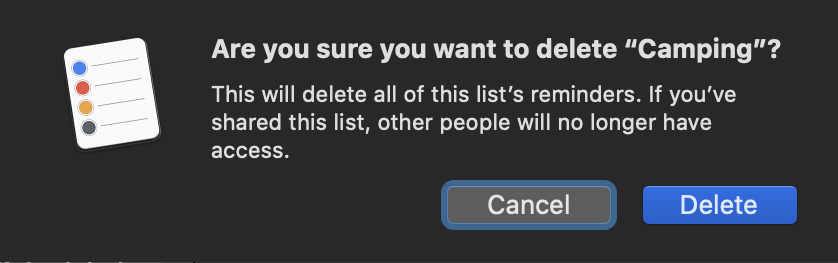
Delete Lists
When you’re done with a list, there’s no need for it to clutter up the place. But proceed with caution: when you delete a list, it’s likely gone. (The option to restore reminders from an iCloud backup has been removed.)
Here’s how to zap a list:
Mac: Select the list in the Reminders sidebar, and then press Delete. Or, Control-click (right-click) a list name in the Reminders sidebar and choose Delete from the contextual menu.
Mac with trackpad or Magic Mouse: If you have a trackpad, use two fingers to swipe left over the list’s name and then click Delete or swipe all the way left until the list vanishes. The technique is the same with the Magic Mouse, except you use only one finger to swipe.
When you use any of these methods, if the list includes reminders you’ll see a warning that asks if you’re really, really sure you want to delete it (Figure 53). Click Delete if you are. Click Cancel if you aren’t.
Customize Your Lists’ Look
Make your lists easy to tell apart at a glance by customizing their appearance. Reminders now lets you choose from up to 12 colors and 60 symbols. Like all of the new Reminders features, you can do this only with iCloud lists. Here’s how:
Double-click a list’s circular icon in the sidebar.
In the dialog that appears, click the triangle next to its circular icon. A popover appears.
Click a new icon to replace the generic one. Then, click a color to change that, too (Figure 54).

Figure 54: Choose from icons and colors to gussy up your lists and make them easier to tell apart at a glance. Click OK.
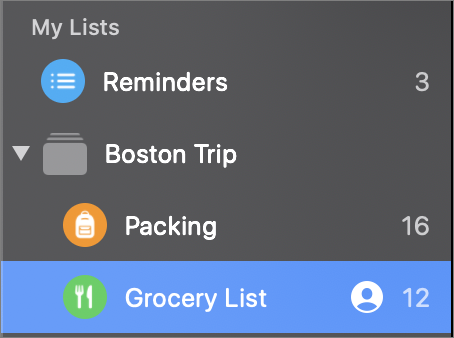
Group Related Reminder Lists
Now you can group reminder lists—for instance, to keep track of multiple sets of tasks for one project. Select the lists you want to group in the sidebar and choose File > New Group. Type a title into the field that appears. The lists appear underneath this header (Figure 55)
Share Lists with Others
If you’re using iCloud with Reminders, it’s easy to share a list with other iCloud users. Share a groceries list with your spouse so that whoever gets to the store first knows what to buy. Share a household chores list with your roommates (or children) and you can all check off chores as you take care of them. Likewise, share a project or call list with a coworker and you’ll both know what tasks you need to tackle next.
Everyone who shares a list can view and edit it, as well as check off items as they’re completed. Note that notifications aren’t shared, so the alarms you set ping only you.
You can access shared Reminders lists using Reminders on a Mac, iPhone, iPad, or Apple Watch. You can also access shared reminders by signing in to your account at iCloud.com.
To set up a shared list and send out invitations via Mail:
Hover over the space to the right of the list’s name in the sidebar to reveal the Share
 icon. Click this.
Choose how to send your invitation, for example, via the Mail app (Figure 56).
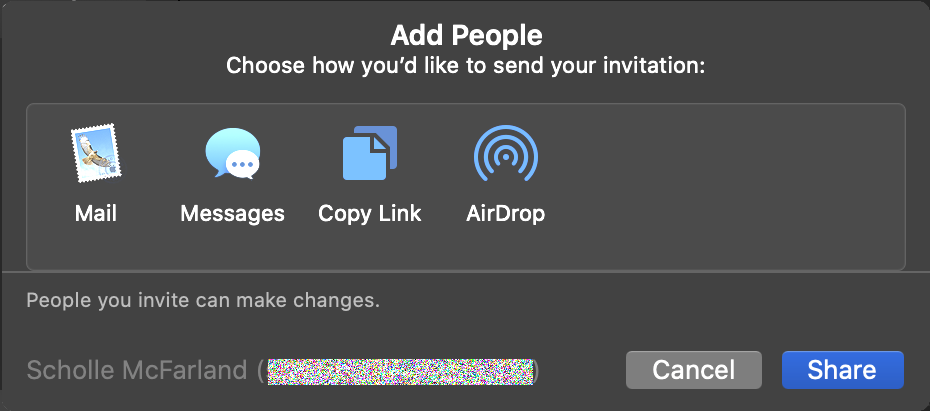
Figure 56: Choose how to send your invitation to the shared list, and then click Share. Click Share.
A new email message appears with a link to the Reminders list. In the To field, type the iCloud email address of a person you want to share the list with. By “iCloud email address,” I mean not necessarily an email address that ends with
@icloud.com, but instead an email address is associated with that person’s iCloud account. Your Mac suggests matches from the Contacts app. Click one to choose it. You can invite as many people as you’d like to fill out the group by typing in one or more email addresses and then pressing Return.Type a note in the message body, if you choose.
Finally, click Send.
Everyone you’ve invited receives an invitation via email. They must accept in order to gain access to the list.
If you think of someone else you’d like to invite later, click the Share ![]() icon next to the shared list and click the Add People button. Then, go through the steps described above again.
icon next to the shared list and click the Add People button. Then, go through the steps described above again.
If your team members change or a roommate moves away (or falls out of your favor), it takes just a few steps to stop sharing a Reminders list with them: click the Share ![]() icon next to the list’s name, select the person’s name, and click the Stop Sharing button. Finally, click Done.
icon next to the list’s name, select the person’s name, and click the Stop Sharing button. Finally, click Done.