CHAPTER 2. Setting Up a Project
The Microsoft Bot Framework team created a starter template for building a chatbot. This starter template helps set up a project with folders, files, configuration, and assembly references that represent the basic configuration for a chatbot. This chapter tours a Bot Framework project and examines the minimal amount of code necessary for a chatbot.
While the ultimate goal is publishing a chatbot to one or more platforms, testing is a required activity. That’s why the Bot Framework includes an emulator for communicating with a bot and testing its functionality. After testing, you can publish a chatbot and then register with the Bot Framework and request placement in the Bot Framework directory.
Steps to Building a Chatbot
Getting started with building a chatbot with the Microsoft Bot Framework is similar to building any software application that you build with Visual Studio: Create a new project, replace default code with your own, test, and deploy. Some developers have a specialized process to automating and performing a couple of these steps, but the end result is that these are the basic steps, shown in Figure 2-1, for creating and deploying a chatbot.
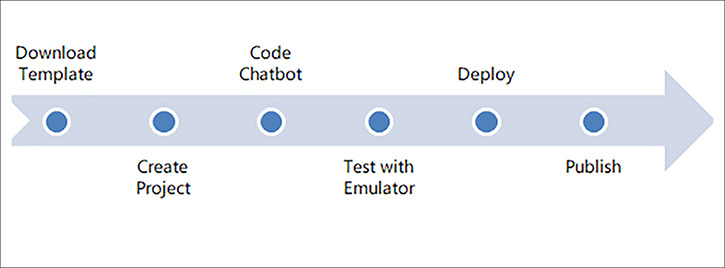
FIGURE 2-1 Steps to building a chatbot with the Microsoft Bot Framework.
Here’s a quick overview of the steps, explained in greater detail in the following sections.
1. Download Visual Studio Template from the Microsoft Bot Framework site.
2. Create a Bot Framework Project in Visual Studio.
3. Write chatbot code.
4. Download the Bot Emulator from the Microsoft Bot Framework site and test it.
5. Deploy to a web server, such as Microsoft Azure.
6. Publish to channels.
This doesn’t imply any type of process or guidance, but is a learning tool to understand how to go from 0 to chatbot in a short amount of time. The following sections take you through these steps to help get you started with your first chatbot.
 Note
Note
This chapter is a quick introduction with an abstract view of chatbot creation steps. Later chapters in this book go into greater depth on coding, testing, and deploying chatbots.
Creating a Bot Framework Project
Before getting started with a Bot Framework project, it’s useful to download the Microsoft Bot Framework project template so you don’t have to do the work yourself. This section explains how to do that and how to create a new project.
Installing the Project Template
If you’ve never created a Bot Framework chatbot before, the first task should be to download the Microsoft Bot Framework template. The template contains all the folders, files, and assembly references you need to get started. The first thing you need to do is to open your browser and navigate to https://docs.microsoft.com/en-us/bot-framework/resources-tools-downloads, as shown in Figure 2-2.
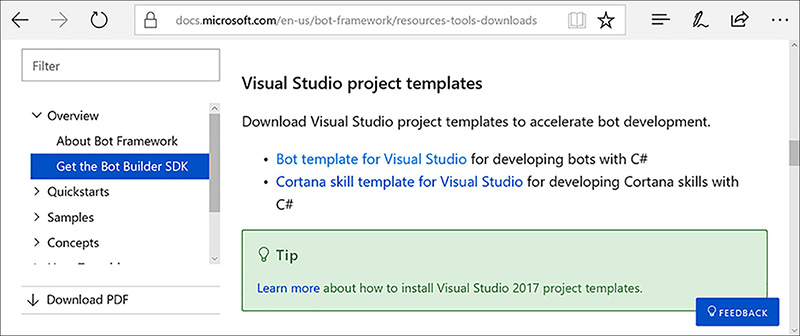
FIGURE 2-2 To get the template, visit https://docs.microsoft.com/en-us/bot-framework/resources-tools-downloads and click the Bot template for Visual Studio link.
Clicking the Bot template for Visual Studio link will download the template file named Bot Application.zip and you can find that file in your downloads folder. The Microsoft Edge and IE browsers ask if you want to open the folder and other browsers have similar features.
![]() Warning
Warning
The inherent nature of the web is that pages on an active site change. Therefore, the exact steps for downloading could change between the time this is written and when you download the Bot Framework template. That means you might have to search for the template in case it’s on another page and the exact steps in this book are different from the changed site.
Copy Bot Application.zip into the %USERPROFILE%DocumentsVisual Studio 2015TemplatesProjectTemplatesVisual C# folder. This effectively installs the template so you can create a new project in Visual Studio, and the next section explains how to do that.
![]() Tip
Tip
If Visual Studio is running when you installed the Bot Application.zip template, you might want to restart Visual Studio to see the Bot Framework template in the new applications list, discussed in the section titled Starting a New Project.
Starting a New Project
To create a new Bot Framework project, select the menu options File | New | Project, which displays the New Project dialog, shown in Figure 2-3. Click the Visual C# branch and scroll to Bot Application.

When you create a new project, notice that it’s very similar to creating most other projects in that it asks for project Name, Location, and Solution name. You’re welcome to change any of the settings or just take the defaults to see what the template produces. Click OK to generate the project. The next section explains the project that this template creates.
Examining the Default Code
When creating a new project with the Bot Framework template, the resulting project is an ASP.NET MVC Web API project. It contains folders laid out with ASP.NET MVC conventions and the appropriate file references. In addition to ASP.NET MVC assembly references, it includes Bot Framework assembly references. The following sections cover the details of a new Bot Framework project.
Assembly References
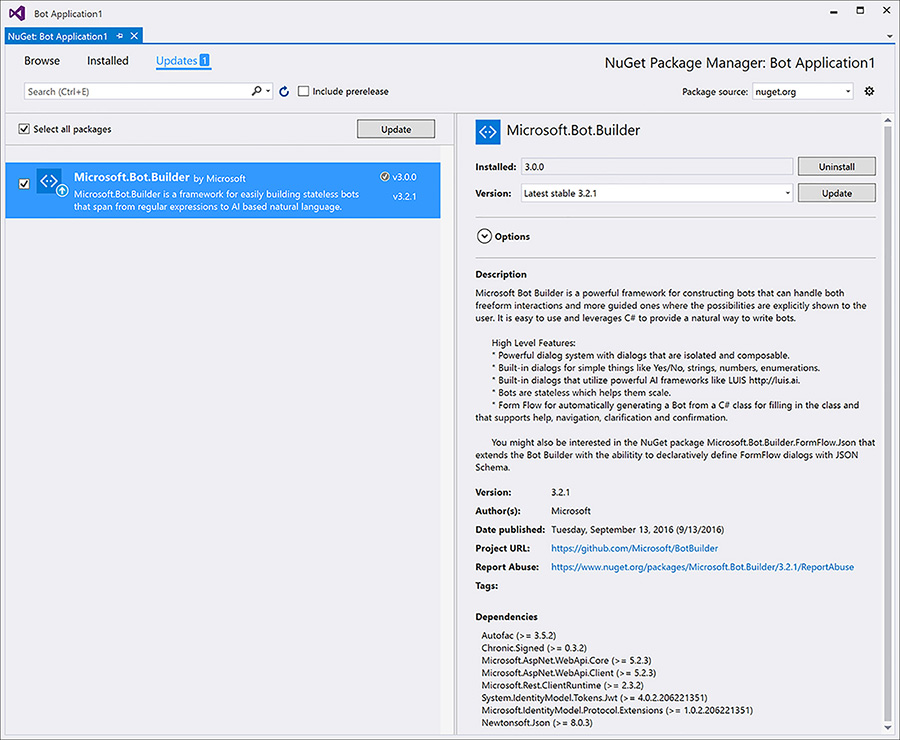
The Bot Framework template includes all of the assemblies required for a new chatbot. This includes all of the ASP.NET MVC and Bot Framework assemblies, shown in Figure 2-4.
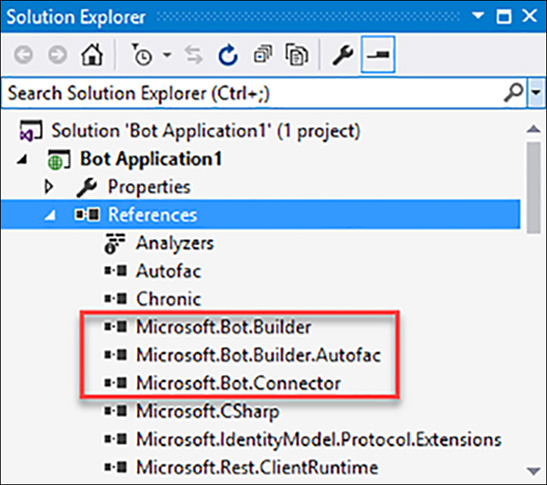
FIGURE 2-4 The Microsoft.Bot.Builder, Microsoft.Bot.Builder.Autofac, and Microsoft.Bot.Connector install via NuGet.
The Microsoft.Bot.Builder assembly installs via NuGet and depends on Microsoft.Bot.Connector. Microsoft.Bot.Builder (Bot Builder) has types for managing a chatbot conversation while Microsoft.Bot.Connector has types for communicating with the Bot Connector. Bot Builder also uses Autofac as its Inversion of Control (IoC) container and has additional types in Microsoft.Bot.Builder.Autofac to help work with Autofac. You’ll see a few examples throughout this book that rely on Autofac and there is more info on how to use Autofac at https://autofac.org/. So, all you need to do is keep Microsoft.Bot.Builder up-to-date via NuGet, as shown in Figure 2-5.
Note
NuGet is the Microsoft package manager. It makes it easy to install, update, and remove assembly references. Library writers, including Microsoft and third-parties, configure these libraries to automatically update dependencies, install necessary project files, and update configuration to help the library work with a project.
Often, library authors upate NuGet assemblies to versions that are newer than the assemblies referenced by a new project template. These updates can include new features and/or security updates so it could be useful to periodically review updates. You can do this via NuGet by right-clicking the References folder (in the Visual Studio project) and selecting Manage NuGet Packages, showing a dialog similar to Figure 2-5.
Figure 2-5 shows (at the time this is written) that the current version of Microsoft.Bot.Builder is v3.0.0 and can be upgraded to v3.2.1. Unless you have an exceptional circumstance that makes you not want to install the upgrade (e.g. existing code relying on a deprecated feature), you should check NuGet to make sure you start a project with the most recent version. Select Microsoft.Bot.Builder, click Update, and accept the confirmation and licensing dialogs.
Another way to update the Microsoft.Bot.Builder is via the Package Manager Console, which you can find in Visual Studio by selecting the Tools | NuGet Package Manager | Package Manager Console menu. Then you can update with fhe following command:
>Update-Package Microsoft.Bot.Builder
With assemblies updated, it’s time to look at the rest of the project structure, which is next.
Folder and File Layout
Because the project is for a web API, the folder and file structure follows the conventions of ASP.NET MVC. Figure 2-6 shows the Controllers folder with a MessagesController.cs and other web-related files.
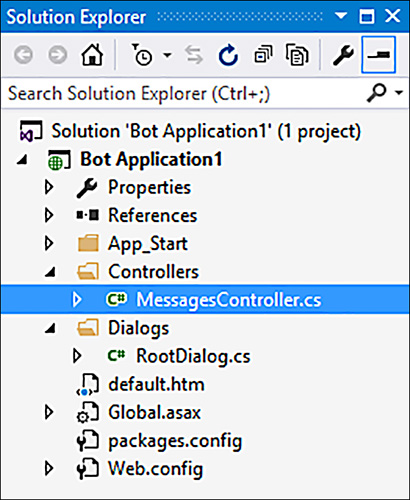
FIGURE 2-6 The folder structure of a Bot Framework project follows ASP.NET MVC conventions.
The default.htm file is an initial web page that has basic information about the chatbot. It’s your choice whether to use this page or not, but it’s useful when testing a chatbot. One potential use of default.htm is to host a Web Chat control, discussed in Chapter 12, and including links to various channels that the the chatbot is configured for. Global.asax and Web.config are the standard ASP.NET MVC application and configuration files. The App_Start folder contains web API initialization code that this book doesn’t need to cover and generally won’t need to change.
Figure 2-6 shows a Dialogs folder with a RootDialog.cs file. Right now, we’re going to ignore that file because it contains a type derived from IDialog<T>, which we’ll discuss in-depth in Chapter 5.
Note
ASP.NET is the Microsoft web application development framework. ASP is an acronym for Active Server Pages and it works on the .NET platform. MVC is an acronym for Model View Controller, which is an interface separation pattern with an implementation geared toward the Microsoft ASP.NET framework. This book doesn’t require deep knowledge of ASP.NET MVC and will explain the parts that are fundamental to building chatbots.
What is most interesting in this project is the MessagesController.cs file. Pay particular attention to the name of this file because the ASP.NET MVC convention matches the prefix of this controller, Messages, as part of the addressable URL that the Microsoft Bot Connector uses to locate a chatbot. The next section examines the contents of MessagesController.cs.
The Default Chatbot
The MessagesController.cs file is the entry point to the chatbot. It’s a Representational State Transfer (REST) interface with an HTTP POST endpoint. As shown in Listing 2-1, the ASP.NET web API models the HTTP POST endpoint with a method named Post inside of a controller class, MessagesController in the default case. As mentioned earlier, we’re ignoring the default RootDialog.cs implementation for now. Replace the code in MessagesController.cs with the code from Listing 2-1.
What is REST
REST is an architectural style of communication, first described by Dr. Roy Fielding in his 2000 University of California, Irvine, Ph.D. thesis, Architectural Styles and the Design of Network-based Software Architectures, which can be found at http://www.ics.uci.edu/~fielding/pubs/dissertation/top.htm. The ASP.NET MVC implementation relies on web communcations and HTTP verbs, with a capability for more formal implementations, depending on the developer’s design choices. REST has taken over as a dominant form of communication over the web in modern times. Deep understanding of REST isn’t required to build a chatbot and this book covers just enough details on REST to help build a chatbot.
LISTING 2-1 The entry point of a chatbot is the Post method inside a controller.
using System;
using System.Linq;
using System.Net;
using System.Net.Http;
using System.Threading.Tasks;
using System.Web.Http;
using System.Web.Http.Description;
using Microsoft.Bot.Connector;
using Newtonsoft.Json;

namespace Bot_Application1
{
    [BotAuthentication]
    public class MessagesController : ApiController
    {
        /// <summary>
        /// POST: api/Messages
        /// Receive a message from a user and reply to it
        /// </summary>
        public async Task<HttpResponseMessage> Post([FromBody]Activity activity)
        {
            if (activity.Type == ActivityTypes.Message)
            {
                ConnectorClient connector =
                    new ConnectorClient(new Uri(activity.ServiceUrl));
                // calculate something for us to return
                int length = (activity.Text ?? string.Empty).Length;

                // return our reply to the user
                Activity reply = activity.CreateReply(
                    $”You sent {activity.Text} which was {length} characters”);
                await connector.Conversations.ReplyToActivityAsync(reply);
            }
            else
            {
                HandleSystemMessage(activity);
            }
            var response = Request.CreateResponse(HttpStatusCode.OK);
            return response;
        }

        private Activity HandleSystemMessage(Activity message)
        {
            if (message.Type == ActivityTypes.DeleteUserData)
            {
                // Implement user deletion here
                // If we handle user deletion, return a real message
            }
            else if (message.Type == ActivityTypes.ConversationUpdate)
            {
                // Handle conversation state changes, like members
                // being added and removed Use Activity.MembersAdded
                // and Activity.MembersRemoved and Activity.Action
                // for info Not available in all channels
            }
            else if (message.Type == ActivityTypes.ContactRelationUpdate)
            {
                // Handle add/remove from contact lists
                // Activity.From + Activity.Action represent what happened
            }
            else if (message.Type == ActivityTypes.Typing)
            {
                // Handle knowing tha the user is typing
            }
            else if (message.Type == ActivityTypes.Ping)
            {
            }
            return null;
        }
    }
}
Listing 2-1 shows a MessagesController class, containing a Post method, and decorated with a BotAuthentication attribute. The BotAuthentication attribute is a Bot Framework type for securely authenticating that only the Microsoft Bot Connector can communicate with the chatbot. It relies on the following Web.config appSettings element keys:
  <appSettings>
    <!-- update these with your BotId, Microsoft App Id and your Microsoft App Password-->
    <add key=”BotId” value=”YourBotId” />
    <add key=”MicrosoftAppId” value=”” />
    <add key=”MicrosoftAppPassword” value=”” />
  </appSettings>
The default appSettings elements have empty values and the developer fills these in based on values obtained during bot registration, discussed in a later section of this chapter.
The Post method accepts an Activity parameter and returns a Task<HttpResponseMessage>, shown below:
        public async Task<HttpResponseMessage> Post([FromBody]Activity activity)
        {
        }
The Activity is a Bot Framework type, representing a communication between the Bot Connector and a chatbot. The available Activity types are for user messages, conversation status changes, and various others. Chapter 4 discusses the activity types in more depth, while this chapter gives a quick view into the Message Activity type.
Post is a normal C# async method, so the return type is Task<T> with a payload type of HttpResponseMessage. The [FromBody] parameter attribute indicates that the parameter comes from the body of the HTTP message, which is normal for an HTTP POST.
The Post method logic, shown below, includes an if statement to filter for a Message Activity type, branches appropriately, and responds to the Bot Connector with an HTTP message.
            if (activity.Type == ActivityTypes.Message)
            {
            }
            else
            {
                HandleSystemMessage(activity);
            }
            var response = Request.CreateResponse(HttpStatusCode.OK);
            return response;
When the Activity type isn’t Message, the default code calls a helper method, HandleSystemMessage, to handle the message type. After handling the message, the code uses the ASP.NET MVC Request.CreateResponse method to return HttpStatusCode.OK, which is status code 200 for the HTTP protocol. You’ll read more about how to work with the Activity types in HandleSystemMessages in Chapter 4, though this chapter goes into more depth about the Message type because it’s foundational in it’s contribution to building a chatbot.
The main part of a chatbot will start when the Activity type is a Message. This example takes the message the user passed in and replies with the text and the length of that text. The code will instantiate a type to communicate with the Bot Connector, process the user’s message, create a reply activity, and send that reply activity to the Bot Connector as shown below:
                ConnectorClient connector =
                    new ConnectorClient(new Uri(activity.ServiceUrl));
                // calculate something for us to return
                int length = (activity.Text ?? string.Empty).Length;

                // return our reply to the user
                Activity reply = activity.CreateReply(
                    $”You sent {activity.Text} which was {length} characters”);
                await connector.Conversations.ReplyToActivityAsync(reply);
The ConnectorClient class allows the code to communicate with the Bot Connector. The Activity parameter has a Text property, containing the message that the user entered. The code calculates the length of that text.
The Activity type also has a CreateReply method for creating a new Activity instance that is sent back to the connector. In this example, CreateReply builds a string with the original user text and the length of that text, and returns an Activity instance, assigned to reply.
In addition to formatting the text, the CreateReply message takes communications information from the original Activity, with the parameter name activity, to populate values of the new Activity instance. In particular, the original Activity contains information about the conversation and user and performs actions such as swapping the From and Recipient user properties. This convenience method helps avoid instantiating a new response Activity and populationg property values manually.
Using the ConnectorClient instance, connector, the code sends the new Activity, reply, to the Bot Connector. The Bot Connector knows how to translate and routes the Activity to the original channel that the user is communicating with.
![]() Tip
Tip
Whether going through old Bot Framework documentation or watching HTTP traffic, you’ll see URLs that refer to the Bot Connector, where the communication came from. Don’t be tempted to hard-code these URLs. Because of versioning and other system changes, the Bot Connector URL can change. It’s better to always rely on the ServiceUrl property of the incoming Activity parameter, as shown in the ConnectorClient instantiation from Listing 2-1.
This section demonstrated how to create the default chatbot with the Bot Application template and modify that template to simplify the discussion. Now it’s time to test the user experience and see the chatbot in action.
Initial Testing with the Emulator
The Bot Framework comes with an emulator that lets you test the user experience for a chatbot. Chapter 4 covers emulator details in more depth and this section is a quick introduction to testing essentials such as installing the emulator, performing basic configuration, and communicating with the chatbot.
Installing the Bot Emulator
Your first task in performing user testing of a chatbot is to download the Bot Framework Emulator. You can find it by browsing to the Bot Framework site at https://docs.microsoft.com/en-us/bot-framework/debug-bots-emulator, shown in Figure 2-7.
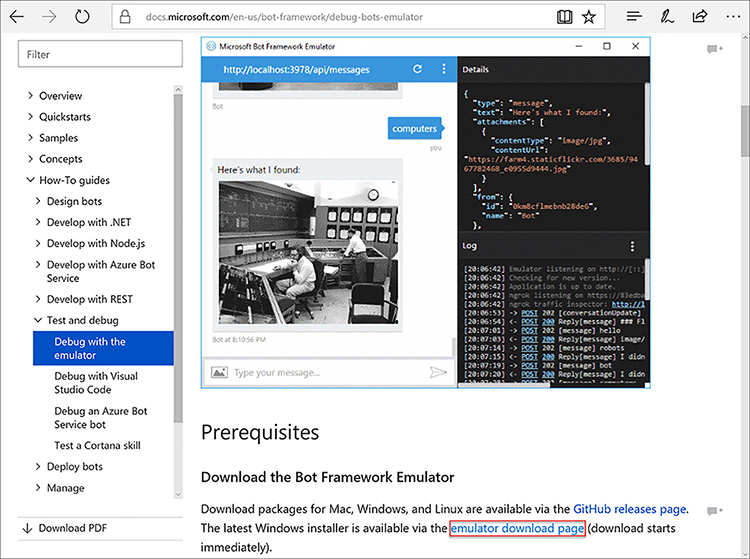
FIGURE 2-7 Download the Bot Framework Emulator from the Bot Framework website.
To perform the installation, click emulator download page. This downloads a setup file that you should Run and click the Install button on the dialog that appears.
![]() Warning
Warning
The inherent nature of the web is that pages on an active site change. Therefore, the exact steps for downloading could change between the time this is written and when you download the Bot Framework Emulator. That means you might have to search for the emulator in case it’s on another page and the exact steps in this book are different from the changed site.
The Bot Framework Emulator is an open source project and the code runs on Linux, Mac, and Windows. You can find the source code by clicking the GitHub releases page link, shown in Figure 2-7.
With the Bot Framework Emulator installed, it’s time to configure the chatbot.
Configuring the Chatbot
Bot Framework Emulator configuration consists of properly addressing the chatbot and correctly setting credentials. The emulator has many features, and Chapter 4 discusses them in-depth. This section looks at the minimal work required to perform basic user testing.
After installation, the Bot Framework Emulator opens. You should manually start the program if it isn’t already open. You’ll see a window similar to Figure 2-8.

FIGURE 2-8 The Bot Framework Emulator allows user testing of a chatbot.
The parts of the Bot Framework Emulator of current interest are the URL, Microsoft App ID, and Microsoft App Password. When you first open the emulator, the URL box at the top of the emulator is empty with Enter your endpoint URL placeholder text, but we added one here to illustrate points that follow.
The URL consists of base address, port number, and segments addressing the chatbot. The chatbot runs on the current computer, launched by Visual Studio via IIS Express by default, which is addressed as localhost. The port number must match the port number of the chatbot being tested. To see how this base address and port are configured in the Bot Application project template, open the default chatbot from previous sections of this chapter, double-click the Properties folder, and click the web tab to see a screen similar to Figure 2-9.
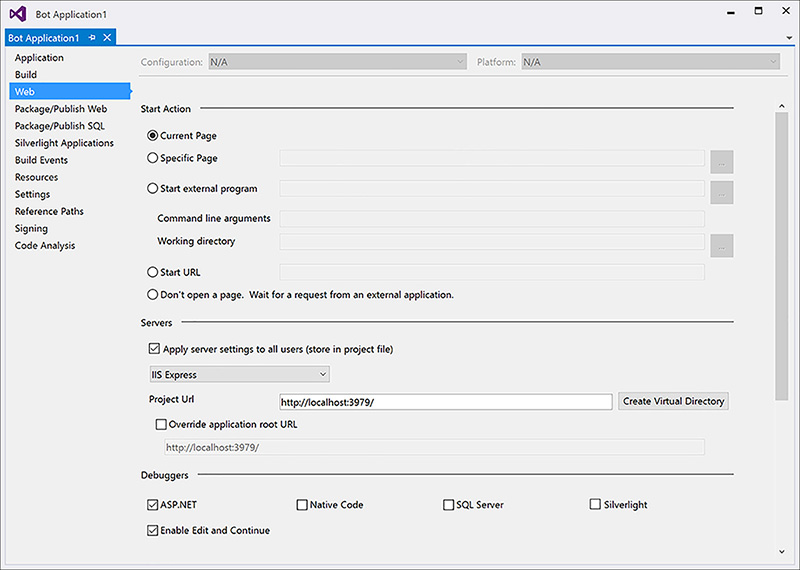
FIGURE 2-9 The Properties, Web, Servers, Project Url shows the base address and port number for a chatbot.
The URL in Figure 2-8 has a base address and port of localhost:3978 and the Project Url in Figure 2-9 has a base address and port of localhost:3979. Because the port numbers are different, the Bot Framework Emulator, with port 3978, is not able to communicate with the chatbot, with port 3979. Either change the chatbot port number or change the Bot Framework Emulator port number so that they match. This example changes the Bot Framework Emulator port number to 3979 by editing the emulator URL field.
The URL field in Figure 2-8 also has address segments, api/messages. The name of these segments are based on ASP.NET MVC Web API conventions. By default, the api segment is always included. The messages segment comes from the convention of how the MessagesController in the chatbot project is named. The convention removes the Controller suffix and uses the prefix as the address, resulting in api/messages. Hypothetically, if you changed the controller name to DefaultBotController, the new address would be api/defaultbot. This book leaves the chatbot controller name as the default, MessagesController.
![]() Tip
Tip
If you have multiple chatbots in the same project, perhaps testing or doing demos, you might want to give each chatbot a separate port number. This will help avoid confusion caused by accidentally communicating with the wrong chatbot.
Based on the information and values from this section, set your URL, in the Bot Framework Channel Emulator, to http://localhost:3979/api/messages so it matches the Project Url.
The next configuration task is to set Microsoft App Id and Microsoft App Password correctly. In Figure 2-8 the values are empty, as they should be. The reason they should be empty is because their values, in Web.config, are not set yet, as shown below:
  <appSettings>
    <!-- update these with your BotId, Microsoft App Id and your Microsoft App Password-->
    <add key=”BotId” value=”YourBotId” />
    <add key=”MicrosoftAppId” value=”” />
    <add key=”MicrosoftAppPassword” value=”” />
  </appSettings>
The appSettings section of Web.config holds the MicrosoftAppId and MicrosoftAppPassword keys and those should match the Microsoft App Id and Microsoft App Password fields in the Bot Framework Channel Emulator, which are corresponding credentials. These appSettings keys are required for the BotAuthentication attribute. When communicating with a chatbot, the Bot Framework Channel Emulator sends the Microsoft App Id and Microsoft App Password. The BotAuthentication attribute reads the values sent from the Bot Framework Channel Emulator, and compares them with the matching appSettings keys. In the “Publishing and Registering a Chatbot” section later in this chapter, you’ll see how the registration process produces these keys and that you need to populate appSettings with the new values when publishing the chatbot to communicate securely with the Bot Connector. For the purposes of user testing with the Bot Framework Channel Emulator, leave the credentials blank in both appSettings and the Bot Framwork Channel Emulator.
With the Bot Framework Channel Emulator installed and configured, you’re ready to communicate with the chatbot.
Communicating with the Chatbot
To communicate, both the chatbot and the Bot Framework Channel Emulator must be running. Start by opening the chatbot project in Visual Studio and pressing F5 to run. You’ll see a test web page similar to the one shown in Figure 2-10.

FIGURE 2-10 Run the chatbot before communicating with it.
This default.htm page is made of HTML and is the home page when the chatbot is running. Notice that the port number, in the address bar, is 3979. Next, open the Bot Framework Channel Emulator and you’ll see a screen similar to Figure 2-11, except the chat text will be empty the first time. You might need to click the URL and click the Connect button, as shown in Figure 2.8.
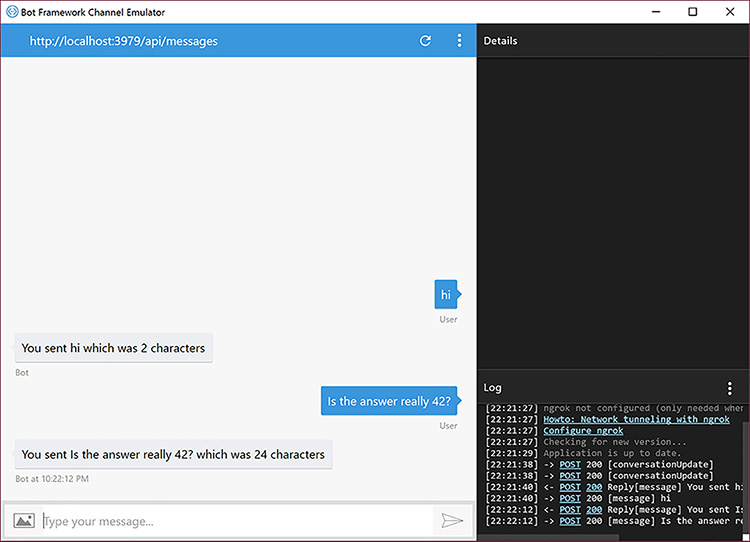
FIGURE 2-11 The Bot Framework Channel Emulator lets you chat with a chatbot.
Two parts of Figure 2-11 pertain to the current discussion: The chat window and the text entry box on the left side of the screen. This is where an entire conversation appears. It scrolls vertically as the conversation grows. The lighter colored statements on the left of the chat window is from the chatbot and the darker boxes on the right are from the user.
The text box at the bottom of the window, with the arrow on the right side, lets the user type text to the chatbot. You can type in this box and either press Enter, or click the arrow button to send text to the chatbot.
You can see a couple of messages in the chat window and how the chatbot responded. This matches the chatbot functionality from Listing 2-1. The chatbot responds with the text the user types, as well as the number of characters in that text.
At this point, you’ve successfully built and tested a chatbot. Now, it’s ready for others to use and you do that by publishing and registering the chatbot.
Publishing and Registering a Chatbot
For other people to use a chatbot, it has to be published somewhere they can interact with. You also need to register with the Bot Framework website so the Bot Connector can find the chatbot. The following sections describe how to accomplish these tasks.
Publishing the Chatbot
Publishing a chatbot means that it will be deployed to a server. This book uses Windows Azure and you’re free to select any hosting provider of your choice. The requirements are that the host must be publicly accessible over the Internet, so the Bot Connector can find it, and the hosting provider must support ASP.NET MVC.
Note
Technically, your chatbot can be built with any technology stack and hosted anywhere with a public endpoint that accepts HTTP Post requests. As long as it conforms to the Bot Connector interface, it should work. Specifics aside, the Microsoft .NET and Azure technology stack with the Bot Framework SDK are compelling technologies, which is why we are excited to write this book.
If you don’t already have an Azure account, you can visit https://azure.microsoft.com/ and sign up for a free trial. The following steps explain how to deploy to Azure:
1. Open the chatbot project in Visual Studio.
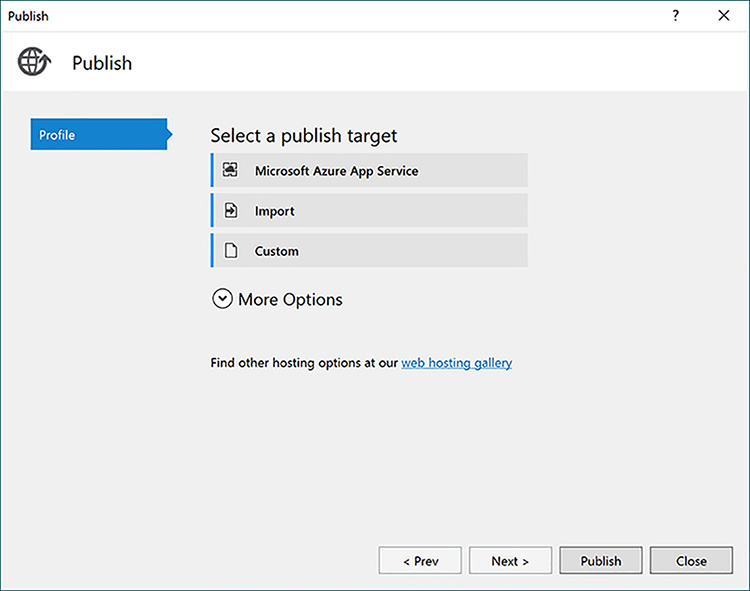
2. Right-click the project and select Publish.
3. When you see the Publish dialog in Figure 2-12, click the Microsoft Azure App Service button.
4. When you see the App Service dialog in Figure 2-13, click the New button (on the middle-right side).
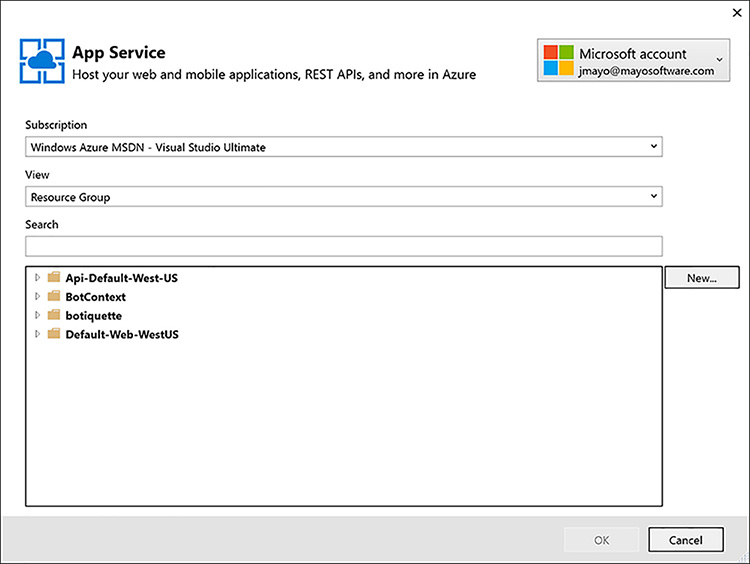
FIGURE 2-13 The App Service dialog lets you select the Azure account to publish to.
5. When you see the Create App Service dialog in Figure 2-14, select the Change Type drop-down list to Web App and give the bot a unique Web App Name. We used JoeMayoTestBot as the name and you’ll need to use something different. The dialog shows an error icon on the right side of Web App Name if the name isn’t unique.
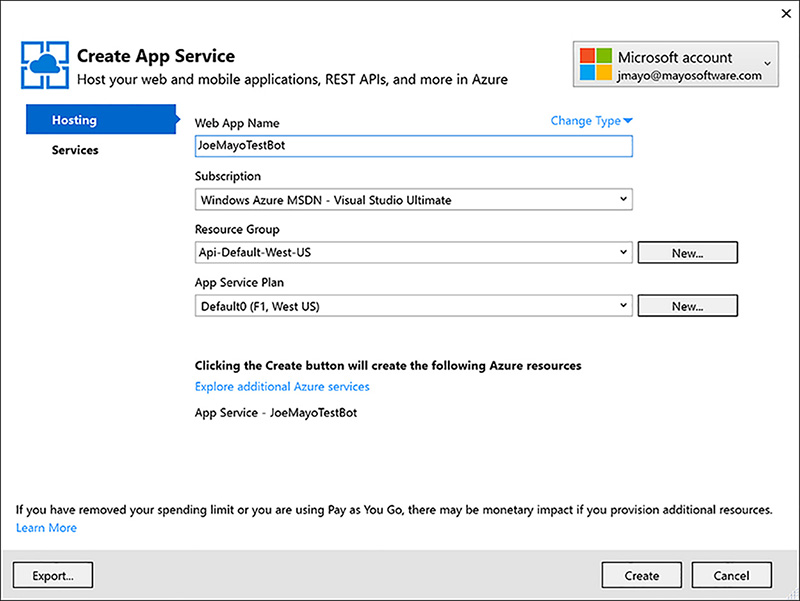
FIGURE 2-14 The Create App Service dialog lets you select the App type and change the Web App Name.
6. Click the Create button in the Create App Service dialog.
7. When you see the Publish dialog in Figure 2-15, click the Publish button.
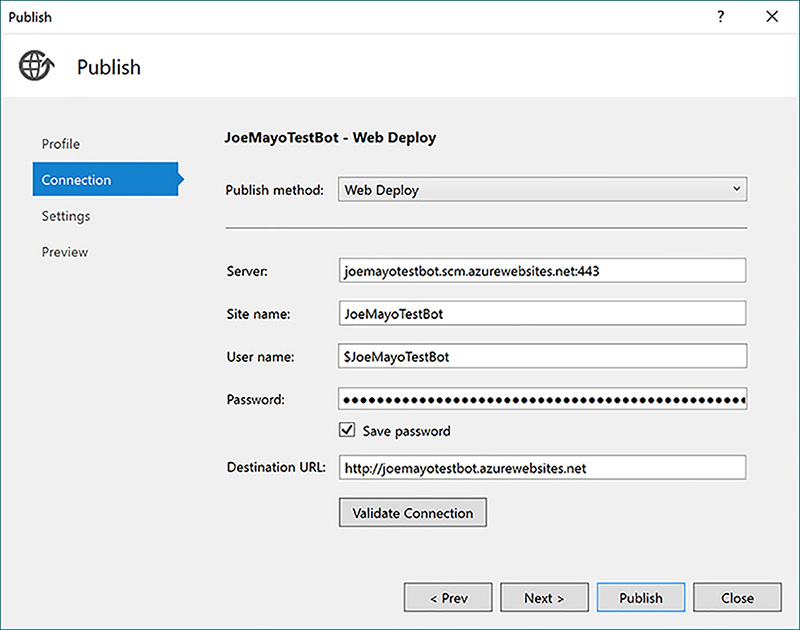
The publishing wizard deploys the chatbot and opens a new browser window, shown in Figure 2-16, addressing the chatbot on Windows Azure.

FIGURE 2-16 When publishing a chatbot to Azure, the wizard concludes by opening a browser addressing the chatbot.
At this point, you can’t test the chatbot yet because the Bot Connector doesn’t know it exists. Take note of the address in the browser window because you’ll use that in the next section to register the chatbot.
Azure has paid plans that allow you to assign your own domain name to an App Service. They also have free plans and you can use the address a chatbot is deployed to as a link to the web page for a chatbot – like http://joemayotestbot.azurewebsites.net shown in Figure 2-16.
Registering a Chatbot
You need to register with the Bot Framework website so that the Bot Connector can find your chatbot. During this process, you’ll also receive credentials to enable secure communications between your chatbot and the Bot Connector.
To register a chatbot, visit https://dev.botframework.com/bots/new, sign in, and you’ll see a page similar to Figure 2-17.

FIGURE 2-17 The registration page has fields to describe a chatbot.
At the Bot Profile page, fill out the form and click any question marks for guidance on fields. A couple of interesting fields are the Messaging endpont and the button under Register your bot with Microsoft to generate a new App ID and password.
The Messaging endpoint is the base address of your chatbot on Azure, as shown in the address bar in Figure 2-16, appended with api/messages. You must change the address protocol to https. Earlier sections of this chapter explained why api/messages is part of the address. For the example chatbot, the Messaging Endpoint is https://joemayotestbot.azurewebsites.net/api/messages.
Click the Create Microsoft App ID and password button and follow the instructions to generate a new App ID and password. Make sure you copy the App ID and password to add to the chatbot configuration.
![]() Warning
Warning
When Microsoft recommends you copy the password, they’re serious. After you complete generating the password and click OK, the password is then obfuscated so you can’t read it. There is no way to change it or read it. In case you didn’t copy your password and don’t remember it, your only option is to re-generate a new set of credentials.
After filling in all the fields, click the Register button and your chatbot is registered. However, you aren’t done yet because the chatbot needs the new credentials. Open the chatbot project, open Web.config, and add the credentials to their corresponding appSettings keys as follows:
  <appSettings>
    <!-- update these with your BotId, Microsoft App Id and your Microsoft App Password-->
    <add key=”BotId” value=”JoeMayoTestBot” />
    <add key=”MicrosoftAppId” value=”<Your App ID>” />
    <add key=”MicrosoftAppPassword” value=”<Your App Password>” />
  </appSettings>
BotId should be the value used in Bot Handle when registering the chatbot and the MicrosoftAppId and MicrosoftAppPassword keys hold the corresponding credentials from the chatbot registration.
After you set credentials, re-publish the chatbot. You can verify that the Bot Connector can communicate with the chatbot by re-visiting the Bot Framework site https://dev.botframework.com, clicking My Bots, clicking your chatbot, and using the Test tab on your chatbot page.
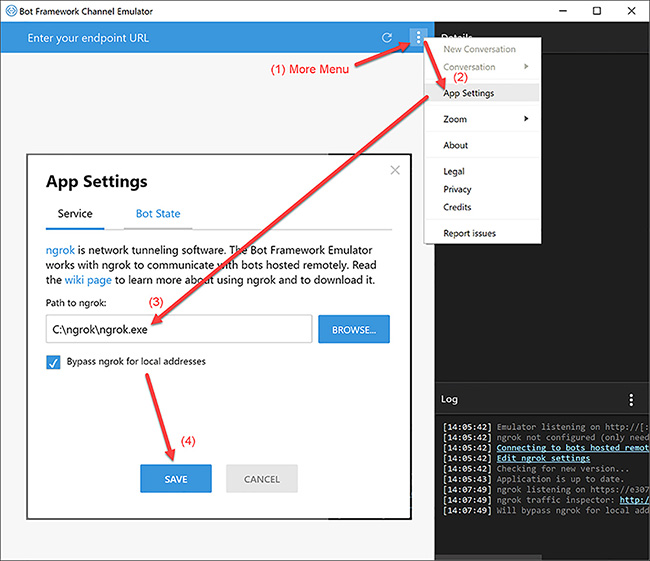
Before testing the chatbot deployed to Azure, you need one more step to install ngrok. Visit https://ngrok.com/, download, unzip, and copy ngrok.exe to a folder of your choice. I put ngrok in the C: grok folder. Following the steps demonstrated in Figure 2-18, click More | App Settings menu, enter the path to ngrok, and click Save. The Bypass ngrok for local addresses causes the emulator to avoid extra network traffic when the address is localhost in the development environment.
![]() Tip
Tip
ngrok is tunneling software, which is useful in situations where Internet connection ports are restricted. For the Bot Emulator, ngrok allows communication with a deployed chatbot. Visit https://ngrok.com for more information.
To test your chatbot on Azure, open the Bot Framework Channel Emulator. Replace the Bot Url with the Azure chatbot address, remembering the https protocol prefix, base address, and append the api/messages segment. Instead of leaving the credentials blank, fill in the credentials received from registering the chatbot, which you can probably locate in the appSettings section in Web.config. You should be able to communicate with your chatbot now.
If you type the address incorrectly, you’ll see a red error message with an HTTP code 405, saying “Method Not Allowed”. Besides looking for typing mistakes, verify the protocol is https and that you’ve appended api/messages.
![]() Tip
Tip
Generally, it’s good to publish a new chatbot, before writing any code. This validates the communication and credentials and eliminates bugs in code as a cause of problems. It also helps you reserve a meaningful handle early in the process.
Summary
You now know how to create, test, and deploy a chatbot. Creating a chatbot is similar to any other type of new .NET application project creation. Be sure to visit the Bot Framework website for the latest Bot Application template.
A chatbot is essentially an ASP.NET MVC Web API project, where the Bot Connector communicates with the chatbot via HTTP POST requests. You learned that the Bot Connector sends activities and the chatbot receives the activities, processing the message activities as requests from the user.
To test a chatbot, you must configure the emulator, which relies on addressing the chatbot via base address, port, and web API segment conventions. You also need to ensure credentials match what is in the chatbot project Web.config file. The emulator has a chat interface, allowing messages to be sent and received from the chatbot.
Before configuring channels for others to use the chatbot, you must publish and register the chatbot. This chapter showed how to publish to Azure. You need to visit the Bot Framework website to register the chatbot. Remember that the address is to the deployed chatbot with the api/messages segments appended. During the registration process, you obtain credentials to configure the chatbot with. These steps allow the Bot Connector to communicate with your chatbot.
Although this chapter explained how to publish a chatbot, we won’t set up any channels until a later chapter. For now, there are additional skills you need and the next chapter starts that off with a real chatbot and explanation of Bot Framework communications essentials.