
CHAPTER 10. Attaching Cards
Previous chapters displayed plenty of text for user interaction. That’s great because it’s where chatbots excel. However, sometimes text isn’t enough to illustrate a concept. Sometimes an image can enhance communication. Other times, you need to share rich binary data, like audio and video. This chapter shows how to display rich graphical user interface (GUI) elements with cards.
This chapter starts out with an overview of the demo program, Music Chatbot. You’ll start learning about some building-block features: Attachment and Suggested Actions. A Suggested Action is a button that a user can select for a specified action. Attachments allow sharing files between user and chatbot. Attachments are also instrumental in allowing chatbots to show cards to users. You’ll learn how to build several types of cards, like Hero and Audio. We’ll wrap up the chapter with a section on Adap tive cards that allow a more flexible cross-platform interface to a chatbot.
Music Chatbot Overview
This chapter shifts gears by presenting a new demo, named Music Chatbot with much more functionality than you’ve seen earlier. This demo gives you more conceptual information to consider when designing a chatbot. You’ll see several listings throughout the chapter and they are all part of the same project, for Music Chatbot, available in the accompanying source code.
Before building a chatbot, you’ll want to design the conversation paths. The sections that follow describe from beginning to end what a conversation with Music Chatbot might be. I’ve used Visio and the diagrams mostly resemble UML flowcharts. There’s a growing list of 3rd party tools to help design chatbot conversations and you should pick what works best for you as long as it helps. I’ll explain the design here, implement each in code, and refer back to each diagram throughout the chapter to associate the implementation with the design.
 Note
Note
These diagrams largely describe what is often referred to as the Happy Path, where conversation takes place in a problem-free environment. In real life, users will say anything and everything to a chatbot, deviating from the ideal of the Happy Path. For these reasons, you’ll logically need to design responses to handle unexpected input or grow team conventions on how to handle unexpected scenarios during development.
The Groove API
Music Chatbot uses the Microsoft Groove API to access content. To run the accompanying code for this chapter, there are a few things you’ll need to do:
1. Register Music Chatbot with the Bot Framework, as described in Chapter 2, Setting Up a Project.
2. Visit https://docs.microsoft.com/en-us/groove/api-overview and register with the Groove API.
3. Update Web.config with credentials obtained during Step #1 – necessary to get security tokens with the Groove API.
![]() Tip
Tip
Remember to add credentials when connecting with the Bot Emulator.
Music Chatbot contains its own GrooveService class, Listing 10-1, for handling communication with the Groove API.
LISTING 10-1 The Music Chatbot GrooveService
using MusicChatbot.Models;
using Newtonsoft.Json;
using System;
using System.Collections.Generic;
using System.Configuration;
using System.IO;
using System.Linq;
using System.Net;
using System.Text;
using System.Text.RegularExpressions;

namespace MusicChatbot.Services
{
    public class GrooveService
    {
        const string BaseUrl = “https://music.xboxlive.com”;

        public string GetToken()
        {
            string service = “https://login.live.com/accesstoken.srf”;

            string clientId = ConfigurationManager.AppSettings[“MicrosoftAppId”];
            string clientSecret = ConfigurationManager.AppSettings[“MicrosoftAppPassword”];
            string clientSecretEnc = System.Uri.EscapeDataString(clientSecret);

            string scope = “app.music.xboxlive.com”;
            string scopeEnc = System.Uri.EscapeDataString(scope);

            string grantType = “client_credentials”;

            string postData =
                $”client_id={clientId}&client_secret={clientSecretEnc}” +
                $”&scope={scopeEnc}&grant_type={grantType}”;

            string responseString = SendRequest(“POST”, service, postData);

            string token = ExtractTokenFromJson(responseString);
            return token;
        }

        string ExtractTokenFromJson(string json)
        {
            Match match = Regex.Match(
                json, “.*”access_token”:”(?<token>.*?)”.*”, RegexOptions.IgnoreCase);

            string token = null;
            if (match.Success)
                token = match.Groups[“token”].Value;

            return token;
        }

        string SendRequest(string method, string service, string postData)
        {
            HttpWebRequest request = (HttpWebRequest)WebRequest.Create(service);

            UTF8Encoding encoding = new UTF8Encoding();
            byte[] data = encoding.GetBytes(postData);

            request.Method = method;
            request.ContentType = “application/x-www-form-urlencoded”;
            request.ContentLength = data.Length;

            using (Stream stream = request.GetRequestStream())
                stream.Write(data, 0, data.Length);

            string responseString = null;
            using (HttpWebResponse response = (HttpWebResponse)request.GetResponse())
                responseString = new StreamReader(response.GetResponseStream()).ReadToEnd();

            return responseString;
        }

        public List<string> GetGenres()
        {
            string token = GetToken();

            HttpWebRequest request = (HttpWebRequest)WebRequest.Create(
                $”{BaseUrl}/3/content/music/catalog/genres”);
            request.Method = WebRequestMethods.Http.Get;
            request.Accept = “application/json”;
            request.Headers[“Authorization”] = “Bearer “ + token;

            string responseJson;
            using (var response = (HttpWebResponse)request.GetResponse())
            using (var sr = new StreamReader(response.GetResponseStream()))
                responseJson = sr.ReadToEnd();

            Genres genres = JsonConvert.DeserializeObject<Genres>(responseJson);
            var genreList =
                (from genre in genres.CatalogGenres
                 where genre.ParentName == null
                 select genre.Name)
                .ToList();

            return genreList;
        }

        public List<Item> GetTracks(string genre)
        {
            string token = GetToken();

            HttpWebRequest request = (HttpWebRequest)WebRequest.Create(
                $”{BaseUrl}/1/content/music/catalog/tracks/browse?” +
                $”genre={genre}&maxItems=5&extra=Tracks”);
            request.Method = WebRequestMethods.Http.Get;
            request.Accept = “application/json”;
            request.Headers[“Authorization”] = “Bearer “ + token;

            string responseJson;
            using (var response = (HttpWebResponse)request.GetResponse())
            using (var sr = new StreamReader(response.GetResponseStream()))
                responseJson = sr.ReadToEnd();

            TracksRoot tracks = JsonConvert.DeserializeObject<TracksRoot>(responseJson);
            var genreList =
                (from track in tracks.Tracks.Items
                 select track)
                .Take(5)
                .ToList();

            return genreList;
        }

        public Preview GetPreview(string namespaceId)
        {
            string token = GetToken();

            string clientInstanceId = ConfigurationManager.AppSettings[“MicrosoftAppId”];
            HttpWebRequest request = (HttpWebRequest)WebRequest.Create(
                $”{BaseUrl}/1/content/{namespaceId}/preview?” +
                $”clientInstanceId={clientInstanceId}”);
            request.Method = WebRequestMethods.Http.Get;
            request.Accept = “application/json”;
            request.Headers[“Authorization”] = “Bearer “ + token;

            string responseJson;
            using (var response = (HttpWebResponse)request.GetResponse())
            using (var sr = new StreamReader(response.GetResponseStream()))
                responseJson = sr.ReadToEnd();

            Preview preview = JsonConvert.DeserializeObject<Preview>(responseJson);
            return preview;
        }

        public string Search(SearchArguments args)
        {
            string token = GetToken();

            HttpWebRequest request = (HttpWebRequest)WebRequest.Create(
                $”{BaseUrl}/1/content/music/search?q={Uri.EscapeDataString(args.Query)}” +
                $”&maxItems={args.MaxItems}&filters={args.Filters}&source={args.Source}”);
            request.Method = WebRequestMethods.Http.Get;
            request.Accept = “application/json”;
            request.Headers[“Authorization”] = “Bearer “ + token;

            string responseJson;
            using (var response = (HttpWebResponse)request.GetResponse())
            using (var sr = new StreamReader(response.GetResponseStream()))
                responseJson = sr.ReadToEnd();

            return responseJson;
        }
    }
}
The Groove API requires a token for each API request and GetToken shows how that works. To get a token, GetToken uses the MicrosoftAppId and MicrosoftAppPassword from the chatbot registration, performed in step #1. The following code shows where the MicrosoftAppId and MicrosoftAppPassword are in the appSettings section of Web.config.
<?xml version=”1.0” encoding=”utf-8”?>
<configuration>
  <appSettings>
    <add key=”BotId” value=”MusicChatbot” />
    <add key=”MicrosoftAppId” value=”Your App ID” />
    <add key=”MicrosoftAppPassword” value=”Your Password” />
  </appSettings>
  <connectionStrings>
    <add name=”StorageConnectionString”
         connectionString=”Your Azure storage connection string” />
  </connectionStrings>
  <system.web>
    <!-- Omitted for clarity -->
  </system.web>
  <system.webServer>
   <!-- Omitted for clarity -->
  </system.webServer>
  <runtime>
   <!-- Omitted for clarity -->
  </runtime>
</configuration>
The rest of the methods use GetToken to make Groove API calls. GetGenres gets a list of music categories that a user can choose. GetTracks gets a list of tracks for browsing and playing music tracks. The GetPreview method returns a type with the URL for a track’s audio, so the user can listen to a track. Search performs the search based on criteria from the user. All of this code is based on demos from the Groove API documentation, which you can find at the link in step #2.
The Item, Preview, and SearchArguments are custom types, defined in the Music Chatbot code, holding properties with data the program needs and you’ll see how those come into play throughout this chapter.
The next section describes the design of the dialogs that use GrooveService.
The Root Dialog
Music Chatbot starts with a root menu asking a user what they would like to do. Figure 10-1 explains that workflow.
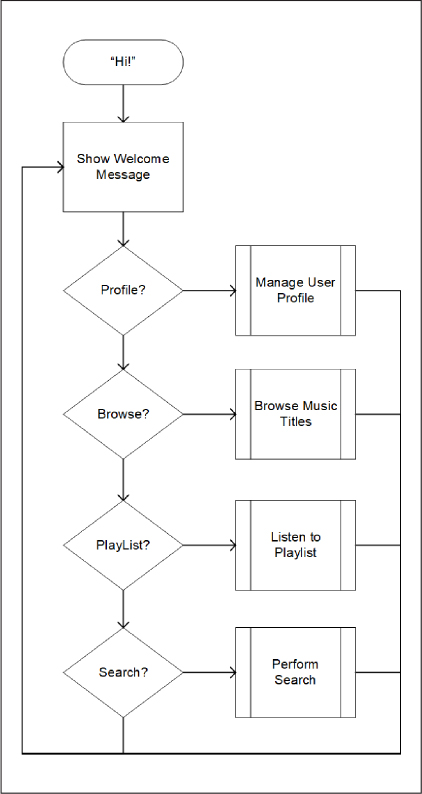
FIGURE 10-1 The Music Chatbot Root Dialog.
As shown in Figure 10-1, after the Welcome message, the user can select Profile, Browse, Playlist or Search. Each option launches a new dialog to fulfill the request.
The Profile Dialog
The profile dialog lets a user update or display their profile information. Figure 10-2 shows how that works.

FIGURE 10-2 The Music Chatbot Profile Dialog.
The profile dialog in Figure 10-2 lets a user choose to Update or Display their profile information. Update branches into processes to request and save a users name and image. Display retrieves the user’s name and image and displays the values. Done lets the user go back to the root dialog.
The Browse Dialog
When the user selects browse, they can see a list of tracks (songs) and optionally make a purchase. Figure 10-3 shows how browse dialog works.

FIGURE 10-3 The Music Chatbot Browse Dialog.
Figure 10-3 shows how the browse dialog shows a menu. Music Chatbot does a direct request to the Groove service to get available categories, giving the user a dynamic list of categories to select. When a user picks a category, they’ll see a set of tracks in that category and can choose to buy a track. Selecting Done takes the user back to the root dialog.
The Playlist Dialog
Users can choose the playlist to listen to tracks. Figure 10-4 shows how playlist dialog works.

FIGURE 10-4 The Music Chatbot Playlist Dialog.
The playlist dialog in Figure 10-4 lets a user listen to a track. They can continue listing to tracks as long as they want. When they’re done listening, they’ll go back to the root dialog.
The Search Dialog
Search lets users search for various information, such as artists, tracks, and albums. Figure 10-5 shows how the search dialog works.
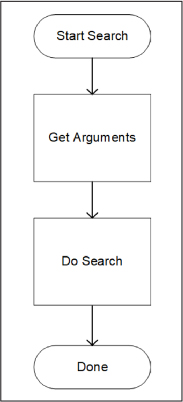
FIGURE 10-5 The Music Chatbot Search Dialog.
Figure 10-5 shows how the search collects arguments and then does the search.
That was the Music Chatbot design and a description of the services for the data source, the Groove API. The rest of the chapter looks at the implementation of that design and how each dialog uses GrooveService.
Building Blocks
This section is called Building Blocks because each of these features are fundamental to the implementation of Bot Framework cards. Suggested Actions have CardAction types, which are the buttons in cards, and Attachments are the vehicle for adding cards to a chatbot response. This will become clearer as you learn more about cards in the coming section, but first we’ll start with Suggested Actions.
Presenting Suggested Actions
A Suggested Action lets you add commands to a chatbot’s message. These typically appear as buttons that the user can click or tap. There are various configurable actions, but this example receives the user’s response as a normal IMessageActivity. Figure 10-6 shows what a message with Suggested Actions looks like.

FIGURE 10-6 A message with Suggested Actions.
As shown in Figure 10-6, the suggested actions appear as a set of buttons for Profile, Browse, Playlist, and Search. Figure 10-6 is the user interface for the Root Dialog, diagramed in Figure 10-1 and implemented in Listings 10-2 and 10-3.
LISTING 10-2 The Music Chatbot RootDialog
using System;
using System.Threading.Tasks;
using Microsoft.Bot.Builder.Dialogs;
using Microsoft.Bot.Connector;
using MusicChatbot.Models;
using System.Linq;
using System.Collections.Generic;

namespace MusicChatbot.Dialogs
{
    [Serializable]
    public class RootDialog : IDialog<object>
    {
        public const string WelcomeMessage =
            “### Welcome to Music Chatbot!
” +
            “Here are some of the things you can do:
” +
            “* *Profile* to manage your profile information.
” +
            “* *Browse* to find the music you like.
” +
            “* *Playlist* for listening to favorite tunes.

” +
            “Type ”Go” to get started!”;

        public Task StartAsync(IDialogContext context)
        {
            context.Wait(MessageReceivedAsync);
            return Task.CompletedTask;
        }

        async Task MessageReceivedAsync(IDialogContext context, IAwaitable<IMessageActivity> result)
        {
            IMessageActivity activity = await result;

            RootMenuItem choice;
            if (Enum.TryParse(activity.Text, out choice))
            {
                switch (choice)
                {
                    case RootMenuItem.Profile:
                        await context.Forward(new ProfileDialog(), ResumeAfterDialogAsync, activity);
                        break;
                    case RootMenuItem.Browse:
                        await context.Forward(new BrowseDialog(), ResumeAfterDialogAsync, activity);
                        break;
                    case RootMenuItem.Playlist:
                        await context.Forward(new PlaylistDialog(), ResumeAfterDialogAsync, activity);
                        break;
                    case RootMenuItem.Search:
                        await context.Forward(new SearchDialog(), ResumeAfterDialogAsync, activity);
                        break;
                    default:
                        await context.PostAsync(WelcomeMessage);
                        context.Wait(MessageReceivedAsync);
                        break;
                }
            }
            else
            {
                await ShowMenuAsync(context);
            }
        }

        async Task ResumeAfterDialogAsync(IDialogContext context, IAwaitable<object> result)
        {
            await ShowMenuAsync(context);
        }

        async Task ShowMenuAsync(IDialogContext context)
        {
            var options = Enum.GetValues(typeof(RootMenuItem)).Cast<RootMenuItem>().ToArray();

            var reply = (context.Activity as Activity).CreateReply(“What would you like to do?”);

            reply.SuggestedActions = new SuggestedActions
            {
                To = new List<string> { context.Activity.From.Id },
                Actions =
                    (from option in options
                     let text = option.ToString()
                     select new CardAction
                     {
                         Title = text,
                         Type = ActionTypes.ImBack,
                         Value = text
                     })
                    .ToList()
            };

            await
                new ConnectorClient(new Uri(reply.ServiceUrl))
                    .Conversations
                    .SendToConversationAsync(reply);

            context.Wait(MessageReceivedAsync);
        }
    }
}
Listing 10-3 The Music Chatbot RootMenuItem
namespace MusicChatbot.Models
{
    public enum RootMenuItem
    {
        Profile, Browse, Playlist, Search
    }
}
RootMenuItem in Listing 10-3 is an enum for what valid message choices could be. When MessageReceivedAsync, in Listing 10-2, can’t match a RootMenuItem member, it calls the ShowMenuAsync method.
ShowMenuAsync uses the CreateReply method from the incoming Activity to create the new Activity that goes back to the user. Activity has a SuggestedActions property, which is type SuggestedAction that has two properties: To and Actions. The To property is optional and might be useful to specify which user can see the actions in a group chat scenario. Actions is a List<CardAction>, containing the options for the user. Each option is a CardAction, containing Title, Type, and Value properties, and ShowMenuAsync populates the Actions with a LINQ statement on the available options corresponding to RootMenuItem members. The ActivityTypes.ImBack causes the user’s choice to come back to the dialog as a normal IMessageActivity. The following ActivityTypes class is a Bot Framework type showing what options work with the CardAction Types property:
    public class ActionTypes
    {
        /// <summary>
        /// Client will open given url in the built-in browser.
        /// </summary>
        public const string OpenUrl = “openUrl”;

        /// <summary>
        /// Client will post message to bot, so all other participants will see
        /// that was posted to the bot and who posted this.
        /// </summary>
        public const string ImBack = “imBack”;

        /// <summary>
        /// Client will post message to bot privately, so other participants
        /// inside conversation will not see that was posted.
        /// </summary>
        public const string PostBack = “postBack”;

        /// <summary>
        /// playback audio container referenced by url
        /// </summary>
        public const string PlayAudio = “playAudio”;

        /// <summary>
        /// playback video container referenced by url
        /// </summary>
        public const string PlayVideo = “playVideo”;

        /// <summary>
        /// show image referenced by url
        /// </summary>
        public const string ShowImage = “showImage”;

        /// <summary>
        /// download file referenced by url
        /// </summary>
        public const string DownloadFile = “downloadFile”;

        /// <summary>
        /// Signin button
        /// </summary>
        public const string Signin = “signin”;
    }
The difference between ImBack and PostBack is that all users (in a group conversation) can see ImBack, but PostBack is private to the user who chose it. PostBack can be useful for sending information, such as a JSON document, back and you don’t want that to show in the chat window. This behavior can also vary by channel, so be sure to test to verify behaviors on all channels the chatbot surfaces on. Some of the ActionTypes members correspond to a card and you’ll see how they work later in this chapter.
![]() Tip
Tip
Notice how ShowMenuAsync is factored into it’s own method. This lets ResumeAfterDialogAsync and the else clause in MessageReceivedAsync call ShowMenuAsync and always provide the user with some guidance. This might or might not make sense for your chatbot, but the concept of making sure a user doesn’t get lost can help quality.
Cards use CardAction for their options, so you’ll see it used as an integral part of cards. The next building block is Attachments.
Working with Attachments
Attachments allow chatbots and users to share content. When a user needs to send content to a chatbot, it will be in the form of a file, such as . an image to update their profile or a CSV file for data analysis. From the other direction, a chatbot might want to show the user an image. Listing 10-4 shows how Music Chatbot uses attachments in ProfileDialog.
LISTING 10-4 The Music Chatbot ProfileDialog
using Microsoft.Bot.Builder.Dialogs;
using Microsoft.Bot.Connector;
using MusicChatbot.Models;
using MusicChatbot.Services;
using Newtonsoft.Json.Linq;
using System;
using System.IO;
using System.Linq;
using System.Net.Http;
using System.Threading.Tasks;

namespace MusicChatbot.Dialogs
{
    [Serializable]
    public class ProfileDialog : IDialog<object>
    {
        public string Name { get; set; }
        public byte[] Image { get; set; }

        public Task StartAsync(IDialogContext context)
        {
            context.Wait(MessageReceivedAsync);
            return Task.CompletedTask;
        }

        Task MessageReceivedAsync(IDialogContext context, IAwaitable<object> result)
        {
            ShowMainMenu(context);
            return Task.CompletedTask;
        }

        void ShowMainMenu(IDialogContext context)
        {
            var options = Enum.GetValues(
                typeof(ProfileMenuItem)).Cast<ProfileMenuItem>().ToArray();
            PromptDialog.Choice(
                context, ResumeAfterChoiceAsync, options, “What would you like to do?”);
        }

        async Task ResumeAfterChoiceAsync(
            IDialogContext context, IAwaitable<ProfileMenuItem> result)
        {
            ProfileMenuItem choice = await result;

            switch (choice)
            {
                case ProfileMenuItem.Display:
                    await DisplayAsync(context);
                    break;
                case ProfileMenuItem.Update:
                    await UpdateAsync(context);
                    break;
                case ProfileMenuItem.Done:
                default:
                   context.Done(this);
                    break;
            }
        }

        Task UpdateAsync(IDialogContext context)
        {
            PromptDialog.Text(context, ResumeAfterNameAsync, “What is your name?”);
            return Task.CompletedTask;
        }

        async Task ResumeAfterNameAsync(IDialogContext context, IAwaitable<string> result)
        {
            Name = await result;
            await context.PostAsync(“Please upload your profile image.”);
            context.Wait(UploadAsync);
        }

        async Task UploadAsync(IDialogContext context, IAwaitable<object> result)
        {
            var activity = await result as Activity;

            if (activity.Attachments.Any())
            {
                Attachment userImage = activity.Attachments.First();
                Image = await new HttpClient().GetByteArrayAsync(userImage.ContentUrl);

                StateClient stateClient = activity.GetStateClient();
                BotData userData = await stateClient.BotState.GetUserDataAsync
                    (activity.ChannelId, activity.From.Id);
                userData.SetProperty(nameof(Name), Name);
                userData.SetProperty(nameof(Image), Image);
                await stateClient.BotState.SetUserDataAsync(
                    activity.ChannelId, activity.From.Id, userData);
            }
            else
            {
                await context.PostAsync(“Sorry, I didn’t see an image in the attachment.”);
            }

            ShowMainMenu(context);
        }

        async Task DisplayAsync(IDialogContext context)
        {
            Activity activity = context.Activity as Activity;

            StateClient stateClient = activity.GetStateClient();
            BotData userData =
                await stateClient.BotState.GetUserDataAsync(
                    activity.ChannelId, activity.From.Id);

            if ((userData.Data as JObject)?.HasValues ?? false)
            {
                string name = userData.GetProperty<string>(nameof(Name));

                await context.PostAsync(name);

                byte[] image = userData.GetProperty<byte[]>(nameof(Image));

                var fileSvc = new FileService();
                string imageName = $”{context.Activity.From.Id}_Image.png”;

                string imageFilePath = fileSvc.GetFilePath(imageName);
                File.WriteAllBytes(imageFilePath, image);

                string contentUrl = fileSvc.GetBinaryUrl(imageName);
                var agenda = new Attachment(“image/png”, contentUrl, imageName);
                Activity reply = activity.CreateReply();
                reply.Attachments.Add(agenda);

                await
                    new ConnectorClient(new Uri(reply.ServiceUrl))
                        .Conversations
                        .SendToConversationAsync(reply);
            }
            else
            {
                await context.PostAsync(“Profile not available. Please update first.”);
            }

            ShowMainMenu(context);
        }
    }
}
ProfileDialog implements the Profile Dialog diagram in Figure 10-2. Music Chatbot uses the IBotDataStore<BotData> to store attachments. The first consideration with this approach is that IBotDataStore<BotData> uses the default Bot State Service, with a capacity of 32Kb,which doesn’t have enough storage space for images.
Note
The Bot State Service isn’t meant for production work and is there to only facilitate development.
The proper way to manage state data is to provide an IBotDataStore<BotData> implementation that uses your own data source. For Music Chatbot, the data source is Azure Table Storage and here are the steps for doing that:
1. Install the Microsoft.Bot.Builder.Azure NuGet package. This contains the IBotDataStore<BotData> implementation for multiple data sources, including Azure Table Storage. If you need more help with understanding Azure, the free Microsoft Press book, Fundamentals of Azure (https://blogs.msdn.microsoft.com/microsoft_press/2016/09/01/free-ebook-microsoft-azure-essentials-fundamentals-of-azure-second-edition/), is an excellent reference.
2. Create an Azure Storage account.
3. Create a connection string entry in web.config, as shown in Listing 10-5.
4. Register a TableBotDataStore as the IBotDataStore<BotData> implementation with the Autofac container in Global.asax.cs, shown in Listing 10-6.
LISTING 10-5 Table Storage connection string.
  <connectionStrings>
    <add name=”StorageConnectionString” connectionString=”Your connection string” />
  </connectionStrings>
LISTING 10-6 The Music Chatbot Global.asax
using Autofac;
using Microsoft.Bot.Builder.Azure;
using Microsoft.Bot.Builder.Dialogs;
using Microsoft.Bot.Builder.Dialogs.Internals;
using Microsoft.Bot.Connector;
using System.Configuration;
using System.Web.Http;

namespace MusicChatbot
{
    public class WebApiApplication : System.Web.HttpApplication
    {
        protected void Application_Start()
        {
            GlobalConfiguration.Configure(WebApiConfig.Register);

            Conversation.UpdateContainer(builder =>
            {
                var store = new TableBotDataStore(
                    ConfigurationManager
                        .ConnectionStrings[“StorageConnectionString”]
                        .ConnectionString);

                builder.Register(c => store)
                    .Keyed<IBotDataStore<BotData>>(AzureModule.Key_DataStore)
                    .AsSelf()
                    .SingleInstance();

                builder.Register(c => new CachingBotDataStore(store,
                    CachingBotDataStoreConsistencyPolicy
                    .ETagBasedConsistency))
                    .As<IBotDataStore<BotData>>()
                    .AsSelf()
                    .InstancePerLifetimeScope();
            });
        }
    }
}
As shown in Listing 10-6, the Bot Framework passes its ContainerBuilder as the Conversation.UpdateContainer lambda parameter. If you aren’t familiar with Autofac, it’s an open source Inversion of Control (IoC) container that the Bot Framework uses and you can visit https://autofac.org/ for more information.
The following sections explain how uploading and displaying attachments works.
Accepting Attachments from Users
The Bot Emulator has a file upload button on the left of the text entry window and you can use that to upload an image to Music Chatbot. Music Chatbot asks the user for their name and then asks them to upload an image. The only image type Music Chatbot accepts is *.png. The UploadAsync method, repeated below, handles the user’s file:
        async Task UploadAsync(IDialogContext context, IAwaitable<object> result)
        {
            var activity = await result as Activity;

            if (activity.Attachments.Any())
            {
                Attachment userImage = activity.Attachments.First();
                Image = await new HttpClient().GetByteArrayAsync(userImage.ContentUrl);

                StateClient stateClient = activity.GetStateClient();
                BotData userData = await stateClient.BotState.GetUserDataAsync(activity.ChannelId, activity.From.Id);
                userData.SetProperty(nameof(Name), Name);
                userData.SetProperty(nameof(Image), Image);
                await stateClient.BotState.SetUserDataAsync(activity.ChannelId, activity.From.Id, userData);
            }
            else
            {
                await context.PostAsync(“Sorry, I didn’t see an image in the attachment.”);
            }

            ShowMainMenu(context);
        }
There’s only one attachment, so UploadAsync reads the first item in the Attachments collection. When a user uploads an attachment, that file gets posted on the Bot Connector server for a short period of time, so you don’t want to wait too long before getting it. The Attachment has a URL for where that file is located in the ContentUrl property. With that ContentUrl, the code can get a byte[], which it places in the Image property. Then the chatbot saves the Name and Image in User State as covered in Chapter 3, Conversation Essentials.
Now that you know how to accept attachments from users, the next section explains how to send attachments to users.
Sending Attachments to Users
When a user wants to see their profile information, they choose the Display option from the ProfileDialog menu, which runs the DisplayAsync method below:
        async Task DisplayAsync(IDialogContext context)
        {
            Activity activity = context.Activity as Activity;

            StateClient stateClient = activity.GetStateClient();
            BotData userData =
                await stateClient.BotState.GetUserDataAsync(
                    activity.ChannelId, activity.From.Id);

            if ((userData.Data as JObject)?.HasValues ?? false)
            {
                string name = userData.GetProperty<string>(nameof(Name));

                await context.PostAsync(name);

                byte[] image = userData.GetProperty<byte[]>(nameof(Image));

                var fileSvc = new FileService();
                string imageName = $”{context.Activity.From.Id}_Image.png”;

                string imageFilePath = fileSvc.GetFilePath(imageName);
                File.WriteAllBytes(imageFilePath, image);

                string contentUrl = fileSvc.GetBinaryUrl(imageName);
                var agenda = new Attachment(“image/png”, contentUrl, imageName);
                Activity reply = activity.CreateReply();
                reply.Attachments.Add(agenda);

                await
                    new ConnectorClient(new Uri(reply.ServiceUrl))
                        .Conversations
                        .SendToConversationAsync(reply);
            }
            else
            {
                await context.PostAsync(“Profile not available. Please update first.”);
            }

            ShowMainMenu(context);
        }
User profile information is saved in User State by the UploadAsync method, so the DisplayAsync method must retrieve those values from User State.
Since Attachments passes files via ContentUrl, DisplayAsync saves the file to the local file system so it can create a URL. Another way to do this is to build a URL that points at a Web API endpoint that will return a file, but this was simple. Listing 10-7 shows the FileService class used to manage file names and URLs.
LISTING 10-7 The Music Chatbot FileService
using System.Web;

namespace MusicChatbot.Services
{
    public class FileService
    {
        public string GetBinaryUrl(string fileName)
        {
            string absoluteUri =
                HttpContext.Current.Request.Url.AbsoluteUri +
                $”/Binaries/” + fileName;
            return absoluteUri.Replace(“api/messages/”, “”);
        }

        public string GetFilePath(string fileName)
        {
            return HttpContext.Current.Server.MapPath(“/Binaries/” + fileName);
        }
    }
}
Both GetBinaryUrl and GetFilePath use the ASP.NET HttpContext to build strings that use the Binaries folder, which is part of the MusicChatbot project in the downloadable source code.
After saving the file into the Binaries folder, the DisplayAsync method instantiates a new Attachment with the contentUrl, creates a new reply, and adds that Attachment to the Attachments collection. DisplayAsync calls context.PostAsync to display the name, but that won’t work for attachments. To send the attachment with the image, the code instantiates a new ConnectorClient and then calls the the Conversation property’s SendToConversationAsync method, covered in Chapter 3, to send the attachment to the user. Figure 10-7 shows what happens when the user chooses the Display option.

FIGURE 10-7 Displaying an attachment
Now you know how to receive and send attachments. Attachments are important for sending cards to users too, which you’ll learn about next.
Displaying Cards
The Bot Framework has a growing list of cards. While each of these cards has specific purposes, their commonality is in presenting a GUI interface to the user. This section discusses some of the available cards and how they work.
Implementing BrowseDialog
The BrowseDialog implementation, in Listing 10-8, shows how to use Hero cards and Thumbnail cards. A Hero card lets you add a title, sub-title, a Hero image, and actions to a card. A Thumbnail card is similar to the Hero card, but a smaller thumbnail image. The BrowseDialog class implements the design in Figure 10-3.
LISTING 10-8 The Music Chatbot BrowseDialog
using Microsoft.Bot.Builder.Dialogs;
using Microsoft.Bot.Connector;
using MusicChatbot.Models;
using MusicChatbot.Services;
using System;
using System.Collections.Generic;
using System.Linq;
using System.Threading.Tasks;

namespace MusicChatbot.Dialogs
{
    [Serializable]
    public class BrowseDialog : IDialog<object>
    {
        const string DoneCommand = “Done”;

        public Task StartAsync(IDialogContext context)
        {
            context.Wait(MessageReceivedAsync);
            return Task.CompletedTask;
        }

        Task MessageReceivedAsync(IDialogContext context, IAwaitable<object> result)
        {
            List<string> genres = new GrooveService().GetGenres();
            genres.Add(“Done”);
            PromptDialog.Choice(context, ResumeAfterGenreAsync, genres, “Which music category?”);
            return Task.CompletedTask;
        }

        async Task ResumeAfterGenreAsync(IDialogContext context, IAwaitable<string> result)
        {
            string genre = await result;

            if (genre == DoneCommand)
            {
                context.Done(this);
                return;
            }

            var reply = (context.Activity as Activity)
                .CreateReply($”## Browsing Top 5 Tracks in {genre} genre”);

            List<HeroCard> cards = GetHeroCardsForTracks(genre);
            cards.ForEach(card =>
                reply.Attachments.Add(card.ToAttachment()));

            ThumbnailCard doneCard = GetThumbnailCardForDone();
            reply.Attachments.Add(doneCard.ToAttachment());

            reply.AttachmentLayout = AttachmentLayoutTypes.Carousel;

            await
                new ConnectorClient(new Uri(reply.ServiceUrl))
                    .Conversations
                    .SendToConversationAsync(reply);

            context.Wait(MessageReceivedAsync);
        }

        List<HeroCard> GetHeroCardsForTracks(string genre)
        {
            List<Item> tracks = new GrooveService().GetTracks(genre);

            var cards =
                (from track in tracks
                 let artists =
                     string.Join(“, “,
                        from artist in track.Artists
                        select artist.Artist.Name)
                 select new HeroCard
                 {
                     Title = track.Name,
                     Subtitle = artists,
                     Images = new List<CardImage>
                     {
                         new CardImage
                         {
                             Alt = track.Name,
                             Tap = BuildBuyCardAction(track),
                             Url = track.ImageUrl
                         }
                     },
                     Buttons = new List<CardAction>
                     {
                         BuildBuyCardAction(track)
                     }
                 })
                .ToList();
            return cards;
        }

        CardAction BuildBuyCardAction(Item track)
        {
            return new CardAction
            {
                Type = ActionTypes.OpenUrl,
                Title = “Buy”,
                Value = track.Link
            };
        }

        ThumbnailCard GetThumbnailCardForDone()
        {
            return new ThumbnailCard
            {
                Title = DoneCommand,
                Subtitle = “Click/Tap to exit”,
                Images = new List<CardImage>
                {
                    new CardImage
                    {
                        Alt = “Smile”,
                        Tap = BuildDoneCardAction(),
                        Url = new FileService().GetBinaryUrl(“Smile.png”)
                    }
                },
                Buttons = new List<CardAction>
                {
                    BuildDoneCardAction()
                }
            };
        }

        CardAction BuildDoneCardAction()
        {
            return new CardAction
            {
                Type = ActionTypes.PostBack,
                Title = DoneCommand,
                Value = DoneCommand
            };
        }
    }
}
In Listing 10-8, MessageReceivedAsync uses GrooveService to get a list of genre’s, prompts the user to pick one, and processes the result in ResumeAfterGenreAsync. Next the code calls GetHeroCardsForTracks and GetThumbnailCardForDone, which we’ll discuss soon.
Right now, look at how the return values from these methods get added to Attachments. GetHeroCardsForTracks returns a List<HeroCard>. Each card, whether it’s a Hero card or any other type of card, has a ToAttachment method, to convert it to an attachment, and that’s what’s happening in the LINQ ForEach statement on the List<CardAction>. Each card gets converted to an Attachment and added to the Attachments collection.
The default layout for cards is vertical, but you can change that, as this demo does, by setting the AttachmentLayout property of the reply Activity to AttachmentLayoutTypes.Carousel. This makes the attachments scroll horizontally.
Now, each card has become an attachment and gets sent to the user in the same way you leared how to send an attachment earlier, via SendToConversationAsync. Next, we’ll look at a couple of examples of how to create cards.
Creating Hero Cards
The GetHeroCardsForTracks, repeated below for convenience, builds a List<HeroCard>. These Hero cards display song tracks, using GrooveService, from the genre that the user selected. They also have a Buy button that takes the user to a Web page where they can read more info and/or buy the song.
        List<HeroCard> GetHeroCardsForTracks(string genre)
        {
            List<Item> tracks = new GrooveService().GetTracks(genre);

            var cards =
                (from track in tracks
                 let artists =
                     string.Join(“, “,
                        from artist in track.Artists
                        select artist.Artist.Name)
                 select new HeroCard
                 {
                     Title = track.Name,
                     Subtitle = artists,
                     Images = new List<CardImage>
                     {
                         new CardImage
                         {
                             Alt = track.Name,
                             Tap = BuildBuyCardAction(track),
                             Url = track.ImageUrl
                         }
                     },
                     Buttons = new List<CardAction>
                     {
                         BuildBuyCardAction(track)
                     }
                 })
                .ToList();
            return cards;
        }
The GetHeroCardsForTracks is mostly a LINQ statement that builds a Hero card for each track returned by GetTracks. There could be multiple artists, so the let clause combines the artist names into a comma separated list. The select clause projects a new HeroCard instance.
Each HeroCard has a Title, Subtitle, Images, and Buttons. The Images property only takes a single image, of type CardImage where Alt is a description of the image and Url is the location of the image, both of which come from the Item type returned by the GrooveService. The Tap property executes a CardAction, returned by the BuildBuyCardAction method. The code assigns the return value of BuildBuyCardAction, repeated below from Listing 10-8, to the List<CardAction> assigned to Buttons too:
        CardAction BuildBuyCardAction(Item track)
        {
            return new CardAction
            {
                Type = ActionTypes.OpenUrl,
                Title = “Buy”,
                Value = track.Link
            };
        }
This is the same CardAction type explained in the previous section on Suggested Actions. This time, its Type is ActionTypes.OpenUrl, which opens a Web browser and navigates to the page specified by track.Link, which is assigned to Value.
A similar card is the Thumbnail card, discussed next.
Creating Thumbnail Cards
BrowseDialog adds a Thumbnail card to the end of the list so the user can click Done and go back to the previous dialog in the stack. Here’s the implementation of GetThumbnailCardForDone, repeated from Listing 10-8:
        ThumbnailCard GetThumbnailCardForDone()
        {
            return new ThumbnailCard
            {
                Title = DoneCommand,
                Subtitle = “Click/Tap to exit”,
                Images = new List<CardImage>
                {
                    new CardImage
                    {
                        Alt = “Smile”,
                        Tap = BuildDoneCardAction(),
                        Url = new FileService().GetBinaryUrl(“Smile.png”)
                    }
                },
                Buttons = new List<CardAction>
                {
                    BuildDoneCardAction()
                }
            };
        }
This code is nearly identical to the HeroCard, except the type is ThumbnailCard. It has a single image–this time using FileService to get a Smile.png file from the local file system and returning a URL. Both CardImage.Tap and the CardAction for Buttons call BuildCardDoneAction, shown here:
        CardAction BuildDoneCardAction()
        {
            return new CardAction
            {
                Type = ActionTypes.PostBack,
                Title = DoneCommand,
                Value = DoneCommand
            };
        }
This is the same CardAction type used for the HeroCard demo, except that its Type is ActionTypes.PostBack and the Title and Value are set to the BrowseDialog DoneCommand constant, creating a button that says Done. Since ResumeAfterGenreAsync is the current method at the top of the dialog stack, Bot Builder calls that if a user selects the Done buton, the ResumeAfterGenreAsync method checks to see if that’s the text of the current IMessageActivity and, if so, will pop the dialog stack to return control to the previous dialog.
Now you’ve seen how cards work, with a couple of examples. The next section discusses implementation of PlaylistDialog with another example of how to create cards.
Implementing PlaylistDialog
The PlaylistDialog lets a user select a genre and then receive a list of cards that let them play songs in that genre. Listing 10-9 shows PlaylistDialog, which implements the diagram in Figure 10-4.
LISTING 10-9 The Music Chatbot PlaylistDialog
using Microsoft.Bot.Builder.Dialogs;
using Microsoft.Bot.Connector;
using MusicChatbot.Models;
using MusicChatbot.Services;
using System;
using System.Collections.Generic;
using System.Linq;
using System.Threading.Tasks;

namespace MusicChatbot.Dialogs
{
    [Serializable]
    public class PlaylistDialog : IDialog<object>
    {
        const string DoneCommand = “Done”;

        public Task StartAsync(IDialogContext context)
        {
            context.Wait(MessageReceivedAsync);
            return Task.CompletedTask;
        }


        Task MessageReceivedAsync(IDialogContext context, IAwaitable<object> result)
        {
            List<string> genres = new GrooveService().GetGenres();
            genres.Add(“Done”);
            PromptDialog.Choice(
                context, ResumeAfterGenreAsync, genres, “Which music category?”);
            return Task.CompletedTask;
        }

        async Task ResumeAfterGenreAsync(IDialogContext context, IAwaitable<string> result)
        {
            string genre = await result;

            if (genre == DoneCommand)
            {
                context.Done(this);
                return;
            }

            var reply = (context.Activity as Activity)
                .CreateReply($”## Viewing Top 5 Tracks in {genre} genre”);

            List<AudioCard> cards = GetAudioCardsForPreviews(genre);
            cards.ForEach(card =>
                reply.Attachments.Add(card.ToAttachment()));

            ThumbnailCard doneCard = GetThumbnailCardForDone();
            reply.Attachments.Add(doneCard.ToAttachment());

            reply.AttachmentLayout = AttachmentLayoutTypes.Carousel;

            await
                new ConnectorClient(new Uri(reply.ServiceUrl))
                    .Conversations
                    .SendToConversationAsync(reply);

            context.Wait(MessageReceivedAsync);
        }

        ThumbnailCard GetThumbnailCardForDone()
        {
            return new ThumbnailCard
            {
                Title = DoneCommand,
                Subtitle = “Click/Tap to exit”,
                Images = new List<CardImage>
                {
                    new CardImage
                    {
                        Alt = “Smile”,
                        Tap = BuildDoneCardAction(),
                        Url = new FileService().GetBinaryUrl(“Smile.png”)
                    }
                },
                Buttons = new List<CardAction>
                {
                    BuildDoneCardAction()
                }
            };
        }

        List<AudioCard> GetAudioCardsForPreviews(string genre)
        {
            var grooveSvc = new GrooveService();
            List<Item> tracks = grooveSvc.GetTracks(genre);

            var cards =
                (from track in tracks
                 let artists =
                     string.Join(“, “,
                        from artist in track.Artists
                        select artist.Artist.Name)
                 let preview = grooveSvc.GetPreview(track.Id)
                 select new AudioCard
                 {
                     Title = track.Name,
                     Subtitle = artists,
                     Media = new List<MediaUrl>
                     {
                         new MediaUrl(preview.Url)
                     }
                 })
                .ToList();

            return cards;
        }

        CardAction BuildDoneCardAction()
        {
            return new CardAction
            {
                Type = ActionTypes.PostBack,
                Title = DoneCommand,
                Value = DoneCommand
            };
        }
    }
}
Just like in the previous BrowseDialog code, the PlaylistDialog in Listing 10-9 asks for a genre and processes the user’s choice in ResumeAfterGenreAsync. The code then calls GetAudioCardsForPreviews, adds the result to the Attachments collection of a reply, and calls SendToConversationAsync to show those Audio cards to the user. The next section discusses how to create the Audio cards.
Creating Audio Cards
An Audio card allows the user to listen to Audio recordings. In Music Chatbot, the user goes to the PlaylistDialog, can see a list of Audio cards with songs, and can listen. The following excerpt, from Listing 10-9, shows how to create Audio cards:
        List<AudioCard> GetAudioCardsForPreviews(string genre)
        {
            var grooveSvc = new GrooveService();
            List<Item> tracks = grooveSvc.GetTracks(genre);

            var cards =
                (from track in tracks
                 let artists =
                     string.Join(“, “,
                        from artist in track.Artists
                        select artist.Artist.Name)
                 let preview = grooveSvc.GetPreview(track.Id)
                 select new AudioCard
                 {
                     Title = track.Name,
                     Subtitle = artists,
                     Media = new List<MediaUrl>
                     {
                         new MediaUrl(preview.Url)
                     }
                 })
                .ToList();

            return cards;
        }
The GetAudioCardsForPreview method uses a LINQ statement to build a list of AudioCard. Instead of an Image, an AudioCard has a Media collection, which is a List<MediaUrl>. This method retrieved a list of preview items from GrooveService, where a preview is about 30 seconds of a song. This preview has a Url, that is passed to the MediaUrl constructor. As with other aspects of attachments, files are passed as URLs. Figure 10-8 shows what the Audio cards look like.

FIGURE 10-8 Music Chatbot Audio Cards.
One of the things you might notice in Figure 10-8 is that the Audio card is full-featured with go/pause button, timer progress, volume and so on. It uses the URL passed to MediaUrl to stream the music. Functionality like this really highlights a benefit of cards for accomplishing sophisticated tasks like this that might not have been as well suited (or possible) with text alone.
Creating Other Cards
One of the patterns you might have observed in previous card demos is that all of the cards, while having a different purpose are very similar in how you approach using them. There will typically be some back-end functionality, like GrooveService helping with data acquisition and other services, but the task of adding a card to a chatbot will be similar. Table 10-1 lists some of the other cards that you can use with a chatbot.
TABLE 10-1 Other Card Types
Card Type |
Description |
ReceiptCard |
Has properties for holding item entries, taxes, and totals that is designed to provide a user with a receipt after purchase. |
SignInCard |
Indicates to a user that they need to sign in and the code will open a URL to a separate Web page or other authentication service to let a user sign in. |
VideoCard |
Plays videos. Like an Audio card, but accepts a URL to a video a user can watch. |
Note
Whether a card is built-in or adaptive, different channels can render differently. You’ll want to verify the rendering on each channel the chatbot surfaces on to verify your intended experience.
While the built-in cards are generally simple and quick, they might not always meet your needs. A more flexible card type is called Adaptive cards, which are discussed next.
Adaptive Cards
Adaptive cards let you include rich UI in a chatbot. They’re designed to be cross-platform, with a goal of adding consistency between technology UI, foster greater sharing, and enabling a potential 3rd party market. This section shows how to create an Adaptive card for a Bot Framework chatbot.
The Adaptive cards feature list is huge and likely to increase over time. What this section does is highlight three useful areas that help you understand how to build these cards: layout, controls, and actions. SearchDialog, shown in Listing 10-10, performs a search function with the Groove API and uses Adaptive cards to do it. SearchDialog also implements the design in Figure 10-5.
Listing 10-10 The Music Chatbot SearchDialog
using AdaptiveCards;
using Microsoft.Bot.Builder.Dialogs;
using Microsoft.Bot.Connector;
using MusicChatbot.Models;
using MusicChatbot.Services;
using Newtonsoft.Json;
using Newtonsoft.Json.Linq;
using System;
using System.Collections.Generic;
using System.Threading.Tasks;

namespace MusicChatbot.Dialogs
{
    [Serializable]
    public class SearchDialog : IDialog<object>
    {
        public Task StartAsync(IDialogContext context)
        {
            context.Wait(MessageReceivedAsync);
            return Task.CompletedTask;
        }

        async Task MessageReceivedAsync(IDialogContext context, IAwaitable<IMessageActivity> result)
        {
            var card = new AdaptiveCard();

            card.Body.AddRange(
                new List<CardElement>
                {
                    new Container
                    {
                        Items = BuildHeader()
                    },
                    new TextBlock { Text = “Query (max 200 chars):”},
                    new TextInput
                    {
                        Id = “query”,
                        MaxLength = 200,
                        IsRequired = true,
                        Placeholder = “Query”
                    },
                    new TextBlock { Text = “Max Items (1 to 25):”},
                    new NumberInput
                    {
                        Id = “maxItems”,
                        Min = 1,
                        Max = 25,
                        IsRequired = true
                    },
                    new TextBlock { Text = “Filters:”},
                    new ChoiceSet
                    {
                        Id = “filters”,
                        Choices = BuildFilterChoices(),
                        IsRequired = false,
                        Style = ChoiceInputStyle.Compact
                    },
                    new TextBlock { Text = “Source:”},
                    new ChoiceSet
                    {
                        Id = “source”,
                        Choices = BuildSourceChoices(),
                        IsMultiSelect = false,
                        IsRequired = false,
                        Style = ChoiceInputStyle.Expanded
                    }
                });

            card.Actions.Add(new SubmitAction
            {
                Title = “Search”
            });

            Activity reply = (context.Activity as Activity).CreateReply();
            reply.Attachments.Add(
                new Attachment()
                {
                    ContentType = AdaptiveCard.ContentType,
                    Content = card
                });

            await
                new ConnectorClient(new Uri(reply.ServiceUrl))
                    .Conversations
                    .SendToConversationAsync(reply);

            context.Wait(PerformSearchAsync);
        }

        async Task PerformSearchAsync(IDialogContext context, IAwaitable<IMessageActivity> result)
        {
            IMessageActivity activity = await result;

            string values = activity.Value?.ToString();
            var searchArgs = JsonConvert.DeserializeObject<SearchArguments>(values);

            var results = new GrooveService().Search(searchArgs);

            context.Done(this);
        }

        List<Choice> BuildFilterChoices()
        {
            return new List<Choice>
            {
                new Choice
                {
                    Title = “artists”,
                    Value = “artists”
                },
                new Choice
                {
                    Title = “albums”,
                    Value = “albums”
                },
                new Choice
                {
                    Title = “tracks”,
                    Value = “tracks”
                },
                new Choice
                {
                    Title = “playlists”,
                    Value = “playlists”
                }
            };
        }

        List<Choice> BuildSourceChoices()
        {
            return new List<Choice>
            {
                new Choice
                {
                    Title = “catalog”,
                    Value = “catalog”
                },
                new Choice
                {
                    Title = “collection”,
                    Value = “collection”
                }
            };
        }

        List<CardElement> BuildHeader()
        {
            string contentUrl = new FileService().GetBinaryUrl(“Smile.png”);

            return new List<CardElement>
            {
                new ColumnSet
                {
                    Columns = new List<Column>
                    {
                        new Column
                        {
                            Items = new List<CardElement>
                            {
                                new TextBlock()
                                {
                                    Text = “Music Search”,
                                    Size = TextSize.Large,
                                    Weight = TextWeight.Bolder
                                },
                                new TextBlock()
                                {
                                    Text = “Fill in form and click Search button.”,
                                    Color = TextColor.Accent
                                }
                            }
                        },
                        new Column
                        {
                            Items = new List<CardElement>
                            {
                                new Image()
                                {
                                    Url = contentUrl
                                }
                            }
                        }
                    }
                }
            };
        }
    }
}
To get started, you’ll need to add a reference to the Microsoft.AdaptiveCards NuGet package. SearchDialog is a typical IDialog<T> where MessageReceivedAsync handles the initial message after the user has chosen the Search option from RootDialog.
MessageReceivedAsync starts by instantiating an AdaptiveCard type. Quickly skimming MessageReceivedAsync, you can see that the AdaptiveCard type has a Body property, holding the content of the card. AdaptiveCard also has an Actions property that gives the user abilities to execute various commands.
Some of the Adaptive card features run together in the code, which will be normal when building any chatbot, so the following sections navigate the code, explaining core concepts, starting with layout.
Layout with Containers
The built-in cards specify layout for you, but this might not meet your needs, and would signify a reason to approach Adaptive cards. With Adaptive cards, you can use a container to wrap other controls. Additionaly, you can wrap containers in other containers and specify rows and columns. As shown in the following excerpt from Listing 10-10, the Body property lets you build the card:
            card.Body.AddRange(
                new List<CardElement>
                {
                    new Container
                    {
                        Items = BuildHeader()
                    },
                    // …
                });
Body takes a List<CardElement> and CardElement is the base class of controls that can reside in an Adaptive card. Here, I’ve cut out the other controls assigned to the body, but the default layout of these controls is vertical, where the controls appear from top to bottom in the order they appear in code. The first CardElement in the list is a Container, which has an Items property of type List<CardElement>. The idea here is that the first part of the card is a header and the BuildHeader method, next, creates that List<CardElement> representing how the header should look:
        List<CardElement> BuildHeader()
        {
            string contentUrl = new FileService().GetBinaryUrl(“Smile.png”);

            return new List<CardElement>
            {
                new ColumnSet
                {
                    Columns = new List<Column>
                    {
                        new Column
                        {
                            Items = new List<CardElement>
                            {
                                new TextBlock()
                                {
                                    Text = “Music Search”,
                                    Size = TextSize.Large,
                                    Weight = TextWeight.Bolder
                                },
                                new TextBlock()
                                {
                                    Text = “Fill in form and click Search button.”,
                                    Color = TextColor.Accent
                                }
                            }
                        },
                        new Column
                        {
                            Items = new List<CardElement>
                            {
                                new Image()
                                {
                                    Url = contentUrl
                                }
                            }
                        }
                    }
                }
            };
        }
BuildHeader instantiates a List<CardElement> that is highly nested to show the container structure. The ColumnSet is a container for columns and the header is divided into two columns. Columns line up from left to right with the first column in code being the furthest most left.
Each Column has an Items collection of type List<CardElement>. The first column has two TextBlock controls to display the specified text. The second column has an image. That gives us a header with text on the left and an image on the right.
This is a first glimpse at controls, but you can also see how option-rich Adaptive cards can be by looking at the font styling properties of the TextBlock. The next section discusses controls in more detail.
Using Controls
In the previous section, you saw how Image and TextBlock controls fit into a container. These controls were primarily for display. Additionally, you can add input controls for text, combo boxes, radio buttons, and more. This excerpt from Listing 10-10 shows how to populate the AdaptiveCard Body property with controls that follow the header:
            card.Body.AddRange(
                new List<CardElement>
                {
                    new Container
                    {
                        Items = BuildHeader()
                    },
                    new TextBlock { Text = “Query (max 200 chars):”},
                    new TextInput
                    {
                        Id = “query”,
                        MaxLength = 200,
                        IsRequired = true,
                        Placeholder = “Query”
                    },
                    new TextBlock { Text = “Max Items (1 to 25):”},
                    new NumberInput
                    {
                        Id = “maxItems”,
                        Min = 1,
                        Max = 25,
                        IsRequired = true
                    },
                    new TextBlock { Text = “Filters:”},
                    new ChoiceSet
                    {
                        Id = “filters”,
                        Choices = BuildFilterChoices(),
                        IsRequired = false,
                        Style = ChoiceInputStyle.Compact
                    },
                    new TextBlock { Text = “Source:”},
                    new ChoiceSet
                    {
                        Id = “source”,
                        Choices = BuildSourceChoices(),
                        IsMultiSelect = false,
                        IsRequired = false,
                        Style = ChoiceInputStyle.Expanded
                    }
                });
After adding the header, the remaining controls fit into the card vertically from the top down. The choice made here was to place the controls in pairs with a leading TextBlock to explain the purpose of the control. Each of these input controls correspond to a parameter for the Groove API search service.
The first and common part of all input controls is the Id property. It’s important that you populate the Id property because when the user submits the card, you’ll use that Id to know what each received value means. As a generally good coding practice, the Id you come up with for each control should be descriptive for the nature of the data the control captures. e.g. the NumberInput for the maximum number of items has an Id named maxItems. Also, when the user submits the form, the resulting value will be a JSON document, so you might find that it makes sense to use JSON propery naming conventions.
Another common property of controls is the IsRequired property, that if true makes it mandatory for the user to set a value in that control.
The ChoiceSets are interesting because they represent either combo boxes, radio button lists, or check box lists. Setting IsMultiSelect to true creates a check box list. Setting Style to ChoiceInputStyle.Compact creates a combo box and ChoiceInputStyle.Expanded creates an open list where the user can see all items at one time.
Controls have a plethora of options and the best way to learn about how they work is to use this chapter’s code or create your own example and start experimenting with the options. That’s how you add controls to an AdaptiveCard. Now, let’s see what it takes to submit those values back to the chatbot.
Handling Actions
Much like CardActions, Adaptive cards allow a card to take various actions. This example uses the SubmitAction, shown in the exerpt below from Listing 10-10, to send the values from the card back to the chatbot:
            card.Actions.Add(new SubmitAction
            {
                Title = “Search”
            });

            Activity reply = (context.Activity as Activity).CreateReply();
            reply.Attachments.Add(
                new Attachment()
                {
                    ContentType = AdaptiveCard.ContentType,
                    Content = card
                });

            await
                new ConnectorClient(new Uri(reply.ServiceUrl))
                    .Conversations
                    .SendToConversationAsync(reply);

            context.Wait(PerformSearchAsync);
All you need to do is add a SubmitAction instance to the AdaptiveCard Actions property. Adaptive cards are shared with the user as Attachments and this example instantiates a new Attachment, setting its ContentType to AdaptiveCard.ContentType and setting Content to the AdaptiveCard instance, card.
Next, look at the context.Wait and how it sets PerformSearchAsync as the next method on the stack to call. When the user submits the card, by clicking the button associated with the SubmitAction, the message goes back to the current method of the chatbot, which is PerformSearchAsync, shown here:
        async Task PerformSearchAsync(IDialogContext context, IAwaitable<IMessageActivity> result)
        {
            IMessageActivity activity = await result;

            string values = activity.Value?.ToString();
            var searchArgs = JsonConvert.DeserializeObject<SearchArguments>(values);

            var results = new GrooveService().Search(searchArgs);

            context.Done(this);
        }
In PerformSearchAsync, the Value property on the Activity is a string that holds the JSON object containing the user’s choices. The SearchArguments class holds properties corresponding the the Ids of the input controls in the AdaptiveCard. This is why it was important to specify the Ids on the input controls. With the proper parameters, the GrooveService Search method performs the search and returns results, which is a string containing the JSON object with results. This would be a great opportunity for you to practice using those results to build creative Adaptive cards for the chatbot to display to the user.
Figure 10-9 shows what the Adaptive card for the Groove API search looks like.
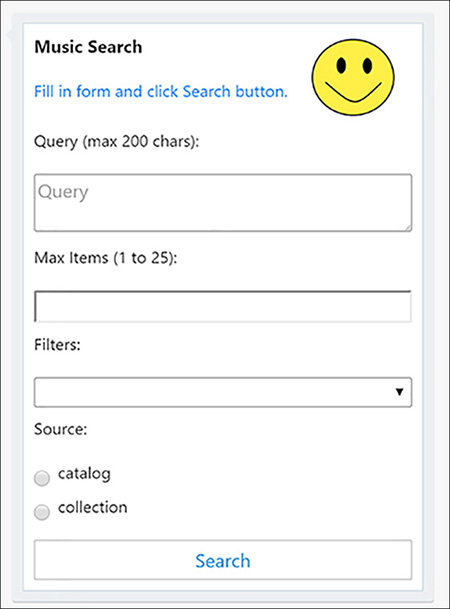
FIGURE 10-9 The Music Chatbot Search Adaptive Card
Summary
This chapter showed how to use cards to enhance the graphical appearace of a chatbot. It introduced Music Chatbot–a chatbot that uses the Microsoft Groove API to browse, play, and search for music.
You learned about some basic card features: CardAction and Attachment. We call them building blocks because they’re essential parts of how cards work. You assign CardAction instances to Suggested Actions to give a user quick commands to select. CardActions are also used in other cards. Attachments let you exchange files with users and are the vehicle for sending cards to a user.
The demos showed you how to add Hero cards, Thumbnail cards, and Audio cards to display information and let a user listen to music. Remember that while the functionality of cards differ, the way you approach creating them is very similar.
Adaptive cards are cross-platform, reusable code that allows you to present rich content to a user. They’re more flexible than the built-in cards because you can manage their layout, configure controls, and have various actions. The examples in this chapter showed you how to build an Adaptive card for searching the Groove API. Adaptive cards are nice because you can be creative and provide users with a nice interface.
Now that you know how to how to create cards and attach them to activities, you’ll want to see how they appear in different channels. The next chapter shows how to set up and deploy chatbots to channels.