CHAPTER 2
Configure and support core services
After you have successfully deployed Windows 10 Creators Update (1703) to your users’ devices within your organization, you must know how to configure and support the fundamental components of the operating system. This exam contains questions that verify your understanding of networking, storage, data access, app implementation, and remote management.
Skills covered in this chapter:
Skill 2.1: Configure networking
The ability to connect devices running Windows 10 to both wired and wireless networks is important, whether this is a home network or your organization’s network infrastructure. To configure networking settings correctly, understand fundamental IP settings and know how to configure name resolution. It is also important to understand network location profiles and how Windows Firewall uses these to define security settings on your Windows 10-based devices and facilitate network discovery. In addition, the 70-698 Installing and Configuring Windows 10 exam also covers network troubleshooting issues, and it is therefore important to know how to use Windows 10 networking tools to investigate and resolve network-related problems.
Configure and support IPv4 and IPv6 network settings
Before you can configure name resolution and firewall settings, you must have a grasp of the underlying fundamentals of networking and how to configure both Internet Protocol version 4 (IPv4) and Internet Protocol version 6 (IPv6) network settings.
Overview of IPv4
IPv4 is a mature networking protocol and is widely used on almost all Internet-connected client devices. Each client on an IPv4 network is assigned a unique IPv4 configuration that identifies that client device. This configuration is based on a number of elements.
An IPv4 address IPv4 uses a 32-bit binary address, which is divided into four octets (or groups of eight digits), each of which is converted to a decimal number. Thus: 11000000101010000001000100000001 becomes 11000000.10101000.00010001.00000001 and converts to: 192.168.17.1.
A subnet mask A subnet mask is also a 32-bit binary string, entered as four decimal digits, and is used to indicate the client’s unique identity, known as the host ID, and the subnet where the client resides, known as the network ID.
A default gateway address To facilitate communications between network segments, or subnets, each client device is assigned the IPv4 address of a router in the local network that is used to forward network traffic destined for devices in other subnets.
A Domain Name System (DNS) server address DNS enables the client computer to resolve names into IPv4 or IPv6 addresses.
Need More Review? IPv4 addressing
To review further details about IPv4 addressing fundamentals, refer to the Microsoft website at: https://docs.microsoft.com/en-us/previous-versions/windows/it-pro/windows-server-2008-R2-and-2008/dd379547(v=ws.10).
Subnets
A subnet is a network segment. One or more routers separate the subnet from other subnets. Each subnet on an Internet has a unique ID, just as each host within a subnet has a unique ID. You must use the 32 bits of an IPv4 address to define both the host’s ID and the subnet ID in which that host resides.
Simple networks
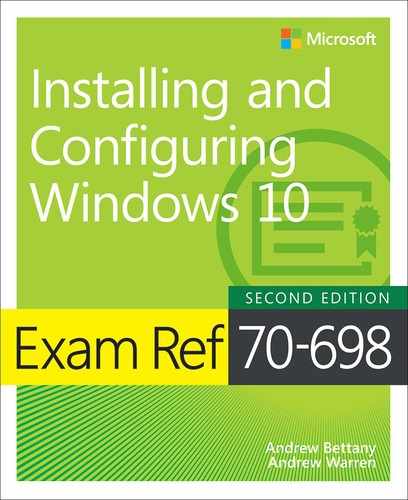
Remember that each 32-bit IPv4 address is divided into four octets. In simple IPv4 subnetting, whole octets are reserved for defining the subnet portion of the IPv4 address, as shown in Figure 2-1. Consequently, the remaining whole octets are available for defining the host portion of the address.
This simple subnetting is referred to as classful addressing, by which the address class, A, B, or C, defines the number of octets reserved for host and subnet IDs. Table 2-1 shows how this works.
TABLE 2-1 Characteristics of the default IPv4 address classes
Class |
First octet |
Default subnet mask |
Number of networks |
Number of hosts per network |
|---|---|---|---|---|
A |
1 to 127 |
255.0.0.0 |
126 |
16,777,214 |
B |
128 to 191 |
255.255.0.0 |
16,384 |
65,534 |
C |
192 to 223 |
255.255.255.0 |
2,097,152 |
254 |
Note Other address classes
There are also class D and class E addresses. Class D addresses are used for multicasting when a client device is part of a group. Class E addresses are reserved and are not used for hosts or subnets.
Complex networks
For some situations, using a classful addressing scheme can be ideal. But for many situations, it might be important to have more flexibility over the number of bits allocated to the subnet address portion of an IPv4 address. For example, instead of using 8, 16, or 24 bits for the subnet, you can use 12 or 18.
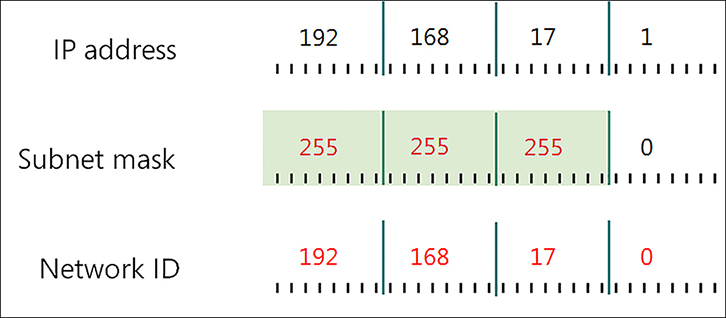
Bear in mind that the more bits you allocate to subnetting, the fewer bits remain for the host portion of the IPv4 address. That is, you can have more subnets, each containing fewer hosts, or you can have few subnets, each containing many hosts. Figure 2-2 shows how changing the subnet mask changes the subnet ID without changing the octets that define the whole IPv4 address. This scheme is often referred to as classless addressing, or Classless Interdomain Routing (CIDR).
In Figure 2-2, notice how changing the subnet mask from 255.255.255.0 to 255.255.240.0 shifts the device from subnet 192.168.17.0 to 192.168.16.0. In this case, by shifting the mask to the left, we have allocated more bits to describe hosts in each subnet, with correspondingly fewer subnets. You can see that to express a host’s IPv4 configuration properly, not only must you state the IPv4 address, but you must also state the subnet mask. For example, in Figure 2-2, this host has an IPv4 configuration of 192.168.17.1/255.255.240.0.
![]() Exam Tip
Exam Tip
You will often see devices with IPv4 configurations shown as 192.168.17.1/20. The number after the slash denotes the number of sequential binary 1s in the subnet mask (20 in this instance). If the mask were 255.255.248.0, that would be represented as /21.
Need More Review? IPv4 routing
To review further details about IPv4 subnetting and routing, refer to the Microsoft website at: https://docs.microsoft.com/en-us/previous-versions/windows/it-pro/windows-server-2008-R2-and-2008/dd379495(v=ws.10).
Public and private addressing
Devices that connect directly to the Internet require a unique public IPv4 configuration. However, due to the limitation of the 32-bit addressing scheme of IPv4, there is a limit to the number of hosts that can be connected to the Internet using a public configuration. To alleviate this potential but significant problem, many organizations use private IPv4 configurations for their network clients, only using public IPv4 configurations for Internet-facing devices, such as routers.
The Internet Assigned Numbers Authority (IANA) has defined the address ranges shown in Table 2-2 as being available for private use. A technology, such as network address translation (NAT), is used to enable devices using private IPv4 configurations to communicate with the Internet.
TABLE 2-2 Private IPv4 address ranges
Class |
Mask |
Range |
|---|---|---|
A |
10.0.0.0/8 |
10.0.0.0-10.255.255.255 |
B |
172.16.0.0/12 |
172.16.0.0-172.31.255.255 |
C |
192.168.0.0/16 |
192.168.0.0-192.168.255.255 |
Configuring an IPv4 connection
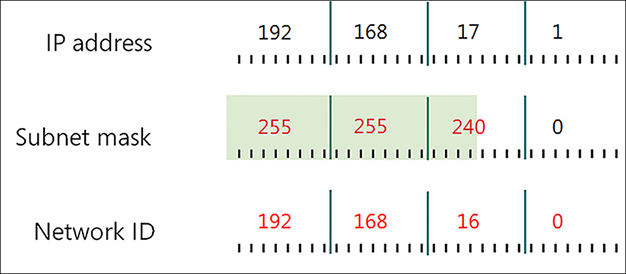
Devices running Windows 10 are configured to obtain an IPv4 configuration automatically by default, as shown in Figure 2-3.
Typically, Windows 10-based devices obtain their IPv4 configurations from a Dynamic Host Configuration Protocol (DHCP) service, perhaps running on a Windows Server 2016 server computer or provided as a service on a device such as a router or wireless access point (wireless AP).
![]() Exam Tip
Exam Tip
If a Windows 10-based device fails to obtain an IPv4 configuration from a DHCP server, it reverts to using an Automatic Private IP Addressing (APIPA) address. If your computer has an IPv4 address that starts 169.254.X.Y, it is using an APIPA address. APIPA enables only local, subnet-based communications at best. You can override this behavior by opening the Alternative Configuration tab, shown in Figure 2-3, choosing User Configured, and specifying the IPv4 configuration to use when DHCP is unavailable.
To view or configure the IPv4 settings on your computer, perform the following procedure.
Right-click the network icon in the system tray and then click Open Network And Sharing Center.
Click Change Adapter Settings.
Right-click the appropriate network adapter and then click Properties.
Double-click Internet Protocol Version 4 (TCP/IPv4).
You can then configure the IPv4 settings. Click Use The Following IP Address and then specify the following: IP Address, Subnet Mask, Default Gateway, Preferred DNS Server, and Alternative DNS Server (Optional).
You can also configure a number of options from the Advanced TCP/IP Settings dialog box. From the Internet Protocol Version 4 (TCP/IPv4) Properties dialog box, click Advanced to open the dialog box, shown in Figure 2-4.

Configure the options on the following tabs.
IP Settings tab Enables you to configure additional IPv4 addresses and default gateways manually for this network interface.
DNS tab You can define additional DNS server addresses for name resolution and additional DNS suffix processing options.
WINS tab The Windows Internet Name Service (WINS) is an older name resolution service used by earlier versions of Windows and Windows Server. Generally, you do not need to configure anything here.
Configuring IPv4 from the command line and by using Windows PowerShell
In addition to configuring IPv4 settings from the user interface, you can also use the Netsh.exe command-line tool and Windows PowerShell cmdlets. You can use the Netsh.exe command-line tool to reconfigure many network-related settings. For example, the following command reconfigures the IPv4 settings.
Netsh interface ipv4 set address name="Ethernet" source=static addr=192.168.17.1 mask=255.255.240.0 gateway=192.168.31.254
There are numerous Windows PowerShell cmdlets that you can use to view and configure network settings, some of which are shown in Table 2-3.
TABLE 2-3 Windows PowerShell IPv4 networking-related cmdlets
Cmdlet |
Purpose |
|---|---|
Get-NetIPAddress |
Displays information about the IP address configuration |
Get-NetIPv4Protocol |
Displays information about the IPv4 protocol configuration |
Set-NetIPAddress |
Changes the IP address configuration |
Set-NetIPv4Protocol |
Changes the IPv4 protocol configuration |
For example, to change the IPv4 configuration for a network connection with Windows PowerShell, use the following cmdlet.
Set-NetIPAddress -InterfaceAlias Ethernet -IPAddress 192.168.17.1
Overview of IPv6
It is still the case that almost all computers and other devices connect to the Internet by using an IPv4 configuration. However, some network services and devices do require an IPv6 configuration, so it is important to understand the IPv6 fundamentals, including how to configure IPv6. There are a number of reasons to consider IPv6. These include:
Some services require IPv6 Services, such as DirectAccess, use IPv6 to facilitate remote connections.
Larger address space IPv6 uses a 128-bit address space, providing a vast increase in the availability of addresses for devices on the Internet.
Hierarchical addressing IPv6 uses a structured address space, which is more efficient for routers, helping to optimize network communications.
Support for stateless and stateful autoconfiguration You can configure your IPv6 devices to use DHCPv6 to obtain a stateful configuration, or you can rely on router discovery to use a stateless configuration, simplifying the process of enabling IPv6 on your network devices.
IPv6 addressing
As mentioned, IPv6 uses a 128-bit addressing scheme. This is usually written in hexadecimal. The following is an example of an IPv6 address.
2001:CD8: 1F2D::2BB:FF:EF82:1C3B
IPv6 uses the following three address types.
Unicast addresses Packets are delivered to a single interface.
Multicast addresses Packets are delivered to multiple interfaces.
Anycast addresses Packet are delivered to multiple interfaces that are the closest in routing distance.
Unlike IPv4, IPv6 does not have broadcast messages. Instead, for most scenarios where broadcast messages are using in IPv4, IPv6 uses multicast messages. The unicast and anycast addresses in IPv6 can have the following scopes:
Link-local IPv6 hosts on the same subnet.
Site-local IPv6 hosts in the same organization, also known as private site addressing.
Global IPv6 Internet addresses.
![]() Exam Tip
Exam Tip
Unicast site-local addresses are similar to IPv4 private addresses and have the FEC0::/64 prefix. Unicast link-local addresses are similar to IPv4 APIPA addresses and have the FE80::/64 prefix.
Configuring an IPv6 connection
Configuring IPv6 is almost identical to the process of configuring IPv4. By default, Windows 10 uses automatic IPv6 configuration. If a DHCPv6 server is available, it obtains its configuration from that service; otherwise, it will use stateless autoconfiguration. As with IPv4, you can use either the Windows user interface to configure IPv6, as shown in Figure 2-5, or you can use Netsh.exe or Windows PowerShell.
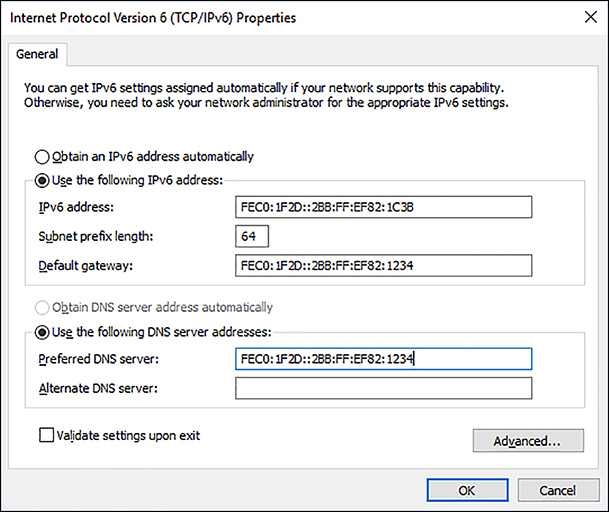
To view or configure the IPv6 settings on your computer, perform the following procedure.
Right-click the network icon in the system tray and then click Open Network And Sharing Center.
Click Change Adapter Settings.
Right-click the appropriate network adapter and then click Properties.
Double-click Internet Protocol Version 6 (TCP/IPv6).
There are numerous Windows PowerShell cmdlets that you can use to view and configure IPv6 network settings, some of which are shown in Table 2-4.
TABLE 2-4 Windows PowerShell IPv6 networking-related cmdlets
Cmdlet |
Purpose |
|---|---|
Get-NetIPAddress |
Displays information about the IP address configuration |
Get-NetIPv6Protocol |
Displays information about the IPv4 protocol configuration |
Set-NetIPAddress |
Changes the IP address configuration |
Set-NetIPv6Protocol |
Changes the IPv4 protocol configuration |
For example, to change the IPv6 configuration for a network connection with Windows PowerShell, use the following cmdlet.
Set-NetIPAddress -IPAddress 2001:CD8: 1F2D::2BB:FF:EF82:1C3B -PrefixLength 64
Configure name resolution
Devices running Windows 10 communicate over networks by using names rather than IPv4 or IPv6 network addresses. A service on the Windows 10-based device, known as a client resolver, resolves names into IPv4 or IPv6 addresses. To configure Windows 10 networking, you must know how to configure name resolution.
Overview of name resolution
Although IP addressing is not especially complex, it is generally easier for users to work with host names rather than with the IPv4 or IPv6 addresses of hosts, such as websites, that they want to connect to. When an application, such as Microsoft Edge, references a website name, the name is converted to the underlying IP address by using a process known as name resolution. Windows 10-based devices can use two types of name. These are:
Host names A host name, up to 255 characters in length, contains only alphanumeric characters, periods, and hyphens. A host name is an alias combined with a fully qualified domain name (FQDN). For example, the alias computer1 is prefixed to the domain name contoso.com to create the host name, or FQDN, of computer1.contoso.com.
NetBIOS names Less relevant today, NetBIOS names use a nonhierarchical structure based on a 16-character name. The sixteenth character identifies a particular service running on the computer named by the preceding 15 characters. Thus, LON-SVR1[20h] is the NetBIOS server service on the computer called LON-SVR1.
The way a client computer resolves names varies based on its configuration but is typically as shown in Figure 2-6.
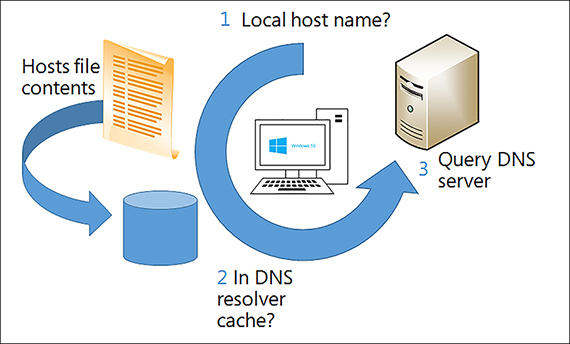
The following process identifies the typical stages of name resolution for Windows 10-based devices.
Determine whether the queried host name is the same as the local host name.
Search the local DNS resolver cache for the queried host name. The cache is updated whenever records are successfully resolved. In addition, the contents of the local Hosts file are added to the resolver cache.
Petition a DNS server for the required host name.
![]() Exam Tip
Exam Tip
Windows 10 devices also use Link-Local Multicast Name Resolution for networks that do not provide DNS. You can find out more on the Microsoft Press Store website at: https://www.microsoftpressstore.com/articles/article.aspx?p=2217263&seqNum=8.
Need More Review? IPv4 name resolution
To review further details about IPv4 name resolution, refer to the Microsoft website at: https://docs.microsoft.com/en-us/previous-versions/windows/it-pro/windows-server-2008-R2-and-2008/dd379505(v=ws.10).
Configure DNS settings
To configure DNS settings for either IPv4 or IPv6, perform the following procedure.
Right-click the network icon in the system tray and then click Open Network And Sharing Center.
Click Change Adapter Settings.
Right-click the appropriate network adapter and then click Properties.
Double-click either Internet Protocol Version 4 (TCP/IPv4) or Internet Protocol Version 6 (TCP/IPv6).
Click Use The Following DNS Server Addresses and then enter a valid IPv4 or IPv6 address for a DNS server that is accessible to the client.
You can also configure DNS settings by using Netsh.exe, as follows.
netsh interface ip set dns name="Ethernet" static 192.168.16.1
Alternatively, you can use Windows PowerShell to configure the DNS client settings.
Set-DNSClientServerAddress -interfaceIndex 12 -ServerAddresses ('192.168.16.1')
Configure advanced DNS settings
In addition to configuring the basic DNS client settings, you can configure advanced DNS settings, as shown in Figure 2-7. To configure these settings, from either the Internet Protocol Version 4 (TCP/IPv4) Properties dialog box or from the Internet Protocol Version 6 (TCP/IPv6) Properties dialog box, click Advanced and then click the DNS tab.
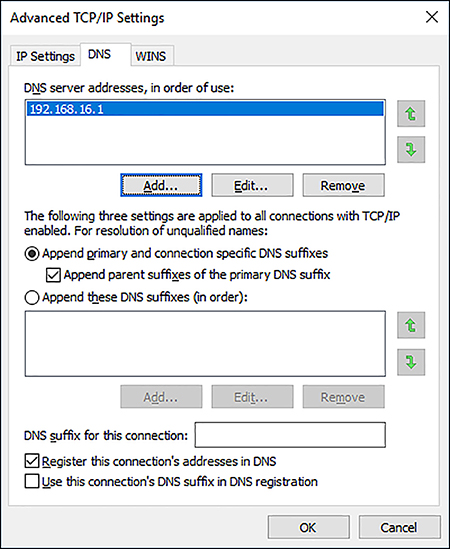
The advanced DNS settings are:
Append Primary And Connection Specific DNS Suffixes This option controls how the DNS resolver on the local client appends the DNS suffixes during queries. For example, if you query www, and your computer’s primary suffix is contoso.com, the contoso.com suffix is appended to your query to make www.contoso.com.
Append Parent Suffixes Of The Primary DNS Suffix In this example, the parent suffix of contoso.com is com. This option determines whether, after attempting www.contoso.com, the DNS resolver tries www.com.
Append These DNS Suffixes (In Order) This option enables you to define suffixes and order them for queries.
DNS suffix For This Connection You can define a DNS suffix for each network interface card installed in your device.
Register This Connection’s Address In DNS Windows-based devices can register their IPv4 addresses with DNS servers that support dynamic updates of host records, such as the DNS server role service in Windows Server 2016.
Use This Connection’s DNS Suffix In DNS Registration This option determines whether the IP addresses and the connection-specific domain name of this connection are registered with DNS.
Connect to a network
It is important to know how to create and configure new network connections in Windows 10 in order to support your users’ needs to connect with other computers, either at home or at their workplace. Windows 10 enables you to connect to a HomeGroup to share resources and peripherals and to your workplace by using a virtual private network (VPN) or by using DirectAccess.
Connect to a HomeGroup
HomeGroup enables you to join computers quickly and easily to create a simple file- and resource-sharing network. To create a HomeGroup, from the Network And Sharing Center, next to HomeGroup, click Ready To Create.
![]() Exam Tip
Exam Tip
When your computer is joined to an Active Directory Domain Services (AD DS) domain, you cannot create or join a HomeGroup.
As shown in Figure 2-8, if a HomeGroup exists, you can join it. Otherwise, to create a HomeGroup, click Create A HomeGroup. Then, in the Create A HomeGroup Wizard, specify what you want to share with other HomeGroup users. You can choose the following options.
Pictures (Shared)
Videos (Shared)
Music (Shared)
Documents (Not shared)
Printers & Devices (Shared)
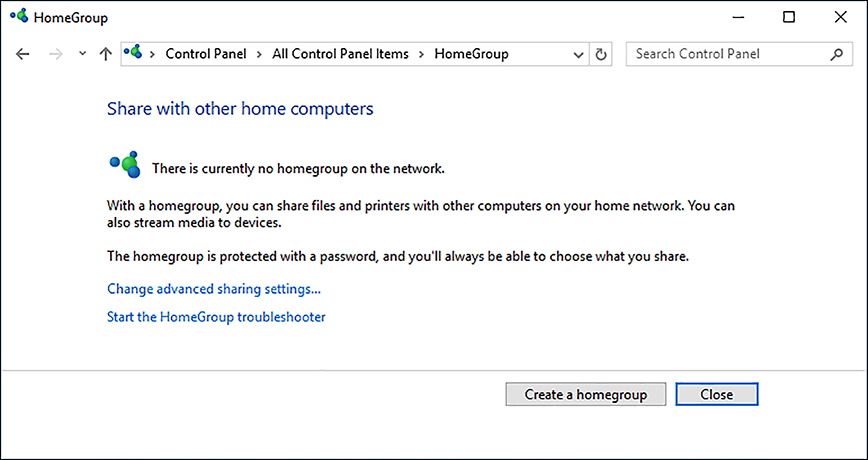
FIGURE 2-8 The Share With Other Home Computers dialog box
You are then provided with a password. Use this password when you want to access shared resources on other HomeGroup computers and devices.
![]() Exam Tip
Exam Tip
To create or join a HomeGroup, your network location profile must be set to private.
Configure VPN connections
You can use a VPN to connect to your workplace network over the Internet. A VPN provides for a secure connection through a public network by using authentication and encryption protocols. To create a VPN in Windows 10, from the Network And Sharing Center, under Change Your Network Settings, click Set Up A New Connection Or Network and then click Connect To A Workplace.
To configure your VPN connection, in the Connect To A Workplace Wizard, provide the following information.
How do you want to connect? You can connect by using an existing Internet connection or by dialing directly to your workplace.
Internet address This is the name or IP address of the computer that you connect to at your workplace, as shown in Figure 2-9. Typically, this is an FQDN, such as remote .adatum.com.
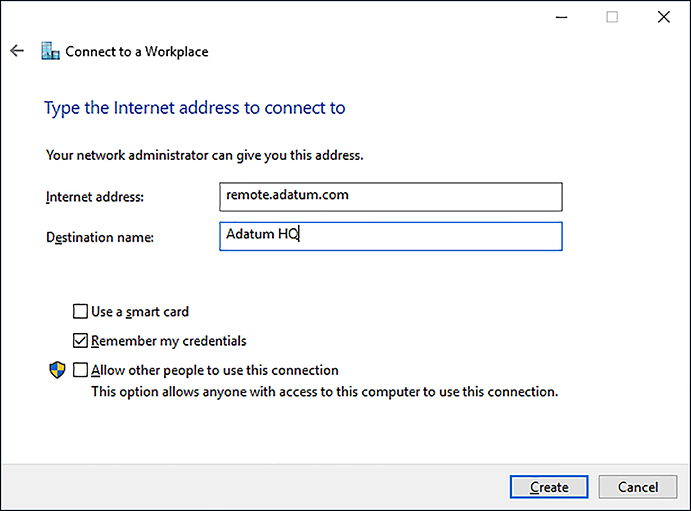
FIGURE 2-9 The Connect To A Workplace Wizard Destination name This is the name of this VPN connection.
After you have created the VPN connection, from the Network And Sharing Center, click Change Adapter Settings, right-click your VPN connection, and click Properties. As shown in Figure 2-10, you can then configure additional options as required by your organization’s network infrastructure.

These settings must match the remote access device that your device connects to, and includes the following options.
Type Of VPN Point-to-Point Tunneling Protocol (PPTP), Layer Two Tunneling Protocol with IPsec (L2TP/IPsec), Secure Socket Tunneling Protocol (SSTP), or Internet Key Exchange version 2 (IKEv2).
Data Encryption None, Optional, Required, or Maximum Strength.
Under Authentication, you choose either Use Extensible Authentication Protocol (EAP) or Allow These Protocols. If you choose to use EAP, you then configure one of the following.
Microsoft Secured Password (EAP-MSCHAP v2)(Encryption Enabled)
Microsoft Smart Card Or Other Certificate (Encryption Enabled)
Cisco: EAP-FAST (Encryption Enabled)
Cisco: LEAP (Encryption Enabled)
Cisco: PEAP (Encryption Enabled)
If you choose Allow These Protocols, you then configure the following options.
Unencrypted Password (PAP)
Challenge Handshake Authentication Protocol (CHAP)
Microsoft CHAP Version 2 (MS-CHAP v2)
Automatically Use My Windows Log-on Name And Password (And Domain, If Any)
Use Extensible Authentication Protocol (EAP)
![]() Exam Tip
Exam Tip
You can use the Connection Manager Administration Kit (CMAK) to create and deploy VPN profiles for remote access. This kit can be installed as a Windows 10 feature from the Control Panel. Find out more from the Microsoft website at: https://docs.microsoft.com/en-us/previous-versions/windows/it-pro/windows-server-2008-R2-and-2008/cc726035(v=ws.11).
Using settings app to create and configure a vpn
You can also use the Settings app to create and configure VPN connections. Use the following procedure:
Click Start and then click Settings.
In Settings, click Network & Internet.
Select the VPN tab, and then, in the details pane, click Add a VPN connection.
On the Add a VPN connection page, enter the following information:
VPN provider: Windows (built-in)
Connection name
Server name or address
VPN type: Automatic (default). You can also choose PPTP, L2TP/IPsec with certificate, L2TP/IPsec with pre-shared key, SSTP, or IKEv2.
Type of sign-in info: User name and password, Smart card, One-time password, or Certificate.
User name and password, although these options are only configurable if you selected User name or password as the Type of Sign-in info.
Click Save.
After you have created the VPN, you can manage it from Network Connections in Control Panel. Alternatively, on the VPN page in the Network & Internet node in Settings, you can click the VPN and then choose Advanced options. From there, you can reconfigure the VPN’s settings.
VPN profiles
Although manually configuring VPN connections is relatively simple, to complete the process on many computers, with the same or similar settings, is very time-consuming. In these circumstances, it makes sense to create a VPN profile and then distribute the profile to your users’ computers.
When you use VPN profiles in Windows 10, you can take advantage of a number of advanced features. These are:
Always On You can configure the VPN profile so that the VPN initiates when the user signs in or when there has been a change in the network state, such as no longer being connected to the corporate Wi-Fi.
App-Triggered VPN You can configure the VPN profile to respond to a specific set of apps; if a defined app loads, then the VPN initiates.
Traffic Filters With traffic filters, your VPN profiles can be configured to initiate only when certain criteria, defined in policies, are met. For example, you can create app-based rules in which only traffic originating from defined apps can use the VPN. You can also create traffic-based rules that filter based on protocol, address, and port.
LockDown VPN You can configure LockDown to secure your user’s device so that only the VPN can be used for network communications.
![]() Exam Tip
Exam Tip
You can find out more about VPN profile options in Windows 10 from the Microsoft website at: https://docs.microsoft.com/en-us/windows/security/identity-protection/vpn/vpn-profile-options.
You can create and distribute Windows 10 VPN profiles with these advanced settings by using Microsoft Intune and Configuration Manager.
Need More Review? VPN connections in Microsoft Intune
To review further details about VPN connections in Microsoft Intune, refer to the Microsoft website at: https://docs.microsoft.com/intune/vpn-settings-configure.
Need More Review? How to Create VPN Profiles in Configuration Manager
To review further details about creating VPN Profiles in Configuration Manager, refer to the Microsoft website at: https://docs.microsoft.com/en-us/sccm/mdm/deploy-use/create-vpn-profiles.
Configure DirectAccess connections
DirectAccess connections enable you to connect your Windows 10-based device to your organization’s workplace without creating a VPN. Connections established with DirectAccess are not user-initiated, but are automatic.
You cannot initiate the configuration of DirectAccess solely on the client computer; rather, you must configure the server-side components. To configure DirectAccess on a Windows 10 client, you must use Group Policy Objects (GPOs) to deploy the required settings to your Windows 10-based devices. In addition, only Windows 10 Enterprise and Windows 10 Education support DirectAccess connections.
DirectAccess uses IPv6 and IPsec to facilitate connections to internal resources. Because most organizations do not have a native IPv6 network infrastructure, tunneling technology is used to enable communications, enabling the DirectAccess clients to use the IPv4-based Internet to communicate with your organization’s servers. Protocols such as Intra-Site Automatic Tunnel Addressing Protocol (ISATAP), 6to4, Teredo, and IP-HTTPS are used to tunnel IPv4 communications.
The DirectAccess infrastructure consists of the following components.
DirectAccess server This can be any server computer that is a member of an AD DS domain that is running Windows Server 2012 or later. This server establishes communication with intranet resources for remote DirectAccess clients.
DirectAccess clients A DirectAccess client can be any domain-joined computer that is running the Enterprise edition of Windows 10, Windows 8.1, Windows 8, or Windows 7.
Network Location Server DirectAccess clients use the Network Location Server (NLS) to determine their own location - that is, whether they are internal or external clients. If the client computer can securely connect to the NLS by using HTTPS, then the client computer assumes it is on the intranet (internal), and the organization’s DirectAccess policies are not applied. If the client computer cannot reach the NLS, the client assumes it is on the Internet (external).
Internal resources These are the server-based resources that users want to connect to, for example, file servers, web servers, and so on.
AD DS You require an AD DS forest to implement DirectAccess.
Group Policy DirectAccess is configured on client computers using GPOs. In addition, GPOs are used to centralize the administration and deployment of server DirectAccess settings.
Public key infrastructure (PKI) In some more complex deployments, you require digital certificates for authentication.
DNS server Name resolution based on DNS is required.
![]() Exam Tip
Exam Tip
A DirectAccess client can be any domain-joined computer that is running the Enterprise edition of Windows 7 or later. Find out more about DirectAccess from the Microsoft website at: https://docs.microsoft.com/en-us/windows-server/remote/remote-access/directaccess/directaccess.
Configure network locations
Windows manages network security settings based on how inherently secure a particular network connection is. For example, a Wi-Fi network that you connect to in a coffee shop is likely to be more at risk from potential security hazards than a wired network within your organization’s head office. Network location profiles are a way for Windows to assign more or less rigorous network security settings. Understanding how to assign network location profiles and how to configure network security settings for those profiles enables you to support your users more effectively.
Overview of network location profiles
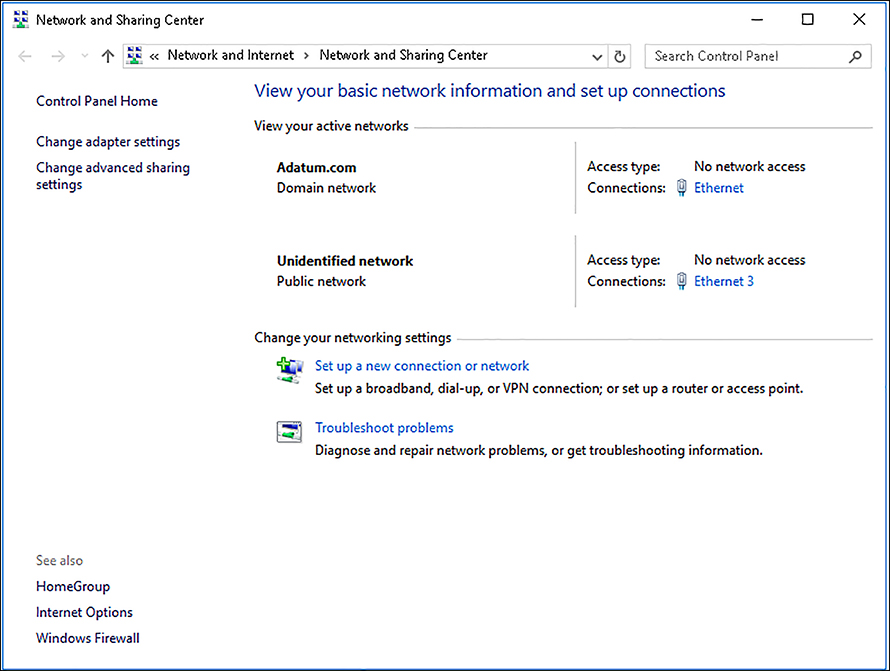
When you connect to a new network, whether a Wi-Fi or wired network, Windows prompts you to define the network location profile. Selecting a network location profile changes certain behaviors in Windows 10, including Windows Firewall settings, network discovery, file and print sharing options, and HomeGroup settings. You can see the currently assigned network location profile in the Network And Sharing Center, as shown in Figure 2-11.
Windows 10 provides three distinct types of network location.
Domain networks These are networks that are connected to an AD DS domain. Assigning this option ensures proper communication with AD DS domain controllers. By default, network discovery is enabled.
Private networks These are nondomain Work or Home networks, where you trust the people using the network and the devices connected to the network. Network discovery is enabled, and Windows 10-based devices on a home network can belong to a HomeGroup.
Guest Or Public networks By selecting this network location profile, network discovery is disabled, helping to keep your computer from being visible to other computers on the network. HomeGroup is also not available.
![]() Exam Tip
Exam Tip
The domain network location profile is assigned automatically on network connections that are connected to AD DS domains for computers which are part of that domain.
Configure network locations
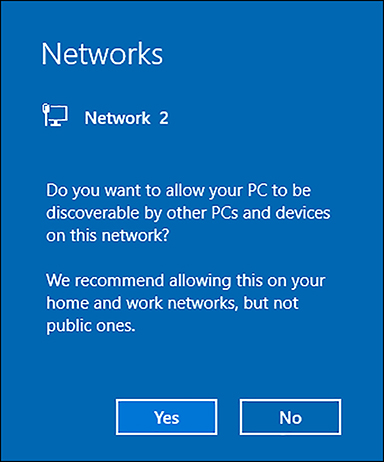
As soon as you connect to a network, Windows 10 prompts you to define the network location, as shown in Figure 2-12. If you click Yes, the private network location is assigned.
Changing your network location profile
If you want to change the network location in Windows 10, click Start, click Settings, and then click Network & Internet. Then, use the following procedure.
Select your network adapter. For a wired connection, click the Ethernet tab and then click the adapter you want to change. For a wireless connection, click the Wi-Fi tab and then click Advanced Options.
Under Make This PC Discoverable, change Allow Your PC To Be Discoverable By Other PCs And Devices On This Network. Enabling this option sets the network location profile to Private, and disabling it sets the network location profile to Public, as shown in Figure 2-13.
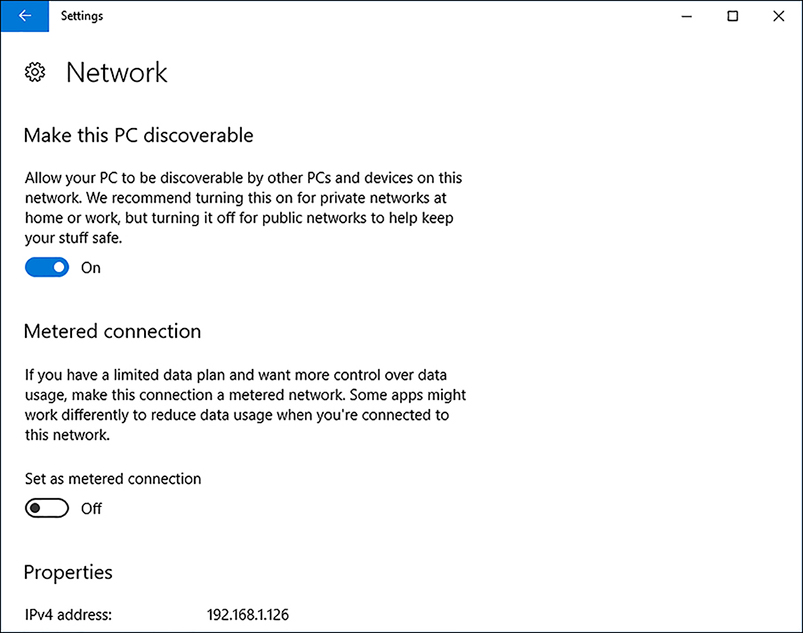
FIGURE 2-13 Changing your network location profile
Configure Windows Firewall, including Advanced Security and Network Discovery
After you connect a computer to a network, you might expose the computer to security risks. To mitigate these possible risks, you can implement a number of network security features in Windows 10, including Windows Firewall.
Windows Firewall blocks or allows network traffic based on the properties of that traffic. You can configure how Windows Firewall controls the flow of network traffic by using configurable rules. In addition to blocking or allowing network traffic, Windows Firewall can filter traffic and be used to implement authentication and apply encryption to this filtered traffic.
The way in which you configure Windows Firewall and your network location profiles can have a significant impact on file and printer sharing and can affect the discoverability of your device on connected networks.
Configure Windows Firewall
You can access the Windows Firewall settings by opening the Network And Sharing Center. Click Windows Firewall. As shown in Figure 2-14, for each network location profile, you can view and configure the following options.
Windows Firewall State Default: On. If you select Off, your device is unprotected by the Windows Firewall. You would normally only turn Windows Firewall off if using an alternative firewall product.
Incoming Connections Default: Block All Connections To Apps That Are Not On The List Of Allowed Apps.
Active Domain/Private/Public Networks Displays a list of current network connections assigned one or other of the network location profiles.
Notification State Default: Notify Me When Windows Firewall Blocks A New App.
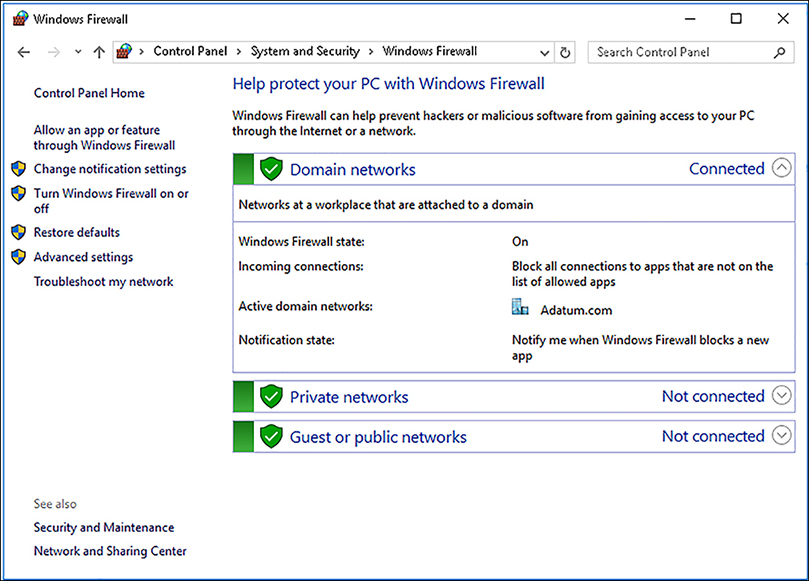
FIGURE 2-14 Windows Firewall
To change these values, click Change Notification Settings. For each network location profile, you can:
Turn Windows Firewall on or off.
Block all incoming connections, including those in the list of allowed apps.
Turn off notifications.
Allowing apps through the firewall
If you want to allow an app through Windows Firewall, from Windows Firewall, click Allow An App Or Feature Through Windows Firewall. As shown in Figure 2-15, you can then choose which app to allow through the firewall by selecting the appropriate check box against the app’s name.
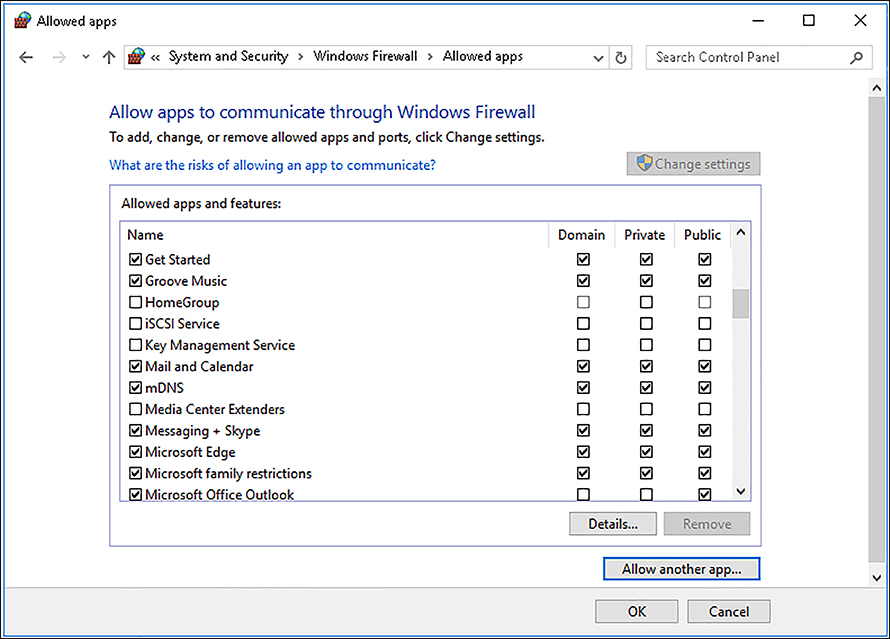
If the app you want is not listed, click Allow Another App. You must then specify the path to the app and select which network profiles this app setting applies to.
You can also configure Windows Firewall by using either Netsh.exe or Windows PowerShell. For example, to configure an app exception in Windows Firewall with Netsh.exe, run the following command.
netsh firewall add allowedprogram C:Program Files (x86)MyAppMyApp.exe "My Application" ENABLE
Need More Review? Using Netsh.exe to configure Windows Firewall
To find out more about controlling Windows Firewall with Netsh.exe, refer to the Microsoft Support website at: https://support.microsoft.com/kb/947709.
There are a significant number of Windows PowerShell cmdlets that you can use to configure and control Windows Firewall. For example, to allow a new app through the firewall, you can use the following command.
New-NetFirewallRule -DisplayName "Allow MyApp" -Direction Inbound -Program "C:Program Files (x86)MyAppMyApp.exe" -RemoteAddress LocalSubnet -Action Allow
Need More Review? Using Windows PowerShell to configure Windows Firewall
To find out more about controlling Windows Firewall with Windows PowerShell, refer to the Microsoft Support website at: https://docs.microsoft.com/en-us/powershell/module/netsecurity/?view=win10-ps&viewFallbackFrom=winserverr2-ps.
Windows Defender Security Center
Windows 10 Creators Update (1703) includes a new security feature called Windows Defender Security Center. This built-in Microsoft Store app provides a unified interface for accessing network security features, including: antivirus and threat protection, device performance, Windows Firewall, app and browser control, and family options.
To access Windows Defender Security Center, select it from the Start menu. To configure Windows Firewall settings, from Windows Defender Security Center, click Firewall & Network Protection. From the Firewall and Network Protection page, you have options for:
Viewing each network interface and reconfiguring firewall behavior for that interface
Allowing an app through the firewall
Launching the network and internet troubleshooter tool
Restoring firewall settings to the default values
Configure Windows Firewall With Advanced Security
You can perform more advanced Windows Firewall configurations by using the Windows Firewall With Advanced Security management console snap-in, as shown in Figure 2-16. To access the snap-in, from Windows Firewall, click Advanced Settings.
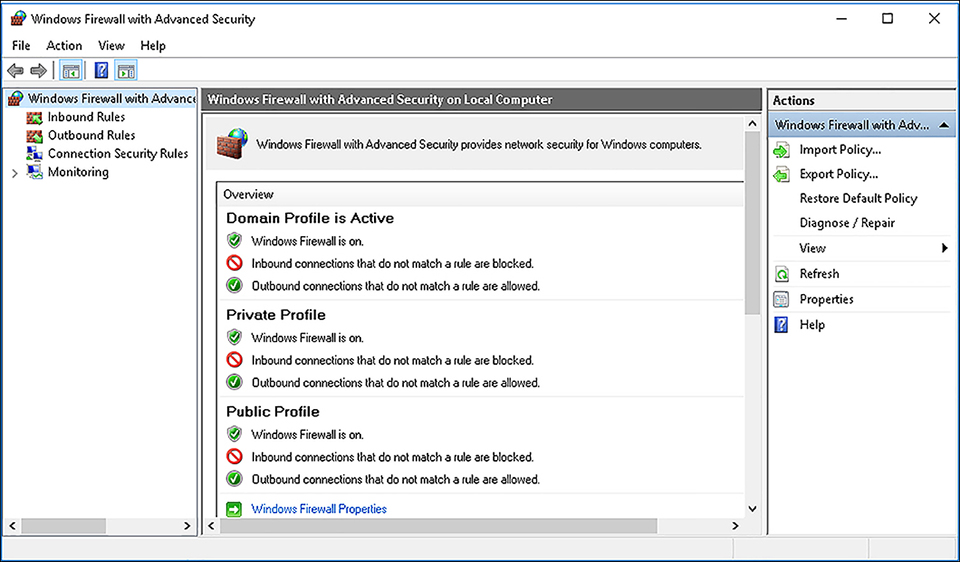
The Windows Firewall configuration is presented differently. Traffic flow is controlled by rules, and there is a Monitoring node for viewing the current status and behavior of configured rules.
Windows Firewall With Advanced Security rules
Rules are criteria that define what network traffic is filtered and what action is taken on that filtered traffic. There are three types of rules.
Inbound rules Monitor inbound network traffic and allow or block inbound traffic that meets the criteria of the rule. You can configure the following types of inbound rules.
Program rules Control connections that a specified app uses.
Port rules Control connections that use a particular TCP or UDP port.
Predefined rules Network-aware apps often create these types of rules so that you can enable or disable the app as a group setting.
Custom rules These rules enable you to create very specific firewall settings based on one or several factors.
Outbound rules Monitor outbound network traffic and allow or block outbound traffic that meets the criteria of the rule. You can configure the following types of outbound rules: Program rules, Port rules, Predefined rules, and Custom rules.
Connection security rules Filter and secure network traffic by using IPsec. You use connection security rules to require authentication or encryption of connections between two computers.
Note When to use connection security rules
Connection security rules enable you to determine when and how authentication occurs, but does not allow connections between computers. To allow a connection, you must create an inbound or outbound rule.
Creating rules
To create a rule, from Windows Firewall With Advanced Security, right-click the appropriate node, click New Rule, and then complete the wizard to create your rule. For example, to create a new inbound rule to enable network traffic for a program, perform the following procedure.
Right-click Inbound Rules and then click New Rule.
On the Rule Type page, click Program and then click Next.
On the Program page, click This Program Path, browse and select the program executable, and then click Next.
On the Action page, choose Allow The Connection and click Next.
On the Profile page, select which network location profiles are affected by the rule and click Next.
Provide a name and description for your rule and click Finish.
![]() Exam Tip
Exam Tip
To configure port-based or custom rules properly, you might need to know about the TCP and UDP ports that common networking apps use. For further information, visit the following website at: https://www.iana.org/assignments/service-names-port-numbers/service-names-port-numbers.xhtml.
In addition to using the Windows Firewall With Advanced Security management console, you can also use Windows PowerShell to configure and manage Windows Firewall With Advanced Security. You can use the following Windows PowerShell cmdlets to manage Windows Firewall rules.
Get-NetFirewallRule Displays a list of available firewall rules
Enable-NetFirewallRule Enables an existing firewall rule
Disable-NetFirewallRule Disables an existing firewall rule
New-NetFirewallRule Creates a new firewall rule
Set-NetFirewallRule Configures the properties of an existing firewall rule
Need More Review? Using Windows PowerShell to configure Windows Defender Firewall with Advanced Security
To find out more about controlling Windows Defender Firewall with Advanced Security Administration with Windows PowerShell, refer to the Microsoft website at: https://docs.microsoft.com/en-us/windows/access-protection/windows-firewall/windows-firewall-with-advanced-security-administration-with-windows-powershell.
Configure IPsec
By default, Windows 10 does not always encrypt or authenticate communications between computers (there are exceptions). However, you can use Windows Firewall With Advanced Security connection security rules to apply authentication and encryption to network traffic in your organization.
Connection security rules are based on IPsec and help to ensure confidentiality, integrity, and authenticity of data in transit on your network. Connection security rules force authentication between two configured computers before communications are established and data are transmitted. You can also define encryption of data in transit by using connection security rules.
You can configure the following types of Connection Security rules.
Isolation rules Connections between computers are restricted based on authentication criteria. For example, membership of a domain can be used to isolate network traffic.
Authentication exemption rules You can define when authentication is not required between computers.
Server-to-server rules Use these rules to authenticate and secure communications between specific computers.
Tunnel rules These rules secure communications between two computers by using tunnel mode in IPsec instead of transport mode.
Custom rules These rules enable you to create specific connection security settings based on one or several factors.
Need More Review? Understanding Connection Security rules
To find out more about using and configuring Connection Security rules, refer to the Microsoft website at: https://docs.microsoft.com/en-us/windows/security/identity-protection/windows-firewall/mapping-your-deployment-goals-to-a-windows-firewall-with-advanced-security-design.
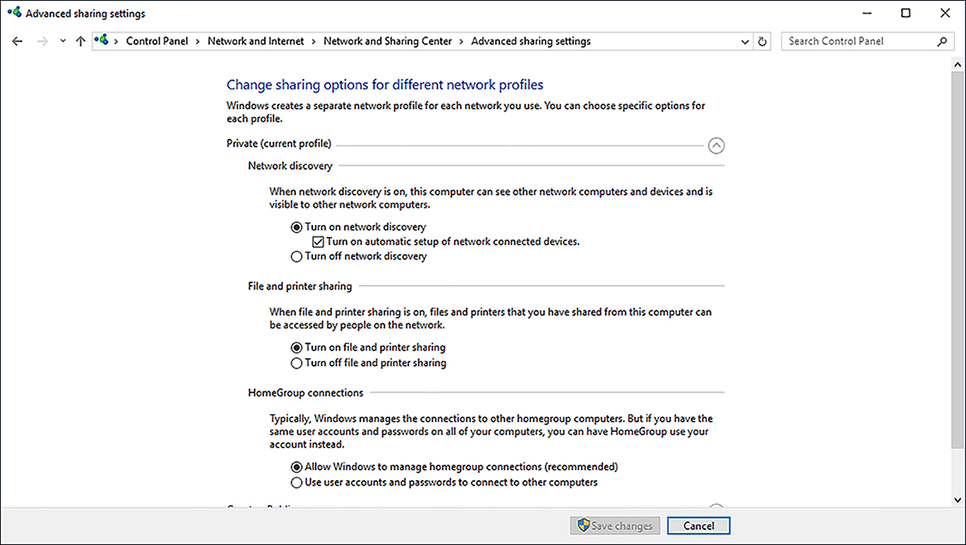
Configure Network Discovery
Network discovery is the ability for your computer to locate devices and resources on the networks to which it is connected, and for other devices to discover your device and resources.
Network discovery is tightly linked to network location profiles and to Windows Firewall configuration. As we have seen, by default, network discovery is enabled for devices connecting to networks that are assigned the Domain or Private network location profile, but network discovery is disabled on public networks.
To change network discovery settings, from the Network And Sharing Center, click Change Advanced Sharing Settings. As shown in Figure 2-17, you can then configure network discovery for each network location profile.
Configure Wi-Fi settings and Wi-Fi Direct
It is not uncommon these days for even laptop computers to be equipped only with a wireless network port but no RJ-45 connection. Consequently, with the increasing prevalence of wireless networking, it is more important than ever to know how to configure wireless settings in Windows 10.
Overview of wireless networking standards
You can configure wireless networks by using one of several modes to suit your requirements and using one of a number of standards to secure the network and achieve compatibility between your wireless devices.
Modes
Wireless networking can be configured in one of three modes.
Ad-hoc This setting enables you to configure wireless connection between devices in a peer-to-peer manner without requiring a wireless access point (AP).
Wi-Fi Direct This setting is a wireless networking standard that you can use to connect your wireless devices without a wireless AP. Similar to ad hoc wireless networking, it is typically used to connect to peripherals such as printers and media players.
Infrastructure Based on wireless APs, infrastructure networks consist of wireless local area networks to enable communications between wireless client devices.
Standards
To ensure compatibility between wireless networked devices, a number of standards have evolved. The 802.11x wireless standards are described in Table 2-5.
TABLE 2-5 802.11 wireless standards
Standard |
Definition |
|---|---|
802.11a |
Provides up to 54 megabits per second (mbps) and uses the 5 gigahertz (GHz) range. Not compatible with 802.11b. |
802.11b |
Provides 11 mbps and uses the 2.4 GHz range. |
802.11e |
Defines Quality of Service and multimedia support. |
802.11g |
For use over short distances at speeds up to 54 mbps. Backward compatible with 802.11b and uses the 2.4 GHz range. |
802.11n |
Increases data throughput at speeds up to 100 mbps, and it uses both 2.4 GHz and 5 GHz ranges. |
802.11ac |
Builds on 802.11n to achieve data rates of 433 mbps. 802.11ac uses the 5 GHz frequency range. |
Security
It is comparatively easy to gain access to a wireless network, so it is important to secure network traffic on your wireless network infrastructure. A number of wireless security standards exist that can help, as shown in Table 2-6. When choosing a security method, ensure that your wireless devices and infrastructure support that method.
TABLE 2-6 Wireless security standards
Standard |
Explanation |
|---|---|
Wired Equivalent Privacy (WEP) |
WEP is an old wireless security standard, and a number of documented security issues surround it. Use WEP only if there is no choice. |
Wi-Fi Protected Access (WPA) |
WPA has two variations. WPA-Personal. Easier to implement than WPA Enterprise and, therefore, ideal for smaller networks. Authentication is based on a password. The password and the network Service Set Identifier (SSID) generate encryption keys for each wireless device. WPA-Enterprise. Designed for larger networks and requires the use of a Remote Authentication Dial-In User Service (RADIUS) server to provide for 802.1x authentication. |
WPA2 |
An improved version of WPA that is the de facto Wi-Fi security standard. It employs larger encryption key sizes than WPA. |
Configure wireless settings
After you have selected the appropriate wireless infrastructure components and chosen your wireless security standard, you must set up and configure your wireless network in Windows 10.
Connect to a wireless network
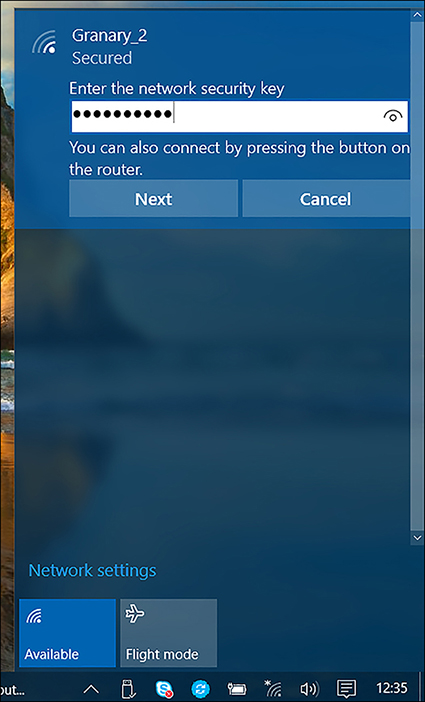
To connect to a wireless network, in the system tray, click the network icon to see a list of available wireless networks. Click the appropriate network and then click Connect. Enter the required security information as shown in Figure 2-18 and click Next.
Configure existing wireless networks
To review or edit your existing wireless networks, from Settings, click Network & Internet. On the Wi-Fi tab, shown in Figure 2-19, you can configure the following options.
Show available networks Enables you to view the currently available WiFi networks within range of your device
Hardware properties Enables you to view the properties of your WiFi connection, including SSID, Protocol, Security type, Network band, Network channel, IPv4 and IPv6 configuration, and details about your WiFi adapter
Manage known networks Enables you to view, configure, or forget any WiFi networks your device has connected to. To forget a WiFi connection, click it, and then click Forget. To configure a WiFi network, click it, and then click Properties. You can then view or configure the following:
Connect automatically when in range
Make this PC discoverable
Set as metered connection
Wi-Fi services Under this heading, you can enable the following options:
Find paid plans for suggested open hotspots near me
Connect to suggested open hotspots
Hotspot 2.0 networks Under this heading, you can enable the following options:
Let me use Online Sign-Up to get connected
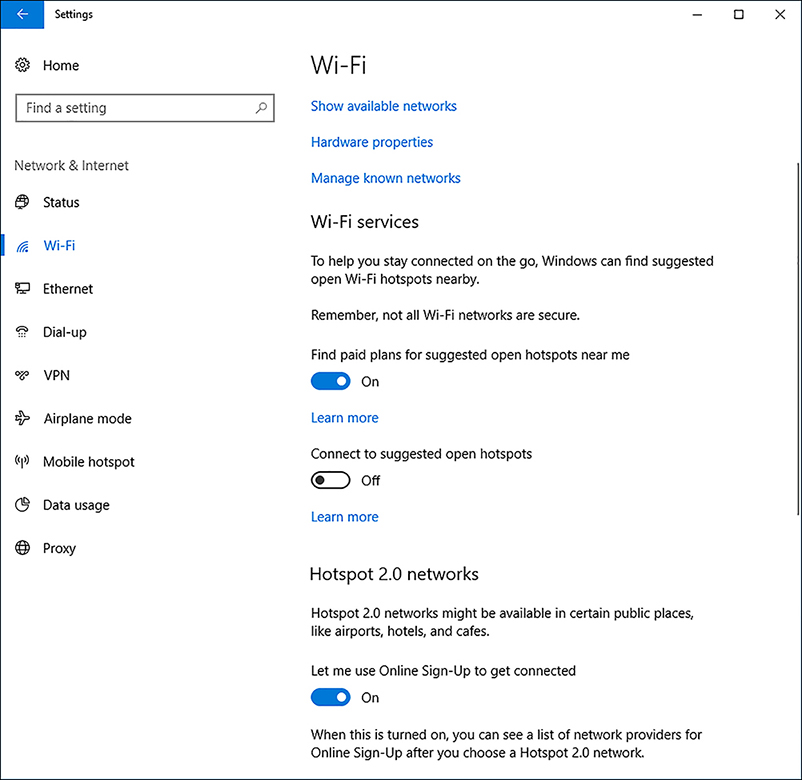
FIGURE 2-19 Managing Wi-Fi settings
Advanced settings
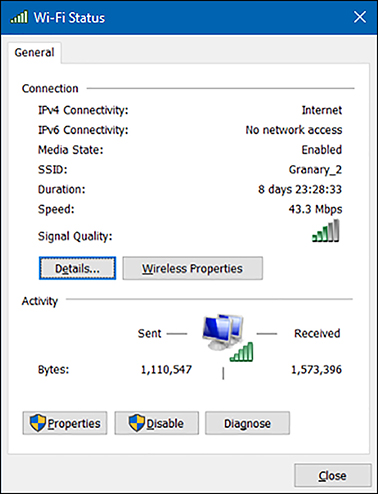
To configure advanced wireless settings, from the Network And Sharing Center, under View Your Active Networks, click the wireless network you want to configure, as shown in Figure 2-20. Then, in the Wi-Fi Status dialog box, click Wireless Properties. You can then view the security settings for your wireless network connection.
You can also manage wireless networks by using Netsh.exe. For example, to list the wireless network profiles on your computer, type:
Netsh wlan show profile
Need More Review? Using Netsh.exe to manage wireless networks
To find out more about managing Wi-Fi settings by using Netsh.exe, refer to the Microsoft website at: https://technet.microsoft.com/library/dd744890(WS.10).aspx.
Configuring Wi-Fi Direct
Windows 10 supports Wi-Fi Direct, a means of connecting your Windows 10-based device to other devices and peripherals without requiring a wireless AP. Your users might want to use Wi-Fi Direct to transfer files between devices more quickly than is possible with Bluetooth, or to use media streaming to a compatible device for a presentation.
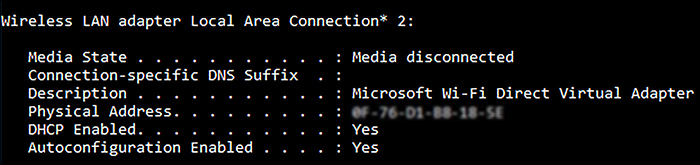
To set up Wi-Fi Direct in Windows 10, you need a compatible network adapter. Type ipconfig /all at the command line and verify that one of the network adapters listed returns the Description value Microsoft Wi-Fi Direct Virtual Adapter, as shown in Figure 2-21.
After you have checked that your wireless network adapter supports Wi-Fi Direct, use the Netsh.exe command-line tool to set up your Wi-Fi Direct network. You can use the following command to start the process of enabling Wi-Fi Direct.
netsh wlan set hostednetwork mode=allow ssid=wifidirect key=passphrase
Use the following command to start Wi-Fi Direct.
netsh wlan start hostednetwork
To stop the Wi-Fi Direct network, use:
netsh wlan stop hostednetwork
Troubleshoot network issues
Windows 10 is a reliable and robust operating system, and the networking technologies built into it are tried and tested. However, networking is an inherently complex area, and problems might occur on your network. When you are facing a networking problem, use an appropriate procedure for troubleshooting the issue. This procedure might include the following steps.
Determine the scope of the problem. Knowing how many users are affected can help you determine possible causes.
Determine the IP configuration. Verify that the network configuration of affected devices is correct.
Determine the network’s hardware configuration. Determine whether there are problems with the networking hardware or device drivers for that hardware.
Test communications. Perform a series of tests that help you pinpoint the nature of the problem. Tests might include:
Verifying basic communications.
Checking the routing and firewall configuration of your network.
Testing name resolution.
Testing connectivity to specific applications on servers.
Know how to troubleshoot network-related problems that occur on your network to minimize disruption to your users.
Network troubleshooting tools
Windows 10 provides a number of tools that you can use to diagnose and resolve many network-related issues. These tools are identified in Table 2-7.
TABLE 2-7 Windows 10 network troubleshooting tools
Tool |
Purpose |
|---|---|
Event Viewer |
Windows collects information about system activity into event logs. For example, the System log stores information about IP conflicts and network-related service failures. |
Windows Network Diagnostics |
You can use Diagnose Connection Problems to help you diagnose and repair a network issue. Windows Network Diagnostics presents possible descriptions of the issue and suggests a potential solution. You can access this tool by clicking Troubleshoot Problems In Network And Sharing Center. |
IPConfig |
Use this command-line tool to display the current TCP/IP configuration of your Windows 10-based device. You can use the command with the following switches.
|
Ping |
This command-line tool can be used to verify connectivity to a target computer system by sending a series of network packets to that target system. Consider that many firewalls block the ICMP packets Ping uses, so you might receive false negatives. Type ping www.contoso.com. |
Tracert |
Use this tool to determine the path that packets take to a designated target computer system. This helps you diagnose routing-related problems. |
NSLookup |
Use this tool to troubleshoot name resolution. |
Pathping |
This traces a network route similar to how the Tracert tool works but provides more statistics on the hops through the network. |
Windows PowerShell |
In addition to the configuration cmdlets referred to earlier, there are also a number of Windows PowerShell cmdlets you can use to troubleshoot and test network connectivity. For example, the test-connection cmdlet behaves in a way similar to Ping.exe. Type test-connection www.contoso.com. |
Troubleshoot name resolution
Many network failures can be caused by failure in name resolution, such as when the wrong server IP address is returned, or a service has not registered itself with a DNS server correctly or at all. When troubleshooting name resolution issues, use a suitable procedure, which might consist of the following steps:
Clear the DNS resolver cache. Use the Ipconfig /flushdns command from an elevated command prompt. This ensures that all subsequent name resolution attempts are performed rather than being satisfied from DNS resolver cache. You can also use the Clear-DnsClientCache Windows PowerShell cmdlet to achieve the same thing.
Attempt to verify basic connectivity by using an IP address. Use the Ping command, or the test-connection Windows PowerShell cmdlet, to verify communications to an IP address; for example, type test-connection 172.16.16.1.
Attempt to verify connectivity to a host name. Using the same tools, check whether you can communicate with a host by using its name, for example, test-connection LON-DC1. If this is successful, it is likely that your problem is not related to name resolution.
If the test is not successful, edit the hosts file. Add the correct IP address and name to your hosts file. For example, add the line 172.16.16.1 LON-DC1.adatum.com to C:WindowsSystem32DriversEtcHosts. Repeat the procedure to verify connectivity to a host name. Name resolution should now be successful.
Display the resolver cache. Use the Get-DnsClientCache cmdlet (or use IPConfig /displaydns) to verify that the entry appears in a resolved cache. You have proven that the problem is likely a name resolution issue. Remove the entry from the hosts file and clear the resolver cache.
Test the name server by performing a query against it by using the Resolve-dnsname lon-DC1.adatum.com. cmdlet. Alternatively, use the NSLookup.exe -d2 LON-cl1.adatum.com. command. You can see the partial output from the Resolve-dnsname cmdlet in Figure 2-22.
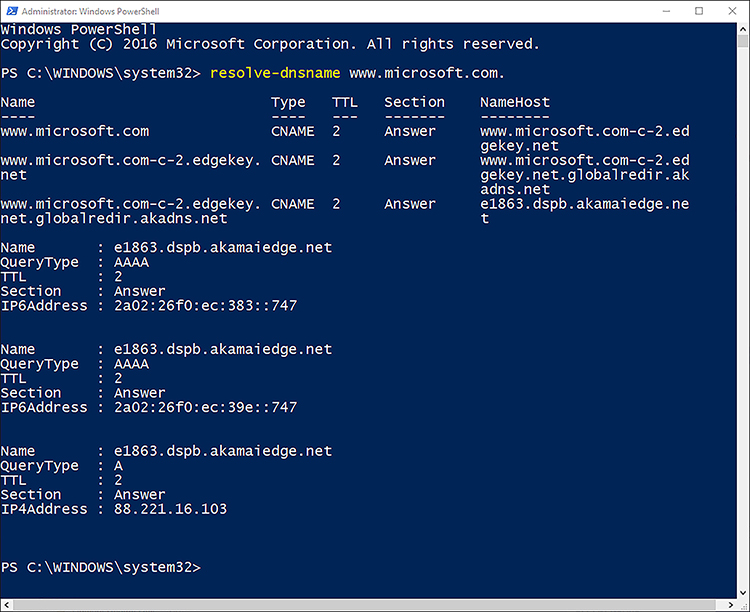
FIGURE 2-22 Using Resolve-dnsname to test name resolution
The information returned from the name server test shows IP addresses of the server you queried against. It also shows which name servers provided the response. It is important to know how to interpret this returned information to diagnose any failures or faults properly.
Need More Review? Diagnosing name resolution problems
To find out more about troubleshooting name resolution, refer to the Microsoft website at: https://technet.microsoft.com/library/cc959340.aspx.
Skill 2.2: Configure storage
Most devices shipped with Windows 10 are supplied with a single physical disk that is configured with one volume that holds the operating system and user data. If the device is a tablet or ultra-book, the hard drive will probably be of the solid-state drive (SSD) or smaller mSATA form factor drive type, which provides very high disk read/write performance and is often soldered direct to the motherboard to reduce the device size. Cloud technologies will continue to improve in terms of both speed and reliability, and more users will store less data on their devices and instead rely on Office 365, Microsoft OneDrive, and other cloud services. During this transition to the cloud, understand how to configure and manage the storage hardware and file systems available to you with Windows 10.
Configure disks, volumes, and file systems
Traditionally, desktop devices that you come across often have multiple hard drives. These drives offer huge storage capacity relatively cheaply, but they can be heavy and mechanical. When you have multiple drives to use, you can access alternative configurations such as multi-boot, boot to VHD, or RAID-enabled systems used for increased speed or data redundancy. Desktop sales are in decline, and it is expected that in the future the demand for desktop PCs will be driven by specialty audiences who have them custom made for specific purposes such as computer-aided design (CAD) or gaming.
This section reviews the essentials you need to know about disks, volumes, and file systems and outlines new features Windows 10 offers you.
Although the exam might focus on newer technologies such as OneDrive or Storage Spaces, you should still understand how to create and manage simple, spanned, and striped volumes in Windows 10. This chapter introduces you to the new Resilient File System (ReFS) file format and describes how ReFS compares to and complements the NTFS file format, which has been part of Windows for more than 20 years.
Configure disks
Before you can store data or applications on a drive, you must first partition it by using the master boot record (MBR) or the GUID partition table (GPT) partitioning scheme. To help you decide which scheme is more appropriate, review the comparison in Table 2-8.
TABLE 2-8 MBR and GPT disk partitioning schemes
Disk Partitioning Scheme |
Description & Features |
|---|---|
Master boot record |
Contains the partition table for a disk and the master boot code. The MBR is created during the initial partitioning; it is located on the first sector of the hard disk and allows four-partition entries in a table that records the size and location of disk partitions. Windows platforms require an MBR-partitioned system disk to boot to. MBR is compatible with BIOS or the newer Unified Extensible Firmware Interface (UEFI). The maximum usable size is 2 terabytes (TB) on a disk when using MBR. MBR disks offer no redundancy. If the MBR or associated startup files become corrupted, the drive and operating system might not start. |
GUID partition table |
GPT disks contain a more robust array of partition entries that record the start and end logical block addressing (LBA) fields of each partition on a disk. GPT is compatible with BIOS or UEFI. Windows cannot start from a GPT disk by using BIOS. Windows Vista and later versions (64-bit only) support boot from GPT when running on UEFI-based computers. Supports up to 128 partitions per disk. GPT definition supports 18-exabyte volume sizes (although disks are not currently available in that size, and Windows file systems are limited to 256 TB). Not available for removable media. GPT offers cyclic redundancy check (CRC32) integrity protection and automatic GUID entry backup. |
During the startup process, the MBR is examined to determine which partition is set as active, and the operating system startup files, including the boot sector and Windows Boot Manager found on this partition, are loaded.
Both MBR and GPT support basic and dynamic disks. A basic disk using MBR can have up to three primary partitions plus one extended partition that contains logical drives. A basic disk using GPT can have up to 128 primary partitions. Dynamic disks are discussed later.
The majority of older disks are configured as MBR, whereas modern systems that use x64-bit operating systems and UEFI-based hardware are increasingly using the newer GPT partitioning scheme.
Configure volumes
Volumes are used to arrange areas on disks. A simple volume is a contiguous, unallocated area of a physical hard disk that you format with one of the supported file systems: NTFS, ReFS, exFat, FAT32, or FAT.
After a volume is formatted, you can then assign a drive letter to it, elect not to provide a drive letter, or mount the drive in an existing volume by using a volume mount point.
Windows 10 supports either simple or dynamic disk volume types. Simple volumes are available on basic disks, whereas mirrored, spanned, or striped volumes are available only if you convert a basic disk to the dynamic disk type.
Simple volumes reside on a single disk, either in a contiguous block or in multiple regions of the same disk that link together. They are not themselves fault-tolerant, and the volume I/O performance is comparable to the disk I/O performance. Most business user scenarios create a basic disk with a single basic volume for storage. This offers simple configuration, simplicity, and ease of use for the user.
It is best practice to store the operating system on a different volume, separate from business data, so that if the operating system becomes unstable, the user can reset the operating system or reinstall it without affecting the business data. The data can be stored in OneDrive or in OneDrive for Business, but businesses might create a basic disk with two or more simple volumes. The operating system will be stored on the first volume, and the second volume will be used to store data.
All volume types, except simple volumes, require dynamic disks and are only available to Windows operating systems. They can offer specialty volume types, which can provide increased performance, fault tolerance, or advanced features. They use a database to record information about the dynamic disk and dynamic volume status. Windows 10 can repair a corrupted database on one dynamic disk by copying the replicated database stored on another dynamic disk.
Mirrored volumes
A mirrored volume uses two disks and presents them to Windows 10 as a single logical volume. The data on each disk is an identical copy of the other and, therefore, provides redundancy and fault tolerance if one disk fails. Mirrored volumes are also referred to as RAID-1 (redundant array of independent disks) volumes and offer a slight performance boost for read operations because you can read from both disks simultaneously, but they are slightly slower for write operations.
To create a mirrored volume, you must use equal-sized areas of unallocated space from two disks and, after you establish the mirror, you cannot modify or resize the mirrored volume. If one of the mirrored drives fails and is replaced, you must repair the mirrored volume, which then re-creates the data on the new drive and reestablishes data redundancy.
Spanned volume
A spanned volume creates a join across unallocated spaces on at least two and, at most, 32 disks and presents this to the operating system as a single logical disk. Because Windows 10 manages the spanned volume, you must be able to boot to the operating system to access the data on the drive. Spanned volumes provide no protection against a disk failure; all data will be unavailable from the remaining disk and will need to be recovered from a backup. There is no performance benefit to using spanned volumes; they are predominately used to provide volume expansion capacity, such as when replacement of the drive with a larger unit is not possible.
Striping
Historically, a user could stripe data between two volumes on separate hard drives to achieve improved write performance by writing data in stripes cyclically across the disks. This is referred to as a RAID-0 volume and is created from equal-sized areas of unallocated space from multiple disks. After you create one, you can delete a striped volume, but you cannot extend or shrink the striped volume.
The performance characteristics of SSDs, with their extremely fast data transfer rates compared to traditional magnetic hard disk drives, are challenging the need to choose disk striping. A striped volume requires two or more disks. Because striped volumes offer no protection against disk failures, use striping for its I/O performance characteristics only when redundancy is not required, such as for paging file isolation or gaming rigs.
Note RAID-5
RAID-5 requires at least three disks and provides striped volumes with fault tolerance by adding parity information to each volume. It is not possible to create software-based RAID-5 with Windows 10. If you require RAID-5 type functionality, consider using the new Storage Spaces feature, discussed later in this chapter.
Configure file systems
Windows 10 supports dozens of file systems, and this book focuses on the most common and new file systems. You can view a complete list of which file systems Windows 10 supports, as shown in Figure 2-23, by launching the System Information tool and following these steps.
Click Start and type Msinfo32.
In the left pane, select Software Environment.
Select System Drivers.
In the results pane, click the Type column to sort the list of drivers.
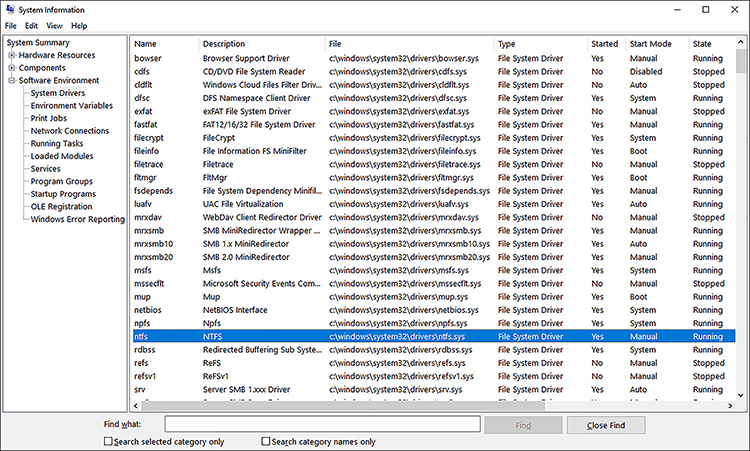
FIGURE 2-23 Windows file system drivers in System Information
The file system drivers have the attribute of File System Driver.
Windows 10 supports the most common file systems, including NTFS, ReFS, exFat, FAT32, and FAT, which are described in Table 2-9. The most commonly used formats are NTFS and exFat, with the new ReFS becoming popular for servers and storage applications.
TABLE 2-9 File formats commonly used with Windows 10
File System |
Description |
|---|---|
NTFS |
NTFS Enterprise-class file system, used by Windows for more than 20 years. |
ReFS |
Maximum file size of 16 exabytes (EB) Maximum volume size of 1 yottabyte Built-in resilience Compatibility with existing NTFS APIs and technologies Does not support NTFS compression or Encrypting File System (EFS) Cannot boot Windows 10 from an ReFS volume ReFS not a replacement for NTFS |
exFat |
Designed by Microsoft for flash storage devices Extended file allocation table Supported on Windows since Vista SP1 Volume size limit of 256 terabytes (TB) File size up to 16 EB Supports more than 1,000 files per directory |
FAT32 |
Supported by Windows 95 SP2 and later versions; extended FAT16 to allow larger number of files per partition File size limit of 4 GB Volume size limit of 32 GB |
FAT |
Sometimes referred to as FAT16 Introduced in 1981 and supported by DOS, OS/2, Linux, Windows 3.x, and later versions Volume size limit of 4 GB |
Note FAT File System
FAT is a simple file system and offers no native file-level encryption, compression, or local security for FAT, FAT32, or exFAT. Anyone with access to the file can read, change, or delete any file stored on a FAT partition.
NTFS
NTFS is the native file system Windows 10 uses, which is widely used across most Windows operating systems. It offers you the ability to protect and secure folders and files through file and folder level security permissions to control access. NTFS offers the following characteristics.
File-level compression
Per-user volume quotas
Symbolic links and junction points
Volume sizes up to 256 TB
Up to 232-1 files per volume
Maximum implemented file size is 256 TB minus 64 KB or 281,474,976,645,120 bytes
File names and total path size limited to 255 characters
Enterprise-level file and folder encryption
Metadata transactional logging to ensure that file structure can be repaired
Limited self-healing capabilities
ReFS
Windows 10 includes support for the new file system called Resilient File System (ReFS), which was introduced with Windows Server 2012 and Windows 8.1 and has been designed to respond to the increased scale, access speed, and distributed nature of storage currently available. At present, ReFS is not intended to replace NTFS, though ReFS uses the same security permissions model as NTFS. In addition ReFS offers benefits to users such as storage stability, flexibility, scalability, and availability. ReFS offers enhanced data integrity and self-healing capabilities with the intention that repairs can be made while the operating system remains online.
Storage Spaces uses ReFS and is covered later in the chapter. When Storage Spaces is configured to use ReFS, it can automatically repair corrupt data to ensure that data is always available and resilient during drive failures.
Some ReFS characteristics are:
Transactional write model Offers protection against power failures
Proactive repairing/self-healing Corruption detection, automatic repairs
Data integrity Reduces disk corruption through check-sums employed on metadata
Improved availability Repairs ReFS volumes while still online
Scalability Works with extremely large data sets, in excess of PB
ReFS supports Long File Names and File Path, with the total path size limited to 32,768 characters.
Using disk management tools
You can use various tools and methods to manage Windows 10 disks and create volumes or partitions on them, including:
Disk Management
Windows PowerShell
DiskPart
Disk management
This is the traditional GUI tool used for performing most configuration and management tasks relating to disks and volumes. The GUI uses the familiar Microsoft Management Console (MMC) used by most administrative tools.
You can connect to the disks on a local or remote computer and perform tasks on both basic and dynamic disks and virtual hard disks. Remote disk management can be used only on domain-joined computers.
Examples of the types of disk management tasks that you can perform using the GUI include:
Partition creation, including creating a basic, spanned, or striped partition.
Disk conversion between basic disks to dynamic disks. (To convert a dynamic disk to a basic disk, you must first delete all present volumes.)
Extending and shrinking partitions.
Viewing information relating to disk and volumes, such as volume name, layout, type, file system, status, capacity, free space, and percentage of disk free for each volume.
To open Disk Management, follow these steps.
Right-click Start and select Disk Management or type diskmgmt.msc in the search box and then click diskmgmt.
Wait for Disk Management MMC to open and load the disk configuration information as shown in Figure 2-24.
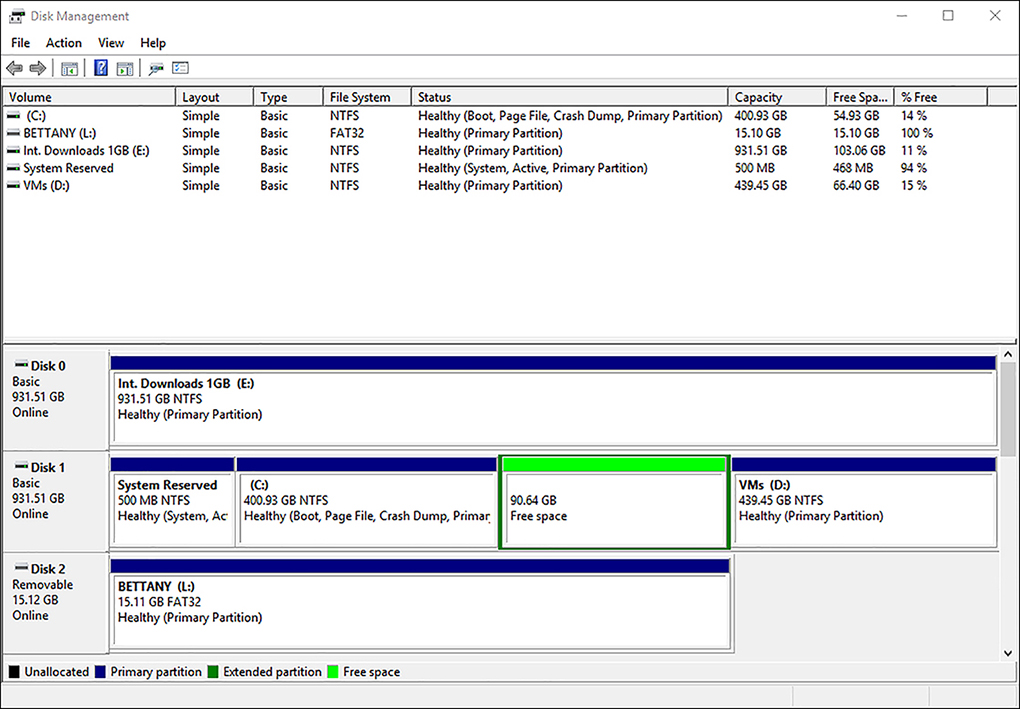
FIGURE 2-24 Disk Management console
You can use the Disk Management console to convert a basic disk to a dynamic disk by right-clicking the disk you want to convert and then selecting Convert To Dynamic Disk.
Windows PowerShell
Windows PowerShell offers many disk-related tasks from the command line; it can be used locally or remotely and can be scripted. Windows PowerShell now natively enables you to manage disks, volumes, and partitions and perform a range of tasks that cannot be performed using DiskPart or Disk Management.
Table 2-10 details some of the most common Windows PowerShell cmdlets that you should become familiar with.
TABLE 2-10 Common disk-related Windows PowerShell cmdlets
Command |
Description |
Additional parameters |
|---|---|---|
Get-Disk |
Return one or more disks visible to the operating system. |
-FriendlyName -Number |
Clear-Disk |
Cleans a disk by removing all partition information and placing it in an un-initialized state. Erases all data on the disk. |
-Number -RemoveData -FriendlyName |
Initialize-Disk |
Initializes a RAW disk for first time use, enabling the disk to be formatted and used to store data. |
-FriendlyName -PartitionStyle -VirtualDisk |
Set-Disk |
Updates the physical disk on the system with attributes. |
-PartitionStyle -IsOffline -IsReadonly |
Get-Volume |
Gets the specified volume object or all volume objects if no filter is provided. |
-DriveLetter -DiskImage -FileSystemLabel -Partition |
Format-Volume |
Formats one or more existing volumes or a new volume on an existing partition. Acceptable file formats include NTFS, ReFS, exFat, FAT32, and FAT. |
-DriveLetter -FileSystem -FileSystemLabel |
Get-Partition |
Returns a list of all partition objects visible on all disks or, optionally, a filtered list using specified parameters. |
-Disk -DriveLetter -PartitionNumber -Volume |
Need More Review? Windows Storage Management-Specific Powershell Cmdlets
You can review all storage cmdlets for Windows PowerShell and syntax explanations and examples at: https://docs.microsoft.com/en-us/powershell/module/storage/?view=win10-ps.
To shrink a partition down to 50GB in Windows PowerShell, type the following command.
Resize-Partition -DiskNumber 0 -PartitionNumber 2 -Size (50GB)
To create simple volumes in Windows PowerShell, open it and type the following commands.
Get-Disk -Number 0

New-Partition -UseMaximumSize -DiskNumber 0 | Format-Volume -Confirm:$false -FileSystem NTFS -NewFileSystemLabel Simple2

Get-Partition -DiskNumber 0
Make a note of the partition number you just created to use in the next step.
Set-Partition -DiskNumber 0 -PartitionNumber <partition number> -NewDriveLetter G
Windows PowerShell is the preferred command-line method for disk operations. The Windows PowerShell storage cmdlets do not recognize dynamic disks, so it is recommended to use Storage Spaces rather than dynamic disks.
DiskPart
DiskPart is a built-in command-line tool that offers you all the functionality of Disk Management plus some advanced features that can also be scripted into .bat files to automate disk-related tasks. One limitation of DiskPart is that it only runs locally.
Note Abbreviating Commands
When you use DiskPart, some of the commands can be abbreviated, such as using SEL instead of SELECT, PART instead of PARTITION, and VOL instead of VOLUME.
To open DiskPart, follow these steps.
Right-click Start and select Command Prompt (Admin); accept UAC.
Type DiskPart and press Enter.
DiskPart launches in the command line.
For a list of all DiskPart commands, type help or commands, or type ?.
When you have finished using DiskPart, you can leave the interface by typing Exit and pressing Enter.
Note DiskPart commands
The following list shows several DiskPart commands whose functions you should understand.
Active Marks the selected partition as the active partition
Add Enables you to add a mirror to a simple volume
Assign Enables you to assign a drive letter to a selected volume
Convert Converts between basic and dynamic disks
Create Enables you to create a volume, partition, or virtual disk
Extend Extends the size of a volume
Shrink Reduces the size of a volume
Format Used to format the volume or partition (for example, FORMAT FS=NTFS LABEL=”New Volume” QUICK COMPRESS)
If you want to create a USB bootable drive manually that contains the Windows installation files, you can use DiskPart commands to create, partition, and mark the USB drive as active.
Create and configure virtual hard disks
You saw in Chapter 1, “Prepare for installation requirements,” and “Post-installation configuration,” that Hyper-V is included in most editions of Windows 10 and provides virtualization technologies that can be used from the client operating system. Virtual hard disks (VHD) provide the portable, self-contained storage medium that you can use with Hyper-V but also natively with all versions of Windows 10.
Virtualization is still a relatively new technology, especially if compared to disks, volumes, and file systems, and your exposure to the virtual alternatives of the older technology will likely increase. This is a significant growth area in IT, and you should familiarize yourself with the terminology and concepts that surround this topic.
You learned the concepts of disks, volumes, and file systems, and these can now be adapted directly to the virtual space.
Work with VHDs
A VHD can be thought of as a container object that holds files, folders, and volumes. The container, or VHD, is a single file with the VHD or VHDX file extension. You can think of a VHD file being similar in concept to a ZIP file. Analogous container types could include ISO, RAR, and WIM; they are all objects that contain files and folders inside them.
Because a VHD is just a file, it is portable and can be saved and transported on a USB drive or copied over a network. Be aware, however, that VHDs can grow very large, and the original open file format of VHD, which had a maximum size of 2048 GB, was soon changed to the VHDX format that allowed up to a 64 TB file size. A VHD can contain data or, as you learned in Chapter 1, “Install Windows 10,” it can also install and boot to an operating system inside the VHD. Windows 7 and later operating systems support booting to VHD.
Wherever possible, because of the disk-intensive nature of VHD, consider using an SSD to host the VHDs. This is especially applicable if you use a single drive on your Windows 10-based computer and use virtual machines and VHD as the disk I/O; performance is likely to degrade quickly because of the increased disk read/write times and disk activity.
You can continue to use either the VHD or VHDX specification for your hard drives, but you should know the main differences between the two formats. VHD offers users ease of use and backward compatibility, whereas the VHDX format offers improvements in both scale and functionality. You can compare the two choices in Table 2-11.
TABLE 2-11 Virtual hard disk format
Type |
Features |
|---|---|
VHD |
Original format. Up to 2048 GB (about 2 TB) in size. Compatible with virtualization technologies, including Virtual PC and Virtual Server. Useful when you are working with older operating systems and require backward compatibility. Can convert VHDX files to VHD by using Windows PowerShell. |
VHDX |
Introduced with Windows 8 and Windows Server 2012. Up to 64 TB in file size. Not compatible with operating systems older than Windows Server 2012 or Windows 8. Uses a 4 KB logical sector size to improve performance compared with VHD files. Offers protection against data corruption related to power failures by continuously keeping track of file updates in the metadata. Larger block sizes for dynamic and differencing disks. Can convert VHD files to VHDX by using Windows PowerShell or in the Hyper-V Manager. VHDX file format supports the shared virtual hard disk feature first available with Windows Server 2012 R2 and available in Windows Server 2016. Newer generation-2 virtual machines that are hypervisor-aware require VHDX file format. Shared VHDX allows guest clustering within Windows Server 2012 R2 and Windows Server 2016. VHDX format is not supported in Microsoft Azure. |
VHD Set (VHDS) |
Introduced with Windows 10 and Windows Server 2016. Same technical features as the VHDX format. Used as a shared virtual hard disk. Allows online resize. Supports host-based backup. Not supported in operating systems earlier than Windows 10. |
There are multiple ways to create a virtual hard disk:
Client Hyper-V Manager
Disk Management
Windows PowerShell
You can also use the DiskPart command-line tool, but this is becoming deprecated in favor of Windows PowerShell, which offers more extensive functionality and support.
Create VHDs with Hyper-V Manager
The client Hyper-V feature can be added to Windows 10 if the computer is running the Windows 10 Pro or Enterprise edition and has hardware that supports virtualization.
To create a virtual hard disk within Hyper-V Manager, complete the following steps.
Launch Hyper-V Manager.
In the Action pane, click New and then click Hard Disk.
Select the format for the disk as VHD, VHDX, or VHD Set, as shown in Figure 2-25, and click Next.

FIGURE 2-25 Choosing Virtual Disk format type Select the Disk Type (Fixed, Dynamically expanding, or Differencing) and click Next.
Provide the virtual disk with a name and storage location and click Next.
Configure the disk. The default settings are normally used and will create a new blank VHD with 127 GB. Click Next and then click Finish.
Use Disk Management to create VHDs
The Disk Management MMC includes a wizard that enables you to create a VHD that you can then mount and use. Not all of the VHD options are available in the Disk Management console, such as the ability to create VHD Sets or differencing disks; you should use Windows PowerShell or Hyper-V Manager if these tasks are required.
To create a simple VHD file, complete the following steps.
Right-click the Start button and select Disk Management.
Click Action on the menu bar and then select Create VHD.
The Create And Attach Virtual Hard Disk wizard appears, as shown in Figure 2-26.

FIGURE 2-26 Creating a virtual hard disk by using Disk Management Select the location where you want to store your VHD.
Configure the VHD format and VHD type and click OK.
The new disk will appear in the lower pane of the screen and display the following characteristics.
Unknown Status
Not Initialized
Disk icon is cyan blue with downward-pointing red arrow
To use the disk, initialize it by right-clicking the downward-pointing red arrow on the disk icon and selecting Initialize Disk.
In the Initialize Disk dialog box, ensure that the disk you want to initialize is selected and choose MBR (Default) or GPT partition style and click OK.
The disk is marked with the status of Basic and you can now create a partition, allocate a driver letter, and format the drive with a file system just like a normal disk.
Apart from the icon color in Disk Management, there is no other visual indicator in File Explorer or Disk Management to indicate that the disk is virtual. After you have finished using the VHD, you can detach the disk by right-clicking the disk icon in the lower pane of Disk Management and selecting Detach VHD. After you have detached the VHD, the VHD file is no longer locked to Windows 10 and becomes a portable hard drive.
Create VHDs by using Windows PowerShell
Disk Management offers the ability to create basic VHDs in a GUI environment, but if you need to create more complicated VHDs, such as differencing disks, or if you need to create 20 VHDs for a team of developers to work with, it would be easier and quicker to build Windows PowerShell scripts to do so. This section focuses on virtual hard disks.
You can manage every aspect of virtual disks with Windows PowerShell in both production and lab environments. Windows PowerShell enables you to configure, provision, and subsequently maintain all of your virtual estate rapidly. Windows PowerShell can be used to build a full virtual environment, including virtual disks, virtual machines, and virtual networks and switches.
More than 50 cmdlets are available in Windows PowerShell in Windows 10 that enable you to manage virtual and physical disks. This number will expand as new functionality is added. Table 2-12 outlines some of the common Windows PowerShell cmdlets that enable you to manage disks natively. After a VHD disk has been created, it is managed in the same way as a physical disk.
TABLE 2-12 Common native Windows PowerShell VHD and disk cmdlets
Command |
Description |
Additional parameters |
|---|---|---|
New-VHD |
Creates one or more new virtual hard disks |
-SizeBytes sets the size, such as 10GB. Set the VHD type by using the following parameters: -Fixed -Differencing -Dynamic |
Get-Disk |
Provides information on all disks |
-FriendlyName provides information about disks that have the specified friendly name. -Number provides information about a specific disk. |
Convert-VHD |
Converts the format, version type, and block size of a virtual hard disk file |
Specify the name of the new VHD as .vhdx or .vhd, and the cmdlet will use this format. -VHDType <VHDType> allows the specification of the VHD type such as -Differencing or -Fixed. |
Clear-Disk |
Cleans a disk by removing all partition information |
-ZeroOutEntireDisk writes zeroes to all sectors of a disk, effectively wiping it clear. |
Initialize-Disk |
Prepares a disk for use by the operating system. Default is to create a GPT partition. |
-PartitionStyle<PartitionStyle> specifies the type of partition, either MBR or GPT. |
Optimize-VHD |
Optimizes the allocation of space in a non-fixed VHD/X. Used with the Compact operation to optimize the files. Reclaims unused space and rearranges blocks, normally reducing the size of a virtual hard disk file. |
-Mode Full (Default for VHD) Scans for zero blocks and reclaims unused blocks. -Mode Retrim Retrims the drive without scanning for zero blocks or reclaiming unused blocks. -Mode Quick (Default for VHDX) Reclaims unused blocks but does not scan for zero blocks. |
Set-Disk |
Updates a disk with the specified attributes |
-PartitionStyle<PartitionStyle> specifies the type of partition, either MBR or GPT. You can use this cmdlet to convert a disk to another type of partition style. |
Get-Volume |
Returns information on all volumes |
-DriveLetter<Char> gets information about the volume with the specified drive letter. -FileSystemLabel<String> returns information on NTFS file systems or Resilient File System (ReFS) volumes. |
There are two new cmdlets that relate to the new VHD set files, which can be used with Windows Server 2016 Technical Preview and Windows 10. These cmdlets are:
Get-VHDSet Obtains information about a VHD set file, such as a list of all checkpoints that the set contains.
Optimze-VHDSet Optimizes the allocation of space that VHD set files use, when used with the compact operation to optimize the files. Reclaims unused space and rearranges blocks, normally reducing the size of a virtual hard disk file.
To create a VHD, you use the New-VHD cmdlet, which was introduced in Windows 8.1. You must specify the path to the VHD, the name for the newly created VHD, VHD type, the size of the disk, and format type, as shown.
New-VHD -Path D:VHDMyDynamicDisk.vhdx -SizeBytes 100GB -Dynamic
The New-VHD cmdlet executes and creates the VHD. As with Disk Management, the newly created VHD will not be mounted, initiated, or formatted without further action. You see how to do this by adding these instructions to the end of the New-VHD script next.
Within Windows 10 is a scripting interface called PowerShell ISE, which enables you to create, execute, and save Windows PowerShell scripts. Type PowerShell ISE into the Start search and then right click Windows PowerShell ISE and select Run as Administrator to launch Windows PowerShell ISE with Administrative privileges. After it launches, locate the right pane that shows all available commands in the GUI. If you type a cmdlet or wild card such as vhd in the name box, the filter function returns all available commands related to .vhd management. Highlight a cmdlet, such as New-VHD, and then click the blue help icon to view a very useful and detailed help relating to the cmdlet, as shown in Figure 2-27.
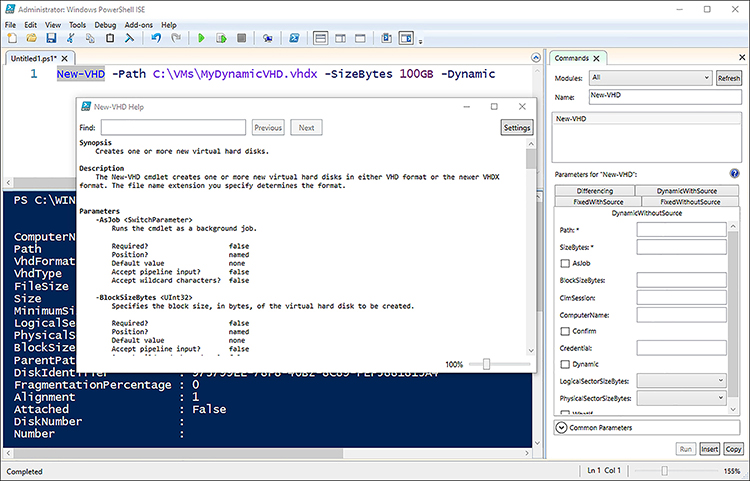
Windows PowerShell enables you to string instructions together and then execute them as a single action. The following example builds on your initial script and creates a new, dynamically expanding, 127 GB virtual hard disk with the .vhdx extension, mounts it, initializes it, and then formats the drive, using NTFS so it is ready to use.
Click the Start button, type powershell, right-click Windows PowerShell, and then select Run As Administrator. Click Yes in the UAC dialog box.
Type the following PowerShell commands all into one line without pressing Enter:
New-VHD -Path "D:VHDsTest.vhdx" -Dynamic -SizeBytes 127GB | Mount-VHD -Passthru |Initialize-Disk -Passthru |New-Partition -AssignDriveLetter -UseMaximumSize |Format-Volume -FileSystem NTFS -Confirm:$false -Force
Press Enter.
Note New-VHD cmdlet
The New-VHD cmdlet is only available for Windows Server 2012 R2 and Windows 8.1 and later; to use it requires the Hyper-V feature to be enabled.
Link to differencing disks
Creating a VHD is easy, and the VHDs are very versatile. However, if you create many virtual disks, you can soon find they consume a huge amount of disk space. This is why you will most often use a dynamically expanding disk. Even when using dynamically expanding disks, you might still find that you quickly use hundreds of GB for your VHD storage. One special type of virtual disk is a differencing disk, which can be useful in reducing the amount of space VHDs use on your host drive.
A differencing disk is a virtual hard disk that you can use to hold changes to a virtual hard disk or the guest operating system by storing the changes in a separate VHD file. A differencing disk needs to be associated with another virtual hard disk, which is marked as read-only. The read-only disk is referred to as the parent (or fixed) disk, and the differencing disk is the child disk.
An example scenario is having three virtual machines running Windows Server 2016 with different roles installed. Each VM has its own separate VHDs. A large proportion of the virtual machines or VHDs are identical, and only the roles installed reflect the differences. Assume that the used space in each VHD is 20 GB each, totaling 60 GB. In this example, building a solution that uses differencing disks instead would have the following:
1 x parent virtual hard disk containing the installed Windows Server 2016 (17 GB)
3 x child differencing disks linked to the parent disk (3 GB each)
After the parent disk has been created and the default Windows Server 2016 installed, this system would be shut down and marked as read only; the read-only status is not mandatory, but is highly recommended.
The differencing disks are then created, linked to the parent, and they expand dynamically as data is written to them. When you first start and connect to the virtual machine in this example, you find the default Windows Server 2016 installation that is present on the parent disk but view it seamlessly through the differencing disk. The user and system will not be aware of the infrastructure. As you make changes, install roles, and configure the operating system, these changes are saved only in the differencing disk, which will grow in size.
You can see in this small-scale scenario that you can save 34 GB in hard-drive space on the host system, a 50 percent reduction by using differencing disks.
The disk configuration criteria in Table 2-13 provide some further examples of VHDs and their different applications.
TABLE 2-13 Example VHD configurations
Disk Format |
Disk Type |
Size |
Application |
|---|---|---|---|
VHD |
Dynamically Expanding |
127 GB |
Default type and size VHD. Useful general purpose disk and backward compatible. If using the Disk Management tool, the Fixed type is the default VHD format. |
VHDX |
Dynamically Expanding |
127 GB |
Default format, type, and size virtual disk. |
VHDX |
Fixed |
50 GB |
Size on disk matches VHDX size. Suitable for hosting an operating system; fastest disk type and format. |
Create and configure Storage Spaces
Storage Spaces was introduced with Windows 8 and Windows Server 2012. It is a technology that is useful for desktop or server devices that have multiple hard disks that can be combined to provide storage redundancy by pooling separate disks and allowing Storage Spaces to manage their administration effectively.
Use Storage Spaces and storage pools
Storage Spaces uses NTFS and the new ReFS file format to configure volumes, which provides greater file resilience through ReFS self-healing capabilities. The redundancy aspects are derived by distributing data across several disk drives and using virtual disk arrays in a RAID configuration or as mirror sets. The operating system maintains the logical disks and presents the virtualized disk as a logical unit number (LUN), which the system can then access. You might have seen the LUN terminology before; it is a term used with Storage Area Network protocols such as Fibre Channel or iSCSI.
The requirements for creating a virtual disk with Storage Spaces are shown in Table 2-14.
TABLE 2-14 Creating virtual disks with Storage Spaces
Requirement |
Description |
|---|---|
Physical disk |
Any size physical disks, such as Serial ATA (SATA), Serially Attached SCSI (SAS), or USB connected disks, can be used. You need a minimum of one physical disk to create a storage pool and more if you require mirrored disks. Disks must not be initialized or formatted. |
Storage pool |
A collection of one or more physical disks that you use to create virtual disks. All unformatted physical disks can be added to a storage pool. |
Storage space |
A logical disk created from one or more physical disks. It allows thin provisioning or just-in-time (JIT) disk allocations and can offer resiliency to physical disk failures through built-in functionality such as mirroring. |
Disk drive |
The drive letter allocated to the logical virtual disk and accessed through File Explorer. |
A storage space is created from a storage pool. As you add additional disks, you can create redundant storage spaces. Four types of storage layouts are available to you with Storage Spaces, as shown in Table 2-15.
TABLE 2-15 Storage Space storage layouts
Storage option |
Description |
Redundancy |
|---|---|---|
Simple |
A simple space has data written across all disks in a logically sequential way that offers increased performance. With multiple disks, automatic data striping enables read/write operations to multiple segments of data concurrently. |
Simple spaces provide no failover capabilities. If a disk that is storing the data fails, the data will be lost. |
Two-way or three-way mirrors |
Mirrored spaces maintain multiple copies of the data by way of data duplication to ensure that all data is redundant. Two-way mirrors maintain two data copies, and three data copies are maintained for three-way mirrors. Data is also striped across the multiple physical drives, which offers the speed enhancements (greater data throughput and lower access latency) of striped disks without the data-loss risk of a simple space. |
Data is mirrored so that if a single disk is lost, the data is available on another of the mirrored disks in the space. A resilient, two-way mirror requires a minimum of two physical disks and can tolerate a single drive failure. Three-way mirroring requires a minimum of five physical disks and can tolerate two drive failures. The ReFS file format automatically maintains data integrity and can only be selected when using mirrored drives. |
Parity |
Parity is similar to RAID 5, which stores data, along with parity information across multiple physical drives. The parity writes are rotated across the available disks, which ensures an even distribution and drive optimization. A minimum of three physical drives is required for parity spaces. |
Parity spaces have increased resiliency through redundant parity information stored across all disks in the parity space. If a drive is lost or corrupted, the missing data can be retrieved from the parity information. To increase write performance journaling can be enabled. |
A further feature that is available with Storage Spaces is how you provision the virtual disk spaces for use. Storage Spaces offers you two schemes.
Thin provisioning It enables you to allocate an intended storage that has greater capacity than is physically present at the time of creation. If you over-specify the amount of capacity compared to the data you currently have, the storage space engine disregards the extra storage capacity until data sets grow to require the storage. At this point, the extra storage is allocated.
Fixed provisioning Similar to traditional fixed storage allocation methods, by which you specify that the spaces will not increase beyond the initial storage capacity allocated at the same time as storage space creation. With fixed provisioning, you specify the hard limit for the size of the storage pool.
Configure Storage Spaces
When you have connected your physical drives to your computer, you can configure Storage Spaces by using the following steps.
Click Start and type Storage Spaces and then open Storage Spaces.
Select Create A New Pool And Storage Space.
If requested, accept the UAC prompt.
Select the drives you want to add, as shown in Figure 2-28.
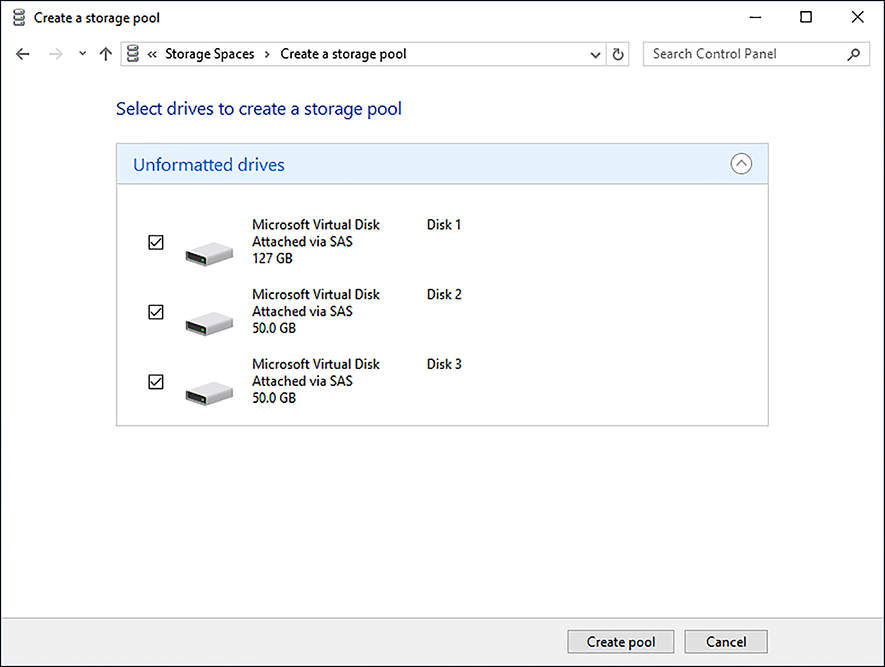
FIGURE 2-28 Selecting the drives to create a storage pool All drives that are offline are automatically selected. Storage Spaces automatically identifies available drives to create the storage pool.
Click Create Pool.
When the create pool operation completes, provide a name for the storage space and select the drive letter you want to use.
Select the type of resiliency you require. (This will depend on how many drives you have added to the storage space.)
Select either the NTFS or ReFS file system. (Only if you choose a mirrored resiliency type can you format the storage space by using either the NTFS or ReFS file system.)
Set the Size (Maximum) of the storage space. The size can be larger than the current capacity of the storage pool, as indicated in the note at the bottom of the dialog box.
Click Create Storage Space to create your storage pool in the storage space.
After the storage pool has been created, the Manage Storage Spaces console manages and maintains it within Control Panel, where you can add, rename, or delete drives. If a physical disk is removed permanently from the pool, it must be reformatted before it can be used in another PC. Just like with mirrored or RAID disk sets, if you need to move the pooled disks to another computer, always move them as a unit so that their integrity is maintained.
As part of your exam preparation, create a storage space, provision a storage pool, and simulate a drive failure. You can see in Figure 2-29 that one of the physical drives used to create the storage space has been disconnected from the computer. Even with only one drive, the E drive continues to be available within File Explorer, and applications and users will be unaware of the failure until they review the notification in the Action Center as shown in Figure 2-29.
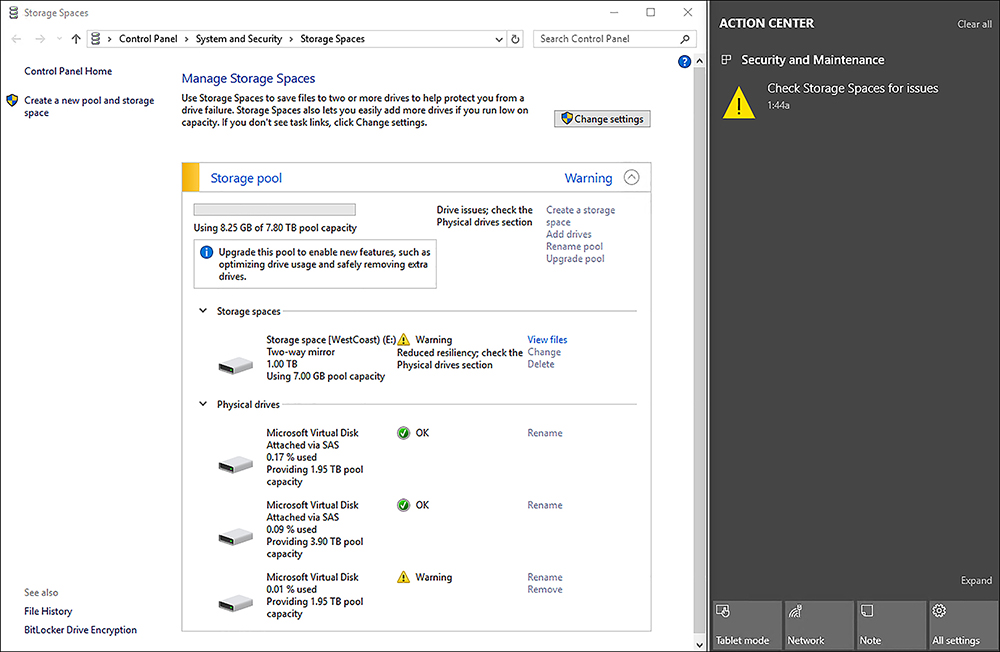
If the removed physical drive is replaced, the storage pool checks the integrity of the pool and makes the necessary repairs. When it’s repaired and full operational resiliency is restored, the icon changes from a warning symbol to the check mark indicating that everything is OK, as was originally shown before the disruption.
Storage Spaces can use the new ReFS file system for mirrored resilient spaces, offering built-in automatic file repair. This helps prevent data loss and can be carried out while the disks are online and do not require a system reboot to check and repair errors. ReFS and Storage Spaces therefore provide enhanced resiliency in the event of storage device failure.
![]() Exam Tip
Exam Tip
Because ReFS is a new file system available in Windows 10, be aware of the self-healing capabilities ReFS offers, which are used for mirrored storage spaces. Remember that ReFS cannot be used for simple or parity resiliency types.
Windows 10 includes several enhancements to the Storage Spaces feature. You can now optimize the drive usage and remove drives from a pool without reducing the effectiveness of the protection against drive failure.
The new optimization features are not available in previous versions of Windows, although you can upgrade an older pool to benefit from the new features in Windows 10. After you have added a new drive to the storage pool, a new action item becomes available, called Optimize Drive Usage.
Optimizing drive usage after adding new drives to an existing pool is beneficial because it redistributes data across all the drives and makes best use of the pool’s new capacity and increased resiliency. This takes place organically by default, but optimizing forces the process to start immediately. The rebalancing process only works on simple and mirrored spaces and is not supported for parity spaces.
When you remove a drive from a pool, the data stored on the removed drive is reallocated to other drives in the pool. Because this is a planned removal (as opposed to a failed drive scenario), this operation can take several hours, depending on the amount of data that has been stored on the drive. To remove a drive, perform the following steps.
Click Start, type Storage Spaces, and then open Manage Storage Spaces.
Select Change Settings.
If requested, accept the UAC prompt.
Expand Physical Drives to see the drives in your pool.
Find the drive you want to remove and select Prepare For Removal.
Leave your computer switched on until the drive is ready to be removed.
When the drive shows Ready To Remove, select Remove and then click Remove Drive.
You can now safely disconnect the drive from your PC and re-purpose it.
Note Speed up drive preparation
Storage Spaces prepares drives for use, optimizes them, and moves data off a drive when you plan to remove it as a background task. When your computer is powered on, you can temporally modify your power and sleep settings to ensure that your computer does not sleep.
Manage Storage Spaces by using Windows PowerShell
You can script the creation, repair, and administration of Storage Spaces by using Windows PowerShell. There are many more storage management-specific cmdlets that relate to storage operations. Some of the Storage Spaces-specific cmdlets that can be used are shown in Table 2-16.
TABLE 2-16 Storage cmdlets in Windows PowerShell
Storage Cmdlets |
Description |
|---|---|
New-StoragePool |
Creates a new storage pool, using a group of physical disks |
Add-PhysicalDisk |
Adds a physical disk to a storage pool for the creation of one or more VirtualDisk objects |
Get-StoragePool |
Gets a specific storage pool or a set of StoragePool objects that are available |
Set-StoragePool |
Modifies the properties of the specified storage pool |
Set-PhysicalDisk |
Sets the attributes on a specific physical disk |
Get-VirtualDisk |
Returns a list of VirtualDisk objects that are available |
New-VirtualDisk |
Creates a new virtual disk in the specified storage pool |
Repair-VirtualDisk |
Deletes an existing virtual disk and reclaims the space for use by other virtual disks in the same storage pool |
Optimize-StoragePool |
Rebalances a storage space configured as simple or mirrored, optimizing files based on disk space, disk size, and file size |
Update-StoragePool |
Upgrades the storage pool metadata to enable new features and functionality on pre-Windows 10 storage pools |
RemovePhysicalDisk |
Removes a physical disk from a specified storage pool |
Remove-StoragePool |
Deletes a storage pool and associated VirtualDisk objects |
To list all the cmdlets that are available, use the Get-Command -Module Storage cmdlet.
Need More Review? Storage Cmdlets in Windows Powershell
You can review the documentation relating to Storage Spaces Windows PowerShell cmdlets at: https://docs.microsoft.com/en-us/powershell/module/storage/?view=win10-ps.
Configure removable devices
Removable devices such as USB flash drives and Secure Digital High-Capacity (SDHC) memory cards are common and can offer portability benefits but also pose a potential threat to data security and loss. In this section, you learn how to prepare removable devices for use, protect the data if the drive is lost or stolen, and restrict access to portable drives.
Format removable devices
You can format removable devices in the same way as you can configure hard drives. All drives without a file format, or that have one that Windows 10 doesn’t understand, are considered RAW. To use the drive, first format the drive. If you insert an unformatted drive in your USB port, Windows prompts you to format the drive. Depending on the size of your drive, you can format the drive using the FAT, FAT32 (default), NTFS, or exFat file format, using the format wizard. Be mindful when formatting a USB drive because, when you perform a quick format, the drive is not checked for errors. Although this is quicker, the system won’t mark bad sectors on the drive, and this can lead to data integrity problems later on.
For drives larger than 32 GB, the exFat is a good general-purpose format; it handles files larger than 4 GB and optimizes the drive space well. For smaller drives, the FAT32 is best because it is compatible with virtually all operating systems and is fast.
You should format using NTFS if you are seeking advanced functionality such as file compression, permissions on individual files and folders, and file encryption using EFS.
Note RAW
A drive listed with RAW as the file system type can still contain data. If the drive has been formatted with a file format Windows 10 doesn’t use, the operating system automatically assigns the RAW file system driver to the volume and displays a dialog box for you to format the drive. Label thumb drives, especially when they are used with various devices.
Secure removable devices
Data stored on USB flash drives is inherently insecure and should be protected. This can be achieved by using NTFS permissions, encrypted using EFS, or by using BitLocker encryption. The most appropriate of these methods in an enterprise scenario is likely to be using BitLocker To Go because users understand it easily, and you can manage and configure the feature by using Group Policy.
BitLocker To Go is not designed to replace EFS or NTFS permissions; it adds an additional layer of security and protection on removable drives, including SDHC cards, USB flash drives, and external hard disk drives. BitLocker To Go is available in the Pro, Enterprise, and Education editions of Windows 10 only.
When encrypting removable media with BitLocker To Go, you have two options.
Encrypt used disk space only Encrypts only the part of the drive that currently has data stored on it. This is quicker and appropriate in most cases.
Encrypt entire drive Encrypts the full volume, including areas that contain no data, which takes longer to complete.
Note Bitlocker to go Requirements
To encrypt a removable drive by using BitLocker To Go, the drive must be formatted with NTFS, Fat16, FAT32, or exFat file system and have at least 64 MB of available space. Because removable drives are portable and typically not tied to one device, BitLocker To Go does not require use of a Trusted Platform Module (TPM) chip. The full volume encryption key and the volume master key are stored on the encrypted drive.
To enable BitLocker Drive Encryption on a removable drive, perform the following steps.
Insert a USB drive into your computer.
Open File Explorer and right-click the USB drive in the left pane.
Select Turn On BitLocker from the context menu.
The Starting BitLocker Wizard appears and initializes the drive.
On the Choose How You Want To Unlock This Drive page, choose Use A Password To Unlock The Drive.
In the Enter Your Password and Reenter Your Password boxes, type a password and click Next.
On the How Do You Want To Back Up Your Recovery Key page, click Save To A File.
In the Save BitLocker Recovery Key As dialog box, select This PCDocuments.
In the Save BitLocker Recovery Key As dialog box, click Save and then click Next.
On the Choose How Much Of Your Drive To Encrypt page, click Encrypt Used Disk Space Only (Faster And Best For New PCs And Drives) and then click Next.
On the Choose Which Encryption Mode To Use page, click Compatible Mode (best for drives that can be moved from this device) and click Next.
In the Are You Ready To Encrypt This Drive page, click Start Encrypting.
During the encryption process, the BitLocker Drive Encryption Wizard shows the encryption progress on the taskbar. The process can take some time to complete and can be paused at any time by clicking the Pause button on the BitLocker Drive Encryption dialog box, as shown in Figure 2-30.
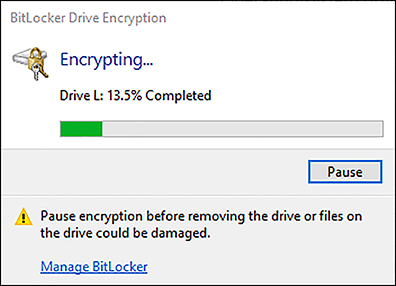
FIGURE 2-30 BitLocker Drive Encryption
When the encryption has completed, BitLocker is fully enabled on the removable drive. If you eject the USB drive and then insert the drive back into your PC or another computer, Windows 10 prompts you to enter the password to unlock the drive.
Restrict access to removable devices
The abundance and increasing capacity of USB flash drives enables users to store huge quantities of data and travel around with it. The drives are small and extremely portable and can easily be lost. It is essential for organizations to restrict access to removable drives for several reasons, including:
Risk of data loss or theft.
Spread of malware.
Document version control.
Risk of data loss/theft
With technologies such as BitLocker To Go, it is possible to ensure that all data stored on removable drives is encrypted, which helps prevent against data theft by an external user accessing the data contained on the removable drive. Because of their size and low value, removable drives are lost on a regular basis both inside the office or home and off premises. If an unauthorized person finds the drive and can access sensitive data, they could publish, sell, or use it illegally. It is therefore advantageous (and in some instances a legal requirement) for data to be inaccessible to unauthorized users.
You can configure Group Policy to help prevent users from saving or copying data to any removable drives that are not encrypted by BitLocker. There are eight policy settings located at Computer ConfigurationAdministrative TemplatesWindows ComponentsBitLocker Drive EncryptionRemovable Data Drives, and they are described in Table 2-17. These settings are useful when you need to enforce the use of BitLocker encryption on USB storage devices.
TABLE 2-17 GPO settings for securing removable devices
Group Policy Setting |
Policy description |
|---|---|
Deny Write Access To Removable Drives Not Protected By BitLocker |
You can configure whether BitLocker protection is required for a computer to write data to a removable data drive. |
Control Use Of BitLocker On Removable Drives |
Control the use of BitLocker on removable data drives, including whether users can apply BitLocker protection to their removable drives. |
Enforce Drive Encryption Type On Removable Data Drives |
With this policy setting, you can configure the encryption type that BitLocker uses on removable drives, either full encryption or used-space-only encryption. |
Configure use of smart cards on removable data drives |
Allows you to allow or deny the use of smart cards to authenticate access to BitLocker-protected removable data drives. |
Configure use of hardware-based encryption for removable data drives |
Some removable data drives can contain hardware that performs data encryption. This policy allows you to allow or deny the use of hardware-based encryption for removable data drives cards. If allowed, you can restrict which encryption algorithms can be used. |
Allow access to BitLocker-protected removable data drives from earlier versions of Windows |
Allows you to control whether earlier versions of Windows can access data contained on BitLocker-protected removable data drives, such as Windows XP. |
Configure the use of passwords for removable data drives |
This policy allows you to specify whether BitLocker-protected removable data drives require a password to unlock them. |
Choose how BitLocker-protected removable data drives can be recovered. |
Allows you to specify the recovery options available for BitLocker-protected removable data drives including storing the BitLocker recovery information in AD DS. |
![]() Exam Tip
Exam Tip
Combining BitLocker protection and write access to removable drives with your knowledge of Group Policy are skills likely to be tested in the exam.
In most organizations, there are groups of users without any reason to read or write to removable drives. For these groups of users, you can remove their right to such devices. You can affect this setting at the user or group level or for all users on a PC. To restrict access to removable devices, configure the access policies by following these steps.
Click Start, type gpedit.msc, and open the Group Policy Editor.
Navigate to Computer ConfigurationAdministrative TemplatesSystemRemovable Storage Access.
You can deny read and write access to many types of storage, including CD, DVD, floppy drives, removable drives, tape drives, or media players (or all removable storage), as shown in Figure 2-31.

FIGURE 2-31 Removable Storage Group Policy settings If a setting is appropriate for your requirements, select the setting and set it to Enabled.
Close the Group Policy Editor.
Note Set user removable storage access permissions
You can also configure these settings for specific users or groups rather than apply them to computers. These settings are located at User ConfigurationAdministrative Templates SystemRemovable Storage Access. By using these GPOs, you can allow administrators and users with group membership, such as IT staff, to use USB flash drives.
Spread of malware
Allowing users to access USB flash drives in an unrestricted way can become a path for viruses to spread. A significant volume of malware finding its way to office computers originates with home users who might frequently download files, such as music or software, from the Internet. They also receive emails containing viruses. If a USB flash drive is used at home and then later at the workplace, on a work laptop, or at a client site, the risk of cross infection is high.
If you evaluate which users in your organization pose the highest risks and find that some high-risk users need access to removable drives, consider granting them access to specific USB storage devices only. IT departments can issue employees with USB flash drives, perhaps adorned with corporate branding, and these flash drives can be tightly controlled using Group Policy so that only these devices can be used on your enterprise computers.
Two other GPO settings are useful to restrict access to removable devices that can be found in this location: Computer ConfigurationAdministrative TemplatesSystemDevice Installation Device Installation Restrictions:
Prevent Installation Of Removable Devices.
Allow Installation Of Devices That Match Any Of These Device IDs.
The first policy prevents users from installing removable devices. A device is considered removable if the device driver used when the device is connected declares the hardware as removable.
The second policy enables you to add a list of allowed devices to the policy and include the specific hardware ID for your USB flash drive, as shown in Figure 2-32. Hardware IDs are found in Device Manager by selecting the device and viewing the Details tab for the device. When you review the information on the Details tab, the following abbreviations might be useful.
HID = Human Interface Device, such as keyboards and mice.
VID = Vendor ID.
PID = Product ID.
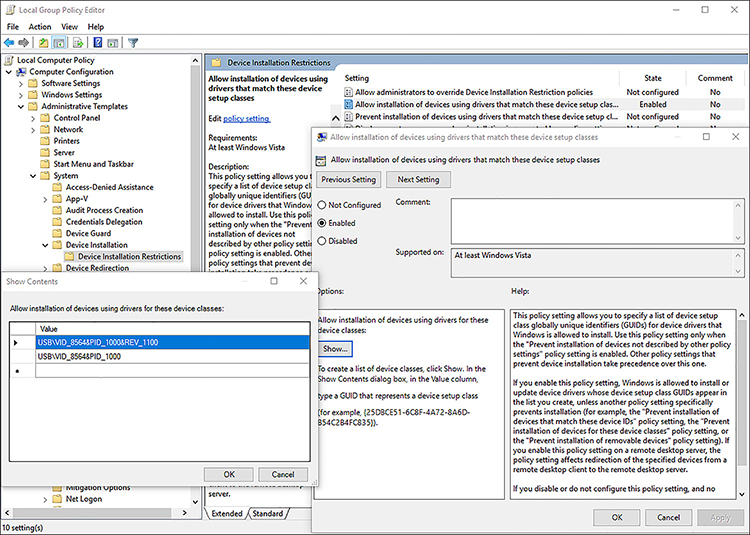
FIGURE 2-32 Preventing unauthorized storage device usage
Document version control
When you save documents to removable drives, you can create issues regarding document version control. It becomes difficult to synchronize documents that are taken outside of the shared repositories such as OneDrive For Business or shared folders on the network.
When this scenario causes you problems, consider enforcing Group Policy settings to prevent the use of removable drives for your users. By ensuring that users only access and modify corporate data through controllable and accountable channels, you help prevent issues with data duplication, versioning conflicts, and data access.
Troubleshoot storage issues and removable devices
You have reviewed how to manage and configure storage, using traditional tools, including File Explorer, Disk Management, DiskPart, Windows PowerShell, and Storage Spaces in Windows 10. In this section, you review what can go wrong with storage devices, how to troubleshoot issues, and, if possible, how to recover from them.
Initialize a basic disk
When you install a new hard disk on your computer, Windows 10 does not recognize it because it won’t contain a valid signature. When you open Disk Management after installing the drive, Disk Management displays a wizard that provides a list of the new disks Windows 10 detects and enables you to choose whether to initialize the disk by using a MBR or GPT partition style.
After it is initialized, the disk status in the left pane of Disk Management changes to Online and is ready to use. If you cancel the wizard, the disk status remains Not Initialized, and you won’t be able to create partitions on the disk.
Import foreign disks
If you need to move a disk drive from one computer to another, Windows 10 will not automatically mount the drive or assign drive letters by default. In Disk Management, a warning icon appears in the left pane next to the disk displaying the Foreign status.
Dynamic disks appear as Foreign when they are added to the system, and you must first import the Foreign disks to change their status to Online. To add a Foreign disk to your system, right-click the disk and then click Import Foreign Disks. All existing volumes on the foreign disk become visible and accessible after you import the disk.
Note Do not Mount Removable Media Devices
Windows 10 automatically mounts removable media devices and optical disks.
Hard drive failure
Hardware performance and reliability continue to improve. With new innovations such as the ReFS self-healing file system and the emergence of SSD drives that have no moving parts, your systems are less susceptible to failure than in the past. Although this is true, your systems will continue to have vulnerabilities that you need to be aware of.
Hard drives of all varieties are generally rated based on their mean time between failures (MTBF), which is the predicted elapsed time between inherent failures of a system while in operation, usually expressed in thousands or tens of thousands of hours. Most drives have a quoted MTBF of somewhere between 100,000 and 1 million hours, which is between 11 and 110 years.
With a removable drive such as a USB flash drive, it might not be possible or economically viable to repair the drive. System and data drives can often be repaired and data recovered, but this depends largely on the type and severity of the failure. Hard disk drives fail for many reasons, including:
Logical failure Including corruption of errors recorded in the file allocation table (FAT) or master file table (MFT) on system volumes. In some cases, Windows RE can automatically repair corrupted file tables; otherwise, you need specialized software tools to fix the problem.
Mechanical failure Disks with rotating, magnetically coated disk platters can fail when the read/write heads of the hard disk come in contact with the hard disk platters. This is often caused by physical damage or shock, computer movement, static electricity, or power surges. Drive motor failure causes the drive to stop working, but the data might still be intact.
Electronic failure The hard disk’s electronic circuit controller board can fail with age or become damaged by electrical power surges. You might be able to recover data because the disk platters and other mechanical components might be undamaged.
Firmware failure If the hard disk firmware code is corrupt or unreadable, your computer will be unable communicate with the drive. You could attempt to re-flash the firmware or reset it to factory defaults; check the manufacturer’s website for the procedure.
Bad sectors These can be either logical or physical sectors on the disk. Where a disk is damaged through shock or vibration, the hard disk drive firmware monitoring the drive automatically mark bad sectors. If the damage is minor, often no data is lost. If the number of physical bad sectors becomes too high, it would be worthwhile to replace the drive before data loss becomes likely.
Note Hard Disk Drive Monitoring Software
Some motherboards and hard disks include self-monitoring, analysis, and reporting technology (SMART) software. SMART monitors the hard disk proactively, checking for reliability issues and marking bad areas on the drive as they are detected. By preventing the drive from storing data in bad sectors, they can reduce data loss.
SSDs are gaining in popularity and reliability. SSDs have always been very fast when compared to mechanical drives, but the early SSDs did not exhibit the levels of reliability that traditional hard drives offer. Reliability has improved significantly, and speed continues to increase. When comparing SSDs, look at factors other than speed alone, such as warranties, MTBF, and cost.
Although there are no moving parts, the memory cells that store data inside an SSD drive can wear out after extensive write operations, which results in errors or even drive failure. The MTBF for SSDs is now comparable to mechanical drives and will continue to improve as the technology and error checking software evolves.
Replacing failed disks
Hard drives can fail, and they should be viewed as a system vulnerability, which is the primary reason for maintaining regular backups. If you experience a failed local disk drive, the data is no longer available, and you need to replace the drive and recover the data from your backup or recovery drive.
The benefit of using a redundant storage solution such as mirrored volumes using Disk Management or using Storage Spaces in Windows 10 is that, when a disk drive fails, the data in storage is still accessible. When you replace the failed disk, full redundancy is reestablished automatically.
If you suffer a single disk failure in a mirrored volume, you can recover your system by using these steps.
Shut down your computer if necessary.
Connect a replacement disk that is the same size or larger to the computer and restart.
Right-click Start and select Disk Management; accept UAC.
Right-click the mirror on the Missing or Offline disk and then click Remove Mirror.
Right-click the volume to be re-mirrored and click Add Mirror, which includes an operational disk from the previous mirror, and then add a new disk by using the Add Mirror Wizard in Disk Management.
The mirror creation process commences, which re-synchronizes both volumes to restore redundancy.
If you are using Storage Spaces, you can use parity or a two-way or three-way mirror storage space. If you experience a drive failure, you can restore full redundancy by performing these steps.
Shut down your computer if necessary.
Connect a replacement disk that is the same size or larger to the computer and restart.
Right-click Start, type Storage Spaces, and click Manage Storage Spaces.
Click the Change Settings button and accept UAC.
Add a new disk to the storage pool.
Storage spaces repairs the mirror automatically.
After you’ve added a new drive to your pool, you can click Remove next to your failed drive to delete it from the storage pool.
The mirror is rebuilt as a background task, and you can close Storage Spaces.
With Storage Spaces, avoid allowing it to become completely full, because the storage space will unmount. When storage spaces are over 70 percent full, consider adding additional storage.
Rebalancing the data stored on the disks in a storage pool can improve performance. You can run the Optimize-StoragePool Windows PowerShell cmdlet to ensure that the data is distributed evenly between the various disks in the storage pool.
Older storage spaces created in Windows 8 or 8.1 should be updated to allow the data to be rebalanced, using the Update-StoragePool Windows PowerShell cmdlet. Updated storage pools can be then optimized.
Skill 2.3: Configure data access and usage
Being able to access your data from anywhere is a key feature of Windows 10, whether at home using a HomeGroup, at work across a LAN, or when mobile using the Internet. This chapter discusses multiple methods of configuring sharing and setting access permissions on the share so that you are in control of who can see or edit the data. You review how to troubleshoot data access issues and stay informed of your usage status when using a metered connection.
Configure file and printer sharing
Data is often shared in an organization, perhaps within a team for project work or between you and your boss. You must know how this can be achieved in Windows 10 within a networked environment, whether that is at home or in a larger workplace network. You must be able to manage shared files and printers.
File and printer sharing is disabled by default, and it is automatically turned on when you share the first folder on a Windows 10 device. If you want to configure this setting manually, you can do so in the advanced sharing settings in the Network And Sharing Center in Control Panel.
Another consideration is that when sharing is enabled, the Windows Firewall is automatically configured to allow users to access shares on a computer in the network. This is a potential security risk. Although the firewall settings are configured automatically when you first share a folder, they are not returned to their default status even if you remove all shared folders.
Server Message Block and Network Discovery
Shares are provided by the Server Message Block (SMB) application-layer network protocol and not by NTFS. You can see what version of SMB your Windows 10 system is using by following these steps.
Sign in to your computer by using an administrative user account.
Open File Explorer and navigate to a shared or mapped folder on the network so that the shared files are visible in the right navigation pane.
On the File Explorer menu, click File and then click Open Windows PowerShell As Administrator.
Accept UAC if prompted.
Type the Windows PowerShell cmdlet Get-SmbConnection.
Windows PowerShell should report the SMB version (dialect) in use, as shown in Figure 2-33.

FIGURE 2-33 Windows 10 SMB version
Need More Review? SMB 3.0 Overview
This Microsoft Resource, although focused on Windows Server 2012 R2 and SMB 3.0, is useful to obtain more information relating to the benefits of using the latest version of SMB compared to previous versions. Visit: https://docs.microsoft.com/en-us/previous-versions/windows/it-pro/windows-server-2012-R2-and-2012/dn551363(v=ws.11).
The network discovery feature was introduced in Windows Vista and uses a new layer 2-level protocol called Link Layer Topology Discovery (LLTD). It allows Windows to identify other devices present on the local subnet and, when possible, establish the quality of service (QoS) bandwidth capabilities of the network.
Knowing what is on the network increases the communication between devices. One downside of this increased awareness capability is that the firewall security settings are slightly relaxed. This means that not only does your computer see other network computers and devices, it also becomes discoverable on the network by other Windows clients. To maintain security, the network discovery feature is disabled by default.
![]() Exam Tip
Exam Tip
Administrators working in a domain environment can manage the settings of the two network discovery settings, LLTD Mapper (LLTDIO) and Responder (RSPNDR), in Group Policy settings, which can be found here: Computer ConfigurationPolicies Administrative TemplatesNetworkLink Layer Topology Discovery.
Sharing files by using a sharing wizard
The Share tab in File Explorer enables you to launch the File Sharing Wizard and provides the same functionality as the Share With shortcut menu. Next to this is Advanced Security, which enables you to fine-tune the sharing beyond the limitations of the File Sharing Wizard.
Files typically cannot be shared without first sharing the parent folder. In Windows 10, files that reside in the user profile, such as Documents, Downloads, and Pictures folders, can be shared. To do this, follow these steps.
Sign in to your computer, using an administrative user account.
Open File Explorer and navigate to the user profile.
Right-click the files, such as pictures, in the user’s profile.
Select Share With, Specific People, as shown in Figure 2-34.
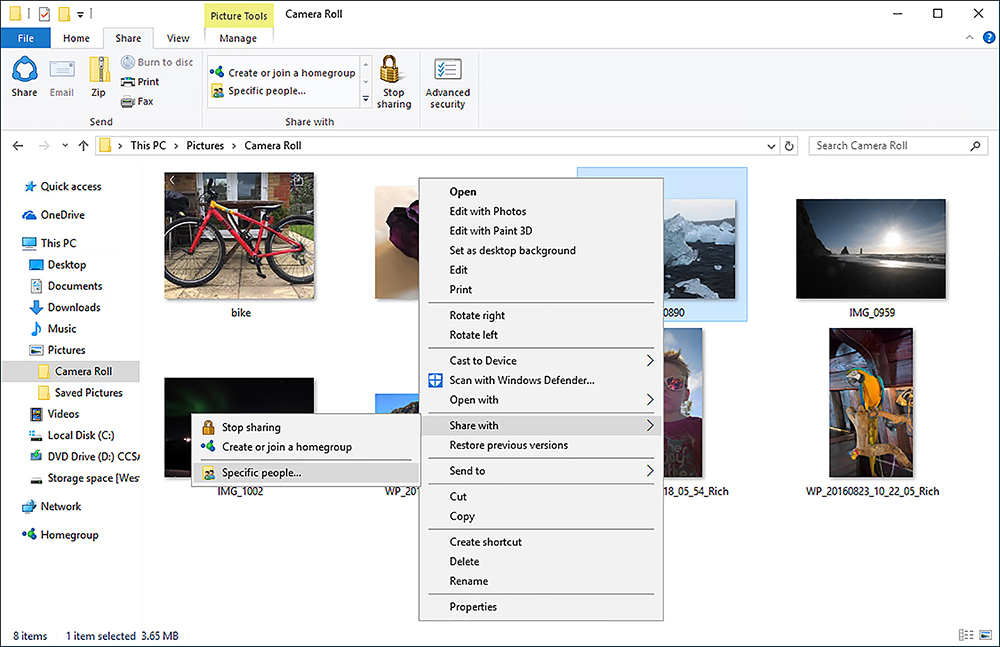
FIGURE 2-34 Share, using the sharing wizard In the Choose People To Share With dialog box, type a user or group and click Add.
Set Permission Level to Read or Read/Write and click Share.
Note that you are sharing. The File Sharing Wizard completes, and the files are shared.
Optionally, you can use the links in the File Sharing Wizard to send someone the links to the shares.
Click Done.
When you configure basic sharing permissions, you have one of two simplified options.
Read Users and groups can open but cannot modify or delete files.
Read/Write Users and groups can open, modify, or delete a file and modify permissions.
After you create a share, all users see the share name over the network. Only users who have at least the Read permission can view its content.
Note Administrators can Share Files and Folders
To share a file or folder across the network in Windows 10, you must be a member of the Administrators group or provide UAC credentials for an administrator.
Later in the chapter, you see in more detail how to configure shared folders by using advanced security.
Share a printer
Windows 10 enables you to share an installed print device and manage it directly through the Print Management tool. In this section, you review how to share a printer and how to administer printers and print servers.
When you add a new printer, Plug and Play normally installs it automatically. Sometimes the terminology relating to printers can be confusing, so review the following list of terms to ensure that you are clear.
Printing device The physical printer or device is connected locally or through the network.
Printer port Modern printers connect by Wi-Fi or Bluetooth, whereas older devices connected by USB, serial, or parallel ports. Plug and Play should auto-configure the correct settings for Windows 10 to communicate directly with a USB connected print device.
Print job This is the computer representation of the document that needs to be printed.
Print job output This is the printed document.
Printer This is the Windows 10 representation of a physical printing device, such as the printer icon.
Printer driver The printing device needs to be given instructions on how to render print jobs from Windows 10, such as size, color, and number of copies. The print device also communicates with Windows 10 with information such as print status, ink levels, and paper jams. These communications are enabled through the printer driver.
Page-description language (PDL) The driver uses the PDL to convert a print job to the print language used to print the document, such as PostScript, Printer Control Language (PCL), Portable Document Format (PDF), and XML Paper Specification (XPS).
Type 4 print class drivers
To protect the system from rogue drivers and to aid simplified sharing, Windows 10 uses the new Type 4 Print Class Driver for each printer device model; this was first introduced with Windows 8. Unlike the older Type 3 printer drivers, an administrator only needs to install a Type 4 printer driver rather than multiple drivers, such as 32-bit and 64-bit drivers, to support both types of client architecture. Type 4 drivers can support multiple printer models and often install faster than the older Type 3 drivers.
The security of Windows 10 is enhanced because Type 4 printer drivers can only be updated by using Windows Update or Windows Server Update Services (WSUS).
Need More Review? V4 printer driver model
This Microsoft resource is useful to obtain more information relating to the Type 4 Printer Class Drivers. Visit: https://docs.microsoft.com/en-us/windows-hardware/drivers/print/v4-printer-driver.
The printer GUI, produced by the original equipment manufacturer (OEM) and found in Windows 10, for example, in Control Panel or Device Stage, is typically installed independently rather than with the Type 4 driver. It’s designed to provide information to the user and interacts with the printer device through the printer driver.
Adding and sharing a printer
In addition to sharing a printer, you can also modify the printer security to ensure that only authorized users can print to the device. Complete the following steps to add and share a local printer.
Open the Control Panel and select View Devices and Printers in the Hardware and Sound section.
In Devices And Printers, click Add A Printer.
On the Add A Device page, click The Printer That I Want Isn’t Listed.
On the Find A Printer By Other Options page, select Add A Local Printer Or Network Printer With Manual Settings and click Next.
On the Choose A Printer Port page, verify that Use An Existing Port is selected and click Next.
On the Install The Printer Driver page, in the Manufacturer list, select Microsoft. In the Printers list, select Microsoft PCL6 Class Driver and click Next.
On the Type A Printer Name Page, in the Printer Name box, type Demo Printer and click Next.
On the Printer Sharing page, click Next.
Verify that the printer is set as the default printer and click Finish.
Setting printer security permissions
To modify the printer’s security to allow only members of the Users group to print, complete the following steps.
Open the Control Panel and select View Devices and Printers in the Hardware and Sound section.
In Devices And Printers, right-click Demo Printer, select Printer Properties, and then select the Security tab.
In the Demo Printer Properties dialog box, verify that Everyone is selected and then click Remove.
Click Add. In the Enter The Object Names To Select (Examples) box, enter Users and click OK.
In the Permissions For Users section, add the Manage Documents Allow permission, verify that the Allow Print permission is selected, and click OK.
The default security settings for a shared printer allow the Everyone group to print, and members of the Administrators group can print, manage the printer, and manage documents, as shown in Figure 2-35.

Note Restart Printer Spooler
Although members of the Everyone group can print to a printer, only administrators and the document Creator Owner can cancel print jobs. Sometimes restarting the Print Spooler service can resolve a stalled printer, although this requires administrative privileges.
Configure HomeGroup connections
Introduced in Windows 7, the HomeGroups feature aims to provide a simplified process of sharing files and printers on small networks such as in small offices or homes, where Active Directory Domain Services (AD DS) is not used. Computers running Windows 7 or newer can connect to HomeGroups.
Although HomeGroups are created automatically by using the Create A HomeGroup Wizard, they are password protected by a system-generated password. By protecting access to this password, a HomeGroup owner has control over who can connect to their HomeGroup.
Create a new HomeGroup
To simplify creation for home and small office staff, the process of creating a HomeGroup is wizard-based.
If a HomeGroup has not been created on your device, you can create a new one. Launch the Create A HomeGroup Wizard in one of several ways, as follows.
Click the Create Or Join A HomeGroup button in the Share node in File Explorer.
Click the Create A HomeGroup button in the HomeGroup node in Control Panel.
Click the HomeGroup link in the Network And Internet Settings app.
Creating a HomeGroup is not available if the computer is joined to a domain, or Azure AD. You must have Administrator privileges to enable the HomeGroup feature, but anyone can join one with the correct password. After you have joined a HomeGroup, you can choose which of your folders you want to share with the HomeGroup. For other users to access files and folders shared in a HomeGroup, the computer that hosts the resources must be turned on and connected to the network, but the user does not need to be logged on.
Follow these steps to configure a HomeGroup.
Click the Create A HomeGroup button in the Share node in File Explorer.
On the Create A HomeGroup page, click Next.
On the Share With Other HomeGroup Members page, select the files and devices that you want to share, set permission levels, and click Next.
When the wizard generates a HomeGroup password, make a note of it or print it and then click Finish.
After you have created a HomeGroup, review the options available on the Change HomeGroup Settings page found on the HomeGroup menu in File Explorer when you select HomeGroup in File Explorer. The Change HomeGroup Settings allows you to modify settings, including:
Viewing or printing the HomeGroup password.
Changing HomeGroup password.
Modifying the items that you are sharing.
Allowing devices on your network to have access to streaming media content.
Leaving an existing HomeGroup.
Starting the HomeGroup troubleshooter.
Modifying advanced sharing settings.
In addition to allowing users and computers access to files and folders in your HomeGroup, you can also allow devices on your network to have access to streaming media content such as music, games, and videos from your HomeGroup, as shown in Figure 2-36.
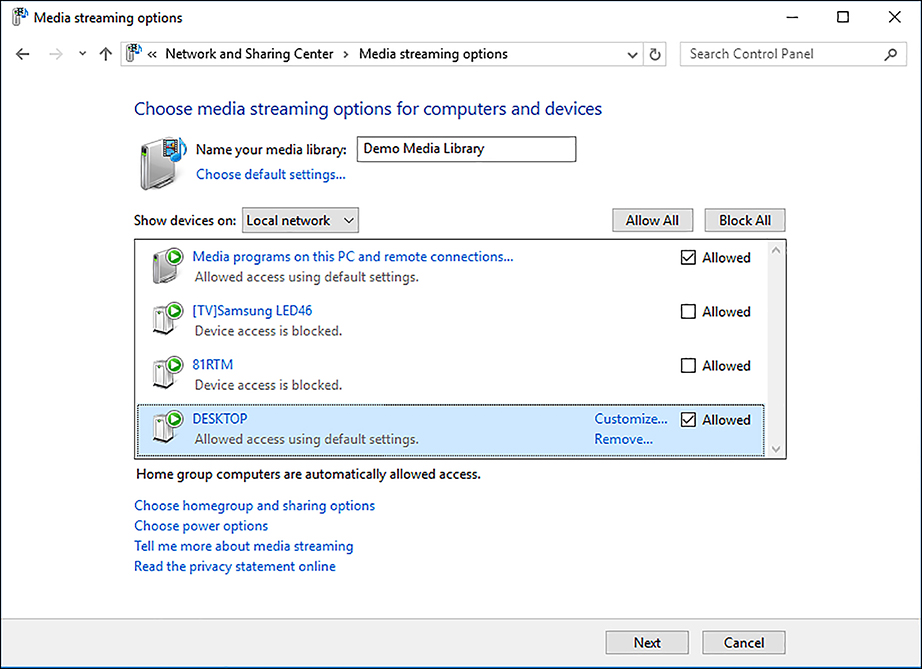
Join a HomeGroup
If a HomeGroup has already been created on the network, the details are displayed when you open the HomeGroup item in the Network And Sharing Center. To join the HomeGroup on your network, perform the following steps.
Open the HomeGroup item in the Network And Sharing Center.
Any existing HomeGroups should be automatically detected, and the name of the user and computer with the HomeGroup appears.
Click Join Now.
On the Join A HomeGroup page, click Next.
On the Share With Other HomeGroup Members page, select the files and devices that you want to share, set permission levels, and click Next.
Enter the HomeGroup password that has been provided to you from the person who created the HomeGroup.
If the password is correct, the wizard completes, and you have joined the HomeGroup.
Click Finish.
If you want to leave the HomeGroup and stop sharing your files and folders, open the HomeGroup item in the Network And Sharing Center and then click Leave. If you want to re-join the HomeGroup, run the Join A HomeGroup Wizard again.
Configure folder shares
When you share a folder, other users can connect to the shared folder and its contents across the network. Shared folders available on the network are no different from normal folders, and they can contain applications, corporate data, or private data. Be careful when creating a network share, to ensure that you do not accidentally provide access to a user or group of users who should not have access. By default, everyone on the network is given read access to the share, although you can change this setting.
Normally, a shared folder is located on a file server, but in a small network environment, the sharing can be located on a Windows 10-based computer or network-attached storage (NAS) device. When choosing the device or server, the resources should be available whenever the users need them and, often, this means the server is always on.
By providing a central location for shared folders to reside on, you enable the following features.
Simplification of management
User familiarity
Ease in backing up data
Consistent location and availability
When a user tries to use resources accessed on a shared folder, the access permissions are determined by taking into consideration both the share permission and the NTFS security permissions. The most restrictive set of permissions prevail to the user.
Ensure that you do not create shared folders where the share permissions (SMB) become the primary access security mechanism. They are more restrictive than the NTFS permissions because users gaining access to the resource locally or by logging on through Remote Desktop would completely bypass SMB permissions. It is therefore essential for NTFS permissions to be configured independently to protect the resource.
Create a share
To allow access to a locally stored folder across a network, first share the folder. Files contained in folders are also shared, but files cannot be specifically shared independently, except from within a user profile.
There are a number of ways you can create a share, for example:
Shared Folders snap-in
File Explorer
Command prompt
Windows PowerShell cmdlets
Create a share by using the Shared Folders snap-In
You can create and manage file shares centrally on your computer by using the Shared Folders snap-in, which can be loaded into an empty Microsoft Management Console (MMC), or the snap-in found in Computer Management.
When you create a new share in the Shared Folders snap-in, the Create A Shared Folder Wizard appears and guides you through specifying the folder path, share name, description, and other settings, as shown in Figure 2-37.
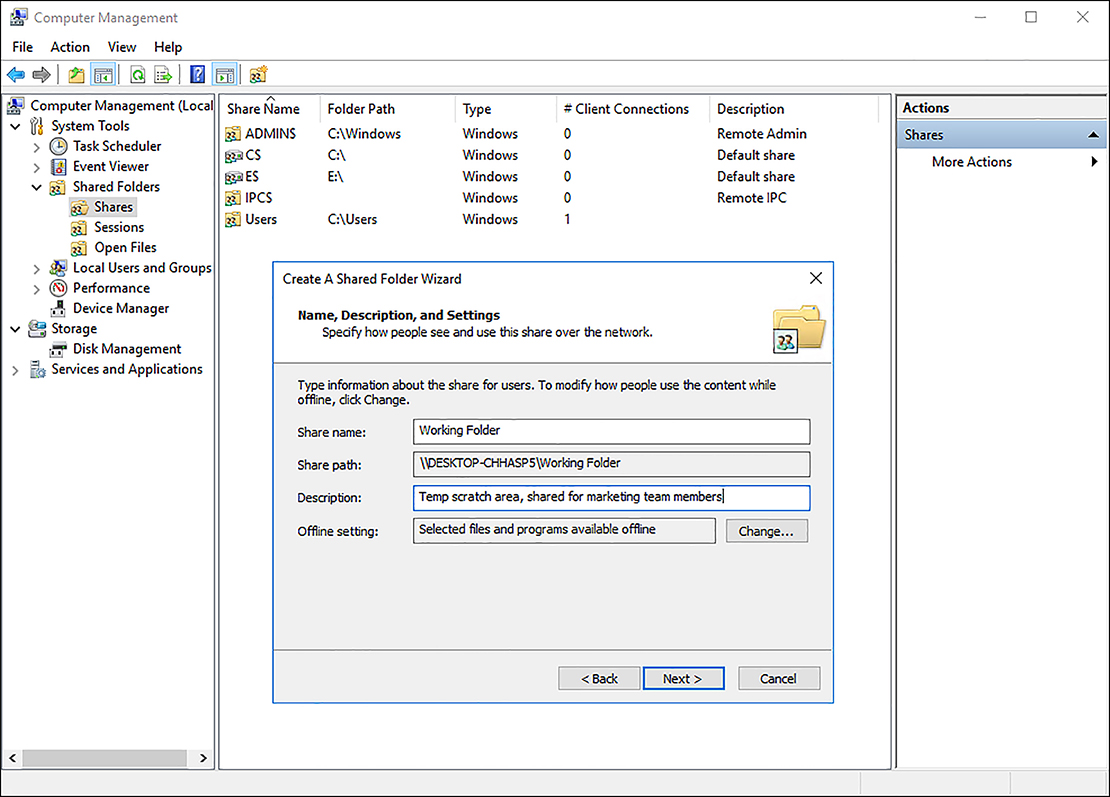
By default, the share name will be the same as the folder name, and permissions for the share are set at read-only access for the Everyone group, but you can choose other options or full customization by completing the underlying Share Permissions discretionary access control list (DACL) page.
The Shared Folders snap-in enables you to view existing shares and modify their properties, including settings such as offline file status, share permissions, and even the NTFS security permissions.
![]() Exam Tip
Exam Tip
To launch the Create A Shared Folder Wizard directly from a command prompt, use Shrpubw.exe.
Sharing folders by using File Explorer
There are three methods of sharing a folder in File Explorer.
Use the Share With option, found on the Share tab on the ribbon bar (also called Network File And Folder Sharing).
Select Advanced Security from the Share tab on the ribbon bar.
Use the Sharing tab in the Properties dialog box.
All the methods present you with slightly different GUIs and wizards from which to choose the sharing options. Although they all result in sharing folders that can be accessed across the network, the main difference between each method is the speed and simplicity that some offer the novice.
In practice, most home users and small businesses prefer to use the sharing wizards found on the ribbon bar, but more experienced users seek the advanced level of control that can be gained through the Sharing tab in the Properties dialog box.
![]() Exam Tip
Exam Tip
Review the three options for configuring shares and pay attention to the limitations of the wizard-based methods. The wizards configure the file system permissions automatically, based on the limited choices they present.
Sharing from the command prompt
The command prompt enables you to share a folder by using the net share command. To create a simple share, you would use the following example.
net share MyShareName=c:TempData /remark:"Temp Work Area"
This command shares the c:TempData folder with the share name MyShareName and includes a description of Temp Work Area.
You must have administrative privileges to create a shared folder by using Net Share.
Review the additional command-line options that you can use with Net Share, as shown in Table 2-18.
TABLE 2-18 Net Share command-line options
Option |
Description |
|---|---|
/Grant:user permission |
Enables you to specify Read, Change, or Full Share permissions for the specified user |
/Users:number |
Enables you to limit the number of users who can connect to the share concurrently (default and maximum for Windows 10 is 20 users) |
/Remark:”text” |
Enables you to add a description to the share |
/Cache:option |
Enables you to specify the offline files caching options for the share |
sharename /Delete |
Enables you to remove an existing share |
Note Sharing Caution
The Net Share command will not create a folder and share it. You can only share folders that already exist on the computer.
Sharing by using Windows PowerShell
If you need to script the creation of shares, Windows PowerShell is the most appropriate choice and provides several cmdlets that enable you to manage shares in Windows 10. Windows PowerShell offers more in both scope and functionality than Net Share and will continue to expand in the future.
An example command for creating a share is:
New-SmbShare -Name MyShareName -Path c:TempData
Other Windows PowerShell cmdlets used in the administration of shares are shown in Table 2-19.
TABLE 2-19 Windows PowerShell Share cmdlets
Cmdlet |
Description |
|---|---|
Get-SmbShare |
Lists the existing shares on the computer |
Get-SmbShareAccess |
Lists the access control list of the SMB share |
New-SmbShare |
Creates a new SMB share |
Set-SmbShare |
Modifies the properties for an existing share |
Remove-SmbShare |
Deletes an existing share |
Grant-SmbShareAccess |
Sets the share permissions on an existing share |
Get-SmbShareAccess |
Lists the current share permissions for a share |
Note Multiple Shares
Sometimes you might want to provide different groups access to the same shared resources. You can share the same folder multiple times and use a different share name and share permission settings for each instance. Each group should only be able to access the share that they have permission for.
Shared folders permissions
Permissions that are set on the share determine the level of access a user has to the files in the share. They can be set on FAT or later file systems. When you use the NTFS file system, be careful not to restrict access at the share level, because this might affect the effective permissions. You can configure the permissions when you share a folder and set a level that the user or group will have when they connect to the folder through the share across the network.
Sharing permissions have three options.
Read Users and groups can view the files, but they cannot modify or delete them.
Change Users and groups can open, modify, delete, and create content, but they cannot modify file or folder permissions; the Change permission incorporates all Read permissions.
Full Users and groups can perform all actions, including modifying the permissions; the Full permission incorporates all Change permissions.
Unlike in earlier versions of Windows, there is no longer a visual icon or indicator in File Explorer to distinguish whether a folder is shared. All shared folders on your device appear in the Shared Folders node of the Computer Management console. You can also view the shared folders that exist on your device by using the Get-SmbShare Windows PowerShell cmdlet or typing net view \localhost /all at the command prompt.
After a user has found the share in File Explorer, they can access the files directly. Another common way that users can connect to a shared folder over the network is by using the shares Universal Naming Convention (UNC) address. UNC addresses contain two backward slashes (\) followed by the name of the computer that is sharing the folder and the shared folder name; for example, the UNC name for the Marketing shared folder on the LON-DC1 computer in the Fabrikam.com domain would be:
\LON-CL1.Fabrikam.comMarketing
Configure public folders
Windows 10 continues to provide support for public folder sharing, which can offer a simplified way to make files that you copy into a public folder immediately available to other users on your computer or network.
Public folder sharing is not enabled by default in Windows 10, but when it is turned on, anyone with a user account on your computer, or any Windows device on your network, can access the contents of the public folders, and the default permissions for public folders enable members of the Everyone group to read, write, change, and delete any public files. Even if a computer is joined to or has a HomeGroup configured, then public folders are still available.
By default, Windows 10 provides the following public folders.
Public Documents
Public Downloads
Public Music
Public Pictures
Public Videos
To share something publicly with your friends or colleagues, copy or move it into one of the public folders. You can navigate to these folders directly in File Explorer from the %systemdrive%UsersPublic folder.
To turn on the Public folder-sharing feature, follow these steps.
Open Network And Sharing Center.
Click Change Advanced Sharing Settings.
Expand the All Networks profile section.
In the Public Folder Sharing section, select Turn On Sharing So Anyone With Network Access Can Read And Write Files In The Public Folders.
Click Save Changes.
Accept the UAC if prompted.
To turn off public folder sharing, select Turn Off Public Folder Sharing in the Network And Sharing Center.
Public folder sharing does not allow you to fine-tune sharing permissions, but it does provide a simple and user-friendly way for users to make their files available to others.
When you enable public folder sharing, the Everyone system group is granted full control permissions for the share and underlying folder permissions.
Configure OneDrive
OneDrive is a cloud-based service designed for storing files and synchronizing settings aimed at the consumer market. Microsoft gives each user 5 gigabytes (GB) of free cloud storage for personal use. To access the service, the user must use a Microsoft account, and the service can be accessed natively from a computer or smartphone. Consumers can upgrade their personal OneDrive account to an Office 365 Home subscription which offers additional software benefits and 1 terabyte (TB) of OneDrive storage space.
A business-oriented service called OneDrive For Business is based on Microsoft SharePoint technologies; it stores data in a specialized library in the cloud. OneDrive For Business plans are available which allow business usage and can be purchased as a standalone plan, or as part of an Office 365 Business or Enterprise subscription. You can add multiple OneDrive for Business accounts to your device, but only one personal account can be added.
OneDrive desktop app
OneDrive is integrated with Windows 10, using the OneDrive app, and when you sign in to Windows with a Microsoft account, a OneDrive folder is created in File Explorer at C:Users UsernameOneDrive.
To protect against data loss, you are advised to use OneDrive as your preferred location for all your data. When you add, modify, or delete files stored in the OneDrive favorite, your changes are replicated to OneDrive as long as you are online.
If you are using an operating system other than Windows 10, you might still be able to use the OneDrive desktop app; it is available to download from https://onedrive.live.com/about/en-us/download/ or the Microsoft Store, and is supported on the following operating systems:
32- or 64-bit version of Windows Vista with Service Pack 2 or later
Windows Server 2008 with Service Pack 2 or later
Mac OS X 10.9 or later
iPhone, iPad, or iPod touch with iOS 9.0
Android
Windows Phone 7.5 or later
Xbox
The OneDrive app, located in the taskbar notification area, enables you to modify synchronization settings. You can choose to synchronize all or selected files and folders from your cloud storage account to your device.
The OneDrive desktop app and sync client is now pre-installed on Windows 10 devices and allows you to access your files stored in your online OneDrive if you use a Microsoft account to sign into the app.
Once the app is configured, you can open File Explorer and see a OneDrive icon which is where the files that you want to be kept in sync will be stored on your PC locally. By default nothing is stored–you must select files and folders and then they will be available.
If you add a new folder in the OneDrive folder within File Explorer, this will be available immediately in the cloud version of OneDrive and will be synchronized.
To configure OneDrive to synchronize folders from your OneDrive to your device, use these steps:
Right click the OneDrive icon in the notification tray and select Settings.
On the Account tab, select Choose Folders.
On the Sync your OneDrive files to this PC use the checkboxes to select the folders and files that you want to sync.
Click OK.
On the Account tab, click OK.
The files will commence downloading immediately and the OneDrive app will monitor changes to local files and also your cloud-based files, and maintain the synchronization.
On the notification area, the OneDrive for Business desktop app is colored blue whereas the consumer version is white. When displayed in File Explorer, both icons are blue, and the name of the account is listed after the business version to help differentiate.
OneDrive Files On Demand
OneDrive Files On Demand is a new feature available within OneDrive, which is available in the Windows 10 1709, Fall Creators Update. This will allow all your files and folders stored in OneDrive to be viewable within File Explorer on your PC without them actually being downloaded to your hard drive. You will be able to change each file and folder status, to configure whether the resource should be stored locally.
The reason for mentioning this feature in a book focused on the Windows 10 1703, Creators Update, is that the OneDrive file placeholders was previously available in Windows 8 and removed in the initial Windows 10 release. Some readers may expect to see this feature in Windows 10, and they need to appreciate that is was removed, but that it will return in the 1709 version.
Once released, the feature will be integrated into the initial OneDrive setup or if you have upgraded your PC, you will need to turn on the Files On Demand feature. You can turn on the Files On Demand feature by using these steps.
Sign in to OneDrive using your Microsoft account,
Right-click the white or blue OneDrive cloud icon in the notification area.
Select Settings.
On the Settings tab, select the Save Space And Download Files As You Use Them Box, from the Files On Demand section.
Once enabled, placeholders for all of your OneDrive content will be displayed in File Explorer. If you want to hide any folders from appearing in the OneDrive location in File Explorer, for example for privacy reasons, you can hide them by using these steps.
Sign in to OneDrive using your Microsoft account.
Right-click the white or blue OneDrive cloud icon in the notification area.
Select Settings.
On the Account tab, select the Choose Folders option from the Choose Folders area.
Clear the check box next to the folder you want to hide on this device.
Once the OneDrive desktop app has retrieved a list of all files and folders from your OneDrive cloud account can browse to your OneDrive folder and see new cloud icons next to each item indicating the status of the file or folder availability as follows:
Online-only files Online-only files are placeholders only and don’t use space on your computer. If you open the file and your device is connected to the Internet, it is downloaded and opened.
Locally available files Once you have downloaded and opened any of your OneDrive files, they become locally available. You can open a locally available file anytime, even without Internet access. To remove the local copy of the file, you can right-click the file and select “Free up space.”
Always available files If you make files “Always keep on this device” they will have the green circle with the white check mark. These files will be downloaded to your device and will be always available even when your device is not connected to the Internet.
OneDrive web portal
Although integration is tight between the Windows 10 OneDrive app and the online version of OneDrive, the online version currently has slightly more functionality, although it can be slower to manipulate your files, depending on available bandwidth.
In the portal, users can:
Manage all their files stored on OneDrive.
Access previous versions of files.
Access the OneDrive Recycle Bin.
Buy more storage (Office 365 subscription-based).
Configure advanced sharing options for files and folders.
Create Microsoft Excel surveys.
Users of mobile phones can also allow the automatic upload of all photos to their private OneDrive photos folder. With photos consuming some of your free 5 GB cloud storage each time you take a picture, you may be surprised at how quickly the quota is used up, but adding additional storage is relatively inexpensive. If you subscribe to Office 365, OneDrive comes with 1 TB of storage and the ability to install Office applications locally on your PC, Mac, or iPad.
In OneDrive, you can access Microsoft Office Online, which enables you to create Word, Excel, Microsoft PowerPoint, and Microsoft OneNote files. After you create an Office online file, you can share the documents online, collaborate with other users, and edit documents at the same time. In addition, you can create text documents and Excel surveys. The surveys are simple; others can fill them out just by opening the link to the survey. You then see everyone’s response compiled in the online spreadsheet.
Privacy is a significant concern for many users, especially when discussing personal data. Although OneDrive is aimed at consumers and is therefore not suitable (or licensed) for use with enterprise data, Microsoft has upgraded the level of security and encryption to protect data held on the OneDrive service. Data is now protected with Perfect Forward Secrecy (PFS) encryption when you access OneDrive through the web portal, onedrive.live.com, mobile OneDrive application, and OneDrive sync clients.
Fetch files on your PC
Another unique feature in the OneDrive desktop app is the ability to retrieve any file remotely from the computer with the app installed, from any web browser. To enable this setting, follow these steps.
Sign in to Windows 10 with a Microsoft account.
Right-click the OneDrive app in the taskbar notification area.
Click Settings.
Select the Settings tab.
Select Let Me Use OneDrive To Fetch Any Of My Files On This PC and click OK, as shown in Figure 2-38.
FIGURE 2-38 OneDrive desktop app settings Restart the OneDrive app to complete the process.
Ensure that the device you want to connect to is powered on and connected to the Internet.
Open OneDrive in your browser. Click the PC link on the left. A new browser windows will launch with the list of Windows 10 devices expanded on the left. From the list of devices, select the PC that you want to retrieve files from.
Although Mac users can use OneDrive and download the OneDrive app, they can’t fetch files from a Mac.
![]() Exam Tip
Exam Tip
The Fetch Files On Your PC setting is a rarely used feature and could be included in the exam. Be sure you know how to enable it. Visit the Office support resource at: http://aka.ms/fetch-files-on-your-PC to obtain some additional information about the setting.
Configure File System permissions
Most users are familiar with using the File Explorer tool to view and manage files and folders. When administrating shared files and folders over a network, this is still the primary tool to configure file- and folder-level permissions. Although permissions have been part of NTFS and earlier versions of Windows, ensure that you are familiar with the changes offered in Windows 10.
Use File Explorer to manage files and folders
The most common tool used is File Explorer, which is located on the taskbar and the Start screen. Typical functions provided through File Explorer include:
Creating new folders and files.
Viewing and accessing files and folders.
Searching for files and information contained in files.
Managing properties of files and folders.
Previewing contents or thumbnails of files and folders.
The quick access area is new in Windows 10 and appears at the uppermost left area of the File Explorer navigation pane; it includes pinned shorts for the Desktop, Downloads, Documents, Pictures, and Music. As you browse and access files in other folders on your computer, folder shortcuts for these items appear in the right navigation pane under Frequent Folders or Recent Files. You can modify the behavior of Quick Access by right-clicking Quick Access and selecting Options, as shown in Figure 2-39.
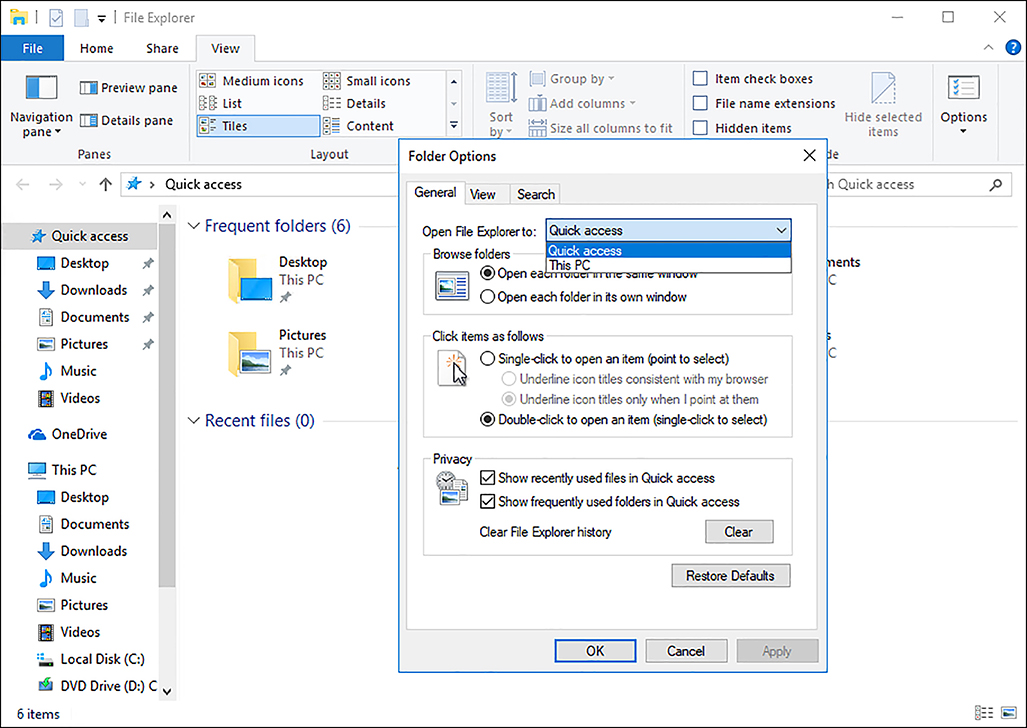
On a shared computer, you might want to clear the check boxes for Show Recently Used Files In Quick Access and Show Frequently Used Folders In Quick Access.
Set file and folder permissions
Volumes formatted using either NTFS or the newer ReFS enable you to configure file and folder permissions. NTFS permissions are robust, reliable, and effective and enables you to configure granular permissions on both files and folders that determine how individual users and groups can use the objects.
The creator of the resource, such as a file or folder, is automatically assigned the special status of creator-owner, and they can grant or deny permissions to it. Administrators and anyone given the Full Control permission also can modify permissions for that file or folder.
To modify permissions to a file or folder, access the Security tab in the object’s properties, as shown in Figure 2-40.
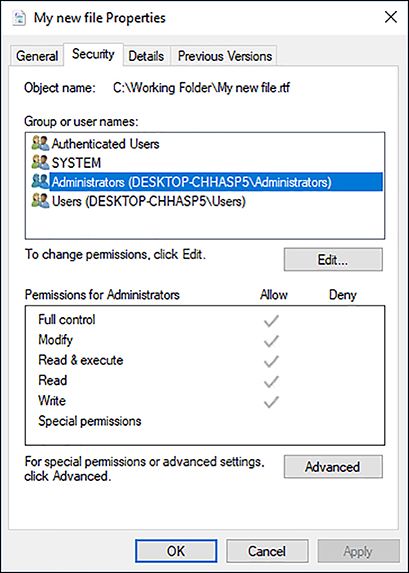
If a user leaves the organization or the account is deleted, an Administrator can take ownership of the files and folders to modify permissions by changing the Owner principal in the Advanced settings in Properties.
If you have the permission to modify the security settings in the access control list (ACL), you can add or remove users or groups and then grant or deny a specific permission level. In organizations, you assign permissions to groups rather than to multiple users because this minimizes administrative effort.
Review the acronyms relating to objects that you might use when applying security permissions, as shown in Table 2-20.
TABLE 2-20 Security Permission acronyms
Name |
Acronym |
Description |
|---|---|---|
Access control list |
ACL |
A list of users and groups with permissions on the object |
Access control entry |
ACE |
Identifies specific permissions granted to a user or group |
Discretionary access control list |
DACL |
Specifies which user has access to the object |
System access control list |
SACL |
Specifies which users and groups will be audited when they perform actions such as creating, modifying, or deleting files |
When assigning permissions to several groups, remember that the security settings have a cumulative effect; you should review the effective permissions obtained for the user by following these steps.
Open Windows Explorer.
Navigate to the file or folder whose effective permissions you want to view.
Right-click the file or folder, click Properties, and click the Security tab.
Click Advanced and then click the Effective Access tab.
Next to the User/Group, click Select A User.
On the Select User Or Group dialog box, click in the Enter The Object Name To Select (Examples) box, enter the name of a user or group, and then click OK.
Click View Effective Access.
You should now see the detailed effective permissions of the user or group for that file or folder.
When configuring permissions for files and folders, you can configure basic or advanced permissions. Unless you are seeking a very fine degree of control to a resource, you typically work with basic permissions and assign them to groups and users, as shown in Table 2-21.
TABLE 2-21 Basic file and folder permissions for NTFS and ReFS
File permission |
Description |
|---|---|
Full Control |
Complete authority and control of all file or folder permissions. |
Modify |
Ability to read a file, write changes to it, and modify permissions. |
Read & Execute |
Ability to see folder content, read files and attributes, and start programs. |
Read |
Ability to read a file but not make any changes to it. |
Write |
Ability to change folder or file content and create new files. |
Special Permissions |
Indication of whether additional advanced permissions have been configured for the file or folder. |
Note Basic and Advanced Permissions
If you are familiar with older versions of Windows, you might notice that Windows 10 uses the modern naming for permissions as follows: Standard Permissions has been changed to Basic Permissions, and Special Permissions has been changed to Advanced Permissions.
Basic permissions are easier to manage and document. Under the hood, a basic permission is made from a combination of individual advanced special permissions. Consider that permissions for folders can have a different effect on files, as described in Table 2-22.
TABLE 2-22 Basic NTFS file and folder permissions
Basic Permission |
Description: When Applied to a Folder |
Description: When Applied to a File |
|---|---|---|
Full Control |
Permits reading, writing, changing, and deletion of files and subfolders. Allows the modification of permissions on folders. |
Permits reading, writing, changing, and deletion of the file. Allows modification of permissions on files. |
Modify |
Permits reading, writing, changing, and deletion of files and subfolders. Does not allow changes to permissions on folders. |
Permits reading, writing, changing, and deletion of the file. Does not allow changes to the permissions on files. |
Read & Execute |
Allows the content of the folder to be accessed and executed. |
Allows the file to be accessed and executed (run). |
List Folder Contents |
Allows the contents of the folder to be viewed. |
Does not apply to files. |
Read |
Allows content to be read. |
Allows access to the contents. Does not allow files to be executed. |
Write |
Allows addition of files and subfolders to the folder. |
Allows a user to modify but not delete a file. |
Behind the basic permissions is a matrix of 13 advanced permissions that can also be applied to files and folders. Each basic permission is a collection of one or more advanced permissions, as shown in Table 2-23.
TABLE 2-23 Basic and advanced permissions
Advanced Permission |
Full Control |
Modify |
Read & Execute |
List Folder Contents |
Read |
Write |
|---|---|---|---|---|---|---|
Traverse Folder/ Execute File |
X |
X |
X |
X |
|
|
List Folder/Read Data |
X |
X |
X |
X |
X |
|
Read Attributes |
X |
X |
X |
X |
X |
|
Read Extended Attributes |
X |
X |
X |
X |
X |
|
Create Files/Write Data |
X |
X |
|
|
|
X |
Create Folders/ Append Data |
X |
X |
|
|
|
X |
Write Attributes |
X |
X |
|
|
|
X |
Write Extended Attributes |
X |
X |
|
|
|
X |
Delete Subfolders And Files |
X |
|
|
|
|
|
Delete |
X |
X |
|
|
|
|
Read Permissions |
X |
X |
X |
X |
X |
X |
Change Permissions |
X |
|
|
|
|
|
Take Ownership |
X |
|
|
|
|
|
It is recommended to use basic permissions unless there is a clear requirement for setting advanced permissions; otherwise, they can become complex and difficult to troubleshoot. If you do use the advanced permissions, it is best practice to document any modifications so that you can review the configuration and, if necessary, reverse the settings.
Many inexperienced users who configure NTFS permissions can complicate the settings on files by setting advanced permissions, frequently using deny permissions, and setting for individual users instead of for groups. There is a strict canonical order or hierarchy of how Deny and Allow permissions can interoperate, and the general rule is that a Deny setting prevents an Allow setting.
![]() Exam Tip
Exam Tip
Remember the principle of least administration when applying NTFS or ReFS permissions. If you want to prevent a user or group from having any access to a resource, you could set no permissions. If neither Allow nor Deny permission is explicitly configured or inherited on a resource, users are prevented from accessing the file or folder.
Review Table 2-24 to understand the relationship between Deny and Allow settings and how the behavior changes, depending on how the setting is applied.
TABLE 2-24 Allow and Deny NTFS permissions
Permission Type |
Description |
Check box status |
|---|---|---|
Explicit Deny |
The user is denied the permission on the file or folder. |
Check box is selected. |
Explicit Allow |
The user is allowed the permission on the file or folder. |
Check box is selected. |
Inherited Deny |
Deny permission is applied to the file or subfolder by virtue of permissions given to the parent folder. |
Check box is dimmed but selected. |
Not configured |
When no permissions are assigned, the user has no permission to access the file or folder. |
Check box is cleared. |
Inherited Allow |
Allow permission is applied to the file or subfolder by virtue of permissions given to the parent folder. |
Check box is dimmed but selected. |
Note When Allow Overrides Deny
When applying permissions to groups and allowing inheritance, sometimes one group has an explicit Allow setting, and another group has an inherited Deny setting. If a user is a member of both groups, the Allow setting will override the implicit Deny.
Although the majority of administrators will use File Explorer to set individual ACLs for files and folders, you can also use Windows PowerShell or the ICACLS command-line utility.
Windows PowerShell offers two cmdlets that you can use to manage file and folder permissions: Get-Acl and Set-Acl. For additional information and examples of how to use these cmdlets, type Get-Help Get-Acl, or Get-Help Set-Acl.
ICACLS enables you to configure and view permissions on files and folders on a local computer. Some of the most common ICACLS parameters and permission masks are shown in Table 2-25.
TABLE 2-25 Common ICACLS parameters and permission masks
Parameter/ Permission Mask |
Description |
|---|---|
/grant |
Grants specific user access rights. Permissions replace previously granted explicit permissions. |
/deny |
Explicitly denies specified user access rights. An explicit Deny ACE is added for the stated permissions, and the same permissions in any explicit grant are removed. |
/reset |
Replaces ACLs with default inherited ACLs for all matching files. |
F |
Full access. |
M |
Modify access. |
RX |
Read and execute access. |
R |
Read-only access. |
W |
Write-only access. |
(OI) |
Object inherit. |
(NP) |
Do not propagate inherit. |
To grant a permission, use the /grant switch, as the following example on an existing file called My New Files within the C:Working Folder shows.
Open File Explorer.
Navigate to the folder on which you want to set permissions.
Click File and then click Open Windows PowerShell as Administrator
Type the following command.
Icacls 'My new files.rtf' /grant 'Demo:(OI)(M)'
Type Icacls 'My new files.rtf' to view the permissions.
Need More Review? ICACLS
This Microsoft resource provides additional information for you to review relating to ICACLS. Visit: https://docs.microsoft.com/en-us/windows-server/administration/windows-commands/icacls.
Understand NTFS inheritance
Setting NTFS permissions on hundreds of files and folders would take a long time, especially if each setting were configured manually. Fortunately, you don’t need to because by default NTFS and ReFS security permissions are inherited from their parent folder.
You can review the inheritance status of a file or folder in File Explorer by following these steps.
Open File Explorer.
Navigate to the folder whose inheritance settings you want to review.
Right-click the file or folder, choose Properties, and click Advanced.
On the Permissions tab, review the permission entries and notice the Inherited From column, as shown in Figure 2-41.
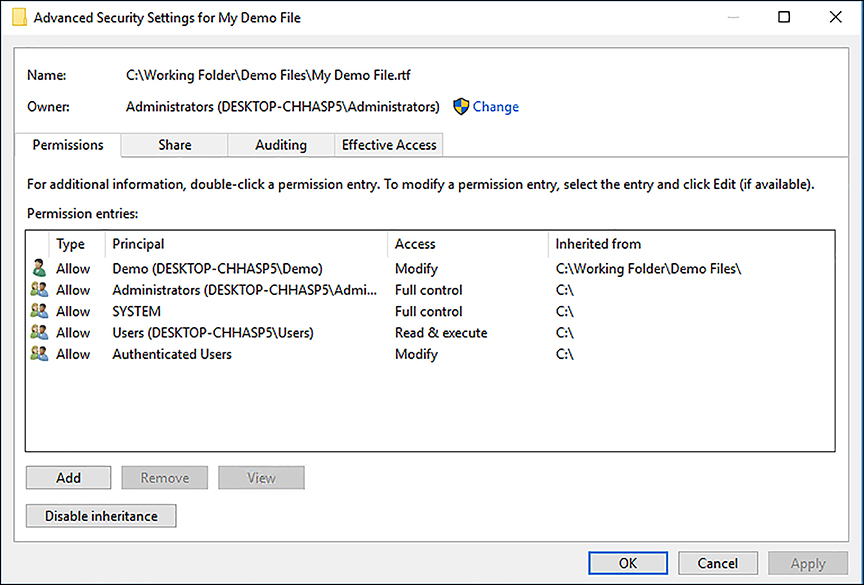
FIGURE 2-41 NTFS inheritance
Figure 2-41 shows a Disable Inheritance button. If you select this button, you are presented with the following choices.
Convert Inherited Permissions Into Explicit Permissions On This Object
Remove All Inherited Permissions From This Object
The option to convert inherited permissions to explicit permissions on this object stops inheritance from flowing from the parent folders and changes the permissions on all child items from implicit permissions to explicit permissions. You can then modify the permissions.
If you choose the second option, Remove All Inherited Permissions From This Object, you completely remove all permissions. This provides you with a folder structure with no permissions at all.
Both of these options are powerful. Best practice recommends employing inheritance wherever possible, to ease administration. You should also document and test your outline folder structure before it becomes too large. A big change on a small structure is simple to put in place, whereas modifying a large, established file structure could be cumbersome.
Configure OneDrive usage
After it is configured, OneDrive can provide you with a reliable and robust service that is very economical to use. Across the world, millions of users access OneDrive, and for many users this is their first experience of the cloud. Users can use the web portal interface or the OneDrive app and work seamlessly between both.
As a cloud service, OneDrive might become unavailable, but this is rare. The underlying backend infrastructure is designed to withstand multiple levels of failure and resiliency; often, any connection glitches will be local to the user rather than at the data center.
This section reviews how to perform some tasks in OneDrive to ensure that you can access your files and share them easily.
Share files with OneDrive
By default, three folders are created on a newly configured OneDrive account: Documents, Pictures, and Public. For the Documents and Pictures folders, sharing is turned off by default, and you are the only one who can access the content. To share a file or folder, you configure the share permissions so that they become publicly accessible. This can be easily achieved by moving, copying, or creating files or folders in the Public folder. The Public folder has the default share permissions of View for Everyone, which means anybody can see the contents, but they cannot edit any documents in that folder.
When you create a new file or folder in OneDrive, you can choose how you want to share it; the default share permission is Allow Editing. If you right-click the folder, or select it and click Share, you can generate a URL link to send to someone, or OneDrive can email them the link for you, as shown in Figure 2-42. You can modify the share permission and include a personal message to accompany the shared link.
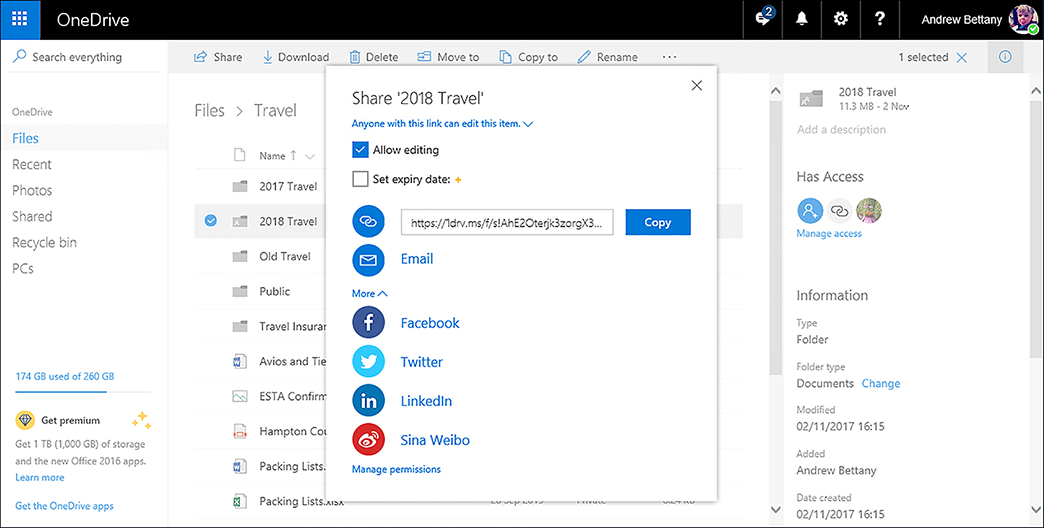
If you click the Manage Permissions link, the right pane appears, and you can invite individuals or groups, and modify share permissions. You can also copy or delete any links to the shared resource.
Sharing is limited to granting view (read-only) permission or edit permission. You remain the owner of your files and can control who has access to your files.
For files that you want to share with a larger audience, for example, an Excel survey, you can also publish a link to an item directly to social media, such as Facebook, Twitter, LinkedIn, or Sina Weibo.
To stop sharing or modify permissions, select the shared item and, in the right pane, click the drop-down Can Edit button under the user account and then click Stop Sharing.
Recover files from OneDrive
From File Explorer, you can use the Recycle Bin to recover deleted files. OneDrive offers the same functionality and because the OneDrive service is synchronized through the OneDrive app, you can continue to use Recycle Bin in File Explorer; your deleted OneDrive files will be waiting to be recovered.
If you realize immediately that a file or folder has been deleted accidently when you are online, you can use the Undo feature from the OneDrive web portal.
The Undo feature works in a fashion similar to the one in an Office document in that if you delete an object in OneDrive by selecting Delete on the context menu, you see an option to Undo the operation. Click the Undo button to restore the deleted file immediately.
Note Disappearing Undo
After deletion, the Undo option remains visible for approximately 10 seconds only. After this time, the message automatically closes, and you must restore it from the Recycle Bin folder.
Recycle Bin offers similar functionality to that found in File Explorer. Click Recycle Bin in OneDrive and you see that files that have been deleted are listed in alphabetical order. You can sort the Recycle Bin items by name, original location, date deleted, and size. Select the items you want to restore and then click the Restore button, as shown in Figure 2-43. If all the files in Recycle Bin require restoring, you can use Restore All Items which will appear if not selection is made.
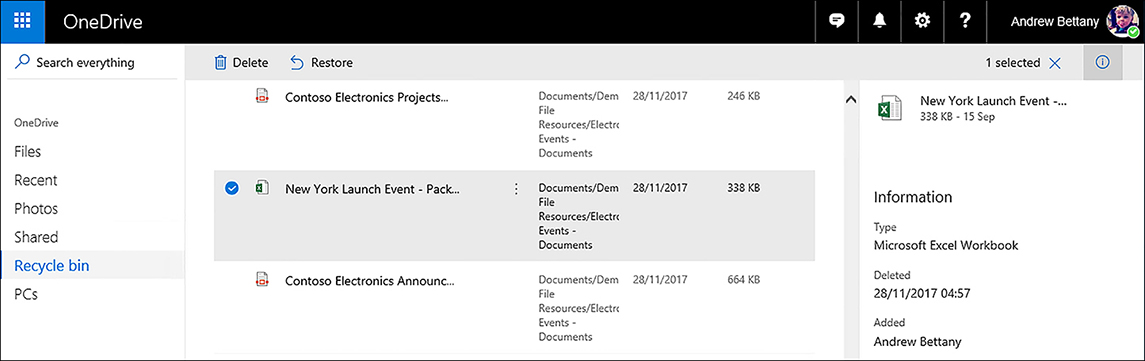
If you click Delete while you have selected files or folders in the Recycle Bin, the items will be permanently deleted.
OneDrive and Windows 10 synchronize the Recycle Bin entries that relate to the OneDrive folder on the PC and deletions online. Recycle Bin stores items for a minimum of three days and up to a maximum of 90 days, with the default capacity of the Recycle Bin set to 10 percent of the total storage limit.
When the online Recycle Bin becomes full, old files that are less than 90 days old are also deleted to make room for new items.
Block access to OneDrive
In an enterprise environment, you might want to prevent your users from accessing OneDrive from domain-enrolled devices. Because you cannot implement policies to restrict or control what data is copied to or from OneDrive, a possible solution is to block all OneDrive access. This can be accomplished by using Group Policy and can be implemented at the domain level or on individual devices as follows.
Type gpedit.msc to open the Local Group Policy Editor.
Navigate to the Computer ConfigurationPoliciesAdministrative Templates Windows ComponentsOneDrive node.
Enable the Prevent The Usage Of OneDrive For File Storage policy setting.
When applied, this Group Policy setting prevents the user from starting the OneDrive app, and they receive a notification that the use of OneDrive has been blocked. In addition to blocking the app, consider also restricting access to the OneDrive web portal by adding the https://onedrive.live.com URL to the block list on your organizational firewall. This would also prevent access from all devices, including users’ personal devices.
OneDrive synchronization
The OneDrive synchronization client provided with Windows 10 enables OneDrive users to choose specific folders to sync to the desktop. In this way, you can select only the content that you want to be available on specific devices instead of syncing an entire library of files.
Troubleshoot data access and usage
It can be frustrating when you use a system and something goes wrong. Understanding common areas that can pose problems and their resolutions can often reduce frustration and prevent data loss. Often, the only time you think about troubleshooting and recovery is at the very time a computer fails. Often, this is too late to help. Windows 10 introduces some new features and offers several strong data recovery and restoration tools, which you will review in troubleshooting scenarios.
Troubleshoot data access
Access Denied is not a helpful message, even for experienced administrators. The message tells you that you do not have the necessary level of privilege to access the resource. This can relate to the following.
User rights assignments
Security options and permissions
A user rights assignment might mean that you are not allowed to carry out a task, such as accessing the system remotely over the network, or you are not allowed to shut down a system or take ownership of a file. These rights are configured as part of Group Policy, and you can familiarize yourself with the types of circumstances that can be managed by using user rights assignments in Computer ConfigurationWindows SettingsSecurity SettingsLocal PoliciesUser Rights Assignment, as shown in Figure 2-44.

If you see that user rights are affecting users, you can modify the group membership that relates to the setting or, if the policy has been set in error, you can disable the setting.
Security options often relate to object permissions (such as devices, resources, shares). They can permit or deny the ability of the user to perform a task, such as to:
Sign in using a Microsoft account.
Influence how UAC affects users with administrative accounts.
Prevent anonymous access to shares.
Deny access to a device outside of normal office hours.
These permissions are normally configured in a domain environment, but you can also familiarize yourself with them through local Group Policy to see the types of security policies that can be managed using Security Options, which you can find in Computer Configuration Windows SettingsSecurity SettingsLocal PoliciesSecurity Options, as shown in Figure 2-45.

Reviewing the settings and establishing which, if any, are being applied through Group Policy can give you a better understanding of whether users are being affected by these access policies.
If you use the HomeGroup feature, there is a useful troubleshooting wizard that can resolve connection issues with HomeGroup resources over the network. To launch the HomeGroup troubleshooter, type HomeGroup in Search and select Find And Fix Problems With HomeGroup.
Troubleshoot share and NTFS permissions
It can be easy when combining share and NTFS permissions to restrict access to resources across the network. By accepting the default share permissions, you provide standard users with only read access even if NTFS permissions are less restrictive.
Unfortunately, there is no wizard to diagnose which restrictions are in effect, but you can use the Effective Permissions feature in NTFS to determine the permissions being applied to a specific user or group (Principal).
NTFS is all about rules, and they are applied thoroughly by the file system. Wrongly applied settings, often combined with default inheritance, can instantly spread a wrongly configured setting across hundreds of files. Unlike most operations, there is no undo option.
If you simply cannot decipher which NTFS settings are creating the problems, or if the problems are too complex or widespread, you can try to reset the file and folder permissions by using the ICACLs command-line utility.
This is especially useful if you get locked out of files and folders due to incorrect or deleted NTFS permissions.
To reset permissions using ICACLS, follow these steps.
Sign in to your computer, using an administrator user account.
Open File Explorer and navigate to the folder that is giving you the problems.
On the File Explorer menu, click File and then click Open Windows PowerShell As Administrator.
Accept UAC if prompted.
Type icacls * /RESET /T /C /Q.
The process of resetting files and folders to their default settings is very quick. After the original operating system defaults have been applied, you can configure the desired settings.
Troubleshoot dynamic access control
If you use an Active Directory domain-based environment, your administrator might have deployed dynamic access control (DAC), a new way to implement a very robust method of applying data governance across resources stored in AD DS file servers.
DAC helps organizations control and audit data access by enabling you to set access controls on files and folders, based on conditions that are retrieved from Active Directory. If DAC is enabled, you see the condition statements being applied in the permission entry dialog box relating to the file or folder under review.
Need More Review? Introducing Dynamic Access Control
To read more information about scenarios and guidance to help you use and understand DAC in a domain-based environment, visit this Microsoft website at: https://docs.microsoft.com/en-us/windows-server/identity/solution-guides/dynamic-access-control--scenario-overview.
Troubleshoot data recovery
When data is deleted or lost due to hardware failure, you will often look to the current backup and restore from disk or from the cloud. Both of these solutions are slow (though often much quicker than the older method, which involved magnetic tape drives). It can take less than a second to delete a thousand files, and yet to restore them from the traditional methods can take a great deal longer. For the recovery of data from Windows 7 backups, Windows 10 retains the traditional Backup And Restore (Windows 7) tool.
In a fast-paced, mobile world, users require a more agile and self-service model of recovering files that might become corrupt.
Consider using tools such as the Previous Versions feature, which enables you to restore files to a previous state instantly and empowers users to recover files without calling the help desk.
Another restorative tool that works particularly well when a system becomes corrupted or infected with a virus or malware is to use System Restore, located on the System Protection tab of System Properties in Control Panel. The System Restore feature is disabled by default and cannot repair or restore corrupted files and folders or NTFS permissions, only the system state and registry.
Some of the advancements developed for the data center have also migrated to Windows 10. You can now employ features such as Storage Spaces, which allow for local data resilience, and the new ReFS, which offers file healing and protection features.
A trend that is likely to continue is to use the cloud to decouple data from a device and place it in the data center, where it should be more secure and significantly more resilient to hardware failures. OneDrive enables you to do this at a user level and to synchronize changes made to resources in the cloud.
Recover BitLocker encrypted drives
If you encrypt your device or hard drive by using BitLocker and use a Microsoft account, you can specify that BitLocker saves a recovery key to your Microsoft account that is located in your OneDrive. If you become locked out of your device, perhaps because you moved the hard drive to another computer, and you need to obtain your saved BitLocker recovery key, follow these steps.
Open an Internet browser.
Navigate to https://onedrive.live.com/recoverykey and sign in with your Microsoft account.
The Recovery keys for all your BitLocker-protected drives will be available.
![]() Exam Tip
Exam Tip
Remember the URL for locating the BitLocker recovery key, https://onedrive.live.com/recoverykey. In an enterprise environment, you can use Active Directory or the Microsoft BitLocker Administration And Monitoring (MBAM) tool to help you administer and manage BitLocker deployment and key recovery in enterprise environments.
Skill 2.4: Implement apps
Without apps, a computer is merely an electronic device of little practical use. However, after you install apps, the computer becomes almost infinitely useful. It is therefore important to know how to install, configure, and maintain apps on devices running Windows 10.
Windows 10 supports both desktop apps and Microsoft Store Apps. These two types of apps are installed and managed differently. Desktop apps tend to be large and complex, multipurpose software programs and are typically designed for desktop computers and laptop computers.
Microsoft Store Apps are designed to be used across multiple platforms, including on desktops and laptops and, more significantly, on smaller touch devices such as phones and tablets. Many of these Microsoft Store Apps are small and focused, designed to perform a single or small subset of tasks.
As an IT professional, you will be expected to implement and configure both desktop and Microsoft Store Apps for your users across all their devices. You will also be required to know how to configure Windows features and manage application startup behavior in Windows 10.
Configure desktop apps
Most users are very familiar with desktop apps, such as Microsoft Office 2016, and might have many years’ experience using them. Desktop apps are designed to run on more traditional computers, such as desktop and laptop computers, and might have fairly significant requirements in terms of the computer’s memory, processor, and, possibly, graphics subsystem.
Install desktop apps
There are a number of ways to install desktop apps. These include:
Installing the app interactively by using the .exe or .msi installer file that is provided on the product media, for example, a vendor-supplied DVD.
Using automatic app deployment methods such as the Microsoft Deployment Toolkit (MDT) or System Center 2012 R2 Configuration Manager.
Implementing an Active Directory Domain Services (AD DS) Group Policy Object (GPO)-based deployment method.
Building the required apps into a desktop computer image for deployment, enabling you to deploy the required apps at the same time that you deploy Windows 10.
The method you choose depends largely on the number of computers you must deploy the app to.
Install desktop apps interactively
To perform an interactive desktop app installation, insert the product DVD into your Windows 10-based computer and, typically, Windows prompts you for the next step by raising the Choose What To Do With This Disc dialog box, as shown in Figure 2-46. Normally, you would click Run Setup.exe and then follow the on-screen instructions the vendor provided. It is also possible to copy the installation files from a product DVD and place them in a shared folder on a Windows Server and then, from a Windows 10-based client computer, map a network drive and run Setup.exe.
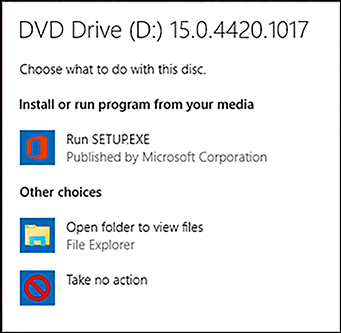
![]() Exam Tip
Exam Tip
To install desktop apps, you must have local administrator privileges. In Windows 10, all users run as standard users. User Account Control (UAC) prompts you to elevate your privileges to perform the app installation. You might be asked simply to confirm the action or to provide administrative credentials to perform the action, depending on system settings and whether the account you are using is a local administrative account. Find out more about UAC on the Microsoft website at: https://technet.microsoft.com/itpro/windows/keep-secure/user-account-control-overview.
If your app is packaged as an .msi installer file rather than as an .exe file, the Windows Installer service manages the app installation and configuration. You can use .msi installer packages to install apps locally, but you can also use automatic deployment methods to add, repair, or uninstall an app by using the installer package. In addition, .msi installer packages generally provide superior app removal to those that use an .exe installer.
Note Silent Installation
You can often silently install apps that use an .msi installer. This means that little or no user input is required to complete installation.
You can use the Msiexec.exe command from an elevated command prompt to perform desktop app installations. For example, the following command installs an app from the \LON-SVR1Apps shared folder.
Msiexec.exe /i \LON-SVR1Appsdesktop-app.msi
Need More Review? Msiexec.exe (Command-Line Options)
To review further details about using Msiexec.exe, refer to the Microsoft website at: https://msdn.microsoft.com/en-us/library/aa367988.aspx.
Install desktop apps automatically
If you have many computers to configure, performing interactive installations of desktop apps quickly becomes infeasible. In these situations, consider using an automated method to deploy your desktop apps. You can choose from a number of automated deployment methods, based on your IT infrastructure and your organizational needs.
Using GPOs to deploy apps
Using GPOs to deploy apps offers a relatively simple method for automating desktop app deployment. However, there are a number of requirements. These are that:
The target computers must be members of an AD DS domain.
Your apps must be available as .msi installer packages.
When you use GPOs to deploy your apps, you can target the app deployment to container objects in your AD DS environment: site, domain, or organizational unit (OU). By using GPO filtering, you can also deploy apps to specific users or computers, perhaps by creating Windows Management Instrumentation (WMI) filters that target specific computers based on their hardware or software characteristics.
There are two deployment types that you can use when considering GPOs. These are:
Assign Assigned apps are automatically installed. If you assign an app to a user, the app is installed when the user signs in. If you assign the app to that computer, it is installed when the computer starts.
Publish Published apps can be installed by the user from Control Panel in Programs And Features. You can only publish apps to users, not to computers.
However, GPO deployment has a number of potential drawbacks, such as:
No scheduling capability Your apps deploy the next time a GPO refresh occurs.
No reporting function It is not easy to verify successful deployment of or updates to your apps.
If you have a very large number of computers, or a range of device types and users’ needs, GPO-based deployment can be difficult to target correctly, and it is harder to maintain apps by using GPOs in these more complex organizations.
Need More Review? Group Policy Software Installation Overview
To review further details about using GPOs to deploy apps, refer to the Microsoft website at: https://docs.microsoft.com/en-us/previous-versions/windows/it-pro/windows-server-2003/cc738858(v=ws.10).
Using MDT to deploy apps
One alternative to using GPOs is to use MDT to deploy your apps. MDT uses a lite-touch installation (LTI) process to enable you to deploy Windows 10 and associated apps. Using MDT requires more specialized technical skills that using GPOs, but it is not overly complex.
Note: Zero-Touch Installation
You can use MDT in conjunction with Configuration Manager to perform zero-touch installation (ZTI) of Windows 10 and associated apps in your organization.
To perform LTI deployments of apps using MDT, you need a management computer on which to install the MDT components and associated images. You also need a reference computer; this computer provides a source image that is used during the deployment process. To create your reference computer, use the following procedure:
Create an MDT task sequence (a set of MDT instructions) and a boot image for the reference computer.
This boot image contains the required elements of MDT, including the task sequence and related files.
Start the reference computer.
The required elements are transferred to the reference computer.
Deploy Windows 10 and the required desktop apps to the reference computer.
Capture an image of the reference computer.
You now have a source image built from your reference computer, based on Windows 10 and including your organization’s apps. Complete the following procedure to deploy the image to your target computers.
Copy the captured image to the management computer (with MDT installed).
Use MDT to create a new boot image and task sequence for the target computers.
Start the target computers.
The required elements are transferred to the target computer.
Run the Windows Deployment Wizard to deploy the previously captured image.
Need More Review? Deploy Windows 10 with the Microsoft Deployment Toolkit
To review further details about using the MDT to deploy Windows 10 and desktop apps, refer to the Microsoft website at: https://docs.microsoft.com/en-us/windows/deployment/deploy-windows-mdt/deploy-windows-10-with-the-microsoft-deployment-toolkit.
Using Configuration Manager to deploy apps
For very large organizations, or those with complex and diverse operating system and app deployment requirements, consider using Configuration Manager to deploy apps. You can use Configuration Manager to target deployments to groups of users or computers. You can also schedule your deployments.
To use Configuration Manager, first install the Configuration Manager client on your computers. Using Configuration Manager provides a number of advantages over previous automated deployment methods, as shown in Table 2-26.
TABLE 2-26 Benefits of using Configuration Manager to deploy apps
Feature |
Benefits |
|---|---|
Collections |
These consist of manually created groups of users or computers, or the results of queries of user or computer properties. This enables you to target your deployments very specifically. |
Multiple deployment methods |
Configure a single app deployment but provide for multiple deployment methods, depending on configured conditions. This enables you to configure an app to install locally if a user is logged on to his or her primary device but, otherwise, to stream as an App-V app if the user is logged on to a secondary device. You can also use this feature to target 32-bit and 64-bit variants of apps to the appropriate platform. |
Reporting |
This enables you to verify how successful an app deployment was after it has finished. You can also perform app deployment simulations to see what the implication of a planned deployment might be. |
Wake on LAN |
To minimize interruptions to users, you can schedule deployments to operate during nonbusiness hours and then have the target devices woken prior to deployment. |
Inventory |
This enables you to gather and maintain a software inventory of your organization’s deployed apps. |
Using Configuration Manager does require more IT infrastructure and more specialized IT skills for personnel involved in planning and performing app deployment.
Need More Review? How to Deploy Applications in Configuration Manager
To review further details about deploying apps with Configuration Manager, refer to the Microsoft website at: https://docs.microsoft.com/en-us/sccm/apps/deploy-use/deploy-applications.
Note Plan for App Deployment in Microsoft Intune
You can also use Microsoft Intune to automate deployment of your desktop app deployments. However, to use Microsoft Intune, you must first deploy the Microsoft Intune client to your organization’s computers. For further information, refer to the Microsoft website at: https://docs.microsoft.com/en-us/intune-classic/deploy-use/add-apps.
Uninstall or change a desktop app
To uninstall a desktop app, change components in an app, or repair an app, open Control Panel and then click Programs And Features, as shown in Figure 2-47. You can then locate the appropriate app, right-click it, and choose from the available options. These typically include Uninstall, Change, and, sometimes, Repair. The available options vary according to the installation method used to deploy the apps.
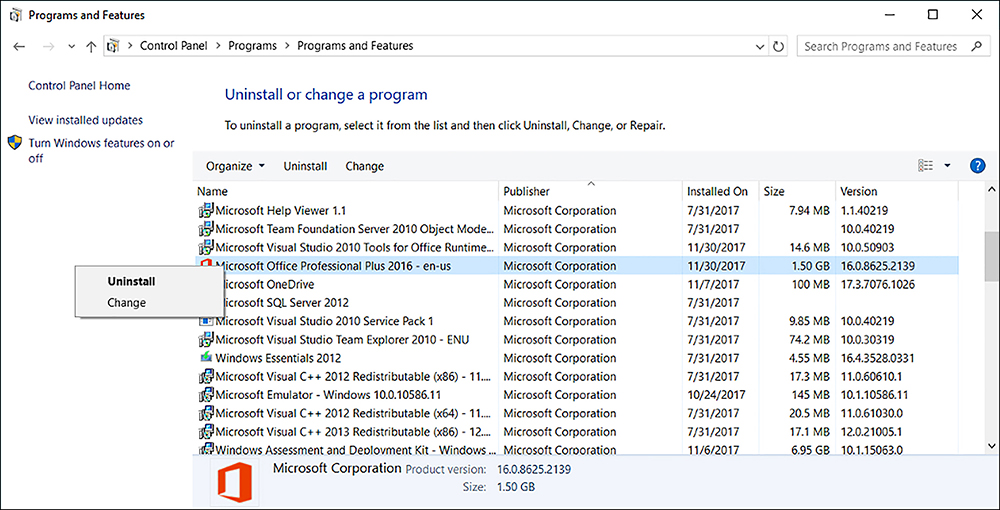
Configure app startup options
The ability to start a computer quickly is important to most users. Windows 10 has a number of features designed to help the operating system start more quickly than some earlier versions of Windows. It is important to know how to manage these startup settings to optimize Windows startup times.
Many apps have additional components that run in the background to perform automatic updates or provide user notifications of app-related events. These components initialize during startup and, in addition to consuming system resources, they can have an impact on how fast Windows 10 can start. It is therefore important to know how to manage these components.
Control Windows 10 Fast Startup
Fast Startup is a Windows 10 feature that enables Windows 10 to start more quickly. The feature achieves this by combining some of the features of Windows 10 hibernation with standard shutdown features. In essence, a hybrid hibernate/shutdown is achieved, with elements of important system files and drivers stored in the Hiberfil.sys file and used to initiate the computer more quickly during startup.
To control Windows 10 startup properly, it might be necessary to access your computer’s UEFI firmware settings. In Windows 10, this is fairly straightforward. Use the following procedure.
Click Start and then click Settings.
Click Update & Security and then click Recovery.
Under Advanced Startup, click Restart Now.
Your computer starts in recovery mode. Click Troubleshoot when prompted.
Click Advanced Options, click UEFI Firmware Settings, and then click Restart.
The procedure now varies according to the hardware vendor of your computer, but in the UEFI settings, look for and, if necessary, enable Fast Boot or Fast Startup. Save your UEFI settings and then exit; restart your computer.
After you have verified that Fast Startup is enabled in your computer hardware, you can then configure the setting in Windows 10. To do this, complete the following procedure.
From Settings, click System and then click Power & Sleep.
On the Power & Sleep tab, click Additional Power Settings.
In the Power Options dialog box, click Choose What The Power Buttons Do.
In the System Settings dialog box, click Change Settings That Are Currently Unavailable.
Under Shutdown Settings, select the Turn On Fast Startup (Recommended) check box, as shown in Figure 2-48, and then click Save Changes.
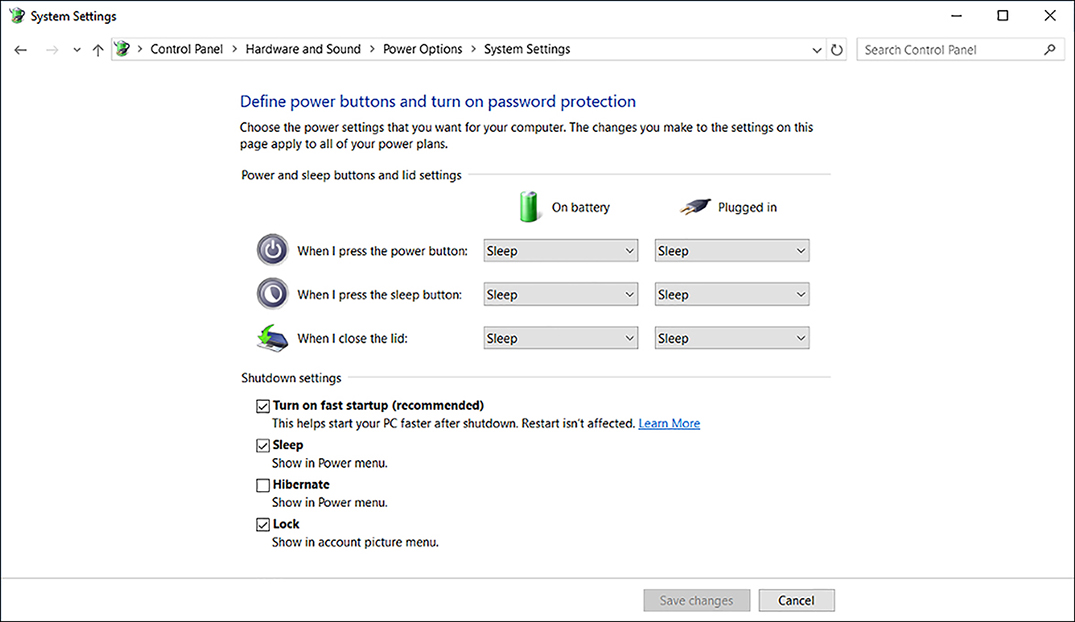
FIGURE 2-48 Configuring Fast Startup in System Settings in Power Options
Configure app startup behavior
In addition to controlling Fast Startup, you can also improve system startup time by controlling the apps that load during startup. A simple way to view and edit app startup behavior is to use Task Manager, as shown in Figure 2-49.
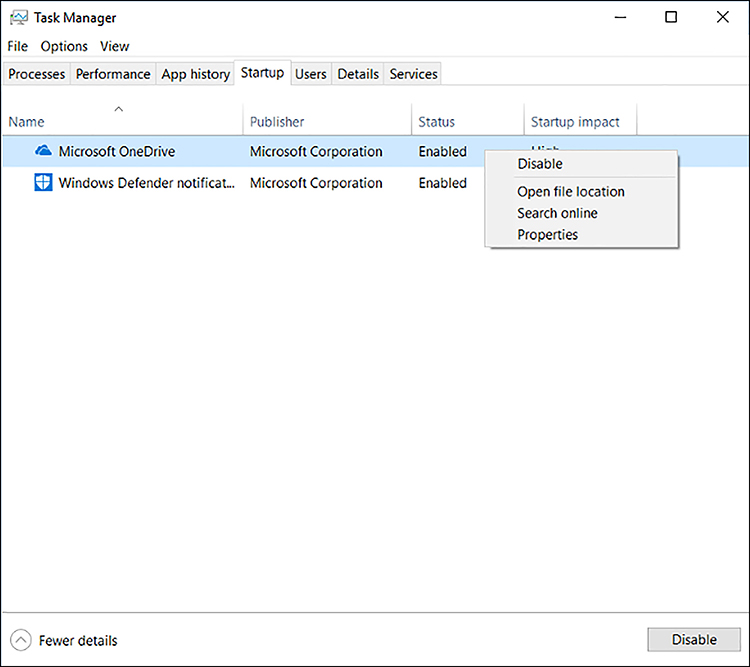
On the Startup tab, you can see that each background app running is assessed for its impact on startup. This impact is reported as None, Low, Medium, or High. If you decide that an app’s impact is too high, you can right-click the app and then click Disable. This prevents the app from running at startup.
You can also view the startup information for apps in the system registry. Open the Registry Editor (Regedit.exe) and navigate to the following two registry keys.
HKEY_CURRENT_USERSOFTWAREMicrosoftWindowsCurrentVersionRun contains the apps configured to start for a particular signed-in user.
HKEY_LOCAL_MACHINESOFTWAREMicrosoftWindowsCurrentVersionRun, as shown in Figure 2-50, contains the apps configured to start for any signed-in user.

FIGURE 2-50 The Run key in the Registry
From each of these keys, in the results pane, you can delete the listed values to prevent the associated app from running at startup. However, you should exercise caution when editing the registry unless you are comfortable with the attendant risks of making a mistake.
Configure Windows features
Windows 10 provides many features and components, not all of which are enabled by default. For example, the Client Hyper-V feature and related components are disabled by default. You can use the Settings app, Control Panel, or command-line tools to add to and remove features and components from Windows 10.
To add or remove features in Windows 10, from Settings, click System and then click the Apps & Features tab. You can see a list of installed apps, but at the bottom of this list, click the link for Programs And Features. The Control Panel Programs And Features app loads.
In Programs And Features, click Turn Windows Features On Or Off. The Turn Windows Features On Or Off dialog box appears. As shown in Figure 2-51, you can select which optional components you want to install by clicking the appropriate component. When you have finished your selection, click OK. The components and features you selected are installed.

In addition to using the Settings app, you can also enable and disable Windows features by using either Windows PowerShell or the Dism.exe command-line tool. For example, to install the Client Hyper-V components on your computer, from the Windows PowerShell Admin prompt, type the following cmdlet and press Enter.
Enable-WindowsOptionalFeature -Online -FeatureName Microsoft-Hyper-V -All
To remove features, use the Disable-WindowsOptionalFeature cmdlet.
Need More Review? Enable-Windowsoptionalfeature
To review further details about using Windows PowerShell to manage Windows features, refer to the Microsoft website at: https://docs.microsoft.com/en-us/powershell/module/dism/enable-windowsoptionalfeature?view=win10-ps.
To use the Dism.exe command-line tool, from an elevated command prompt, run the following command.
DISM /Online /Enable-Feature /All /FeatureName:Microsoft-Hyper-V
Need More Review? Deployment Image Servicing and Management Technical Reference for Windows
To review further details about using Dism.exe, refer to the Microsoft website at: https://docs.microsoft.com/en-us/windows-hardware/manufacture/desktop/dism---deployment-image-servicing-and-management-technical-reference-for-windows.
Implement Microsoft Store Apps
Microsoft Store Apps are designed to be more focused on one or a small subset of tasks and are usually optimized for a specific device type, tablet, phone, or desktop computer. The recent proliferation of these small, task-focused apps, and of the app stores used to deliver them, raises challenges for IT support staff. Because your users want to be able to use these apps across all of their devices, it is important to know how to configure your Windows 10-based devices to support the use of these new apps properly.
Manage Microsoft Store Apps
The Microsoft Store provides a single point of access for your users to browse, download, and install their apps, including both kinds of desktop apps, such as Office and Microsoft Store Apps.
Install apps
When users access the Microsoft Store, they land on the home page. Installing apps is simple. A user clicks a desired app and then clicks a button to install the app. The button might be labeled Free or Trial or appear with a price if the app is not free. When the app is installed, a tile appears in the All Apps list on Start.
![]() Exam Tip
Exam Tip
In Windows 8.1, users’ apps synchronized across their devices without action on their part. In Windows 10, users must manually install their apps across their devices.
Update apps
By default, Windows 10 checks for app updates daily and automatically updates any apps for which updates are available. If you do not want Windows 10 to update Microsoft Store Apps automatically, complete the following procedure.
Open the Microsoft Store.
Near the Search box at the top of the window, next to the account symbol, click the ellipse symbol.
Then click Settings
As shown in Figure 2-53, under App Updates, turn off Update Apps Automatically.
FIGURE 2-53 Disabling Microsoft Store automatic app updates
After you have disabled automatic app updates, you might want to update apps manually. To do this, perform the following procedure.
In the Microsoft Store, near the Search box at the top of the window, click the ellipse icon, and then click Downloads And Updates.
All apps with pending updates appear. You can tap or click Update All. Alternatively, you can select which apps to update manually.
![]() Exam Tip
Exam Tip
Although users do not need a Microsoft account to access the Microsoft Store, they must sign in with their Microsoft account to download and install apps.
Configure Microsoft Store App settings
There are a number of settings that you can use to customize Microsoft Store App settings. The first of these controls is where Windows 10 saves Microsoft Store Apps.
To configure the default file save location for Microsoft Store Apps, from Settings, click System. On the Storage tab, in the results pane, click Change where new content is saved. Then, on the Change where new content is saved page, shown in Figure 2-54, under New Apps Will Save To, click the appropriate storage location.

If you want to move existing Microsoft Store Apps to a new storage location, in the System settings app, on the Storage tab, under the Local storage heading, click This PC (C:). In the Storage usage list, click Apps & Games. Scroll down the list of apps, as shown in Figure 2-55, and click each that you want to move. Then click Move and specify a new location. Note that desktop apps are also displayed and cannot be moved in this way. You can also access the storage location for apps by selecting the Apps node in Settings, and then selecting the Apps & Features tab.
Block the Microsoft Store App
If you do not want your users to be able to access the Microsoft Store, in Windows 10 Enterprise, you can use GPOs to block the Microsoft Store App. On a single computer, using the Local Group Policy Editor, enable the following GPO value: User ConfigurationAdministrative TemplatesWindows ComponentsStoreTurn off the Store application, as shown in Figure 2-56.
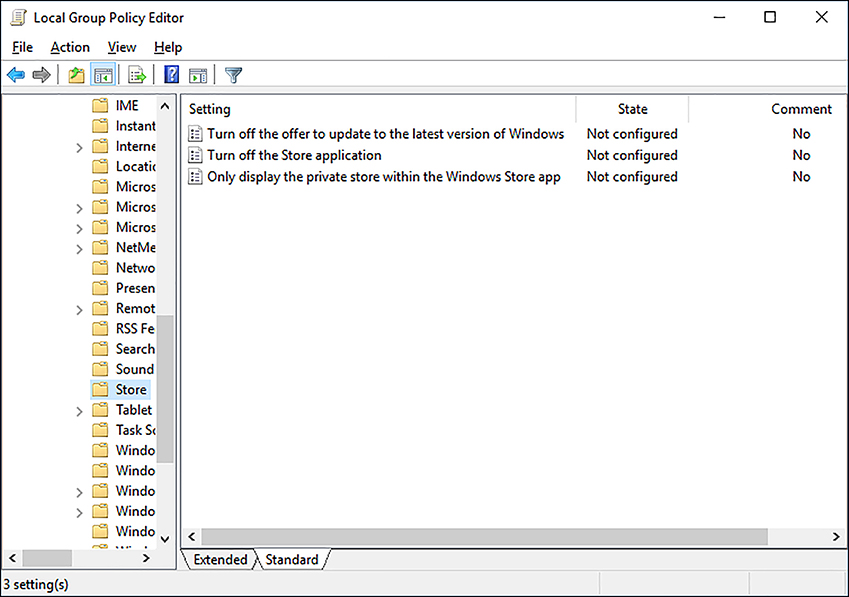
To do this in a domain environment, complete the following procedure.
Open Group Policy Management on a domain controller.
Navigate to the appropriate AD DS container, for example, your domain.
Open an existing GPO for editing or create a new GPO and link it to your chosen container and open for editing.
Navigate to the User ConfigurationPoliciesAdministrative TemplatesWindows ComponentsStore folder and open the Turn Off The Store Application value.
Enable the value, click OK, and close Group Policy Management.
For the policy to be effective, users must sign out and sign back in. Alternatively, you can issue the Gpupdate.exe /force command from an elevated command prompt to force GPO propagation.
Sideload apps
Many organizations now develop and use Microsoft Store Apps. One way to make these apps available to your users is to sideload them. Sideloading is a technique by which the app is installed without requiring access to the Microsoft Store.
When you sideload an app, you must have an .appx installer file for your app.
![]() Exam Tip
Exam Tip
Microsoft Store Apps must be digitally signed by a certificate authority that your users’ computers trust. This includes apps that you internally develop and deploy.
After you have created and packaged your app, you can use either the Dism.exe tool or Windows PowerShell to sideload and manage your custom apps. To sideload an app, use the following procedure.
Open Settings and click Update & Security.
On the For Developers tab, select Sideload Apps, as shown in Figure 2-57.
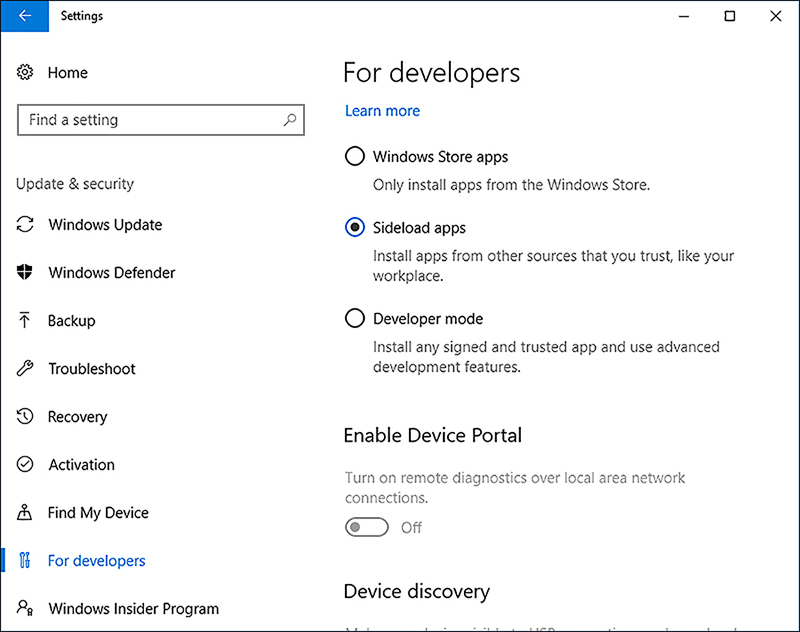
FIGURE 2-57 Enabling sideloading In the Use Developer Features dialog box, click Yes.
After you have enabled sideloading, open Windows PowerShell.
Run the add-appxpackage PATHyour_app.appx cmdlet, where PATHyour_app.appx is replaced with the specific path and file name for your app.
![]() Exam Tip
Exam Tip
If the app is signed with a certificate that your users’ computers do not trust, you must import the certificate. Locate the certificate in File Explorer, right-click the certificate file, and then click Install.
Distribute apps by using Microsoft Store for Business or the Microsoft Store for Education
Although sideloading apps is relatively straightforward, it is perhaps not the best way to distribute custom or line-of-business (LOB) apps in your organization. Consequently, Microsoft has introduced Microsoft Store for Business and Microsoft Store for Education.
The Microsoft Store for Business provides you with a means to distribute your LOB apps more easily and consistently to users’ devices within your organization. This enables you to manage and maintain these custom apps in the same way as you do commercially available apps from the Microsoft Store.
Users sign in to the Microsoft Store for Business or Education by using an Azure AD account rather than a Microsoft account. Consequently, organizations require an Azure tenant in order to make the Store available to their users.
Once a user signs in, navigation is easy. Apps are divided into categories, such as Management, Financial and so on. As shown in Figure 2-58, you can also create a private store so that users in your organization can easily view, download, and install your LOB apps.
Need More Review? Microsoft Store for Business And Education
To review further details about Microsoft Store for Business and Education, refer to the Microsoft website at: https://docs.microsoft.com/en-gb/microsoft-store/index.
Create and deploy provisioning packages
Although you can use the manual procedures outlined earlier in this section to deploy apps, for large numbers of target devices, it makes sense to try to deploy apps by using packaging and deployment tools. Windows 10 includes the ability to create and use provisioning packages.
Using provisioning packages offers benefits enabling you to:
Configure devices quickly without needing new deployment images.
Configure user-owned devices without needing to implement Multiple Device Management (MDM).
Configure multiple devices simultaneously.
Configure devices that are not connected to the corporate network.
You can use provisioning packages to perform a number of management tasks, including the following.
Deploy apps You can deploy both Windows apps and line-of-business apps.
Enroll devices into MDM You can enroll devices in Microsoft Intune or a non-Microsoft MDM service.
Distribute certificates You can distribute a root CA certificate or client certificates your organization requires.
Configure and deploy connectivity profiles You can distribute Wi-Fi, email, and VPN profiles.
Apply device policies Your policies might include settings for controlling device lock, password restrictions, encryption settings, and update settings.
Create provisioning packages
To create provisioning packages, you can use the Windows Configuration Designer tool. To use this tool, you must first install the Windows Assessment And Deployment Kit (Windows ADK).
Note Download Windows ADK
You can download the Windows ADK from the Microsoft website at: https://developer.microsoft.com/en-us/windows/hardware/windows-assessment-deployment-kit. Ensure that you download the version of the Windows ADK that matches the version of Windows 10 that you have.
After downloading the Windows ADK, run the setup program (ADKsetup.exe) and choose the following components.
Deployment tools
Windows Preinstallation Environment (Windows PE)
Imaging And Configuration Designer (ICD)
Configuration Designer
Windows User State Migration Tool (USMT)
Complete the installation process, and then you are ready to create and deploy your provisioning packages. Start by opening Windows Configuration Designer. On the Start page, shown in Figure 2-59, click the option that best describes the type of provisioning that you want to do. If you are uncertain, choose Advanced provisioning.
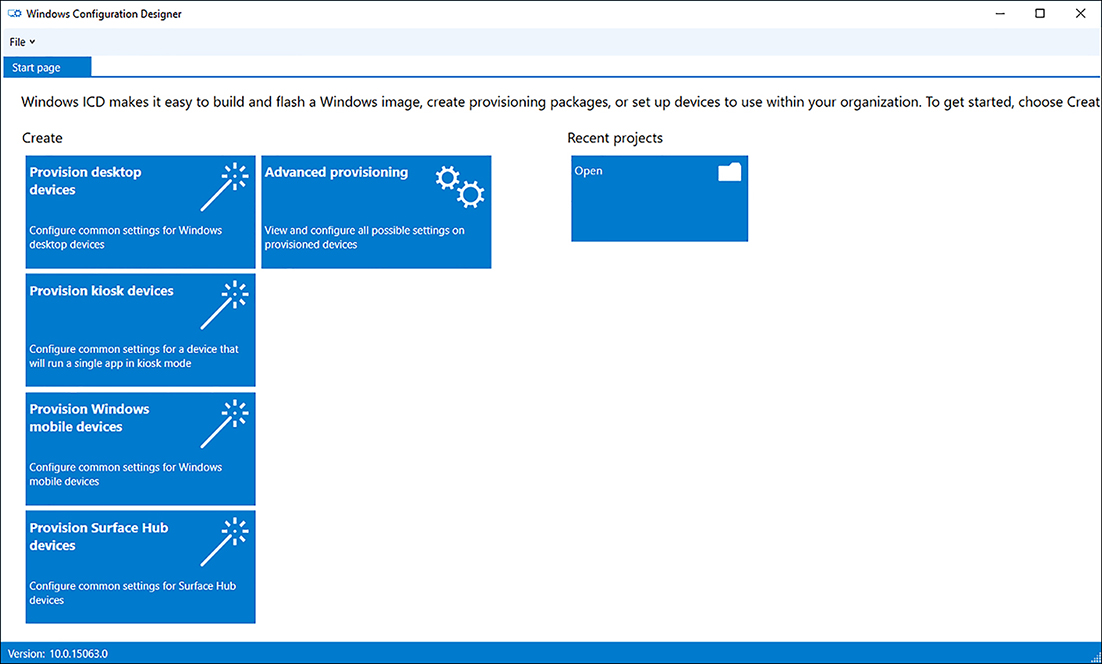
Use the following procedure to create your provisioning package to deploy a universal LOB app.
Click Advanced provisioning.
In the New Project Wizard, on the Enter Project Details page, in the Name box, type the name for your provisioning package and a meaningful description. For example, type LOB apps and then click Next.
On the Choose Which Settings To View And Configure page, choose whether the package is applicable to all Windows editions, only to desktop editions, only to mobile editions, or to IoT editions, and then click Next.
On the Import A Provisioning Package (Optional) page, click Finish. You can use this option to import settings from a previously configured package that mostly, but not entirely, meets your needs.
On the Available Customizations page, shown in Figure 2-60, in View, click Common IT Pro settings, and then expand Runtime Settings.
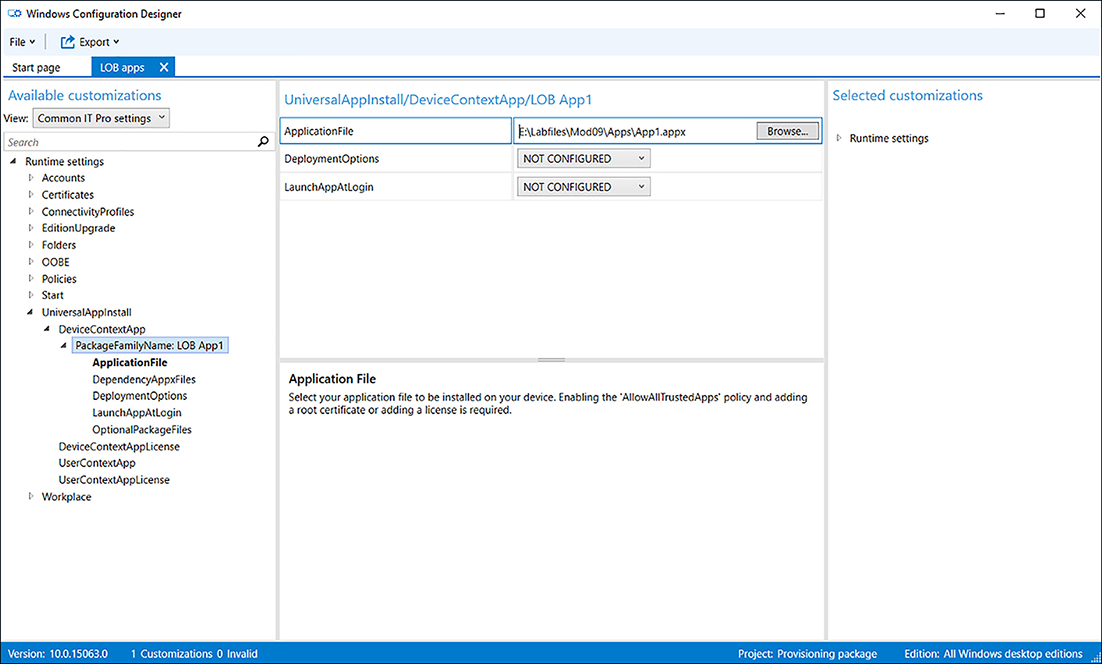
FIGURE 2-60 Available customizations for your package On the Available Customizations page, in the navigation pane, expand UniversalAppinstall, and then click DeviceContextApp.
In the details pane, in the PackageFamilyName text box, type a name for this collection of apps. For example, LOB App1.
Select the PackageFamilyName: LOB App1 node.
Click the ApplicationFile node, and in the ApplicationFile text box, click Browse and navigate to and select the .appx file that represents your app.
In the File menu, click Save.
You have created a customization for your app. You are now ready to deploy this customization by applying the provisioning package.
Apply provisioning packages
To apply a provisioning package, you must start by exporting the package. To export your provisioning package, in the Windows Configuration Designer, use the following procedure.
Click Export and then click Provisioning Package.
In the Build wizard, on the Describe The Provisioning Package page, the Name box is already complete with the name you specified earlier. You can now specify version numbers and vendor information. Complete this information and then click Next.
On the Select Security Details For The Provisioning Package page, choose whether you want to encrypt or sign your package, or both, and then click Next. To sign your package, you must have an appropriate digital certificate that users of your package trust.
On the Select Where To Save The Provisioning Package page, specify where you want to store the package and then click Next.
On the Build The Provisioning Package page, click Build. Your provisioning package is exported to your specified location.
The All Done page appears, showing you where the package is located. Click Finish.
You can now apply the package. Distribute the package to devices already running Windows 10 by making the package file available. You can instruct users to run the package file. For example, distribute the package file by email or place the package file in a shared folder.
Need More Review? Build and Apply a Provisioning Package
To review further details about provisioning packages, refer to the Microsoft website at: https://docs.microsoft.com/en-us/windows/configuration/provisioning-packages/provisioning-create-package.
Skill 2.5: Configure remote management
When you have a large number of computers to manage, or a workforce that uses their devices in a number of locations, it is important to be able to manage those computers by using remote management tools.
As a result, the 70-698 Configuring Windows exam includes objectives on choosing the appropriate remote management tools and knowing how to use those tools to manage your organization’s devices and computers.
Choose the appropriate remote management tools
Windows 10 provides a number of tools that you can use to manage your organization’s computers remotely. These include Remote Assistance, Remote Desktop, Windows PowerShell remoting, and many management console snap-ins. Knowing which tools to use to support a given situation helps you address your users’ needs more quickly.
Remote management tools in Windows 10
You can use a variety of tools to manage Windows 10 devices remotely. Table 2-27 shows the available remote management tools in Windows 10.
TABLE 2-27 Windows 10 remote management tools
Tool |
Purpose |
|---|---|
Remote Assistance |
A built-in tool that provides for interaction with the remote user. By using Remote Assistance, you can view or take remote control of the user’s computer and perform remote management of it. You can also use a text-based chat facility to interact with the user. |
Remote Desktop |
A built-in tool that you can use to access a computer remotely over the Remote Desktop Protocol (RDP). In the past, users often accessed their computers from other locations by using Remote Desktop. Security concerns and the adoption of mobile devices have made this a less common use of this tool. However, you can also use Remote Desktop to manage a remote computer. It does not provide for user interaction and requires the user of the computer to sign out before you can access the computer remotely. |
Windows PowerShell |
Windows PowerShell is a powerful command-line management tool and scripting environment. You can use it to perform virtually any management function in Windows 10. You can also use Windows PowerShell to manage remote computers. This is known as Windows PowerShell remoting. |
Microsoft Management Console |
Microsoft Management Console (MMC) is an extensible interface for management applications in both Windows clients and Windows Server. To perform management by using MMC, a specific tool for the management task, known as a snap-in, is loaded into the console. For example, to perform management of disks and attached storage, you add the Disk Management snap-in to MMC. You can use MMC snap-ins to manage Windows 10 devices remotely by targeting the remote computer from the MMC interface. |
Selecting the appropriate remote management tool
Given that a variety of tools is available, it is important to know which one to use in a given situation. When considering the appropriate tool, use the guidance in Table 2-28 to help you make your choice.
TABLE 2-28 Selecting the appropriate Windows 10 remote management tool
Scenario |
Tool |
|---|---|
User requires help and guidance. For example, you must help the user perform a specific task in an application such as printing, using the appropriate settings. |
Remote Assistance |
You must perform a single remote management task on a single computer and require no user interaction. |
Remote Desktop or MMC |
You must perform the same management task on several or many remote computers. |
Windows PowerShell |
You must perform a remote management task that you have performed many times in the past and expect to perform again in the future. |
Windows PowerShell |
You are unsure of the nature of a problem a user is experiencing on her computer and wish to investigate computer settings. |
Remote Desktop |
You want to be able to perform the same management task, using the same management tool on any computer. |
MMC |
You can see from Table 2-28 that you can sometimes use several methods to address a specific remote management scenario. It is therefore a question of choosing the most appropriate method. Generally, if you know you will be required to perform the same management task again, on the same or a different computer, it is worth considering Windows PowerShell remoting. If you need to provide user interaction, choose Remote Assistance. After that, it’s probably a personal preference of whether you use an MMC snap-in remotely or Remote Desktop.
Configure remote management settings
Depending on the remote management tool you have decided to use, it is almost certain that you must configure the target computer (the one you wish to manage) and possibly the local management computer (the one you are using) to enable the selected remote management tool. For example, it is common to have to enable the appropriate feature through Windows Firewall to allow for management of a remote Windows 10-based device.
Configuring Windows Firewall to enable remote management
To enable remote management through Windows Firewall on a target computer, open Control Panel and complete the following procedure.
In Control Panel, click System And Security, and then click Windows Firewall.
In Windows Firewall, click Allow An App Of Feature Through Windows Firewall.
In Allowed Applications, click Change Settings.
In the Allowed Apps And Features list, scroll down and select the appropriate management feature.
For example, as shown in Figure 2-61, select Remote Assistance. This enables the selected management feature on the Private network location profile. If you also wish to allow the remote management feature on Public networks, select the Public check box.
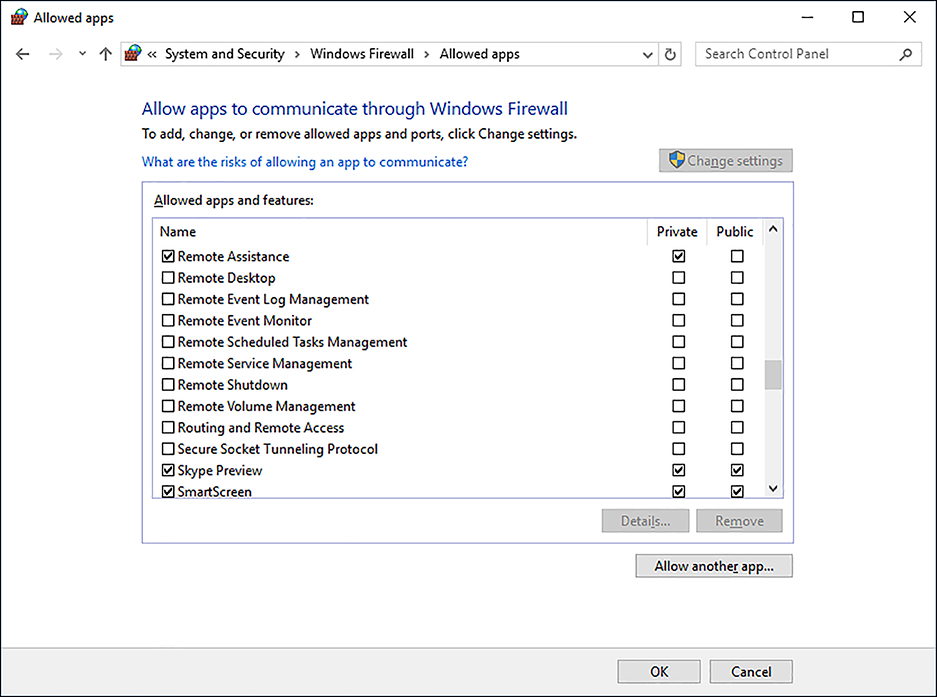
FIGURE 2-61 Allowing Remote Assistance through Windows Firewall Click OK. The available remote management features are:
Remote Assistance
Remote Desktop
Remote Event Log Management
Remote Event Monitor
Remote Scheduled Tasks Management
Remote Service Management
Remote Shutdown
Remote Volume Management
Virtual Machine Monitoring
Windows Firewall Remote Management
Windows Management Instrumentation (WMI)
Windows Remote Management
Windows Remote Management (Compatibility)
It is not always feasible, or especially desirable, to reconfigure these settings manually on each computer to enable the appropriate remote management feature. Instead, in an Active Directory Domain Services (AD DS) environment, you can use Group Policy Objects (GPOs) to configure the desired firewall settings.
Enabling remote management through System Properties
Both Remote Assistance and Remote Desktop can be enabled through the System Properties dialog box, as shown in Figure 2-62. To access these settings, from the Settings app:
Click System and then click About.
In the details pane, under Related Settings, click System Info.
In the System Properties dialog box, click the Remote tab.
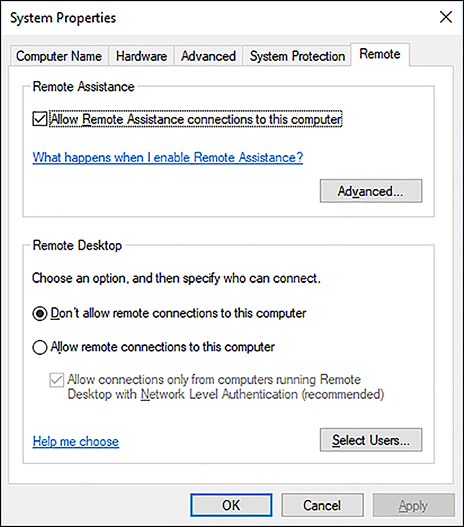
FIGURE 2-62 Configuring Remote Settings through System Properties
Enabling Remote Assistance
To enable Remote Assistance, on the Remote tab of the System Properties dialog box, select the Allow Remote Assistance Connections To This Computer check box. Then, optionally, click Advanced. As shown in Figure 2-63, you can then configure the following additional settings.
Allow This Computer To Be Controlled Remotely This setting enables you to determine whether the person providing remote support can take remote control of the computer or only view the computer desktop. This setting is enabled by default when Remote Assistance is enabled.
Set The Maximum Amount Of Time Invitations Can Remain Open One way of initiating a Remote Assistance session is for the user to invite the support person to connect. This setting defines the validity period of the invitations. The default is six hours.
Create Invitations That Can Only Be Used From Computers Running Windows Vista Or Later Windows Vista and later versions of Windows use a superior method of encrypting Remote Assistance network traffic. It is advised to select this option if you are using Windows Vista and later on all support computers.
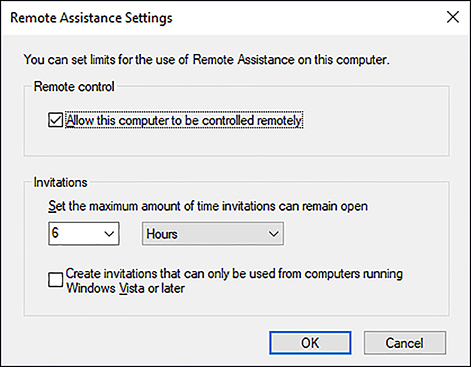
FIGURE 2-63 Configuring Remote Assistance advanced settings
Enabling Remote Desktop
To enable Remote Desktop, on the Remote tab of the System Properties dialog box, select the Allow Remote Connections To This Computer check box. Then, optionally, select Only Allow Connections From Computers Running Remote Desktop With Network Level Authentication (Recommended). This setting improves security of the Remote Desktop network traffic between the management computer and the target computer.
Click Select Users. As shown in Figure 2-64, you can then add the users or groups that you want to have remote access to this computer by using Remote Desktop.

![]() Exam Tip
Exam Tip
When you enable Remote Assistance or Remote Desktop by using these methods, the corresponding Windows Firewall setting is automatically configured to allow the selected app.
Configure Remote Assistance
After you have enabled Remote Assistance, you can configure and use this tool to help your users to administer and manage their computers remotely. There are two fundamental ways of initiating a Remote Assistance session: one is for the user to request assistance, and the other is for the support person to offer it.
Requesting help using Remote Assistance
If a user is experiencing problems with their computer, they can request assistance from support personnel by using the Request Assistance feature of Remote Assistance. This is known as solicited remote assistance. To request assistance, the user must open Control Panel, select System And Security, and then click Launch Remote Assistance.
As shown in Figure 2-65, you can then choose between:
Invite Someone You Trust To Help You Choose this option if you require assistance.
Help Someone Who Has Invited You Choose this option if you can provide assistance.
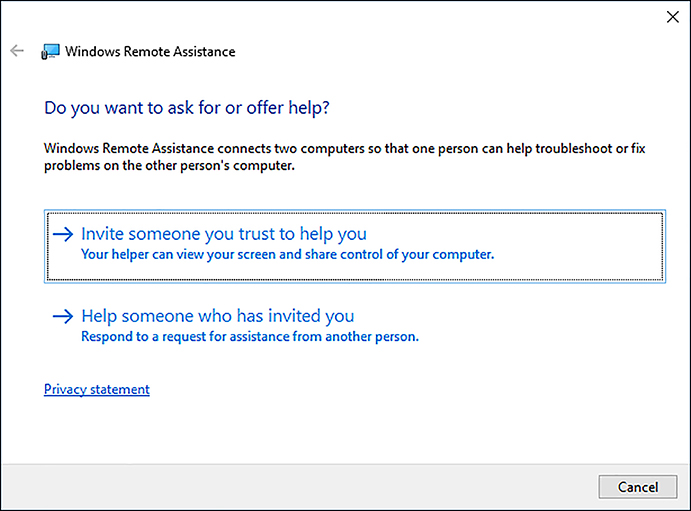
FIGURE 2-65 Requesting Windows Remote Assistance
To request help, click Invite Someone You Trust To Help You. You can then choose from among three options, as shown in Figure 2-66:
Save This Invitation As A File Choose this option to create an RA Invitations file. These have a .msrclIncident file extension. You are prompted to save the request file. Store this file in a location that is accessible to the user you are requesting help from. Typically, this location will be a file server shared folder. After you have defined a save location, a dialog box appears with the password for the remote assistance session. Share this password with your helper. When your helper double-clicks the file you saved, they are prompted for the password, and then the Remote Assistance session begins.
Use Email To Send An Invitation If you choose this option, your default email program is opened by Remote Assistance, and the invitation file is automatically attached to an email message. You must enter the email address of the person you want to invite. When you send the message, the same dialog box appears containing the session password. Again, share this password with your helper. When your helper double-clicks the attached file in the email you sent, they are prompted for the password, and then the Remote Assistance session begins.
Use Easy Connect Easy Connect enables you to establish a Remote Assistance session without the need to use an invitation file. After you have established an Easy Connect session, you can save the name of the helper for future use, enabling you to receive remote assistance without the need to exchange a password.

FIGURE 2-66 Choosing a method to request assistance
![]() Exam Tip
Exam Tip
Easy Connect only works if both computers are running Windows 7 or later and if both computers have access to the global peer-to-peer network. This network can sometimes be inaccessible to users of computers that are placed behind network routers than do not support the Peer Name Resolution Protocol. This protocol is used to transfer Remote Assistance invitations over the Internet.
![]() Exam Tip
Exam Tip
You can open the Windows Remote Assistance tool by running Msra.exe from the command line or the Windows Run dialog box.
Offering help with Remote Assistance
A user might not be in a position to request assistance. In these circumstances, an administrator can offer assistance. This is known as unsolicited remote assistance. To offer remote assistance, run Msra.exe and choose Help Someone Who Has Invited You. Then, on the Choose A Way To Connect To The Other Person’s Computer page, click Advanced Connection Option For Help Desk, as shown in Figure 2-67.
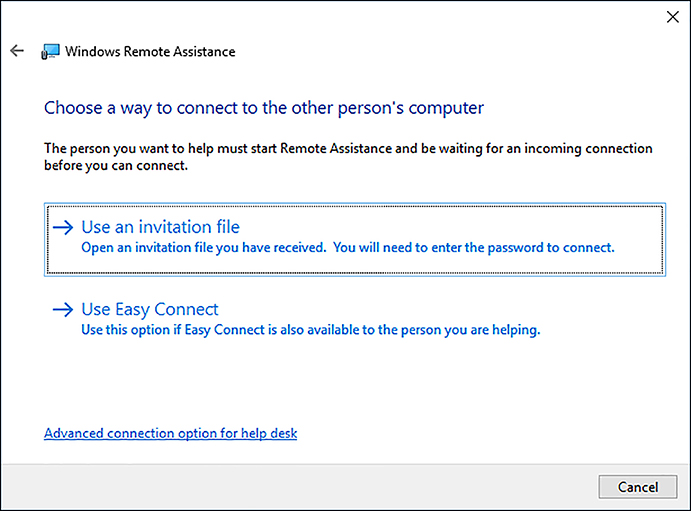
On the Who Do You Want To Help page, in the Type A Computer Name Or IP Address box, as shown in Figure 2-68, type the relevant computer name or IP address of the computer that you want to send the offer of help to and then click Next.
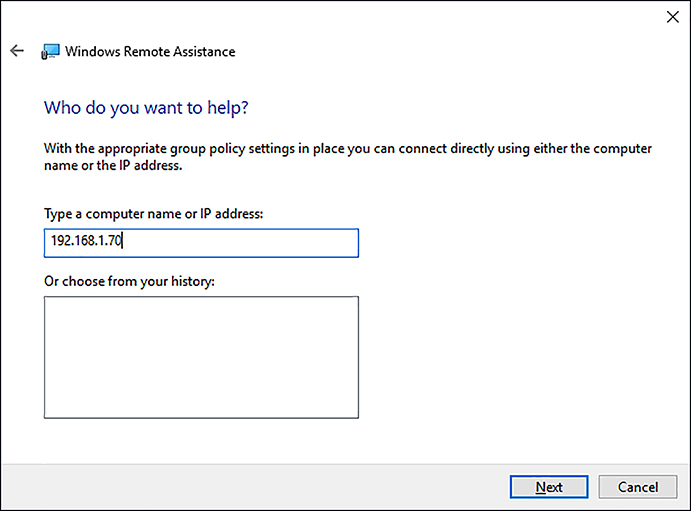
The user on the target computer must accept your offer, and then the remote assistance session is initiated. This is often a useful way to start a remote assistance session, especially when you are attempting to support novice users.
Configuring Remote Assistance with GPOs
Although you can configure the necessary settings for Remote Assistance manually on each computer, in an AD DS domain environment, it is easier to use GPOs to distribute the required settings. Table 2-29 shows the settings you can configure for Remote Assistance by using GPOs. To configure these settings, open Group Policy Management and locate the appropriate GPO. Open the GPO for editing and navigate to Computer Configuration > Policies > Administrative Templates > System > Remote Assistance.
TABLE 2-29 Configuring Remote Assistance with GPOs
Policy Setting |
Explanation |
|---|---|
Allow Only Windows Vista Or Newer Connections |
Enables Remote Assistance to generate invitations with more secure encryption. This setting does not affect Remote Assistance connections initiated by unsolicited offers or Remote Assistance. |
Turn On Session Logging |
Enables session logging. Logs are stored in the user’s Documents folder in the Remote Assistance folder. |
Turn On Bandwidth Optimization |
Provides performance improvements in low-bandwidth situations. Adjust from No Optimization through Full Optimization. |
Configure Solicited Remote Assistance |
Enables solicited Remote Assistance on a computer. If you disable this setting, it prevents users from asking for Remote Assistance. You also can use this setting to configure invitation time limits and whether to allow remote control. |
Configure Offer Remote Assistance |
Enables unsolicited Remote Assistance on this computer. |
Using Remote Assistance to manage a computer remotely
After you have configured the desired settings and established a Remote Assistance session, you can perform the following tasks.
Request Control It enables you to ask the remote user for permission to take remote control of their computer. They must allow you to do this. Remember also that the ability to gain remote control is a configurable option.
Chat It enables you to open a chat window to communicate with the remote user. You can use this to explain what you are doing, or the remote user can use chat to discuss the details of their computer problem.
Configure Remote Desktop
After Remote Desktop is enabled on a computer, you can use the Remote Desktop Connection program to connect to the computer. When connected, you can use the computer as if locally signed in and perform all management tasks that your user account has the rights to perform. This makes using Remote Desktop particularly useful.
Creating and editing Remote Desktop connections
To create a Remote Desktop connection, from Start, click All Apps, click Windows Accessories, and then click Remote Desktop Connection. As shown in Figure 2-69, you must then specify the computer that you want to connect to. Use either a computer name or an IP address. You can configure additional connection properties by using the options discussed in Table 2-30.
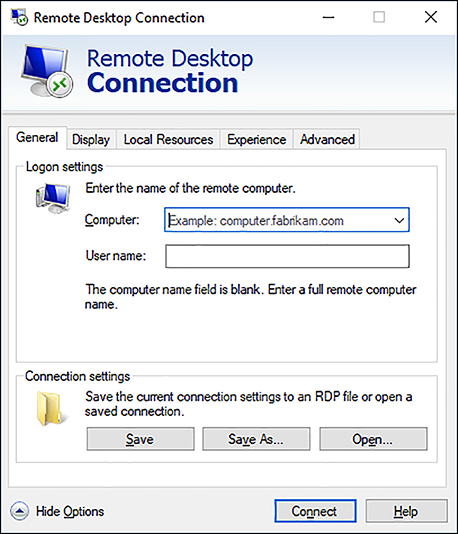
TABLE 2-30 Configurable Remote Desktop Connection options
Tab |
Settings |
|---|---|
General |
|
Display |
|
Local Resources |
|
Experience |
|
Advanced |
|
When you have finished configuring the connection, from the General tab, click Connect. You can also choose to save your configuration to a .rdp file for subsequent use.
![]() Exam Tip
Exam Tip
You can open the Remote Desktop Connection app by running Mstsc.exe from the command line or the Windows Run dialog box.
Configuring Remote Desktop with GPOs
Just as with Remote Assistance, although you can configure Remote Desktop settings manually on each computer, in an AD DS domain environment, it makes sense to configure these settings with GPOs. Table 2-31 contains the configurable GPO settings for Remote Desktop. To configure these settings, open Group Policy Management and locate the appropriate GPO. Open the GPO for editing and navigate to Computer Configuration > Policies > Administrative Templates > Windows Components > Remote Desktop Services.
TABLE 2-31 Configuring Remote Desktop with GPOs
Policy setting |
Explanation |
|---|---|
Remote Desktop Connection Client Do Not Allow Passwords To Be Saved |
Determines whether users can save passwords on this computer from Remote Desktop Services clients. |
Remote Desktop Connection Client Prompt For Credentials On Client Computer |
If enabled, a user is prompted to provide credentials for a remote connection to a Remote Desktop server on their client computer rather than on the Remote Desktop server. |
Remote Desktop Session HostConnections Allow Users To Connect Remotely By Using Remote Desktop Services |
If enabled, users that belong to the Remote Desktop Users group on the target computer can connect remotely to the target computer, using Remote Desktop Services. |
Remote Desktop Session Host Device And Resource Redirection |
You use these settings to specify whether to allow or prevent data redirection from local devices (such as audio and clipboard) to the remote client in a Remote Desktop Services session. |
Remote Desktop Session HostSecurity Set Client Connection Encryption Level |
If enabled, all communications between clients and Remote Desktop servers is encrypted, using the encryption method specified. By default, the encryption level is set to High. |
Remote Desktop Session Host Session Time Limits |
These policies control session time limits for disconnected, idle, and active sessions and whether to terminate sessions when specified limits are reached. |
Configure Windows PowerShell remoting
Although using Windows PowerShell cmdlets can sometimes seem daunting, they do offer a convenient and quick way of configuring many machines more quickly than by using a graphical tool. In addition, through the use of scripting, you can use Windows PowerShell to complete frequently performed management tasks.
Using Windows PowerShell to manage remote computers is referred to as Windows PowerShell remoting, but before you can use Windows PowerShell remoting, you must know how to enable and configure it.
Windows PowerShell is ubiquitous across the Windows platform, appearing in both Windows 10 and Windows Server. Therefore, using Windows PowerShell to perform management tasks on both local and remote computers makes sense because you can transfer those skills to other management and administration situations.
Many cmdlets in Windows PowerShell can be used with a -ComputerName parameter, making the use of the command remotely no more complex than specifying the name of the computer you want to run the command against. For example, to determine the IP configuration of a computer, you can run the following command.
Get-NetIPConfiguration -ComputerName LON-CL1
However, not all cmdlets accept the -ComputerName parameter, and for these, you must enable and configure Windows PowerShell remoting. The function of Windows PowerShell remoting is to enable you to connect to one or several remote computers and execute one or more cmdlets or scripts on those remote computers and return the results to your local computer.
Although Windows PowerShell remoting is enabled by default on Windows Server 2016, you must manually enable it on Windows 10. To do this, complete the following procedure.
If necessary, start the Windows Remote Management service. You must also enable Windows Remote Management through the Windows Firewall. As shown in Figure 2-70, you can do this by running the winrm quickconfig command at an elevated command prompt. When prompted, press Y and Enter twice.
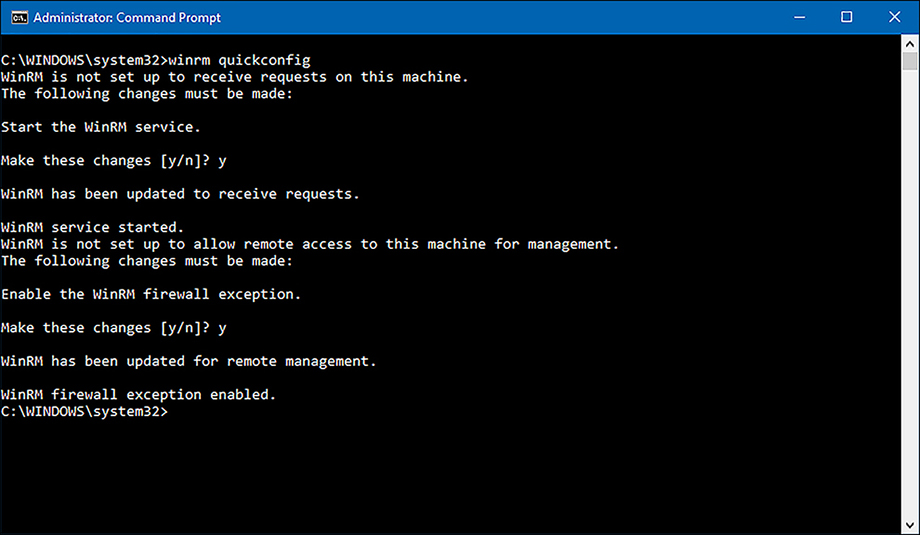
FIGURE 2-70 Enabling Windows Remote Management Note Winrm quickconfig and the Public network location profile
If one of your network connections is assigned the Public network location profile, this command fails and you must manually configure the Windows Firewall exceptions.
To enable Windows PowerShell remoting, you must run the enable-PSremoting -force cmdlet from a Windows PowerShell (Admin) window.
![]() Exam Tip
Exam Tip
Windows Remote Management uses HTTP and listens on TCP port 5985 by default. If you enable encryption then Windows Remote Management can use HTTPS on TCP port 5986. Windows PowerShell remoting uses Windows Remote Management for network communication.
Need More Review? Enable-Psremoting
To review further details about enabling Windows PowerShell remoting, refer to the Microsoft website at: https://docs.microsoft.com/en-gb/powershell/module/Microsoft.PowerShell.Core/Enable-PSRemoting?view=powershell-5.1.
Modify settings, using Microsoft Management Console or Windows PowerShell
With both Remote Desktop and Remote Assistance, you use RDP to connect to a remote computer. After you establish a connection, you can perform any management task interactively just as if you were sitting at the remote computer. This is not the case with either MMC or Windows PowerShell remoting.
With MMC, you must enable the necessary remote management feature that you wish to exploit by modifying the Windows Firewall configuration. Then you can use the appropriate management console snap-in and target the desired remote machine.
In Windows PowerShell, you enable remote management by enabling the Windows Remote Management service and then enabling Windows PowerShell remoting. Thereafter, you connect to the remote computer and run the appropriate Windows PowerShell cmdlets or scripts.
Using MMC to manage remote computers
It is very easy to use MMC snap-ins to manage remote computers. Some management snap-ins enable you to specify additional computers to connect to from the console. As shown in Figure 2-71, you can right-click the uppermost node in the navigation pane and then click Connect To Another Computer.
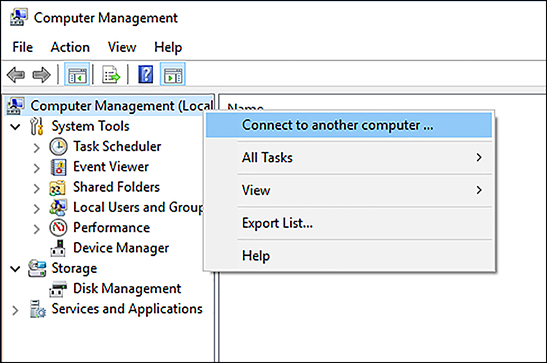
If the management snap-in you want to use does not enable you to connect to additional computers, you can create a new management console by running mmc.exe and adding the appropriate snap-in to the empty console. When prompted, specify Another Computer, as shown in Figure 2-72.
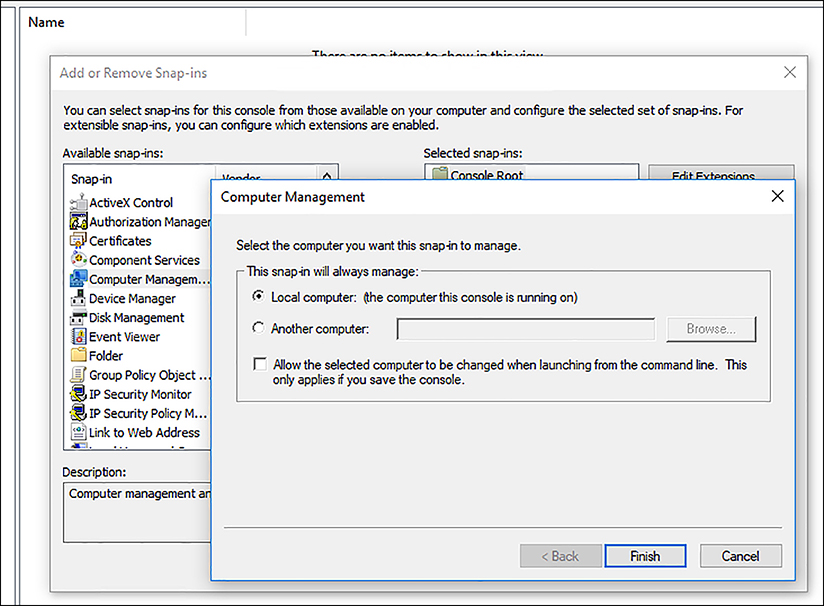
It is important to realize that the remote computer must recognize you. This means that you must authenticate your connection by using a username and password that have the necessary management rights on the target computer. This is simple in an AD DS domain environment because you can use domain admin credentials. However, in workgroup environments, this is trickier. Generally, you must be able to provide credentials of a member of the target computer’s local Administrators group.
In addition to authentication, the necessary Windows Firewall feature must be enabled. The available remote management features are:
Remote Assistance
Remote Desktop
Remote Event Log Management
Remote Event Monitor
Remote Scheduled Tasks Management
Remote Service Management
Remote Shut-down
Remote Volume Management
Virtual Machine Monitoring
Windows Firewall Remote Management
Windows Management Instrumentation (WMI)
Windows Remote Management
Windows Remote Management (Compatibility)
After you have enabled the required remote management feature in Windows Firewall, and modified your MMC to connect to a remote computer using appropriate credentials, performing remote management is no different from performing local management.
Using Windows PowerShell to manage remote computers
After you have enabled Windows PowerShell remoting, you can use Windows PowerShell cmdlets and scripts to manage the remote computer in virtually the same way that you manage local computers. However, you must first establish a connection with the remote computer.
After you have established a connection, you can run any cmdlets or scripts against the remote machine. When you connect to the remote computer and run a remote command against it, the command is transmitted across the network and run on the remote computer. The results are sent back to your local computer and displayed in your Windows PowerShell window.
One way to establish a remote connection and run a command is to use the invoke-command cmdlet. You can also use the Invoke-command cmdlet to establish a temporary remote connection. For example, the following command retrieves the contents of the system event log from the remote computer LON-CL1.
Invoke-Command -ComputerName LON-CL1 -ScriptBlock {Get-EventLog -log system}
If you intend to run several cmdlets, or to run more complex scripts, it is useful to establish a persistent connection to the remote computer. Use the New-PSWorkflowSession cmdlet to do this. For example:
$s = New-PSWorkflowSession -ComputerName LON-CL1
You can now use the Enter-PSSession command to establish the persistent connection.
Enter-PSSession $s
You will now have a Windows PowerShell prompt that looks like this.
[LON-CL1]: PS C:>
Any commands that you run in this session run on the LON-CL1 computer. The session remains active until you close with the Exit-PSSession command.
You can also use these commands to establish remote connections with multiple computers. For example, to connect simultaneously to computers called LON-CL1 and LON-CL2, use the following command.
$s = New-PSSession -ComputerName LON-CL1, LON-CL2
Next, run the remote Windows PowerShell cmdlets against the new session.
Invoke-Command -Session $s -ScriptBlock { Get-EventLog -log system }
You can run any Windows PowerShell command remotely in this way.
Need More Review? An Introduction to Powershell Remoting: Part One
To review further details about using Windows PowerShell remoting, refer to the Microsoft website at: https://blogs.technet.microsoft.com/heyscriptingguy/2012/07/23/an-introduction-to-powershell-remoting-part-one/.
Thought experiments
In these thought experiments, demonstrate your skills and knowledge of the topics covered in this chapter. You can find the answers to these thought experiments in the next section.
Scenario 1
You have been hired to deploy Windows 10 at a new office for Adatum Corporation. The office was a green field site with no computer infrastructure and has just had all the network cabling and wireless infrastructure installed by a contractor. You must help plan and implement networking services at the new location and verify that all equipment is working on the network.
As a consultant for Adatum, answer the following questions about networking.
You connected a number of devices to the wireless APs in the new building. They seem to be connected, but you want to verify that they can communicate with each other. Is it true that the Test-Connection Windows PowerShell cmdlet is the equivalent of the Ping command-line tool?
You want to be able to view the current network configuration of the installed laptops in the new building. Which of the following commands enable you to do this?
Ping
Tracert
NSlookup
IPconfig
Get-NetIPAddress
Netsh
You are troubleshooting name resolution to the LON-DC1 domain controller. You suspect a problem might reside with the configured DNS server that was just installed at the site. If you create an entry for LON-DC1 in the local hosts file of a test computer running Windows 10, which is used first, the DNS server or the local resolver cache?
You have been asked to set up a VPN solution for some users who want to work from home. Which VPN tunneling protocols can you use with Windows 10?
You notice that one of your computers has an IPv4 address that starts 169.254. What could this mean?
Scenario 2
Your organization has a central head office and five remote branch offices located across the United States. Operational data is cloud-based, using OneDrive for Business. There is a business requirement for full computer backups for each of the staff members at the five branches, and currently this is being performed locally to a second drive partition on each device. Your manager wants to ensure that each office has local file storage redundancy for the backups (stored on a central server) and has asked you to recommend a solution. During the past 2 months, you have upgraded many of the desktop computers and installed new 128 GB SSD drives. You have 50 spare drives of various sizes as follows.
32 x 1 TB SATA drives (2 years old)
18 x 320 GB SATA drives (4 years old)
Each branch office currently uses a Windows 10-based computer, which is used as a printer server. The printer is connected directly to it and shared across the network. Your solution should use the equipment currently available and not incur additional cost.
Answer the following questions for your manager.
What feature will you recommend to be used on the Windows 10 print servers to provide a fault tolerant file system?
How will you use the spare drives?
If the print server can only fit a maximum of four drives per computer, how would this affect your proposal?
If you have any drives left over, how would you use these?
What user-level training will be required at the branch office?
Scenario 3
You are helping a small consulting business configure its file and folder strategy. Eleven employees work from a single office, which also acts as a technology center, home to a showcase demonstration area and meeting rooms. The company is still in the startup growth phase, and financial resources are restricted. It currently does not use a domain environment, but its location has excellent Internet access and uses the cloud extensively for email, Dropbox, and OneDrive. All devices use Windows 10 Pro with Microsoft accounts, and no dedicated IT support is available.
You need to ensure that the company can share files and folders in a cost-effective way.
Answer the following questions on behalf of the company.
The staff members have personal experience using OneDrive. Could they use OneDrive for file storage and sharing in the small company?
Employees need to have access to their data resources when not connected to the Internet. How would OneDrive help them?
In the demonstration area of the business, a Windows tablet is used as a media playback device. It is configured to play a slideshow of all media files within a specified directory on the local drive. How would you ensure that this device has the latest media content available at all times?
The owner has concerns about using OneDrive for Business for storing business resources and the long-term viability of using OneDrive for Business. Should he be concerned?
Scenario 4
Windows 10 is about to be deployed throughout your organization. You must now consider strategies for how best to implement apps for your users. Users require access to a number of desktop apps, including Microsoft Office 2016. Many users also want to be able to download and install Microsoft Store Apps for their Windows 10-based devices. Finally, your IT manager has been discussing the feasibility of making the sales-tracking app available to your users. Only the sales team uses this small, task-focused app.
As a consultant for Adatum Corporation, answer the following questions about the app deployment within the Adatum organization.
You have 1,000 Windows 10-based desktop computers that require Microsoft Office 2016. How will you deal with this?
You want to deploy a subset of Adatum’s required apps to several hundred computers after Windows 10 has been deployed. What technologies could you use to assist in this?
How might you make the Sales app available to your users?
After deploying the required apps to your users’ devices and computers, you begin to receive complaints about slow startup times. What can you do to improve startup times?
You have a line-of-business app that users in your Sales department need to access. How might you achieve that without using the Microsoft Store for Business?
Scenario 5
You work in support at Adatum Corporation. Many of your users work in small branch offices. Some work from home, using work laptops. It is important for you to be able to manage these users’ computers remotely. As a consultant for Adatum, answer the following questions about remote management in the Adatum organization.
One of your users telephones the help desk, requiring assistance with an application. They need to know how to perform a grammar check with Microsoft Word 2016. They are not very experienced and, despite your best efforts and explanation of how the process works, they are still confused. What remote management tool might you consider using in this situation?
Another user calls the help desk. They’ve lost a file and need you to locate it. They’re due to leave the office for a conference this afternoon, and they tell you that’s the best time for you to resolve the issue. What remote management tool would you use?
You try to connect to this user’s computer later that afternoon, but despite knowing that the necessary Windows Firewall settings are configured, you cannot connect. Why?
You want to use Windows PowerShell remoting. You try to connect to a remote machine but are unsuccessful. What steps must you perform on the remote machine before Windows PowerShell remoting can work?
Thought experiment answers
This section provides the solutions for the tasks included in the thought experiment.
Scenario 1
Yes, the Test-Connection Windows PowerShell cmdlet is the equivalent of the Ping command-line tool.
The IPconfig, Get-NetIPAddress, and Netsh commands enable you to view the network configuration of computers running Windows 10.
The DNS resolver cache is checked before a DNS server is petitioned.
You can use the following VPN tunneling protocols: Point-to-Point Tunneling Protocol (PPTP), Layer Two Tunneling Protocol with IPsec (L2TP/IPsec), Secure Socket Tunneling Protocol (SSTP), or Internet Key Exchange version 2 (IKEv2).
It means that the device is configured to obtain an IPv4 address automatically and has been unable to obtain an IPv4 configuration from a DHCP server. This might be because the DHCP server is offline or because an insufficient number of addresses are available on the server.
Scenario 2
You would suggest using Storage Spaces on the Windows 10 print server computer.
Answers might vary, but you would only use the 1 TB drives because they offer larger capacity, and they are quite new. Allocate five drives to each print server computer as a three-way mirror. Alternatively, five drives could be configured as a parity drive array. After the storage pool has been created, a new drive letter should be made available and shared on the network to the members of staff for the backup storage.
With only four drive bays available, you would use three of the 1 TB drives in a parity drive array; the currently installed Windows 10 operating system would use the other drive bay.
These drives could be labeled as storage space drive spares and distributed to each site to be used if the branch experiences a drive failure.
Users should not need significant training; all users should direct their current backup application to the new drive letter available on the print server computer.
Scenario 3
Each employee could continue to use OneDrive for personal use, but this is not licensed for use within a business environment. For business use, the company should purchase either a standalone OneDrive for Business plan, or an Office 365 subscription which includes OneDrive for Business and SharePoint Online which can be used for centralize file storage. They can then create folders to contain their work files, which could then be shared among the employees as required.
The employees could configure the OneDrive app settings to synchronize their local devices with the files and folders they use. They could then work on these files; the files would then synchronize automatically when the users are connected to the Internet.
Answers might vary. You could use OneDrive. Create a shared folder stored on OneDrive for Business to contain the media. Employees can then add new content to this media folder in OneDrive for Business. Configure the media playback device to synchronize with this folder and maintain the device connection to the Internet.
Answers might vary. OneDrive is aimed at the consumer audience, whereas OneDrive for Business is an enterprise solution. The data stored in both OneDrive and OneDrive for Business is encrypted and therefore secure from unauthorized access. Employees should be granted access to only the shared resources they require. The default amount of space per OneDrive for Business 1 TB, but this can be unlimited depending upon the OneDrive for Business plan that the company purchases.
Scenario 4
Ideally, the Windows 10 desktop image used to deploy Windows 10 can be customized to include all the required desktop apps. Then, deployment of both Windows 10 and the desktop apps can be performed in a single step.
You can consider using either MDT or Configuration Manager to deploy your apps to the target group of computers. Although you could use GPOs to target this deployment, it is not the most efficient way to deploy and maintain apps in a large enterprise network.
Assuming that the Sales app is a Microsoft Store App, you could sideload the app onto the required computers. You could also consider signing up for the Microsoft Store for Business and creating a private store for the distribution of this type of LOB app.
You could verify that all devices are configured through their UEFI firmware to enable Fast Boot/Fast Startup. After that, verify that Fast Startup is enabled in the appropriate Windows 10 power plan. Finally, if the previous actions do not resolve the startup time issues, consider checking whether any apps that initialize during startup have an excessive effect on startup time. Use the Task Manager Start-up tab for this solution.
Consider using a provisioning package that contains the customization for your line-of-business app. Then, you could export the provisioning package and distribute the resultant package by using a GPO to your Sales users’ devices.
Scenario 5
Using Remote Assistance would enable you to demonstrate how to perform the grammar check. You could take remote control of the user’s computer and show them the procedure.
Remote Desktop is the most suitable tool. Remote Assistance requires the interaction of the user to accept your connection request and, initially, to invite you to help. Remote Desktop requires no invitations and does not require the remote user to assist you in connecting.
The most likely reason you can’t connect is that Remote Desktop users must be granted access in addition to the Windows Firewall configuration changes being made.
You must start the Windows Remote Management service and reconfigure the Windows Firewall, and then Windows PowerShell remoting must be enabled. You can perform these steps by running winrm quickconfig and then Enable-PSRemoting.
Chapter summary
Each device on a network requires a unique IPv4 and, optionally, a IPv6 configuration.
Windows 10-based network devices use name resolution to change names in IP addresses for network communications.
Network location profiles enable Windows 10 to determine appropriate security settings for designated network connections.
Windows Firewall helps protect your Windows 10-based devices when connected to networks and verifies that settings in Windows Firewall and the selected network location profile determine whether network discovery is enabled.
Windows 10 provides support for most Wi-Fi networking standards, including Wi-Fi Direct.
Windows 10 provides a number of tools that you can use to help troubleshoot networking issues.
A disk can use the MBR or GPT disk partitioning scheme, and Windows 10 (x64) can boot from a GPT disk if it is using a UEFI-enabled motherboard.
Disks can support either simple or dynamic volumes. Dynamic volumes can offer enhanced volume features, including mirrored, spanned, and striped volumes.
Updated device drivers that are not stable can be rolled back to the previous version.
The most common file systems Windows 10 supports include NTFS, ReFS, exFat, FAT32, and FAT. ReFS is a new file system used with Storage Spaces in Windows 10; it offers self-healing and repairing capabilities.
Windows PowerShell is the preferred method to manage disks, but you can also use Disk Management and DiskPart.
You must initialize foreign disks before they can be used by Windows 10.
Windows 10 supports VHD and the newer VHDX format natively.
Storage Spaces enables you to combine redundant storage into a new, managed storage pool in which virtual disks are created, providing data redundancy and increased resilience at low cost.
BitLocker To Go can be used to secure removable hard drives and thumb drives with BitLocker encryption.
Windows 10 uses SMB to facilitate shares over the network by using SMB v 3.00 and later.
Share permissions are effective through shares and NTFS and are applicable to files and folders locally and when shared.
Public folders, HomeGroups, and simple folder sharing are useful for home-user and small networks to enable file sharing.
Windows 10 supports Type 4 printer-class drivers, which are more secure and easier to share and maintain. OEMs can install device management software in Device Stage.
OneDrive is a free, cloud-based, consumer-oriented file storage service that is built into Windows 10 and used by many other operating systems through the OneDrive app.
OneDrive On Demand Files will be available in Windows 10 version 1709 and will show placeholders for all files not hidden. Additionally files can be configured to always be stored locally.
OneDrive Fetch Files On Your PC enables you to access locally stored files from the OneDrive web portal.
Effective Permissions is useful to determine the permissions a particular user would have through NTFS permissions.
The OneDrive Recycle Bin and Undo Delete feature enable you to recover deleted files.
User Rights assignments affect what users can do to a system, and Security Permissions affects which access permissions a user has.
For home and small-business users, BitLocker recovery keys are stored in their Microsoft account at https://onedrive.live.com/recoverykey.
Although you can install desktop apps manually by using product DVDs, you can choose between several methods and technologies to deploy the apps to multiple computers.
Windows 10 is optimized to start quickly, but you can enable Fast Startup and configure the startup behavior of apps to improve startup times further.
You can add and remove Windows features by using the Settings app and by using either Windows PowerShell or the Dism.exe command-line tool.
You have extensive control over the configuration of Microsoft Store Apps and can use sideloading or the Microsoft Store for Business to manage your organization’s LOB apps.
You can deploy apps by using provisioning packages, either as part of a Windows 10 deployment image or subsequently to deployed Windows 10 devices.
You can choose from a number of management tools to perform remote management.
To configure and enable remote management settings, you must first modify the Windows Firewall configuration.
Remote Assistance can be used to view or take remote control of a remote user’s computer.
Both Remote Desktop and Remote Assistance can be configured manually or by using GPOs.
Windows PowerShell remoting enables you to perform remote management of any Windows 10-based computer with Windows PowerShell.
Management console snap-ins support both local and remote connections.