
Chapter 5. Managing Firewall Users
Refer to the following sections for information about these topics:
• 5-1: Managing Generic Users—Covers how default “generic” or ambiguous users can be allowed to connect to a firewall and execute commands or make configuration changes.
• 5-2: Managing Users with a Local Database—Presents methods to configure unique usernames locally on the firewall. You can then manage these users’ privileges and monitor their activity.
• 5-3: Defining AAA Servers for User Management—Discusses external servers that can be used to authenticate, authorize, and keep accounting records about user activity on and through a firewall.
• 5-4: Configuring AAA to Manage Administrative Users—Explains the configuration steps needed to offload user management functions when administrative users connect to a firewall.
• 5-5: Configuring AAA for End-User Cut-Through Proxy—Covers the methods that can be used to authenticate users initiating connections through a firewall and to authorize their ability to do so.
• 5-6: Firewall Password Recovery—Discusses procedures that can be used to recover or bypass a firewall’s privileged user password when it is lost or forgotten.
Although its primary function is to provide and enforce security policies at the boundaries of networks, a Cisco firewall also supports several methods to manage users who interact with it. Firewall users fall into the following general categories:
• Administrative users—Users who can open administrative sessions with the firewall to make configuration changes or to monitor activity. These users can connect to the firewall through the console, Telnet, Secure Shell (SSH), or the PIX Device Manager (PDM)/Adaptive Security Device Manager (ASDM) application.
• End users—These are users who need to open connections through the firewall. These connections can use various protocols, which are all ultimately inspected by the firewall. When the user first initiates a connection, the firewall intervenes with an authentication challenge. If the user successfully authenticates, that connection is opened. Through the cut-through proxy feature, the firewall opens future connections for that user without any intervention.
• VPN users—Remote-access users who need to open VPN client connections to the firewall. The firewall can use extended authentication (xauth) to authenticate the users before the VPN connections are completed.
Firewalls can perform three basic operations to manage any user’s access:
• Authentication—A user’s identity is verified against known credentials.
• Authorization—A user’s privileges are predefined and approved by a third party.
• Accounting—A user’s activity is recorded for auditing or billing purposes.
Finally, a Cisco firewall can support several levels of user management, based on the amount of control and security that is required. For example, a firewall can authenticate a user based on a generic password only, against a local or internal user database, or against databases maintained on external servers.
When users log in to a firewall, they are assigned a privilege level from 1 to 15 (0 is available, but is not used). User authentication and privilege levels are used for all management interfaces:
• The command-line interface
• Adaptive Security Device Manager (ASDM)
• Cisco Security Manager (CSM) or VPN/Security Management Solution (VMS)
By default, users begin at level 1 and move to level 15 only when they successfully enter privileged EXEC or enable mode.
Firewall commands are also given various privilege levels, so users can run only commands that are at the same level as or at a lower level than their own. By default, all firewall commands (both EXEC and configuration) are given privilege level 0 (the lowest) or 15 (the highest). Additional levels between 0 and 15 can be defined if the user community needs to be segmented further.
5-1 Managing Generic Users
By default, administrative users can authenticate with a firewall by using only a password. After they are authenticated, these users are known by the generic username enable_1.
The firewall prompts you for the password in Telnet and SSH sessions, but not in console sessions. On the console, a user is immediately placed at the unprivileged level.
With SSH sessions, users are prompted for a username and password. You can use the username pix as the generic username.
Tip
Even though you might be using an ASA or FWSM platform, you can still use pix as a username. The generic username began with the PIX family and has been retained since.
The following sections present the configuration steps needed to authenticate administrative users based only on a password or on a username and password pair, and to authenticate end users initiating traffic through the firewall.
Authenticating and Authorizing Generic Users
Generic user authentication is performed using only passwords. Users are authorized to perform certain actions based on the privilege level that they are permitted to use. Passwords can be defined for the two default privilege levels 0 and 15, as well as other arbitrary levels, using the following configuration steps:
1. Set the unprivileged mode password:
ASA, FWSM Firewall(config)# {password | passwd} password [encrypted]
PIX 6.3 Firewall(config)# {password | passwd} password [encrypted]
The generic user at privilege level 0 can be authenticated by entering the password string password. After the command is entered, the password string is encrypted whenever the configuration is displayed. This is denoted by the encrypted keyword.
You can also transfer this command to another firewall by copying and pasting. As long as the encrypted keyword is retained, the new firewall can use the same encrypted password.
Tip
You can use the following commands to reset the level 0 password to the default value cisco:
ASA, FWSM Firewall(config)# clear {password | passwd}
PIX 6.3 Firewall(config)# clear {password | passwd}
2. Set a privileged-mode password:
ASA, FWSM Firewall(config)# enable password [pw] [level priv_level] [encrypted]
PIX 6.3 Firewall(config)# enable password [pw] [level priv_level] [encrypted]
The password for privilege level priv_level is set to the string pw. If the level keyword is omitted, the password for enable mode or privilege level 15 is assumed.
You can use this command to define a new unique privilege level to support a subset of administrative users. Specify the priv_level as a level between 0 and 15.
If you need to reset the privilege level password to its default value (no password), use the enable password configuration command with no pw string given.
Tip
Administrative users can gain access to a specific privilege level by using the enable level command, where level is 0 to 15 (the default is 15).
Accounting of Generic Users
When a firewall is configured to authenticate administrative users with only a password, you can perform user accounting only through the logging function. You should make sure the following Syslog message IDs are enabled to use them as an audit trail of user activity. The default severity levels are shown in parentheses:
• 611101 (6)—Successful user authentication
• 611102 (6)—Failed user authentication
• 111008 (5)—User executed the command text
• 111009 (6)—User executed the command show text
• 611103 (5)—User logged out
• 502103 (5)—User changed privilege levels
It might seem odd that users connecting through the firewall console are not logged with a 611101 authentication message. This is because the console remains logged in to the generic privilege level 1 user at all times.
For example, the following output shows the Syslog audit trail for a user who moved into privilege level 15 (enable mode) and made a configuration change. Later, you might need to trace back and see which user made a specific change to the firewall.
single_vf : %PIX-7-111009: User 'enable_1' executed cmd: show clock
single_vf : %PIX-5-502103: User priv level changed: Uname: enable_15 From: 1 To:
15
single_vf : %PIX-5-111008: User 'enable_1' executed the 'enable' command.
single_vf : %PIX-5-111008: User 'enable_15' executed the 'configure terminal'
command.
single_vf : %PIX-5-111008: User 'enable_15' executed the 'access-list acl_outside
permit ip any any' command.
single_vf : %PIX-5-611103: User logged out: Uname: enable_1
Tip
Although the default generic user authentication is flexible and convenient, it offers little security benefit. For example, users log in by entering the level 1 password only. This means that every user must know and use the same password; there will never be an audit trail showing exactly who logged in. All level 1 users are simply shown as enable_1.
The level 15 enable access is similar—users must enter one enable password that is common to all administrators. Those users are simply shown as enable_15. Again, no accurate audit trail shows what user made what configuration change to the firewall.
Best practice dictates authenticating users with usernames that uniquely identify them. Each user also has a unique password and can be assigned to a specific privilege level if needed. This can be done in a local (internal) user database or on an external user database server.
5-2 Managing Users with a Local Database
You can configure a firewall to control user access by defining users in its local database. This approach assigns usernames and passwords to each end user, allowing access rights and accounting trails to be granular and specific.
Each user must use a unique username when accessing or passing through the firewall. For administrative users, privilege levels can be defined to authorize their ability to access firewall commands. User activity can also be tracked and identified by the unique usernames.
You can define usernames locally on the firewall if external user management servers (RADIUS, TACACS+, and so on) are unavailable or impractical. However, local user management does have some limitations. For example, each user’s password must be configured and updated on the firewall. Usernames must be added or deleted as users come and go from the enterprise. If a consistent user management framework must be used across the network, each user’s credentials and access rights must be maintained at every location.
Without a central point of management, local user databases do not scale very well and can become difficult to administer. Best practice is to use external user management servers first and then fall back on a local user database as a last resort.
Authenticating with Local Usernames
You can use the following configuration steps to define usernames locally on the firewall.
1. Define each firewall user:
Firewall(config)# username username [{nopassword | password password}
[encrypted]] privilege level
The user identified as username (a text string of up to 15 characters) can have a password configured with the password keyword. After password is entered, it is encrypted automatically so that the cleartext string is never displayed in the configuration. If this command is copied and pasted from one firewall to another, the encrypted keyword specifies that the password string is already encrypted before the command is executed.
If you choose to configure the user with no password, using the nopassword option, the blank password is still displayed as an encrypted string. However, you should carefully consider this, because anyone will be able to log in to the firewall (and potentially make configuration changes) by knowing only the username.
A privilege level must be given as level (1 to 15), where 15 is the highest level the user is allowed to reach. This limit applies only when enable authentication is configured. (See Step 3.)
Privilege level 1 is the lowest and offers the user the least capability. At level 15, the user can access and use any command on the firewall platform. All users begin at level 1 when they successfully authenticate. To move to a higher privilege level, users must issue the enable command.
2. Enable local user authentication:
Firewall(config)# aaa authentication {serial | telnet | ssh | http} console LOCAL
You can enable user authentication locally on the firewall for any of the following access methods:
• serial (console connection)
• telnet (Telnet)
• ssh (SSH sessions)
• http (Web-based management with PDM or ASDM)
You can repeat this command to define local authentication for more than one connection type.
You must always use the console keyword, indicating that firewall management sessions are being authenticated. The LOCAL keyword causes the firewall’s local username database to be used for authentication.
Tip
It might seem odd to use the aaa command here, even though external AAA servers are not used for the local user database. The firewall processes all user management functions involving usernames as AAA functions. A predefined AAA server group called LOCAL uses the LOCAL “protocol,” as if the following command were used:
Firewall(config)# aaa-server LOCAL protocol local
Requests that would go out to an external AAA server are intercepted and handled internally according to the local username database.
3. (Optional) Authenticate users for enable mode:
Firewall(config)# aaa authentication enable console LOCAL
By default, privilege level 15 is defined with the enable password configuration command. Any user who can successfully authenticate with the firewall can also use the enable command to move to level 15—regardless of the privilege level set for the username. As well, all users share the same password for privilege level 15.
You can configure enable authentication so that each user must enter an independent enable password to reach a higher privilege level. With local authentication, the enable password is the same as the username password for each user.
After a user is authenticated with his or her enable password, the privilege level is changed to the level configured for the username. In other words, the privileged EXEC level is set on a per-user basis; not every user automatically arrives at level 15.
For example, suppose the username userjoe is created with a privilege level limit of 15. A second user, userbob, has a privilege level limit of 5. Local authentication is used for SSH sessions. Enable authentication is configured locally so that each user can enter his or her password to move into the respective privilege level, as demonstrated with the following commands:
Firewall(config)# username userjoe password joespasswd privilege 15
Firewall(config)# username userbob password bobspasswd privilege 5
Firewall(config)# aaa authentication ssh console LOCAL
Firewall(config)# aaa authentication enable console LOCAL
User userjoe logs in to the firewall and moves into his privileged EXEC level (15). Each time, userjoe’s username password is used for authentication. The show curpriv command verifies the user’s current identity and privilege level, as shown in the following output:
login as: userjoe
[email protected]'s password:
Type help or '?' for a list of available commands.
Firewall> show curpriv
Username : userjoe
Current privilege level : 1
Current Mode/s : P_UNPR
Firewall> enable
Password: ********
Firewall# show curpriv
Username : userjoe
Current privilege level : 15
Current Mode/s : P_PRIV
Firewall#
Authorizing Users to Access Firewall Commands
Users are authorized to execute firewall commands based on a comparison of their current privilege level and each command’s privilege level. If the user’s level is greater than or equal to the command’s level, the user is allowed to use the command. If not, an error is returned.
By default, only a simple authorization test is used. Users at privilege level 1 can use only commands that are set at level 1. If a user can move to any level greater than 1, he or she can access any other command—even commands set for level 15.
You can use local command authorization to achieve more granularity. When it is enabled, strict privilege level comparisons are done for each command that is entered. Users who have privilege levels lower than the commands they try to use are rejected.
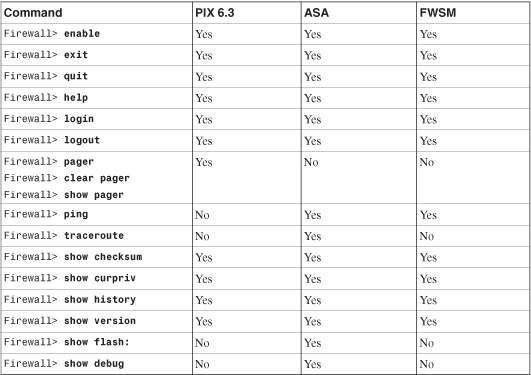
Each firewall command has a privilege level associated with it. Some command keywords can be used in several different modes, such as show (as in show pager), clear (as in clear pager), and configure (as in pager 24 in configuration mode). Each of these is considered a separate command, having a unique privilege level. Therefore, the privilege levels are assigned according to the command keyword and the mode in which it is used. EXEC mode commands that can be run without the show or clear keywords are referenced in configure mode. An example is the help command.
By default, the commands shown in Table 5-1 are accessed with privilege level 0; all other commands default to level 15.
Table 5-1 Commands Accessed with Privilege Level 0
Local user authorization is configured using the following steps:
1. (Optional) Display the current privilege levels for commands:
ASA, FWSM Firewall# show privilege {all | command command | level level}
PIX 6.3 Firewall# show privilege {all | command command | level level}
You can see the current privilege level configured for all possible firewall commands, or for only a single command command (only the first keyword). You can also see all the commands available to a user at a given privilege level level (0 to 15). (The default privilege levels are not shown in the configuration file. On an ASA or FWSM platform, you can see default settings for any command with the show run all command.)
2. Set a command’s privilege level:
ASA, FWSM Firewall(config)# privilege [show | clear | cmd] level level [mode
mode] command command
PIX 6.3 Firewall(config)# privilege {show | clear | configure} level level
[mode {enable | configure}] command command
For the mode (show, clear, or configure) of the command keyword command, a new privilege level (0 to 15) is assigned. In ASA and FWSM, the configure mode is known only as cmd mode.
Some commands can also be used in several submodes within a single mode. In PIX 6.3, for example, the clear logging command can be run from enable mode or configure mode. In either case, the contents of the logging buffer are cleared, but you might want to restrict that command when a user is in one mode versus another.
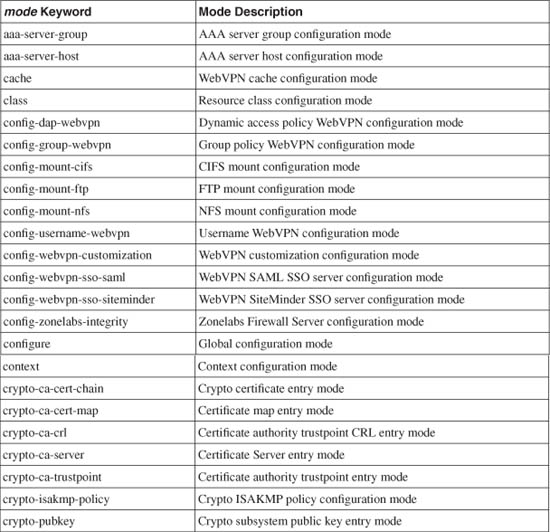
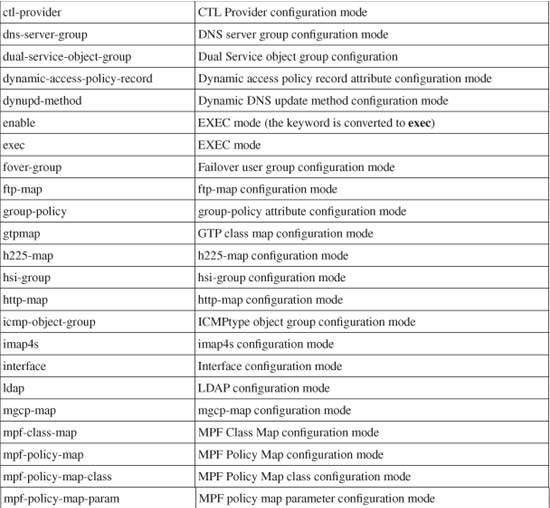
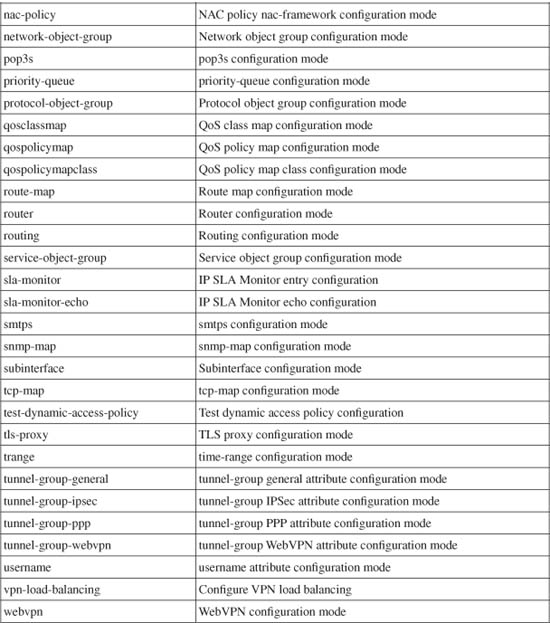
In ASA and FWSM, you can set command privilege levels with a greater granularity. You can use the mode keyword to identify a specific mode or submode where the command keyword is used. The mode parameter can be given as any one of the keywords shown in Table 5-2, usually shown in the firewall configuration mode prompt.
Table 5-2 ASA Privileged Command Mode Values
For example, users at or above level 8 can be allowed to show the connection table entries:
Firewall(config)# privilege show level 8 command conn
ASA and FWSM can also accept this command as
Firewall(config)# privilege show level 8 mode exec command conn
3. Enable local command authorization:
Firewall(config)# aaa authorization command LOCAL
Each time a user attempts to use a firewall command, the firewall authorizes the user based on the local privilege configuration commands.
Accounting of Local User Activity
With local user authentication and authorization, user accounting can be performed only through the logging function. You should make sure that the following Syslog message IDs are enabled to use them as an audit trail of user activity. The default severity levels are shown in parentheses:
• 611101 (6)—Successful user authentication
• 611102 (6)—Failed user authentication
• 502103 (5)—User changed privilege levels
• 111008 (5)—User executed the command text
• 111009 (7)—User executed the command show text
• 611103 (5)—User logged out
For example, suppose someone managed to log in to a firewall, clear its configuration, and reload it. If Syslog were configured on the firewall, you might be able to find an audit trail with clues as to who took those actions. In the following output, a user named userjane has authenticated, used the enable command to move into privilege level 15, cleared the configuration, and reloaded the firewall:
%ASA-6-109005: Authentication succeeded for user 'userjane' from 172.28.4.41/0 to
10.1.1.10/24 on interface outside
%ASA-6-611101: User authentication succeeded: Uname: userjane
%ASA-5-502103: User priv level changed: Uname: userjane From: 1 To: 15
%ASA-5-111008: User 'userjane' executed the 'enable' command.
%ASA-7-111009: User 'userjane' executed cmd: show clock
%ASA-5-111008: User 'userjane' executed the 'write erase' command.
%ASA-5-111008: User 'userjane' executed the 'reload' command.
5-3 Defining AAA Servers for User Management
A firewall can interface with external user management servers to offload any authentication, authorization, or accounting (AAA) functions. This provides a very scalable solution, because all user identities, privileges, and activity logs can be centralized.
You can use the following steps to configure AAA servers and server groups for all AAA-related firewall functions:
1. Define the AAA server group and protocol:
ASA, FWSM Firewall(config)# aaa-server server_tag protocol {tacacs+ | radius}
PIX 6.3 Firewall(config)# aaa-server server_tag protocol {tacacs+ | radius}
A group of servers is named server_tag (an arbitrary string without white space) using a common AAA protocol. All firewall platforms support the tacacs+ or radius protocol. In fact, PIX 6.3 has the following three predefined server groups:
aaa-server TACACS+ protocol tacacs+
aaa-server RADIUS protocol radius
aaa-server LOCAL protocol local
With ASA and FWSM, only the LOCAL group is predefined. You can also use other AAA protocols if they exist in your network. Specific protocol parameters are configured on a per-server basis in Step 2.
Tip
You can define multiple AAA servers in a single group. Table 5-3 lists the maximum number of server groups and servers per group.
Table 5-3 AAA Server Limits by Security Platform
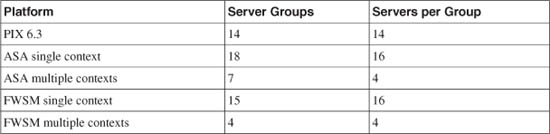
The firewall sends requests to the first server configured in the group. If that server does not answer within a configurable time, the other servers in the group are tried in succession.
a. (Optional) Set the server failure threshold:
ASA, FWSM Firewall(config-aaa-server-group)# max-failed-attempts number
PIX 6.3 Firewall(config)# aaa-server server_tag max-failed-attempts number
If a AAA server is unreachable, the firewall retries its request. After number (1 to 5; the default is 3) failed attempts, the firewall declares that server dead and moves on to the next server in the group.
b. (Optional) Define a server reactivation policy:
ASA, FWSM Firewall(config-aaa-server-group)# reactivation-mode {depletion [deadtime minutes] | timed}
PIX 6.3 Firewall(config)# aaa-server server_tag deadtime minutes
By default, any server that is considered deactivated remains deactivated until no more usable servers remain in the group. This is called depletion mode.
If only one server group is configured for a AAA function, all servers are immediately reactivated after depletion so that they can be tried again.
If multiple server groups are configured for a AAA function, a depleted group is skipped so that the next server group can be used. The depleted group is declared dead for the duration of the deadtime timer, configured as minutes (1 to 1440; the default is 10 minutes). After that time, the failed servers are reactivated in the group, and that group is eligible for new AAA requests.
In ASA and FWSM, you can use an alternative policy called timed reactivation. Here, any failed or deactivated server is automatically reactivated after 30 seconds.
c. (Optional) Define an accounting policy:
ASA, FWSM Firewall(config-aaa-server-group)# accounting-mode {single | simultaneous}
PIX 6.3 -
If you are using AAA accounting, you can specify how the accounting information will be sent. With the single keyword, accounting messages are sent to only the active server. The firewall can also send the accounting messages to every server in the group if the simultaneous keyword is used.
a. Identify the server:
ASA, FWSM Firewall(config)# aaa-server server_tag [(if_name)] host server_ip
[key] [timeout seconds]
PIX 6.3 Firewall(config)# aaa-server server_tag [(if_name)] host server_ip
[key] [timeout seconds]
The server located on the firewall interface named (if_name) (be sure to include the parentheses) at IP address server_ip is added to the server_tag group. If you do not specify the interface, the outside interface is assumed. The firewall can use the string key (a text string of up to 127 characters without spaces) for all exchanges with the server. Therefore, you must configure the same key on the server and the firewall.
If a response is not received from the server within a timeout period of seconds (the default is 5 seconds), the firewall sends the same request to the next server in the group.
b. (Optional) Set the server deactivation timer:
ASA, FWSM Firewall(config-aaa-server-host)# timeout seconds
PIX 6.3 -
The firewall continues to retry requests for a timeout period of seconds (1 to 60; the default is 10 seconds) before it declares the server dead. After that point, the next server in a server group is tried.
c. (Optional) Use one common port for all server protocols:
ASA, FWSM Firewall(config-aaa-server-host)# server-port port
PIX 6.3 -
Each AAA protocol uses a different default port for its services. For example, TACACS uses port 49, Kerberos uses 88, Lightweight Directory Access Protocol (LDAP) uses 389, NT uses 139, and Security Dynamics Incorporated (SDI) uses 5500. You can configure the firewall to use one port (1 to 65535) for any protocol used on the server, as long as the server is also configured to use the same port.
Although it is not necessary, using one common port for any AAA protocol can simplify the types of traffic passing between the firewall and the server. This in turn might simplify any firewall or router access lists that need to permit the AAA traffic.
3. (Optional) Adjust RADIUS server parameters.
a. (Optional) Adjust the RADIUS port numbers:
ASA, FWSM Firewall(config-aaa-server-host)# authentication-port port
Firewall(config-aaa-server-host)# accounting-port port
PIX 6.3 Firewall(config)# aaa-server {radius-authport | radius-acctport} [port]
By default, a firewall uses UDP/TCP port 1645 for RADIUS authentication and port 1646 for accounting.
Tip
You should confirm that your RADIUS server uses matching port numbers. If it does not, you can configure the authentication port (radius-authport) or the accounting port (radius-acctport) to port. Some RADIUS servers use legacy values of 1812 for authentication and 1813 for accounting.
b. Set the RADIUS key:
ASA, FWSM Firewall(config-aaa-server-host)# key key
PIX 6.3 -
In ASA and FWSM, the RADIUS key (a text string of up to 127 characters without spaces) should be configured as a host parameter. You must configure the same key on the firewall and the RADIUS server.
c. (Optional) Set the retry interval:
ASA, FWSM Firewall(config-aaa-server-host)# retry-interval seconds
PIX 6.3 -
If the server does not answer a RADIUS request, the firewall retries it after seconds (1 to 10; the default is 10 seconds) has elapsed.
d. (Optional) Use one common password for server requests:
ASA, FWSM Firewall(config-aaa-server-host)# radius-common-pw string
PIX 6.3 -
You can configure a common password that the firewall will use for all RADIUS authorization requests. The password is given as string (up to 127 characters).
4. (Optional) Adjust Kerberos server parameters.
a. Define the Kerberos realm name:
ASA, FWSM Firewall(config-aaa-server-host)# kerberos-realm string
PIX 6.3
The Kerberos realm name defined on the server is string (up to 64 characters with no spaces).
b. (Optional) Set the retry interval:
ASA, FWSM Firewall(config-aaa-server-host)# retry-interval seconds
PIX 6.3 -
If the server does not answer a RADIUS request, the firewall retries it after seconds (1 to 10; the default is 10 seconds) has elapsed.
5. (Optional) Adjust LDAP server parameters.
a. (Optional) Use SASL authentication:
ASA, FWSM Firewall(config-aaa-server-host)# sasl-mechanism {digest-md5 | kerberos server_group_name}
PIX 6.3 -
The firewall authenticates with an LDAP server on behalf of the actual clients by using Simple Authentication and Security Layer (SASL). With the digest-md5 keyword, an MD5 hash of the username and password is sent to the LDAP server. Kerberos can be used instead, with the kerberos keyword. The server_group_name is the name of the AAA server group used for Kerberos.
b. (Optional) Secure the LDAP communication:
ASA, FWSM Firewall(config-aaa-server-host)# ldap-over-ssl enable
PIX 6.3 -
Normally, traffic between the firewall and the LDAP server is sent in the clear. With the ldap-over-ssl command, an SSL connection is brought up so that the LDAP traffic is secured.
c. (Optional) Set the LDAP server type:
ASA, FWSM Firewall(config-aaa-server-host)# server-type {auto-detect | microsoft | sun | generic}
PIX 6.3 -
By default, the firewall attempts to automatically detect the type of LDAP server it is communicating with. You can use this command to define the server type if auto-detection is not giving the results you expect. The server type can be auto-detect (the default), microsoft (Microsoft LDAP), sun (Sun LDAP), or generic (generic LDAPv3).
d. Set the starting point in the LDAP hierarchy:
ASA, FWSM Firewall(config-aaa-server-host)# ldap-base-dn string
PIX 6.3 -
To process a AAA request, the LDAP server should begin its search at the distinguished name (DN) given by string (up to 128 characters). A DN has the form XX=xxxx,YY=yyyy,... where XX and YY are abbreviations for parameters within the hierarchy, and xxxx and yyyy are strings. For example, a DN string can be o=MyCompany.com or o=MyCompany.com,ou=Engineering.
e. Limit the scope of an LDAP search:
ASA, FWSM Firewall(config-aaa-server-host)# ldap-scope {onelevel | subtree}
PIX 6.3 -
By default, the LDAP server is asked to search only one tree level (onelevel) below the base DN. If your LDAP hierarchy is structured such that there are many levels below the base, you can use the subtree keyword to force a search of the entire subtree.
f. Define the relative DN attributes to search:
ASA, FWSM Firewall(config-aaa-server-host)# ldap-naming-attribute string
PIX 6.3 -
When a user is authenticated or authorized, the firewall can pass only the username and password to the LDAP server. The firewall must also inform the LDAP server which DN attributes are necessary to uniquely identify a user during a search. These are given as string (up to 128 characters).
For example, if usernames are referenced in the Common Name attribute (the CN field of a DN), the following command would be used:
Firewall(config-aaa-server-host)# ldap-naming-att cn
g. Authenticate the firewall:
ASA, FWSM Firewall(config-aaa-server-host)# ldap-login-dn string Firewall(config-aaa-server-host)# ldap-login-password string
PIX 6.3 -
The firewall must authenticate itself with the LDAP server when AAA requests are sent. This is done with a DN and a password, which are strings of up to 128 and 64 characters, respectively.
For example, a firewall might authenticate itself with the following DN and password commands:
Firewall(config-aaa-server-host)# ldap-login-dn cn=firewall,
o=mycompany.com,ou=networking
Firewall(config-aaa-server-host)# ldap-login-password mysecretpassword
h. (Optional) Map user-defined LDAP attributes to Cisco LDAP attributes:
If you are adding a firewall to an existing LDAP environment, you might need to map existing, user-defined attributes to Cisco LDAP attributes. The mapping is defined as an attribute map with the ldap-attribute-map global configuration command. You can map attribute names and attribute values as needed, using the map-name and map-value commands, respectively:
ASA, FWSM Firewall(config-aaa-server-host)# ldap-attribute-map map_name
Firewall(config-aaa-server-host)# exit
Firewall(config)# ldap-attribute-map map_name {auto-detect|
microsoft | sun | generic}
Firewall(config-ldap-attribute-map)# map-name
user_attribute_name cisco_attribute_name
Firewall(config-ldap-attribute-map)# map-value
user_attribute_name user_value_string cisco_value_string
PIX 6.3 -
6. (Optional) Identify the NT domain controller:
ASA, FWSM Firewall(config-aaa-server-host)# nt-auth-domain-controller string
PIX 6.3 -
The name of the Windows NT Primary Domain Controller (PDC) is defined as string (up to 16 characters).
7. (Optional) Adjust SDI SecureID server parameters.
a. Define the SDI protocol version:
ASA, FWSM Firewall(config-aaa-server-host)# sdi-version {sdi-pre-5 | sdi-5}
PIX 6.3 -
The SDI version should be set to reflect the version used on the server: sdi-pre-5 (releases before 5.0) or sdi-5 (release 5.0 or later).
b. (Optional) Set the retry interval:
ASA, FWSM Firewall(config-aaa-server-host)# retry-interval seconds
PIX 6.3 -
If the server does not answer an SDI request, the firewall retries it after seconds (1 to 10; the default is 10 seconds) has elapsed.
5-4 Configuring AAA to Manage Administrative Users
You can use external AAA servers to manage users who connect to the firewall for administrative purposes. Usernames and passwords are created or deleted on one or more centralized AAA servers. The firewall can query the servers when users connect and need to be authenticated. Firewall command authorization can also be used when various users must be limited to specific privilege levels and sets of commands. A firewall can also generate user accounting information that is collected by the external servers.
You can use the configuration steps covered in the following sections to set up AAA for administrative user management.
Enabling AAA User Authentication
Follow these steps to configure administrative user authentication with AAA servers:
1. Authenticate with a AAA server group:
Firewall(config)# aaa authentication {serial | telnet | ssh | http} console
server_tag [LOCAL]
The AAA server group named server_tag is used to handle authentication requests. The server group must be configured as a separate step, as described in section 5-3, “Defining AAA Servers for User Management.” Each server defined in the group is tried in succession in case some are unreachable or unavailable.
If all the servers in the group are down or the firewall cannot reach any of them because of networking issues, the user authentication fails. This means that you can effectively be locked out of the firewall, unable to make any configuration changes or execute any commands.
As a fallback measure, you can add the LOCAL keyword to make the firewall use local authentication after trying the AAA server group. Even if the network is down, the local user database always is available as a way to authenticate with and connect to the firewall. You should define some administrative users on the firewall with the username command. You do not need to duplicate the entire set of users defined on the AAA servers. Just define enough usernames to allow you and your staff to connect.
2. (Optional) Authenticate users for enable mode:
Firewall(config)# aaa authentication enable console server_tag [LOCAL]
By default, privilege level 15 is defined with the enable password configuration command. Any user who can successfully authenticate with the firewall can also use the enable command to move to level 15, regardless of the privilege level set for the username. As well, all users share the same password for privilege level 15.
You can configure enable authentication so that each user must enter an independent enable password to reach a higher privilege level. With an AAA server group, you can define a unique enable password for each user.
After a user is authenticated with his or her enable password, the privilege level is changed to the level configured for the username. In other words, the privileged EXEC level is set on a per-user basis; not every user automatically arrives at level 15.
Tip
Enable authentication is fully functional with TACACS+ servers, because they support per-user enable passwords and enable privilege level settings. You can also use RADIUS servers for this, but each user’s enable password is always identical to his or her RADIUS password. As well, RADIUS does not directly support enable privilege levels for users.
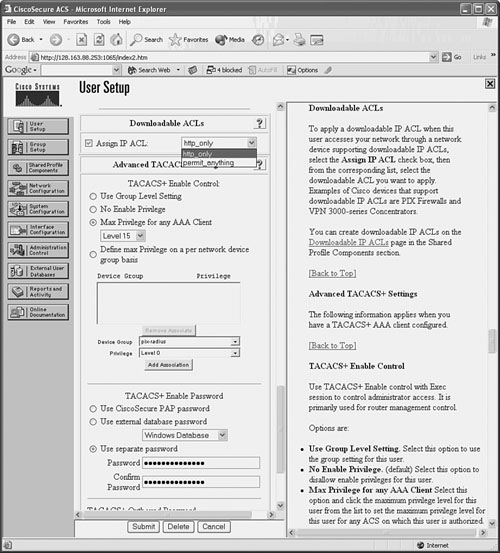
Figure 5-1 shows an example of the User Setup configuration for a user in CiscoACS. Under Advanced TACACS+ Settings, the user’s maximum privilege level is set to 15 for any AAA client accessible to the user. The per-user enable password has also been configured in the TACACS+ Enable Password section as a separate password maintained in the CiscoACS database.
Figure 5-1 Enabling Authentication Configuration on a CiscoACS Server
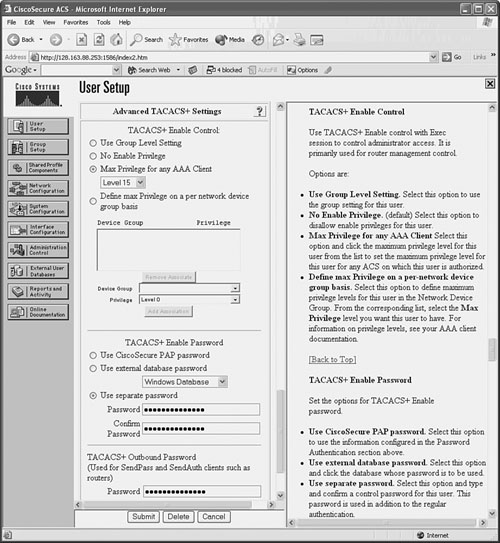
With CiscoACS, make sure the enable authentication options are made available in the user or group setup screens. In the Interface Configuration, go to Advanced Options and make sure the Per-User TACACS+/RADIUS Attributes option is checked. You should also go to Interface Configuration and select TACACS+(Cisco IOS); make sure the Advanced TACACS+ Features option is checked.
For example, suppose a firewall needs to be configured to use a farm of five RADIUS servers for administrative user authentication. The server has IP addresses 192.168.100.10 through 14, all located on the inside firewall interface. These servers authenticate users connecting to the console port, Telnet, SSH, and web-based management applications. As a fallback, local authentication is used to support a single user ID, admin, in case none of the RADIUS servers can be reached.
The following configuration commands can be used to complete the scenario:
Firewall(config)# aaa-server RADIUS_FARM protocol radius
Firewall(config)# aaa-server RADIUS_FARM (inside) host 192.168.100.10 key
Server1Key
Firewall(config)# aaa-server RADIUS_FARM (inside) host 192.168.100.11 key
Server2Key
Firewall(config)# aaa-server RADIUS_FARM (inside) host 192.168.100.12 key
Server3Key
Firewall(config)# aaa-server RADIUS_FARM (inside) host 192.168.100.13 key
Server4Key
Firewall(config)# aaa-server RADIUS_FARM (inside) host 192.168.100.14 key
Server5Key
Firewall(config)# aaa authentication serial console RADIUS_FARM LOCAL
Firewall(config)# aaa authentication telnet console RADIUS_FARM LOCAL
Firewall(config)# aaa authentication ssh console RADIUS_FARM LOCAL
Firewall(config)# aaa authentication http console RADIUS_FARM LOCAL
Firewall(config)# aaa authentication enable console RADIUS_FARM LOCAL
Firewall(config)# username admin password AdminPW privilege 15
Enabling AAA Command Authorization
If you are using external TACACS+ servers, you can configure command authorization with the following configuration command:
Firewall(config)# aaa authorization command server_tag [LOCAL]
In ASA or FWSM, you can add the LOCAL keyword to allow a fallback method of local command authorization in case none of the TACACS+ servers can be reached.
On a CiscoACS server, you can follow these steps to configure command authorization:
1. In Interface Configuration, go to TACACS+(Cisco IOS). Under TACACS+ Services, check the Shell(exec) boxes for User or Group. This displays command authorization options in the user and/or group configuration pages.
2. Select User Setup or Group Setup, depending on whether command authorization will be configured per user or per group. Select the appropriate user or group from the list.
3. Under TACACS+ Settings, look for the Shell Command Authorization Set section. Select Per User (or Per Group) Command Authorization. You can configure specific commands to permit or deny for the user or group. For all other “unmatched” or unspecified Cisco IOS commands, choose whether the CiscoACS server will Permit or Deny them.
4. To authorize a specific command, check the Command box and enter the first command keyword in the text box. You can also specify command arguments or keywords in the Arguments box. Under Unlisted arguments (arguments or keywords that you do not explicitly list for the command), select whether to Permit or Deny them.
The ACS page can display space for more than one command to be configured. You can enter an additional command in each section that begins with a “Command” checkbox. Click the Submit button at the bottom of the page when all the command arguments have been entered. You can add more commands to the list by selecting the user or group again. Each time you configure a command, it is appended to the list of commands and arguments on the configuration page.
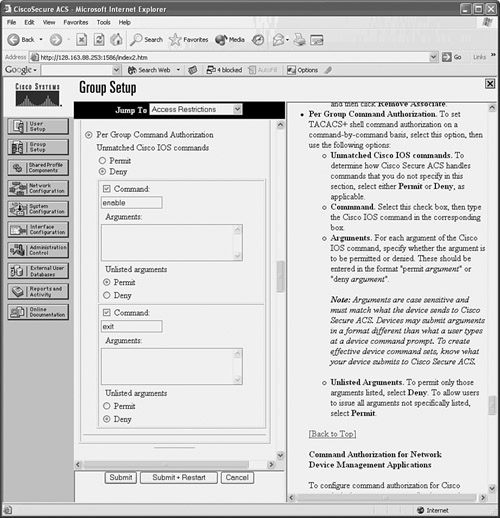
Figure 5-2 shows an example of how a CiscoACS group has been configured so that enable and exit are permitted commands. All other commands are denied for the group.
Figure 5-2 CiscoACS TACACS+ Command Authorization
5. You can also define lists of permitted firewall commands, which can be applied to users or groups in CiscoACS.
a. Go to Shared Profile Components, and select Shell Command Authorization Set.
Enter one command (only the first keyword) at a time in the text box, and click Add Command. If you need to specify keywords that can appear after the command keyword, enter those in the rightmost text box. Be sure to begin each line with permit or deny, followed by the command arguments and keywords.
Choose whether unmatched (unlisted) commands will be permitted or denied. Then click Submit.
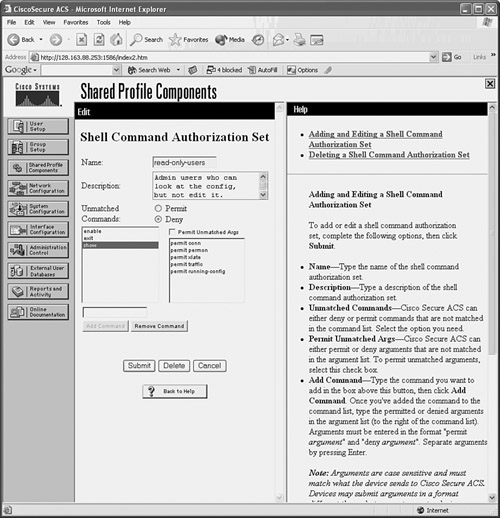
In Figure 5-3, a shell command authorization set has been configured to allow a subset of users to display various firewall resources. With the show command, only specific keywords are permitted. Any other command that is not listed is denied.
Figure 5-3 CiscoACS Command Authorization Set Configuration
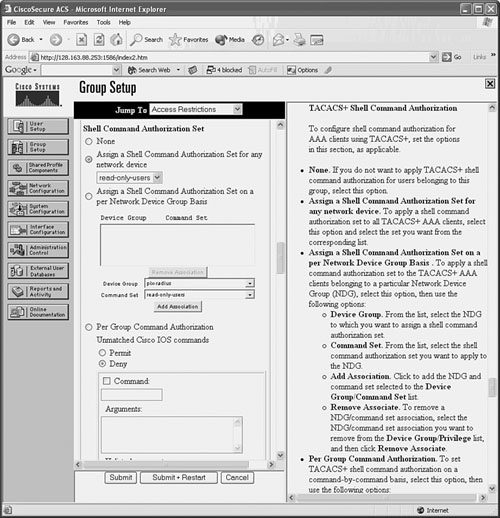
b. After a command authorization set is configured, you can apply it in User Setup or Group Setup. Under the Shell Command Authorization Set section, you can select the set in the drop-down list. Figure 5-4 shows how the read-only-users command authorization set can be applied to any network device that CiscoACS makes available to a group.
Tip
If you decide to enable command authorization, you should make sure you define an administrative user who can always access all firewall commands. In other words, disable command authorization for at least one administrative user so that you have a fallback plan. Otherwise, it is possible to misconfigure command authorization for users or groups such that you are effectively denied from making configuration changes on the firewall.
Figure 5-4 Applying a CiscoACS Command Authorization Set
Enabling AAA Command Accounting
In PIX 6.3 or FWSM prior to 3.1(1), AAA command accounting can be performed only through the logging function. In that case, you should make sure the following Syslog message IDs are enabled to use them as an audit trail of user activity. The default severity levels are shown in parentheses:
• 611101 (6)—Successful user authentication
• 611102 (6)—Failed user authentication
• 502103 (5)—User changed privilege levels
• 111008 (5)—User executed the command text
• 111009 (7)—User executed the command show text
• 611103 (5)—User logged out
Beginning with ASA 7.0(1) and FWSM 3.1(1), accounting records can be generated each time an administrative user executes a firewall command. These accounting records can be sent to one or more AAA RADIUS or TACACS+ accounting servers.
To enable command accounting, you can use the following configuration command:
Firewall(config)# aaa accounting command [privilege level] server_tag
Accounting records are generated only when users execute commands at or above the privilege level level (0 to 15; the default is 0). The accounting records are sent to the current active server in the server group configured as server_tag.
With CiscoACS, you can view accounting records by clicking the Reports and Activity button. Then click TACACS+ Accounting or RADIUS Accounting. All accounting reports are in comma-separated value (CSV) format and can be displayed in a web browser.
5-5 Configuring AAA for End-User Cut-Through Proxy
A firewall can be configured to require users to authenticate before connections are permitted. As soon as an authentication is successful, it is cached and used to permit subsequent connections from the same user.
The firewall functions as an authentication proxy, because cached authentication information is used in place of repeated authentication credentials entered by the user. Connections simply “cut through” the firewall in a very efficient fashion.
Devices that initiate connections but cannot participate in authentication (Cisco IP phones, for example) can be exempted from AAA and allowed to pass through the firewall.
Authenticating Users Passing Through
You can use the following steps to configure AAA authentication for cut-through proxy users:
1. (Optional) List protocols that trigger authentication:
Firewall(config)# aaa authentication {include | exclude} service if_name
local_ip local_mask [foreign_ip foreign_mask] server_tag
To trigger user authentication, use the include keyword and identify the triggering protocol as service. This usually is a protocol that can support native authentication, where a username and password exchange is possible. These are telnet, ssh, ftp, http, and https, which can also be written as tcp/23, tcp/22, tcp/21, tcp/80, and tcp/443, respectively.
You can also specify other types of traffic as udp/port, tcp/port, icmp/type, or protocol/port (the IP protocol number and port number). You can use 0 for a port or type to indicate a wildcard for any value, as in tcp/0 for any TCP port. Notice that these values always pertain to the destination port and never the source port.
Note
Be aware that the cut-through proxy authentication process can be triggered only with Telnet, SSH, FTP, HTTP, or HTTPS traffic. If you specify other types of traffic, those packets are dropped unless the user has already authenticated and has a cut-through proxy session already initiated.
Authentication is triggered for connections initiated from the firewall interface named if_name (“inside,” for example) from local addresses defined by local_ip and local_mask. You can define specific destination addresses by foreign_ip and foreign_mask if needed. To indicate a wildcard local or foreign address, you can use 0s or the any keyword for the address and mask values.
Authentication is performed by contacting the server group name server_tag. This can be a TACACS+ group name, a RADIUS group name, or the firewall itself with the LOCAL keyword.
Tip
With the include keyword, no traffic is allowed to pass from a given user (source address) until that user has successfully authenticated using Telnet, FTP, HTTP, or HTTPS. You can define protocols that are allowed to pass without authentication by using the exclude keyword.
2. (Optional) Use an access list to trigger authentication:
Firewall(config)# aaa authentication match acl_name if_name server_tag
Here, an access list named acl_name is used to match connections that are initiated from hosts on the firewall interface named if_name. Protocols that can be authenticated are defined in permit statements in the access list.
Because this is the most specific method of traffic authentication, it is also the preferred method. You can make the matching conditions very specific by giving the local (source) and foreign (destination) addresses. Remember that the matching protocol is always specified as the destination port in the access list entry.
The authentication server group named server_tag is used to handle the actual authentication. This can be a TACACS+ server group name, a RADIUS server group name, or the firewall itself as LOCAL.
For example, all IP traffic coming from source addresses 172.16.0.0/24 should be authenticated before being passed through the firewall. In addition, all HTTP and HTTPS connections initiated from the inside interface should be authenticated. Authentication is handled by servers assigned to the default TACACS+ server group. The following commands can be used to accomplish this:
Firewall(config)# access-list AuthList1 permit ip 172.16.0.0 255.255.255.0
any
Firewall(config)# access-list AuthList1 permit tcp any any eq http
Firewall(config)# access-list AuthList1 permit tcp any any eq https
Firewall(config)# aaa authentication match AuthList1 inside TACACS+
3. (Optional) Use SSL for all web-related authentication:
Firewall(config)# aaa authentication secure-http-client
By default, if a user initiates authentication with Telnet, FTP, or HTTP traffic, his or her username and password credentials are collected as cleartext through a popup browser window. You can use this command to force the firewall to use SSL to collect this information securely with encryption.
Note
A firewall supports only 16 simultaneous SSL sessions for the initial user authentication. Any connections that require additional SSL sessions are dropped until a new session can be started.
4. (Optional) Exempt devices from authentication.
a. Define a list of exempt MAC addresses:
Firewall(config)# mac-list id {deny | permit} mac macmask
The device list is named id (an arbitrary text name). You can permit the device to pass without authentication or deny it from doing so. The device is identified by its Media Access Control (MAC) address mac (in dotted-triplet form, as in 1111.2222.3333) and a MAC address mask macmask (in dotted-triplet format, where a 1 bit matches and a 0 bit ignores). To match a single-device MAC address, the macmask is given as ffff.ffff.ffff.
You can repeat this command to define multiple MAC addresses in a single list. For example, the following MAC list allows the host using MAC address 0006.5b02.a841 or 0040.9646.6cf6 to initiate connections without authentication:
Firewall(config)# mac-list Exemptions permit 0006.5b02.a841 ffff.ffff.ffff
Firewall(config)# mac-list Exemptions permit 0040.9646.6cf6 ffff.ffff.ffff
Note
If you decide to list device MAC addresses here, those devices must be located on the firewall interface’s IP subnet. In other words, they cannot lie beyond a router, or their MAC addresses will become obscured by the router.
Any devices not explicitly permitted or denied in a MAC address control list are subject to any other authentication methods that are configured on the firewall interface.
b. Apply the list to authentication:
Firewall(config)# aaa mac-exempt match id
The MAC address control list named id is used to permit or deny specific hosts from passing without authentication.
5. (Optional) Limit per-user proxy connections:
Firewall(config)# aaa proxy-limit {proxy_limit | disable}
By default, a firewall supports cut-through proxy for up to 16 concurrent active connections per user. You can change this limit to proxy_limit (1 to 128 concurrent connections per user) or disable the limit completely.
6. (Optional) Adjust the cut-through proxy session timer.
The firewall keeps two timers for each user’s connection activity after a successful authentication: an absolute timer and an inactivity timer.
a. Adjust the absolute timer:
Firewall(config)# timeout uauth hh[:mm[:ss]] absolute
By default, the absolute timer is used to require a user to reauthenticate if a new connection is initiated at least 5 minutes after the previous authentication. This timer runs for each user who authenticates with the cut-through proxy feature. The user must authenticate again if a new connection begins after the timer has expired, even if other connections are active or still initiating.
You can set the absolute timer by giving the hours, minutes, and seconds duration. Notice that minutes and seconds are both optional. It might seem intuitive that giving two digits (60, for example) would mean seconds, but in fact it means hours.
b. Adjust the inactivity timer:
Firewall(config)# timeout uauth hh[:mm[:ss]] inactivity
By default, the inactivity timer is set to 0, which disables it for each user. You can use this timer to require a user to reauthenticate only after all his or her connections become idle or inactive (no data passed) for a period of time. Opening a new connection also resets the counter.
You can set the inactivity timer by giving the hours, minutes, and seconds duration. Notice that minutes and seconds are both optional. It might seem intuitive that giving two digits (60, for example) would mean seconds, but in fact it means hours.
Tip
Setting and using the user authentication (uauth) timers is a bit of a trade-off. The absolute timer forces a strict authentication policy, making users reauthenticate again and again at regular intervals. This can be beneficial to protect access to sensitive data, but it also can be a nuisance to the end users.
The inactivity timer is less secure but more user-friendly. As long as a connection is kept alive, the user is not asked to authenticate again.
You can use both timers to gain some benefits from each. Always make sure that the inactivity timer is set to a value less than the absolute timer. In addition, the absolute timer must be set to a value less than the xlate timer. The idea is to require an absolute timer authentication only after all sessions become inactive. Any existing xlate entries for the user’s connections should also stay alive until both types of timers have expired and the user has been given a chance to reauthenticate.
You can use the show timeout command to see the current values of all connection timers. For example, this firewall is configured to reauthenticate users after their connections have been idle for 15 minutes and at regular 30-minute intervals:
Firewall# show timeout
timeout xlate 3:00:00
timeout conn 1:00:00 half-closed 0:10:00 udp 0:02:00 rpc 0:10:00 h225 1:00:00
timeout h323 0:05:00 mgcp 0:05:00 sip 0:30:00 sip_media 0:02:00
timeout uauth 0:30:00 absolute uauth 0:15:00 inactivity
Firewall#
Authorizing User Activity with TACACS+ Servers
You can follow these steps to configure traffic authorization using AAA and TACACS+ servers:
1. List protocols that require authorization:
Firewall(config)# aaa authorization {include | exclude} service if_name
local_ip local_mask foreign_ip foreign_mask server_tag
The protocol that must be authorized for a user is identified as service with the include keyword. The protocol can be telnet, ftp, http, any, or protocol/port (decimal IP protocol number and decimal port number).
Connections using this protocol are initiated on the firewall interface named if_name from local addresses defined by local_ip and local_mask. You can define specific destination addresses by foreign_ip and foreign_mask if needed. To indicate a wildcard local or foreign address, use 0s for the address and mask values. This is similar to the any keyword in Cisco router IOS software.
Authorization is performed by contacting the TACACS+ server group name server_tag. For example, the following commands cause the firewall to generate requests to see if the users are authorized to initiate FTP and Telnet connections. All other connection types are authorized without explicit AAA authorization requests.
Firewall(config)# aaa authorization include ftp inside 0 0 0 0 TACACS_Farm
Firewall(config)# aaa authorization include telnet inside 0 0 0 0 TACACS_Farm
2. (Optional) Use an access list to trigger authorization:
Firewall(config)# aaa authorization match acl_name if_name server_tag
Here, an access list named acl_name is used to match connections that are initiated from the firewall interface named if_name. Protocols that are checked for authorization are defined in permit statements in the access list. You can make the matching conditions very specific by giving the local (source) and foreign (destination) addresses.
This is the preferred method of defining authorization, because the access list is the most scalable and easiest to administer. Remember that the matching protocol is always specified as the destination port in the access list entry.
The TACACS+ server group named server_tag is used to handle the actual authorization.
3. Configure a user’s TACACS+ profile.
To authorize a user to use a protocol, you must configure the user’s profile on the TACACS+ server. TACACS+ has a facility to authorize only commands to be executed; therefore, the protocol is considered a “command” even though it is not.
You should configure the command by using any of the valid keywords or protocol/port definitions that are supported by the aaa authorization {include | exclude} command. For example, you can use the telnet, ssh, ftp, http, or https keyword along with an optional permitted destination address. You can give the permitted address as any or .* if no granularity is required.
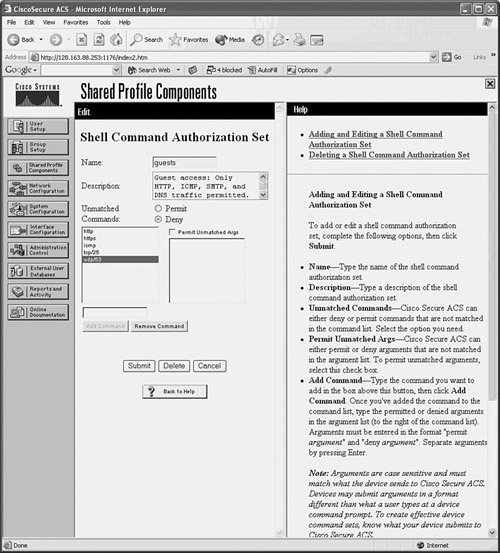
For example, suppose a CiscoACS server is configured with a command authorization set called guests that allows HTTP, ICMP, SMTP, and DNS traffic from any host. Figure 5-5 shows the Shell Command Authorization Set configuration page. Each of the protocols is listed as a “command” by using a keyword or the protocol/port.
Figure 5-5 Sample Configuration of CiscoACS Traffic Authorization
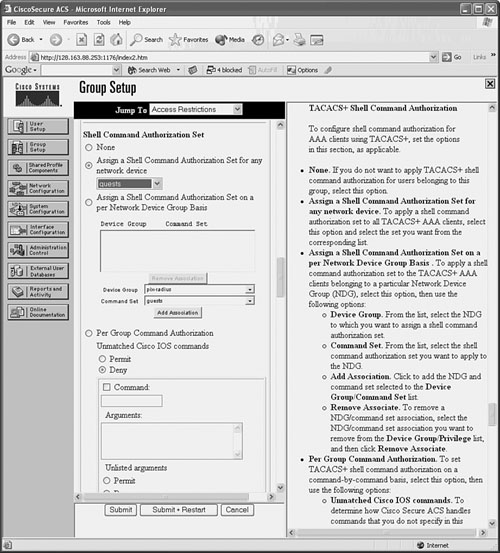
You then apply the shell command authorization set to a User Setup or Group Setup in CiscoACS by selecting it from the drop-down list. Figure 5-6 shows how the guests set is configured for a group of users.
Figure 5-6 Applying Traffic Authorization to a User Group in CiscoACS
Authorizing User Activity with RADIUS Servers
User authorization is not available as a part of the RADIUS protocol. However, if you have only RADIUS servers available and you need to set up authorization for user traffic, you can use access lists to emulate authorization.
The RADIUS server can be configured to return a reference to an access list that is based on a user’s authorization. The firewall can use the access list information to permit or deny the user’s connections as they are initiated. You have two ways to approach RADIUS authorization:
• The RADIUS server returns the name of an access control list (ACL) that is defined locally on the firewall.
• The RADIUS server returns the contents of an ACL that is downloaded and used by the firewall. The ACL is actually defined on the RADIUS server, not on the firewall.
You can use the following steps to configure RADIUS user authorization:
1. (Optional) Reference an ACL from the AAA server.
a. Configure access lists to permit specific traffic:
Firewall(config)# access-list acl_name permit protocol any foreign_ip
foreign_mask operator port
Add a permit access list entry for a protocol and destination address that should be allowed for a user. Normally, the access list entries are configured for groups of users so that one policy can be applied to multiple users.
Remember that the access list has an implicit deny any any at the end, so any traffic not specifically permitted in the list is rejected.
b. Add the access list name to the RADIUS user profiles.
The RADIUS server simply returns a text value for attribute 11 from the user’s profile. This is returned when the user authenticates, so RADIUS authentication must also be configured on the firewall. Attribute 11 is called filter-id. When the firewall receives this attribute value, it uses it to reference an access list by the same name.
On a CiscoACS server, begin by making the filter-id parameter available to user or group configurations. Go to Interface Configuration, select RADIUS(IETF), and make sure that attribute [011]Filter-Id is checked for User and/or Group.
Next, go to User Setup or Group Setup, select a user or group, and click Edit Settings. In the IETF RADIUS Attributes section, look for attribute [011]Filter-Id. Check that box and enter the name of the ACL in the text box.
For example, suppose an ACL named acl_http_only is used to “authorize” or control a user’s access through a firewall. Only HTTP and HTTPS connections are allowed. First, the access list must be configured on the firewall with the following commands:
Firewall(config)# access-list acl_http_only permit tcp any any eq www
Firewall(config)# access-list acl_http_only permit tcp any any eq https
Next, the user (or group) profile in CiscoACS must be configured with the ACL name as RADIUS attribute 11, as shown in Figure 5-7.
Figure 5-7 Defining the Filter-Id Attribute in CiscoACS

Tip
If attribute 11 (shown as [011]Filter-Id in CiscoACS) is not defined for a user, the AAA server does not return that attribute. In this case, traffic is assumed to be authorized.
If attribute 11 is defined for a user on the AAA server but the corresponding ACL is not configured on the firewall, all traffic for that user is denied. This is because a nonexistent ACL is being referenced.
Instead of attribute 11, you can also use a vendor-specific attribute-value pair. Use vendor 9 attribute 1, with the value text acl=acl_id.
2. (Optional) Download an ACL from the RADIUS server.
Rather than preconfiguring ACLs on the firewall to authorize user traffic, you can use a RADIUS server to download the actual ACL content to the firewall. ACLs can be downloaded per user or per group. In either case, the ACL is actually downloaded during user authentication so that it is available when the users begin initiating connections. ACLs can be created on the RADIUS server at the same time a new user is added, making the administration a bit easier.
When the RADIUS profile is being edited, you can choose a “downloadable ACL” and enter the ACL contents exactly as you would in a firewall session.
If the firewall is configured for RADIUS authentication, it also begins accepting any downloadable ACLs that are returned in a RADIUS exchange. The firewall requests an ACL download only if the specified ACL is not already configured on the firewall. No other authorization commands are necessary.
a. Create the downloadable ACL on the RADIUS server.
In CiscoACS, go to Shared Profile Components and select Downloadable IP ACLs. Click the Add button to create a new ACL. Give the ACL a name and an optional description.
To configure the ACL contents, click the Add button. You must enter the ACL name again, along with the actual ACL permit or deny statements in the ACL Definitions text box. As soon as the ACL contents are in place, click the Submit button.
Figure 5-8 shows an example in which a downloadable ACL called http_only has been created.
Figure 5-8 An Example of a Downloadable ACL in CiscoACS
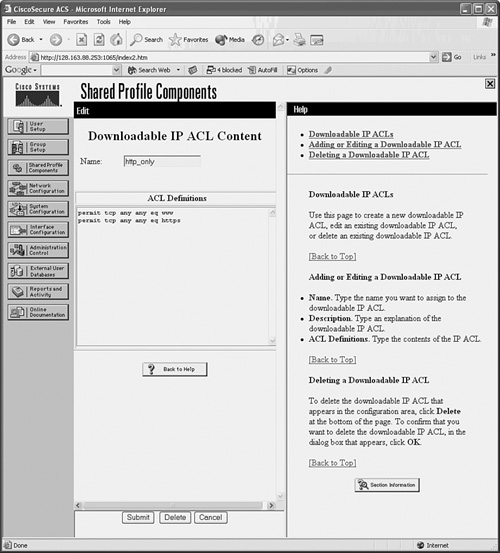
You should see a list of downloadable ACLs that includes the new ACL as well as the CiscoACS default called permit_anything.
b. Assign the downloadable ACL to a user or group.
In CiscoACS, go to User Setup or Group Setup. In the Downloadable ACSs section, check the Assign IP ACL box and select the appropriate ACL from the drop-down list. In Figure 5-9, the http_only ACL has been selected and will be downloaded when the user authenticates with the CiscoACS server.
Figure 5-9 Assigning a Downloadable ACL in CiscoACS
c. Enable downloadable ACLs on the firewall:
Firewall(config)# access-group access-list {in | out} interface if_name
per-user-override
After downloadable ACLs are accepted from a AAA server, they must be treated like any other access list—they must be applied to an interface. Therefore, you can use the per-user-override keyword when you apply an access list to an interface with the access-group command.
Any downloadable ACLs simply override the contents of the existing access list for a given end user. The access list statements are not replaced, however; the per-user ACL is evaluated first, ahead of the regular access list.
Tip
Downloadable ACLs are active only as long as the user is authenticated on the firewall. As soon as the uauth timer expires for a user, the corresponding downloadable ACL is removed. When the user initiates a new connection and authenticates again, the downloadable ACL is retrieved and put into service once more.
You can verify downloadable ACLs on a firewall as they are being used. First, use the show uauth username and look for the access list that has been downloaded from the RADIUS server. This is indicated by a line beginning with access-list followed by the ACL name that was dynamically created. Next, use the show access-list command to see the current contents and counters for the ACL entries. The following example demonstrates this downloadable ACL verification process:
Firewall# show uauth dhucaby
user 'dhucaby' at 192.168.199.4, authenticated
access-list #ACSACL#-ASA-dhucaby_access_list-1cff1dd1
absolute timeout: 0:05:00
inactivity timeout: 0:00:00
Firewall#
Firewall# show access-list #ACSACL#-ASA-dhucaby_access_list-1cff1dd1
access-list #ACSACL#-ASA-dhucaby_access_list-1cff1dd1; 3 elements
access-list #ACSACL#-ASA-dhucaby_access_list-1cff1dd1
permit tcp any any eq http (hitcnt=17)
access-list #ACSACL#-ASA-dhucaby_access_list-1cff1dd1
permit tcp any 172.17.3.0 255.255.255.0 eq telnet (hitcnt=5)
access-list #ACSACL#-ASA-dhucaby_access_list-1cff1dd1
deny ip any any (hitcnt=201)
Firewall#
Downloaded ACLs always have this naming format:
#ACSACL#-acl_name-versionID
where acl_name is the name of the access list (ASA-dhucaby_access_list in the preceding example) and versionID is a string of digits that uniquely identifies the current ACL (1cff1dd1 in the example). If the ACL is updated on the RADIUS server, the versionID is changed.
Keeping Accounting Records of User Activity
You can use the following steps to configure user activity accounting using AAA servers:
1. (Optional) List protocols that will be tracked:
Firewall(config)# aaa accounting {include | exclude} service if_name
local_ip local_mask foreign_ip foreign_mask server_tag
The firewall sends accounting records when a user initiates a connection on the firewall interface named if_name with protocol service (telnet, ftp, http, any, or protocol/port), as long as you use the include keyword. You can further specify the user traffic by giving the local and foreign IP addresses and masks. You can also use a wildcard for any of the address and mask values by giving a 0 value.
Usually, you can enter this command with the same arguments as the aaa authentication command. In this way, the firewall tracks the same connection activity for which it acts as a cut-through proxy. Accounting records are sent only to the active AAA server in the server group named server_tag. The active server is determined by the firewall’s AAA authentication feature.
Tip
If you plan to generate accounting information for all user traffic involving a specific protocol, you can use this alternative form of the command:
Firewall(config)# aaa accounting {include | exclude} service if_name server_tag
2. (Optional) Use an access list to trigger accounting:
Firewall(config)# aaa accounting match acl_name if_name server_tag
Here, an access list named acl_name is used to match connections that are initiated from the firewall interface named if_name. Protocols that are recorded are defined in permit statements in the access list.
This method of traffic accounting is preferred, because it is more scalable and easier to maintain. You can make the matching conditions very specific by giving the local (source) and foreign (destination) addresses. The AAA server group named server_tag is used to receive accounting information.
AAA Cut-Through Proxy Configuration Examples
In a sample network, user authentication is used on a firewall to require users on the inside to authenticate before initiating outbound connections. Users located on the 192.168.128.0/27 subnet should have all traffic except outbound DNS requests subject to authentication. The DNS traffic should be allowed without authentication so that users can resolve host names.
Three TACACS+ servers are available on the inside network:
• 192.168.4.10
• 192.168.4.11
• 192.168.4.12
These are tried in succession until a responsive server is found. User authentication should be performed over an HTTPS session so that username and password credentials are encrypted from the client to the firewall. (The TACACS+ exchanges between the firewall and the servers are encrypted as part of the TACACS+ protocol.)
After a user is authenticated, the firewall performs cut-through proxy service until the user’s sessions have been idle for one hour. After two hours, each user is required to reauthenticate.
You can use the following configuration commands to satisfy the cut-through proxy requirements:
aaa-server tacacs-servers protocol tacacs+
aaa-server tacacs-servers (inside) host 192.168.4.10 SpecialKey99
aaa-server tacacs-servers (inside) host 192.168.4.11 SpecialKey99
aaa-server tacacs-servers (inside) host 192.168.4.12 SpecialKey99
aaa authentication include any inside 192.168.128.0 255.255.128.0 0 0 tacacs-servers
aaa authentication exclude udp/53 inside 192.168.128.0 255.255.128.0 0 0 tacacs-servers
aaa authentication secure-http-client
timeout uauth 1:00:00 inactivity
timeout uauth 2:00:00 absolute
Remember that only Telnet, SSH, FTP, HTTP, and HTTPS traffic can actually trigger a prompt for user authentication. What, then, is the point of excluding DNS for this example? Until a user authenticates, all traffic is dropped. By excluding DNS from authentication, those requests are allowed to pass on through, so the inside users might be able to resolve addresses and then initiate connections like HTTP that can trigger the actual authentication.
You can also use an access list to trigger the authentication process. An access list might be preferable if you need fine granularity over combinations of source and destination addresses and protocols. The ACL and AAA commands required for the same example are as follows:
access-list acl_aaa_trigger permit ip 192.168.128.0 255.255.128.0 any
access-list acl_aaa_trigger deny udp 192.168.128.0 255.255.128.0 any eq domain
aaa authentication match acl_aaa_trigger inside tacacs-servers
aaa authentication secure-http-client
You can also apply AAA to authorize end-user connections through the firewall. The following command makes all outbound connections from the inside users subject to authorization:
aaa authorization include any inside 192.168.128.0 255.255.128.0 0 0 tacacs-servers
Each new connection is presented to the active TACACS+_server in the tacacs-servers server group. The users or user groups must be configured in the TACACS+ servers to authorize the appropriate protocols.
Finally, the AAA servers are used to collect accounting information about end-user activity through the firewall. Only HTTP, HTTPS, and FTP connections are recorded. You can use the following firewall configuration commands to implement this accounting action:
aaa accounting include http inside 192.168.128.0 255.255.128.0 0 0 tacacs-servers
aaa accounting include tcp/443 inside 192.168.128.0 255.255.128.0 0 0 tacacs-servers
aaa accounting include ftp inside 192.168.128.0 255.255.128.0 0 0 tacacs-servers
5-6 Firewall Password Recovery
If the first-level (Telnet) and privileged user (enable) passwords on a functioning Cisco firewall are unknown or have been forgotten, it is possible to recover control of the device. The password recovery procedure varies according to the firewall platform and is explained in the sections that follow.
Recovering an ASA Password
On an ASA, the configuration register is changed to allow booting without the startup configuration file. The ASA can boot its normal operating system image. Without the startup configuration, you can move directly into the privileged EXEC mode without having to use an enable password.
Follow these steps to recover from an unknown password:
1. Connect to the ASA console.
2. Power cycle the ASA.
The ASA must be reloaded so that you have a chance to break out of the normal boot sequence and change the configuration register.
If the ASA is already running and you do not have the enable password, you will not be able to reload it unless you turn its power off and then back on.
3. Press the Escape key when you are prompted.
When you see “Use BREAK or ESC to interrupt boot.”, you have 10 seconds to press the Escape (Esc) key. The ASA should end up at a rommon prompt, as in the following example.
Rebooting....
Booting system, please wait...
CISCO SYSTEMS
Embedded BIOS Version 1.0(10)0 03/25/05 22:42:05.25
Low Memory: 631 KB
High Memory: 256 MB
PCI Device Table.
Bus Dev Func VendID DevID Class Irq
00 00 00 8086 2578 Host Bridge
00 01 00 8086 2579 PCI-to-PCI Bridge
[device list output omitted]
Evaluating BIOS Options ...
Launch BIOS Extension to setup ROMMON
Cisco Systems ROMMON Version (1.0(10)0) #0: Fri Mar 25 23:02:10 PST 2005
Platform ASA5510
Use BREAK or ESC to interrupt boot.
[ESC pressed here]
Use SPACE to begin boot immediately.
Boot interrupted.
Management0/0
Ethernet auto negotiation timed out.
Interface-4 Link Not Established (check cable).
Default Interface number-4 Not Up
Use ? for help.
rommon #0>
4. Edit the configuration register:
rommon #0> confreg
The confreg command displays the current configuration register contents and allows you to enter a new value. Be sure to write down the value that is shown so that you can restore it later.
When you are prompted to change the configuration, enter y and press Enter. Then answer each of the questions by pressing the Enter key to accept the default value. The only exception is the “disable system configuration?” question; answer y and press the Enter key, as in the following example:
rommon #0> confreg
Current Configuration Register: 0x00000001
Configuration Summary:
boot default image from Flash
Do you wish to change this configuration? y/n [n]: y
enable boot to ROMMON prompt? y/n [n]:
enable TFTP netboot? y/n [n]:
enable Flash boot? y/n [n]:
select specific Flash image index? y/n [n]:
disable system configuration? y/n [n]: y
go to ROMMON prompt if netboot fails? y/n [n]:
enable passing NVRAM file specs in auto-boot mode? y/n [n]:
disable display of BREAK or ESC key prompt during auto-boot? y/n [n]:
Current Configuration Register: 0x00000040
Configuration Summary:
boot ROMMON
ignore system configuration
Update Config Register (0x40) in NVRAM...
rommon #1>
In the example, notice that the configuration register has gone from 0x00000001 to 0x00000040.
5. Reload the ASA:
rommon #1> boot
In the following example, the boot command is used to reload the ASA. At the end of the boot sequence, the console is left at the EXEC level prompt.
Launching BootLoader...
Boot configuration file contains 2 entries.
Loading disk0:/asa800-248-k8.bin... Booting...
Loading...
Processor memory 180940800, Reserved memory: 20971520 (DSOs: 0 + kernel: 20971520)
[output omitted]
Copyright 1996-2007 by Cisco Systems, Inc.
Restricted Rights Legend
Use, duplication, or disclosure by the Government is
subject to restrictions as set forth in subparagraph
(c) of the Commercial Computer Software - Restricted
Rights clause at FAR sec. 52.227-19 and subparagraph
(c) (1) (ii) of the Rights in Technical Data and Computer
Software clause at DFARS sec. 252.227-7013.
Cisco Systems, Inc.
170 West Tasman Drive
San Jose, California 95134-1706
Ignoring startup configuration as instructed by configuration register.
INFO: Converting to disk0:/
Type help or '?' for a list of available commands.
ciscoasa>
6. Enter privileged EXEC mode.
Because the startup configuration file was ignored, the enable password is unset. Therefore, you can just press the Enter key with a blank password:
ciscoasa> enable
Password:
ciscoasa#
7. Restore the running configuration:
ciscoasa# copy startup-config running-config
Destination filename [running-config]?
Cryptochecksum (unchanged): e4cd72c3 e3a210b0 cafaccc4 eb376c85
7028 bytes copied in 2.440 secs (3514 bytes/sec)
Firewall#
8. Reset the passwords.
Now that you are in privileged EXEC mode, you can edit the passwords that were previously stored in the configuration. Use the password and enable password commands to set the passwords to new, known values:
Firewall# configure terminal
Firewall(config)# password password
Firewall(config)# enable password enablepass
9. Restore the configuration register:
Firewall(config)# config-register hex-value
Enter the original configuration value you recorded in step 4, as in the following example:
Firewall(config)# config-register ?
configure mode commands/options:
<0x0-0xffffffff> Configuration register value
Firewall(config)# config-register 0x00000001
Firewall(config)#
10. Save the running configuration:
Firewall# copy running-config startup-config
As soon as the running configuration is saved into the startup configuration file, the firewall uses the new passwords the next time it is reloaded.
Tip
You can use the show version command to see the configuration register settings at any time. The register contents are shown toward the end of the output, as in the following example:
Firewall# show version
Cisco Adaptive Security Appliance Software Version 8.0(0)248
Device Manager Version 6.0(0)120
[output omitted]
Serial Number: JKX1014K074
Running Activation Key: 0x70192e4e 0x507e3e04 0xa8f2f16c 0x85c40864
0x4907ef91
Configuration register is 0x40 (will be 0x1 at next reload)
Configuration last modified by enable_15 at 12:25:07.492 EDT Fri Apr 20 2007
Firewall#
Recovering a PIX Password
On a PIX platform, a password recovery utility must be downloaded to the firewall from a TFTP server. This procedure is very similar to upgrading the OS image from the PIX monitor prompt.
Follow these steps to reload and erase the PIX passwords:
1. Make sure a TFTP server is available.
The TFTP server should have a copy of the correct PIX Password Lockout Utility software. You can find this utility on Cisco.com at http://www.cisco.com/warp/customer/110/npXX.bin
where XX is the PIX OS software release. For example, the utility for PIX OS 6.3 is called np63.bin.
2. Boot the firewall to the monitor prompt.
Just after booting the firewall, press the Esc key to break the normal bootup sequence.
3. Identify the TFTP server.
a. Identify the firewall interface where the TFTP server is located:
monitor> interface number
TFTP uses the interface with index number (0 to n – 1, where n is the number of interfaces installed). During the bootup sequence, the firewall lists the physical interfaces and their MAC addresses.
b. Assign an IP address to that interface:
monitor> address ip-address
Here, the firewall needs just enough information to be able to contact the TFTP server. Only one physical interface can be used, so this IP address is applied to it. Because a subnet mask cannot be given, the firewall assumes a regular classful network mask (172.17.69.41 yields a Class B mask of 255.255.0.0, for example).
If your TFTP server is located on a different classful subnet, you can also specify a gateway address that can route between the firewall and the server. Use the following monitor command:
monitor> gateway ip-address
c. Make sure the firewall can reach the TFTP server.
The firewall must be able to reach the server with a minimal amount of routing. You can use the following monitor command to test reachability:
monitor> ping ip-address
d. Define the TFTP server’s IP address:
monitor> server ip-address
e. Define the utility filename to fetch:
monitor> file npXX.bin
The utility file named npXX.bin (replace XX with the release number) is located in the TFTP server’s root directory. This is often called the /tftpboot directory, but it depends on how your TFTP server is configured.
4. Copy the utility from the TFTP server:
monitor> tftp
When the download is complete, the utility runs and prompts you to clear the PIX passwords. If you answer y to the prompt, the firewall reloads, and the passwords are reset to their default values (enable_1 is cisco; enable_15 is blank).
Recovering an FWSM Password
Follow these steps to reload and erase the FWSM passwords:
1. Boot the FWSM into the maintenance partition:
Router# hw-module module slot-number reset cf:1
Router# session slot slot-number processor 1
From the Catalyst 6500 Supervisor IOS EXEC prompt, the FWSM in slot slot-number can be reset so that it reboots into its maintenance partition. Log in as the user root. The default root password is cisco.
2. Reset the passwords in the compact Flash configuration file:
root@localhost# clear passwd cf:partition_number
root@localhost# exit
The FWSM compact Flash is organized into the five partitions listed in Table 5-4.
Table 5-4 FWSM Compact Flash Partitions
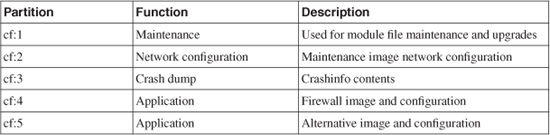
To clear the passwords in the application partition, where the normal firewall image is executed, use partition-number 4 or 5, depending on which one contains the bootable image. For example, the clear passwd cf:4 command clears the passwords in the application partition 4 configuration file.
You are prompted to delete the password configuration commands (enable_1 becomes cisco; enable_15 becomes blank) and any AAA commands.
3. Reload the FWSM into the application partition:
Router# hw-module module slot-number reset cf:partition-number
Specify the partition number that contains the bootable firewall image.
The application partition image is booted. You can log in to the FWSM using the default passwords.
Tip
The FWSM contains two types of partitions you can boot: the maintenance partition and the application partition. You can reset the passwords in either partition by first booting into the opposite partition. For example, as the preceding sequence of steps illustrates, you can reset the application partition passwords by booting into the maintenance partition. You also can reset the maintenance partition passwords by booting into the application partition.
You cannot clear the passwords in the configuration of the partition that is booted, however. You can clear them only in a partition that is not currently in use.