
Chapter 15. ACS 5.1
This chapter covers the following subjects:
• Replication Among ACS 5.1 Servers in a Distributed Environment
• Understanding Dictionaries
• Remote Logging on ACS 5.1
• Importing Network Resources and Users
• Managing System Administration
• Backup and Restore Options Available on ACS
This chapter looks at some of the advanced configuration components involved in ACS 5.1. The chapter provides details about components involved in replication as well as the options available for backing up and restoring an ACS database. The chapter also covers bulk import of network resources and users. System administration is also a part of advanced configuration, so you will familiarize yourself with the configuration part pertaining to system administrators.
Replication
In a deployment, you can have multiple ACS servers with one server designated as the primary server and all other servers as secondary servers. For the purpose of centralized management, configuration changes are made only on a primary server, and the changes are propagated to all secondary servers.
In a distributed deployment of ACS, communication happens only between the primary server and the secondary servers. There is no communication between the secondary servers and they are not aware of other secondary server status in a deployment.
Distributed deployment ensures that all instances in a system will have an identical configuration. The primary instance centralizes the configuration of the registered secondary instances. Configuration changes made in the primary instance are automatically replicated to the secondary instances.
Secondary instances in a deployment can view the configuration data only as read-only data. A small number of configuration changes can be performed on a secondary instance in a deployment, including configuration of the server certificate, and these changes remain local to the server.
If there is a firewall between the primary instance and the secondary instances in a deployment, you must ensure that communication over port 2638 and port 61616 is allowed.
In a distributed deployment, the changes made on the primary instance are automatically replicated to secondary instances. If configuration changes do not replicate to the secondary instances, you can force a full replication.
Note
Replication on ACS 5.1 happens immediately when the change is made, as opposed to ACS 4.2 where changes get replicated only during configured replication time.
After the distributed deployment is working well, there might be times when you want to test some configuration on a single ACS server while not affecting other ACS servers in the deployment. This can be done using a mode called local mode.
You can use the local mode option in following scenarios:
• If the primary server is unreachable from a secondary server and a configuration change must be made to a secondary server, you can specify that the secondary server go into local mode.
• If you want to perform some configuration changes on a trial basis that would apply to only one server and not impact all the servers in your deployment, you can specify that one of the secondary servers go into local mode.
In local mode, you can make changes to a single ACS instance through the local web interface, and the changes take effect on that instance only. When the connection to the primary server resumes, you can reconnect the disconnected secondary instance in local mode to the primary server. All configuration changes made while the secondary server was in local mode are lost.
Registration of a server to the primary server and local mode operation on ACS 5.1 are controlled from System Administration > Operations > Local Operations > Deployment Operations.
Activating Secondary Servers
To add a server to a deployment, you must perform the following steps:
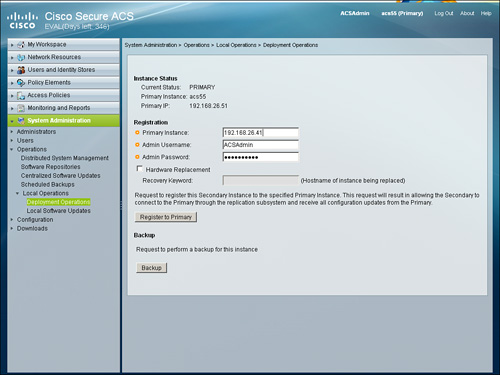
Step 1. From the secondary server, issue a request to register on the primary server/instance from System Administration > Operations > Local Operations > Deployment Operations.
In the Registration section, specify the primary server details as illustrated in Figure 15-1.
Figure 15-1. Registering Secondary Server to Primary
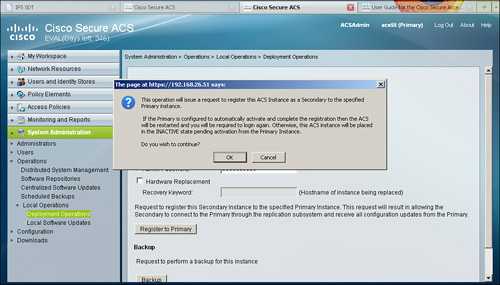
After choosing the option Register to Primary, the ACS instance will provide you with information regarding the next step to follow as shown in Figure 15-2.
Figure 15-2. Registering the Secondary Instance to the Primary Instance
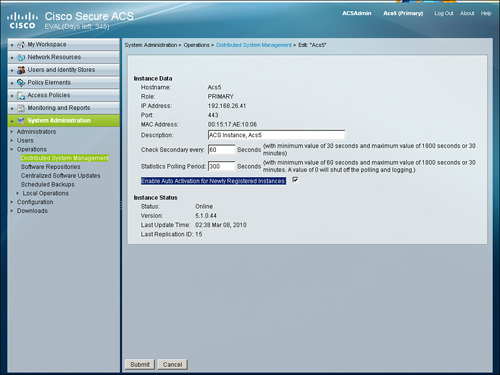
Step 2. Activate the secondary instance on the primary server. You must activate the secondary instance on the primary instance for the secondary instance to receive configuration information; this provides a mechanism of admission control. However, there is an option to automatically activate newly added secondary instances, rather than performing a manual activation request as shown in Figure 15-3—check the radio button for Enable Auto Activation for Newly Registered Instances.
Figure 15-3. Auto Activation Setting on Primary Server
After the secondary instance has been registered successfully and the services are up, the status can be viewed from either instance (primary or secondary) from System Administration > Operations > Distributed System Management as shown in Figure 15-4.
Figure 15-4. Distributed System Management
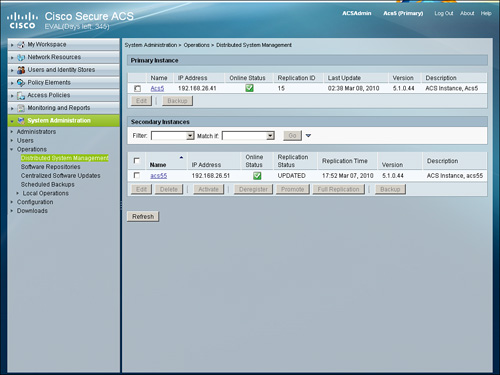
Note
Unlike ACS 4.2 where full replication was performed, in ACS 5.1, only the specific changes are propagated.
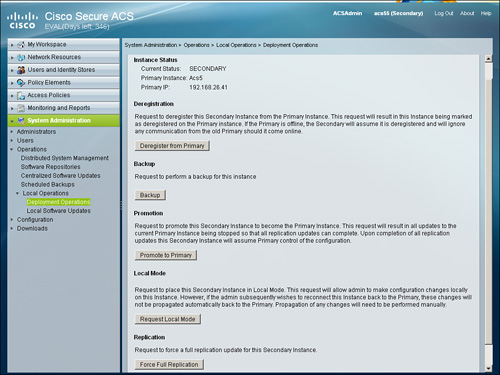
Recall the previously discussed information about local mode on an instance. On a secondary server, you can find this option at System Administration > Operations > Local Operations > Deployment Operations.
Figure 15-5 shows the Request Local Mode option available on the secondary instance.
Figure 15-5. Options Under Deployment Operation on Secondary Instance
A full replication can be initiated from either instance (primary server or secondary server). As an example, Figure 15-6 provides an example of full replication initiated from the primary server from System Administration > Operations > Distributed System Management.
Figure 15-6. Full Replication from Primary Server
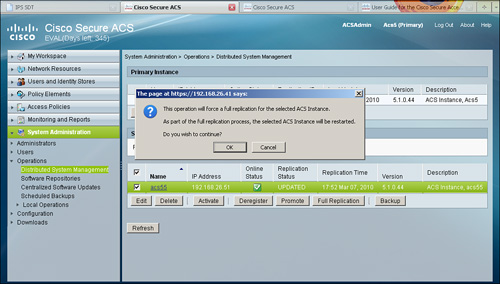
During full replication, the full set of configuration data is transferred to the secondary server to ensure the configuration data on the secondary server is resynchronized.
Dictionaries
As the name suggests, dictionaries on ACS 5.1 are a place to hold all RADIUS- and TACACS+-related dictionaries. This section displays available protocol attributes in the respective dictionary.
To view and choose attributes from a protocol dictionary, select System Administration > Configuration > Dictionaries > Protocols; then choose a RADIUS or TACACS+ dictionary.
ACS 5.1 supports RADIUS Vendor Specific Attributes (VSAs). A set of predefined RADIUS VSAs pre-exists on ACS. You can also create, edit, or delete RADIUS VSAs from the ACS web interface.
Note
Some of the internally used attributes cannot be modified. You cannot modify an attribute’s type if the attribute is used by any policy or policy element.
On ACS 5.1, you can only view TACACS+ attributes; you cannot create, edit, or delete them.
To view or edit RADIUS IETF attributes, go to System Administration > Configuration > Dictionaries > Protocols > RADIUS > RADIUS IETF.
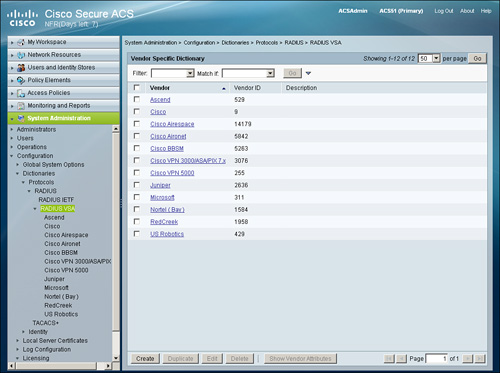
To view, edit, create or delete RADIUS VSA attributes, go to System Administration > Configuration > Dictionaries > Protocols > RADIUS > RADIUS VSA as shown in Figure 15-7.
Figure 15-7. Predefined RADIUS VSAs on ACS
To create a RADIUS VSA for a vendor, perform the following steps:
Note
The IETF specifies VSAs as a method for communicating vendor-specific information between network access servers and RADIUS servers. Attribute 26 encapsulates vendor-specific attributes, thereby allowing vendors to support their own extended attributes otherwise not suitable for general use.
Step 1. Go to System Administration > Configuration > Dictionaries > Protocols > RADIUS > RADIUS VSA.
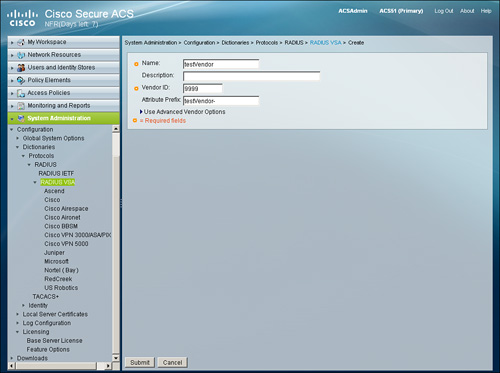
Step 2. Choose the Create option to create a RADIUS VSA for a vendor.
Step 3. Fill in the name and vendor ID as the minimum information, as shown in Figure 15-8, and press Submit.
Figure 15-8. Creating RADIUS VSA
Step 4. To create attributes for the new vendor VSA, navigate to the newly created vendor VSA under the RADIUS VSA section. Go to System Administration > Configuration > Dictionaries > Protocols > RADIUS > RADIUS VSA > testVendor.
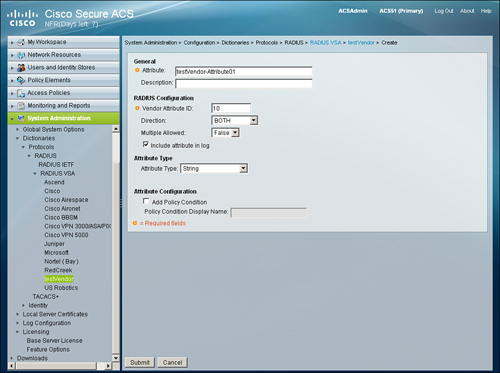
Choose the Create option to create a new attribute for the vendor VSA. Specify the attribute name and vendor attribute ID as minimum and press Submit. Configure additional options based on information provided by the vendor about its attributes.
Figure 15-9 illustrates a sample configuration of a new vendor VSA attribute.
Figure 15-9. Vendor VSA Attribute
After a RADIUS VSA is created, it can be used in policies, authorization profiles, and RADIUS token servers in the same way as predefined VSAs.
Remote Logging
On ACS, log records are generated for the following types of messages:
• Accounting
• AAA audit and diagnostics
• System diagnostics
• Administrative and operational audits
As shown in Figure 15-10, these log messages are arranged in a tree hierarchy structure, which you can view by going to System Administration > Configuration > Log Configuration > Logging Categories > Global.
Figure 15-10. Logging Categories
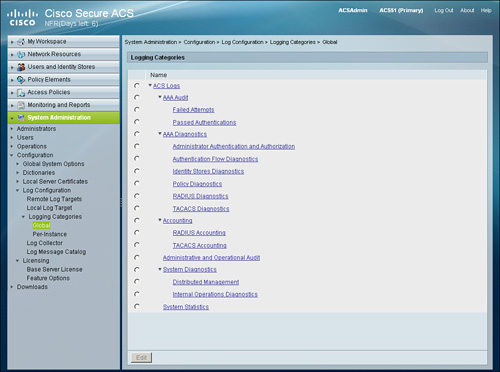
Log messages can be stored locally or remotely based on the logging categories and maintenance parameters.
This section looks at how to configure remote logging on ACS 5.1 for log records.
On ACS 5.1, you can configure specific remote log targets to receive the logging messages for a specific logging category. The remote log targets first need to be defined, which you can do only on a syslog server. After you define a remote log target, you can specify it under a specific logging category.
Defining a Remote Log Target
To define a remote log target, follow these steps:
Step 1. Go to, System Administration > Configuration > Log Configuration > Remote Log Targets.
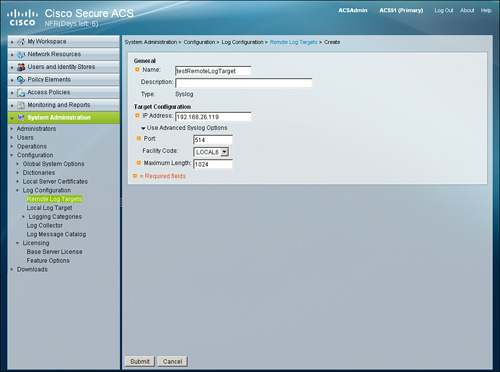
Step 2. Choose the Create option to create a new remote log target. Provide name, IP address, port, and maximum length for the syslog server as shown in Figure 15-11 and press Submit.
Figure 15-11. Defining a Remote Log Target
Specifying a Remote Log Target Under a Logging Category
If you want to change the log target globally for all instances, go to the Global option under Logging Categories; otherwise, if you want to change the log target for only a particular instance of ACS, choose Per-Instance under Logging Categories for the particular ACS.
The list that follows shows how to change the log target using the Global option.
Step 1. Go to System Administration > Configuration > Log Configuration > Logging Categories > Global.
Step 2. Select any log for which you want to change the remote log target and click Edit.
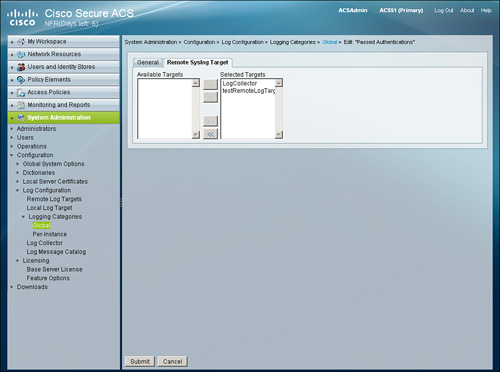
Step 3. Select the Remote Syslog Target tab and choose the remote log target that you created previously under Selected Targets.
For example, go to System Administration > Configuration > Log Configuration > Logging Categories > Global > Edit: “Passed Authentications” as shown in Figure 15-12.
Figure 15-12. Specifying Remote Log Target for Passed Authentications Log
Importing Network Resources and Users
You can perform bulk operations for network resources and users on ACS 5.1. You can achieve this using the File Operations function, which enables you to add, update, or delete internal users, internal hosts, or network devices on the database.
The File Operations function is accessible from the following sections for network devices, internal users, and internal hosts, respectively:
• Network Resources > Network Devices and AAA Clients
• Users and Identity Stores > Internal Identity Stores > Users
• Users and Identity Stores > Internal Identity Stores > Hosts
Bulk import on ACS is done using a comma-separated values (CSV) file. There are certain guidelines that you must to follow to bulk-import information into a ACS database.
Because the .csv templates for users, internal hosts, and network devices are specific to their individual type, you must download the .csv file template from ACS. You can then add the records that you want to add, update, or delete to the .csv file and save it to your local disk.
While updating the template .csv file, you must adhere to these requirements:
• Do not alter the contents of the first record (the first line, or row, of the .csv file).
• Use only one line for each record.
• Do not embed new line characters in any fields.
• For non-English languages, encode the .csv file in utf-8 encoding or save it with a font that supports Unicode.
For demonstration purposes, consider the following procedure of importing a user using File Operations.
Step 1. Go to Users and Identity Stores > Internal Identity Stores > Users and select the option File Operations as shown in Figure 5-13.
Figure 15-13. Choosing File Operations Function

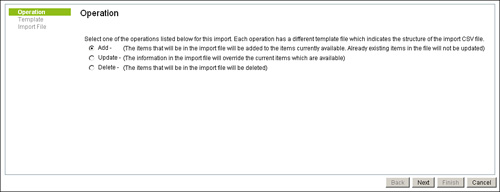
Step 2. From the screen in Figure 15-14, select the Add option select Next.
Figure 15-14. Add Option: File Operations
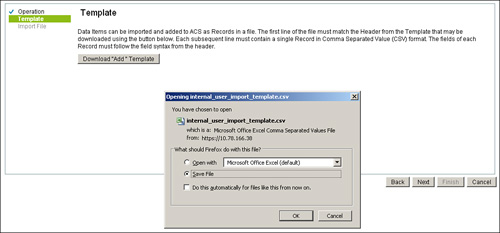
Step 3. Click Download “Add” Template options and save the template on your PC as shown in Figure 15-15.
Figure 15-15. Download Template: File Operations Add User
Step 4. Open the CSV file and add the user record as shown in Figure 15-16. All fields are not mandatory. Mandatory fields have the Required keyword in their column header. After the information has been filled, save the file.
Figure 15-16. Editing Template File: File Operations Add User

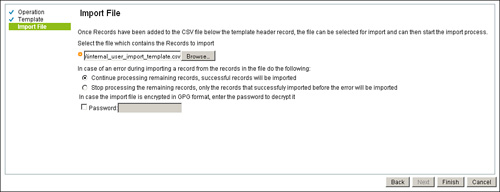
Step 5. After you have a file ready to import, you can either restart the process from step 1 until step 3, skipping the option to download the template if you have closed or canceled the operation; otherwise, click Finish to proceed to upload the file as shown in Figure 15-17.
Figure 15-17. Import File: File Operations Add User
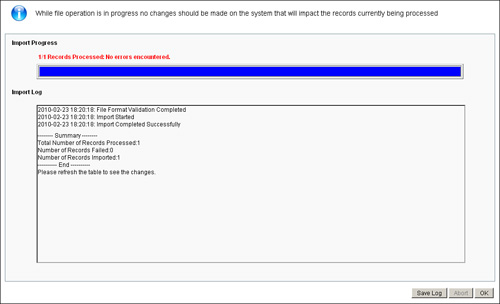
ACS will show you the import progress and will log the success/failure messages on the progress windows as shown in Figure 5-18.
Figure 15-18. Import Progress: File Operation Add User
You can adopt a similar process to update or delete user, host, or network resources.
Managing System Administrators
As with any application or system, system administrators on ACS are responsible for deploying, configuring, maintaining, and monitoring. The administrators are controlled through the ACS administrative interface on ACS, available at System Administration > Administrators.
This section enables you to perform various system administration–related operations, including the following:
• Create, edit, duplicate, or delete administrator accounts
• Change the password of other administrators
• Associate roles to administrators
• Configure authentication settings that include password complexity, account lifetime, and account inactivity
• Configure administrator session setting
• Configure administrator access setting
Note
The first time you log in to ACS 5.1, you are prompted for the predefined administrator username (ACSAdmin) and required to change the predefined password (default). This administrator has super administrator permissions—Create, Read, Update, Delete, and Execute to all ACS resources.
To control what an administrator can do, ACS provides roles, which consist of typical administrator tasks, each with an associated set of permissions. Each administrator can have more than one predefined role, and a role can apply to multiple administrators. As a result, you can configure multiple tasks for a single administrator and multiple administrators for a single task.
Note
On ACS, by design, all roles are predefined and cannot be changed.
As shown in Figure 15-19, you can view these roles on ACS at System Administration > Administrators > Roles.
Figure 15-19. Administrator Roles
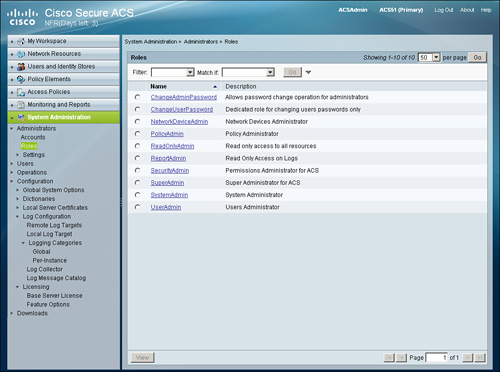
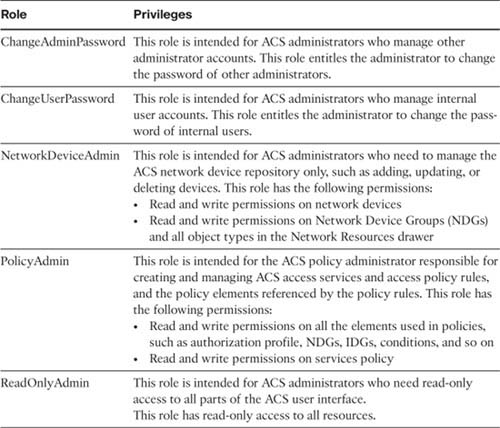
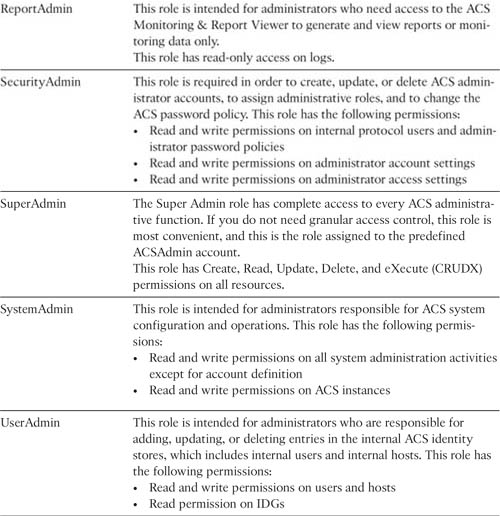
Table 15-1 describes the predefined administrator roles in greater detail.
Table 15-1. Predefined Role Descriptions
Note
Administrators are authenticated against the internal database only.
The most important task is to create an administrator account and assign it the required role. You can do this from System Administration > Administrators > Accounts > Create, as shown in Figure 15-20.
Figure 15-20. Administrator Accounts

Administrator account definitions consist of a name, status, description, e-mail address, password, and role assignment.
ACS provides the following configurable options to manage administrator passwords:
• Password Complexity: Required length and character types for passwords
• Password History: Prevents repeated use of same passwords
• Password Lifetime: Forces the administrators to change passwords after a specified time period
• Account Inactivity: Disables the administrator account if it has not been in use for a specified time period
• Password Failures: Disables the administrator account after a specified number of consecutive failed login attempts
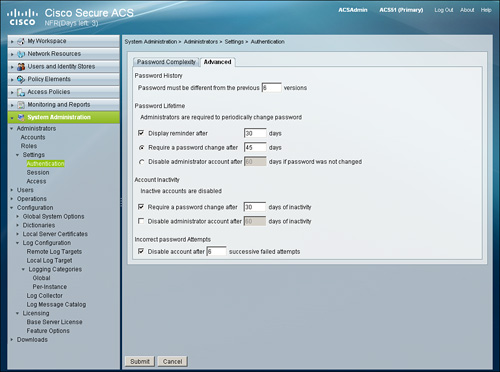
You can find these configurable options under the Password Complexity and Advanced tabs available from System Administration > Administrators > Settings > Authentication as shown in Figure 15-21 and Figure 15-22.
Figure 15-21. Administrator: Password Complexity
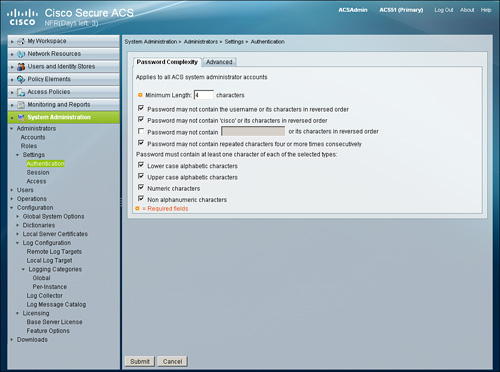
Figure 15-22. Administrator: Advanced
To make administration to ACS more secure, you have configurable options that determine the IP addresses from which administrators can access the ACS administrative web interface and the session duration after which idle sessions are logged out from the system.
These options are available at
• System Administration > Administrators > Settings > Access (see Figure 15-23)
Figure 15-23. Administrator: Access

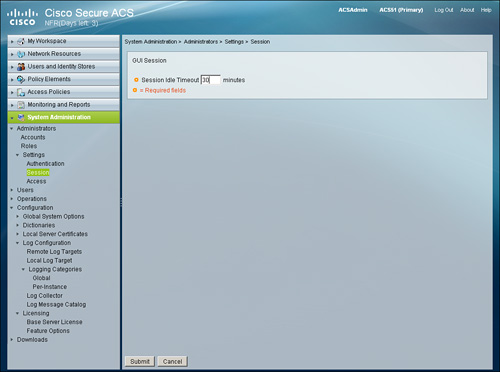
• System Administration > Administrators > Settings > Session (see Figure 15-24)
Figure 15-24. Administrator: Session
Backup and Restore
Backup is an essential process; in a data loss event, the database backed up using the backup process can be restored using the restore process. ACS provides various options to back up a database.
Before you can perform any backup or restore operation on ACS 5.1, you must have a software repository to do so.
Software Repositories
On ACS 5.1, you can create software repositories using the web interface or command-line interface (CLI). There are a few rules associated with creating or deleting repositories from the web interface or CLI that must always be considered, however:
• If you create a repository from the CLI, that repository is not visible from the web interface and can be deleted only from the CLI.
• If you create a repository from the web interface, it can be deleted from the CLI; however, that repository still exists in the web interface. If you use the web interface to create a repository for a software update, the repository is automatically created in the CLI.
• If you delete a repository using the web interface, it is also deleted in the CLI.
As an example, Figure 15-25 shows how to create a software repository from the web interface from System Administration > Operations > Software Repositories > Create.
Figure 15-25. Software Repository from Web Interface
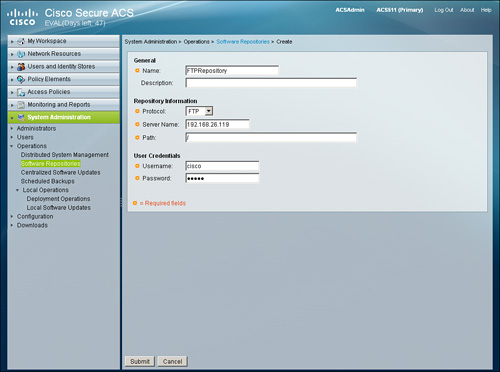
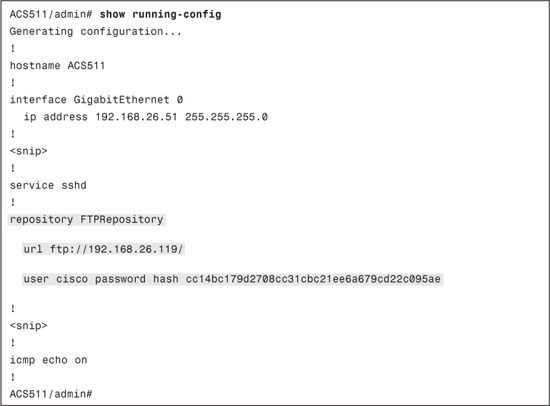
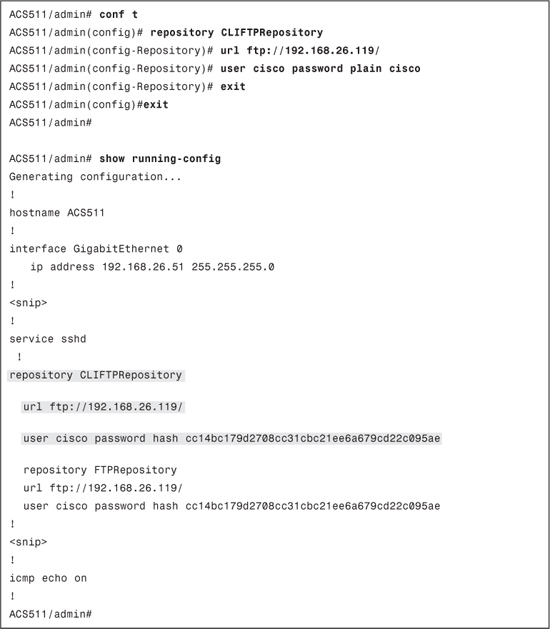
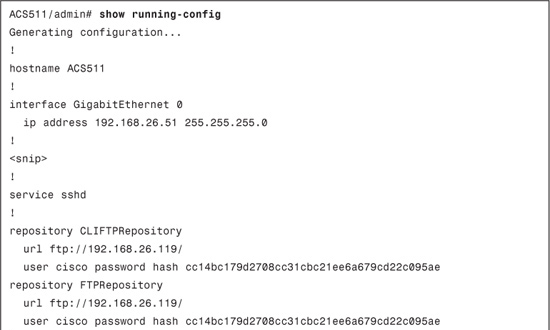
After you click Submit, the software repository FTPRepository is visible in the web interface. In addition, you can view the corresponding configuration from the CLI as shown in Example 15-1.
Example 15-1. Software Repository Configuration: CLI and Web Interface
If you create a software repository from the CLI as shown in Example 15-2, it will not be visible in the web interface.
Example 15-2. Software Repository Configuration in CLI Only
After a software repository is created, you are ready to back up or restore a database.
Backing Up a Database
ACS 5.1 provides you with the option to back up data from primary and secondary instances at any time along with the option of regular scheduled backups.
There are two types of configuration available on ACS 5.1:
• ACS configuration data backup
• ADE-OS configuration data backup
For a primary instance, the following backup options are available:
• ACS configuration data only
• ACS configuration data and ADE-OS configuration data
For a secondary instance, you can only back up ADE-OS configuration data. This actually makes sense, as in replication ACS configuration on both instances primary and secondary are identical.
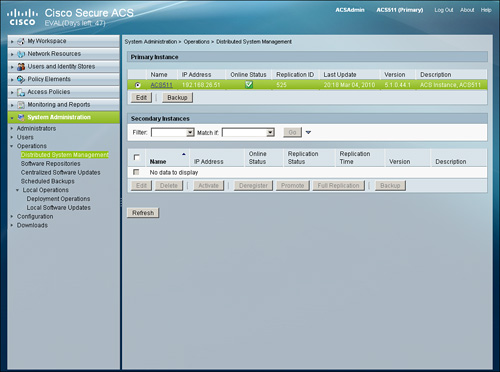
To perform a backup operation from the web interface, go to System Administration > Operations > Distributed System Management.
Choose an instance from the Primary Instance table or the Secondary Instances table and use the Backup function as demonstrated in Figure 15-26.
Figure 15-26. Choosing Instance for Backup
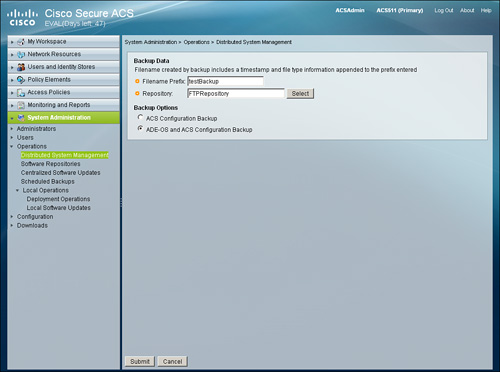
The next step is to provide a name for the backup file, choose the repository, and finally choose the configuration that you need to back up, as shown in Figure 15-27.
Figure 15-27. Primary Instance ADE-OS and ACS Configuration Backup
Note
You can select only one primary instance, but many secondary instances for a backup.
The backup file that gets created on the repository has a predefined format:
<Filename Prefix>-YYMMDD-HHMM.tar.gpg
For example, if you specified the Filename Prefix as testBackup and the current date and time on ACS clock is Mar 3 22:25:28 EST 2010. The filename would be
testBackup-100303-2051.tar.gpg
Another method to backing up data is to use the CLI as outlined in the steps that follow.
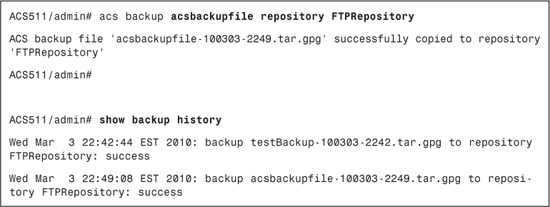
Step 1. Back up the ACS configuration: To back up an ACS configuration only, use the acs backup command in the EXEC mode:
acs backup backup-filename repository repository-name
Example 15-3 demonstrates this configuration.
Example 15-3. CLI ACS Configuration Backup
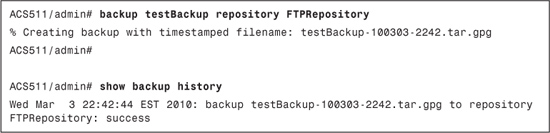
Step 2. Backup ACS and ADE-OS configuration: To perform ACS and ADE-OS configuration data backup and place the backup in a repository, use the backup command in the EXEC mode:
backup backup-name repository repository-name
Example 15-4 demonstrates this configuration.
Example 15-4. CLI ACS and ADE-OS Configuration Backup
Scheduled Backups
You can schedule ACS backup to run at periodic intervals. You can schedule ACS backup from the primary web interface or through the CLI. One important point to note is that the scheduled backup feature only backs up ACS configuration data.
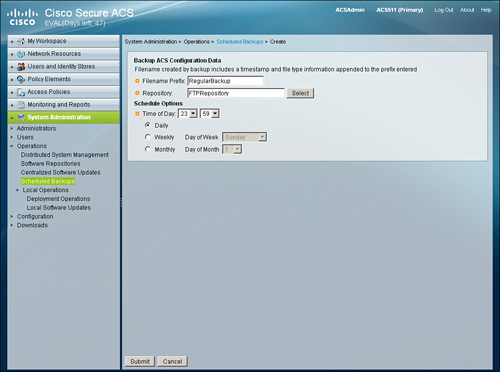
From the web interface, you can create scheduled backups from System Administration > Operations > Scheduled Backups > Create as shown in Figure 15-28.
Figure 15-28. Scheduling Backup from the Web Interface
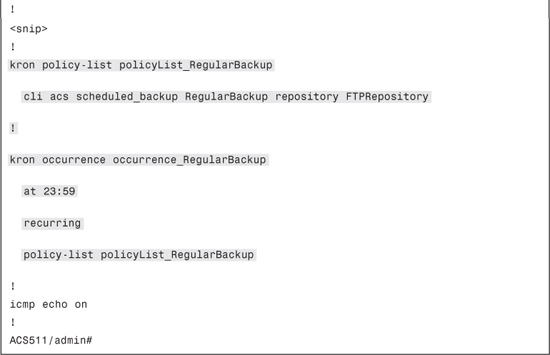
Example 15-5 shows the resulting CLI configuration for the backup scheduled in the web interface in Figure 15-28.
Example 15-5. CLI Schedule Backup Configuration
Restoring Databases
As in the case of the backup where you can back up the ACS configuration only or both the ACS and ADE-OS configuration; similarly, you can restore ACS configuration only on ACS 5.1 or you can restore ACS and ADE-OS configuration.
Restoration on ACS 5.1 can be performed only through the CLI. At presstime, the option to restore from the web interface was not available.
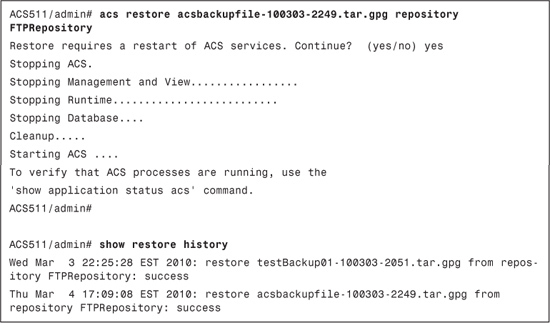
To restore an ACS configuration only from one ACS node to another, use the following command in EXEC mode:
acs restore backup-file-name repository repository-name
Example 15-6 demonstrates restoring ACS only.
Example 15-6. CLI ACS Configuration Restore
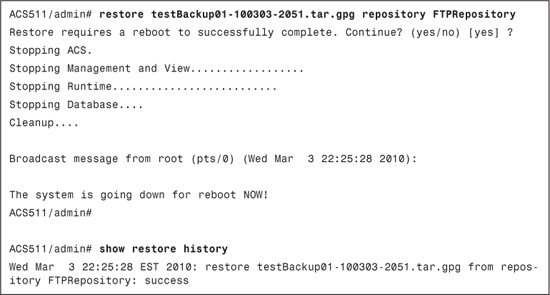
To perform a restore of a previous backup for both ACS and ADE-OS, use the following command in EXEC mode:
restore filename repository repository-name
This restore operation restores data related to ACS as well as the ADE OS.
When you use this command for ACS, the ACS server restarts automatically.
Example 15-7 demonstrates restoring ACS and ADE-OS.
Example 15-7. CLI ACS and ADE-OS Configuration Restore
Note
You cannot back up data from an earlier version of ACS and restore it to a later version. Backup and restore must be performed on the same version of ACS. If you need the data on a different version of the ACS, you can perform an upgrade after you restore the data.
Summary
This chapter covered a few of the advanced features available in ACS 5.1. The key concepts and takeaways from the chapter can be summarized as follows:
• Distributed deployment on ACS 5.1 has two components: primary server/instance and secondary server(s)/instance(s).
• In a distributed deployment, replication happens automatically from primary instance to secondary instance(s) only.
• In distributed deployment, to make changes on the secondary instance, you need to use the local mode option. When a secondary instance is registered back to primary, all changes on secondary instance are lost.
• ACS 5.1 provides an option to create a dictionary for RADIUS VSAs.
• Only syslog option is available for remote logging on ACS 5.1.
• ACS 5.1 provides File Operation function to facilitate bulk operation for network resources and users.
• System administrator creation with predefined roles along with session and access restriction settings for ACS 5.1 access.
• Two type of backups are available on ACS 5.1: ACS configuration and ADE-OS configuration.
• You can back up a database from both the CLI and web interface.
• You can restore a database only through the CLI in ACS 5.1.