
APPENDIX B
Building Instructions for Bots
If you build a unique bot of some sort, someone with a Mindstorms NXT kit might ask you for instructions on building a duplicate. There are numerous methods for demonstrating how to build a robot that you have designed. One easy method is to simply digitally record yourself building it, talking as you go and showing to the camera the pieces you are using and where you place them. I'd like to also introduce to you something called CAD (computer-aided design) software. This type of software allows you to create accurate drawings of your robot designs as well as step-by-step instructions that can be printed or viewed on a computer screen; examples of CAD programs used for Lego creations include LDraw (http://www.ldraw.org) and MLCad (http://www.lm-software.com/mlcad).
For this book, I've been using photographs taken with a digital camera. With the digital camera, I can immediately upload the photo to my computer (a laptop in this case) and view the image. If it's blurry or doesn't show quite what I wanted to capture, I can delete it and take another.
This appendix is a short tutorial containing some tips and suggestions I want to pass along—I've learned a lot from photographing this book's bots and I'm hoping some of my experiences can help you if you choose to create building instructions (BI) from photos of your own bots.
Background
One of the biggest mistakes I made early on was to photograph the construction of my bots against a white background. After converting the photos to black-and-white images, what I found was that the colors of most of the Mindstorms NXT parts (off-white, light gray, dark gray) just didn't show up very well when I placed a white posterboard under the parts. Take a look at Figure B-1. On the left is a collection of parts against a white background, and on the right is the same collection of parts against a yellow background. After converting the photograph to a black-and-white image, which do you think looks better?
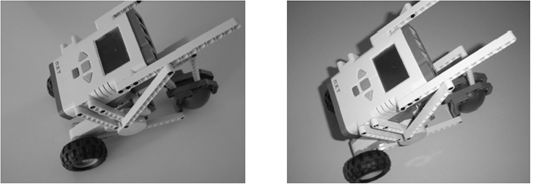
Figure B-1. The background can make all the difference.
I also tried photos using blue, green, red, and gray posterboard. What I found was that yellow or light-blue posterboard worked best. Whether you convert the pictures to black-and-white or not, photographing your bot's assembly against a colored background instead of white works much better. Even better is to use a colored background with some texture.
Step by Step
I'll jump straight to the secret for taking great BI photographs: Build your bot first—get it perfect, the way you like, and make sure it works—and then start taking pictures as you take the bot apart.
You're right, this is not a big secret. You'll photograph the bot as it's disassembled and then reverse the photographs. Simple. But I do have a couple of suggestions for you:
Your first photograph should be of the completed bot: When you are done, you'll reverse the picture order, so this will actually be your last building instruction photo. Whatever angle you use to take a picture, that is the angle you need to keep for the next photo.
Without moving the bot, remove a part and set it down close to the bot: Take the photograph (from the same angle as the first) so that it shows the bot and the removed part, and make sure that where the part was removed is visible in the new photograph. Look at Figure B-2. On the right side is the final bot, and on the left you can see that a part has been removed. You should be able to determine from the photo on the right where the part on the left will be placed. Good building instructions always show you a part in one step that you'll use in the next step (which is why the photo on the right has two parts next to it).
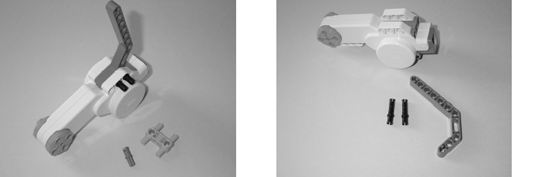
Figure B-2. Look at the image on the right to determine the placement of the part on the left.
Remove multiple parts if they are all visible in the most recent photograph: If you have three 15-hole beams and two small black connectors that can be immediately removed and are not hidden by other pieces, feel free to take all of them off. Place them in an organized fashion near the bot (or what's left of it) and take a picture. As long as the locations of all the parts you are removing are visible in the previous photo you took, everything should be fine.
As you take more and more photographs, you'll find even better methods for taking photographs and discover things to avoid. For example, you can't remove a part on a nonvisible side of the bot that you just photographed. If you take off a nonvisible part, place it next to the bot, and then photograph it, how will others using your instructions know where to place the part? They'll see the new part to add, but when they look at the next photograph, the part you removed will not be visible.
Note If at all possible, photograph in strong, indirect light. The built-in flash on most cameras tends to "flatten" the image, removing or reducing depth cues. If you can use a strong, even light source from a different direction than the camera, you have much more control over the lighting and depth cues in the picture.
After taking the picture, inspect it closely in the LCD screen of the camera . . . and delete any picture that is not in sharp focus or doesn't clearly show what you want to show. It's digital, so you can always take another picture, but the model will never be at this particular step again, so check now, and don't regret it later.
After you've completely disassembled your bot, take the pictures and put them in reverse order. If you used a digital camera and uploaded the photos to your computer, rename the images Step 1, Step 2, etc. The first image will show the first piece (or first few pieces) of your bot being placed or connected together.
Now, use your new building instructions and try to build your bot. If you took good photographs, you should be able to build your bot again. If anything is confusing, take a picture to capture the proper placement of a part or two where you found the problem. You can give the picture a name such as Step 3b if it fits between Steps 3 and 4.
When you are happy with your building instructions, you can use image editing software to add text to your pictures if you like. Then, burn the images to a CD or print them out and share them with others. You can also post your steps to NXTLOG (see Appendix C). And now your bot design can be re-created anytime.