
6 Posture and Flexibility Assessment
Good range of motion and alignment are crucial to optimum performance.
In a way, this is the most important chapter in this book for injury prevention, and if I have learned anything about human nature over the years, it will be the least read. That’s too bad, because almost every running injury that I see is the result of a body being out of whack, imbalanced, some muscle groups too strong or too weak, others too tight. It’s usually just not because you’re out of shape or lazy or suffering from an accident. It’s because basic maintenance—stretching and strengthening—has been neglected. The good news is that it’s easy to determine what the problem is—one look at a photograph of yourself can tell your story.
So that’s what we’re going to do here: Let you look at yourself to see where you are imbalanced, then have you test yourself with fourteen flexibility-assessment positions. Whether you’re hurting right now or not, the assessments in this chapter—beginning with overall posture, then moving to part-by-part flexibility—will tell you why and what you must do to maintain a healthy, pain-free running career.
Posture Assessment
The definition of good overall posture is a standing position that allows you to use the least amount of muscular force to keep your body erect against the relentless forces of gravity. This requires your body’s skeletal building blocks to be vertically aligned over one another.
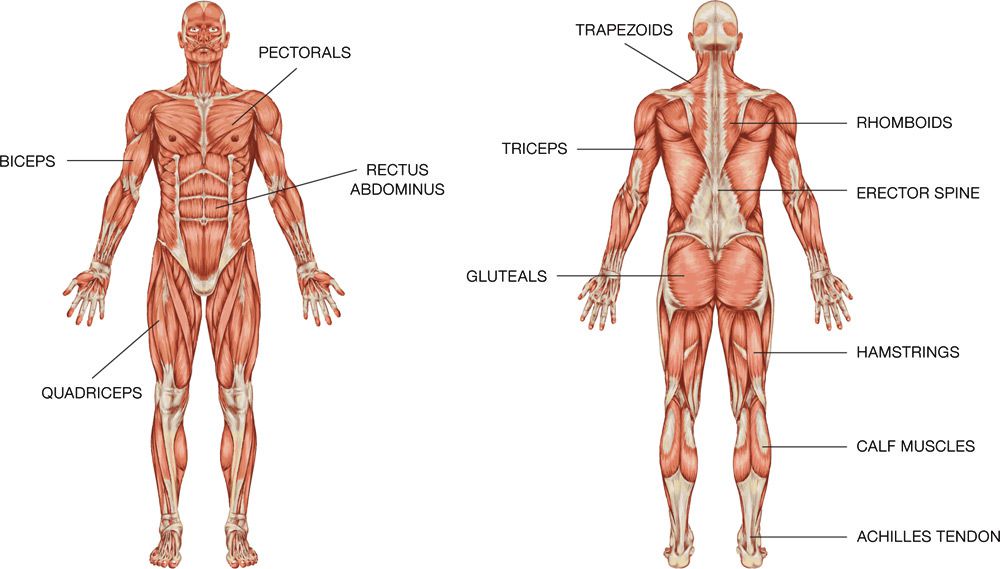
You aren’t born with body parts misaligned; that happens little by little over the years through work and play. Don’t feel special—we all spend most of our lives in a forward-leaning, sitting position, typing at a computer or even riding a bike. Your muscles, such as the pecs and hip flexors, shorten and tighten to accommodate that position. Making matters worse, we exacerbate the kyphosis (excessive hump in the thoracic spine or the upper back) through imbalanced strength training at the gym. Too often runners work the front-of-body “mirror” muscles (pecs, biceps, abs, quads) with pushing exercises while neglecting the backside muscles (hamstrings, glutes, erector spinea [back], rhomboids), which are largely activated with pulling exercises.
Fully undoing the damage will take time, but when you start taking action, you’ll quickly notice positive results. The remedy is actually pretty logical:
• Stretch the too-tight front-side muscles and strengthen the weak back-side muscles.
• And from this point forward, do twice as many pulling exercises as pushing exercises in the gym. Plus, give extra work to scapula stabilizers (shoulder blades), such as the rhomboids and trapezius.
LEG-LENGTH DISCREPANCIES CAUSE INJURIES
By the way, everyone I talk to is surprised when I tell them that a huge part of all overuse running injuries comes down to leg-length discrepancies—that is, one leg is longer than the other. There are two types: a structural discrepancy, in which a leg is truly longer than the other (in which case you may need shoe lifts), or the more common functional discrepancy caused by an asymmetry in your ilium, one of the two large bones that make up your pelvis. In other words, your pelvis is torqued one way or the other—and your goal is now to un-torque it. Because in my experience, the source of leg-length discrepancies are 99 percent functional and 1 percent structural, so nearly all of them may be fixable. I am convinced that the vast majority of overuse running injuries I treat are from leg-length discrepancies—especially if the injuries are asymmetric.
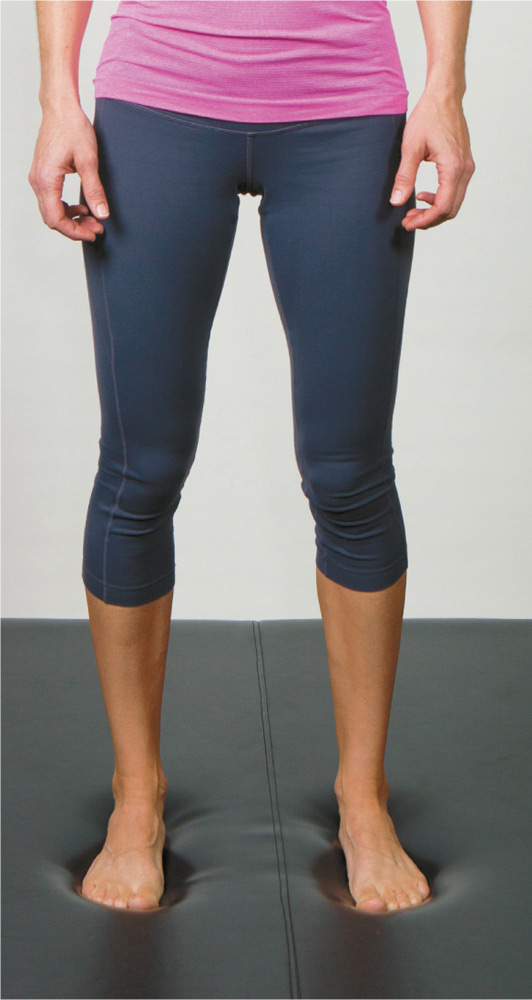
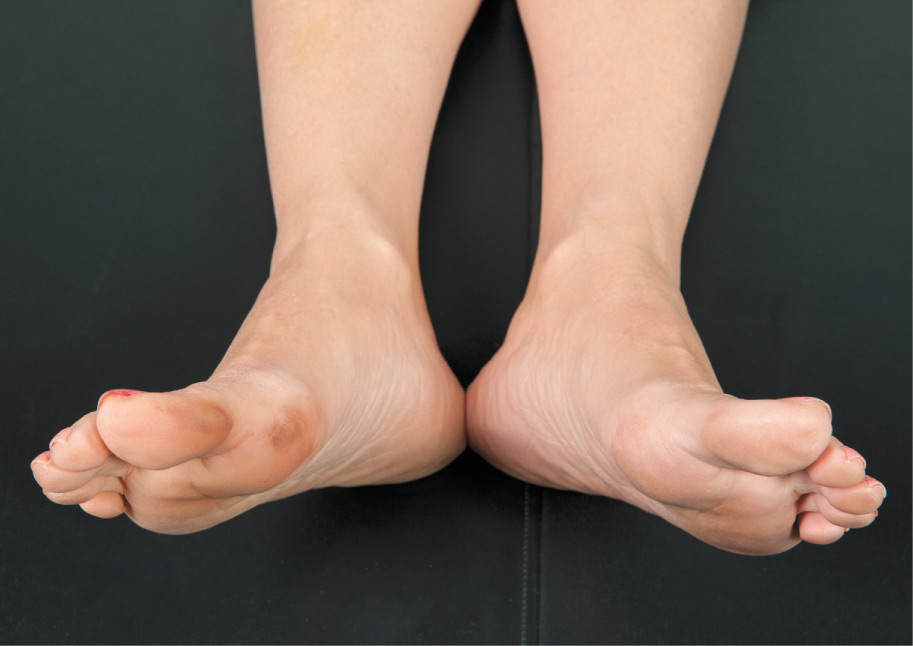
After all, ask yourself: If you have pain on one side and not the other when both legs did the same workout—why? If you look closely, you can see your own leg-length discrepancies in the mirror. Stand in the mirror naturally, not consciously correcting your posture. Now look at your legs and observe the following:
• Are both feet facing forward or is one more externally rotated—pointing outward? That could be the sign of a longer leg.
• Are both legs and feet equidistant from the midline, directly below your belly button?
• Is one arch collapsed (flat-footed) more than the other? It might be hard to tell, but which arch is closer to the ground?
• Inspect your toes: Is the knuckle of the big toe more enlarged on one foot than the other? And is the big toe on one foot angled outward more than the other? And is there a bigger callus on the inside ball of one foot than the other—or underneath the knuckles of the big toe on one foot? All these are signs that that may be the longer leg, whether the problem is functional or structural.
Even leg-length differences as small as 1/4 to 3/8 inch (6 mm to 1 cm) will cause damaging forces to build up somewhere on the long or short leg, and can result in injury. If this is the case, go to an experienced physical therapist for a pelvic alignment assessment. He or she will work with you to create weight-bearing symmetry.
The bottom line: Even the worst postures are probably fixable if you are serious and vigilant. If you do all the stretching and strengthening outlined in this book (see chapters 7 and 8), your body will straighten up and your aches and pains will gradually disappear.
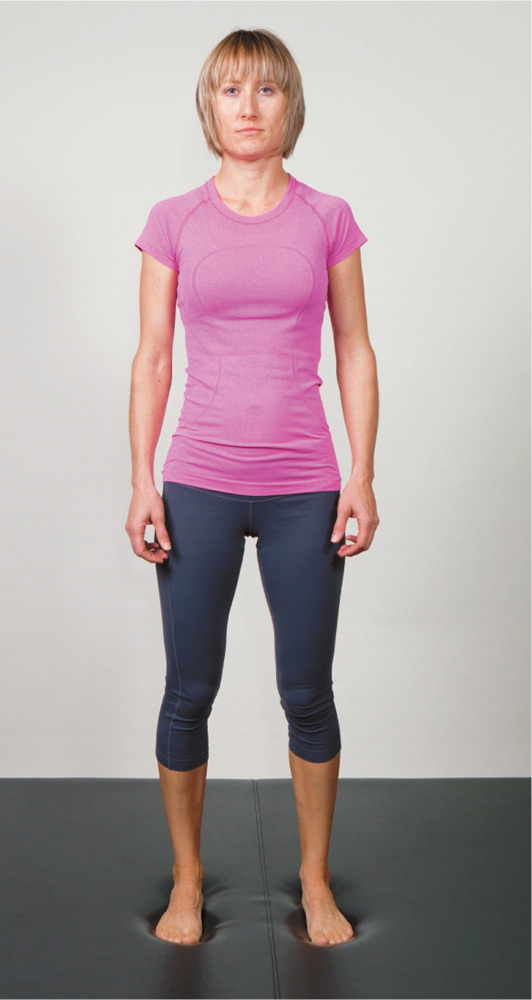
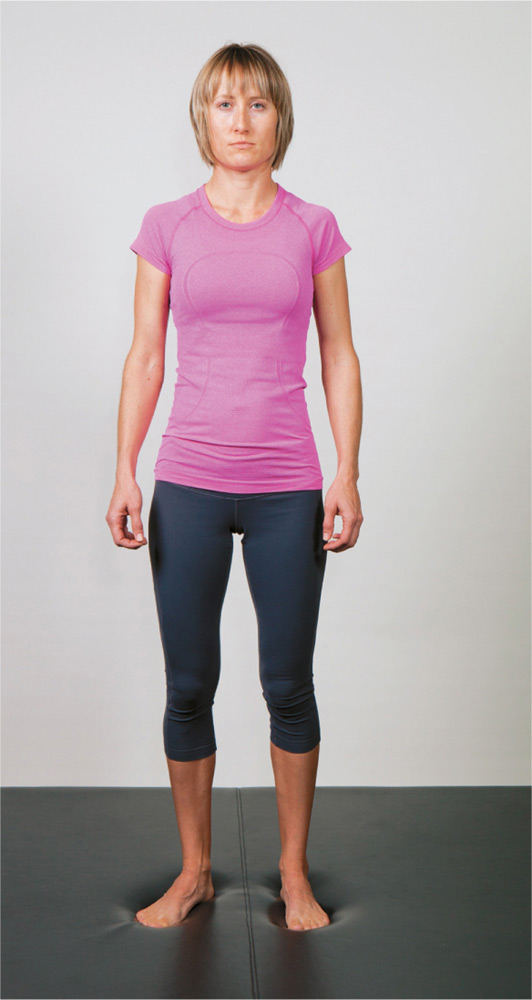
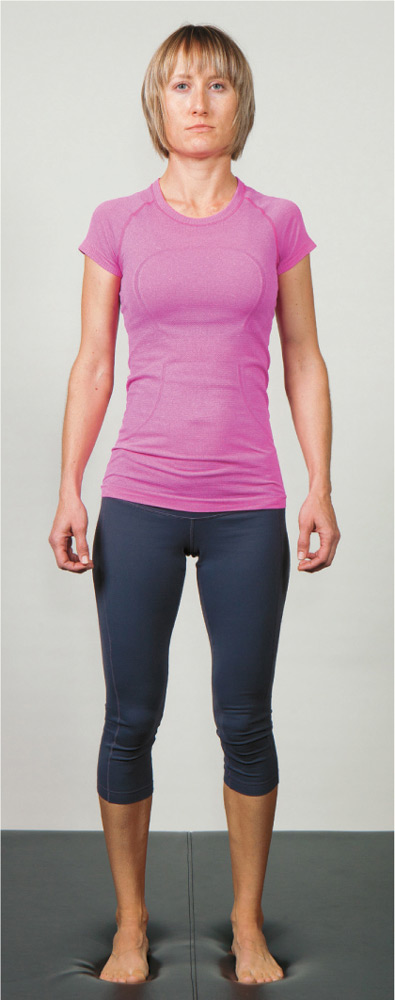
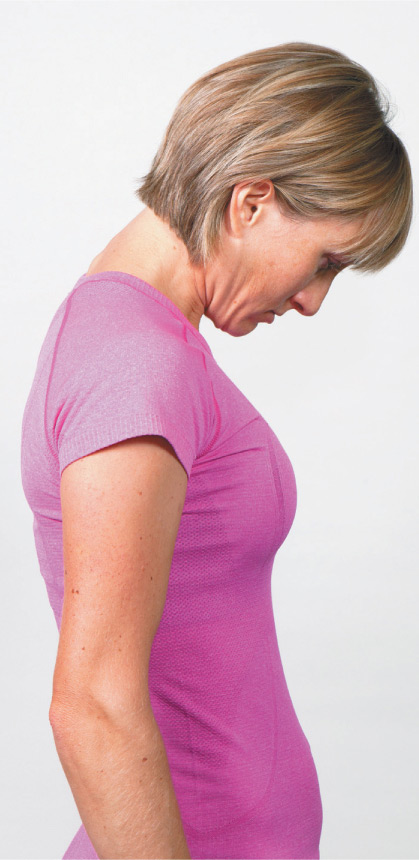
As I mentioned earlier, your posture issues are pretty easy to see. Just have someone take a picture of you directly from both the side and front (see below). Stand naturally without making any conscious adjustments.
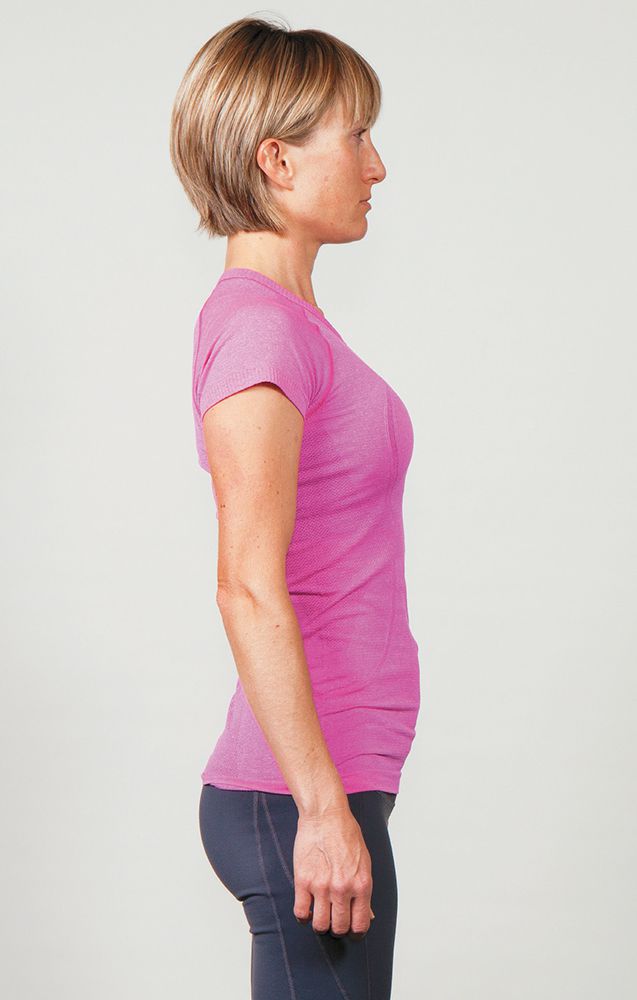
1. Side View
Good posture: Your ears should be directly aligned over your shoulders, with the shoulders aligned over your pelvis, pelvis over knees, and knees over ankles.
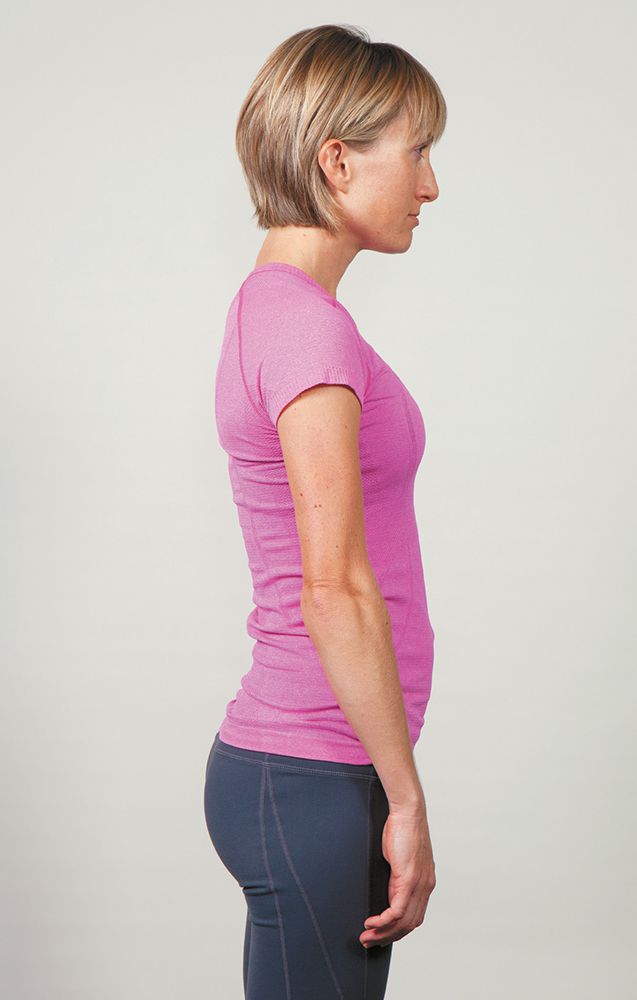
Bad posture. Head is thrust forward, shoulders slump forward, arms hang in front of body, and palms face backward.
Bad posture: Kyphotic spine featuring forward-positioned head; forward-slumped shoulders; swayed lower back; arms hanging in front of the legs with palms facing backward (instead of straight down at the sides with your palms facing your thighs); hyperextended knees that bend slightly backward.
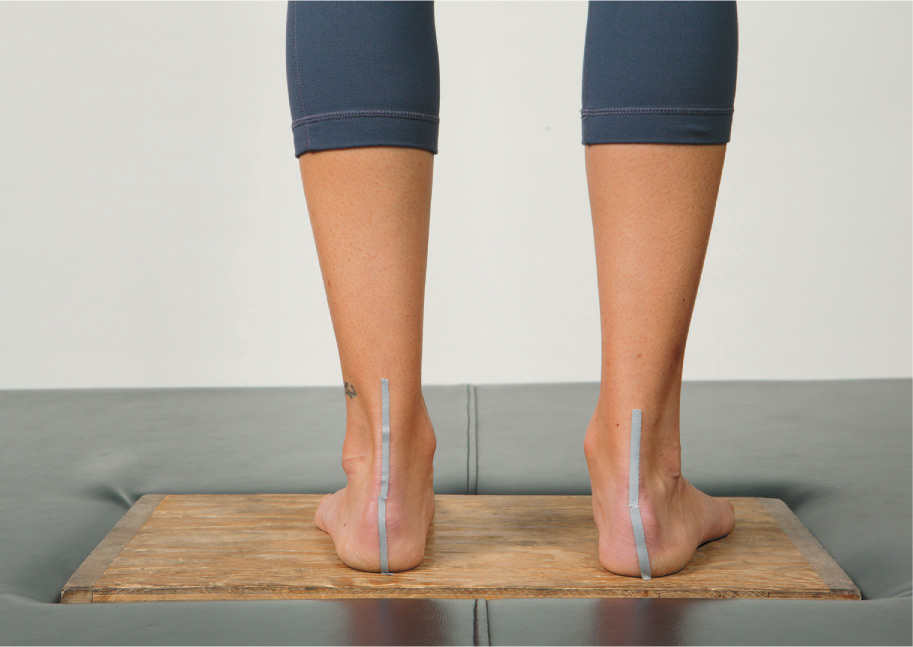
2. Front View
Good posture: Head centered on level shoulders and level hips. (Shoulders can be slightly less than an inch [2.5 cm] out of line to account for natural right- or left-hand dominance). Knees are neutral—in-line with the ankles, not knock-kneed or bowlegged. Feet have equally well-developed arches.
Bad posture: Shoulders more than 1 inch (2.5 cm) higher on one side, asymmetric love handles (indicating one leg longer than the other), ankle bones collapsed inward due to overpronation on one or both feet.
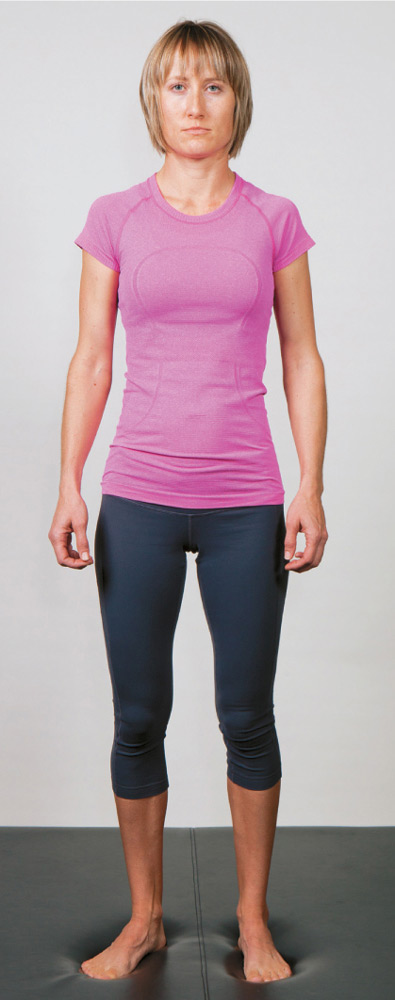
Bad posture. Foot on left points outward and farther from the midline indicating possible leg-length inequality.
Flexibility Assessment
To make the most of your body as a runner and to avoid injuries, all your joints must have a full range of motion. These fourteen flexibility assessment positions will tell you where to focus your attention most in terms of both stretching and strength (see chapters 7 and 8).
1. Forward Head Hang
What it does: Assesses the flexibility of your neck and upper-back muscles. The cervical extensors—the muscles that keep your head up against gravity—get weak and shorten after years of developing a forward neck posture, in which the head juts ahead of you. Causes include long hours of looking at a computer screen plus tight pecs, which pull the shoulders forward.
How to assess: Drop your head down and try to touch your chin to your chest.
If you’re healthy, you should be able to: Touch your chin to your chest with your mouth closed.
Implications for running: You’ll have more stress and fatigue in your neck and upper back on long runs.
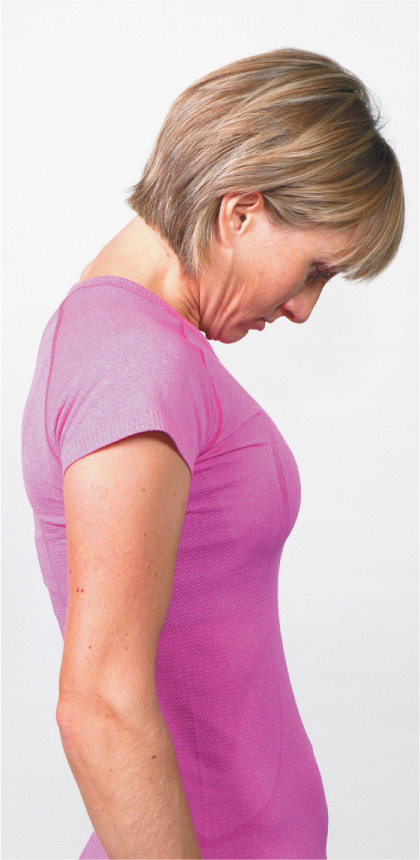
2. Chin Tuck
What it does: Like the forward head hang, it assesses the flexibility of the cervical extensors. (See image on page 133.)
How to assess: Suck your head backward like a chicken clucking.
If you’re healthy, you should be able to: Suck your head back far enough to line your ears up with your shoulders.
Implications for running: You’ll have more stress and fatigue in your neck and upper back on long runs.
3. Neck Rotation
What it does: Assesses the flexibility of the upper trapezius and sternocleidomastoids (the large group of muscles that wrap around the side of your neck to the clavicle).
How to assess: Turn your head to the side as far as it’ll go without forcing it. The ideal, which most people probably won’t be able to do at first, is to have your nose pointing directly sideways—that is, 90 degrees from the forward position and lined up over your shoulder.
If you’re healthy, you should be able to: Turn your head to the side so that your nose lines up with your shoulder—not your eyes, your nose.
Implications for running: A limited range of rotation in the neck means the spine will be more susceptible to wear and tear over the years.
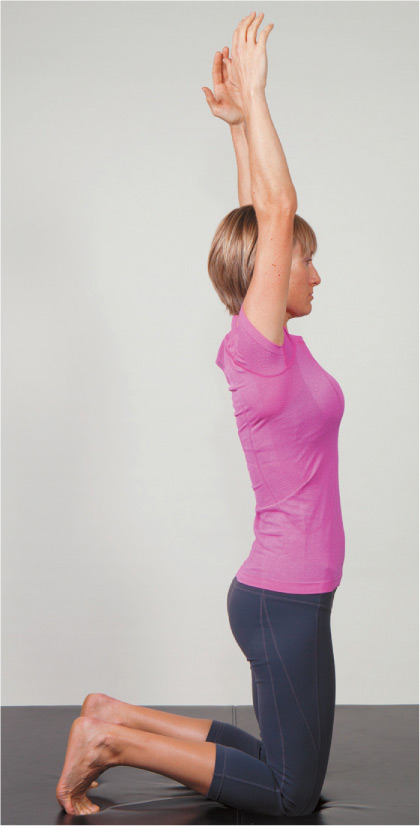
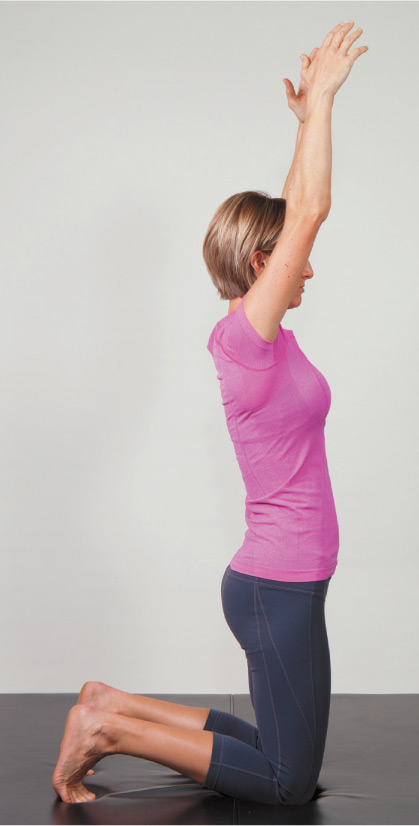
4. Shoulder Flexion
What it does: Assesses range of motion of your shoulders, which would be limited by tightness of your lats and the posterior muscles of the rotator cuff.
How to assess: Lift your arms straight up as far as they’ll go.
If you’re healthy, you should be able to: Touch biceps to ears.
Implications for running: Shoulder inflexibility does not allow you to hold good posture and maintain an efficient pendulum arm swing.
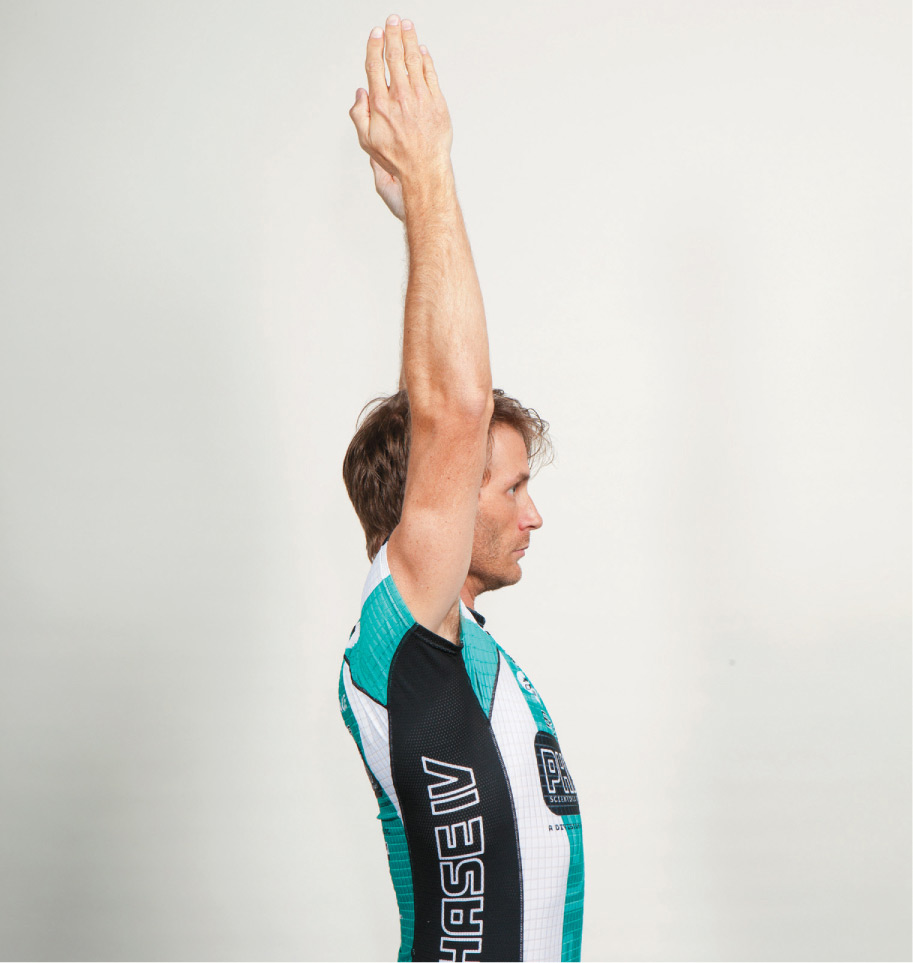
How to assess: Hold your hands next to your hips with palms facing forward. Then raise your arms directly overhead in an arc (as in jumping jacks), with thumbs pointing upward as you go.
If you’re healthy, you should be able to: Touch your biceps to your ears.
Implications for running: Not having the range of motion will limit the efficiency of your arm swing.
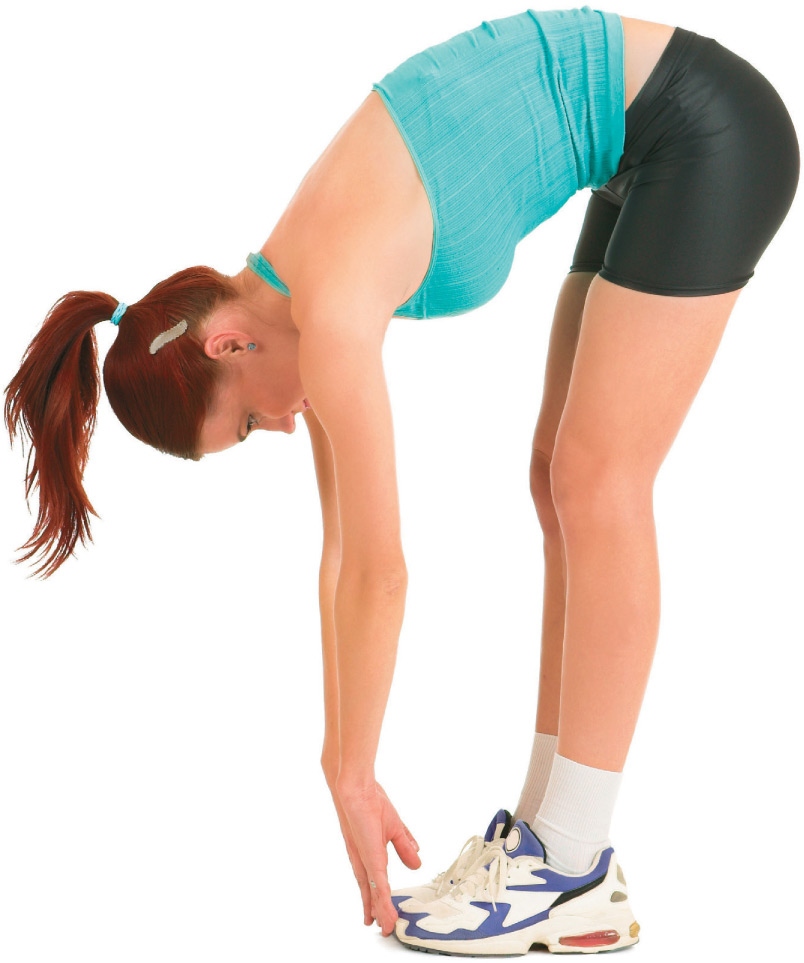
6. Standing Forward Bend
What it does: Assesses the flexibility of your glutes, hamstrings, and/or lower back.
How to assess: While standing, bend over and try to touch your toes with your fingers. If you can only touch your knees or mid-shin, one or all of these muscles is too tight (we’ll sort these out in the tests that will follow).
If you’re healthy, you should be able to: Touch the floor or toes (flat hands not necessary).
Implications for running: Tightness will limit your high knee rise and cause fatigue and tightness in your lower back on longer runs.
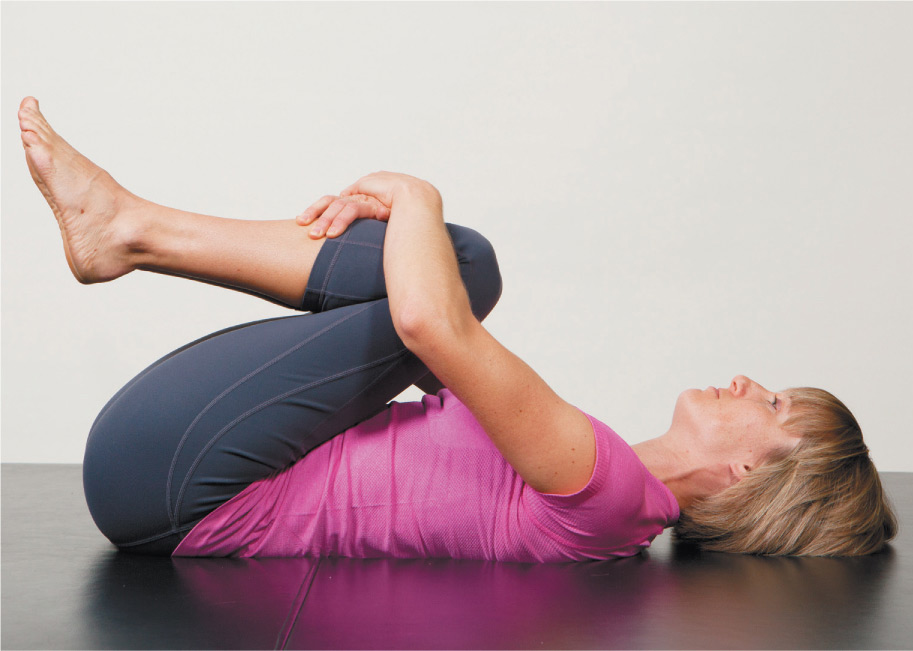
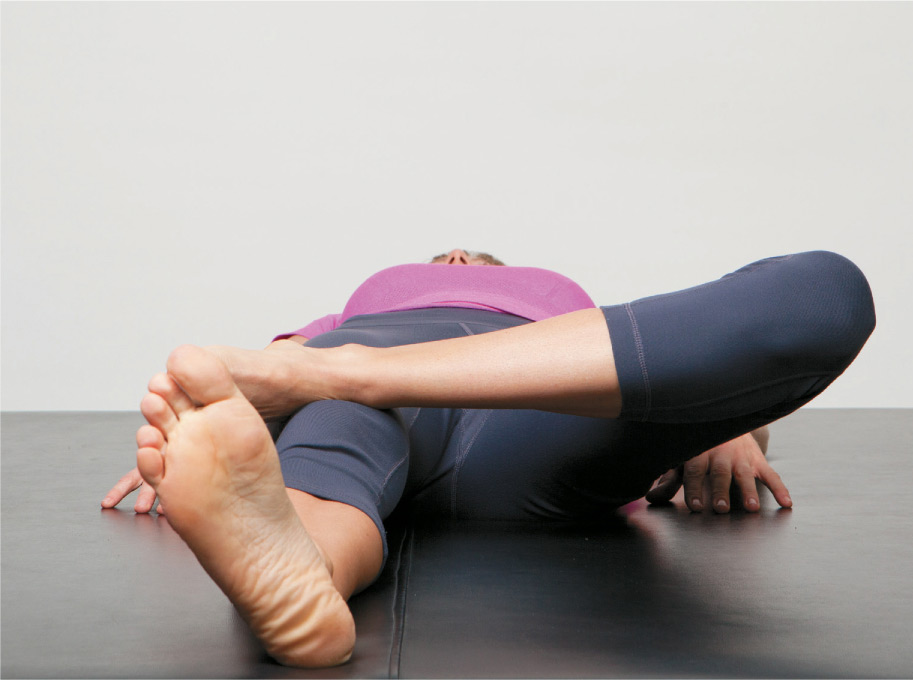
How to assess: Lying on your back, pull both knees to your chest. If your entire butt and pelvis come off the ground, your glutes are too tight.
If you’re healthy, you should be able to: Get your knees fairly close to your chest without your pelvis lifting off the floor or table.
Implications for running: Tight buttock muscles make it difficult to achieve the high knee position needed for good running mechanics. Also, your butt and hamstrings are the prime movers in running. If they are tight, they are weak, and so you lose power. Specifically, you’ll have difficulty pulling your legs back under your center of gravity before they hit the ground, meaning you’ll have a tendency to overstride.

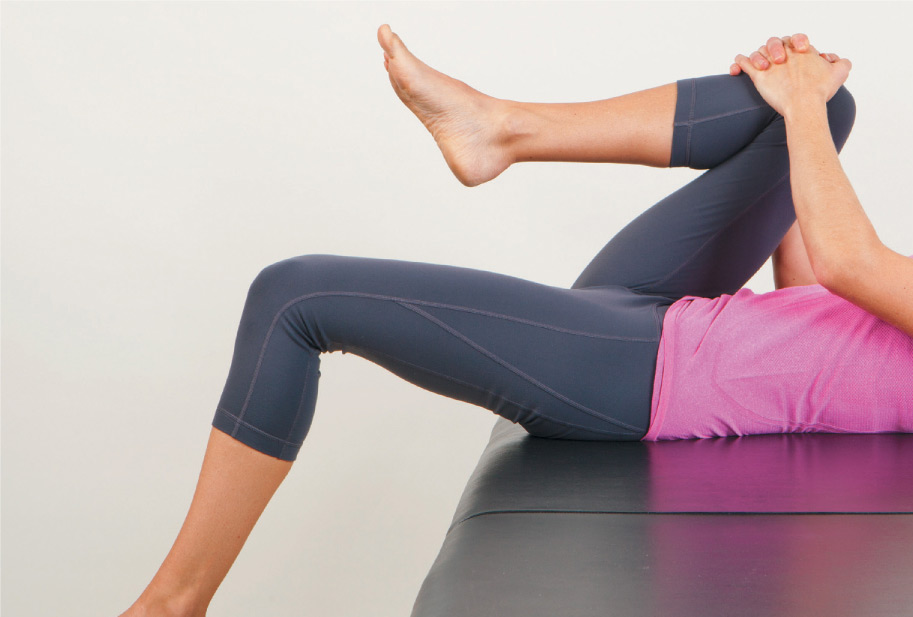
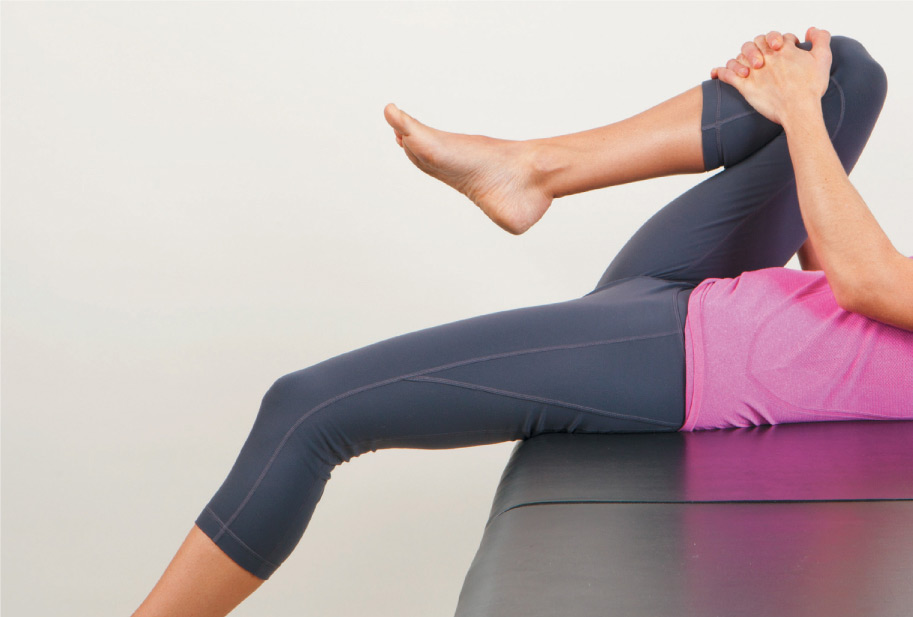
How to assess: Lying on a sturdy table on your back with your buttocks at the edge, bring both knees to your chest. Hold one knee to your chest while you lower the other leg down to the table. If the knee you dropped is hanging up in the air and not lying flat, horizontal with the table, or below the plane of the table, your hip flexors are tight. Now observe how bent your knee is on the lower leg. It should be relaxed, at close to a 90-degree angle. If it isn’t, then the one quad that crosses the hip as well as the knee (i.e., the rectus femoris) is tight.
If you’re healthy: Your thigh bone will lay perfectly aligned with your body and your knee will be bent at a 90-degree angle.
Implications for running: Tight hip flexors are weak, which impedes the high knee rise necessary for good running mechanics.
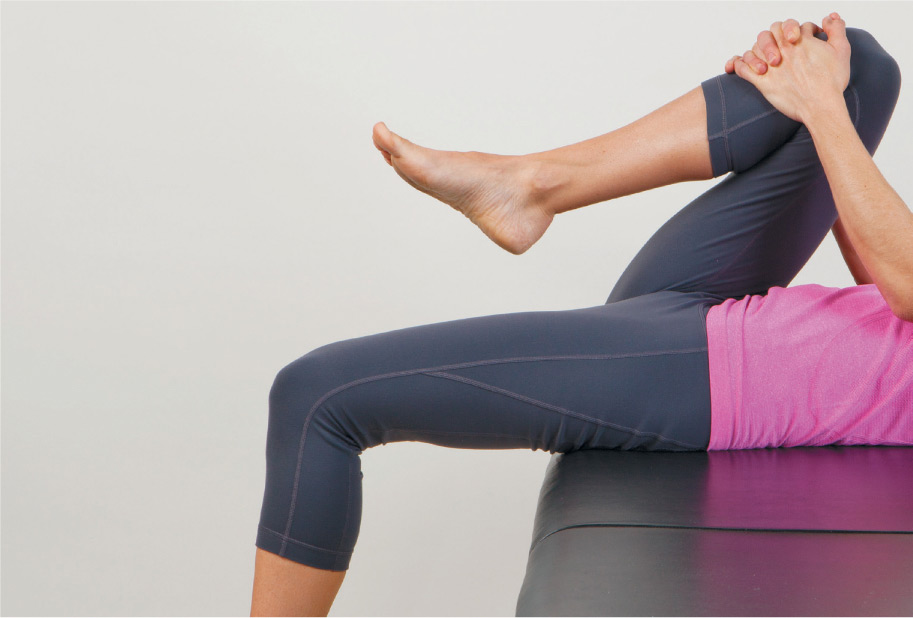
Good hip flexor range of motion; thigh lays on the plane of the table. Also shows good flexibility of the quad crossing the hip, the rectus femoris; knee is bent to near right angle.
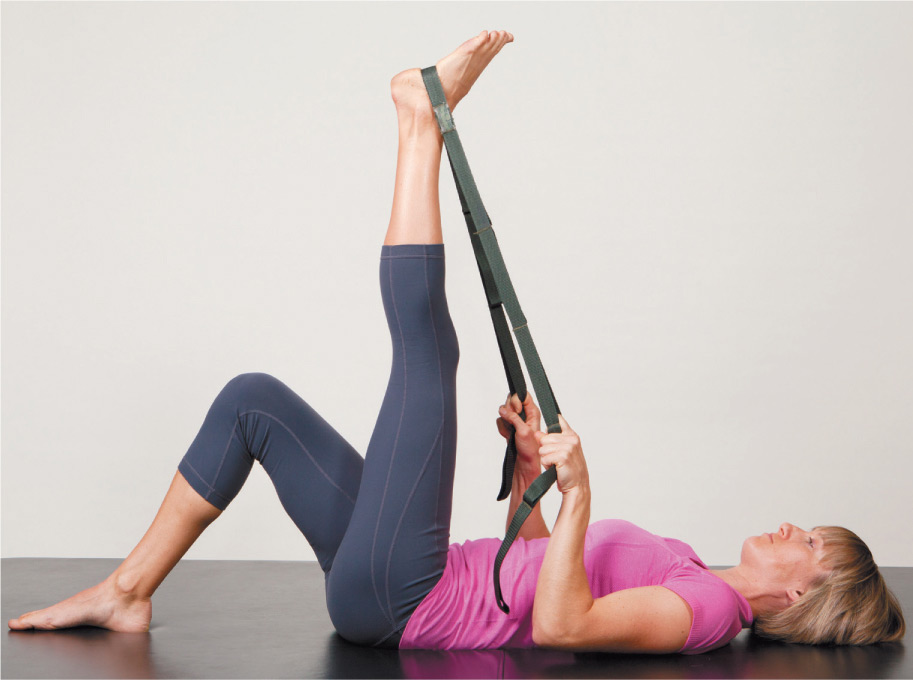
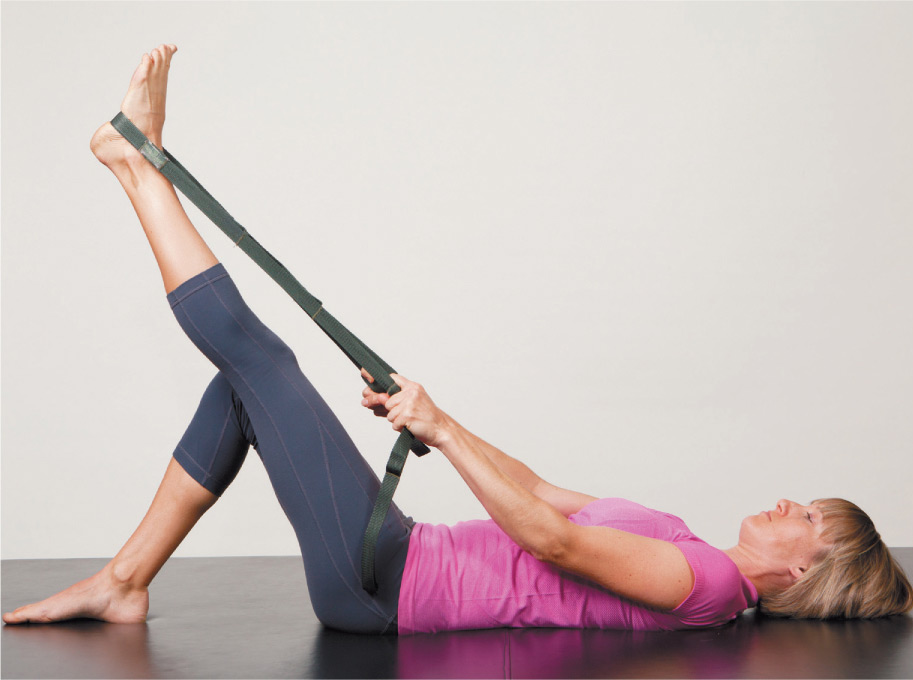
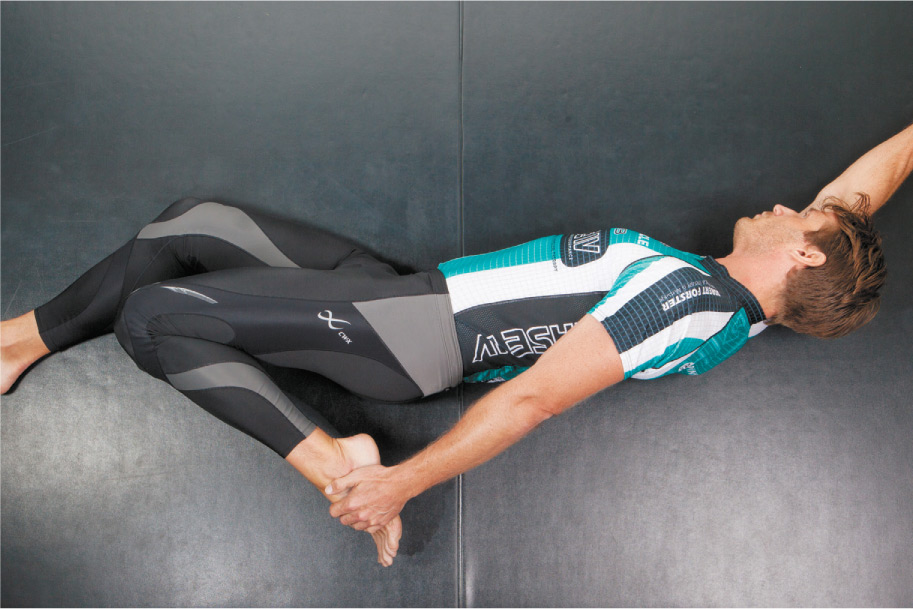
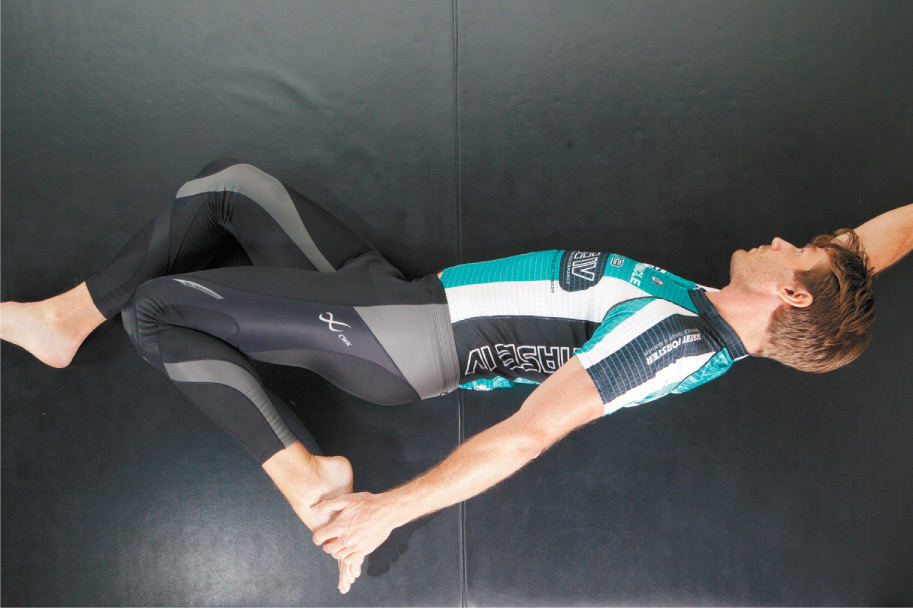
How to assess: Lying on your back, with one knee bent and the foot flat on the floor, raise a leg and loop a strap around the foot back by the heel. While your foot is relatively low, fully straighten your knee. Now raise the leg up while keeping the knee absolutely straight, and stop when you feel a definite stretch anywhere in the back of your leg—for example, the hamstring or calf.
If you’re healthy, you should be able to: Bring the entire leg, with the knee perfectly straight and the toes relaxed and pointed toward the ceiling, to a 90-degree angle with your body. Anything less means your hamstrings are relatively tight, making you susceptible to knee, hamstring, and lower-back strain.
Implications for running: Tight hams mean you won’t be able to achieve a high knee rise, which will degrade your rearward foot landing. You’ll also lose power, because running power comes from the hamstrings.
10. Patrick’s Test
What it does: Assesses flexibility of the internal hip rotators deep in your buttocks.
How to assess: Lie flat on your back with your legs extended straight. Bend the left knee and place the left foot just above the right knee. Then relax. Then do the other side and compare the distance from the ground to your knee.
If you’re healthy: Your knee should come within 12 inches (30.5 cm) off the floor. There should be symmetry from side to side, because asymmetry indicates that one hip joint is having more problems than the other.
Implications for running: Tight hip rotators make you susceptible to injuring the muscles deep in your buttocks, including piriformis syndrome and hip-joint deterioration.

How to assess: Lying flat on your back, bend both knees with feet flat on the floor. Place your right ankle on your left thigh just above your knee. Then reach down and push your right knee down while holding your left knee stable. Feel the stretch around your right hip.
If you’re healthy, you should be able to: Look like the top photo. If you’re tight, you’ll look like the bottom photo.
Implications for running: Same as Patrick’s test: Inflexibility makes you susceptible to piriformis syndrome and hip-joint degeneration.
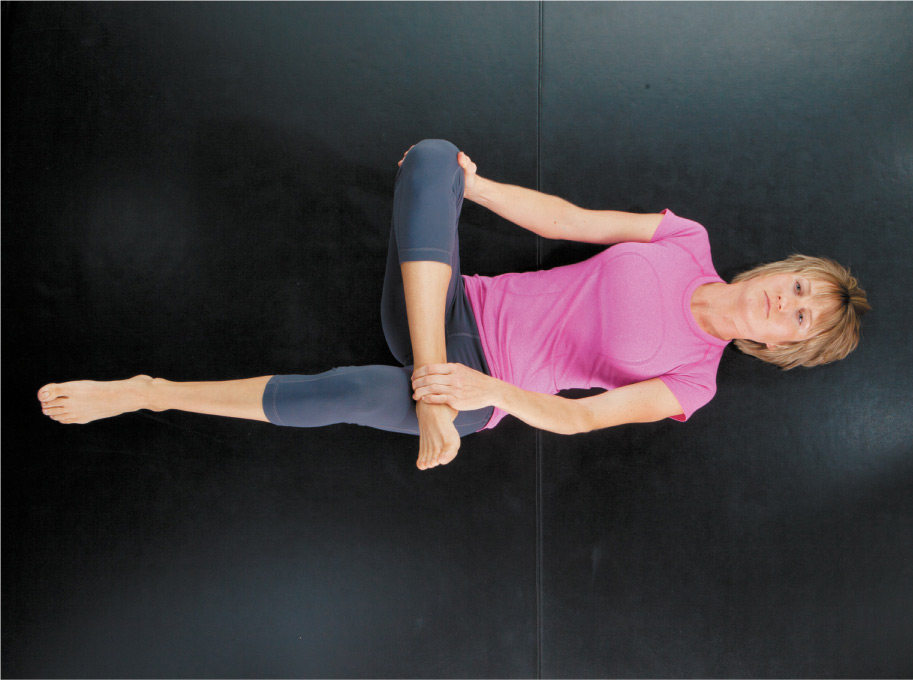
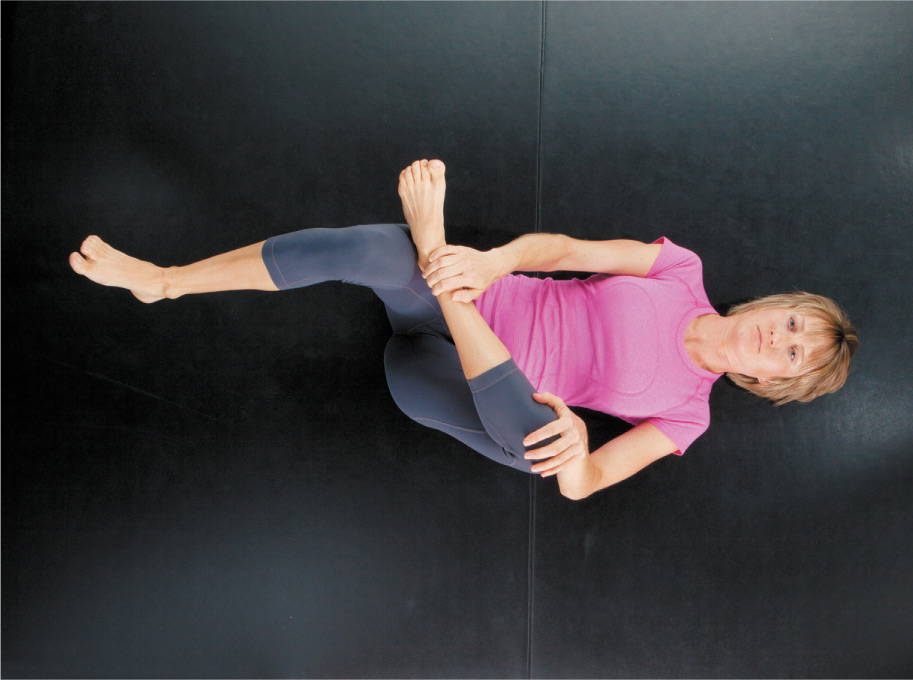
How to assess: Lying on your side with your hips stacked (perpendicular to the ground), bend your left knee and reach back with your left hand to grab the top of your foot close to your toes. Then pull your heel toward your buttocks.
If you’re healthy, you should be able to: With your knee directly below your hip, pull your heel within 3 to 4 inches (7.5 to 10 cm) of your buttocks.
Implications for running: Tight quads make you susceptible to knee issues such as patella femoral pain syndrome and patella tendonitis. When the quads are tight, the patella won’t track properly in the groove in the femur, scraping the sides of the groove and causing damage and pain.
Negative test for tight quads: heel is within 3 to 4 inches (7.5 to 10 cm) of buttock and the knee is aligned directly below the hip.
How to assess: Sit on the floor with your legs outstretched and try to touch your toes with your fingertips.
If you’re healthy, you should be able to: Reach for your toes. If you’re healthy, you should at least be able to reach anywhere in the middle of your shin (not many people will be able to touch their feet). You should be able to see your pelvis angled forward (bottom photo) and an even curve from your lower back to your neck. (Any parts of the spine that are flat indicate tightness.)
Implications for running: A tight lower back makes you susceptible to knee, hip, and lower-back strain.
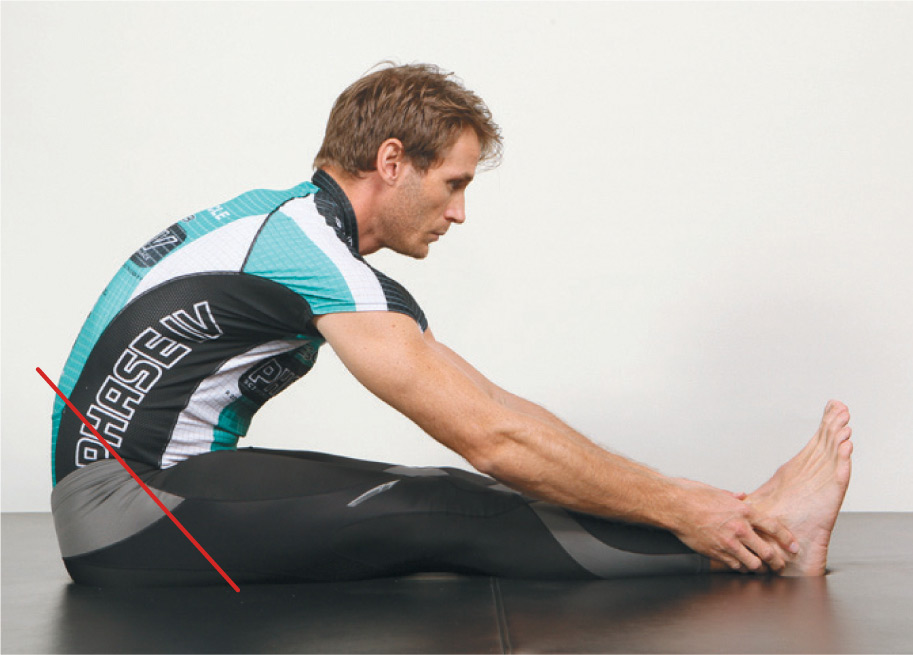
Positive for low back tightness; positive for hamstring tightness. Pelvis is angled backward and there is a flat low back curve, as indicated by the red line.
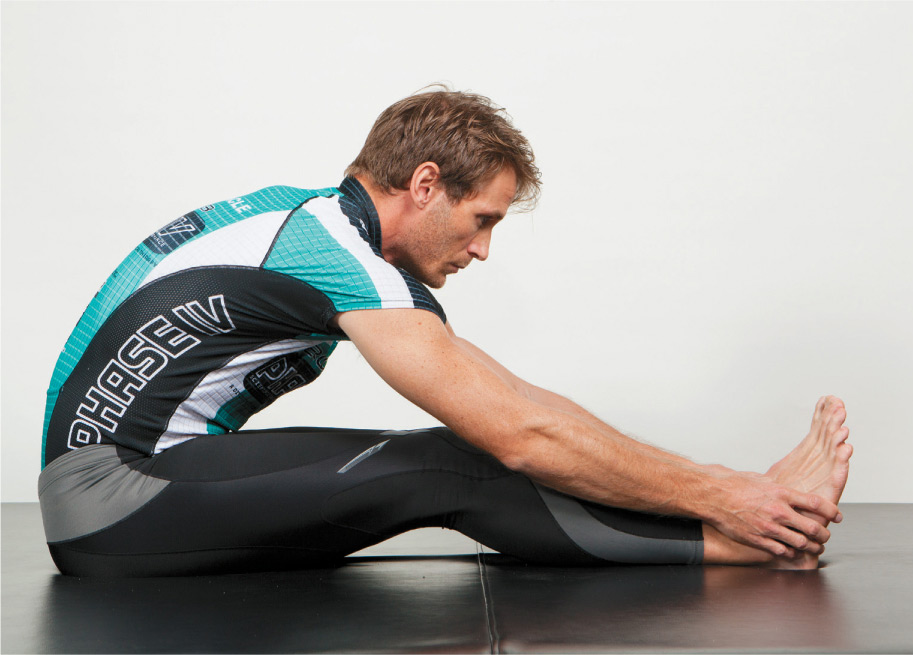
Negative for low back tightness. Pelvis is forward and there is a uniform spinal curve from tailbone to head.
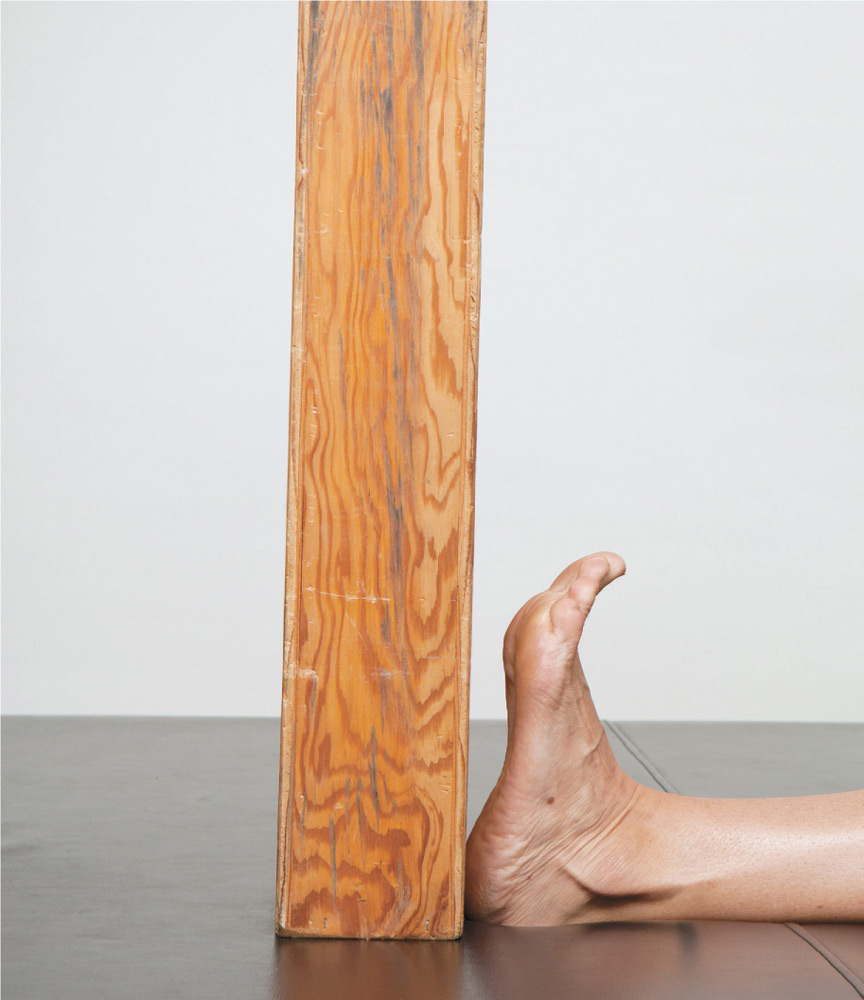
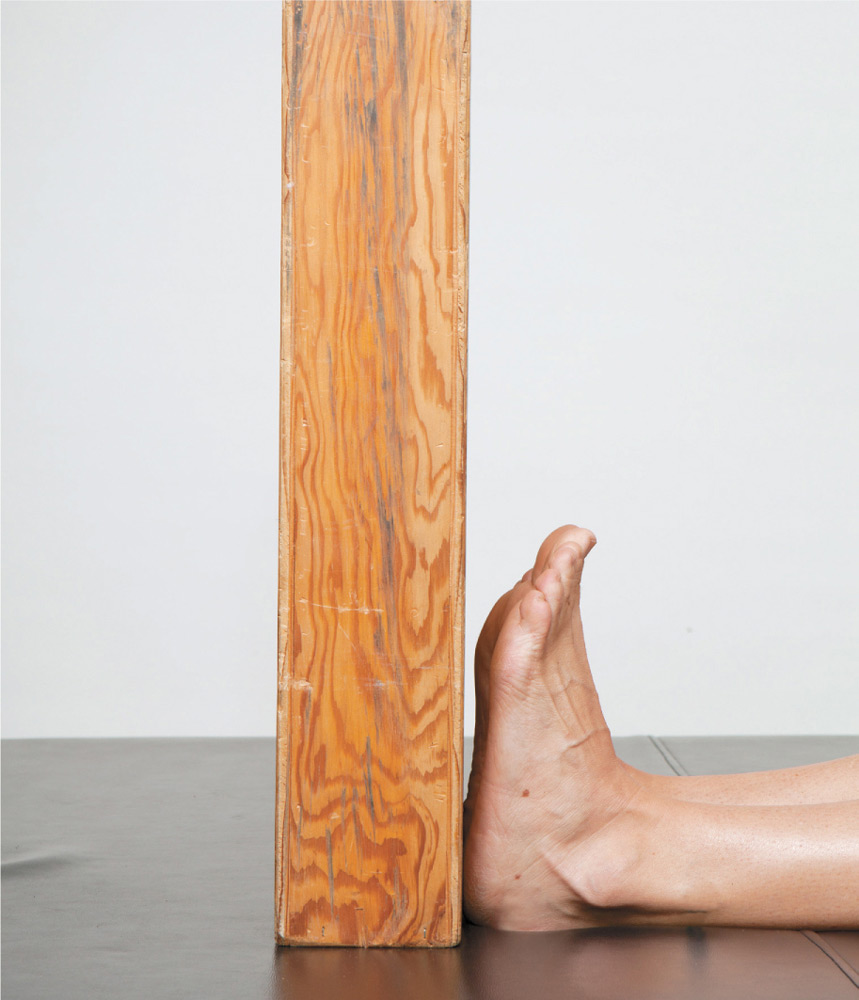
How to assess: Sitting on the floor with your legs straight and the bottom of your feet flat against a wall, pull your toes away from the wall.
If you’re healthy, you should be able to: Pull your toes 2 inches (5 cm) away from the wall while keeping your heels against wall.
Implications for running: Tight calves can lead to overpronation, Achilles tendonitis, and recurrent calf injuries.
While you’re evaluating yourself, note which tests were positive and which didn’t work. Write the results down so you can emphasize those stretches later.