
8 Strength Training for Runners
Why weights are a magic bullet for injury prevention, robust bones and muscles, and a time-saving shortcut to speed and endurance.
In 2013, Evan, a 25-year-old elite triathlete, came into the office complaining of one of the most common running injuries: chronic knee pain. It first appeared after longer runs and then progressed to pain during every run. Eventually, the knee hurt in daily activities, including going up stairs and during squatting motions. It had been bothering him for several weeks and was interfering with his training and his life.
There are many causes of knee pain in runners, but coaches and athletes have lumped them all together as “runner’s knee.”
Every injury is a puzzle that needs to be solved. To do so, physical therapists use two related approaches: a physical examination to find out which body part hurts (the damaged structure) and movement analysis to find why it hurts (usually a misalignment issue). Besides some sort of acute injury (which didn’t apply in Evan’s case), the misalignment is often due to a muscular imbalance—muscles on one side of the body being stronger or weaker than the same muscles on the other side, and/or opposing muscles on one side of the same leg being relatively tighter than opposing muscles on the other side of the leg.
In Evan’s case, the physical exam found the pain to be emanating from under the kneecap. This is caused when the backside of the kneecap tracks imprecisely in the groove between the condyles (humps) at the bottom of the femur (thigh bone). Because Evan continued running in that condition, he damaged the cartilage, the smooth coating on the ends of the bones, which doesn’t heal easily, if at all.
The second step was movement analysis, and sure enough, during a video gait analysis of Evan’s running mechanics, we immediately noticed that his form was off: His right knee was coming across the midline of his body. That was a deviation from normal running form, in which the knee should drive forward in a straight line.
Now, basic kinesiology (the study of movement) told us what to look for: something that was pulling his right leg to the left. We quickly assumed that was the right adductor, the large muscle on the inside of the thigh that moves the leg from a widespread stance to one in which the legs are parallel to one another.
For the adductor to overpull, it had to be either tighter or stronger compared to its opposing muscle group on the outside of the hip: the hip abductors, which draw the leg outward from the center when the leg is unweighted in the standing position. The hip abductors are made up of four muscles located in the buttocks region: the tensor fasciae latae, gluteus maximus, gluteus medius, and gluteus minimus, with the latter two doing the lion’s share of the work.
With early testing establishing that the hip abductors were weak, the solution was clear: Stop the thigh bone from being pulled inward by stretching the adductors and strengthening the abductors.
After 3 days of doing strength exercises for the gluteus minimus and medius, and stretching the inner thigh, Evan was back on the track, running pain-free for the first time in 2 months. Just like that, the biomechanical deviation that caused his pain was gone. From that point on, we had Evan perform abductor exercises regularly as part of his health maintenance program. Evan began stretching and using the foam roller to make sure that his imbalance and knee pain did not return.
I love working on elite athletes, but not just because it’s good for the ego. What I learn from them directly translates to treating regular people, who make up 99.9 percent of my practice. You see, the elites’ bodies are so honed and fine-tuned that they respond quickly to therapy, getting almost instant results. As such, they become a learning laboratory for clinicians like me, teaching guides for the procedures I’ll use on average folks, who respond to therapy slower. The same results I get from an elite athlete in 3 days may take 3 weeks with the general public. But the elite’s experience gives me the confidence that what we are doing will work, even when the patient does not see immediate results in the first few sessions.
The Benefits of Strength: Speed, Endurance, Injury Prevention, Fat Loss, and Robust Muscles, Bones, and Connective Tissue
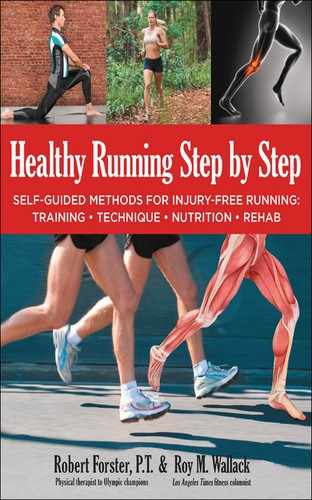
The solution to Evan’s knee injury illustrates the tremendous power of weight training to effect significant changes in the body and quickly get results. Weight training allows athletes to perform much more concentrated work in training throughout the season. Strength work is incredibly time efficient; the three 15-minute sessions we’re recommending per week in this chapter will recoup any lost running time many times over. Once you adapt to the rigors of weight training, your ability to perform work is elevated, your mechanics improve, your aerobic performance is enhanced, and your resistance to injury is greatly increased. Although endurance training alone increases performance, it is clear to us in our work with runners that supplementing with weight training results in larger gains than endurance training alone.
In general terms, weight training improves two muscle functions: propulsion and stabilization. It also can strengthen other structures, such as bones and connective tissues, making them more injury resistant. Here’s an overview of the great benefits of weight training for runners.
1. Strength training turbocharges performance.
It’s hard to get runners to listen when you tell them that they should lift weights to prevent injuries (unless they’re already hurt). But if I tell them it’ll make them faster and give them better endurance—and do it in a hurry—it gets their attention! So listen up:
Progressive resistance training gives you the Holy Grail of speed: the ability to generate more power, optimize running mechanics, improve your strength-to-weight ratio, and make your muscles more resistant to fatigue.
Strength training works by tapping the basic principle of fitness: To elicit a bigger response, you must do more work (i.e., create more stress) in the same period of time. Strength training provides a concentrated stimulus that can build muscular strength and power in a way that regular running can’t. That means that what you can do in 10 miles in running shoes, you can often do in 3 sets of 20 reps in the weight room in terms of improving strength.
The goal of strength training, which is increasing the amount of force generated by each of the individual muscle fibers, translates into increased speed as well as greater endurance. That’s because having more powerful muscles delays fatigue.
You see, the body is smart about the way it uses your muscle fibers to get work done. It only uses what it needs to, and no more. So as you make each muscle fiber stronger, fewer of them are needed to maintain a given running pace. Technically, the way it works is that muscle fibers contract in specific recruitment patterns to generate force. While the first set of fibers bear the burden of the workload, others rest, waiting to be called upon later. By increasing each individual fiber’s strength, you use fewer of them as you run, saving some fresh fibers for later.
Progressive resistance training is a central principle used for all strength-training programs dating back to at least the Roman Empire. Roman gladiators in training would do lifting exercises with a young calf. As the calf grew over time, so did the gladiator’s strength. By slowly increasing the load we lift in our weight training over the course of weeks and months, we allow for physiological adaptation to occur and we end up with stronger muscles, tendons, ligaments, and bones.

So in theory, if you use weight training to make your muscles 10 percent stronger, you can use 10 percent fewer fibers to maintain the same speed, and then you can use those fibers to keep you from slowing down in the last miles of a race. This is how strength training improves endurance.
With a program designed around progressive increases in weight, following the Periodization model, strength training will continually improve your strength and your endurance.
2. Weight training strengthens weak points to perfect mechanics.
You may be wondering why the hip stabilizers of a world-class runner such as Evan got weak in the first place, given his high level of daily training. But his experience is not unusual. In our modern, sedentary world, many of our muscles are unused most of the time, and those that don’t get worked deteriorate. So it should come as no surprise that, in a sitting-based culture that lacks much hip rotation and side-to-side motion, we tend to suffer tight hip flexors; corrupted, kyphotic postures; and withered gluteus medius, minimus, and maximus. Sitting robs us of the hip strength and movement of our ancestors, which made them natural runners.
What does surprise athletes is that these muscles don’t get worked much by “linear” activities such as running and cycling, which have us moving forward in one direction with no lateral motion. As a result, even elite runners are often too weak, imbalanced, and unstable to pull off all the natural economy of motion built into our bodies, leading to less than optimal form and injuries.
Unless you play a lot of tennis and basketball—activities that require lots of side-to-side motion—the only way to work the abductors is weight training.
3. Weight training maintains robust tendons, ligaments, fascia, and bones.
As with muscles, sedentary lifestyles neglect connective tissues and bones, leaving them too weak to tolerate the stress they are subject to in running. While strengthening your muscles, your weight training will also strengthen your tendons, ligaments, and fascia, the body parts of endurance athletes that are most subject to injury. Tendonitis, plantar fasciitis, Achilles tendonosis, and hip flexor strains are all common connective tissue injuries that too often sideline runners. These collagen-fiber connective tissues continually go through a breakdown-rebuild cycle that creates more or less strength in direct relationship to the stress placed on the tissue as they remodel themselves for performance. These tissues are hardened against injury at an accelerated rate with resistance training. Some of my Olympic athletes dubbed their weight work “Kevlar training” for its ability to seemingly bulletproof them against injury.
When it comes to strong bones, runners can’t get cocky. Having heard that hard-core cyclists are subject to osteoporosis because of their activity’s lack of weight-bearing stimulus, runners often pat themselves on the back, thinking that running naturally creates strong bones. But the illusion of runners’ bulletproof bone density is shattered by the sport’s fairly high incidence of stress fractures. A crack in a bone means that your exercise program outpaced your bone’s ability to adapt to the load (which is why you have to gradually work up to greater mileage). As the thin legs and birdlike upper bodies of many runners show, you need more than impact to maintain solid bones. You need a progressive weight-lifting program!
Again, it comes back to weight training’s ability to concentrate a load on your tissues. The bigger the load you put on your muscles, the more you strengthen the tissues that transmit forces to your bones and maintain their alignment. That’s because bones are living tissues that are continually building, breaking down, and rebuilding. They bend under the stress of running or a muscle pulling on them. And when they do, it makes them thirstier to drink in more calcium, bone’s raw building-block material.
Aging adds substantially to the risk of bone thinning for older runners. Bone density naturally peaks around age 25, but through the build-rebuild process you can keep your bones strong by lifting weights. Two out of four women will suffer an osteoporotic fracture in their lifetime; one of every four men will, too. The mortality rate for seniors, post-fracture, is very high. The strategy for avoiding the thinning, fragile bones that put you on the fast track to osteoporosis is clear: Get proper nutrients in your diet (such as calcium, which is raided from bones in large quantities during exercise as an electrolyte from your sweat glands) and perform hard physical activity, the most effective of which is resistance training. It is never too early to start fighting bone loss. The more calcium you have in your bone bank, the more protection you have against bone thinning as you age. Start now, because you need good bones throughout your running career and your life.
Bottom line: All body tissues of an endurance athlete are subject to breakdown. Whether it is bone, tendon, ligament, or fascia, they are all strengthened and hardened against injuries at an accelerated rate with resistance training.
4. Weight training helps you maintain muscle mass as you age.
As with bone loss, muscle mass peaks in our mid-20s. Between the ages of 25 and 50, the average man loses about a fifth of a pound (91 g) of muscle every year. After 50, men lose up to a pound (455 g) of muscle a year! Because natural levels of testosterone and growth hormone plummet after 50, this muscle loss, known as sarcopenia, has significant effects on health and function. With less muscle pulling on our bones, bones weaken faster and the risk of fracture increases. As muscle decreases, the calories burned all day also decrease, which results in later-life weight gain. Done right, weight training will maintain muscle mass and maintain higher testosterone levels in later life.
5. Weight training cuts body fat.
The increased testosterone levels associated with weight training (in women as well as men) combine with the higher daily calorie-burn rate of well-trained muscle to reduce body fat—a huge boon for your power-to-weight ratio. Not only will slimmed-down, strength-trained runners now go faster, but they’ll recover better because of increased T levels. Testosterone promotes recovery, especially when paired with adequate rest.
The Runner’s Dozen: Twelve Essential Joint-Stability Exercises
Progressive strength training for runners could be—and should be—an entire book. (Get back with us on that one.) To be truly progressive, strength training must be timed to your running race schedule and Periodized—that is, coordinated with your run training to peak your fitness for key races. Early in your training cycle, when you are logging long, slow, flat miles to build your metabolic infrastructure, your weight training should be designed to simultaneously build a base of structural integrity and health.
Once you have developed a metabolic and structural fitness foundation, and before you begin any hill running or speed training, you should progress to pushing heavy weights in the gym—but only after this initial joint preparation phase. Because we don’t have space to lay out the full strength program here, we have included only the first, and most important, phase of strength training: joint stability training. This simple but proven program will create efficient running mechanics and protect against injury, two keys to injury-free peak performance.
By first performing exercises that isolate the smaller, weaker muscles and tendons surrounding each joint, we create functional joint stability—joints that have the flexibility and strength to maintain good alignment through their full range of motion. This helps ensure sound running mechanics and injury prevention and protects your joints if you move on to the heavier compound or multi-joint exercises that we all know so well: hamstring curl, lat pull-down, squat, and so on. Along with the stretching exercises, this program is designed to strengthen joint structures so that all the muscles, tendons, and ligaments surrounding the joint will function in harmonic balance, keep the bones properly aligned, and keep you injury-free.
Eventually, for best effect, you should be pushing heavy weights in the gym, but only after you establish joint stability and correct joint alignment with the workout illustrated below.
In this first phase of strength training, we will begin the strengthening process with all-body exercises performed with ankle weights and dumbbells. Since the last thing a runner needs is heavy, bulky muscles, which would negatively affect the power-to-body-weight ratio that is the goal of strength work, we’ve designed the program to make you stronger and not necessarily bigger. This is not body building.
My strengthening program has a built-in bias to strengthen the vulnerabilities of the modern-day human body. After almost four decades of treating athletes, patterns of how a runner, cyclist, or swimmer is going to get hurt become quite clear. The human body has predictable weak points—so we know where it’s going to break down, we can address these specifically in the strength program.
Functional joint stability is where strength and flexibility blend to allow bones to articulate properly throughout the full range of motion. Optimum joint function allows for more powerful movements and prevents injuries. The goal of the twelve prescribed movements described here is to create joint stability in three critical areas of the body that must function properly for injury-free, high-performance running: the joints of the pelvis, core, and shoulder girdle.
The stability comes by challenging the muscles to work in diagonal patterns, which is how they operate in the real world. You must keep these three areas stable while you run; therefore, maintaining strict form is key. Pay close attention to the execution of each exercise. Some might look similar to other exercises you’ve seen or done, but the twelve here have been chosen and created to be most effective at correcting muscle imbalances, and improving performance, while eliminating inherently dangerous exercises.
I call them the Runner’s Dozen—strength exercises distilled from all those I have encountered in the nearly four decades that I’ve spent studying weight-training programs from around the world. Each one has been handpicked to address the vulnerabilities of the running body. They have proven effective for everyone—from spine-injured tennis players such as Pete Sampras to healthy Olympians such as Jackie Joyner-Kersee.
Anatomy of a Stable Core
In anatomical terms, core refers to the joints of the pelvis and lumbar spine, including the hip joints, the sacroiliac joint, joints between the vertebrae, and all the muscles that stabilize these skeletal parts. This midsection, where the body’s center of gravity is located, is where all human movement originates. The large, prime-mover muscles of the lower extremities (hamstrings, quads, hip flexors, adductors, and gluteus maximus) and the trunk (lats, paraspinals, and rectus abdominis) all attach to the spine and pelvis. Stability is achieved when the muscles in the abdomen engage simultaneously with the muscles in the back of the body to hold the otherwise flexible spinal joints steady, thereby providing a sturdy platform needed to allow the prime movers to do their job. Crunches alone will not achieve stability.
While we all need a strong core to protect the inherently unstable spine during simple daily activities such as bending, lifting, and sitting, runners need an even stronger core to create a solid anchor from which the prime movers contract and propel us forward. But there’s a conundrum here: The joints of the spine are delicate and highly susceptible to wear and tear and acute injury. Most core workouts I see in gyms all over the world put undue stress on the spine with ill-conceived exercises that compress, torque, and twist it. That’s why safety and performance get equal billing in my exercises.
For runners, a stable spine is the key to training the core for injury-free, peak performance. It allows the hip flexor muscles, which are attached to it, to contract and create the high knee position that is so critical to good running mechanics. You can do crunches and work the rectus abdominis for years and never achieve true core stability, because they only work the front of the abdomen and are the wrong muscles for stability. The main function of the rectus abdominis is to contort the trunk for sports such as gymnastics, diving, and wrestling. As runners we don’t need or want our trunk to move a whole lot. Instead, we want a solid, stationary core for the legs to work like pistons in the up-and-down movement that is running.
An effective and safe core workout for runners focuses on stabilizing the spine by improving the function of the transverse abdominis muscle located deep below the more popular and identifiable rectus abdominis (six-pack) muscle. However, as stated previously, true core stability is only achieved when the muscles in the front and back of the abdomen contract simultaneously to hold the spine steady. The handpicked exercises in our spine-stabilization series train both the transverse abdominis muscle in front of the body and the multifidi muscle group, located deep in the spine, to contract simultaneously to stabilize the spine.
In addition, this workout isolates and strengthens two key muscles: the hip abductors, which work to steady the pelvis from energy-wasting side-to-side movement while running, and the adductors, which assist the back-and-forth movement of the thigh. Strengthening the large and often-neglected adductor muscle group is the secret weapon we used to help Bob Kersee’s track and field athletes win forty-six Olympic medals.
The spine stabilization series of exercises gives you a simple yet sophisticated method of creating stability with handpicked exercises that remove the risk inherent in most core workouts. These exercises have been proven safe because they’re the ones we use to fix spinal injuries such as bulging discs, compressed nerves, and arthritic joints. This program has been tolerated by everyone from our 7-year-old student athletes to 70-year-olds, and it’s the same workout our Olympic gold medalists and mixed martial arts champions use to achieve elite performance. So they will work for you.
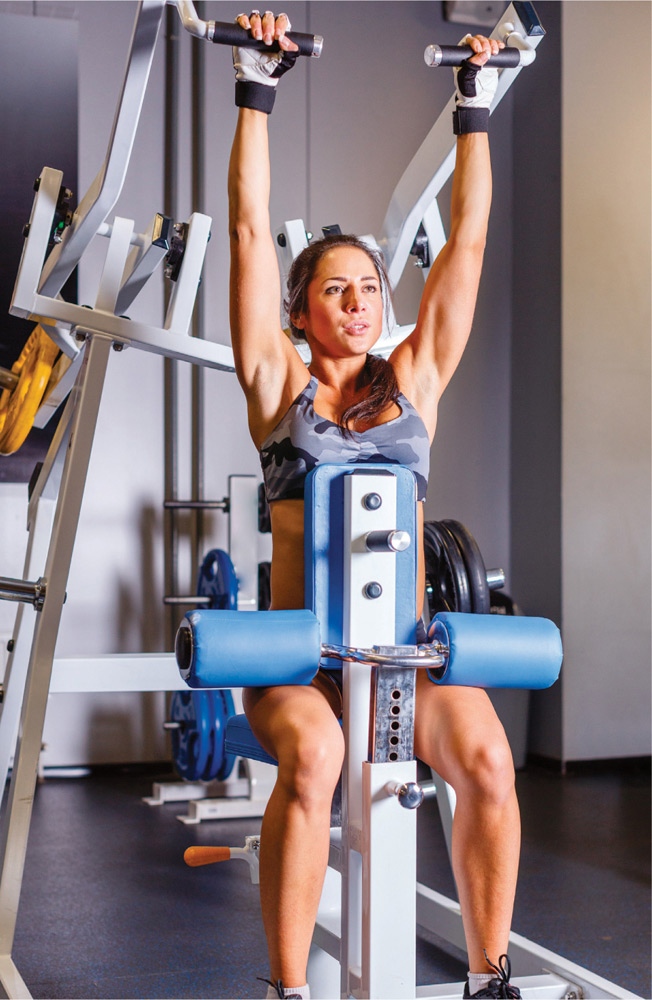
BASIC BASE-BUILDING STRENGTH EQUIPMENT
You don’t need much to begin hardening your body against the stresses of running during the base-building phase of Periodization. Forget giant cable weight machines that take up a den. Lightweight dumbbells and ankle weights, both shown here, will work just fine.
The Runner’s Dozen: Rules
Perform this workout two or three times per week and always stretch before and after every workout. Follow the directions carefully. The workout is only effective if it is done with strict attention to the technique cues for each exercise. For the first three workouts, do the exercises only as directed. Before you start, keep these rules in mind:
• Start unweighted: No matter how fit or how strong you think your core is, start with no weights as you first train the neurological system to perform these exercises correctly.
• Shift to 1: After the first three workouts, add 1 pound (455 g) to your ankle and wrist.
• Advance slowly: Follow the directions on when to increase the weights and do not start the advanced exercises until week 3 or 4, and not before progressing to 2 pounds (910 g) on each extremity for all the basic exercises.
• Top out at 5 pounds: Progress by adding 1/2 to 1 pound (225 to 455 g) per week to a maximum of 5 pounds (2 kg). Never go higher than 5 pounds for any of these exercises. Using more than 5 pounds (2 kg) on each extremity is not necessary and only increases the chances that you will deviate from good form and negate the purpose of the workout.
• Never work through pain. If you experience pain, stop and perform the stretches for that area again. If pain persists, skip that exercise and try the others. Only continue if you can perform each exercise pain-free.
• Inhale: Before starting, perform 10 to 20 diaphragmatic breaths (see page 117) or until you feel ready to begin.
The Runner’s Dozen
1. Bracing Maneuver
• Do this exercise for each of the spine stabilization series exercises. Lie on your back, knees bent, feet flat on the floor.
• Begin by making a sharp “psssst” sound. Notice how your abdomen and lower back tighten simultaneously and your back maintains a normal arch. This is a neutral spine.
• Hold this tension for 5 deep diaphragmatic breaths. Repeat 3 times.
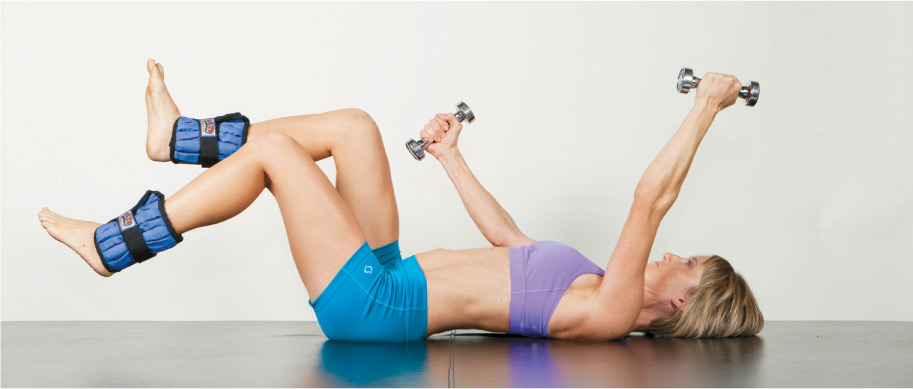
2. Alternate Arms
• While lying on your back with knees bent and feet flat on the floor, make the “psssst” sound and perform the bracing maneuver as described previously. Hold this tension in your midsection and breathe.

• Place your left arm on the mat beside your head with the elbow locked perfectly straight as pictured and your right arm at your side.
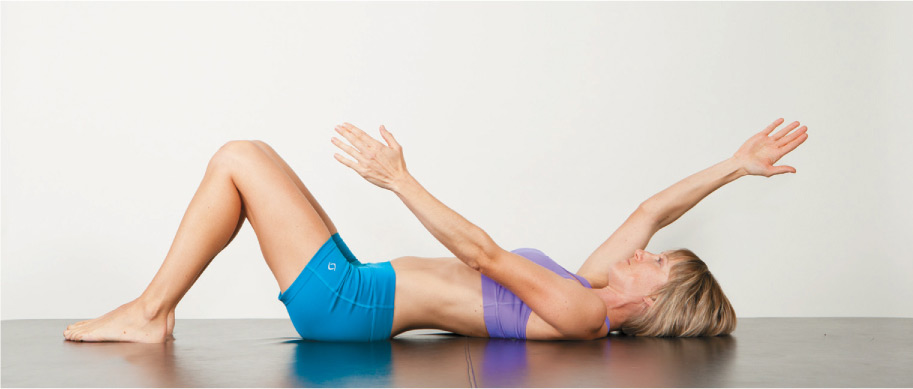
• Now, while holding the bracing maneuver, reverse the arm positions by moving your arms simultaneously at the very same instant.
• Return to the start position; this is one repetition. Keep a slight (normal) arch in your lower back and pelvis still as you move your arms. Breathe. Maintain a neutral spine.
• Repeat 10 times and rest 30 seconds, then repeat 10 times. Only add weights as directed above.
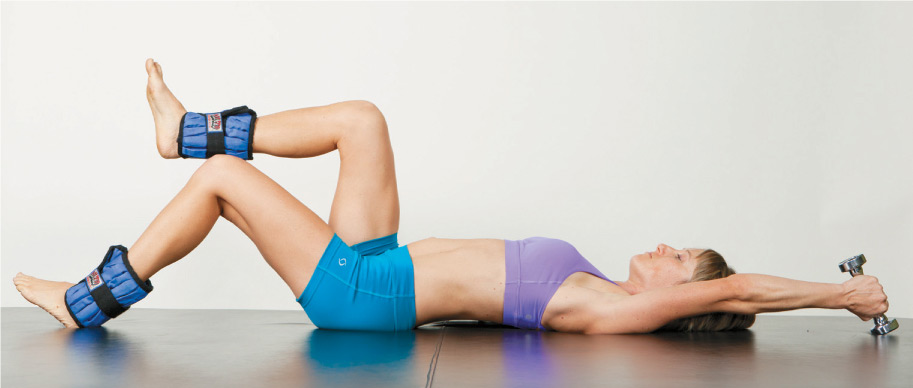
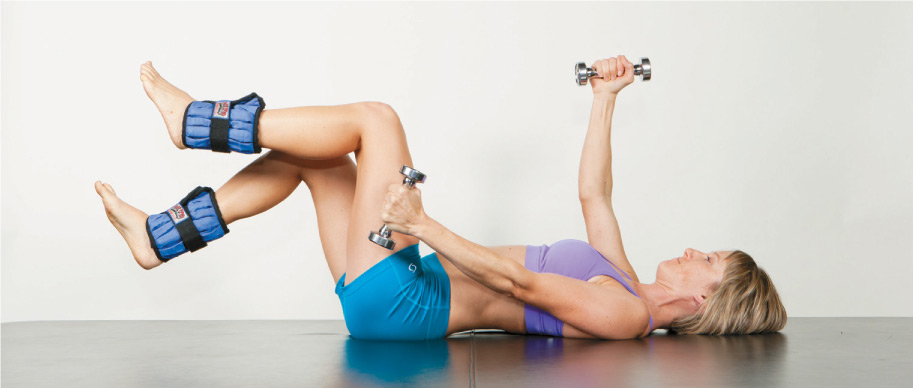
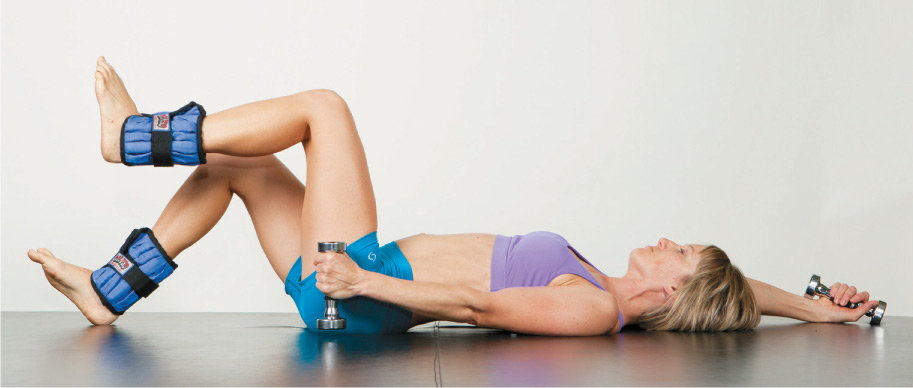
3. Alternate Arms with Knees at 90 Degrees
• Perform the bracing maneuver before lifting one leg at a time so the knees and hips are both flexed to 90 degrees as pictured.
• Place your left arm on the mat beside your head, elbow locked, and your right arm at your side.
• Reverse your arm position while holding the brace and breathing and then return to the start position.
• Repeat 2 sets of 10 with a 30-second rest between sets. Only add weights as directed in the Runner’s Dozen Rules on page 150.
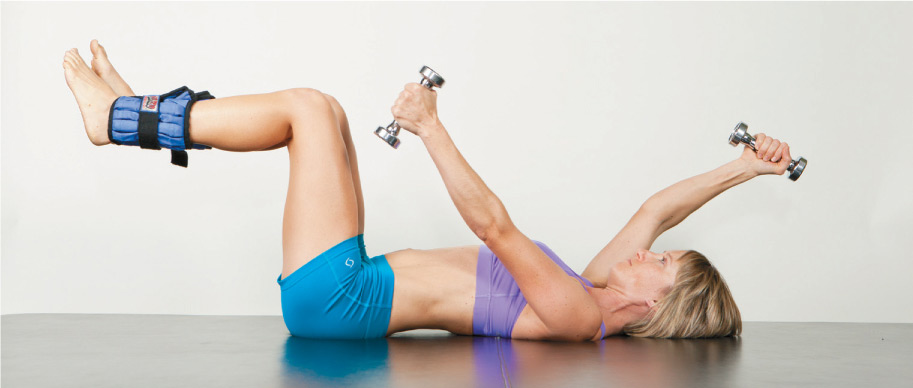
4. Dead Bug (advanced exercise)
• When you begin this exercise you can eliminate exercise #2, Alternate Arms, but always warm up with exercise #3, Alternate Arms with Knees at 90 Degrees (page 152).
• To start, perform the bracing maneuver before placing your left arm on the mat beside your head and your right arm at your side.
• While maintaining a neutral spine position with the bracing maneuver, lift your right leg to 90 degrees and keep your left knee bent with only the heel in contact with the ground.
• Now reverse your arm and leg positions by moving all extremities simultaneously. Pause for 1 count at the top and bottom but don’t let your arms or heels rest on the ground.
• Return to the start position; this is 1 repetition.
Note: During the exercise, keep your pelvis still and knees/legs locked at 90 degrees and elbows locked in the fully extended position as you move your arms and legs. Breathe. Do not pelvic tilt.
• Perform 10 repetitions, rest for 30 seconds, and perform a second set of repetitions.
• Only add weight as directed in the rules and never use more than 5 pounds on each extremity.
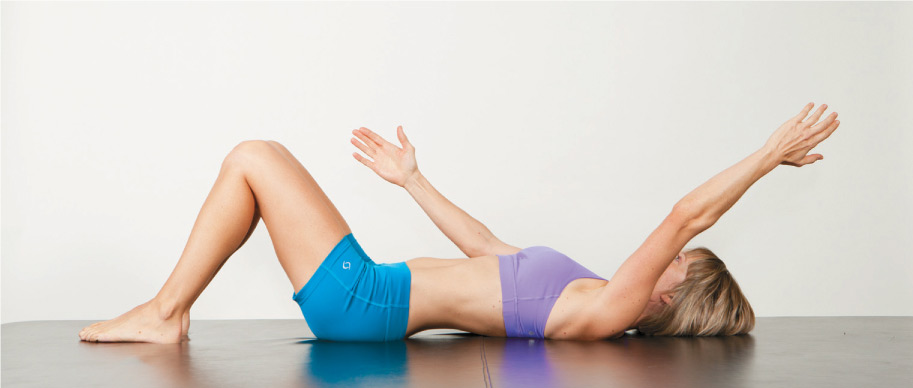
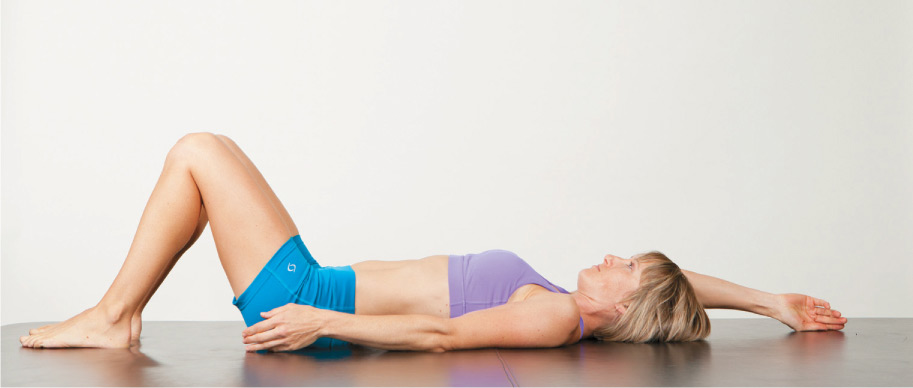
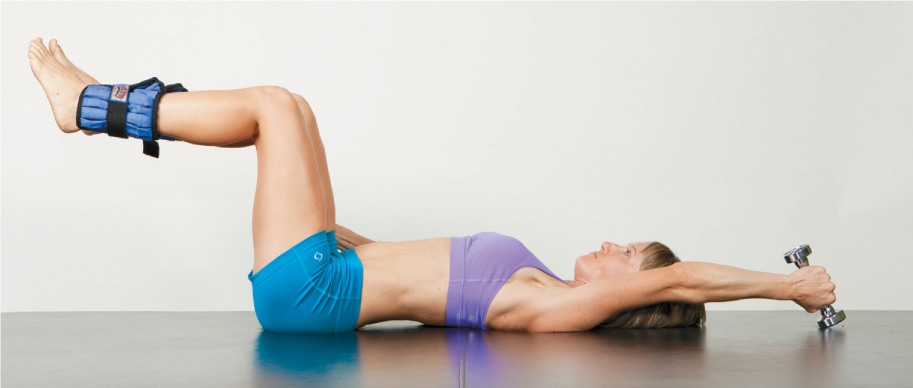
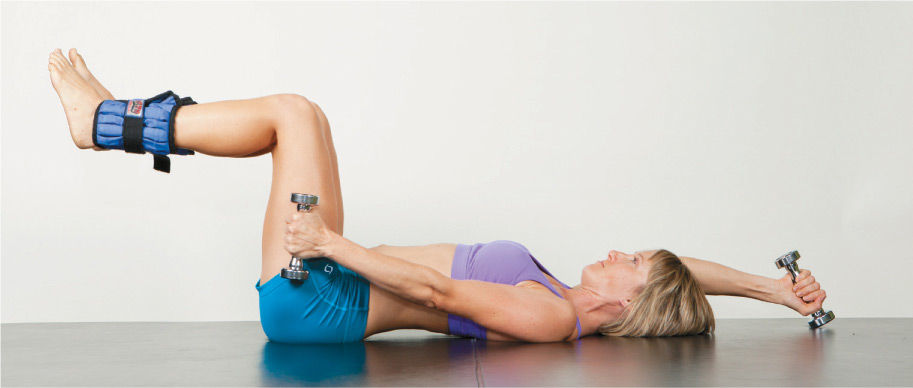
5. Abdominal Isometric (Partial Sit-Up)
• Lie on your back, knees bent with feet flat, and your arms outstretched, pointing toward your knees. Do a pelvic tilt by contracting your abdominals and flattening your lower back down into the floor.

• While keeping your head and neck in line with your shoulders by performing a chin tuck, contract your abdominals and raise your shoulder blades up off the floor as you reach your hands toward your knees. Look directly at the ceiling, not at your knees. Do not grab your knees.

• Hold this position for a count of 5 and return to the starting position. Repeat 5 times with 2 diaphragmatic breaths between reps.
• Add 2 repetitions to each successive workout for a maximum of 10 repetitions. Increase holds from 5 to 8 and then 10 counts over the course of 2 weeks. Once you can do 10 reps 10 times, add a 2-pound (910-g) weight in your hands.
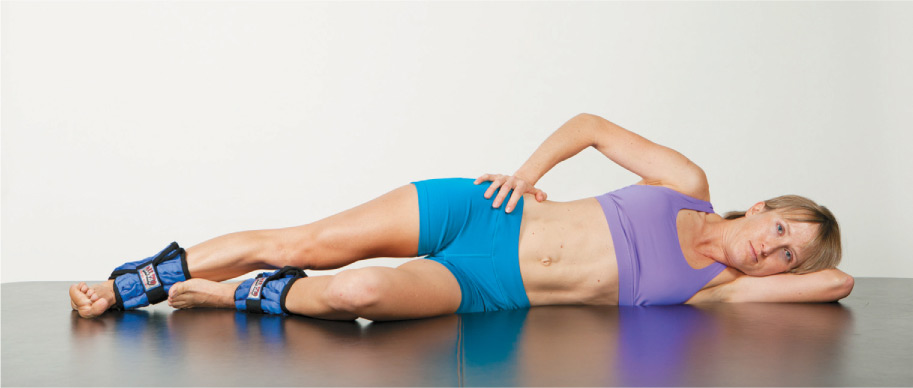
6. Hip Adduction with Shoulder Internal Rotation
• Lie on your side with your hips and shoulders stacked perpendicular to the floor.
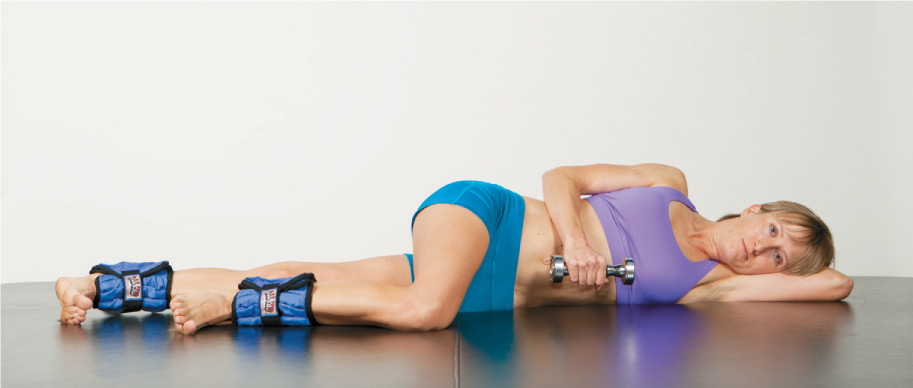
• Bend your top knee 90 degrees and lay it on the floor in front of your body. Straighten your bottom leg perfectly in line with your torso and lock that knee tight. Pull your toes up toward your head by dorsiflexing your ankle as shown. This locked knee and ankle position is called “locked and loaded.”
• Flex the elbow of your top arm to 90 degrees and let it drop in front of your abdomen, holding a 90-degree angle at the elbow.
• Tighten your abs while you simultaneously lift your entire bottom leg off the floor with the knee locked and rotate your top arm outward away from your body.
• Hold at the top for a count of 1 and return your arm and leg to the starting position. Repeat 10 times, rest for 30 seconds, and repeat for another set of 10.
Note: Be sure your bottom leg is absolutely straight and in line with your body and your knee and ankle are locked during the entire exercise.
• Switch to the other side and repeat the exercise.
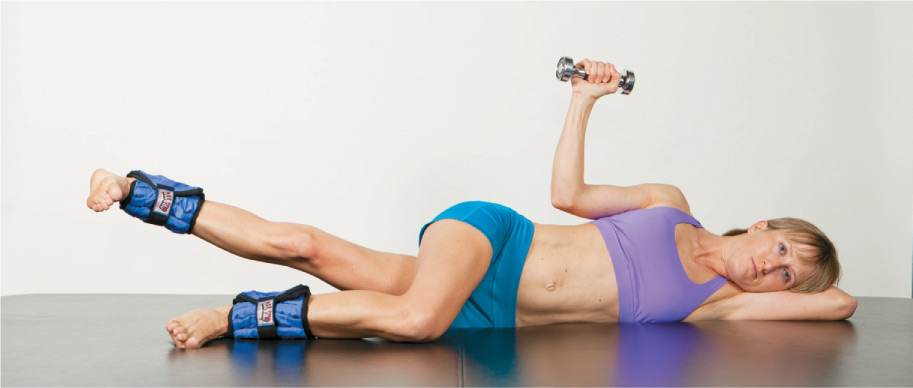
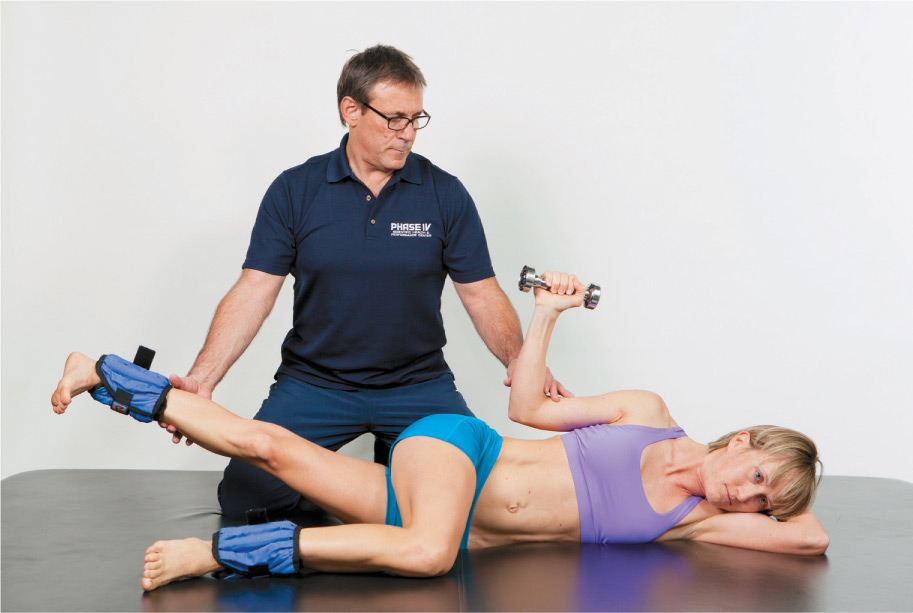
7. Hip Abduction
• Lie on your side, supporting your head with your bottom arm. Bend your bottom knee 90 degrees as pictured. Tighten your abs and lock your top knee perfectly straight by contracting your quads while pulling your toes to your head. Hold the top leg exactly in line with your body. Look down and if you can see your extended knee, it is not in line with your body. Move it back.
• Keeping your top leg in line with your trunk, place your top hand on your pelvis and push your hip forward. Make sure it doesn’t rock backward. Lift your leg up, with your knee and ankle locked and in line with your trunk, so your foot is about 2 feet (61 cm) off the ground. Hold the position for 1 count and then slowly lower it back down.
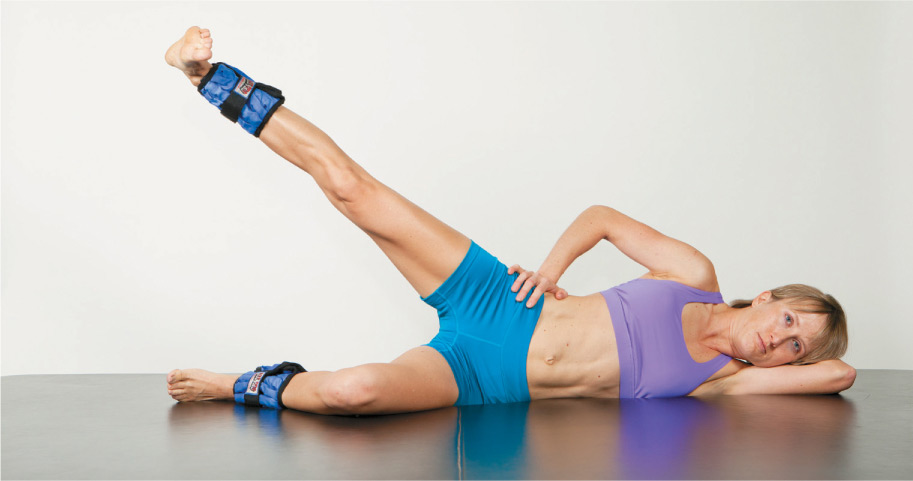
• Repeat 10 times and rest 30 seconds before doing a second set of 10 reps. Repeat on the other side. If you do this correctly, you should feel your muscles working on the side of your pelvis within the first 3 reps. If not, your upper hip is not rolled forward enough.
Notes: The hand pushing forward on your pelvis ensures that you don’t rotate your pelvis backward and render the exercise useless. For this exercise to isolate and work the weak and neglected hip abductors, you must keep your pelvis directly on its side, perpendicular to the surface you’re lying on. If you look down and can see your knee, move your leg backward and push forward on the right pelvis.
8. All-Fours Opposite Arm and Leg with Hamstring Curls
• Start on your hands and knees in the all-fours position with your hands directly below your shoulders and your knees spread wide right below your hips for a stable base.
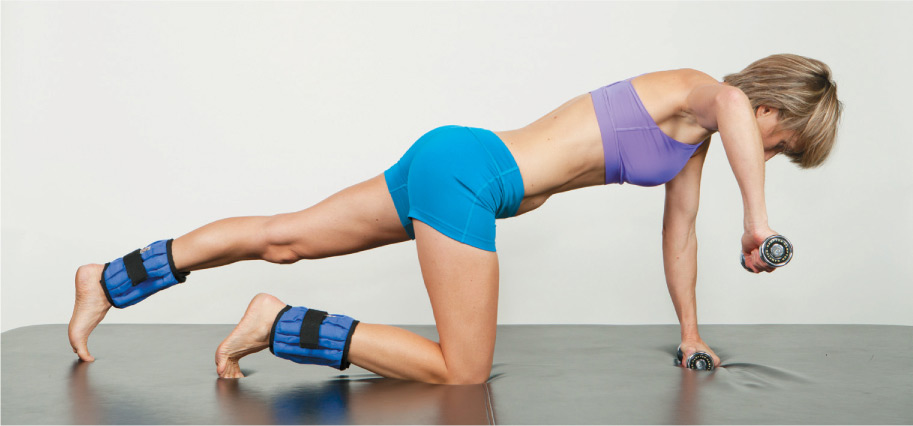
• Tighten your abs and extend your left leg behind you with a straight knee and the big toe lightly touching the floor. Keep your back flat, hips level, and face looking down to the ground.
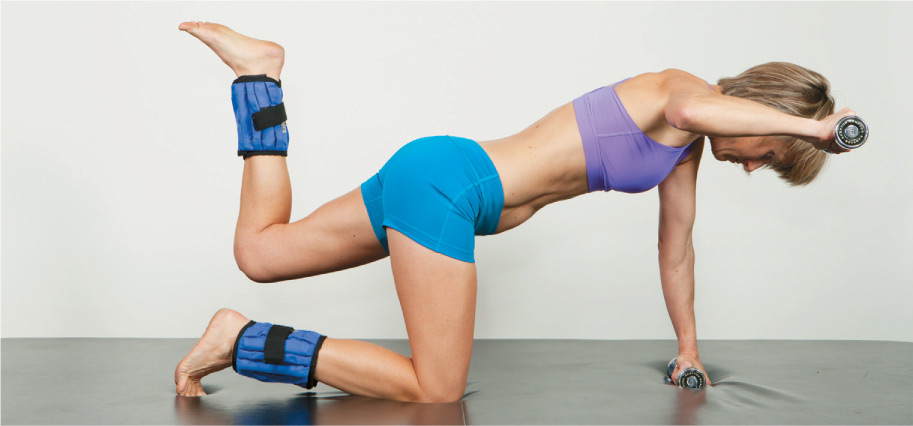
• Now, raise your right arm out to the side with your shoulder abducted 90 degrees away from your body, elbow bent 90 degrees, and palm facing backward as pictured. Keep your elbow lifted high and in line with your shoulder.
• Bend only your knee, moving your heel toward your buttocks as you rotate your shoulder and raise your hand to the ceiling. For the lower extremity, only your lower leg should move with each repetition, not your thigh. Your knee should not move in space as you lower your toe to touch the mat with the knee perfectly straight again. Repeat 10 times and then switch sides for two sets of 10 repetitions on each side.
Note: Keep your knee straight when you touch the ground with each repetition. Maintain a stable trunk and level pelvis during the entire exercise. Avoid arching your back.
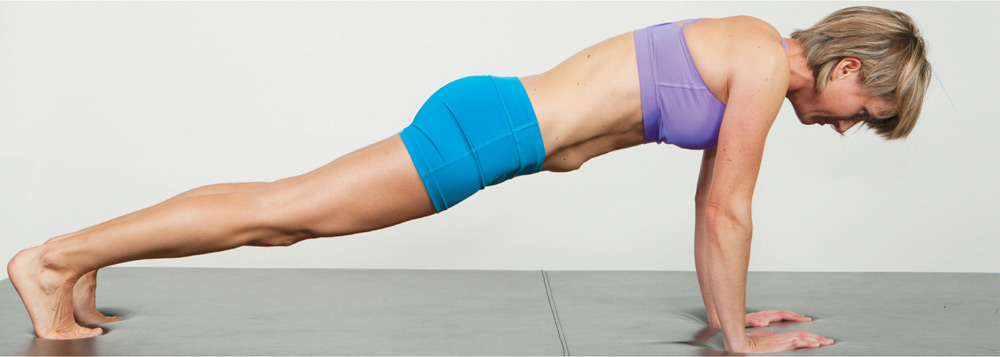
9. Front Plank
• Line up your body in the push-up position with your hands directly below your shoulders and your trunk held tight with a strong pelvic tilt (see top photo on page 159). Keep your buttocks down and in line with your body.
• Hold this position for a count of 5 and then lower your entire body to the floor.
• Repeat 5 times for the first 3 workouts. Progress to 8 repetitions for an 8 count for 3 workouts before progressing to 10 reps for 10 seconds.
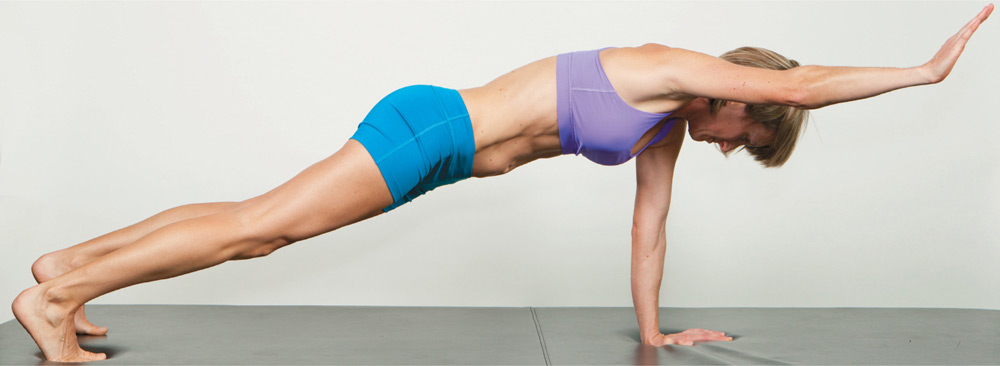
9A. (Advanced Exercise) Front Plank with Opposite Arm and Leg Lift
• To start, perform a front plank (exercise 9) and hold for 10 seconds as a warm-up. Then lower yourself to the floor and rest for a count of 10.
• On the second repetition, steady yourself and carefully lift your right arm to a position next to your right ear (see middle photo on page 159) as you lift your left leg to the height of your pelvis. Repeat on the other side.
• Finally, lift your right arm and left leg simultaneously while keeping your pelvis and trunk in good alignment (see bottom photo on page 159).
• Hold this position for a count of 5 and repeat 5 times.
• Repeat on the opposite side.
• Over the course of 2 weeks, progress to 8 repetitions for a count of 8 and then to 10 repetitions for a count of 10.
While doing a front plank, keep your hands under your shoulders, your trunk tight, and hold a strong pelvic tilt.

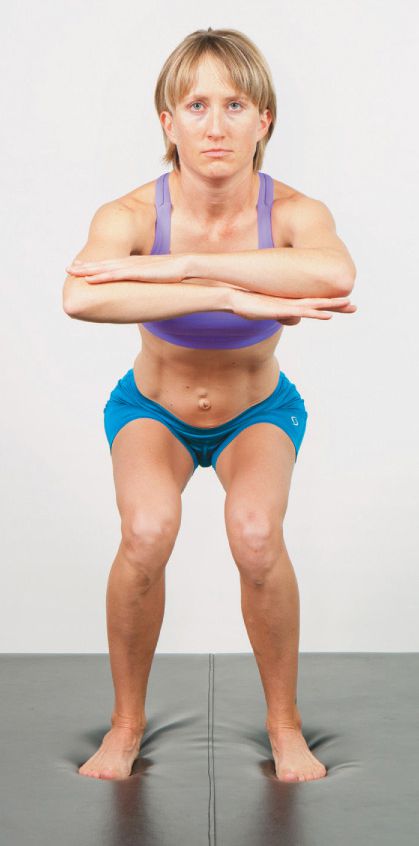
10. Standing Squats
• Stand with your feet straight ahead, shoulder width apart. Bend your elbows 90 degrees with your hands at the opposite elbows as pictured. Keep your chest up and out and your head and neck back in line with your shoulders.
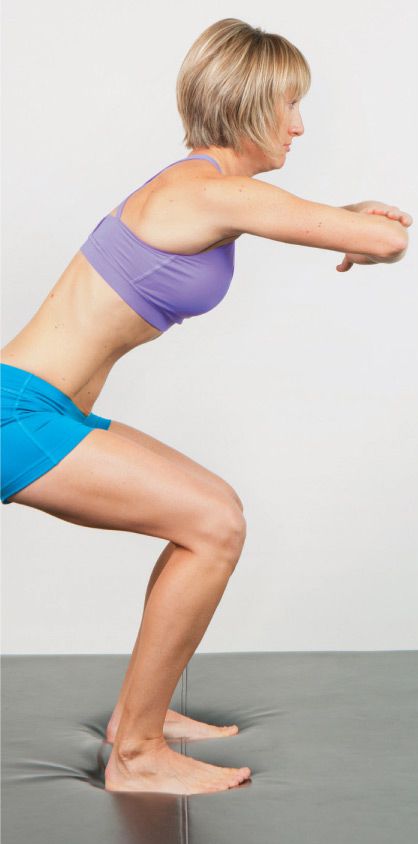
• Bend your knees and hips, lowering your torso backward. Keep your body weight over your heels so your kneecaps do not move in front of your toes. This protects your knees from injury (see the photo with the model standing against the board). Keep your back straight and your torso up and away from your thighs. Look down and check that your knees are spread right in line with your feet but not extended past your toes.
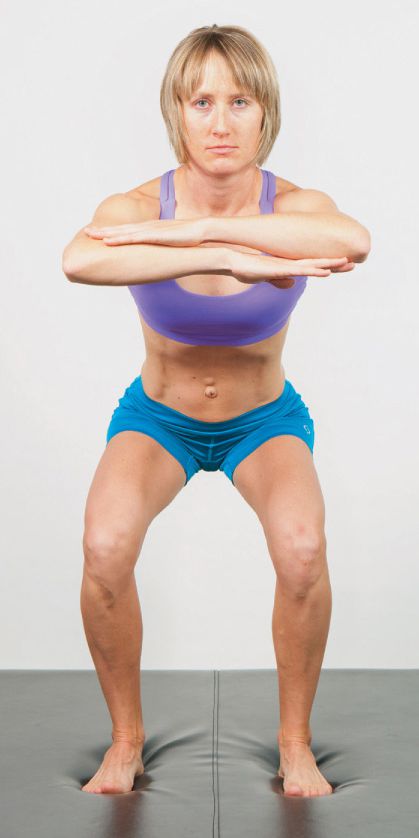
• Hold for a 5 count and raise yourself back up, pushing through your heels. Do 5 repetitions.
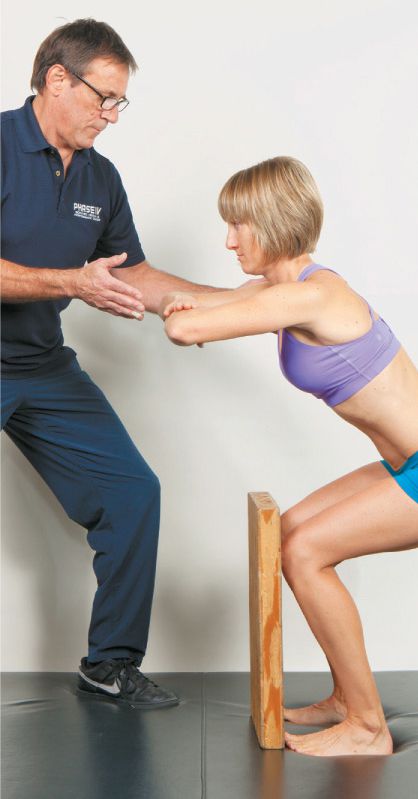
Proper squat technique requires that you sit back and don’t let your knees move forward past your toes.
• Progress to 8 reps for an 8 count after 3 workouts and then 10 reps for a 10 count after 3 more workouts. You can then progress to holding weights in your hands in the same position.
11. Single-Leg Balance Rotation
• Stand on one leg with the other leg bent. Hold your arms with elbows flexed to 90 degrees as pictured.
• Rotate your torso to the right so your hands are pointing 45 degrees from the center. Hold for a count of 5 before returning to the center.
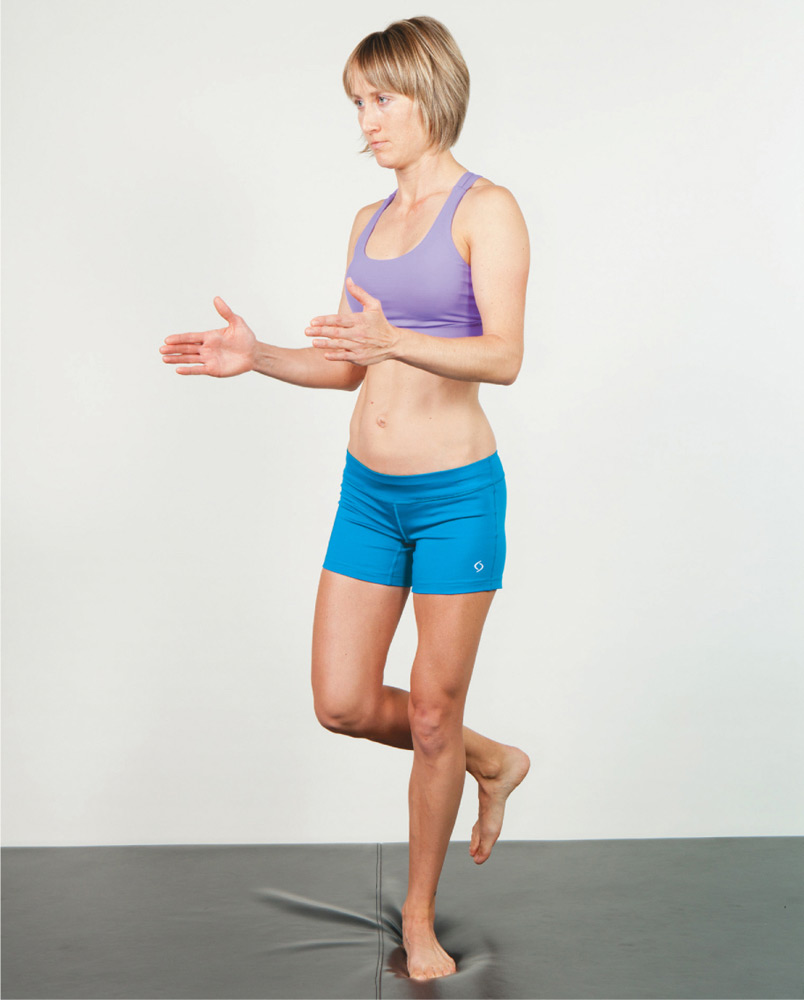
• Rotate to the left for a count of 5. Return to center.
• Put your leg down and rest as needed before repeating 5 times in each direction, keeping your knee in front of your body.
• Repeat on the other leg. To make it more difficult, perform this exercise with your eyes closed or on an unstable surface.
12. Single-Leg Squat and Reach
• Stand on your left leg with that knee bent in a single-leg squat and aligned directly over the foot but not extending past the toes. Bend your other knee and hold it off the floor.
• Hold your right arm abducted 90 degrees away from your body and the elbow bent to a right angle with your hand held high.
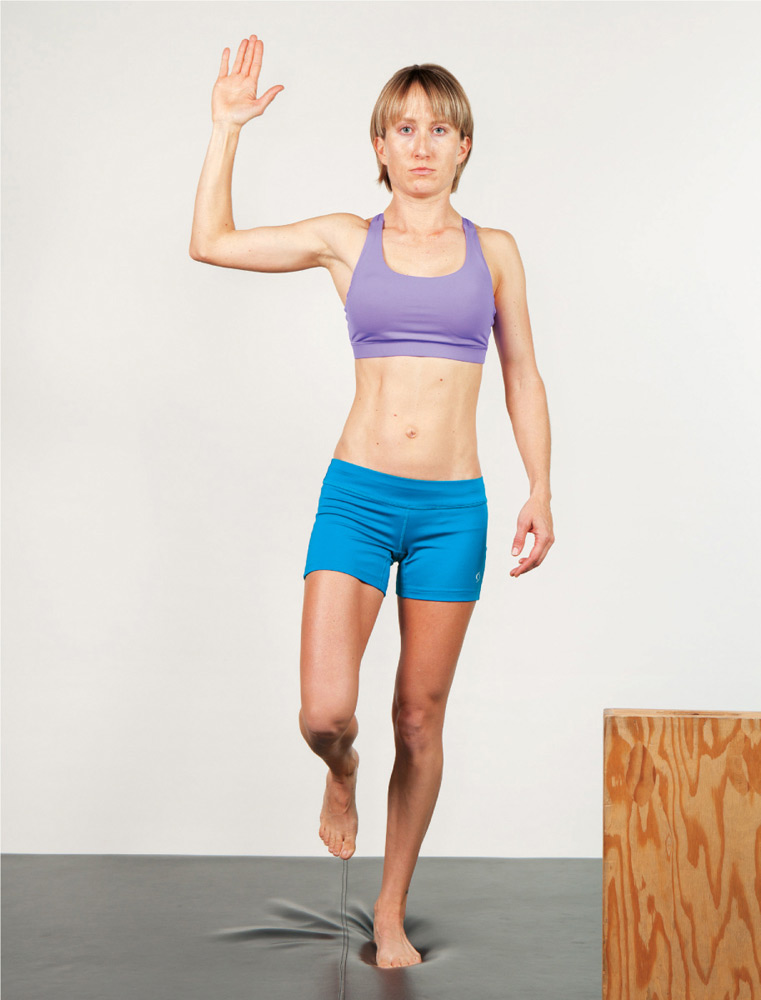
• Rotate to the left and reach across your midline for a point about knee high and return to the starting position. Repeat 5 times to each side.
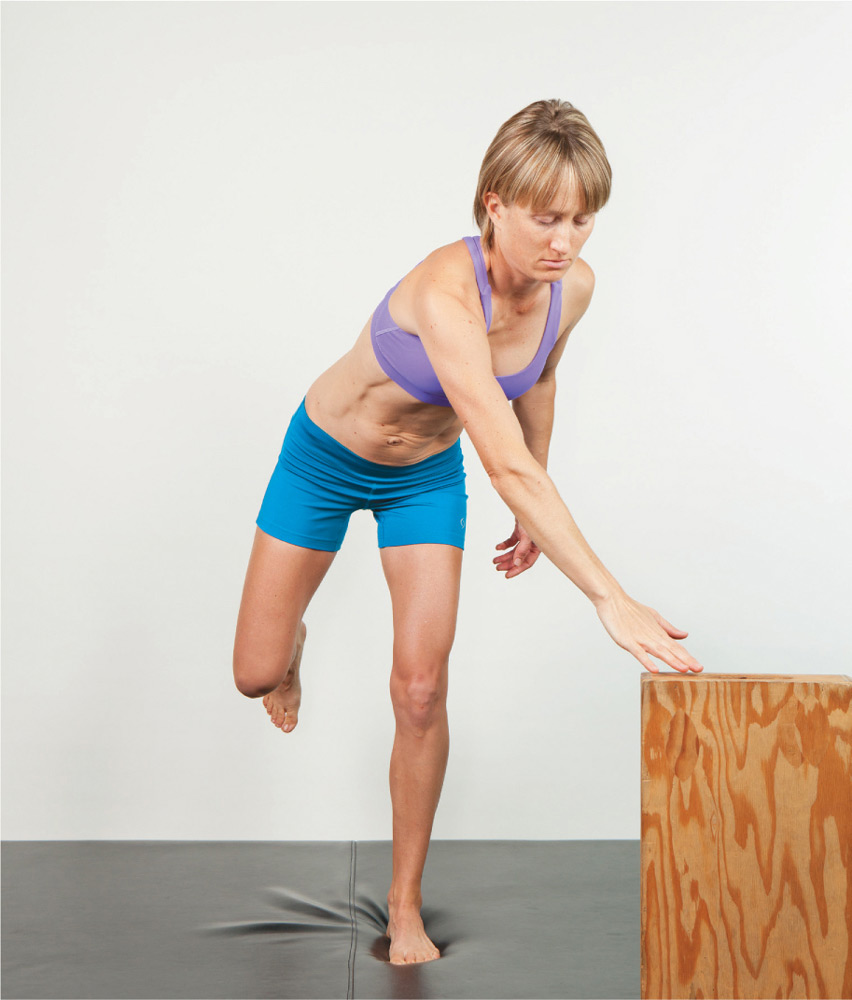
• Progress to 8 reps when you are able and finally to 10 reps. Increase the benefit of the exercise by touching a point on the floor in front of your weight-bearing leg. When that gets easy, attempt this exercise with eyes closed for maximum benefit.