Chapter 1. Tools of the trade
Information in this chapter:
• Objectives
• Approach
• Core Technologies
• Open Source Tools
• Case Study: The Tools in Action
• Hands-On Challenge
The quality of the tools that we use as penetration testers is part of what determines the quality of work that we perform. Other parts are, of course, skill, experience, and imagination. By building an excellent toolkit, we can better perform our penetration testing work and do a better, faster, and higher quality job. While the rest of this book will be focusing on individual tools and how to use them, in this chapter we will be talking about toolkits which contain a number of the tools we'll be discussing later and more.
We will also be talking about some of the technologies used to make carrying around your toolkit easier and safer. A good set of tools should always be stored in a good toolbox. In addition, we'll touch on some of the tools that you can use to build target systems for penetration testing. In Chapter 10, we'll talk about building a test lab, but here we'll talk about some of the kits that you can use within that lab.
This chapter may not be quite as interesting as the remaining chapters in this book since we will not be doing any actual penetration testing examples here. However, it is very important to have a solid foundation in the general tools available to you as a penetration tester prior to learning how to use those tools in real-world scenarios. You'll find that it saves you a lot of time later when we demonstrate using a tool if you already have a toolkit which contains it.
1.1. Objectives
Our objectives for this chapter are to learn which toolkits exist in the open source world for penetration testing, learn how those toolkits are built and how to modify them, and discuss some of the kits which exist to build target systems. To meet these objectives, we'll go over the general approach of how and why these kits are made, then move into the core technologies of how they work. We'll then go over some open source toolkits, which exist today, and talk about how each applies to your work in penetration testing. Lastly, we'll do a case study using one of the available toolkits and give you a chance to show what you've learned in a hands-on challenge.
Many open source penetration testing toolkits exist today and are built to reduce your work. In the past, performing a penetration test meant that every penetration tester built up a set of tools that they prefer using, kept them updated manually, maintained master copies in case of corruption, and had to manually research how to integrate new tools as they became available. This was where a great deal of the penetration tester's time was spent versus getting into the “real” work of testing a client's security. This was generally not considered billable time and was a real challenge.
1.2. Approach
The general approach to building penetration testing toolkits is to minimize the amount of work spent maintaining tools and maximize the amount of time spent performing penetration testing. To do this, you generally start with a list of tools that are commonly used for either the specific type(s) of penetration testing that you are performing or a list of tools that can be used for a wide variety of purposes. This is akin to either selecting a knife custom designed for a specific purpose (e.g., a thin bladed knife for filleting) or grabbing a Swiss Army knife to cover a variety of situations.
Generally if you're building your own penetration testing toolkit from scratch, you'll take the approach of selecting your favorite or most commonly used tools. If you are building a toolkit for public use, it's usually best to include a wider variety of tools so that more general penetration testing needs can be met. This is the approach used by most of the people who put together these kits today.
The next decision that you have is the type of operating system that you'd like to use. There are a number of penetration testing tools which are built to run under Windows, but there are typically more tools available under the Linux platform. The challenge there is to determine which Linux distribution to use since there are such a wide variety to choose from. Some examples of popular Linux distributions are:
Many of these have served as the foundation for penetration testing toolkits over the years and your choice will often be driven by personal preference as much as any technical reasoning. Each distribution has their own unique release schedule and goals, which may play a part in your decision as well.
With the list of tools and the operating system choice out of the way, now it's time to determine how your penetration test toolkit will execute. Do you want to install the operating system and all tools on a desktop/laptop/etc. permanently or within a virtual machine? Would you prefer to boot off of an optical disk (CD/DVD)? Or maybe booting and running off of a flash drive or SD card is your preference. Whichever of these options works best for your needs is obviously the direction that you should go. Each has its own pros and cons.
For example, if you choose to do an on-disk installation, you should be aware that any corruption from a bad tool install or an erroneous command could mean reinstalling everything from scratch or restoring from a backup. On the other hand, you can make changes to your toolkit easily and know that those changes will be available for you the next time that you go to use the system. This tends to be a less portable solution, but takes advantage of the speed of the disk and makes saving changes easy.
Booting off of a CD or DVD works great for some toolkits, however, not all operating systems support running in this manner. In addition, you need to be sure that the machine you'll be using has a compatible drive and ensure that your disk doesn't get scratched or otherwise damaged. The risk of corruption is lower since changes are wiped out after the machine using the CD/DVD is powered off, but that also limits your ability to save changes that you actually want to keep such as tool updates.
Using a USB drive or SD card is another option similar to using a CD/DVD, but there are some additional advantages and disadvantages here. Not all systems support booting off of a USB drive and even fewer support booting off of an SD card so compatibility can be a problem. However, with correct partitioning, you can build a USB/SD penetration testing toolkit which supports persistent changes, meaning that all modifications that you make to the booted OS are saved to a special partition and reapplied the next time the toolkit is booted up. This is considered a “persistent Live USB” build and has the advantage of being able to be returned to a baseline state by removing the persistence partition. Alternately, you can build an operating system on the USB drive that is read/write like a normal hard disk.
Whether you're installing on a drive or building a bootable image, your next step is to install your tools. Many of the open source tools available share dependencies and in some cases conflict on the version of those dependencies that they support. While you may want to use the latest version of a specific driver, for example, there may be something new in that version that your chosen tools don't support. Always keep this in mind when doing your tool installations. The process of resolving incompatibilities and ensuring that the correct dependencies are there is very time consuming and requires a lot of effort.
1.3. Core technologies
There are a few core technologies that you need to be aware of when building your penetration testing toolkit. In this section, we'll talk about LiveCDs and how they work as well as some basics on how to build or modify a LiveCD. We'll talk about International Organization for Standardization (ISO) images and how to use those as well. Next, we'll go over how to make a bootable USB drive and then finish up by talking about how to make a persistent LiveCD environment.
1.3.1. LiveCDs
A LiveCD is basically a CD or DVD that is written with a bootable version of an operating system modified so that there is no need to write files to the disk the system is booted from. This allows you to use read-only media to boot a system into a fully functional operating system, leaving no data written to the hard disks of the system that you're using. It isn't even required for the system to have a hard disk since everything it needs will be coming off of the optical media.
LiveCDs started becoming popular in the early to mid 1990s and it's now common to find LiveCDs that support a majority of the common operating systems or distributions. Since most operating systems do need a place for temporary files, LiveCDs are built to create this temporary file area in memory or (less commonly) use an existing location on the system's hard disk. Files created while using the LiveCD that the user wants to keep can usually be written to a USB drive or a hard disk partition as well.
1.3.1.1. Creating a LiveCD
Depending on the operating system that you're using, a number of options exist on how to create your LiveCD. For Windows, one of the most popular methods of creating a LiveCD is to use Bart's Preinstalled Environment (BartPE) Builder to create a Windows-based bootable CD or DVD. This is free software and is available at http://www.nu2.nu/pebuilder/. Using BartPE in combination with an original licensed Microsoft Windows DVD allows you to generate a bootable image very quickly and easily. We'll demonstrate the use of this tool in the Open source tools section of this chapter.
Warning
BartPE is not an official Microsoft product and is not officially supported by Microsoft. It was created as an alternative to Microsoft's Windows Preinstallation Environment (Windows PE) by Bart Lagerweij and Windows installations created by this tool are not supported by Microsoft.
Creating a LiveCD with Linux is a little more complex and can vary depending on distribution. For Ubuntu, this involves creating a number of directories and installing some packages on an existing Linux system, creating a copy of the operating system, modifying it to work properly, building out the appropriate directory structures, then finally burning the CD or DVD. All of the steps and a detailed tutorial on this process can be found at http://ubuntuforums.org/showthread.php?t=688872.
Using Fedora, the process is a little more streamlined. There is a LiveCD-tools package available which includes a tool called LiveCD-creator. This tool effectively goes through the following steps:
• Sets up a file for the ext3 file system that will contain all the data comprising the LiveCD
• Loopback mounts that file into the file system so there is an installation root
• Bind mounts certain kernel file systems (/dev, /dev/pts, /proc, /sys, /selinux) inside the installation root
• Uses a configuration file to define the requested packages and default configuration options. The format of this file is the same as is used for installing a system via kickstart.
• Installs, using yum, the requested packages into the installation using the given repositories in the kickstart file
• Optionally runs scripts as specified by the LiveCD configuration file
• Relabels the entire installation root (for SELinux)
• Creates a LiveCD-specific initramfs that matches the installed kernel
• Unmounts the kernel file systems mounted inside the installation root
• Unmounts the installation root
• Creates a squashfs file system containing only the default ext3/4 file (compression)
• Configures the boot loader
• Creates an iso9660 bootable CD/DVD
This greatly simplifies the LiveCD creation process if Fedora is the distribution that you are using. Full documentation on this process is available at http://fedoraproject.org/wiki/How_to_create_and_use_Fedora_Live_CD.
1.3.1.2. Modifying LiveCDs
Modifying LiveCDs is very similar to creating a LiveCD from scratch except that you have an easier foundation to work from. Basically, the contents of the LiveCD are extracted into a working area and modified as needed. This can include the addition of new files, modification of existing files, or deletion of files as required. Where this becomes complex is when you need to perform installations of packages and then build a new LiveCD using the updated versions.
To do this, there are a couple of methods that you can use. First, you can perform an install of the operating system to a machine, update all of the files or packages necessary, and then rebundle that modified version as a new LiveCD. Alternately, you can take the compressed images created when building some types of LiveCDs, mount those images, update them, and then use the updated images to create a new LiveCD. This is generally the method used with Knoppix as an example. An example of a similar method for Ubuntu can be found at https://help.ubuntu.com/community/LiveCDCustomization.
1.3.2. ISO images
A common theme for all of these methods of creating a LiveCD is the use of an image at the end to write to the optical media. This image is typically an ISO image and is a standardized method of taking all of the data which will be extracted to a CD or DVD and archiving it into a single file. Instead of a directory structure with a bunch of different files, you have a single file which can be extracted to a hard disk or extracted and written simultaneously to optical media in real time using a number of tools.
In Windows 7, the ability exists natively within the operating system to burn an ISO image to an optical disk. In prior releases, the ISO Recorder “power toy” was required to perform this function or a variety of freeware or commercial tools could be used. In Linux, the cdrecord utility (part of the cdrtools collection) is typically used for this purpose. An example command line for this tool is:
cdrecord myimage.iso
This will burn the ISO to the first identified optical drive at the highest rate of speed and will default to building a data CD.
1.3.3. Bootable USB drives
In general, building a bootable USB drive is similar to creating a bootable CD or DVD. In both cases, the appropriate files and data structures must be copied to the media being used. Also, the disk must be made bootable. When burning an ISO image to an optical disk, this has frequently already been done and the boot record will be created when the image is written. This process is not automatic for USB drives and needs to be manually performed.
A number of methods exist for doing this, ranging from creating a boot sector on the USB drive from Windows to creating a multi-boot menu-driven system by using a variety of utilities. For our purposes, we'll go through two examples, one for Windows and one for Linux.
1.3.3.1. Creating a bootable USB drive using Windows 7 or Vista
This method will work to create a bootable Windows-based USB drive. As part of this, the USB drive will be formatted using NTFS. The steps described below are a step-by-step process on how to accomplish this task. Perform the following actions on an existing Windows 7- or Vista-based machine.
Warning
Issuing the wrong commands when creating bootable USB drives can format your hard disk, so be careful.
1. Open a Command Prompt using Administrative privileges.
2. Run the command
diskpart.
3. Enter the command
list disk to determine which disk is your USB drive.
4. Use the command
select disk X where X is replaced with the number of the disk used by your USB drive.
5. Enter the command
clean to wipe the drive.
6. Enter the command
create partition primary to create a new primary partition on the USB drive.
7. Enter the command
select partition 1 to select the newly created partition.
8. Enter the command
active to mark the new partition as active.
9. Enter the command
format fs=ntfs to format the drive.
10. Enter the commands
assign and
exit to complete the formatting process.
11. Insert your Windows 7 DVD, change to the DVD drive in your command window, then change into the “boot” directory.
12. Run the command
bootsect.exe /nt60 X: where X: is the drive letter assigned to your USB drive.
1.3.3.2. Creating a bootable USB drive using Linux
A number of utilities exist for performing this task under Linux and we'll talk about one of them (UNetbootin) in the Open source tools section of this chapter. However, to perform a similar process manually using Linux, you can go through the following steps:
Warning
Again, issuing the wrong commands when creating bootable USB drives can format your hard disk, so be careful.
1. Run the command
fdisk /dev/sda (assuming that your USB drive has been assigned to device sda).
2. Enter
d to delete a partition.
3. Enter
1 to select partition #1.
4. Enter
n and then
p to create a new primary partition.
5. Enter
1 to select partition #1 and press enter to accept the default starting cylinder.
6. Enter the size that you'd like for your partition, for example,
+4G for a 4
GB partition.
7. Enter
t to change the partition type.
8. Enter
1 to select partition #1.
9. Enter
b to select fat32 for the partition type.
11. Enter
w to write the changes.
12. Run the command
mkfs.vfat /dev/sda1 to format the new partition.
13. Run the command
grub-install /dev/sda to install the GRUB boot loader onto the USB drive.
Note
These instructions are for example purposes only. Your success with these may be limited depending on the packages that you have installed and the disk layout of your individual machines.
1.3.4. Creating a persistent LiveCD
The major disadvantage of using a LiveCD is that you lose any changes that you make when the system is shut down. Of course, this is also one of its advantages in that your core boot image is always safe and unmodified. But what if you could accomplish both purposes? This is where the concept of a persistent LiveCD comes into play.
A persistent LiveCD is a standard LiveCD built using Linux with some extra features. Basically, while the core operating system is read-only, you can make changes and save them to a separate location. This is especially useful when using a LiveCD stored on a bootable USB drive as the media can easily be written to without modifying the hard disk of the system that is being booted with the LiveCD. This is currently possible using Ubuntu.
If you followed the instructions shown in the Creating a bootable USB drive using Linux section, you're already partway there to being able to do this. There are just a few additional steps necessary to create the appropriate partition for persistence. After going through the steps to create the primary partition, you will need to follow these additional steps to create a second partition and format it correctly.
Tip
Using the ext3 file system works well for this, but if you're constrained for space on your USB drive, consider using ext2 instead.
1. Run the command
fdisk /dev/sda (assuming that your USB drive has been assigned to device sda).
2. Enter
n and then
p to create a new primary partition.
3. Enter
2 to select partition #2 and press enter to accept the default starting cylinder.
5. Enter
t to change the partition type.
6. Enter
2 to select partition #2.
7. Enter
83 to select Linux for the partition type.
8. Enter
w to write the changes.
9. Run the command
mkfs.ext3 -b 4096 -L casper-rw /dev/sda2 to format the new partition and label it as “casper-rw”.
Note
You also have the option of using a loopback file on the hard drive of the system you're working on instead of the USB drive. This requires a slightly different configuration and details can be found at https://help.ubuntu.com/community/LiveCD/Persistence.
Again, this method is specific to Ubuntu currently, but may be supported by other distributions as well. To use this, you will need to tell the kernel to boot into persistent mode. This can be done by adding “persistent” to the kernel arguments list either manually on boot or within your boot loader. In the event that you want to remove all of your changes and go back to the base LiveCD, simply wipe the “casper-rw” partition and you're back to the base install.
1.4. Open source tools
There are a number of open source tools and toolkits that are available to help with penetration testing. In this section, we're going to talk about a couple of the tools mentioned in the Core technologies section of this chapter and then move on to two additional types of tools. We'll talk about published toolkits containing a number of open source tools and then penetration testing targets that are available for your testing purposes.
1.4.1. Tools for building LiveCDs
To complete our discussion of LiveCDs and their creation, we have two specific tools to go over. First we'll talk about BartPE for Windows LiveCDs and then we'll go over UNetbootin which is available under both Windows and Linux.
1.4.1.1. BartPE Builder
As mentioned in the Core technologies section of this chapter, BartPE Builder is a utility which allows you to build a Windows-based LiveCD. This LiveCD can then be used to access data stored on corrupted Windows systems that are unable to boot, function as a forensics utility to gather data from a system, or simply run your favorite Windows-based utilities. After installing the utility available at http://www.nu2.nu/download.php?sFile=pebuilder3110a.exe, you can begin building your BartPE image.
Warning
BartPE Builder must be run in Administrative mode on Windows systems.
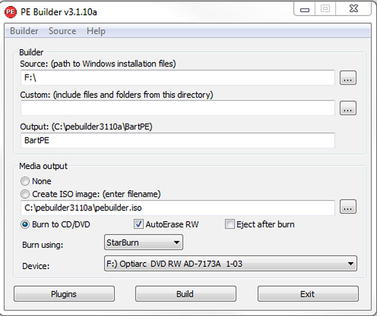
Start the BartPE Builder, and you will be prompted with the screen shown in Fig. 1.1. There are several options available to you at this point including the ability to add custom files to your image, identify an ISO image filename to create, or even burn the ISO directly to disk. In addition, BartPE Builder allows you to use custom plugins. By clicking the “Plugins” button at the bottom of the window, you are prompted with a screen listing a number of available plugins including (for example) Norton Ghost. This is shown in Fig. 1.2.

From the plugins screen, you can enable/disable plugins, configure them, or even add new plugins if needed. As an example, the Windows XPE plugin available at http://sourceforge.net/projects/winpe/files/Windows%20XPE/ allows you to use a graphical environment that looks similar to the Windows user interface.
1.4.1.2. UNetbootin
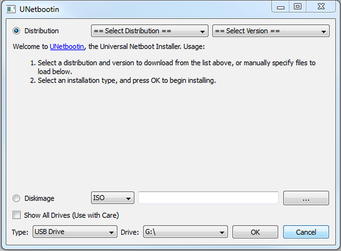
UNetbootin is a utility which allows you to create Live USB drives using a number of different operating systems. It's available in both Windows and Linux versions at http://unetbootin.sourceforge.net/ and is an excellent utility for building out your bootable USB drive. After downloading the utility, simply run it and you will be prompted with a screen allowing you to select the distribution and version of operating system that you would like to create a Live USB install of. You can also select to create an ISO image if necessary. This is shown in Fig. 1.3.
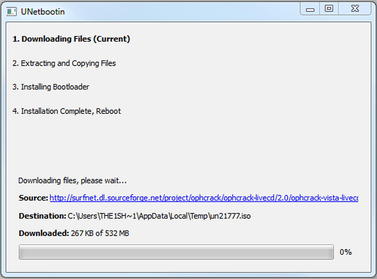
After selecting the operating system that you want and the location you want it installed to, UNetbootin automatically begins downloading the appropriate data and preparing it for installation. For example, Fig. 1.4 shows UNetbootin setting up a USB drive to be bootable with Ophcrack.
This process is very simple and straightforward and the tool ensures that all of the necessary back-end steps such as partitioning, setting up files, and making the drive bootable are taken care of. By doing so, UNetbootin drastically reduces the amount of time required to build out these bootable disks.
Epic Fail
Remember that utilities like UNetbootin work by creating a bootable partition on your destination USB drive. If you inadvertently select your hard drive as the destination, you could overwrite your drive's master boot record and make it unusable for your normal operating system.
1.4.2. Penetration testing toolkits
Many penetration testing toolkits have been created over the years and it seems like there is a new one almost monthly if not weekly. There are several that are excellent depending on what your needs are. Each tends to have a number of similar tools, but their differences lie in the operating system used for the toolkit and specialized tools or configurations which may exist within the build. While we certainly couldn't cover every penetration testing toolkit in this book, we will be going over a few of the more popular kits.
1.4.2.1. BackTrack Linux
BackTrack Linux is arguably one of the most popular penetration testing toolkits available at this time. It is available for download at http://www.backtrack-linux.org/ and can be downloaded as either an ISO image or a pre-configured VMware image. The current release (as of the time of this writing) is BackTrack Linux 4 R2 with BackTrack Linux 5 slated for release on May 10, 2011.
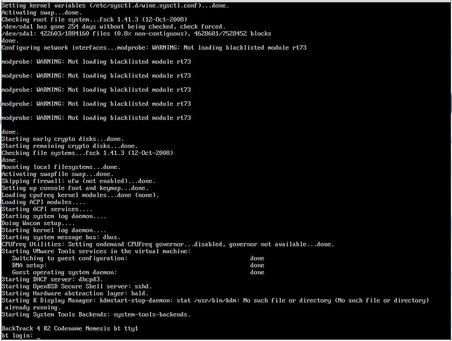
BackTrack Linux is designed to be run as a LiveCD, installed on a hard drive, or even run within a virtual machine and works equally well when installed in any of these manners. Assuming that you set up a virtual machine running BackTrack Linux, it might look similar to the screenshot shown in Fig. 1.5.
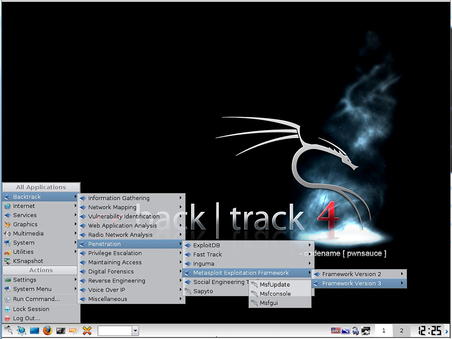
After logging in (the default user ID and password are root/toor), you can begin running any of the tools included on the distribution. There are hundreds of tools available within BackTrack Linux so your best bet is to boot it up and see if your chosen tool is already there. Optionally, you can use the graphical interface by running the command
startx after booting up. This is shown in Fig. 1.6.
1.4.2.2. Live Hacking CD
The Live Hacking CD is a distribution based on Ubuntu and is available at http://www.livehacking.com/live-hacking-cd/download-live-hacking/. This distribution includes a number of useful utilities and is very easy to use. While not as feature-packed as other penetration testing toolkits, the Live Hacking CD focuses on a few primary areas and ensures that tools are available for performing penetration testing of those areas. A sampling of the tools in the distribution includes:
• Reconnaissance (and DNS)
• Dig
• DNSMap
• DNSTracer
• DNSWalk
• Netmask
• Relay Scanner
• TCPTraceroute
• Firewalk
• Password Cracking
• Chntpw
• Rainbowcrack
• THC PPTP Bruter
• VNCrack
• John the ripper
• Network Sniffing
• DHCP Dump
• Dsniff
• SSLDump
• Ntop
• Wireshark
• Spoofing
• File2cable
• Netsed
• Sing
• TCPreplay
• Wireless Networking Utilities
• Aircrack-ng
• Kismet
• THC Leap Cracker
• WEPCrack
• WIDZ
• Cowpatty
1.4.2.3. Samurai Web Testing Framework
When performing web penetration testing, one of the better toolkits is the Samurai Web Testing Framework available at http://samurai.inguardians.com/. This toolkit is specifically designed for testing web sites and includes all of the utilities necessary to perform this type of test. It is available in a LiveCD format or can be installed on a hard disk or USB drive. Fig. 1.7 shows the Samurai Web Testing Framework booted as a LiveCD.
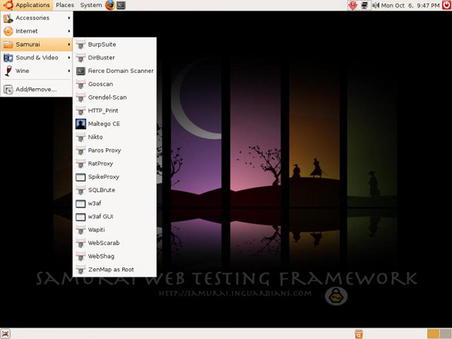
As you can see in Fig. 1.7, the tool list in this distribution is not extensive, but it does include most of the tools necessary for penetration testing of web applications. This is an example of a toolkit that is highly focused on one specific area of penetration testing.
1.4.2.4. Organizational Systems Wireless Auditor Assistant
The Organizational Systems Wireless Auditor Assistant (OSWA-Assistant) is a LiveCD specifically designed for performing wireless penetration testing. It is unique in that it is designed not only for security specialists, but also for non-technical users as well. The toolkit (available at http://securitystartshere.org/page-training-oswa-assistant-download.htm) is designed to be easy to use, but still has enough tools and capabilities to be useful to an experienced penetration tester. An example of the wireless tools included can be seen in Fig. 1.8.
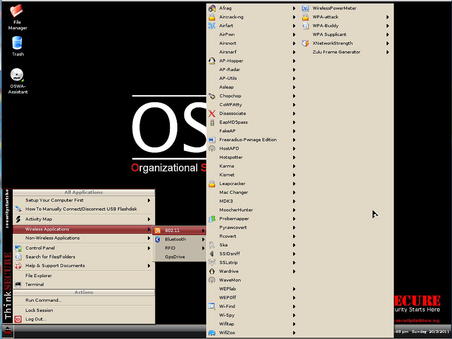
The list of tools shown in Fig. 1.8 is actually pretty extensive and fits most needs for wireless penetration testing. Again, this toolkit is an example of a kit highly focused in one specific area of penetration testing; in this case it's wireless testing. This includes 802.11, Bluetooth, and RFID within the wireless space. As one of the few tools designed for both penetration testers and non-technical users, OSWA-Assistant fits a rather unique gap in the penetration testing world.
1.4.2.5. Network Security Toolkit
The Network Security Toolkit (NST) is a Fedora-based penetration testing toolkit and can be downloaded from http://www.networksecuritytoolkit.org/nst/index.html. It is available for free, though a “Pro” edition has also been created which is planned to be kept more current than the free edition with updates being release to “Pro” first. This toolkit has a huge number of tools available and is a bootable LiveCD much like most of the other toolkits that we've discussed.
TIP
NST is not necessarily the easiest toolkit to get started with. With the current version (2.11), the HTTP daemon is down until the NST-specific password change utility is executed. If you are logged in as the default “VPN User” and are using the graphical interface, hit ALT-F2 and execute
su with “Run in terminal” checked to open up a terminal. The default password for root in this version is “nst2003”. After entering the password, run the command
nstpasswd to change the passwords and start the appropriate daemons. Then, just open Firefox and the WUI will be available.
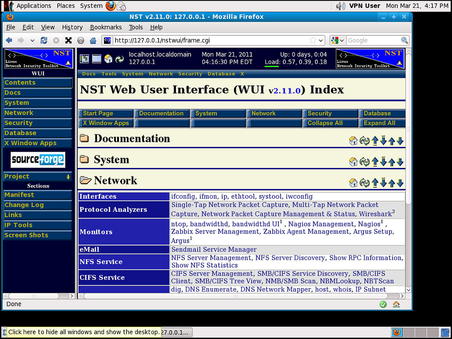
One of the major features of NST is that it has an advanced Web User Interface (WUI) designed specifically for performing penetration testing. This web interface allows the penetration tester to quickly find and execute the tool that they want within the included web browser. Fig. 1.9 shows NST's web-based interface.
1.4.2.6. Arudius
Arudius is a LiveCD built by TDI Security and is available at http://www.tdisecurity.com/tdi-labs/arudius.htm. It has a very small footprint with an ISO size of only 209
MB. Its size makes it a very useful tool in situations where space is an issue. Along with a great selection of security tools, Arudius also includes some utilities developed by TDI including network sniffers for instant messaging and peer-to-peer applications. The list of tools included is pretty extensive considering the size of the distribution. Fig. 1.10 shows what Arudius' LiveCD looks like when booted.
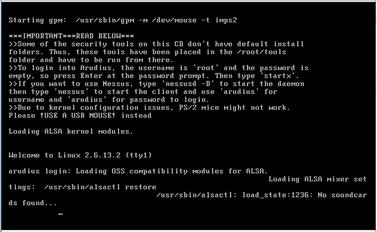
As indicated in the message shown in Fig. 1.10, after logging in, you can start up the graphical console using the
startx command. Within the menus of the graphical interface, you can execute a number of tools or even view a full tool list for the LiveCD.
1.4.2.7. Operator
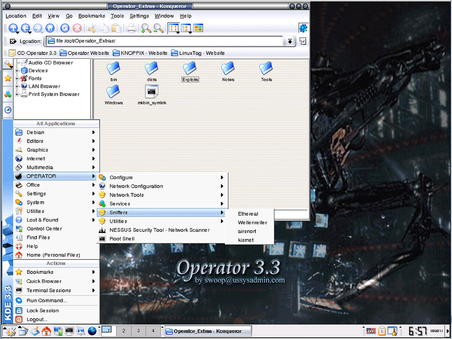
Operator is a Debian-based distribution using Knoppix to load and run completely in memory. It's available at http://www.ussysadmin.com/operator/ and contains hundreds of packages and applications including a substantial amount of network and security analysis tools. Again, depending on your operating system preferences, this toolkit may fit with your needs and provide the tools that you need. Overall, other distributions do have more tools, but Operator has a pretty clean user interface and includes some interesting data in its “Operator_Extras/Notes” section on a number of topics. The Operator interface can be seen in Fig. 1.11.
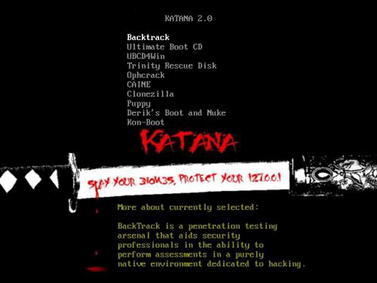
1.4.2.8. Katana
One of the best toolkits available is the Katana portable multi-boot security suite. This isn't just because it's another distribution with a great collection of tools, rather, it's because it is a collection of a number of other toolkits put into one easy-to-use package. Katana, available from http://www.hackfromacave.com/katana.html, is a bootable LiveCD which contains the following bootable toolkits:
• BackTrack
• The Ultimate Boot CD
• CAINE
• Ultimate Boot CD for Windows
• Ophcrack Live
• Puppy Linux
• Trinity Rescue Kit
• Clonezilla
• Derik's Boot and Nuke
• Kon-Boot
In addition to these, more distributions can easily be added to the Katana LiveCD. Fig. 1.12 shows Katana's boot menu.
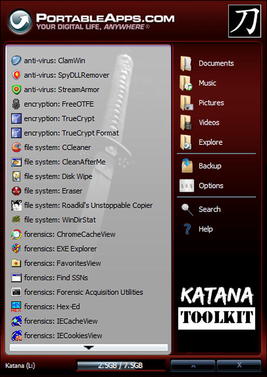
Aside from the bootable distributions included in Katana, it also includes over 100 portable applications which can be run directly from the CD or USB drive where Katana is loaded. These include utilities for anti-virus, backup, encryption, file systems, forensics, networking, password recovery, penetration testing, registry modification, and more. Fig. 1.13 shows Katana's portable applications menu.
1.4.3. Penetration testing targets
It does not matter whether you are on a pen-test team of a large global corporation or just starting out in a spare room of your apartment: All penetration tests need targets to practice against. If you have the financial backing of a company, the targets are usually internal systems, or customers that contract to have a penetration test done. However, if you do not have systems “at the ready,” you must throw targets together in the hope that you can learn something valuable. This generally frustrates only the penetration tester, and eventually causes him to give up on a lab.
It is in this area that penetration testing target LiveCDs or images fill a need. These targets are designed to help penetration testers by providing an area where they can practice their skills or learn new ones in a safe environment. Depending on the target that you use, you can test almost all aspects of penetration testing, with some exceptions of course. Naturally, nothing is perfect, and LiveCDs do have some disadvantages. If your goal in building a penetration test lab is to learn networking and attacking network devices, LiveCDs will not necessarily provide what you need to conduct your testing. In addition, it's difficult to practice social engineering in a lab environment of any type, so LiveCDs can't help you there either.
There are some serious advantages in selecting pen-test LiveCDs to simulate real-world servers in your penetration test lab. The biggest advantage is cost. Typical labs become quite expensive, and expansive. However, by using LiveCDs, you can keep some costs down. Another advantage to pen-test LiveCDs is time. Under normal circumstances, you have to reload your penetration test systems often. It is not unusual to break a service, or delete a necessary file while attacking a system, requiring reloading of that application, or worse: reloading of the whole operating system. By using LiveCDs, if you break something beyond repair, you can just reboot the disk and you have a clean slate.
1.4.3.1. De-ICE.net PenTest disks
De-ICE.net offers multiple LiveCDs available for free that provide real-world scenarios based on the Linux distribution Slax. On these disks, you will find different applications that may or may not be exploitable, just like in the real world. The advantage to using these LiveCDs is you do not have to configure a server on your pen-test lab. You simply drop the LiveCD into the CD tray and reboot your system to run from the CD, and within minutes you have a fully functional server to hack against. They can be downloaded from http://de-ice.net/hackerpedia/index.php/De-ICE.net_PenTest_Disks.
Another advantage to the De-ICE.net PenTest LiveCDs is that they are designed to support different levels of difficulty so that the penetration tester can try out different skills. Levels one and two are currently available with two different LiveCDs within level one. Each has different vulnerabilities and by penetration testing and learning how to compromise these LiveCDs, you'll be able to exercise a substantial number of your penetration testing skills and tools. The learning opportunity available with these LiveCDs cannot be overstated.
1.4.3.2. Damn Vulnerable Web Application
Damn Vulnerable Web Application (DVWA) is not a just a LiveCD, but rather a PHP/MySQL web application that has a number of known vulnerabilities. It is available at http://www.dvwa.co.uk/ and will allow you to try out a number of different techniques specific to web application vulnerabilities. Penetration testing of web applications is covered in detail within Chapter 6 of this book.
DVWA is available as both a LiveCD as well as just an application which can be downloaded and installed on an existing system. In both cases, you will be able to practice using the tools and techniques described in this book for testing web applications.
1.4.3.3. Mutillidae
Another great web application for practicing penetration testing is Mutillidae, available at http://www.irongeek.com/i.php?page=security/mutillidae-deliberately-vulnerable-php-owasp-top-10. This application is intended to be installed on an existing web server using XAMPP and uses Apache, PHP, and MySQL. The intent with this project is to create an application which has all of the Open Web Application Security Project's (OWASP's) top 10 web vulnerabilities implemented in such a way that they are easy to demonstrate. The application accomplishes this goal very well and is an excellent penetration testing target to work with. In Chapter 6, Mutillidae is used for some vulnerability demonstrations.
1.4.3.4. WebGoat
While Mutillidae is intended to demonstrate the OWASP's top 10 web vulnerabilities, OWASP has a vulnerable application that they have also developed and distributed for this purpose. It is called WebGoat and is available at http://www.owasp.org/index.php/Category:OWASP_WebGoat_Project. This application has a number of vulnerabilities in it and is very self-contained and easy to use. The compressed file includes the Java Runtime Environment (JRE) and a pre-configured Tomcat instance, so all you have to do is unzip the archive and execute the launch script.
TIP
WebGoat is configured by default to only respond on the loopback address (127.0.0.1) so it's best to set this up on the machine where you're running all your tools from.
1.4.3.5. OldApps.com
In some cases when doing penetration testing, you're going to want to test out vulnerabilities in a specific version of a specific application. For example, you may be looking for a potential buffer overflow within an older version of some software that your client has installed. However, the software vendor will typically only offer the latest version of their application. After all, why would they want to keep distributing a version that potentially has a security vulnerability?
One solution to this is to find the application on http://oldapps.com. This site has a huge number of applications and maintains multiple revisions of that application. For example, as of the time of this writing, there are over 50 different versions of AOL Instant Messenger available for download. If your client happens to be using an older version of this software, this gives you the opportunity to download and test the exact version that they're using, even if it's no longer available from the vendor.
1.5. Case study: the tools in action
For this case study, we're going to focus on how to build out a penetration testing toolkit. This toolkit will be comprised of BackTrack R2 setup on a USB drive and configured for persistent changes. The process for this was created, refined, and tested by Kevin Riggins, who maintains a great security blog located at http://www.infosecramblings.com/[1]. To perform this installation, the following tools and supplies are required:
• A USB drive with a minimum capacity of 8
GB
• A BackTrack LiveCD, another Linux-based LiveCD, or a blank USB drive or DVD
• UNetbootin (described in the Open source tools section of this chapter) if you don't have an existing Linux-based LiveCD
Now that we have the goods in hand, we can get to cooking. This case study is based on booting BackTrack 4 first. This means that you need some form of bootable BackTrack 4 media. This can be a virtual machine, DVD, or USB drive. Use your favorite method of creating a DVD or USB drive or you can use UNetbootin to create the thumb drive. Fig. 1.14 is a screenshot of using UNetbootin to install BackTrack 4 on a USB drive.
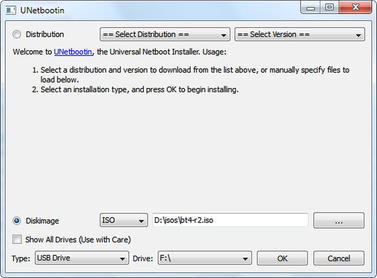
The setup is as simple as selecting the image we want to write to the USB drive and the drive to write it to, and then clicking the “OK” button. Make sure you pick the correct destination drive as this tool can potentially overwrite your boot sector and other data.
The next step is to boot up BackTrack 4 from our newly created media. With the release of BackTrack 4 Final, a 4
GB drive is required (8
GB recommended) if we are going to enable persistence. We will also need to figure out which drive is our target drive. The following command will show the drives available and you can determine from that which is the new USB drive:
dmesg | egrep hd.|sd.
We need to partition and format the drive as follows:
• The first partition needs to be a primary partition of at least 2.5
GB and set to type vfat. Also remember to make this partition active when you are creating it. Otherwise you might have some boot problems.
• The second partition can be the rest of the thumb drive.
Below are the steps to take to get the drive partitioned and formatted. A “#” indicates a comment and is not part of the command and user typed commands are bolded. One important note to keep in mind is that we will need to delete any existing partitions on the drive.
fdisk /dev/sdb # use the appropriate drive letter for your system
# delete existing partitions. There may be more than one.
Command (m for help):
d
Partition number (1-4):
1
# create the first partition
Command (m for help):
n
Command action
e
extended
p
primary partition (1-4)
p
Partition number (1-4): 1
First cylinder (1-522, default 1):
<enter>
Using default value 1
Last cylinder, +cylinders or +size{K,M,G} (1-522, default 522): +
2500M
#create the second partition
Command (m for help):
n
Command action
e
extended
p
primary partition (1-4)
p
Partition number (1-4): 2
First cylinder (193-522, default 193):
<enter>
Using default value 193
Last cylinder, +cylinders or +size{K,M,G} (193-522, default 522):
<enter>
Using default value 522
# Setting the partition type for the first partition to vfat/fat32
Command (m for help):
t
Partition number (1-4):
1
Hex code (type L to list codes):
b
Changed system type of partition 1 to b (W95 FAT32)
# Setting the partition type for the second partition to Linux
Command (m for help):
t
Partition number (1-4):
2
Hex code (type L to list codes):
83
# Setting the first partition active
Command (m for help):
a
Partition number (1-4):
1
Command (m for help):
w
# now it is time to format the partitions
mkfs.vfat /dev/sdb1
Two things to notice above in the format commands: 1) we are using ext3 instead of ext2 and 2) you must include the
-L casper-rw portion of the command. Being able to use ext3 is great because of journaling when there is enough space available. The
-L casper-rw option helps us get around the problem we had in the past where we had to enter the partition name in order to get persistence working. As you will see, that is no longer necessary.
The next steps are basically:
• Mount the first partition.
• Copy the BackTrack files to it.
• Install grub.
Following are the commands to execute. Again, “#” denotes comments and user typed commands are bolded.
# mount the first partition, sda1 in my case.
mkdir /mnt/sdb1
mount /dev/sdb1 /mnt/sdb1
# copy the files (you will need to find where the ISO is mounted on your system)
cd /mnt/sdb1
rsync -r /media/cdrom0/∗ .
# install grub
grub-install --no-floppy --root-directory=/mnt/sdb1 /dev/sdb
That's it! We now have a bootable BackTrack 4 USB thumb drive. Now on to setting up persistent changes.
This is done much differently and more easily than it was in Backtrack 4 Beta or Backtrack 3. First of all, for basic persistence, we don't have to do anything at all. There is already a menu option that takes care of it for us. Unfortunately, it is only for console mode so we need to make a couple changes:
• Change the default boot selection to persistent.
• Set the resolution for our gui.
To do so, do the following:
cd /mnt/sdb1/boot/grub
vi menu.lst
# change the default line below to 'default 4' and append 'vga=0x317' (that's a zero) to the kernel line to set the resolution to 1024x768
# By default, boot the first entry.
default 4
.
.
title
Start Persistent Live CD
kernel
/boot/vmlinuz BOOT=casper boot=casper persistent rw quiet vga=0×317
initrd
/boot/initrd.gz
# save and exit
:wq
Reboot and either select “Start Persistent LiveCD” or just wait since we set it to auto-boot to persistent mode. To test it, create a file and reboot again. If your file is still there, everything is golden.
1.6. Hands-on challenge
In each chapter of this book, we will have a hands-on challenge where you are challenged to accomplish a task associated with what we've talked about within that chapter. Your first challenge will, naturally, be related to penetration testing toolkits.
For this challenge, create a penetration testing toolkit on a USB drive using the tools demonstrated in this chapter. Use any of the toolkits that we've discussed and ensure that the USB drive boots after you've created it. After you've completed this step, boot up a machine using your newly created USB drive and ensure that you are able to accomplish the following tasks:
• View the network card configuration for the machine.
• If you have enabled persistence, ensure that you can write files and they exist after a reboot.
• Execute at least one of the tools within the toolkit to ensure that everything appears to be set up correctly.
Summary
This chapter was focused on the tools of the trade for penetration testers. This really encompasses both penetration testing toolkits and penetration testing targets. We started off talking about our objectives as they relate to the tools that we use. We learned a little bit about which toolkits have been created already for penetration testing and how those toolkits are built. We also talked about how to modify them and discussed some of the kits which exist to build penetration testing target systems.
When discussing the core technologies used for created penetration testing toolkits, we learned about LiveCDs and the great advantages that these offer in the areas of ease-of-use and portability. We also talked about creating bootable USB drives and how similar technologies apply in this area as well. Since most LiveCDs are made available as ISO images, we also took a look at that technology and what ISO images really are as well as how to use them.
Next we got to play with the toys! As we talked about open source tools for penetration testing toolkits, we discovered a wide variety of toolkits that are freely available and contain massive numbers of open source penetration testing tools. We also talked about some of the tools which can be used to create penetration testing toolkits of your own. Penetration testing targets are another type of open source “toolkit” in a sense and give us as penetration testers something to practice with. These are obviously a very important part of our overall set of toolkits as they provide a place to learn.
Lastly, we went through a real-world scenario of how to create a bootable USB drive with BackTrack (one of the penetration testing toolkits). As an added bonus here, we also enabled persistence which allows us to save changes that we make to the toolkit as we go along. This is especially useful for keeping the toolkit up-to-date as any package updates are saved versus disappearing on reboot when using the toolkit in a non-persistent mode. You were then challenged to go through this yourself and get started with open source tools-based penetration testing by creating a bootable USB drive with the toolkit of your choice.
Endnote
[1]
Riggins, K.,
BackTrack 4–USB/persistent changes/Nessus.
(
2011) ;
http://www.infosecramblings.com/backtrack/backtrack-4-usbpersistent-changesnessus/;
[accessed 29.03.11].
..................Content has been hidden....................
You can't read the all page of ebook, please click here login for view all page.