
Chapter 2. Reconnaissance
Information in this chapter
• Objective
• A Methodology for Reconnaissance
• Intelligence Gathering
• Footprinting
• Human Recon
• Verification
• Case Study: The Tools in Action
• Hands-On Challenge
The goal of the reconnaissance phase of penetration testing is to gain as much information as possible about a real-world target, such as a company, government, or other group, without actually "touching" the target, and then be able to map the real-world target to a cyberworld target (i.e., to a set of reachable and relevant Internet Protocol addresses). This chapter explores the technologies and techniques used to make that translation happen. In addition to explaining the first four phases of reconnaissance — intelligence gathering, footprinting, human recon, and verification — and how reconnaissance differs from more intrusive forms of penetration testing, the chapter covers many of the technologies used in reconnaissance, and demonstrates how to use some of the open source tools available today. It also explains how to use the human aspect of reconnaissance to further map out a target. A topically relevant case study and hands-on challenge complete the chapter.
When your goal is to successfully penetrate a target, your first objective should be to gather as much information about that target as possible. The United States Army describes reconnaissance as “a mission to obtain information by visual observation or other detection methods, about the activities and resources of an enemy or potential enemy”[1]. This is a very apt definition for our purposes as our goal in reconnaissance is to gain as much information as possible about a target without actually “touching” the target.
Reconnaissance differs from enumeration, but often these two exercises are categorized together. It is important to recognize the differences in the activities however as reconnaissance exercises tend to have less risk of being detected by the target than enumeration exercises. Due to this, it makes sense to do as much reconnaissance as possible on a target before drilling in for details using enumeration. We will be covering enumeration in Chapter 3.
There are a number of very strong technical reasons as well for conducting an accurate and comprehensive reconnaissance exercise before continuing with the enumeration portion of the penetration test:
• Ultimately computers and computer systems are designed, built, managed, and maintained by
people. Different people have different personalities, and their computer systems (and hence the computer system vulnerabilities) will be a function of those personalities. In short, the better you understand the people behind the computer systems you're attacking, the better your chances of discovering and exploiting vulnerabilities. As tired as the cliché has become, the reconnaissance phase really does present one with the perfect opportunity to know your enemy.
• In most penetration testing scenarios, one is actually attacking an entity—a corporation, government, or other organization—and not an individual computer. If you accept that corporations today are frequently geographically dispersed and politically complex, you'll understand that their Internet presence is even more so. The simple fact is that if your objective is to attack the security of a modern organization over the Internet, your greatest challenge may very well be simply discovering where on the Internet that organization actually is—in its entirety.
• As computer security technologies and computer security skills improve, your chances of successfully compromising a given machine lessen. Furthermore, in targeted attacks, the most obvious options do not always guarantee success, and even 0-day exploits can be rendered useless by a well-designed Demilitarized Zone (DMZ) that successfully contains the attack. One might even argue that the real question for an attacker is not what the vulnerability is, but where it is. The rule is therefore simple: The more Internet-facing servers we can locate, the higher our chances of a successful compromise.
2.1. Objective
The objective of the reconnaissance phase is therefore to map a “real-world” target (a company, corporation, government, or other organization) to a cyberworld target, where “cyberworld target” is defined as a set of
reachable and
relevant IP addresses. This chapter explores the technologies and techniques used to make that translation happen. We'll also cover the human aspect of reconnaissance and how to use human reconnaissance to further map out our target.
What is meant by “reachable” is really quite simple: If you can't reach an Internet Protocol (IP) over the Internet, you simply cannot directly attack it. Indirect attacks are, of course, still possible and we will be covering some indirect penetration methods as well. Scanning for “live” or “reachable” IP addresses in a given space is a well-established process and we describe it when covering enumeration in Chapter 3. The concept of “relevance” is a little trickier, however, and bears some discussion before we proceed.
A given IP address is considered “relevant” to the target if it belongs to the target, is registered to the target, is used by the target, or simply serves the target in some way. Clearly, this goes far beyond simply attacking www.fake-inc.com. If Fake, Inc. is our target, Fake's web servers, mail servers, and hosted domain name system (DNS) servers all become targets, as does the FakeIncOnline.com e-commerce site hosted by an offshore provider.
It may be even more complex than that however. If our target is a large organization or part of a large organization, we also need to factor in the political structure of that organization when searching for relevant IP addresses. As we're looking for IP addresses that may ultimately give us access to the target's internal domain, we also look at the following business relationships: subsidiaries of the target, the parent of the target, sister companies of the target, significant business partners of the target, and perhaps even certain service providers of the target. All of these parties may own or manage systems that are vulnerable to attack, and could, if exploited, allow us to compromise the internal space of our target.
NOTE
We look at the target as a complex political structure. As such, we must consider many different relationships:
• The parent company
• Subsidiary companies
• Sister companies
• Significant business partners
• Brands
• Divisions
• Belongs to the organization
• Is used by the organization
• Is registered to the organization
• Serves the organization in some way
• Is closely associated with the organization
Now that we understand our objective for the reconnaissance phase—the translation of a real-world target into a broad list of reachable and relevant IP addresses—we can consider a methodology for achieving this objective. For this, we will use a five-step approach, as outlined in the following section.
WARNING
It is assumed for this book that any attack and penetration test is being conducted with all the necessary permissions and authorizations. With this in mind, please remember that there is a critical difference between
relevant targets and
authorized targets. Just because a certain IP address is considered relevant to the target you are attacking does not necessarily mean it is covered by your authorization. Be certain to gain specific permissions for each individual IP address from the relevant parties before proceeding from reconnaissance into the more active phases of your attack. In some cases, a key machine will fall beyond the scope of your authorization and will have to be ignored. DNS servers, which are mission-critical but are often shared among numerous parties and managed by Internet Service Providers (ISPs) for example, frequently fall into this category.
2.2. A methodology for reconnaissance
At a high level, reconnaissance can be divided into five phases as listed in Table 2.1. We will cover most of these in this chapter; however the final phase of
vitality will be covered in Chapter 3 as it can involve some level of enumeration as well.
The first four phases in Table 2.1 are reiterative; that is, we repeat them in sequence over and over again until no more new information is added, at which point the loop should terminate. This can take a very long time and can be as detailed as you need depending on your specific purposes. If you reach a point where you feel that you have gathered sufficient information for successfully performing your penetration test, feel free to terminate your reconnaissance. Reconnaissance's value decreases after you have reached the point where further actions should be performed or when no further useful information can be gathered. That said, if you find additional details about the target during future penetration testing activities which could be further expanded upon through addition reconnaissance, it may be worthwhile to go through the reconnaissance methodology using those new details as input.
For the remainder of this chapter, we will examine four of the reconnaissance phases in detail: intelligence gathering, footprinting, human recon, and verification. Each of these uses specific core technologies which we will leverage using a variety of open source tools. For each phase, we will be going over the core technologies that we will be using, the general approach, and how to use open source tools to utilize that technology effectively in our reconnaissance activities.
2.3. Intelligence gathering
The ultimate output of this phase is a list of DNS names that are relevant to our target as well as a rough organization chart showing the links between our target and its partners. As we've discussed, relevance can be a difficult concept and it may be hard to determine exactly how relevant the information gathered is. Because of this, it comes down to your personal analysis of the data you've gathered and your gut feel on whether or not the data you've gathered is really relevant or if you're going “down the rabbit hole.”
EPIC FAIL
Ever have one of those days when you bang your head on your desk repeatedly? Sometimes ignoring some organizational data's relevance can cause this. A perfect example is a penetration test performed against a corporate entity. This company was listed as a customer of a specific offshore web development firm. This detail was ignored when documenting the reconnaissance performed and no more was thought of it.
When performing deeper penetration tests, the tester ran into difficulty penetrating part of their externally facing web presence where it was felt that they could gather some useful data. After running into roadblock after roadblock, the tester realized that the web application being worked with was a custom-developed application and that the target probably outsourced the development of it to the previously mentioned web development firm. This happened to be a firm which was well known for adding administrative backdoors to help support their customers in the future.
A little research later and the tester was successfully logged into their web application as a superuser. Paying attention to the details of this company's partners could have saved hours of time and a pretty severe headache.
2.3.1. Core technologies
Before going into the approaches we'll take or the tools we'll use, it's best to have a good understanding of the core technologies which we will be leveraging. In the intelligence gathering phase of reconnaissance, we will be focusing on our primary information source which is the data mined through search engines. A huge amount of information related to our target organization information is typically publicly available; we just have to know how to look for it properly.
2.3.1.1. Search engines
Search engines are the key to finding out as much information about a target as possible. Without the use of advanced search engines, it would probably be almost impossible to locate vital information regarding the target from the web. So the question is, what is a search engine and how does it work?
A search engine is a system dedicated to the searching and retrieval of information for the purpose of cataloging results. There are two types of search engines: a crawler-based search engine and a human-based directory. The two search engines gather their information in two different ways, but most search sites on the web today obtain their listings using both methods.
2.3.1.1.1. Crawler-based search engines
Crawler-based search engines use “crawlers” or “spiders” to surf the web automatically. Spiders will read web pages, index them, and follow the links found within a site to other pages. Three highly active spiders on the Internet today from major search engines are: Slurp from Yahoo!, MSNBot from Bing (sure to be renamed at some point in the future), and Googlebot from Google. Several others are available but as of the time of this writing, these are the major players in this space. You should also be aware that there are open source crawlers available as well. If you are so inclined, you could set up your own web crawler to get a better idea of how this technology works.
Before a spider can actively “crawl” pages, it must read a list of URLs that have already been added to the index. This list of URLs is considered “seed” data and is used as a starting point for the spider. As a spider crawls through the pages, it examines all the code and returns all information back to its index. The spider will also add and follow new links and pages that it may find to its index. Spiders will periodically return to the web sites to check for any type of content changes. Some spiders, such as Googlebot, can detect how frequently a site typically changes and adjust the frequency of its visits appropriately.
Over time, the algorithms used by spiders are modified to become more complex and improve their efficiency. In some cases, minor changes such as adding a limit to the search depth for a single domain can greatly improve the efficiency of a spider by causing it to spend less time on a single domain and instead spend time indexing other domains. As spiders continue to evolve, the results available to us through this automated indexing system become more complete and more useful.
2.3.1.1.2. Human-based search engines
Human-based search engines specifically rely on human input. Humans submit a short description to the directory for the entire web site. A search result returns matches based on the descriptions submitted by humans. The changing and updating of web sites have no effect on the listing. Yahoo!, for example, makes use of a human-powered directory in addition to its spider. This method of data collection tends to be prone to errors including incorrect descriptions of web sites, misspelling of keywords, and omitted information.
When search engines were first being created for the web, human-based search engines were much more common than crawler-based systems. As the web continued to grow, this method grew more and more difficult to maintain thus all major search engines today use spiders. Now this method is generally used for adding sites to search engines that would not necessarily be found by spiders due to a lack of links elsewhere to the site and to augment crawler-based results.
Every search engine will have some system for determining the order in which the results are displayed. This is referred to as its ranking system, which (more than the number of entries in the database) will determine how useful a search engine is for any given purpose.
NOTE
Google's page ranking is a system Google developed in which it determines and calculates a page's importance. Page rank is a type of vote by all other pages that Google has in its repository. A link from a site to a page counts as a support vote; the more sites that link to the page, the greater the number of votes the page receives. A page with no links to itself does not count as a negative vote, but rather no vote at all. The rank of a page is also influenced by the rank of the page linking to it.
Sites of a high quality and level of importance receive higher page rankings. Google combines page ranking with a highly evolved text-matching technique to only find pages of importance that are relevant to your search query. For more information regarding the Google page ranking, visit www.sirgroane.net/google-page-rank/.
2.3.2. Approach
To help break down the intelligence gathering reconnaissance phase into manageable chunks, we'll look at it as a series of sub-phases:
• Real-world intelligence
• Link analysis
• Domain name expansion
Each of these uses slightly different technologies and we will examine each of them in detail as well as look at some sample output which we can use for recording the data.
2.3.2.1. Real-world intelligence
We start by trying to understand the structure of the organization we're targeting, its geographical spread, products, business relationships, and so forth. This is essentially an old-school investigative exercise that makes use of the web as a primary resource. You'll visit the target's web site, search for the target in search engines, read the target's news, press releases, and annual reports, and query external databases for information about the target. At this stage, there are no hard or strict rules, and the value of each different resource will vary from target to target and from sector to sector. As you work through these sources, you need to collect the DNS domain names you find—not necessarily the host names (although these can be useful also), but at least the domain names. Bear in mind always that we're interested in the broader organization, which may encompass other organizations with other names.
A good (albeit simple) example of this is the media company News Corporation. News Corporation has a very large number of related corporations and brands. If we wanted to find out what some of these are in the interest of performing reconnaissance on News Corporation, we could simply plug their name into a search engine such as Google. The results of this search are shown in Fig. 2.1.

This gives us the root domain for News Corporation (www.newscorp.com). The next step is simply to go to that web site and see what information they have publicly available. Going into their site map, there is a link for “Other Assets.” How about that, based on the information shown in Fig. 2.2, News Corporation also owns MySpace. This may or may not be relevant information now, but it's possible that it could be useful as we probe deeper. Who knows, maybe there are some vulnerable systems from the original MySpace infrastructure which were migrated into News Corporation's corporate infrastructure….
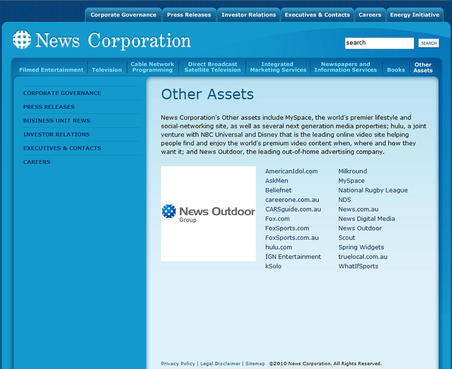
With this in mind, due to the potential relevance of subsidiary companies, our target could now include MySpace as well as all of the other assets listed on News Corporation's web page. Additional DNS names and details on these subsidiaries could then be gathered through additional searches. As more and more company and domain names are identified, we continue to reiterate through this process until we have as much information as we need.
We will go through some of the available tools for information gathering in the Open source tools section for this phase. Keep in mind, however, that one of the more important tools for intelligence gathering is your analysis of the relevance of the data you've gathered. Retaining too much unnecessary data can cause you to waste time later by enumerating or scanning irrelevant targets.
WARNING
Please note again our earlier comments regarding permissions when performing reconnaissance. A
relevant target is not necessarily an
authorized target! While reconnaissance is non-intrusive compared to enumeration, you may need to go through the data you've gathered and remove all references to unauthorized targets gathered during your reconnaissance. This may help you to better remember not to drill in on those unauthorized targets later in your penetration testing work.
2.3.2.2. Link analysis
Link analysis is a way to automate web surfing to save us time. Given any DNS domain that has a web site (www.fake-inc.com), we use web spiders and search engines to enumerate all the HTTP links to and from this site on the web. A link, either to or from the initial site, forms a pair, and an analysis of the most prominent pairs will often reveal something about the real-world relationships between organizations with different domain names. Entire studies on this subject are available on the web, as well as one or two freeware tools which help automate the analyses. We will go over some of these tools later in the chapter.
These tools typically use some form of statistical weighing algorithm to deduce which web sites have the strongest “relationships” with the target site. The reasoning, obviously, is that if there's a strong relationship between two sites on the web, there may a strong link between those two organizations in the world. The output from this type of analysis is a list of additional domain names which appear to statistically have a strong connection to your target and upon which you can perform additional reconnaissance.
You should keep in mind, however, that the automation of this type of analysis is absolutely not foolproof. As a good example, many news aggregators such as fark.com or gizmodo.com link back to the original source for news stories. This could be anything from a small-town online newspaper site to larger news entities such as CNN or MSNBC. The larger news sites will also occasionally have links back to the news aggregators referencing some of the more unusual stories that they've covered thus building a strong link relationship between the news aggregator and the large news site. This would statistically show that there is a strong link between the sites and thus potentially the companies, but in this case that would be an inaccurate assumption.
2.3.2.3. Domain name expansion
Given a DNS domain that is relevant to our target, we can automatically search for more domains by building on two key assumptions:
• If our target has a DNS name in a specific top-level domain (TLD)—fake-inc.com—it may also have the same domain in a different TLD, for example, fake-inc.co.za. We refer to this as TLD expansion.
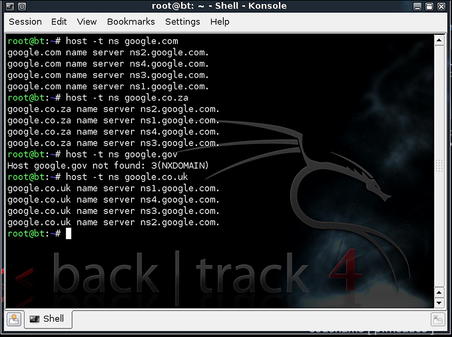
Together, these two assumptions allow us to expand our list of target domains in an automated fashion. TLD expansion (our second technique) is relatively easy: Build a list of all possible TLDs (.com, .net, .tv, .com, .my, etc.) and build a loop to enumerate through each, tagging it to the end of the root name (fake-inc). For each combination, test for the existence of a DNS Name Server (NS) entry to verify whether the domain exists. This technique is not perfect and may produce many, many false positives, but it's relatively easy to weed these out and the return on investment for the time spent performing the analysis is often significant. Fig. 2.3 shows the manual method of performing this task. Naturally, tools exist which help to automate TLD expansion.
Much trickier to automate than TLD expansion is domain name expansion (the technique derived from our first assumption, earlier). Name expansion is harder because the number of possible iterations is theoretically infinite (an infinite number of things “sound like” fake-inc). A pure brute-force attack is therefore not feasible. It used to be possible to do wildcard searches with WHOIS in order to gather all similar domain names from a DNS query. This is no longer a very viable option as fewer and fewer DNS servers are supporting wildcard queries.
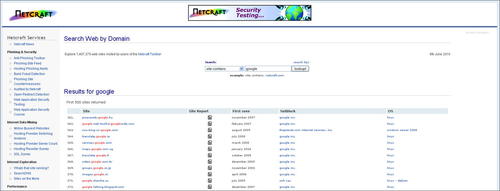
A better approach to domain name expansion is available from the British ISP www.netcraft.com, possibly already known to you for its statistical profiling of different web servers on the Internet over the years. Through various relationships, Netcraft has built a substantial list of DNS host names, which it makes available to the public via a searchable web interface on its site (click on SearchDNS). This interface allows wildcard searches also, as shown in Fig. 2.4. There are several other web sites which offer similar services which you can find through a query with your favorite search engine.
Netcraft doesn't officially apply any restrictions (as far as we're aware), but it also doesn't own all the information on the Internet. There are many times when performing wildcard DNS queries that Netcraft's database does not necessarily include all of the domain names which might exist. Netcraft is thus an additional resource, not an ultimate authority. It is generally best to use a number of different queries and different services when performing domain name expansion.
2.3.3. Open source tools
Some of the technologies discussed in this section are not, strictly speaking, “open source.” They are, however, freely available on the web as services and are used so extensively that it would be impossible to omit them. Others are tools which are available as downloadable open source applications which you can use to automate some of your intelligence gathering activities.
2.3.3.1. Google (www.google.com)
As previously mentioned, search engines enable us to find out just about anything on the Internet. Google, possibly the most popular search engine among penetration testers, can be used to perform basic searches by simply supplying a keyword or phrase. In this section, we look at how to find specific information that may be particularly important in the reconnaissance phase. Google has various types of functionality; in this section, we will also look at certain key directives that we can use to enhance our search queries to focus on specific information regarding a specific web site, file type, or keyword. Google has a list of key directives that we can use in search queries to help us focus on specific information:
• site sampledomain.com
• filetype [extension]
• link siteURL
You use the site directive to restrict your search to a specific site or domain. To only return results from the Syngress web site, use the site:syngress.com syntax in the Google search box. This will return all pages Google has indexed from syngress.com sites. To search for specific pages of information, you can add keywords or phrases to the search query.
The next directive is file type, which you use to return only results with a specific file extension. To do this, you supply filetype:pdf in the Google search box, which will only return results with the PDF file extension. This is one of the most useful directives available for penetration testing as much more information tends to be found in specific files than in HTML-based data. For example, performing a search for filetype:xls will provide a list of spreadsheets found which match your other search criteria. Many times this can help you find lists of contacts or other useful information stored in spreadsheet format.
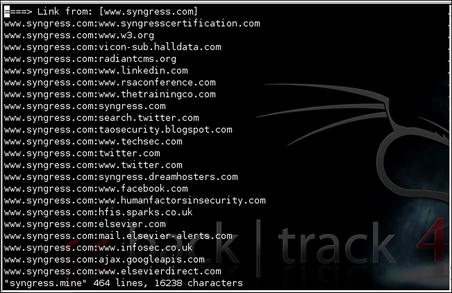
Google also has a directive that allows you to view who links to a specific URL. For example, link:syngress.com will return search results of web sites linking to the Syngress home page. You can use all key directives in conjunction with each other and with other keywords and phrases (see Fig. 2.5).

When Google spiders crawl the web, Google takes snapshots of each visited page. The snapshots are then backed up to the Google repository. These cached pages are displayed as links next to results from Google-returned queries. Viewing cached pages may reveal old information regarding other domains within the organization, links to administrative back-ends, and more. Sites that have not yet been indexed will not have cached links available. The same goes for sites managed by administrators who have asked not to have their content cached.
2.3.3.2. Netcraft (www.netcraft.com)
Netcraft is an Internet monitoring company that monitors uptimes and provides server operating system detection. Netcraft has an online search tool that allows users to query its databases for host information.
The online search tool allows for wildcard searches (see Fig. 2.6), which means that a user can input ∗elsevier∗, and the results returned will display all domains that may have the word elsevier in them.
 |
| FIGURE 2.6 Results from a Wildcard Query at www.netcraft.com. |
The results may return www.elsevier.com and www.elsevierdirect.com, thus expanding our list of known domains. To take this step further, a user can select the “Site Report” link, which will return valuable information such as:
• IP address
• Name servers
• Reverse DNS
• Netblock owner
• DNS admin
• Domain registry
This is shown in Fig. 2.7.
 |
| FIGURE 2.7 Extended Information on www.elsevier.com. |
2.3.3.3. BiLE software suite
The BiLE software suite is a free set of Perl tools from the security company SensePost. BiLE, which stands for Bi-Directional Link Extractor, is a tool used in the footprinting process to find non-obvious relationships between various web sites. It is one of the only open source software tools that addresses this component of penetration testing on the Internet.
The essence of a “non-obvious” relationship is this: By examining the way that companies link to one another with their web sites, we can learn something of their relationships with one another in the real world. A link from A
→
B says A knows something of B. A link from B
→
A suggests A might know something of B, and even a link from A
→
C
→
B suggests that A and B might have some kind of relationship. By enumerating and analyzing these links between web sites, we discover relationships we may otherwise never have stumbled upon. The system is not perfect by any means, and bear in mind that the “obvious” relationships are easily discovered using the other techniques discussed in this chapter—we therefore expect this component to be hard. The BiLE software suite then goes further to offer similarly insightful solutions to many of the problems we face during the reconnaissance phase.
The following is a list of some of the tools in the collection:
• BiLE.pl
• BiLE-weigh.pl
• vet-mx.pl
• jarf-dnsbrute
• jarf-rev
• tld-expand.pl
2.3.3.3.1. BiLE suite: BiLE.pl (www.sensepost.com/labs/tools/misc)
For the intelligence gathering process, we will focus on BiLE, BiLE-weigh, and tld-expand. BiLE attempts to mirror a target web site, extracting all the links from the site using HTTrack (www.httrack.com). It then queries Google and obtains a list of sites that link to the target site specified. BiLE then has a list of sites that are linked from the target site, and a list of sites linked to the target site. It proceeds to perform the same function on all sites in its list. This is performed on only the first level. The final output of BiLE is a text file that contains a list of source site names and destination site names (see Fig. 2.8).
BiLE leans on Google and HTTrack to automate the collections to and from the target site, and then applies a simple statistical weighing algorithm to deduce which web sites have the strongest “relationships” with the target site. The reasoning, obviously, is that if there's a strong relationship between two sites on the web, there may a strong link between those two organizations in the world. BiLE is a unique and powerful tool and works very well if you understand exactly what it is doing. BiLE cannot build you a list of target domains. BiLE will tell you this: “If you were to spend hours and hours on the Internet, using search engines, visiting your target's web site, and generally exploring the web from that point, these are the other web sites you are most likely to come across….”
TIP
Installing HTTrack and BiLE isn't exactly as straightforward as one might like when installing into the BackTrack image. There are a couple hints that might make this easier for you.
• After downloading HTTrack, use the following commands to install it:
tar -zxvf httrack-3.43-9C.tar.gz
cd httrack-3.43.9
./configure
make install
ln -s /usr/local/lib/libhttrack.so.2 /usr/lib/libhttrack.so.2
• After downloading BiLE-suite.tgz and BiLEPublic.tgz, copy them into a subdirectory such as “BiLE” and extract them using the command:
tar -zxvf ∗.tgz
In this toolset, let's first examine the use of BiLE.pl and its syntax.
BiLE.pl USAGE
How to use:
perl BiLE.pl [website] [project_name]
Input fields:
[
website] is the target web site name, for example, www.test12website.com.
[
project_name] is the name of the project, for example, BiLExample.
Output:
Creates a file named [project_name].mine.
Output format:
Source_site:Destination_site
Typical output: (extract)
root@bt:~# perl BiLE.pl www.fake-inc.com fake-inc
www.fake-incincorp.com: www.businessfake-inc.com
www.invisible-fake-inc.com: www.businessfake-inc.com
www.fake-inc2ofus.net: www.businessfake-inc.com
www.fake-incpromotions.com: www.businessfake-inc.com
www.fake-incinfo.com: www.businessfake-inc.com
www.fake-incrooq.com: www.businessfake-inc.com
www.fake-increalthings.com: www.businessfake-inc.com
This command will run for some time. BiLE will use HTTrack to download and analyze the entire site, extracting links to other sites that will also be downloaded, analyzed, and so forth. BiLE will also run a series of Google searches using the link: directive to see what external sites have HTTP links toward our target site.
BiLE produces output that contains only the source and destination sites for each link, but tells us nothing about the relevance of each site. Once you have a list of all the “relationships” (links to and from your chosen target web site), you want to sort them according to relevance. The tool we use here, bile-weigh.pl, uses a complex formula to sort the relationships so that you can easily see which are most important.
2.3.3.3.2. BiLE suite: BiLE-weigh.pl (www.sensepost.com/labs/tools/misc)
The next tool used in the collection is BiLE-weigh, which takes the BiLE output and calculates the significance of each site found. The weighing algorithm is complex and we will not discuss the details. However, you should note the following:
• The target site that was given as an input parameter does not need to end up with the highest weight. This is a good sign that the provided target site is not the organization's central site.
• A link to a site with many links weighs less than a link to a site with fewer links.
• A link from a site with many links weighs less than a link from a site with fewer links.
• A link from a site weighs more than a link to a site.
Fig. 2.9 shows some sample BiLE-weigh output.
BiLE-Weigh.pl USAGE
How to use:
perl BiLE-weigh.pl [website] [input file]
Input fields:
[website] is a web site name, for example, www.sensepost.com.
[input file] typically output from BiLE.
Output:
Creates a file called [input file name].sorted, sorted by weight with lower weights first.
Output format:
Site name:weight
root@bt:~# perl BiLE-weigh.pl www.fake-inc.com fake-inc.mine
www.google.org:8.6923337134567
www.securitysite1.com:8.44336566581115
www.internalsystemsinc2.com:7.43264554678424
www.pointcheckofret.com:7.00006117655755
www.whereisexamples.com:6.65432957180844
Depending on the version of
sort that you have installed, you may experience this error when running BiLE-weigh:
sort: open failed: +1: No such file or directory
This is due to a slight syntax change needed for
sort to work as expected. Open the BiLE-weigh.pl file for editing and search for the following line:
'cat temp | sort -r -t ":" +1 -n > @ARGV[1].sorted';
Change it to this instead:
'cat temp | sort -r -t ":" -k 2 -n > @ARGV[1].sorted';
This should fix the problem and you should be able to successfully run BiLE-weigh!
The number you see next to each site is the “weight” that BiLE has assigned. The weight in itself is an arbitrary value and of no real use to us. What is interesting, however, is the relationship between the values of the sites. The rate at which the sites discovered become less relevant is referred to as the rate of decay. A slow rate of decay means there are many sites with a high relevance—an indication of widespread cross-linking. A steep descent shows us that the site is fairly unknown and unconnected—a stand-alone site. It is in the latter case that HTML link analysis becomes interesting to us, as these links are likely to reflect actual business relationships.
NOTE
In its original paper on the subject (www.sensepost.com/restricted/BH_footprint2002_paper.pdf), SensePost describes the logic behind the BiLE-weighing algorithm as follows:
“Let us first consider incoming links (sites linking to the core site). If you visit a site with only one link on it (to your core site), you would probably rate the site as important. If a site is an ‘Interesting Links’-type site with hundreds of links (with one to your core site), the site is probably not that relevant. The same applies to outgoing links. If your core site contains one link to a site, that site is more relevant than one linked from 120 links. The next criterion is looking for links in and out of a site. If the core site links to site XX and site XX links back to the core site, it means they are closely related. The last criterion is that links to a site are less relevant than links from a site (6:10 ratio). This makes perfect sense, as a site owner cannot (although many would want to try) control who links to the site, but can control outgoing links (e.g., links on the site)”[2].
2.3.3.3.3. BiLE suite: tld-expand.pl (www.sensepost.com/labs/tools/misc)
The tld-expand utility is used to automate the generation of alternate TLDs for TLD expansion and determine if the domain is in use. It takes a simple input file of second-level domain names and outputs a file with a variety of valid TLDs prefixed with the second-level domain names. This can really speed up TLD expansion compared to the manual method previously shown. You can see an example of output from tld-expand in Fig. 2.10.

As you can see in the example (Fig. 2.10), not only does tld-expand create a list of TLDs, but it also does a DNS query to determine if any of the TLDs are valid. By doing this, you are quickly able to assess whether or not the target has other potential hosts under other TLDs. Keep in mind, there is no guarantee that other TLDs with your target's domain name are actually owned by the target. They could also be purchased by a third party and used for advertisement or other purposes.
2.3.4. Intelligence gathering summary
At this point, we've discussed the basics of building a list of DNS domain names we consider relevant to the real-world target as well as how to expand the size of that target by including relevant organizations. We've also discussed the steps to expand our list of domains by using TLD and domain name expansion. We're now ready to proceed to the next major phase of reconnaissance:
footprinting.
2.4. Footprinting
The objective of the footprinting phase is to derive as many IP/host name mappings as we possibly can from the domains gathered in the previous phase. As an organization's machines usually live close together, this means that if we've found one IP address, we have a good idea of where to look for the rest. Thus, for this stage, our output can actually be IP ranges (and not necessarily just individual IPs). For the sake of completeness, if we find even a single IP in a given subnet we should include that entire subnet in the list. The technically astute among us will already be crying “False assumption! False assumption!” and they would be right. At this stage, however, it is better to overestimate than underestimate and gather as much data as possible. In the verification phase we'll prune the network blocks to a more accurate representation of what's actually relevant.
2.4.1. Core technologies
Again, let's go over some of the core technologies that we'll be using before going into the approaches we'll take or the tools we'll use. In the footprinting phase of reconnaissance, we will be focusing on the technologies of DNS, WHOIS, RWHOIS, and SMTP. Each of these technologies can be leveraged to gather more information on the overall footprint of our target and can help us in building our IP/host name mappings.
2.4.1.1. DNS
The Domain Name System (DNS) can be considered the life and blood of the Internet today. It is much easier for people to remember DNS names than full IP addresses of web sites. DNS, which is used for resolving DNS names into IP addresses and vice versa, can be seen as a database of host information. DNS is widely used by all Internetworking applications, such as web browsers, email, and so on.
DNS has been arranged in a hierarchical naming scheme, known to us as domain names. It functions with a top-down method, where a query begins at the top of the DNS tree and works its way to an endpoint. At the top of this hierarchy (called the “root”) are root servers. Thirteen root servers (logical, not physical) form the top of the DNS tree. The names of these root servers start with the letters A–M, all in the domain root-servers.net.
The next level on the tree is known as the top-level domain (or TLD), which is the label to the right of a domain name delineated by a period. There are two types of TLDs: country code (ccTLDs) and generic (gTLDs). A ccTLD may consist of .uk, .us, .za, or .il, for example. A gTLD may consist of .com, .org, .net, .edu, .mil, and so forth.
Each label to the left of the TLD is then technically a subdomain, until the end is reached and we actually have a full host name description. With that said, the label/subdomain immediately to the left of the TLD is also referred to as the second-level domain. The second-level domain is usually the core of the name, for example, “google,” “syngress,” or “elsevier.” These second-level domains are registered by registrars accredited by the Internet Corporation for Assigned Names and Numbers (ICANN).
ICANN is the decisive authority for domain name assignments, but in 1999 the concept of a Domain Name Registrar was introduced. A registrar is a commercial company, accredited by ICANN to sell domain names. More than 2000 different registrars are accredited and in operation today. Each maintains registration information for the registered domains it manages and makes this information available in the manner and format it chooses.
The decentralization of domain name registration in 1999 has significant implications for the penetration tester. In essence, it means that there is no single location for obtaining information about a given domain, no way of precisely determining where a domain name is registered, and no way of enumerating the domains registered to a single entity. Collectively, this radically reduces the usefulness of the system to the penetration tester. This specifically relates to second-level domain names and not IP address allocations.
Once a domain name has been purchased from a registrar, the owner of the second-level domain can then create as many subdomains as he likes under his domain name. These can be individual hosts or actual subdomains which further segment the owner's name space.
Let's look at a typical DNS request, ignoring DNS caching servers for now. A user opens his or her web browser and types www.google.com. The machine requests a DNS query from the local DNS server. In theory, the local DNS server first visits one of the root servers and requests the addresses of the TLD servers for the .com domain. The root server will then reply with addresses of the .com TLD servers, to which the local DNS server will go to request the IP address of google.com. The local DNS server then requests from the google.com name server the final address of www.google.com and is returned the address 74.125.95.103. The local DNS server then informs your browser of the address to use and begins to download the first page presented on www.google.com. Of course, all of this takes place within seconds. This is illustrated in the diagram shown in Fig. 2.11.

Two key components are used from the domain name space: name servers, and resolvers. A resolver, which functions as a client-side-based tool, will make a DNS request to a name server. The name server will return either the requested information or an address of another name server until the DNS query is resolved. If the DNS name cannot be resolved, an error message will be returned.
Asynchronous Full Transfer Zone requests, which are also known as AXFR or zone transfers, are another type of DNS transaction. Zone transfers are typically used to replicate DNS data across a number of DNS servers or to back up DNS files. A user or server will perform a specific zone transfer request from a name server. If the name server allows zone transfers to occur, all the DNS names and IP addresses hosted by the name server will be returned in human-readable ASCII text.
A DNS database is made up of various types of records, some of which are listed in Table 2.2.
When a resolver requests data from a name server, the DNS returned information may include any of the fields in Table 2.2.
Sometimes we need to find the DNS name of an IP address, so we perform a reverse lookup query. This will work exactly the same way as a forward lookup, whereby the resolver will query a name server for a DNS name by supplying the IP address. If the DNS name can be resolved for the IP address, the name server will return the name to the end-user. If not, an error message will be displayed.
DNS will be the key technology used during footprinting. It's a generally well-understood technology and therefore doesn't need much more discussion here. Please note the sidebar on DNS tips, however, as it contains some critical pointers.
TIP
Here are some tips to help you get the most out of DNS during the footprinting and verification phases of the attack:
• We use DNS as a bridge between the real world and the cyberworld because it is so ideally positioned for this purpose. However, remember that DNS is a completely unregulated environment, so DNS entries may only ever serve as pointers toward your targets. Fake entries, stale entries, incorrect DNS entries, and entries that point to hosts that can't be reached from the Internet are all commonly found during a penetration test. The verification phase is therefore needed to double-check the findings of your DNS searches.
• Location, location, location! Be sure that you know which server is being used to handle your queries, and that it's the ideal server for the domain you're examining. Remember that by default your DNS query client will be configured to use your local resolver, which may be unsuitable for the queries you're making. Remember also that some ISPs will grant their own clients more DNS privileges than users with “outside” IP addresses. This is especially true for zone transfers, which are sometimes blocked to external users but are allowed to clients of the ISP. It's therefore often worth retrying your queries from a different IP address.
• Understand the difference between forward and reverse queries. Forward and reverse DNS queries are not just flipsides of the same coin. The queries are in fact made against two completely separate databases, residing in different zone files, possibly residing on different servers and managed by different organizations. Thus, there is very little reason to expect forward and reverse DNS entries to correlate. The forward DNS zone is typically managed by the domain name owner, whereas the reverse zone is usually managed by the IP subnet owner. Now observe this little gem of logic: If the forward entry and the reverse entry for a given host are the same (or even similar), this suggests that the subnet owner
=
the domain owner, which in turn suggests very strongly that the IP in question is, in fact, associated with the domain we're targeting and hence with our target. This simple yet powerful logic is applied extensively when we use DNS reverse walks during the verification phase of reconnaissance.
2.4.1.2. WHOIS
WHOIS is a protocol for submitting queries to a database for determining the owner of a domain name, an IP network, or an Autonomous System Number (ASN). The information returned by WHOIS contains the owner information which may include email addresses, contact numbers, street addresses, and other relevant metadata. WHOIS is a popular informational protocol service that runs on port 43. When a user issues a WHOIS query to the server, the server accepts the connection and then responds to the query issued by the user and closes the connection.
The information returned by the WHOIS server is formatted in plain ASCII human-readable text. However, as WHOIS servers all over the Internet are administrated and maintained by different organizations, information returned to end-users may vary from server to server. Information returned and functionality may also vary between different WHOIS clients, as some servers may support different client-side flags.
WHOIS proxies are used as a mediator between a WHOIS client and a WHOIS server and typically run over HTTP/HTTPS, meaning that if a client were behind a firewall that rejects direct connections to port 43, a client could possibly access a WHOIS proxy on the Internet using a browser via HTTP. By using a WHOIS proxy, the user never has to be aware of the different WHOIS servers it may have to contact for different lookups. Instead, the proxy will handle determining which server it will need to contact to successfully complete the query automatically. In some cases, WHOIS proxies are even set up to cache data to minimize network traffic and speed delivery of results.
Almost all WHOIS services (servers and proxies) have mechanisms in place to prevent data mining. These restrictions are generally intended to prevent the collection of data for spam and so forth, but they unfortunately also limit the usefulness of WHOIS for intelligence gathering. The lack of standards and centralization among WHOIS services further limits its usefulness and makes it a less than 100% reliable tool.
2.4.1.3. RWHOIS
RWHOIS (Referral WHOIS) is a directory service protocol designed to improve the current WHOIS protocol. RWHOIS focuses on the distribution of “network objects” such as domain names, email addresses, and IP addresses to more accurately return the requested information. A client will submit a query to an RWHOIS server, and the server will refer the query to the correct WHOIS server to provide all of the relevant information. This is very similar in structure to DNS and is intended to improve the reliability of WHOIS. Unfortunately, RWHOIS is not yet in general use.
2.4.1.4. Domain name registries and registrars
If WHOIS is the protocol over which information about DNS domain registration can be queried, the DNS Registry is the organization responsible for registering that domain in the first place, collecting and maintaining information about the registered owner, and making that information available to the Internet in general.
A single registry is typically responsible for one Generic Top-Level Domain (gTLD) such as .com or a Country Code Top-Level Domain (ccTLD) such as .za. This authority is delegated to the registry by IANA—the Internet Assigned Numbers Authority—which is responsible for ensuring that each gTLD has exactly one delegated owner. IANA oversees IP address, top-level domain, and IP code point allocations.
The registry is also responsible for operating the DNS servers for the given gTLD and for making its index available to the Internet using WHOIS or some other interface. The political structure of registries varies—some are governments, some are not-for-profit, and others are full commercial ventures.
2.4.1.5. SMTP
The Simple Mail Transfer Protocol (SMTP) is used for sending and receiving email between email clients and servers. When an SMTP server receives an email from a mail client, the SMTP server will then check the MX records for the domain in the email address in order to exchange the mail with the remote SMTP server. It will then either process the mail (if it is the MX server) or forward it to the appropriate SMTP server.
For SMTP to work properly, a set of MX records has to be defined within the name server's DNS database for the recipient's domain. An MX record has two specific pieces of information—a preference number, and the DNS name of the mail server that's configured to handle mail for that domain. If there is more than one mail server for the domain, the SMTP server will choose one based on its preference number. The lowest number will have the highest priority, and based on availability, the SMTP server will work its way up from there.
One can view the headers of a received email to see the path the email traveled from client to server to destination endpoint. Each time an email is passed to and from an SMTP server, information regarding the server is recorded in the header. Fig. 2.12 shows an example of an email header with SMTP server information using the RFC 2822 (www.ietf.org/rfc/rfc2822.txt) format.

Once the local mail server receives the mail message, it is given an initial header (received by), which appears as:
Received: from [sending-host’s-name] [sending-host’s address] by [receiving-host’s-name]
[software-used]
with [message-ID]
for [recipient’s-address]; [date][time][time-zone-offset]
You can see two examples of such headers in Fig. 2.12. The message then progresses through numerous mail relays where the message is given appended header information. The mail is eventually received by the recipient's mail server and is stored in the recipient's mail account (inbox), where the user downloads it. At this stage, the message has received a final header. Additional information given by the headers includes Message IDs, Multipurpose Internet Mail Extensions (MIME) version, and content type.
MIME is a standard for handling various types of data, and essentially it allows you to view mail as either text or HTML. Other MIME types are defined that enable mail to carry numerous attachment types. A message ID is assigned to a transaction by a particular host (the receiving host, or the “by” host). Administrators use these message IDs to track transactions in the mail server logs.
Mail headers are interesting to us because they show us where the mail servers are. In addition, they tend to deserve special attention because mail servers are usually where the people are, and that's usually right at the heart of the network. Mail servers are very seldom hosted outside the private network in larger organizations and thus represent an organization's core infrastructure to us.
2.4.2. Approach
There are a few different techniques for identifying IP/host name mappings. Without going into too much detail at this point, these techniques are all derived from two assumptions:
• Some IP/name mappings are very likely to exist on an active domain. For example, “www” is a machine that exists in just about every domain. Names such as “mail,” “firewall,” and “gateway” are also likely candidates—there is a long list of common names we can test.
Building on these assumptions, we can develop a plan with which to extract the greatest number of IP/host combinations technically possible. The basic steps necessary to accomplish this are:
1. Attempt a DNS zone transfer.
2. Extract domain records.
3. Forward DNS brute force.
4. SMTP mail bounce.
We've covered some of the basic core technologies for these steps already. Now we can use that information and continue on to focusing on our approach. In that vein, let's look at each of these steps in more detail.
2.4.2.1. Attempt a DNS zone transfer
Zone transfers are typically used to replicate DNS data across a number of DNS servers, or to back up DNS files. A user or server will perform a specific zone transfer request from a name server. If the name server allows zone transfers to occur, all the DNS names and IP addresses hosted by the name server will be returned in human-readable ASCII text.
Clearly, this mechanism suits our purposes at this point admirably. If the name server for a given domain allows zone transfers, we can simply request—and collect—all the DNS entries for a given domain. If this works, we can perform the same task for other domains that we have identified and move on to the next phase of the attack.
The basic method of performing a zone transfer from a UNIX environment is to use the
host command. We will go through the use of this tool in detail later, but you should be aware that the chances that a zone transfer will succeed on the Internet are relatively low. One of the most basic principles of securing DNS is to disable zone transfers, but you'll still find a few cases where this has been missed. If so, you can use a zone transfer to quickly gather all the IP/host name combinations that the name server is hosting. In most cases, unfortunately, you'll have to roll up your sleeves and get on with it the hard way.
NOTE
Many people aren't aware that the access restrictions on DNS zone transfers are a function of the DNS server, and not of the DNS domain. Why is this important? More than one host may be configured to serve a particular domain. If even one allows zone transfers, your attempts will succeed—there is no global setting for the domain itself.
It's also important to note that not all the hosts configured to serve DNS for a particular domain will be registered as name servers for that domain in the upstream DNS. It's not uncommon to find hidden primaries, backup servers, internal servers, and decommissioned servers that will serve DNS for a domain even though they're not registered to do so. These machines are often not as well configured and may allow zone transfers.
The question then becomes, how do you find a name server if it's not registered? In Chapter 3, we cover vitality scanning and port scanning. A host that responds on Transmission Control Protocol (TCP) port 53 is probably a name server and may allow zone transfers. If you have scanned a subnet for a target and found additional hosts with this port open that are not registered, you may have found a hidden DNS server.
Finally, you should be aware that a given domain will probably have more than one name server serving it. Not all DNS query clients will necessarily attempt to query all the servers, especially if the first one responds. Be sure you know how your chosen query client handles multiple name servers, and be prepared to specify each individual server by hand if necessary. This may cause the scan to take longer, but may provide additional details depending on the configuration of each server.
2.4.2.2. Extract domain records
Every registered and functional domain on the Internet will have an NS record and probably an MX record. These special records are easily derived using standard command-line DNS tools such as
dig,
nslookup, and
host. These tools allow us to query the information stored in DNS for the domain and put together an IP/host name match for DNS servers (NS) and mail servers (MX) associated with the domain. Incidentally, the additional DNS names found with this extraction can then be used to attempt zone transfers … just in case.
2.4.2.3. Forward DNS brute force
Based on the assumption that certain DNS names are commonly used, it's logical to mount a forward DNS brute-force scan. This can be done by simply putting together a list of potential host names and querying DNS to see if any of those names can be resolved. Many people do this by default every day simply by assuming (correctly) that the web server for a given domain will have a host name of “www.” Using this same concept, there are many other potential host names that can be tried in a brute-force scan.
Consider for a moment the psychology of DNS or rather those who use it (we're always dealing with people in the end). Hosts within an organization are often named according to some convention, often from a pool of possible names that appeal to the administrator or align to the host's purpose. Thus, one sees machines named for Tolkien's
Lord of the Rings characters, characters from the movie
The Matrix, planets, Greek gods, cities, trees, cartoon characters, and even people's names as well as the common purpose names such as “mail,” “app,” or “file.” If you can determine what convention an organization is using, you can build a much more efficient brute-force tool. With a little effort, you can code all this into one tool, along with some refinements such as fuzzing, whereby numbers are tagged onto the end of each name found to test whether derivations of a given name also exist (e.g., www.fake-inc.com, www-1.fake-inc.com and www1.fake-inc.com). Later in this section we'll go into some detail on techniques for forward brute-forcing DNS names.
2.4.2.4. SMTP mail bounce
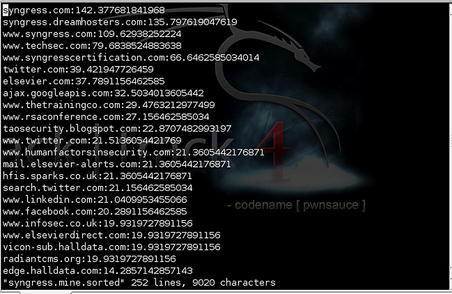
If all else fails (and it sometimes does), we can resort to a mail bounce. This is a simple trick, really, but very often it is well worth the time it takes to execute. The basic principle is to send a normal email to an email address within the target domain we assume does not exist. Our hope is that the message will find its way to the actual mail server responsible for that domain, where it will be rejected and sent back to us, all the while recording the host names and IP addresses of the servers that handle it. In this way, we can often learn a lot about the infrastructure we're targeting, as shown in FIGURE 2.13 and FIGURE 2.14.
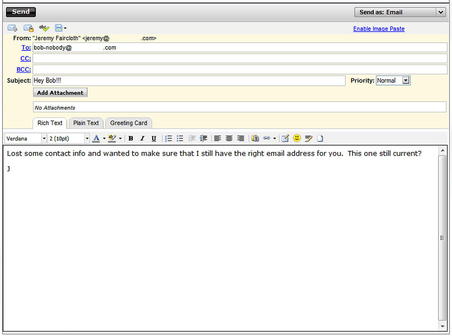
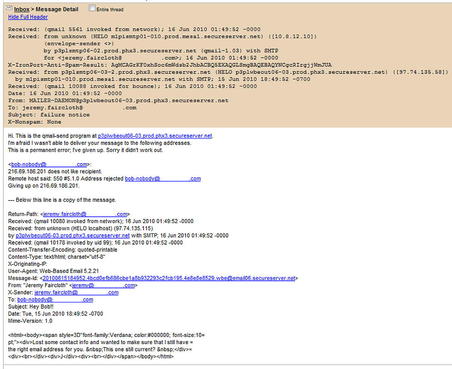
As you can see from FIGURE 2.13 and FIGURE 2.14, we now have a number of host names within the target's infrastructure as well as a good understanding of the path that the mail took. This can aid us in putting together additional names and IPs for future scanning. Also, knowing the path the mail took can help us to better understand the target's architecture and how they have their critical services hosted.
TIP
Even when the other techniques are already producing results, it is still recommended to perform a quick mail bounce. Occasionally, we come across situations in which the mail path
in is different from the mail path
out, revealing new and completely insecure elements of the target infrastructure. Of course, if the target happens to have a catch-all account setup, you won't get a mail bounce, but this non-intrusive method of reconnaissance is always worth a try.
2.4.3. Open source tools
Now that we've gone over the core technologies that we're using for footprinting as well as the approach, it's time to discuss the tools that we use for this phase of reconnaissance. Each of these tools leverages the core technologies that we discussed and allows us to use our targeted approaches to create IP/host name pairs for penetration testing.
2.4.3.1. WHOIS
You use the WHOIS command tool to look up domain and IP address ownership records from registrar databases via the command line. Information returned to the user may include organizational contact, administrative, and technical contact information. Table 2.3 lists the WHOIS basic command-line flags, and FIGURE 2.15 and FIGURE 2.16 show WHOIS from the command line.


2.4.3.2. WHOIS proxies
You can find many types of online WHOIS proxies on the Internet today. By simply Googling for “online WHOIS tools,” you will be presented with links to various sites, such as:
You can use these online WHOIS tools to look up DNS domain or IP address registrant information; the WHOIS proxies will handle determining which WHOIS server to contact to best complete the query in much the same process the WHOIS console tool will (see Fig. 2.17).
 |
| FIGURE 2.17 Ping.eu Data for syngress.com. |
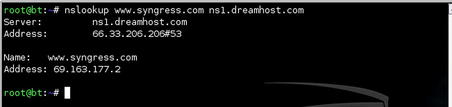
2.4.3.3. nslookup
nslookup is an application that is used to query name servers for IP addresses of a specified domain or host on a domain. You can also use it to query name servers for the DNS host name of a supplied IP address. You can run the tool in two modes: noninteractive and interactive. Noninteractive mode is used to display just the name and requested information for a specified host or domain. Interactive mode on the other hand is used to contact a name server for information about various hosts and domains, or to display a list of hosts in a domain (see Fig. 2.18).
nslookup usually uses User Datagram Protocol (UDP) port 53, but it may also use TCP port 53 for zone transfers.
2.4.3.4. dig
dig is an incredibly useful tool for querying DNS servers for information about a target. You can use dig by simply calling the dig command followed by a domain name, i.e.
dig www.syngress.com. This will gather some basic information about the domain such as the IP address. However, by using some of the more extensive capabilities of the dig utility, you can gather some even more useful data. Table 2.4 shows some of the command-line options for dig and how it can be used to gather extensive data on your target. Fig. 2.19 shows what some of these might look like.

2.4.3.5. host
host is another tool which can be used to query DNS servers. Most of the information returned is the same as dig, just in a slightly different format. Some of the more common command-line options for host are listed in Table 2.5. Some examples are shown in Fig. 2.20.

2.4.3.6. dnsenum.pl
dnsenum is a perl script included with the BackTrack 4 toolkit (/pentest/enumeration/dnsenum/) which automates the footprinting of DNS for a specific target. It allows you to automate the DNS queries shown in FIGURE 2.19 and FIGURE 2.20 using host and dig, as well as scrape Google for additional subdomains and brute-force subdomains based on a list of common names stored in a file. It also includes reverse lookup capabilities using WHOIS.
dnsenum.pl USAGE
How to use:
perl dnsenum.pl --dnsserver [name server] --enum -f [host file name] [domain]
Input fields:
[name server] is a specific name server to use for the query. This is optional.
The --enum option automatically sets some of the threading, scraping, and WHOIS variables.
[host file name] is a text file containing a number of common host names for brute-force scanning.
[
domain] is the target domain; for example, syngress.com.
Output:
Displays a huge amount of information about your target to the screen. This can be piped to a file if needed.
Typical output: (extract)
-----
syngress.com
-----
-----------------
Host's addresses:
-----------------
syngress.com.
14400
IN
A
69.163.177.2
Name servers:
-------------
ns2.dreamhost.com.
14400
IN
A
208.96.10.221
ns1.dreamhost.com.
14400
IN
A
66.33.206.206
ns3.dreamhost.com.
14400
IN
A
66.33.216.216
-----------
MX record:
-----------
---------------------
Trying Zonetransfers:
---------------------
trying zonetransfer for syngress.com on ns3.dreamhost.com …
trying zonetransfer for syngress.com on ns1.dreamhost.com …
trying zonetransfer for syngress.com on ns2.dreamhost.com …
--------------------------------------------
Scraping syngress.com subdomains from google:
--------------------------------------------
----
Google search page:
1
----
----
Google search page: 2
----
----
Google search page: 3
----
----
Google search page: 4
----
Google results: 0
perhaps google is blocking our queries.
------------------------------
Brute forcing with dns.txt:
------------------------------
ftp.syngress.com.
14400
IN
A
69.163.177.2
www.syngress.com.
14400
IN
A
69.163.177.2
-----------------------
Lunching whois queries:
-----------------------
whois ip result:
69.163.177.0
->
69.163.128.0/17
----------------------------
syngress.com whois netranges:
----------------------------
69.163.128.0/17
----------------------------------------------------
Performing reverse lookup on 32768 ip addresses:
----------------------------------------------------
0 results out of 32768 ip addresses.
---------------------
syngress.com ip blocks:
---------------------
done.
2.4.3.7. DigDug
DigDug is a tool by Edge-Security (www.edge-security.com/digdug.php) which automates DNS server brute forcing as well as reverse lookups. It is very similar in functionality to dnsenum, but includes a larger list of DNS names for brute forcing. The two scripts that we'll use are
forcedns.py and
dnsreverse.py. First, we'll look at the use of
forcedns.py.
forcedns.py USAGE
How to use:
python forcedns.py -d [domain] -f [host file name]
Input fields:
[domain] is the target domain, for example, syngress.com.
[host file name] is a text file containing a number of common host names for brute-force scanning.
Output:
Displays a list of host names and associated IP addresses found with the scan.
Typical output:
root@bt:~/digdug# python forcedns.py -d syngress.com -f dns-names.txt
∗∗∗∗∗∗∗∗∗∗∗∗∗∗∗∗∗∗∗∗∗∗∗∗∗∗∗∗∗∗∗∗∗∗∗∗∗
∗DigDug-NG
v1.1
∗
∗Coded by Laramies
∗
∗∗∗∗∗∗∗∗∗∗∗∗∗∗∗∗∗∗∗∗∗∗∗∗∗∗∗∗∗∗∗∗∗∗∗∗∗
[+] Using dictionary: dns-names.txt
[+] Loaded 556 words.
[+] Getting Nameservers for the domain syngress.com
[+] Nameserver: ns1.dreamhost.com
[+] Starting DNS force attack:
[-] Host found: ftp.syngress.com -> 69.163.177.2
[-] Host found: mysql.syngress.com -> 69.163.167.100
[-] Host found: www.syngress.com -> 69.163.177.2
zlog.syngress.com
[+] Attack finished ok!
Next, let's take a look at the usage of dnsreverse.py and how this tool gathers further details on our target.
dnsreverse.py USAGE
How to use:
python dnsreverse.py -n [domain]
Input fields:
[domain] is the target domain, for example, www.syngress.com.
Output:
Displays the IP associated with the host, the IP range that the IP is part of, and all of the DNS names found within that IP range.
Typical output:
root@bt:~/digdug# python dnsreverse.py -n www.syngress.com
∗∗∗∗∗∗∗∗∗∗∗∗∗∗∗∗∗∗∗∗∗∗∗∗∗∗∗∗∗∗∗∗∗∗∗∗∗
∗ DNSreverser -
v1.2
∗
∗ Coded by Laramies
∗
∗∗∗∗∗∗∗∗∗∗∗∗∗∗∗∗∗∗∗∗∗∗∗∗∗∗∗∗∗∗∗∗∗∗∗∗∗
69.163.177.0/24
[+] Range to reverse: 69.163.177.0/24
[+] Length of host list: 256
[+] Nameserver: ns3.dreamhost.com
[+] Starting DNS Reverse attack:
[-] Host found: etovalosag.com-> 69.163.177.0
[-] Host found: apache2-beer.bulls.dreamhost.com-> 69.163.177.10
[-] Host found: eco-cli.com-> 69.163.177.11
[-] Host found: ps14648.dreamhost.com-> 69.163.177.9
[-] Host found: apache2-jiffy.nuggets.dreamhost.com-> 69.163.177.12
[-] Host found: ps18609.dreamhost.com-> 69.163.177.6
[-] Host found: apache2-bongo.rapids.dreamhost.com-> 69.163.177.7
[-] Host found: apache2-bongo.predators.dreamhost.com-> 69.163.177.8
[-] Host found: apache2-noxim.monarchs.dreamhost.com-> 69.163.177.4
[-] Host found: apache2-zoo.flames.dreamhost.com-> 69.163.177.13
[-] Host found: apache2-xenon.flames.dreamhost.com-> 69.163.177.14
[-] Host found: apache2-ogle.saprissa.dreamhost.com-> 69.163.177.3
…
[+] Waiting for threads to finish…
2.4.4. Footprinting summary
In summary, if intelligence gathering is the process of translating real-world targets into a list of DNS domains, footprinting is the process of converting those domains into IP/name combinations. As always, the more comprehensively we can do this, the more targets we will have to aim at, and the more likely we will be to penetrate a system.
Remember our earlier comments, however: On the assumption that an organization's IP addresses will often be grouped together on the Internet, our output for this stage is not just the IPs themselves, but the IP ranges in which they reside. At this stage, we blindly assume that all subnets are class C. Thus, if we've discovered the IPs a.b.c.d, a.b.c.f, and e.f.g.h, our output from this phase will be the IP blocks a.b.c.0/24 and e.f.g.0/24. It will later be the purpose of the verification phase to determine how big these ranges really are and to confirm that they are relevant to the organization we're targeting.
2.5. Human recon
As we mentioned earlier, we're always dealing with people in the end. Therefore one of the most vulnerable areas within a target organization is its employees. At this point, we're not necessarily referring to the social-engineering aspect of penetrating an organization, although that is certainly valid, but rather the information about an organization that you can get from its people and vice versa. When performing reconnaissance, you must include the human perspective to get a full view of the organization.
The methodology for human recon revolves around where people post information about themselves or where information about them is posted. The areas that we focus on are:
• Relationships
• Email lists
• Web site posts
• Social networks
In the past, Usenet newsgroups and bulletin board systems were great sources also, but they have become less valuable over time.
2.5.1. Core technologies
The core technologies used for this phase of reconnaissance are all based around people and their activities on the Internet. We will be focusing on the areas of relationships, email lists, web site posts, and social networks as listed above. Using information that people post about themselves or information that others post about them can give us a great deal of insight into their lives and how that relates to our target organization.
2.5.1.1. Relationships
Knowing the basic relationships between individuals and our organizational target can be very helpful in performing a penetration test also. If you have a good understanding of the people involved in an organization and where they exist in the corporate structure, you may be able to exploit those people as a potential attack vector.
As an example, let's take a look again at the home page for News Corporation. Under their “Executives & Contacts” page (shown in Fig. 2.21), they have the following board member listed:

• Viet Dinh
Professor of Law,
Georgetown University
Performing a quick web search provides a web page on the Georgetown University web site with this person's full name, academic credentials, address, assistant's name, phone number, and biography. Additional search results reveal his parents' names, associations that he is part of, and the fact that he stutters.
Why is this important? If we were to try and penetrate this target, it would now be a relatively simple act to create an email pretending to be a former classmate or associate and include a .PDF file with an invitation to some sort of reunion or other event. We have enough information on hand with a single search to act as if we know Viet. Now if that .PDF file takes advantage of a vulnerability in Adobe Acrobat, we could end up with access to Viet's computer and through the data there be able to penetrate into our final target. Additional options are getting him to visit a malicious web page or including some other type of malicious file as an attachment to the email.
2.5.1.2. Email lists and web site posts
Many people find that they can get help with almost any problem through various forums on the Internet. Most will typically make a post with the issue they're having or respond to someone else's post with little regard to what their posts reveal about them. By simply knowing their email address or name, you can often find this personal information. Even if they're not a well-known person, you may be able to find additional details about them that can help you take advantage of them later in your penetration testing process.
With this approach, you can use search engines to scour the web for posts made by people with the name you're looking for. You can go for even better results by tightening the search to include the domain of the company they work for also or even just scan the search engines for all emails that include a specific domain. Many people make the error of posting using their business email address therefore making it even easier to identify them.
When you have found more information about the individuals you search for, make sure to document it and keep a record of everything you find no matter how irrelevant it seems at the time. It helps to put together a simple organizational chart to keep track of people that you have found associated with a company as well as the details around those individuals. See Fig. 2.22 for a brief example of what this looks like.

As you can see from this organizational chart, you should not only keep track of the people's names, but also their hobbies, email addresses, and any other personal information that you can find out about them. All of this information could be useful later when attempting to penetrate the organization.
2.5.1.3. Social networks
Social networks have become very popular over the last several years and it's now to the point that most people who are active on the Internet are members of one or more social networks. These include popular networks such as:
• Bebo
• Classmates.com
• Facebook
• Flixster
• Flickr
• LinkedIn
• MySpace
• Plaxo
• Twitter
Many of these include the ability to search for people you know or to see information about random people that you've never met. That makes them a perfect information source to find out more information about a person or organization.
The most frequently used service of any of these networks is the ability to rapidly post updated information about yourself, your interests, your photos, etc. With these services, many people have been drawn into a habit of constantly updating the entire world with useable personal information. Without the use of adequate security controls (or in some cases even their availability), a few simple searches can tell you a great deal about a person and their personal habits, interests, and associations.
In 2008, Nathan Hamiel and Shawn Moyer gave a presentation at the BlackHat security conference showing many of the vulnerabilities associated with the use of social networking sites. One of their best examples used the LinkedIn social network where they created a phony profile using the name of another well-known security professional (Marcus Ranum). Within a day, over 50 people had linked to the phony profile based on their professional relationships with the real Marcus Ranum. With almost no effort at all, Nathan and Shawn were able to trick a substantial number of people (many of them security professionals) into providing their email address and other personal information to them in the guise of this phony profile. A similar approach can still be used as part of your human reconnaissance to gather more information about individuals.
2.5.2. Open source tools
Aside from manual queries through search engines and directly through the social networking web sites, there are a number of open source tools which can assist you in human recon. These tools help provide some level of automation and can help speed up your data gathering activities tremendously. Keep in mind, however, that it is still you who has to analyze the data and link together the people with the organization. As with the other phases of reconnaissance, the analysis of the data is even more important than the collection of the data.
2.5.2.1. theHarvester
theHarvester is a python script included in BackTrack 4 (/pentest/enumeration/google/theharvester/). It's also available at www.edge-security.com/theHarvester.php where an updated version can be found. This tool automates a variety of searches for a domain then parses the results for email addresses. Using this tool can save hours in manual searches and dramatically speed up the process of gathering email addresses. You can then take these email addresses and search for them specifically in your favorite search engines as well as in social networking sites to see if any additional information can be gathered.
theharvester.py USAGE
How to use:
python theharvester.py -d [domain] -l [results limit] -b [data source]
Input fields:
[domain] is a specific domain to search for.
[results limit] allows you to set a limit to the number of results you want to search through.
[data source] is the search engine to use. Some values for this are: google, bing, pgp, and linkedin.
Output:
Displays a list of email accounts and hosts to the screen. This can be piped to a file if needed.
Typical output:
root@bt:~/theHarvester# python theHarvester.py -d syngress.com -l 500 -b google
∗∗∗∗∗∗∗∗∗∗∗∗∗∗∗∗∗∗∗∗∗∗∗∗∗∗∗∗∗∗∗∗∗∗∗∗∗
∗TheHarvester Ver. 1.6
∗
∗Coded by Christian Martorella
∗
∗Edge-Security Research
∗
∗∗∗∗∗∗∗∗∗∗∗∗∗∗∗∗∗∗∗∗∗∗∗∗∗∗∗∗∗∗∗∗∗∗∗∗∗
Searching for syngress.com in google :
======================================
Limit: 500
Searching results: 0
Searching results: 100
Searching results: 200
Searching results: 300
Searching results: 400
Accounts found:
====================
solutions@syngress com
====================
Total results: 8
Hosts found:
====================
www.syngress.com
booksite.syngress.com
ebook___www.syngress.com
.syngress.com
listening.www.syngress.com
Www.syngress.com
…syngress.com
Syngress…syngress.com
___www.syngress.com
ftp.syngress.com
DC1.corp.syngress.com
Dc1.corp.syngress.com
[www.syngress.com
corp.syngress.com
solutions…syngress.com
amy…syngress.com
2.5.2.2. MetaGoofil
MetaGoofil is a metadata analyzer provided by Edge-Security (www.edge-security.com/metagoofil.php). Anytime a file is written using most office applications, some metadata is included in the file to indicate who the author is, where the file is stored, when it was written, etc. MetaGoofil utilizes a Google search to find documents which have extensions matching file types which typically store metadata from a specific domain.
The multi-step process for this is:
1. Search in Google using the site: and filetype: descriptors to isolate the search to files of specific types found within the target domain.
2. Download all of the files and extract the metadata.
3. Parse results for interesting information such as usernames, file paths, and even MAC addresses depending on the metadata available in the documents.
metagoofil.py USAGE
How to use:
python metagoofil.py -d [domain] -l [results limit] -f [filetype] -o [output file] -t [temp directory]
Input fields:
[domain] is a specific domain to search for.
[results limit] allows you to set a limit to the number of results you want to search through.
[file type] is the file type to scan for. Values for this include: all, pdf, doc, xls, ppt, odp, ods, etc.
[output file] is the html file to store the results in.
[temp directory] is where all of the documents will be downloaded for scanning.
Output:
Displays a list of user accounts, file paths, etc. and stores them to the output file as well.
Typical output:
root@bt:~/metagoofil# python metagoofil.py -d elsevier.com -l 10 -f all -o syngress.html -t /var/tmp
∗∗∗∗∗∗∗∗∗∗∗∗∗∗∗∗∗∗∗∗∗∗∗∗∗∗∗∗∗∗∗∗∗∗∗∗∗
∗MetaGooFil Ver. 1.4b
∗
∗Coded by Christian Martorella
∗
∗Edge-Security Research
∗
∗∗∗∗∗∗∗∗∗∗∗∗∗∗∗∗∗∗∗∗∗∗∗∗∗∗∗∗∗∗∗∗∗∗∗∗∗
[+] Command extract found, proceeding with leeching
[+] Searching in elsevier.com for: pdf
6780
[+] Total results in google: 6780
[+] Limit: 10
[+] Searching results: 0
[+] Directory /var/tmp already exist, reusing it
[ 1/20 ] http://www.elsevier.com/framework_aboutus/pdfs/Extended_Poisson_Games_and_the_Condorcet_Jury_Theorem.pdf
[ 2/20 ] http://www.elsevier.com/framework_aboutus/pdfs/prescott04.pdf
[ 3/20 ] http://www.elsevier.com/framework_aboutus/pdfs/Immortalization_human_cells_malignant_conversion1.pdf
…
[+] Searching in elsevier.com for: pptx
0
[+] Total results in google: 0
Usernames found:
================
Author(Jasper)
Administrator
Catherine Nielsen
Elsevier
Anonymous
mguillemet
…
Paths found:
============
N:prmprdMisc
C:Documents and SettingspjapsamApplication DataMicrosoftWord
C:Documents and SettingsjekilcoyMy Documents emp
…
[+] Process finished
2.5.3. Human recon summary
After gathering all of the information that you can using human reconnaissance, you may have found some additional entities associated with your target. For example, if you find that one of the employees of your target company also runs a home business, you may be able to penetrate a web site associated with this business to gather more data on your target. If you have gathered any additional domain names, go back through the prior reconnaissance phases and turn these into IPs for use with the verification phase.
2.6. Verification
We commence the verification phase with a list of IP ranges we derived from the footprinting phase. These ranges are considered targets because they contain hosts with names in the target domains, and the domains became targets as the result of the intelligence gathering exercise with which we began this whole process or the human recon phase. The additional data gathered from the human reconnaissance can be saved for future use.
2.6.1. Core technologies
The core technologies that we will be using here include some of our old friends such as WHOIS and DNS. These technologies are used extensively in verification as well as many other areas of penetration testing. Make sure that you have a very good understanding of them. In addition, we'll be looking into an additional technology called
virtual hosting and some related topics such as
IP subnetting and
Regional Internet Registries. These technologies are very commonly used and, if not well understood, can skew the results of our reconnaissance.
2.6.1.1. Virtual hosting
Virtual hosting is a method in which web servers are used to host more than one domain name, usually for web sites on the same IP address and computer. This is typically seen with web hosting providers; it is a cheaper method of hosting many web sites on one machine rather than one machine per web site per address.
Virtual hosts are defined by two bits of information found in the host header: the host name specified in the host section of the header, or the IP address. Name-based virtual hosting uses the host name specified by the client in the HTTP headers to map the client to the correct virtual host. With IP-based virtual hosting, the server uses the IP address of a connection to map the client to the correct virtual host. This means that each virtual host will have to have a separate IP address for each host, whereas name-based virtual hosts can share the same IP address on a server.
2.6.1.2. IP subnetting
IP subnetting is a broad and complex subject, and large enough on its own to be beyond the scope of this book. However, as subnetting is a core skill required to understand networks on the Internet, you are encouraged to make at least a cursory study of the concept.
At its very basic, a subnet is a way of dividing a very large network (such as the Internet) into smaller networks. Each subnet contains a number of IP addresses based on its class or subnet mask. The addresses associated to the subnet would be considered the IP range for the subnet. By knowing the IP range for a subnet for a specific host, you have a general idea of the potential IPs that could be assigned to an associated host within the same subnet.
If any of this terminology seemed foreign to you, you are highly encouraged to do some research on subnetting and on IP networks in general. This is crucial to being able to understand the network that you are attempting to penetrate as well as understanding how to properly verify the data you've collected so far in your reconnaissance. Some good information on subnetting in general can be found on TechRepublic at http://articles.techrepublic.com.com/5100-10878_11-5034563.html. You can refer to the information shown in Table 2.6 to see the most common classes of subnets.
2.6.1.3. The Regional Internet Registries
Five Regional Internet Registries (RIR) are responsible for the allocation and registration of Internet numbers. These are outlined in Table 2.7.
| Registry Acronym | Registry Name | Web Site |
|---|---|---|
| ARIN | American Registry for Internet Numbers | www.arin.net |
| RIPE | Réseaux IP Européens | www.ripe.net |
| ANIC | Asia Pacific Network Information Centre | www.apnic.net |
| AFRINIC | African Network Information Centre | www.afrinic.net |
| LACNIC | Latin America & Caribbean Network Information Centre | www.lacnic.net |
IANA assigns Internet numbers to the RIR in huge blocks of millions of addresses. Each IRIR then has the freedom to allocate those addresses based on their own policies. Sometimes addresses are allocated directly to the end-users, but usually they are allocated further to Local Internet Registries (LIRs) that are typically ISPs who then normally assign parts of their allocations to their customers. Virtual ISPs (vISPs) are customers of the bigger ISPs who purchase allocations and infrastructure from the larger ISPs and resell them to the general public. Corporations that have been assigned blocks of IPs in this way can, of course (at least technically), divide the block and do with it what they want, including reselling it to someone else.
According to the IANA policies, each RIR and LIR should make registration information available via WHOIS or RWHOIS services. The WHOIS database should contain IP addresses, Autonomous System (AS) numbers, organizations or customers that are associated with these resources, and related points of contact (POC). However, although IANA does what it can to exert influence on those groups to comply with this regulation, many of them simply don't, with the result that it's often very difficult to obtain accurate and current information regarding IP address allocations and assignments.
2.6.2. Approach
Up to this point, most of our approach has been based on DNS and DNS as a link between the real world and the cyberworld. There's no doubt that this is a logical way to proceed. The relationship between business people and the technical Internet world is probably the closest at the DNS domain name. Ask a CEO of a company what “AS” the company owns and you'll get a blank stare. Ask about the “MX” records and still you'll get a blank stare. However, ask about a web site and the domain name pops out easily—everybody loves a domain name.
For the verification phase, however, we begin to leave DNS behind and consider other technologies that verify our findings to date. Again, we'll consider a number of sub-phases under this heading:
• WHOIS and the Internet Registries
• Exploring the network boundary
• Reverse DNS verification
• Banners and web sites
2.6.2.1. WHOIS and the Internet Registries
Any assigned Internet number must be registered by one of the previously discussed Regional Internet Registries. “Internet numbers” includes both IP addresses (IPv4 and IPv6) as well as autonomous system numbers (see RFC 1930 (www.ietf.org/rfc/rfc1930.txt) for more information on these). All offer a web interface that allows us to query their databases for the registered owner of a given Internet number. In theory, these organizations, each in its respective region, are responsible for keeping track of who is using which IP addresses for the entire world. When this system works, it works very well.
Consider the case of Google's web site:
host www.google.com
www.google.com is an alias for www.l.google.com.
www.l.google.com has address 74.125.95.103
www.l.google.com has address 74.125.95.105
www.l.google.com has address 74.125.95.106
www.l.google.com has address 74.125.95.104
www.l.google.com has address 74.125.95.147
www.l.google.com has address 74.125.95.99
We can take Google's web site IP, enter it into the search field at the ARIN web site (www.arin.net), and are rewarded with an exact definition of the net block in which the IP resides. In this case, the block is indeed Google's own (see Fig. 2.23).

From the results returned by ARIN we now have an exact definition of the size of the net block in question (in this case, the class C assumption made earlier would have been way off).
At some (but not all) of the registries, recursive queries are possible, meaning that you can insert the name of the organization into the search field and obtain a list of all the network ranges assigned to that name (see Fig. 2.24).

Of course, we can perform these and other WHOIS queries using a standard command-line client. Sadly, however, the records kept by the registries are not always very accurate or up-to-date, and WHOIS queries will more often than not fail to return any useful information. When WHOIS fails us, we need to consider some of the other possible techniques.
NOTE
Remember that although the protocol used to query them may be the same, the registries for DNS domains and assigned Internet numbers are completely separate and are not associated with each other in any way. Do not make the mistake of viewing WHOIS as a database for both.
2.6.2.2. Exploring the network boundary
When a range of IP addresses is technically divided into smaller subnets, you can often discover the borders of these subnets using tools such as traceroute and TCP and Internet Control Message Protocol (ICMP) ping. The techniques used to achieve this are based on the fact that a network will usually behave differently at its border, which is at its network and broadcast address. Open source tools such as the Perl script qtrace are designed to do just that.
The qtrace tool works in much the same way as regular traceroute does, but applies the principles more cleverly for the task at hand. Given a list of IP addresses, qtrace will attempt to trace a route to each. Where the route differs between two adjacent IP addresses indicates a network border. To save time, qtrace begins tracing near the farthest point, not the nearest point, as normal traceroute does. As the “interesting” part of the route—where the route to two different IP addresses differs—is usually near the end of the route, the approach qtrace takes can make it considerably faster.
A well-known tool that can be useful at this stage of your attack is Nmap. If you use Nmap to perform an ICMP ping scan, it will detect and report IP addresses that generated duplicate results. An IP address that responds more than once to a single ICMP ping request is almost certainly one of three things: a subnet network address, a subnet broadcast address, or a multihome device such as a router. Whatever the cause, duplicate responses are interesting and they will tell us something about the network we're examining. Nmap flags such addresses with a convenient DUP! flag. Unfortunately, the factors required for this technique are not common on the Internet anymore, and one seldom sees this kind of behavior today.
This technique is part of verification, but as it involves an active scan of the target, it should be classified as enumeration for the purposes of this book. With that in mind, we discuss network scanning in some detail later in the next chapter, and will say no more on the subject here.
2.6.2.3. Reverse DNS verification
Based on our discussion of DNS previously in this chapter, you already know that DNS forward and reverse entries are stored in different zones and are therefore logically and technically quite separate from one another. The term reverse DNS seen in this context is thus quite misleading. As the authority for the reverse DNS zone most frequently lays with the registered owners of the IP block and not with the owner of the domain, studying the reverse entries for a given block can often be very revealing. We can do this with a tool called a reverse walker. We discuss one such tool, called dnsmap, in more detail later in this chapter.
TIP
It's easy to use Nmap to perform a DNS reverse walk of a given IP range:
nmap –sL 192.168.1.1–255
Notice that Nmap simply uses the host's locally configured DNS resolver for these lookups unless instructed otherwise.
Clearly, we can learn a lot about the ownership of a given subnet by examining the range and spread of the reverse DNS entries in that range—the more widely and densely hosts with relevant DNS names are found, the more likely it is that the range belongs to the target organization in question. If the range is known to belong to the target, and other DNS names emerge, those domains should also be considered targets and added to the list of domains for the next iteration of the process.
Let's use Nmap as a reverse DNS walker to examine the subnet in which Syngress' primary mail exchanger resides—207.126.147.0/24. The scan generates too much data to be repeated here, but a selected sample of the results will serve to prove the point:
root@bt:~# nmap -sL 207.126.147.1-255
Starting Nmap 5.21 ( http://nmap.org ) at 2010-06-20 12:45 CDT
Nmap scan report for 207.126.147.1
Nmap scan report for 207.126.147.2
Nmap scan report for 207.126.147.3
Nmap scan report for 207.126.147.4
Nmap scan report for 207.126.147.5
Nmap scan report for 207.126.147.6
Nmap scan report for 207.126.147.7
Nmap scan report for 207.126.147.8
Nmap scan report for 207.126.147.9
Nmap scan report for s200a1.psmtp.com (207.126.147.10)
Nmap scan report for outbounds200.ga.obsmtp.com (207.126.147.11)
Nmap scan report for s200a2.psmtp.com (207.126.147.12)
Nmap scan report for s200b1.psmtp.com (207.126.147.13)
Nmap scan report for s200b2.psmtp.com (207.126.147.14)
Based on these results, we have identified a few more hosts within the target IP range that may be useful to us later.
2.6.2.4. Banners and web sites
When you have finally exhausted your other options, you can try to deduce the ownership of an IP or IP range by examining the service banners for mail servers, FTP servers, web servers, and the like residing in that space. For the most useful services, this is easy to do using a tool such as telnet or netcat, as in Fig. 2.25.
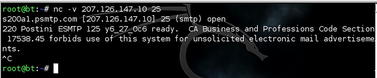
In environments in which the WHOIS records are not accurate and no reverse DNS entries exist, these kinds of techniques may be necessary to discover who's actually using a given host.
Visit web sites also, in the hope that they'll reveal their owners. During this process, be sure to take special care with regard to virtually hosted sites, which may be shared by numerous organizations and therefore perhaps not be targets. Web servers may also tell us a lot about their owners. For example, if we connect to a web server we believe belongs to Syngress, and we're shown a Syngress page, that tends to support our belief regarding the ownership (see Fig. 2.26).
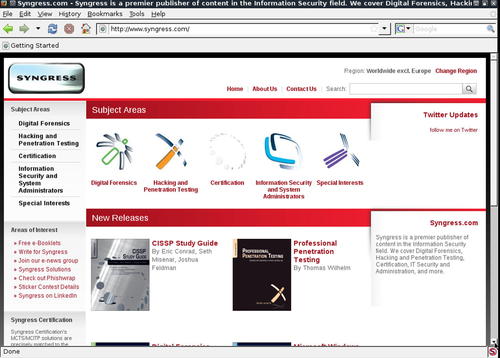 |
| FIGURE 2.26 |
However, if we resolve the host name to its IP address—69.163.177.2—we obtain a different result, as shown in Fig. 2.27.
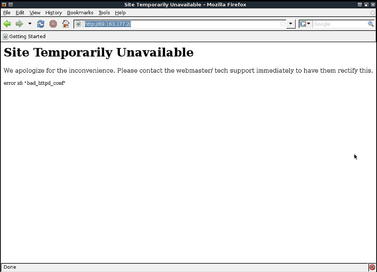
The fact that there isn't a default site on this server suggests that the server may be shared by a number of different sites, and thus the server may not “belong” wholly to the target organization in question. Please refer to the relevant section in this chapter where we previously discussed virtual hosting to fully understand how this works. This is a typical scenario and one for which we should remain alert.
2.6.3. Open source tools
During the verification phase of the reconnaissance, our objective is to test the findings generated by our methodology and tools. Obviously, we need to use different tools from those used thus far or at the very least use our existing tools differently. As it turns out, the latter is the more common case, as few new tools are introduced specifically for the verification phase. The few new tools we'll be using as well as a new way to use an existing tool are described in this section.
2.6.3.1. Regional Internet Registries
We've already covered an example of using the ARIN web site to look up WHOIS information for Google. Each of the RIRs has their own web site (listed in Table 2.7) which can be used to query the information contained in their database. These are excellent tools to use for verifying information found in automated WHOIS queries performed in prior reconnaissance phases.
2.6.3.2. Bing.com: virtual host enumeration (www.bing.com)
Microsoft's Bing search engine has the ability to enumerate virtually hosted sites on a given IP address. This was a feature previously available using their Live Search engine and fortunately it was carried over to the new engine. Supply an IP address of a web server using the Bing operator
ip: and the search engine will list all of the web sites/host names that it has in its database that may match the IP address and/or host name (see Fig. 2.28).

2.6.3.3. IP WHOIS
We mentioned the WHOIS command-line tool previously, but specifically to look up domain registrant information; in the verification phase, you use WHOIS to look up information regarding owners of an IP address/block. Information returned may include IP block size, IP block owner, and owner contact information (see Fig. 2.29).

2.6.3.4. dnsmap
dnsmap is a utility included in BackTrack 4 (/pentest/enumeration/dns/dnsmap/) and available at http://www.gnucitizen.org/static/blog/2009/03/dnsmap-0222tar.gz which automates reverse DNS lookups either using a word list that you provide or its own internal word list.
dnsmap USAGE
How to use:
dnsmap [domain] -r [results file]
Input fields:
[
domain] is the target domain, for example, syngress.com.
Output:
[results file] stores the results of the scan.
Output format:
Host name followed by all IP addresses found for that host.
Typical output:
[+] searching (sub)domains for syngress.com using built-in wordlist
[+] using maximum random delay of 10 millisecond(s) between requests
mysql.syngress.com
IP address #1: 69.163.167.100
search.syngress.com
IP address #1: 208.68.139.38
secure.syngress.com
IP address #1: 208.68.139.38
services.syngress.com
IP address #1: 208.68.139.38
shop.syngress.com
IP address #1: 208.68.139.38
shopping.syngress.com
IP address #1: 208.68.139.38
uk.syngress.com
IP address #1: 208.68.139.38
upload.syngress.com
IP address #1: 208.68.139.38
[+] 8 (sub)domains and 8 IP address(es) found
[+] completion time: 267 second(s)
2.6.4. Verification summary
The process of target verification is no exact science and can be surprisingly tricky. In the end, the Internet remains largely unregulated and therefore occasionally difficult to navigate. Should all else fail, you may need to resort to actually asking the organization in question or its service providers to assist you in verifying the targets you have.
At the end of this phase, you should have a list of well-defined IP subnet blocks that are strongly associated with the organization you're targeting and are ready to be used in the next phases of your test.
2.7. Case study: the tools in action
In this section, we will demonstrate some of the technologies, techniques, and tools of reconnaissance in action. Because of the complexity and recursive nature of the reconnaissance process, we won't attempt to complete the entire exercise here. We will, however, touch on the most pertinent areas.
2.7.1. Intelligence gathering, footprinting, and verification of an Internet-connected network
In this section, we will perform a basic first-run reconnaissance of the SensePost Internet infrastructure. During this phase, we are bombarded with tons of information, contact details, DNS information and IP addresses, and so on. We recommend that you save all data in a well-structured format where you can retrieve it easily at any time. One way to do this is to use the BasKet Note Pads tool found at basket.kde.org. This is a basic note-taking application which allows you to organize and record any notes, screenshots, etc. that you may generate during your penetration testing.
2.7.1.1. Intelligence gathering
We begin our intelligence gathering phase with a simple search on SensePost using Google, as shown in Fig. 2.30. The search reveals the company's corporate web site, www.sensepost.com. The Google search also reveals some other web sites linking to SensePost as well as a company profile on LinkedIn. In this phase, all sorts of information is important and should be recorded, particularly email addresses, users, web site links, and most important, domains that may seem to be connected to the SensePost infrastructure.

Browsing through the SensePost web site's content, including news articles and links, we find important pages, such as the “About Us” page, where SensePost lists its parent affiliation (SecureData Holdings). We record the domain for this web site as well as those linked from the SecureData Holdings web site (www.securedataholdings.co.za) for WHOIS inspection. It's important to browse these sites for any clues to relationships between the two companies. Further inspection of the site reveals a SensePost-provided vulnerability management service named HackRack. Using Google and searching for keywords such as SensePost and HackRack reveals a new domain: www.hackrack.co.za.
TIP
Keep a journal of notes as you work, and record everything of interest that you see. In essence, hacking is a percentage game and the key to succeeding or failing to compromise your target may just lie in the tiniest piece of information that you stumble upon along the way.
Using any search engine or social networking site, do a search for your target—not necessarily an automated data grab, but a simple search. Going through the data by hand for a little while may give you some really interesting information. It may not directly relate to your task at hand, but could be useful later.
Record all of it! You never know what you'll be able to use.
We carefully examine registrant information (Fig. 2.31) of all discovered domains and record such things as contact names, email addresses, name servers, and organizational information. Looking at the sensepost.com registrant information, the contact information points to a Jaco van Graan, and an email address is identified.
 |
| FIGURE 2.31 WHOIS Information for sensepost.com. |
A Google search for that email address leads us to a post on the SensePost blog (http://www.sensepost.com/blog/?find=Hope?) which details the names and some additional information about their current and former members, such as Jaco van Graan, who it mentions was part of an accounting and audit practice called TJC and is currently the Financial Director of SensePost. Not much information out there about TJC, so we'll just record that for later and move on.
A WHOIS query for www.hackrack.co.za gives us even more information. Among other things, it reveals to us the name of person holding a very important title:
5a. tec
: Marco Slaviero
5b. tectitle
: Former head sprinkles-counter
5c. teccompany
: SensePost
5d. tecpostaladdr
: PO Box 176, Groenkloof, 0027,South Africa
5e. tecphone
: 012 460 0880
5f. tecfax
: 012 460 0885
5g. tecemail
: [email protected]
Naturally the “Former head sprinkles-counter” is someone we should try to gather more information about. A few more Google queries later and we are able to find out his association with SensePost as well as the fact that he has presented at multiple security conferences and was part of the review committee for the ISSA South Africa conference. Again, nothing directly useful here, but further queries on other names could provide links to personal pages and other domains which we could further examine.
Performing a WHOIS lookup on hackrack.co.za also confirms that the domain does in fact belong to SensePost, as it contains similar registration information. Performing WHOIS lookups of each newly discovered domain is essential. It is important to confirm that the domains have some sort of relevance to the target organization.
At this point, we analyze the SensePost corporate web site with BiLE (both BiLE.pl and BiLE-weigh.pl), which will deduce more possibly related domains using HTTP link analysis. It is not necessary to go through the entire list of domains BiLE will return as their relevance decreases rapidly. We usually look at only the top 0.1 percent of highest-scoring domains reported by BiLE (Fig. 2.32).
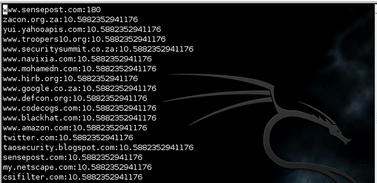
Remember that the results we see in Fig. 2.32 simply indicate strong relationships on the web. We still need to investigate each relationship to understand its significance in the real world.
For each confirmed domain, we then perform a DNS name expansion search via Netcraft. We may discover some new domains in this manner and be able to use them later. Please note, as previously mentioned, that informational resources such as Netcraft should be used as an additional resource and not as an authority.
TIP
In some cases, you may want to simply extract out the sorted list of names from the ∗.mine.sorted file generated by BiLE-weigh. One way to quickly do this is:
awk -F":" '{ print $1 > "sensepost.domains";} ' sensepost.mine.sorted
This list of domains can later be used with other tools for further reconnaissance.
At this point, we process all discovered domains through the tld-expand.pl tool that forms part of the BiLE software suite. tld-expand will build a list of matching domains in other TLDs. We will examine all domains listed by tld-expand via WHOIS registrant information to confirm relevance (see Fig. 2.33).

We can see from Fig. 2.33 that the tld-expand results have returned a little bit of data for us. It should be obvious that SensePost has not registered all of these domains. This is a good example of TLD squatting. Unscrupulous ccTLD Registries use this practice (also called sucking or wildcarding) to catch requests for domains that do not yet exist in the hope of selling those domains to the requestor. Verisign followed this practice for a while until finally bowing to public pressure. Bearing this in mind, we use the vetting phase to identify these false positives while being careful not to accidentally exclude any domains that may really be relevant. This is done by performing WHOIS queries on the domains as well as simply browsing to them and looking at the web site itself.
At this point, we've built a list of DNS domain names that we consider to be relevant to SensePost. We've followed the steps to expand a single domain into multiple lists of domains and we've vetted the domains using WHOIS, Google, browsing, and other tools to verify their relevance. We're now ready to proceed to the next major phase of reconnaissance: footprinting.
2.7.1.2. Footprinting
In the footprinting phase, we want to derive as many IP/host name mappings as we possibly can from the domains gathered in the previous phase. In this phase, we'll perform various DNS forward lookups and attempt zone transfers and DNS brute force. Fig. 2.34 shows host lookups on multiple domains.

By examining the records for sensepost.com and hackrack.com we discover a couple of new hosts. We then add these to the target list, and take it through the whole process up to this point. Another dig scan using the “AXFR” option shows us that DNS zone transfers aren't allowed. With the assumption that certain DNS names are commonly used, the next step is to perform a forward DNS brute force. We will use the PERL tool jarf-dnsbrute.pl to perform the brute force. We will run each domain in our database through DigDug. Fig. 2.35 shows some example results we get with DigDug.

DigDug works relatively well and we retrieve a large number of host names and IP addresses. For the moment, we assume that each IP found belongs to a class [C]. During the verification phase, we will attempt to determine actual block sizes that these IPs fall under.
2.7.1.3. Verification
We begin the verification phase with a list of IP ranges that we derived from the footprinting phase. These ranges are considered targets because they contain hosts with names in the target domains. Up to this point, our entire approach has been based on DNS and DNS as a link between the real world and the cyberworld. We now start to consider the IPs in the blocks identified, regardless of their DNS names.
We first perform IP WHOIS lookup requests on at least one IP address in every block we have. Our aim is to retrieve an exact definition of the net block in which the IP resides. In this case, our attempts seem pretty fruitless, as you can see in Fig. 2.36. For the IP 168.210.134.6 (SensePost's primary MX record) we receive a class (B) definition registered to Dimension Data, a large South African IT integrator. At first glance this appears to be incorrect, and as we don't really trust WHOIS information, we proceed with the next set of steps.

Now we can use the dnsmap utility to do some verification and potentially come up with some additional host/IP combinations. Fig. 2.37 shows the results of this scan.
 |
| FIGURE 2.37 dnsmap Results for sensepost.com. |
At this point, it is clear that there is a strong relationship between SensePost and SecureData Holdings. We will add the securedataholdings.co.za domain to the targets list in the next iteration of the reconnaissance process and then repeat the entire process until no new information regarding domains, IPs, or hosts is found. Once we feel confident that the organization is fully mapped, we will have a list of well-defined IP subnet blocks that are strongly associated with SensePost. We can then proceed with the next phase of our attack.
2.7.2. Case study summary
In this case study, we have used all of the elements of the reconnaissance methodology discussed so far to gather as much information on SensePost as we could without actually “touching” the target. Based on the information we've gathered, we can successfully move forward into the final reconnaissance phase of validity scanning and then move on to enumeration. Again, ensure that at this point in your reconnaissance you have documented all of the verified details you have gathered. You will find that having this data recorded in a logical and useable manner will speed up the penetration testing process as we continue.
2.8. Hands-on challenge
We've gone through a lot of information related to reconnaissance in this chapter. We've covered the phases of reconnaissance, the core technologies used for each phase, the approaches to use for reconnaissance in penetration testing, and a variety of open source tools available for your use. Finally, we walked through a case study showing how to use what we've learned in a real-world scenario.
Now it's your turn. Your challenge is to pick an organization and perform reconnaissance on it. Since this is a non-intrusive information gathering exercise, you can choose any organization that interests you. Your goal should be to find and assemble documentation with the following information:
• A list of domain names associated with the target.
• A list of other organizations which can be linked to the target.
• A list of host names for servers owned by or associated with the target.
• A list of IP addresses for as many hosts as possible associated with the target.
• An organizational chart with names, email addresses, contact information, and any personal details you can find for people related to the organization.
• A subset of this information which has been verified as correct and strongly associated with the target organization.
This pile of information is what you need to move forward into the next phases of penetration testing. Remember, in the early phases of reconnaissance, you should collect as much data as possible whether it is guaranteed to be relevant or not. Then use the verification phase to reduce the data to only the relevant information that can be shown to be strongly associated to your target.
Summary
In this chapter, we have gone over a great deal of information around the reconnaissance phase of penetration testing. We've covered the methodology of reconnaissance itself and how reconnaissance differs from more intrusive portions of penetration testing. We've also discussed many of the core technologies used in reconnaissance, most of which will also be applied in other phases of your work. Some of the many open source tools available for your use were discussed and demonstrated and we talked about how to use these tools in real-world scenarios. Finally, you had an opportunity to try it yourself and use the methods and tools we discussed to start the penetration testing process on a real target. All of this should give you a good understanding of reconnaissance and prepare you for our next penetration testing phase, scanning and enumeration.
Endnotes
[1]
Department of the Army,
The infantry reconnaissance platoon and squad.
FM 7-92 (
1992)Department of the Army,
Washington, DC;
4-1.
[2]
SensePost Research,
The role of non obvious relationships in the foot printing process.
(
2003) ;
<www.sensepost.com/restricted/BH_footprint2002_paper.pdf> (
2003);
[accessed 17.06.10].
..................Content has been hidden....................
You can't read the all page of ebook, please click here login for view all page.