
Chapter 3. Scanning
Information in This Chapter:
■ Pings and Ping Sweeps
■ Port Scanning
■ Vulnerability Scanning
This chapter focuses on the activity of scanning. Two main types of scanning are discussed: port scanning and vulnerability scanning. The chapter begins with quick overview of pings and ping sweeps and then moves into the basics of port scanning. The port scanner Nmap is introduced and several different types of scans are discussed. Actual examples and output of the various scans are demonstrated. The concept of vulnerability scanning is introduced through the use of Nessus. Practical examples are presented and discussed throughout the chapter.
Keywords
Nessus, Nmap, ping sweeps, port scanning, vulnerability scanning
Introduction
Once step 1 has been completed, you should have a solid understanding of our target and a detailed collection of gathered information. This data mainly includes our collection of IP addresses. Recall that one of the final steps in reconnaissance was to create a list of IP addresses that both belonged to the target and that we were authorized to attack. This list is the key to transitioning from step 1 to step 2. In step 1, we mapped our gathered information to attackable IP addresses. In step 2, we will map IP addresses to open ports and services.
It is important to understand that it is the job of most networks to allow at least some communication to flow into and out of their borders. Networks that exist in complete isolation with no Internet connection, no services like e-mail or web traffic, are very rare today. Each service, connection, or potential connection to another network provides a potential foothold for an attacker. Scanning is the process of identifying live systems and the services that exist on those systems.
Step 2 begins by breaking the scanning process into three distinct phases:
2.1 Determining if a system is alive
2.2 Port scanning the system
2.3 Scanning the system for vulnerabilities
Later in this chapter we will discuss tools that combine these phases into a single process; however, for the purpose of introducing and learning new material, it is best to cover them separately.
Step 2.1 is the process of determining whether a target system is turned on and capable of communicating or interacting with our machine. This step is the least reliable and we should always continue with steps 2.2 and 2.3 regardless of the outcome of this test. Regardless, it is still important to conduct this step and make note of any machines that respond as alive.
Step 2.2 is the process of identifying the specific ports and services running a particular host.
Simply defined, ports provide a way or location for software and networks to communicate with hardware like a computer. A port is a data connection that allows a computer to exchange information with other computers, software, or devices. Prior to the interconnection of computers and networks, information was passed between machines through the use of physical media like floppy drives. Once computers were connected to a network, they needed an efficient means for communicating with each other. Ports were the answer. The use of multiple ports allows for simultaneous communication without the need to wait.
To further clarify this point for those of you who are unfamiliar with ports and computers, it may be helpful to consider the following analogy: Think of your computer as a house. There are many different ways that a person can enter the house. Each of the different ways to enter your house (computer) is like a computer port. Just like a port on a computer, all the entryways allow traffic to flow into and out of your home.
Imagine a house with unique numbers over each of the potential entry points. Most people will use the front door. However, the owners may come in through the garage door. Sometimes, people enter the house from a backdoor or sliding glass door off the deck. An unconventional person may climb through a window or attempt to squeeze through the doggie door!
Regardless of how you get into your house, each of these examples corresponds nicely with the analogy of computers and ports. Recall that ports are like gateways to your computer. Some ports are more common and receive lots of traffic (just like your front door); others are more obscure and rarely used (by humans) like the doggie door.
Many common network services run on standard port numbers and can give attackers an indication as to the function of the target system. Table 3.1 provides a list of common ports and their corresponding services.
| Port Number | Service |
|---|---|
| 20 | FTP data transfer |
| 21 | FTP control |
| 22 | SSH |
| 23 | Telnet |
| 25 | SMTP (e-mail) |
| 53 | DNS |
| 80 | HTTP |
| 443 | HTTPS |
Obviously, there are many more ports and services. However, this list serves as a basic introduction to common ports that are utilized by organizations today. You will see these services repeatedly as you begin to port scan your targets.
We need to pay special attention to the discovery of any open ports on our target systems. You should make detailed notes and save the output of any tool run in step 2.2. Remember every open port is a potential gateway into the target system.
The final step in scanning is step 2.3, vulnerability scanning. Vulnerability scanning is the process of locating and identifying known weaknesses in the services and software running on a target machine. The discovery of known vulnerabilities on a target system can be like finding the pot of gold at the end of a rainbow. Many systems today can be exploited directly with little or no skill when a machine is discovered to have a known vulnerability.
It is important to mention that there is a difference in the severity of various vulnerabilities. Some vulnerabilities may present little opportunities for an attacker, whereas others will allow you to completely take over and control a machine with a single click of a button. We will discuss the various levels of vulnerabilities in more detail later in the chapter.
In the past, I have had several clients ask me to attempt to gain access to some sensitive server on an internal network. Obviously in these cases, the final target is not directly accessible via the Internet. Whether we are going after some supersecret internal machine or simply attempting to gain access to a network, we usually begin by scanning the perimeter devices. The reason for this is simple, we start at the perimeter because most of the information we have from step 1 belongs to perimeter devices. Also, with many of today’s technologies and architectures, it is not always possible to reach directly into a network. As a result, we often employ a hacking methodology where we chain a series of machines together in order to reach our final target. First we conquer a perimeter device, then we move to an internal machine.
Perimeter devices are computers, servers, routers, firewalls, or other equipment, which sit at the outer edge of a protected network. These devices serve as an intermediary between protected internal resources and external networks like the Internet.
As previously mentioned, we often begin by scanning the perimeter devices to look for weaknesses or vulnerabilities that will allow us to gain entry into the network. Once we have successfully gained access (which we will discuss in Chapter 4), the scanning process can be repeated from the newly owned machine, in order to find additional targets. This cyclical process allows us to create a very detailed internal network map and discover the critical infrastructure hiding behind the corporate firewall.
Pings and Ping Sweeps
A ping is a special type of network packet called an ICMP packet. Pings work by sending specific types of network traffic, called ICMP Echo Request packets, to a specific interface on a computer or network device. If the device (and the attached network card) that received the ping packet is turned on and not restricted from responding, the receiving machine will respond back to the originating machine with an Echo Reply packet. Aside from telling us that a host is alive and accepting traffic, pings provide other valuable information including the total time it took for the packet to travel to the target and return. Pings also report traffic loss that can be used to gauge the reliability of a network connection. Figure 3.1 shows an example of the ping command.
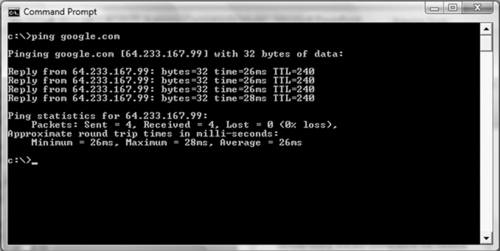
The first line in Figure 3.1 shows the ping command being issued. Please note, this particular screenshot was taken from a Windows machine. All modern versions of Linux and Windows include the ping command. The major difference between the Linux and Windows version is that by default the Windows ping command will send four Echo Request packets and automatically terminate, whereas the Linux ping command will continue to send Echo Request commands until you force it to stop. On a Linux system, you can force a ping command to stop sending packets by using the CNTL+C combination.
Let us focus our attention on the third line that starts with “Reply from.” This line is telling us that our ICMP Echo Request packet successfully reached the IP address of 64.233.167.99 and that the IP address sent a Reply packet back to our machine. The “bytes=32” in the line indicate the size of the packet being sent. The “time=26ms” is telling you how long the entire round trip took for the packets to travel to and from the target. The “TTL=240” is a Time To Live value; this is used to determine the maximum number of hops the packet will take before automatically expiring.
Now that you have a basic understanding of how the ping command works, let us see how we leverage this tool as a hacker. Because we know that pings can be useful in determining if a host is alive, we can use the ping tool as a host discovery service. Unfortunately, pinging every potential machine on even a small network would be highly inefficient. Fortunately for us, there are several tools that allow us to conduct ping sweeps. A ping sweep is a series of pings that are automatically sent to a range of IP addresses, rather than manually entering the individual target’s address.
The simplest way to run a ping sweep is with a tool called FPing. FPing is built into Backtrack and is run from the terminal. The tool can also be downloaded for Windows. The easiest way to run FPing is to open terminal window and type the following: fping –a –g 172.16.45.1 172.16.45.254>hosts.txt. The “–a” switch is used to show only the live hosts in our output. This makes our final report much cleaner and easier to read. The “–g” is used to specify the range of IP addresses we want to sweep. You need to enter both the beginning and the ending IP addresses. In this example, we scanned all the IPs from 172.16.45.1 to 172.16.45.254. The “>” character is used to pipe the output to a file, and the hosts.txt is used to specify the name of the file our results will be saved to. There are many other switches that can be used to change the functionality of the FPing command. You can view them all by entering the following command in a terminal window:
Once you have run the command above, you can open the hosts.txt file that was created to find a list of target machines that responded to our pings. These IP addresses should be added to your target list for later investigation. It is important to remember that not every host will respond to ping requests; some hosts may be firewalled or otherwise blocking ping packets.
Port Scanning
Now that you have a list of targets, we can continue our examination by scanning the ports on each of the IP addresses we found. Recall that the goal of port scanning is to identify which ports are open and determine what services are available on our target system. A service is a specific job or task that the computer performs like e-mail, FTP, printing, or providing web pages. Port scanning is like knocking on the various doors and windows of a house and seeing who answers. For example if we find that port 80 is open, we can attempt a connection to the port and oftentimes get specific information about the web server that is listening on that port.
There are a total of 65,536 (0–65,535) ports on every computer. Ports can be either TCP or UDP depending on the service utilizing the port or nature of the communication occurring on the port. We scan computers to see what ports are in use or open. This gives us a better picture of the purpose of the machine, which, in turn, gives us a better idea about how to attack the box.
If you had to choose only one tool to conduct port scanning, you would undoubtedly choose Nmap. Nmap was written by Gordon “Fyodor” Lyon and is available for free from www.insecure.org and is built into many of today’s Linux distributions including Backtrack. Although it is possible to run Nmap from a graphical user interface (GUI), we are going to focus on using the terminal to run our port scans.
People who are new to security and hacking often ask why they should learn to use the command line or terminal version of a tool rather than relying on a GUI. These same people often complain that using the terminal is not as easy. The response is very simple. First, using the command line version of a tool will allow you to learn the switches and options that change the behavior of your tool. This gives you more flexibility, more granular control, and a better understanding of the tool you are running. Second (and maybe more importantly), rarely does hacking work like it is portrayed in the movies. Finally, the command line can be scripted. Scripting and automation become key when you want to advance your skillset to the next level.
Remember the movie Swordfish where Hugh Jackman is creating a virus? He is dancing and drinking wine, and apparently building a virus in a very graphical, GUI-driven way. The point is that this is just not realistic. Most people who are new to hacking assume that hacking is a very GUI-oriented task: that once you take over a machine you are presented with a desktop and control of the mouse and screen. Although this scenario is possible, it is rarely the case. In most jobs, your main goal will be to get an administrative shell or backdoor access to the machine. This shell is literally a terminal that allows you to control the target PC from the command line. It looks and feels just like the terminals that we have been working with, except a remote shell allows you to enter the commands on your computer terminal and have them executed on the target machine. So learning the command line version of your tools is critical because once you have control of a machine you will need to upload your tools and interact with the target through a command prompt, not through a GUI.
Let us assume you still refuse to learn the command line. Let us also assume that with the use of several tools you were able to gain access to a target system. When you gain access to that system, you will not be presented with a GUI but rather with a command prompt. If you do not know how to copy files, add users, modify documents, and make other changes through the command line, your work of owning the target will have been in vain. You will be stuck, like Moses who was able to see the promised land but not allowed to enter!
When we conduct a port scan, our tool will literally create a packet and send it to each designated port on the machine. The goal is to determine what kind of a response we get from the target port. Different types of port scans can produce different results. It is important to understand the type of scan you are running as well as the expected output of that scan.
The Three-Way Handshake
When two machines on any given network want to communicate using TCP, they do so by completing the three-way handshake. This process is very similar to a phone conversation (at least before everyone had caller ID!). When you want to talk to someone on the phone, you pick up the phone and dial the number, the receiver picks up the ringing phone not knowing who the caller is and says “Hello?,” the original caller then introduces himself by saying “Hi, this is John!” In response to this, the original receiver will often acknowledge the caller by saying “Oh, hi John!” At this point both people have enough information for the conversation to continue as normal.
Computers work much the same way. When two computers want to talk, they go through a similar process. The first computer connects to the second computer by sending a SYN packet to a specified port number. If the second computer is listening, it will respond with a SYN/ACK. When the first computer receives the SYN/ACK, it replies with an ACK packet. At this point, the two machines can communicate normally. In our phone example above, the original dialer is like sending the SYN packet. The receiver picking up the phone and saying “Hello?” is like the SYN/ACK packet and the original caller introducing himself is like the ACK packet.
Using Nmap to Perform a TCP Connect Scan
The first scan we will look at is called the TCP Connect scan. This scan is often considered the most basic and stable of all the port scans because Nmap attempts to complete the three-way handshake on each port specified in the Nmap command. Because this scan actually completes the three-way handshake and then tears down the connection gracefully, there is little chance that you will flood the target system and cause it to crash.
If you do not specify a specific port range Nmap will scan the 1,000 most common ports. Unless you are in a great hurry, it is always recommended specifying all ports. The reason is that oftentimes crafty administrators will attempt to obscure a service by running it on a nonstandard port. You can scan all the ports by specifying “-p-” when running Nmap. Using the “–PN” switch with every Nmap scan is recommended. Utilizing the “–PN” switch will cause Nmap to disable host discovery and force the tool to scan every system as if it were alive. This is extremely useful for discovering additional systems and ports that otherwise may be missed.
To run a TCP connect, we issue the following command from a terminal:
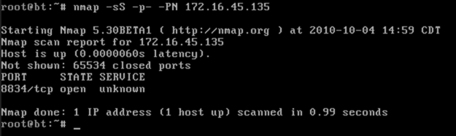
nmap –sT -p- -PN 172.16.45.135
Take a moment to review this command. The first word “nmap” causes the Nmap port scanner to start. The second command “–sT” tells Nmap to run a TCP Connect scan. Specifically, to break this switch down even further, the “-s” is used to tell Nmap what kind of scan we want to run. The “-T” in the “-sT” is used to run a scan type of TCP Connect. We use the “-p-” to tell Nmap to scan all the ports not just the default 1,000. We use the “–PN” switch to skip the host discovery phase and scan all the addresses as if the system were alive and responding to ping requests. Finally, we specify the target IP address; obviously, your target’s IP address will be different from the one shown in the screenshot! Figure 3.2 shows the TCP Connect Nmap scan and the output that was received when run against the target.

Oftentimes, we need to run our scans against an entire subnet, or range of IP addresses. When this is the case, we can instruct Nmap to scan a continuous range of IPs by simply appending the last octet of the ending IP address onto the scan like so:
Issuing this command will cause Nmap to port scan all the hosts between the IP addresses 172.16.45.1 and 172.16.45.254. Just like ping sweeps, this is a very powerful technique that can greatly improve the productivity of your scanning life!
If you need to scan a series of hosts that are not in sequential order, you can create a text file and list each host IP address on a single line. Then add the “–iL path_to_the_text_file” switch to your Nmap command. Doing this allows you to scan all of your target hosts from a single command. Whenever possible, always try to create a single text file containing all of your target IPs. Most of the tools we discuss have a switch or mechanism for loading this text file, which saves the effort or retyping, but more importantly, reduces the number of times you will type each IP address and therefore reduces the chance that you will fat-finger the IP address and scan the wrong target.
Using Nmap to Perform a SYN Scan
The SYN Scan is arguably the most popular Nmap port scan. There are many reasons for its popularity, including the fact that it happens to be the default Nmap scan. If you run the Nmap command without specifying a scan type (using the –s switch), Nmap will use the SYN scan by default.
Aside from the fact that the SYN scan is the default choice, it is also popular because it is faster than the TCP connect scan and yet remains quite safe, with little chance of DOS’ing or crashing the target system. SYN scans are faster because rather than completing the entire three-way handshake, it only completes the first two steps.
In a SYN scan, the scanning machine sends a SYN packet to the target and the target responds with a SYN/ACK (assuming the port is in use and not filtered) just like it did when we ran a TCP Connect scan. However, at this point, rather than sending the traditional ACK packet, the scanning machine sends an RST (reset) packet to the target. The reset packet tells the target machine to disregard any previous packets and close the connection between the two machines. It should be clear that the speed advantage of the SYN scan over the TCP Connect scan comes from the fact that there are less packets sent between the hosts when using a SYN scan rather than a TCP Connect scan. Although a few packets may not sound like a big advantage, it can add up quickly when scanning multiple hosts.
If we consider the example of comparing the three-way handshake to a phone call, SYN scans would be like calling someone up, having the receiver pick up the phone and saying “Hello?”, and then simply hanging up on the person without a single word.
Another advantage to the SYN scan is that in some instances, it provides a level of obscurity or stealth. Because of this feature, the SYN scan is often referred to as the “Stealth Scan.” The stealth portion of this scan comes from the fact that because the three-way handshake is never fully completed, the official connection was never 100 percent established. There are applications and log files that require the completion of the three-way handshake before they begin recording activity. As a result, if a log file only records completed connections and the SYN scan never officially completes a single connection, this scan may be undetected by some applications. Please note, this is the exception and not the rule. All modern firewalls and intrusion detection systems in use today will detect and report a SYN scan!
Because the SYN scan is the default Nmap scan, we do not technically need to specify the scan type with the “–s” switch. However, because this book focuses on the basics, it is worth the effort to get into the habit of specifying your scan type.
To run a SYN scan, you can open a terminal window and issue the following command:
nmap –sS -p- -PN 172.16.45.135
This command is exactly the same as the previous example with one exception—rather than using an “–sT” we used an “–sS.” This instructs Nmap to run a SYN scan rather than a TCP Connect scan. The scan types are easy to remember because a TCP Connect scan begins with the letter “T,” whereas the SYN scan begins with the letter “S.” Each of the other switches was explained in the section above. Please review the “Using Nmap to Complete a TCP Connect Scan” for a detailed breakdown of the switches in this command. Figure 3.3 shows the output of a SYN scan against our target.
Take a moment to compare the total run time between the two scans in Figure 3.2 and Figure 3.3. Even in our simple environment against a single host, the SYN scan completed its execution faster.
Using Nmap to Perform UDP Scans
One of the most common port scanning mistakes of new penetration testers is that they overlook UDP. These aspiring hackers oftentimes fire up Nmap, run a single scan (typically a SYN scan), and move onto vulnerability scanning. Do not neglect to scan UDP ports! Failing to scan your target for open UDP ports is like reading the Cliff Notes version of a book. You will probably have a solid understanding of the story, but you arre likely to miss many of the details.
It is important to understand that both TCP Connect scans and SYN scans use TCP as the basis for their communication. TCP is an acronym for Transmission Control Protocol. UDP is an acronym for User Datagram Protocol. Computers can communicate with one another using either TCP or UDP; however, there are several key differences between the two protocols.
TCP is considered a “connection oriented protocol” because it requires that the communication between both the sender and the receiver stays in sync. This process ensures that the packets sent from one computer to another arrive at the receiver intact and in the order they were sent. On the other hand, UDP is said to be “connectionless” because the sender simply sends packets to the receiver with no mechanism for ensuring that the packets arrive at the destination. There are many advantages and disadvantages to each of the protocols including speed, reliability, and error checking. To truly master port scanning, you will need to have a solid understanding of these protocols. Take some time and learn about each of them.
Recall that earlier the three-way handshake process was described by comparing the process to a phone call. The three-way handshake is a key component of TCP communication that allows the sender and the receiver to stay in sync. Because UDP is connectionless, this type of communication is most often compared to dropping a letter in a mailbox. In most cases, the sender simply writes an address on an envelope, puts a stamp on the letter, and puts the letter in the mailbox. Eventually, the mailman comes along and picks up the letter where it is entered into the mail routing system. In this example, there is no return receipt or delivery confirmation for the sender. Once the mailman takes the letter, the sender has no guarantee that the letter will get to its final destination.
Now that you have a very simple understanding of the difference between TCP and UDP, it is important to remember that not every service utilizes TCP. Several prominent services make use of UPD including DHCP, DNS (for individual lookups), SNMP, and TFTP. One of the most important traits for a penetration tester to have is thoroughness. It will be quite embarrassing to you if you overlook or miss a service because you forgot to run a UDP scan against your target.
Both the TCP Connect scan and the SYN scan use TCP as the basis for their scanning techniques. If we want to discover services utilizing UDP, we need to instruct Nmap to create scans using UDP packets. Fortunately, Nmap makes this process very simple. To run a UDP scan against our target, we would enter the following command in a terminal:
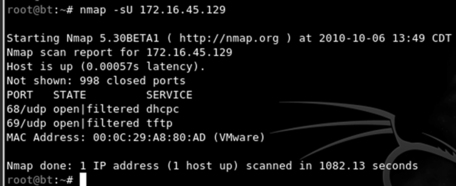
nmap –sU 172.16.45.129
Notice the difference between this command and the others we have learned. First, we specify the Nmap UDP scan by using the “–sU” command. Astute readers will also notice that the “-p-“ and the “–PN” switches have been dropped from the scan. The reason for this is simple. UDP scans are very slow; running even a basic UDP scan on the default 1,000 ports can take 20–30 minutes. You may also notice that the IP address has changed. In this example, we are scanning a Linux machine with the TFTP service running. This will allow us to see the UPD scan with results. Figure 3.4 shows the output of the scan.
It is important to remember that UDP communication does not require a response from the receiver. If the target machine does not send back a reply saying a packet was received, how can Nmap differentiate between an open port and a filtered (firewalled) port? In other words, if a service is available and accepting UDP packets, the normal behavior for this service is to simply accept the packet but not send a message back to the receiver saying “GOT IT!” Likewise, a common firewall strategy is to simply absorb the packet and not send a response packet back to the sender. In this example, even though one packet went through and one packet was blocked, because no packets were returned to the sender, there is no way of knowing if the packet was accepted by a service or dropped by the firewall.
This conundrum makes it very difficult for Nmap to determine if a UDP port is open or filtered. As a result when Nmap does not receive a response from a UDP scan, it returns the following message for the port “open | filtered.” It is important to note that on rare occasions a UDP service will send a response back to the original source. In these cases, Nmap is smart enough to understand that there is clearly a service listening and responding to requests and will mark those ports as “open.”
As was discussed earlier, oftentimes people who are new to port scanning overlook UDP scans. This is probably due in part to the fact that most ordinary UDP port scans provide very little information and mark nearly every port as “open | filtered.” After seeing the same output on several different hosts, it is easy to become disillusioned with UDP scans. However, all is not lost! The fine folks who wrote Nmap provide us with a way to draw more accurate results from our UDP scans.
To elicit a more useful response from our target, we can add the “–sV” switch to our UDP scan. The “–sV” switch is used for version scanning but, in this case, can also help us narrow the results of our UPD scan.
When version scanning is enabled, Nmap sends additional probes to every “open | filtered” port that is reported by the scan. These additional probes attempt to identify services by sending specifically crafted packets. These specially crafted packets are often much more successful in provoking a response from the target. Oftentimes, this will change the reported results from “open | filtered” to “open.”
As mentioned above, the simplest way to add version scanning to a UDP probe is to include the “–sV” switch. Please note that because we are already using the “–sU” switch to specify the type of scan, we can simply append the capital V onto the back of the “–sU.” As a result, our new command becomes:
nmap –sUV 172.16.45.135
Using Nmap to Perform an Xmas Scan
In the computer world, an RFC is a document that contains either notes or the technical specifications covering a given technology or standard. RFCs can provide us with a tremendous amount of detail about the inner workings of a particular system. Because RFCs describe the technical details of how a system should work, attackers and hackers will often review RFCs looking for potential weaknesses or loopholes described in the documentation. Xmas Tree scans and Null scans exploit just such a loophole.
Xmas Tree scans get their name from the fact that the FIN, PSH, and URG packet flags are set to “on”; as a result, the packet has so many flags turned on and the packet is often described as being “lit up like a Christmas tree.” Given what we already know about TCP communications and the three-way handshake, it should be clear that an Xmas Tree packet is highly unusual because neither the SYN nor ACK flags are set. However, this unusual packet has a purpose. If the system we are scanning has followed the TCP RFC implementation, we can send one of these unusual packets to determine the current state of the port.
The TCP RFC says that if a closed port receives a packet that does not have a SYN, ACK, or RST flag set (i.e., the type of packet that is created from an Xmas Tree scan), the port should respond with an RST packet of its own. Furthermore, the RFC states that if the port is open and it receives a packet without a SYN, ACK, or RST flag set the packet should be ignored. Take a moment to reread the last two sentences, as they are critical to understanding the response we get from these scans.
Assuming the operating system of the target fully complies with the TCP RFC, Nmap is able to determine the port state without completing or even initiating a connection on the target system. The word “assuming” was used because not every operating system on the market today is fully RFC compliant. In general, the Xmas Tree and Null scans work against Unix and Linux machines but not Windows. As a result, Xmas Tree and Null scans are rather ineffective against Microsoft targets.
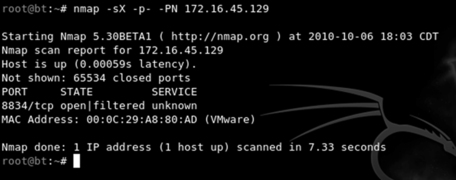
To execute an Xmas Tree scan, we simply replace the “-sU” switch from our last example with an “-sX.” To run the full scan in the terminal, we would enter:
nmap –sX -p- -PN 172.16.45.129
Figure 3.5 shows the command and output of an Xmas Tree scan against a Linux target.
Using Nmap to Perform Null Scans
Null scans, like Xmas Tree scans, are probes made with packets that violate traditional TCP communication. In many ways, the Null scan is the exact opposite of a Xmas Tree scan because the Null scan utilizes packets that are devoid of any flags (completely empty).
Target systems will respond to Null scans in the exact same way they respond to Xmas Tree scans. Specifically, an open port on the target system will send no response back to Nmap, whereas a closed port will respond with an RST packet. It is important to remember that these scans are only reliable for operating systems that comply 100 percent with the TCP RFC.
One of the main advantages of running Xmas Tree and Null scans is that in some cases, you are able to bypass simple filters and Access Control Lists (ACLs). Some of these primitive filters work by blocking inbound SYN packets. The thought with this type of filter is that by preventing the SYN packet from entering the system, it is not possible for the three-way handshake to occur. If the three-way handshake does not occur, there can be no TCP communication streams between the systems, or more precisely, no TCP communications can be originated from outside of the filter.
It is important to understand that neither the Xmas Tree nor the Null scans seek to establish any type of communication channel. The whole goal of these scans is to determine if a port is open or closed.
With the previous two paragraphs in mind, consider the following example. Assume that our Network Admin Ben Owned puts a simple firewall in front of his system to prevent anyone outside of his network from connecting to the system. The firewall works by simply dropping any external communications that begin with a SYN packet. Ben hires his buddy, the ethical hacker, to scan his system. The ethical hacker’s initial TCP Connect scans show nothing. However, being a seasoned penetration tester, the ethical hacker follows up his initial scan with UDP, Xmas Tree, and Null scans. The ethical hacker smiles when he discovers that both his Xmas Tree scans and Null scans reveal open ports on Ben’s system.
This scenario is possible because Nmap creates packets without the SYN flag set. Because the filter is only dropping incoming packets with the SYN flag, the Xmas Tree and Null packets are allowed through. To run a Null scan, we issue the following command in a terminal:
nmap –sN -p- -PN 172.16.45.129
Port Scanning Wrap Up
Now that we have covered the basics of port scanning, there are a few additional switches that need to be covered. These switches provide additional functionality that may be useful to you as you progress in your penetration testing career.
As mentioned earlier, the “-sV” switch is used for version scanning. When conducting version scanning, Nmap sends probes to the open port in an attempt to determine specific information about the service that is listening. When possible, Nmap will provide details about the service including version numbers and other banner information. This information should be recorded in your notes. It is recommended that you use the “-sV” switch whenever possible, especially on unusual or unexpected ports, because a wily administrator may have moved his web server to port 34567 in an attempt to obscure the service.
Nmap includes an option to change the speed of your port scan. This is done with the “-T” switch. The timing switch ranges on a numeric scale from 0 to 5, with 0 being the slowest scan and 5 being the fastest. Timing options are useful if you are attempting to avoid detection by sending your scan more slowly; or if you have a large number of IPs to scan and you have a limited time to complete the scan where faster scans would be more appropriate. Please be aware that by using the fastest scans possible, Nmap may provide less accurate results.
Lastly, the “-O” switch can be useful for fingerprinting the operating system. This is handy for determining if the target you are attacking is a Windows, Linux, or other type of machine. Knowing the operating system of your target will save you time by allowing you to focus your attacks to known weaknesses of that system. There is no use in exploring exploits for a Linux machine if your target is running Windows.
Once we have completed port scanning our target, we should have a list of open ports and services. This information should be documented and reviewed closely. While reviewing the Nmap output, you should take a few moments to attempt to log into any remote access services that were discovered in your port scan. The next chapter will address running a brute force tool to attempt to log in. For the time being, you can attempt to log in using default usernames and passwords. You could also try logging in using any information, usernames, or e-mail addresses you found during reconnaissance. It is possible to complete a penetration test by simply discovering an open remote connection and logging into the box with a default username and password. Telnet and SSH are great remote services that you should always try to connect to. You can do this from the command line by typing:
telnet target_ip
ssh root@target_ip
In this example, the “target_ip” is the IP address of your victim. Most likely these will fail, but on the rare occasion when you are successful, these are an absolute home run.
Vulnerability Scanning
Now that we have a list of IPs, open ports, and services on each machine, it is time to scan the targets for vulnerabilities. A vulnerability is a weakness in the software or system configuration that can be exploited. Vulnerabilities can come in many forms but most often they are associated with missing patches. Vendors often release patches to fix a known problem or vulnerability. Unpatched software and systems often lead to quick penetration tests because some vulnerabilities allow remote code execution. Remote code execution is definitely one of the holy grails of hacking.
It is important to understand this step as the results will feed directly into step 3 where we will gain access to the system. To scan systems for vulnerabilities, we will use a vulnerability scanner. There are several good scanners available to you but for this book we will be focusing on Nessus.
Nessus is a great tool and available for free, for a home user, from their website. You can download a full-fledged version of Nessus and get a key for free. If you are going to use Nessus in a corporate environment, you will need to sign up for the Professional Feed rather than the Home Feed. The Professional Feed will run you about $100 a month. We will be using the Home version for this book.
Installing Nessus is very straightforward. It will run on either Linux or Windows. Nessus runs using a client/server architecture. Once set up, the server runs quietly in the background, and you interact with the server through a browser. To install Nessus, you need to complete the following steps:
1. Download the installer from www.nessus.org.
3. Install the program.
4. Create a Nessus user to access the system.
5. Update the plug-ins.
One of the key components of Nessus is the plug-ins. A plug-in is a small block of code that is sent to the target machine to check for a known vulnerability. Nessus has literally thousands of plug-ins. These will need to be downloaded the first time you start the program. The default installation will set up Nessus to automatically update the plug-ins for you.
Once you have installed the Nessus server, you can access it by opening a browser and entering https://127.0.0.1:8834 in the URL (assuming you are accessing Nessus on the same computer you installed the server on). Do not forget the “https” in the URL as Nessus uses a secure connection when communicating with the server. You will be prompted with a log-in screen. You can use the username and password you created when installing the program. Once you log into the program, you will be presented with a screen similar to Figure 3.6.
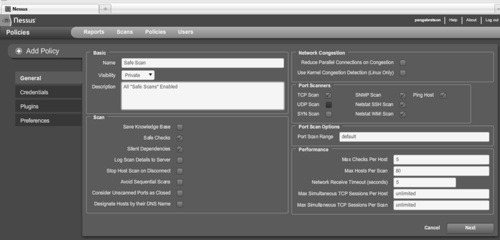
Before we can use Nessus, we need to set up a scan policy. You can do this by clicking on the “Policies” tab at the top of the web page. To set up a scan policy, you need to provide a name. If you are going to set up multiple policies, you should also enter a description. Please take a minute to review Figure 3.6 and notice there is a check in the box next to “Safe Checks.”
When setting up Nessus for the first time, it is common to create two policies: one with the “Safe Checks” checked and the other with the “Safe Checks” unchecked. The reason for this is simple. Some plug-ins and checks are considered dangerous because they check for the vulnerability by attempting to actually exploit the system. Be aware that removing the “Safe Checks” check has the potential to cause network and system disruptions or even take systems off-line. By setting up one policy with the “Safe Checks” enabled and one with the “Safe Checks” disabled, you can avoid unintentional network disruptions.
There are many options that you can use to customize your scan. For the purpose of this book, we will use the defaults. Take a moment to review the various options by clicking “Next” in the lower right. This will take you through each of the remaining pages where you can set additional options for your scan.
Once your scan is set, you can save it by clicking on the “Submit” button that will appear after you have reviewed each of the scan option pages. You only need to set up your scan policy one time. Once your scan has been submitted, you will be able to use that policy to perform vulnerability scans against your target.
Now that you have a scan policy set up, you can run a scan against your target. To set up a scan, you need to click on the “Scans” link located in the top menu. You can enter individual addresses to scan a single target or a list of IPs to scan multiple hosts. Figure 3.7 shows the “Scan” screen.
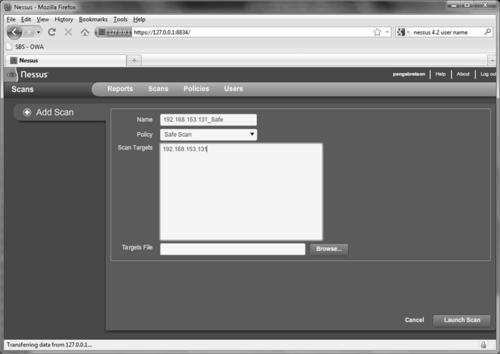
You need to enter a name for the scan, select a policy, and enter the IP address of your targets. You can enter your target IP addresses individually in the “Scan Targets” box or if you have your target IP addresses saved to a text file, you can use the “Browse…” button to locate and load it. Once your options are set, you can click on the “Launch Scan” button in the lower right. Nessus will provide you with information about the progress of your scan while it is running.
When Nessus finishes the scan, you will be able to review the results by clicking on the “Reports” link in the menu bar. The report will provide you with a detailed listing of all the vulnerabilities that Nessus discovered. We are especially interested in vulnerabilities labeled as High. You should take time to closely review the report and make detailed notes about the system. We will use these results in the next step to gain access to the system.
Once we have completed port scanning and vulnerability scanning for each of our targets, we should have enough information to begin attacking the system.
How do I Practice this Step?
The easiest way to practice port scanning is to set up two machines or use virtual machines. You should work your way through each of the options and scan types that we covered in this chapter. Pay special attention to the output from each scan. You should run scans against both Linux and Windows boxes.
You will probably want to add some services or programs to the target system so that you can be sure you will have open ports. Installing and starting FTP, a web server, telnet, or SSH will work nicely.
When a person is first learning about port scanning, one of the best ways to practice is to pick a subnet and hide an IP address in the network. After hiding the target in the subnet, the goal is to locate the target. Once the target has been located, the next step is to conduct a full port scan of the system.
To assist with the scenario described above, a simple script has been created, which can be used to “hide” your system in a given subnet. The code is meant to be run on a Linux machine. Feel free to modify it by changing the IP address so that it will work on your network. The script generates a random number between 1 and 254. This number is to be used as the final octet in the IP address. Once the random IP address is created, the script applies the address to the machine.
Running this script will allow you to become familiar with the tools and techniques we covered in this chapter. You can enter the script into a text editor and save the file as IP_Gen.sh.
#!/bin/bash
echo "Setting up the victim machine, this will take just a moment…"
ifconfig eth0 down
ifconfig eth0 172.16.45.$((( $RANDOM %254) + 1)) up
# uncomment the following lines by removing the #, to start up services on your victim
# please note, you may need to change the location / path depending on your distro
#/etc/init.d/ssh start
# note, you may have to generate your SSH key using sshd-generate
#/etc/init.d/apache2 start
#/etc/init.d/atftpd start
echo "This victim machine is now setup."
echo "The IP address is somewhere in the 172.16.45.0/24 network."
echo "You may now close this window and begin your attack…Good luck!"
You will need to use a terminal to navigate to the directory where you created the file. You need to make the file executable before you can run it. You can do this by typing:
chmod 755 IP_Gen.sh
To run the script, you type the following command into a terminal:
./IP_Gen.sh
The script should run and provide you with a message saying the victim machine is all set up. Using the script above you will be able to practice locating and scanning a target machine.
Where do I go from here?
Once you have mastered the basics of Nmap and Nessus, you should dig into the advanced options for both tools. This chapter only scratched the surface of both of these fine tools. Insecure.org is a great resource for learning more about Nmap. You should dedicate time to exploring and learning all of the various switches and options. Likewise, Nessus has a plethora of additional features. Take time to review the various scans and policy options.
After you are comfortable with the advanced features of these tools, you should look at other scanners as well. There are dozens of good port scanners available. Pick a few, install them, and learn their features. There are several commercial products that you should become familiar with; these products are not exclusively vulnerability scanners (they are much more), but Core Impact and Saint both provide excellent vulnerability assessment components, although both of these tools will cost you actual cash.
Summary
This chapter focused on step 2 that consists mainly of scanning. The chapter started with a brief overview of pings and ping sweeps before moving into the specifics of scanning. The topic of scanning is further broken down into two distinct types including port scanning and vulnerability scanning. The port scanner Nmap was introduced and several different types of scans were discussed. Actual examples and outputs of the various scans were demonstrated as well as the interpretation of the Nmap output. The concept of vulnerability scanning was introduced through the use of Nessus. Practical examples were presented and discussed throughout the chapter.
..................Content has been hidden....................
You can't read the all page of ebook, please click here login for view all page.