
Finite state machines are our first formal structure for game AI. The regularity of the structure helps us to manage program complexity, a major problem of hard-coded scripts. Using FSMs, we break down the AI into a fixed—hopefully small—number of states and the transitions between those states. If you have studied formal FSMs in classes, our usage may differ. “It’s important to understand that when game developers speak of state machines or finite state machines, they are only loosely referring to the traditional Computer Science definition.” [Rabin02]
This chapter looks at what FSMs are and considers their design and analysis. The analysis includes single-transition review and multiple-transition review. (Multiple-transition review unearths the problems of ambiguous transitions and race conditions.) We will touch briefly on complexity and examine three failure modes. At the end of the chapter are projects to implement an FSM for a game-related AI.
Finite state machines have a finite number of states and a set of transitions between those states. So what do we mean by states? The easiest way to think of states is to think of different ways to finish the statement that begins, “I am....” We could create a list of verbs: flying, walking, running, or sitting. Another way to model uses adjectives: tired, happy, or angry. The set of states might represent nouns: egg, worm, dragon. All of these lists are different ways of doing or being or existing in some way. We build the states in an FSM to model these ways. For game AI, the key idea is that different states imply different behaviors. We expect dragons to behave differently from dragon eggs.
That leaves the transitions. The transitions answer the question, “What would make the AI change from one state to a different state?” Since we are using the states in the FSM to map to behaviors, the question translates to, “What would make the AI change from this set of behaviors to that set of behaviors?”
So can we make our FSMs meet our basic definition of game AI from Chapter 1, “What Is Game AI?” Can they act intelligently in the face of changing conditions? The actions are handled in the states. The transitions provide the mechanism to handle changing conditions. The intelligent part depends on the quality of the fit between the simulated world and the selected states and transitions. Horatio, the simulated opera singer from Chapter 2, “Simple Hard-Coded AI,” would still inappropriately break into song if his AI did not correctly differentiate between an opera house and a funeral home. In short, the intelligence is in states and transitions.
Besides being a programming method to implement AI, FSMs are an effective AI analysis tool. Before using an FSM, the programmer must ask, “Can I break the AI into concise, independent states?” In order to answer that question, the AI programmer must first solidify his or her idea of what the AI must do. It is imperative to know what the AI must do before an implementation can be selected. The act of determining whether an FSM is appropriate forces the AI programmer to first define the AI.
Look back at the three lists we used to finish the “I am ...” statement. The answers were concise; it is hard to beat single-word answers for brevity. The answers were also independent; that is to say, each one was not like any of the others. More importantly, it would not make sense for the AI to be any two at the same time. Traffic lights and thermostats have concise, independent states and clear transitions. Simulated monsters or very simple simulated people might easily break into a few states, but more complex simulated people do not. A simple monster might be content only to hide, attack, or flee, but a simulated person in the game The Sims has to be able to be hungry, lonely, and bored all at the same time. [Forbus02] If the problem does not easily resolve into independent states, an FSM is not the best solution.
Another question to ask is, “What do the states represent?” For a traffic light, the states might be the color that is currently illuminated. In this case, each state corresponds to an output. This is the most intuitive way of implementing a finite state machine.
FSM machines lend themselves to pictures. One of the better ways to design an FSM is to lay out the states and transitions as a drawing. Figure 3.1 corresponds to our monster AI. It appears quite simple, but it is probably more interesting to analyze than yet another thermostat.
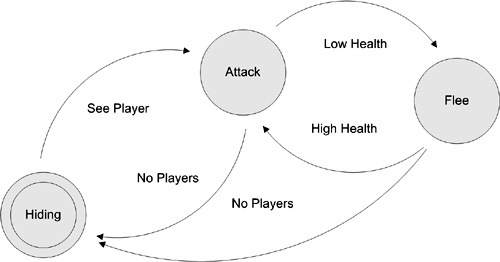
The states are the circles, and the transitions are the arrows. The double circle for the Hiding state means that it is the starting state for our monster. Each transition is an arrow with text showing what causes the transition. There are many drawing programs that make it easy to draw FSM diagrams. This diagram was drawn using Microsoft Visio. In this diagram, the transitions depend on whether the monster can see players or the value of the monster’s health. How intelligent is this model? We start reviewing by looking at each single transition by itself.
This model is intelligent, but not intelligent enough. The monster starts out hiding and then attacks when it sees the player. A powerful monster pitted against a weak or inept player will result in quick victory for the monster, which will go back to hiding. If the combat goes against the monster and the monster’s health gets too low, it will flee. If the monster is not healed by some means and it successfully evades the players, it will hide. So far, so good. What if the player now wanders into the monster’s sight? The monster still has low health. It will attack the player on sight and then immediately flee when it realizes that it has low health. The monster would have been better off if it had remained hidden. So we change the transition from the Hiding state to the Attack state as shown in Figure 3.2.
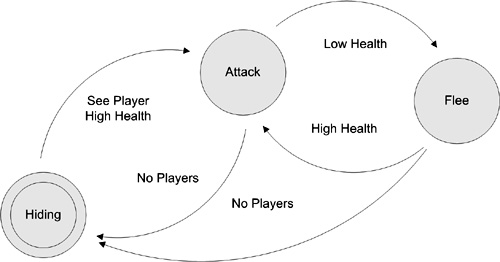
The change we made between Figures 3.1 and 3.2 improved a single transition to make it better. This change avoids artificial stupidity, and we only had to look at each transition by itself. There is only one transition out of the Hiding state in our FSM. Looking at each transition by itself is the easiest way to review an FSM for potential problems. At first, the original transition looked perfect. The change came after the system left the starting state and ran for a while. The original transition assumed that a monster that was hiding had high health. This is true at the beginning, causing the original transition to seem reasonable, but it was not required to be true. It makes sense for a monster with low health to hide, so we do not want to prevent a low-health monster from hiding. We have already programmed monsters with low health to break away from combat, so it makes sense for us to program monsters with low health to avoid combat.
You should review each single transition of your FSM designs to see that it is always reasonable. It will probably be reasonable during the initial phases of operation, but it may present problems after the data upon which it depends works through the range of possible values. The questions to ask are “Is this transition reasonable from this state in the first place?” and “Is this transition still reasonable when the machine returns to this state from other states?”
The second thing to review is multiple transitions. When there is more than one transition out of a state, we face two related issues: disambiguation and race conditions. If two transitions from a single state can be valid at the same time, they are ambiguous. One way that transitions can become ambiguous is if more than one thing in the game world can change before the AI runs again. This gives rise to race conditions. If only one thing can change at a time, Figure 3.2 is perfectly fine. A monster that is in the Attack state can run low on health or it can run out of players, but as long as they do not happen at the same time, the monster AI always does the right thing. If both of those events can happen at the same time, however, the monster AI FSM has two valid transitions to pick from. Transitioning to the Hiding state makes sense, but going to the Flee state does not. The Flee state would transition to the Hiding state as soon as it got a chance.
The problem is that our monster is fleeing from enemies who are not there. A similar condition exists when a monster in the Flee state is healed (perhaps by a more powerful allied monster) at the same time that the players stop pursuit and make themselves scarce (perhaps in order to avoid having to deal with two monsters at the same time). In this case, the FSM in Figure 3.2 will have our monster attack players who are not there. Race conditions like these tend to be subtle and hard to detect at first glance.
In real game development, the AI programmer cannot require that the system change only one thing at a time in order to prevent race conditions in the AI; the AI programmer is forced to deal with race conditions as a fact of life. There are three ways to handle race conditions and ambiguities. You can ignore them, you can fully specify all transitions, and you can prioritize the transitions.
The easiest way to handle ambiguities is to simply not care. In the FSM shown in Figure 3.2, it could be argued that no player will ever see the monster being stupid. The ambiguities all happen when there are no players and some other condition also changes at the same time. We have already noted that if the player never sees great AI, that AI is wasted. Conversely, and to our benefit, if the player never sees artificial stupidity, then for all practical purposes that stupidity did not happen.
This powerful tool fails if the game ever offers the player a chance to see things the player could never see while playing the game. For example, the any-angle instant-replay capability popular in sports games kills this method of handling ambiguities. In our example, we might claim that no player will see our monster being stupid because it only happens when there are no players present. The idea of “no players present” needs closer examination, however. Is the player supposed to be able to hide from the monster? If so, then the player will expect the monster to not detect the hidden player when the player is actually present. If the monster acts like it knows that the player is present when the player is hidden, then the AI is cheating and—more importantly—it is visibly cheating. Players hate visible cheats worse than they hate artificial stupidity. If players can hide and the monster properly ignores them when they do, then the race conditions in the FSM of Figure 3.2 must be dealt with. A player who was hidden from both the monster and the other players will indeed be able to see the monster attack or flee from the other players who are no longer there.
The next simplest way to handle ambiguities is to fully specify every transition in terms of every one of the conditions on which any transition depends. This can be characterized as “Look at all the data every time.” “Simple” in this usage does not mean easy or effective, however; it merely means that it is not hard to understand the concept. Full specification adds complexity to the transitions and quickly becomes a nightmare to maintain.
The third and most common way to handle ambiguities is by prioritizing the transitions. If the No Players transitions from the Attack and Flee states are checked before the health-related transitions out of those states, the monster AI will never attempt to attack or flee from players who are not there. The implication here is that the first valid transition found will be the transition taken. This capability is very easy for the programmer to provide by making the code that checks the transitions for validity go through them in a fixed order set by the programmer. The programmer will probably write the code to check the transitions in a fixed order anyway. All that is required is that the programmer thinks about the order and forces it to be optimal. This simple approach often meets a “good enough” criterion.
When there are numerous transitions and states, a fixed order may not always yield the best AI, however. If need be, the programmer can employ a more sophisticated approach and implement dynamic prioritization. With dynamic prioritization, the valid transitions indicate how well they fit the state of the world.
Consider a more sophisticated monster AI. The transition that handles “Flee combat if health is low” might be modified. The modified transition might factor in how fast the player can move compared to the monster when computing priority. A fast player would be able to run down the fleeing monster, so turning to run would be suicidal. It might factor in if the player has missile weapons and there is no cover. So in adverse conditions, the transition from Attack to Flee might still be valid, but with a low priority. Why do this? Our more sophisticated monster AI might have a Berserk state suitable for when all-out attacks are the only hope. Such a behavior has a high entertainment potential for the player. Chances are that the monster will become very scary and dangerous, but only for a very short time. The transitions to the Berserk state have modest priority. The observed behavior is, “When all the normally good ideas look like bad ideas, this normally bad idea is actually the best idea.” For a more in-depth coverage of useful techniques for dynamic priorities, see Behavioral Mathematics for Game AI [Mark09].
This level of sophistication is not required in all cases, and might not be observable. If it is not observable and the player cannot recognize it, it is wasted effort. Games are an entertainment product first and foremost; everything in them should be there for the player’s benefit.
Note that not all of the transitions in Figure 3.2 needed to evaluate all of the conditional data. In a good FSM implementation, the transitions do not take into account every possible event or condition in the world, only those needed to cause a particular transition and those needed to disambiguate similar transitions. This simplifies life for the programmer. Note that there is no transition from the Hiding state to the Flee state. It commonly happens that there will be many fewer transitions than are possible, especially when there are many states. This also simplifies life for the programmer. The maximum number of transitions possible is N*(N–1) where N is the number of states. The only hard rule about transitions is that there should only be one transition out of a state for any unique set of conditions.
In actual implementation, programmers encounter complexity that is hidden by the state diagram. For each state, there can be an entry function, an exit function, and an update function that runs when there is no transition to be made. The entry function runs when the state is entered from another state. It provides any setup capability the state needs in order to run properly. The entry function for the Hiding state might be tasked with picking the hiding spot. The exit function runs when the FSM is leaving the current state and provides clean-up functionality. Upon leaving the Attack state, the monster might want to put away any weapon it is carrying in order to run away faster or to more easily climb into a hiding spot. The update function runs each time the AI gets to think while in the state. In the Flee state, our monster needs to go quickly in a direction that is away from the players, and the update function for the Flee state handles all of that.
FSMs have some common failure modes. We will touch on three of them: concurrent states, state explosion, and transition explosion. The latter two may be dealt with through careful design practice, but the concurrent states are usually a clear indicator that you should not use an FSM implementation.
When reduced to an FSM, the AI might need to be in more than one state at once. For example, simulated people may need to be hungry, lonely, and bored all at the same time. The original states are clear and concise, but they are not exclusive from each other. Do not attempt to use FSM machines for this kind of AI problem, because it is better solved by other methods, such as the various agent technologies.
The term “state explosion” describes when the finite number of states becomes too large, especially when the number of states starts multiplying. State explosion is often the result when the original states selected blur into each other and more states are added to better differentiate them. Note that our original states were concise, one-word responses to “I am....” The programmer should be concerned when those answers become full sentences. Plain FSMs are not appropriate when those responses become paragraphs.
One method of controlling state explosion is to use hierarchical state machines. Typically, this involves two levels. Each high-level state runs a low-level state as part of the high-level state’s update function. Subtleties within the high-level state are handled by the low-level state machine. If our monster is a fire-breathing dragon, the Attack high-level state might have a few low-level states, such as a Close state in which the dragon charges and breathes fire on far-away targets. When the dragon gets near, it would switch to a Combat state, where it wants to avoid breathing on itself and instead employs claws and teeth. Likewise, the high-level Flee state might involve two low-level states: Running and then Flying. With hierarchical FSMs, the low-level machines from one state have no outside interaction with any of the other low-level FSMs.
Transitions can grow in number and complexity. If an FSM design suffers from state explosion, a far worse transition explosion almost always follows. One characteristic of a good FSM is that the states have mostly local, rather than global, transitions. Hierarchical FSM machines enforce this good trait, but regular FSMs benefit from it as well. Any given state has transitions to a small subset of all of the states. In pictorial form, the FSM resembles a flat mesh with few lines crossing. Without this locality, state growth may be manageable, but the transition growth may not. Ask yourself, “If I add this state, how many existing states will have to connect to it?” If the answer is all (or nearly all) of them, it indicates potential problems. If the answer is a few of them, it is a good sign. Recall from the complexity discussion that the number of possible transitions grows much more quickly than the number of states.
Another characteristic of a good FSM is that the transitions are simple. “Simple” here means that of all the data that gets evaluated by all the transitions, a given transition only depends on a few of those items. Disambiguation methods deal with the problem of multiple valid transitions. If the disambiguation methods are inadequate, the complexity of the transitions grows with the number of data items touched by all transitions. When adding a new transition or changing an existing one, ask, “How many transitions need to be updated to consider this new data item?” If the answer is only a few, your disambiguation is solid. If the answer is all (or nearly all) of them, your machine is not effectively exploiting what are called “don’t care” conditions. (The “don’t care” conditions are all the things that can safely be ignored when evaluating a particular transition. Clever disambiguation simplifies important factors of an evaluation into don’t care conditions. For example, in our monster AI, the High Health transition from the Flee state to the Attack state cares about health, but the No Players transition from the Flee state to the Hiding state does not, because the No Players transition is evaluated prior to the High Health transition. If High Health evaluates at all, then players are known to be present; the transition does not need to check for them again.)
Games are written in many languages, and few of them include out-of-the-box support for FSMs. We will write the structure ourselves. We could write all AI code ad hoc, but the amount of work to build a structure is less than the amount of work needed to debug ad hoc methods. We will write the structure in such a way as to minimize the number of errors we can make in the code.
The project itself will be to implement the simple monster AI in code. Our AI will do more than think; it will think “out loud” for our benefit. That is, our monster will emit text messages for us to read, enabling us to see clearly what it is thinking. Note that as an added benefit, doing so improves our ability to debug the code. More importantly, doing so reinforces the good habit of making the AI programmer look for ways to show the player what the AI is thinking. Games that show the player what the game is thinking are perceived to be smarter than games that do not.
If you are familiar with object-oriented programming, you can safely skip this section. If not, the “Fundamental Concepts” section of the Wikipedia entry on the subject is quite good as a place to start [Wikipedia09].
In object-oriented programming, behavior and internal data are combined as an object. An object is one of something. The kind, or type, of an object is its class. An object named Bob might be of type Human. The Human class does not by itself do anything; objects of that class certainly do, however. The actions a programmer can ask an object to do are called the methods of that object. From this description, you may have realized that we have been dealing with objects all along. For example, in Chapter 2, we passed a World object of type House to the RunAI subroutine.
For our purposes, we will exploit the fact that objects have control over their internal data. Instead of manipulating the data directly, code outside the object uses the methods the object provides. Using a real-world metaphor, an instance of a Painter object might have a method called PaintTheTrim(somecolor). The Painter object internally decides whether it needs to use masking tape or to paint freehand. The Painter object picks which paintbrush to use. A well-implemented object does not allow direct manipulation of the details, and the programmer using the object does not want to micromanage those details. In short, if the programmer gets the class right, he or she can quit worrying about the internals and use the objects at a much higher level of abstraction.
In our code, the Public and Private keywords are how a class marks methods that can be called outside of an object. You can make some of the internal data of an object visible outside of the object by marking it public, but this should be done sparingly. Consider the complexity discussions of Chapter 2. Object-oriented programming helps keep the internal complexity of our AI additive as it grows instead of multiplicative.
Another common feature of object-oriented programming is inheritance. A class, say of type Dragon, can inherit from another class, say of type Monster. In that case, all object of the class Dragon have all the methods of the Monster class plus the methods specific to the Dragon class. So all objects of the Monster class might have a method to indicate their health, but the ability to breathe fire would be implemented only by objects of the Dragon class. We will use inheritance very sparingly. We will use it to get different kinds of objects that inherit from a common class to act the same way. You should never be able to create an object of certain classes. For example, we might not want there to ever be an instance of a generic monster. In VB, we would mark the Monster class MustInherit to enforce this. We can create objects of classes that inherit from Monster, such as Dragon or Orc, but we cannot create an object of type Monster directly.
So what objects do we need for our FSM AI? We need states, the states need transitions, and the states need some machine that runs them. In addition, that machine needs some changing environment to live in; that environment will be our monster. If the FSM needs data, it asks the monster. The monster will either have that data or get it from the rest of the world. We will not consider the outside world; all the world data needed by the FSM will reside in the monster.
Our state objects need four methods for normal operation:
An entry method. The entry method will be called once by the machine when it transitions into a new state.
An update method. The update method will be called when the machine elects to stay in the current state.
An exit method. The exit method will be called to clean up when the machine leaves the current state.
A transition-check method. This method determines if the machine should transition out of the current state. Our states will check their transitions in the order they were loaded and use the first valid transition. This will provide a mechanism for dealing with ambiguous transitions.
Our state objects will also need to initialize themselves. When the state is created, it will load a list of transitions out of the state. In our implementation, transitions are stored in the state that the transition comes from.
Our transitions will be very simple. They have a method that indicates if they are valid when checked against the current world conditions. That method indicates the state to which the machine should transition.
The Machine object will present a RunAI method to the world. This is how the world asks the AI to do some thinking. In addition, it needs a way to load the states and transitions. We will do this by loading the Machine object with states. The first state loaded into the Machine object will be the Start state.
The Monster object will actually be a Windows form, which is also a type of object. It will provide the user interface. The user will be able to adjust whether the monster sees players or not as well as adjust the monster’s health between low and high. The Monster object will make both of those adjustments available to the AI. The Monster object will also have an output window to show what it is thinking. Of course, the Monster object will have a button the user can click to make it think.
The Monster object will be our only Windows form. We will add numerous classes to implement the states and transitions. If we were going to make more than one kind of monster, we would create a class for general monsters first. Each different kind of monster would inherit from the general class. We would reuse the bulk of the software that way. Using inheritance this way is straightforward and easy to understand. Commercial games tend to use a more complex, highly data-driven approach. Since we are only going to do one kind of monster, however, we will not bother generalizing it for reuse. Writing for reuse rarely works unless there are two or better yet three different uses implemented when the software is first written.
Launch Visual Basic.
Create a new Windows Forms Application project and name it MonsterAI.
In the Solution Explorer window, rename Form1.vb to Monster.vb.
Click the form in the editing pane and change the Text property to Monster.
Resize the form to make it much wider.
Open the File menu and click Save All. At this point your project should resemble Figure 3.3. We are going to put the user inputs on the left side of the Monster form and the output of what the monster is thinking on the right side of the form.
We can make short work of the user interface from here. By studying the transitions, we see that the monster needs to be able to know if it can detect players and if it has high or low health. We also need to give the monster a place to show us what it is thinking. After we add the controls that make up the visual elements, we will add the code that makes them work. First, drag a CheckBox control from the Toolbox to the top-left corner of the Monster form.
Change the Text property of the CheckBox control to Sees Players.
Change the Name to SeesPlayersCheckBox.
Drag a Label control from the Toolbox and place it below the Sees-PlayersCheckBox control.
Change the Text property of the Label control to Health.
Drag a NumericUpDown control from the Toolbox and place it below the Health label.
Change the Name property of the control to CurrentHealth.
Change the Maximum property to 10 and the Value property to 10.
Drag another Label control from the Toolbox to the top middle of the form and change its Text property to Thoughts.
Drag a TextBox control to the form just below the Thoughts label. Change its Name property to ThoughtsTextBox.
Change the Multiline property to True. This will allow us to resize the control.
Drag the lower-right corner of the control to the lower-right corner of the form, using nearly all of the available space.
Set the ReadOnly property to True. This keeps the user from editing the text in the control.
Set the ScrollBars property to Vertical. Our monster will do a lot of thinking, and we want to see it all.
Finally, drag a Button control to the bottom-left corner of the form.
Change the Text property to Think and the Name property to ThinkButton. This completes the visible portion of the user interface. Your project should look like Figure 3.4.

Our next task is to provide some code that interprets the meaning of the user interface. Our FSM could look at the controls on the form directly, but we will create a simpler, better-defined interface between the AI and the monster.
Why add this apparent complexity? It will turn out that adding this tiny bit of complexity will make the AI code simpler and easier to maintain. One of the questions the AI will ask is, “Is the monster’s health low?” The evaluation should be made by the monster, not the AI. If the AI looks directly at the controls, it can only ask the question, “What is the value of the CurrentHealth control?” These questions are not the same. If we use the same AI for two different monsters—one that has a maximum health of 10 and another with a maximum health of 100—a value of 10 returned for one monster will probably have the opposite interpretation if it is returned for the other monster. If we change the implementation of our simple monster and use a checkbox for high health/low health, we should not have to change the AI.
Even something as simple as the checkbox for seeing players will go through an interface. A blind monster might hear players and at times be close enough to touch them. The real question the AI wants answered is, “Do I detect players well enough to attack them or flee from them?” Our monster is visually oriented, but our AI interface will be in terms of detection.
We will add a three-part public interface to the monster. The AI will use this interface to ask questions and to supply thoughts. If we do a good job with the interface, we could use it for all kinds of monsters and many kinds of AI to drive them. To begin, right-click Monster.vb in the Solution Explorer window and select View Code. Just below the Public Class Monster line, type the following and press Enter:
#Region "Public Interfaces For the AI"
Visual Basic will create an End Region line for you. Regions have no effect on the program, but they do help you group like pieces of code together. Note the minus sign to the left; you can collapse a region to hide the code inside while you work on other parts of your code. You can also do this to the individual Sub and Function blocks.
Inside the region, we will add the three parts of the interface. We will start with the easiest one first. Add the following lines of code to the region:
Public Function DetectsPlayers() As Boolean
    'If we had more than one way of detecting a player,
    'we would OR them all together.
    Return (SeesPlayersCheckBox.Checked)
End Function
We marked the function with the Public keyword because we want outside code to be able to ask the monster if it detects players. Because we return a value, this code is a function instead of a sub. Since it returns a value, we have to specify the type of value returned—in this case a Boolean. Dealing with the monster’s health requires similar code:
'We will assume that health is either good or bad
Public Function GoodHealth() As Boolean
    'We will use thirty percent as our threshold
    If CurrentHealth.Value >= 0.3 * CurrentHealth.Maximum Then
        Return True
    Else
        Return False
    End If
End Function
The core of this function could be compressed to a single line at a modest cost in readability. What remains is to give our monster a place to speak its mind. We will do this by creating a routine to write to the ThoughtsTextBox control:
'The output side of the interface:
Public Sub Say(ByVal someThought As String)
    'Everything we thought before, a new thought, and a newline
    ThoughtsTextBox.AppendText(someThought & vbCrLf)
End Sub
The & character is used for character string concatenation. Our code takes everything that was already in the text box and adds another line to it.
This completes everything in the user interface except the Think button. Before we can make the Think button do anything, we will have to implement our FSM. We start with the states.
Our states need common parts shared by all states and unique parts for each specific state. We will use classes and inheritance to accomplish this. We will create a class called BasicState to hold all the commonalities. The three classes we will actually use in our FSM will inherit from BasicState. We will never attempt to put a BasicState object into our FSM; our monster only understands Hiding, Attack, and Flee. It does not understand BasicState.
Right-click MonsterAI in the Solution Explorer window and select Add→Class. The Add New Item dialog box appears; name the new class BasicState.vb and click Add. VB will create the file and display it in the Editing pane. The first thing we will do to our new class is make sure that we cannot accidentally try to create an object of this type. Add the MustInherit keyword to the very first line:
Public MustInherit Class BasicState
The three classes we create will inherit from BasicState, and we will be able to create objects of those types. The analogy here is that it is correct to create dogs and cats and impossible to create generic mammals. So what are the things that each child class will need to do in its own unique way? Add the following lines below the class statement.
'Some state functionality must come from the various child states
Public MustOverride Sub Entry(ByVal World As Monster)
Public MustOverride Sub Update(ByVal World As Monster)
Public MustOverride Sub ExitFunction(ByVal World As Monster)
Note that there is no End Sub after each Sub. The MustOverride keyword tells VB that child classes are required to have a member that has this signature. It also means that the parent will not supply any common code for those members. We expect the Update function of the class for the Attack state to be very different from the Update function of the class for the Flee state. But we require all of the classes that inherit from BasicState to implement an Update function.
Not shown in BasicState is the unique initialization that each child class requires. That initialization will be where we load the transitions out of each state into the particular states. All states will keep their list of transitions the same way. Add the following code to the class:
'All kinds of states keep an ordered list of transitions.
Protected MyTransitions As New Collection
The Collection object is very handy in VB. We will exploit many of its capabilities. Since it is an object, we need to ensure that the variable MyTransitions points to an actual object. The New keyword initializes the variable for us so that it always starts pointing to an object. We will store all of the transitions for a state in this collection. What remains is the code that walks through the collection checking the transitions. Before we can do that, we have to implement transitions.
Our approach for transitions will be similar to the one we use for states. We will create a parent class that describes all Transition objects. We will then create child classes that inherit from the parent class and implement the unique needs of the individual transitions. This will work fine for our simple FSM. Be aware that coding this way can easily lead to an explosion of classes, however.
Note
There is a different way to implement transitions and states that does not involve a child class for every unique transition or state. Experienced programmers should look up the Delegate keyword and the AddressOf function. Armed with these two powerful tools, we could store functions the way we store data. Then we could use a single class for all transitions and a single class for all states. This yields less code at the cost of more complicated concepts.
Right-click MonsterAI in the Solution Explorer window and add another class. Name this class BasicTransition.vb and add it. Then add the MustInherit keyword to the very first line.
Public MustInherit Class BasicTransition
There will be only two parts to our transitions. One part is code that will evaluate the current world conditions and decide whether or not to take the transition. That code is unique for every transition, so BasicTransition will force child objects to implement it. Add the following code to the class:
'If a transition is valid, return the name of the next state as a string
PublicMustOverrideFunctionShouldTransition(ByValWorldAsMonster)AsString
The other part of a transition is the state to transition to. We are going to store the name of the next state in a string. It needs be accessible by child classes derived from BasicTransition, so we mark it Protected. The Transition object will give that string to the state that called it. The state machine will use that string to find the next state in its collection of states. Add the following code to the class:
'Store the name of the state to transition to.
Protected NextState As String
So how are the states to be named? We could write code that maps each state, which is an object, to a string. Instead, there is a way to do this automatically, which means less code to maintain if we add a new state.
We will exploit the fact that each state in the FSM is an object of a different class than any other state. The FSM will only keep a single copy of the Flee state. The class that implements the Flee state will be a different class than the classes that implements the Hiding and Attack states. So instead of dealing with the hard question, “Who are you?,” we will deal with the easier question, “What are you?” in regard to naming the states.
In the .NET languages such as VB, code can ask any object what type of object it is. Every different class of object has a unique type name. Since our FSM will only store one of any given type of state, asking a state what type it is will provide us with a unique string identifier for that state. Our code will be asking the states, but it will be telling the answer to the transitions. So the transitions needed to know what type of data to store.
Since all transitions will need to store something in the NextState string variable, we will take care of it in the parent class. Add the following code to the class:
'All child objects should initialize their next state
Public Sub Initialize(ByVal someStateName As String)
    NextState = someStateName
End Sub
All code that creates transitions will also need to initialize them. We will do this in the states. While we have not created any specific transitions, we have completed the parent class for all transitions. When we create a Transition object, we care a great deal which transition class we are using. Other than that we rely on the fact that all of them can be treated as a BasicTransition. We have defined transitions sufficiently well that we can finish off the BasicState class.
Now would be a good time to go to the File menu and choose Save All. Doubleclick BasicState.vb in the Solution Explorer or click the tab for it in the Editing pane. Since all states will use the same method for checking their transitions, we will put it in the parent class. Add the following code to the class:
'All states use the same method for checking transitions
Public Function TransitionCheck(ByVal World As Monster) As String
    'We can hold any transition in a BasicTransition
    Dim Txn As BasicTransition
    'We need to store the name of any state returned
    Dim nextState As String
    'Loop through the collection in regular order
    For Each Txn In MyTransitions
        'Store off the state name if any
        nextState = Txn.ShouldTransition(World)
        If nextState <> "" Then
            'The first valid transition is the one
            Return nextState
        End If
    Next
        'No transition was valid, no state to change to
        Return ""
    End Function
BasicState is now complete.
Just as finishing the base class used for transitions allowed us to finish the base class for states, finishing the base class for states will allow us to write the state machine object. We only have one kind of state machine, so it does not need inheritance. Open the File menu and choose Save All, and then add a new class to the project. Name it FSM.vb and add the following lines to the class:
'We need a place to store the states
Dim States As New Collection
'We need to remember what state is the current one
Dim currentStateName As String
You may have noticed that some variables are declared with New, and others are not. Visual Basic treats certain types of variables differently than others. Basic data types include integers and strings. In VB, there is always storage created for them, and they are initialized automatically. Strings start with the empty string "", and integers start with 0. Collections are not a basic data type; they are objects. The New keyword tells Visual Basic to actually create the object. Variables that deal in objects start with the special value of Nothing until they are assigned to an actual object.
Our monster will want to load its FSM with states. We let the monster control the loading so that different monsters can use the same FSM class but load it with monster-specific states. Add the following code to the class:
Public Sub LoadState(ByVal state As BasicState)
    Dim stateName As String
    'Get the short name of this state's class
    stateName = state.GetType.Name
    'The first state we get is the start state
    If States.Count = 0 Then
        currentStateName = stateName
    End If
    'Never add the same state twice
    If Not States.Contains(stateName) Then
        'Add the state, keyed by its name
        States.Add(state, stateName)
    End If
End Sub
Note
All .NET objects implement the GetType method, which returns a Type object. The Type object has a Name method that we will use to get the short name of a type. The class name Type is necessarily confusing; it is hard to clearly name an object that holds the type information of other objects. Besides being a method of every object, GetType can be called with a class name as a parameter to get a Type object for the class without having to create an object of that class. We will use that capability later to get the name of a state’s type without having to create a State object.
This code takes a State object and gets the name of the type of the object. The state was passed in as an object of type BasicState. So why won’t all objects have the same stateName, BasicState? The GetType method of an object ignores the type of the variable and instead uses the type of the underlying object. In any case, the object passed in can never have been created as type BasicState because we marked BasicState as MustInherit. Put another way, there are no generic mammals, even though dogs and cats are mammals. The object passed in will have been created with a type of FleeState, HidingState, or AttackState, all of which we will create very soon.
Our design called for the first state to be loaded to be the Start state. So we checked the count of items in the States collection to see if there were any states already loaded. If the count is zero, we are loading the first state, so we make it the current state.
Our states are different from each other—one of the hallmarks of a good FSM implementation. Before we add a state to the States collection, we check to make sure it is not already there. If not, we add the state to the collection, keyed by the stateName. If we add an object to a collection and also specify a key string, we can later access the object using that key. Keys must be unique in a collection. What the code actually does is check to see if the key is present in the collection; it does not check the actual objects. Keys are hashed, which means that finding an object in a collection of many objects happens reasonably quickly.
The FSM needs one more member: a way to make the machine run. Add the following code to the class:
Public Sub RunAI(ByVal World As Monster)
    If States.Contains(currentStateName) Then
        'Get the object using the name
        Dim stateObj As BasicState
        stateObj = States(currentStateName)
        'Check for transitions
        Dim nextStateName As String
        nextStateName = stateObj.TransitionCheck(World)
        'Did we get one?
        If nextStateName <> "" Then
            'Make a transition
            If States.Contains(nextStateName) Then
                'Leave this state
                stateObj.ExitFunction(World)
                'Switch states
                stateObj = States(nextStateName)
                currentStateName = nextStateName
                'Enter and run the new state
                stateObj.Entry(World)
                stateObj.Update(World)
            Else
                World.Say("ERROR: State " & stateObj.GetType.Name & _
                    " wants to transition to " & nextStateName & _
                    " but that state is not in the machine!")
            End If
        Else
            'Just run the update of the current state
            stateObj.Update(World)
        End If
    Else
        World.Say("ERROR: Current state " & currentStateName & _
            " is not found in machine!")
    End If
End Sub
This code has two error checks. The first makes sure the current state can be found by name in the collection of states in the machine. This error protects against any programming errors involving the name of the current state. This error is unlikely, but by checking first we keep the code from crashing. We use the monster’s Say function to complain about the problem. Real game code would have a real error log. The second error check makes sure that any state called for by a transition is present in the machine. This type of error is far more likely; forgetting to load a state into the machine is a data error and not an algorithm or coding error. It will not show up unless a particular transition to the missing state executes. All the FSM code can be correct, but it needs to be correctly initialized.
Note
This type of error checking speeds development. It is faster to read an error message than it is to rerun code in a debugger. We could even ensure that the second kind of error never happens by having the FSM self-check for consistent data. That exercise is left for the student.
We have assembled all the basic parts. We are getting closer to the time, as Dr. Frankenstein puts it, to “give my creature life!” We need to implement a child class for each of the unique states and implement the transitions that will go into our monster. Open the File menu and choose Save All; then add a new class to the project. Name it HidingState.vb and type the following line of code inside the class without pressing the Enter key.
Inherits BasicState
Now press Enter. VB adds the three routines called for by BasicState. If you look back at BasicState, you see three MustOverride routines. One of the advantages to the Common Language Runtime languages in Visual Studio such as Visual Basic and C# is that the development environment has a deep understanding of classes. IntelliSense exploits this same technology. The whole package is aimed at speeding up development and reducing errors.
Because Visual Basic was kind enough to create the skeletons of our three routines, we should fill them in. In the Entry routine, add the following:
World.Say("This looks like a good hiding spot!")
In the ExitFunction routine, add the following:
World.Say("I can't stay hiding here.")
And in the Update function, add the following:
World.Say("Shhh! I'm hiding.")
At this point, we might want to do the transitions out of the class, but we have not yet defined the classes at the other end of the transitions. We will start on those other states now. Add another class and call it AttackState.vb. Make it inherit from BasicState the same way you did for HidingState. In the Entry routine, add the following:
World.Say("Grab weapon and shield!")
In the ExitFunction routine, add the following:
World.Say("I better put my weapon and shield away.")
And in the Update function, add the following:
World.Say("Attack!")
We have one state left. Add another class and call it FleeState.vb. Make it inherit from BasicState the same way you did for the prior two states. In the Entry routine, add the following:
World.Say("Feet, don't fail me now!")
In the ExitFunction routine, add the following:
World.Say("I better slow down.")
And in the Update function, add the following:
World.Say("Run away! Run away!")
This would be a really good time to go to the File menu and choose Save All.
All three states are defined, but they are not complete. There are no transitions defined, and this makes it impossible for the states to load their transitions. We will store our transitions in the same file that holds the state the transition is from. We start with HidingState. Go to the End Class statement. Hit the End key on your keyboard or click at the end of the line and then press Enter twice. Now type the following line and press Enter:
Public Class SeePlayerHighHealthTxn
VB nicely adds the End Class statement for you. Exactly as HidingState inherits from BasicState, this transition needs to inherit from BasicTransition. Add the following line inside the class and press Enter:
Inherits BasicTransition
VB again provides the required skeleton.
Note the squiggly line under the End Function statement. This indicates a problem. Hover your mouse over that line, and Visual Basic will tell you what the problem is. You can easily miss the marking, however; fortunately, Visual Basic provides an easier way to see every issue it has with the code. To display it, open the View menu and select Error List. The Error List window docks at the bottom of the environment, listing errors, warnings, and informative messages. It warns us that we should make sure that this function always sets a value to return. We will do that now. Add the following code to ShouldTransition:
If World.DetectsPlayers And World.GoodHealth Then
    Return NextState
Else
    Return ""
End If
The NextState variable is declared in the parent class, BasicTransition, and is made available to this child class because we marked it Protected in the parent. Note that this transition class does not know explicitly what state it transitions to. Not only can any state that wants to use this transition do so, it can point it at any other state. The state that creates the transition will tell the transition what the next state should be. Coding this way makes the transition reusable.
Our code for ShouldTransition has access to the world, but it makes no calls to the Say function. Right now, our monster speaks only when it is doing something. It does not talk about the thinking process itself. But since each transition has full access to the world, it could also speak. If your code does not work right the first time you run it, one of the ways to see what the monster is thinking is to have all the transitions say that they are running and whether they are valid.
Now that the transition is defined, the states that use it can load it into their transition collections. This should happen only one time: when the state is created. The place to do this is in the state’s New() function. Scroll to the top of HidingState.vb and click the word HidingState. VB changes the contents of the drop-down lists at the top of the Editing pane based on where you clicked. The left drop-down list now says HidingState, and the right one says (Declarations). Click (Declarations). All the routines in the class are in this list, plus New and Finalize (whether they have been added or not). Select New from the list. VB adds the skeleton for you.
New() runs once, when an object is created, and it is the perfect place for our State objects to load their transitions. Add code to the New() routine as follows:
Public Sub New()
    Dim Txn As BasicTransition
    'Create a specific transition
    Txn = New SeePlayerHighHealthTxn()
    'Set the next state name of that transition
    Txn.Initialize(GetType(AttackState).Name)
    'Add it to our list of transitions
    MyTransitions.Add(Txn)
End Sub
We see in Figure 3.2 that the Hiding state has only one outgoing transition. At this point, we have completed the Hiding state. If we add this state to the FSM, we could test it to see if it works. We have written a great deal of code at this point and tested none of it, so perhaps some testing is in order. We should expect problems because we have not completed everything, but what we have should run. Before we can do any serious testing, however, we need to give the monster an FSM, and we need to load our single completed state into it.
Navigate to the code for Monster.vb. You can do this via a right-click on Monster.vb in the Solution Explorer window or by clicking the tab above the Editing pane if it is present. If a skeleton for the Load event handler is not present, click the top-left drop-down and select (Monster Events). Then click Load in the right drop-down to create the skeleton. Then add the following two lines above the Load event handler:
'We need an FSM
Dim Brains As New FSM
To the Load event handler itself, add the following lines:
'The first state loaded is the start state
Brains.LoadState(New HidingState)
Working from in the parentheses out, this asks VB to create a new HidingState object and pass it to the LoadState method of the FSM object we call Brains. All that remains is the ability to ask the FSM to think. Switch to the Design view of Monster.vb and double-click the Think button. VB will switch back to the Code view and create the Click event handler for ThinkButton. Add the following line to that handler:
Brains.RunAI(Me)
The Me keyword is how the monster form can refer to itself. Brains is an FSM object, and its RunAI member expects to be passed an object of type Monster. We have not loaded every state into the Brains FSM object, but one state is enough for testing. From the Debug menu, select Start Debugging. VB saves all the files and compiles them before running the program. Click the Think button and manipulate the user interface. When finished, close the form or select Stop Debugging from the Debug menu. You should see something like Figure 3.5.
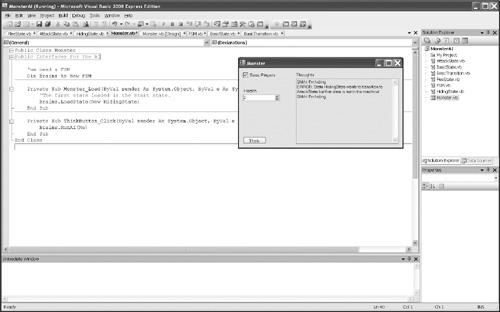
Our lobotomized monster complains about missing two-thirds of its brain, but other than that, it performs reasonably well. The second error check we added to RunAI in the FSM has proven its worth. If your monster is having trouble thinking even that much, add Debug.Writeline statements anywhere in the code. The output appears in the Immediate window at the bottom of the development environment. (You can see this window in Figure 3.5, although it has nothing written in it.) Now that our monster thinks, we should enhance it with more brain power by finishing the other two states and their transitions.
According to Figure 3.2, the Attack state needs two transitions. Go to Attack State.vb and add the following two classes after the End Class line. VB will help you by supplying End Class lines as well as the skeletons for the ShouldTransition members. There are no new concepts in any of this code; it asks the same questions of the world we saw in SeePlayerHighHealthTxn. With good classes, once the hard part of creating the structure is complete, bolting in the rest is simple and straightforward.
Public Class NoPlayersTxn
    Inherits BasicTransition
    Public Overrides Function ShouldTransition(ByVal World As Monster) As String
        If Not World.DetectsPlayers Then
            'No one to attack or flee from
            Return NextState
        Else
            Return ""
        End If
    End Function
End Class

Public Class LowHealthTxn
    Inherits BasicTransition
    Public Overrides Function ShouldTransition(ByVal World As Monster) As String
        If Not World.GoodHealth Then
            'Stop attacking
            Return NextState
        Else
            Return ""
        End If
    End Function
End Class
We need to put these transitions into the AttackState class’s New() routine. Be sure you add the code to the state class and not to either of the transition classes! When complete the New() function of the AttackState class, it will look as follows:
Public Sub New()
    Dim Txn As BasicTransition

    'Order is important - react to players first
    'If no players, hide
    Txn = New NoPlayersTxn()
    'Set the next state name of that transition
    Txn.Initialize(GetType(HidingState).Name)
    'Add it to our list of transitions
    MyTransitions.Add(Txn)

    'Then react to health - if low, flee
    Txn = New LowHealthTxn()
    'Set the next state name of that transition
    Txn.Initialize(GetType(FleeState).Name)
    'Add it to our list of transitions
    MyTransitions.Add(Txn)
End Sub
Recall that we disambiguate transitions by taking the first valid transition and controlling the order in which they are evaluated. They are evaluated in the order loaded, so reacting to players should be loaded first. We do not want our monster to flee from players who are not there. This completes the Attack state. We will add the Attack state to the FSM after we complete the Flee state.
Switch to FleeState.vb so that we can add the two transitions that leave the Flee state as seen in Figure 3.2. Before we add them, note that the No Players transition in the Flee state has the same decision criteria as the No Players transition in the Attack state. We can reuse the NoPlayersTxn class we created in Attack State.vb as it is. We still have to create the High Health transition and load both transitions into the state. Add the following class to the bottom of the FleeState.vb file below the End Class statement:
Public Class HighHealthTxn
    Inherits BasicTransition
    Public Overrides Function ShouldTransition(ByVal World As Monster) As String
        If World.GoodHealth Then
            'Stop flight
            Return NextState
        Else
            Return ""
        End If
    End Function
End Class
The only differences between this and LowHealthTxn are the names, the word Not in the comparison, and the comment text. You can save yourself some typing via copy and paste as long as you remember to edit what is pasted.
Now we will add the two transitions to the New() routine for the state. When finished it will look like the following:
Public Sub New()
    Dim Txn As BasicTransition

    'Order is important - react to players first
    'If no players, hide
    Txn = New NoPlayersTxn()
    'Set the next state name of that transition
    Txn.Initialize (GetType(HidingState).Name)
    'Add it to our list of transitions
    MyTransitions.Add(Txn)

    'Then react to health - if high, attack
    Txn = New HighHealthTxn()
    'Set the next state name of that transition
    Txn.Initialize(GetType(AttackState).Name)
    'Add it to our list of transitions
    MyTransitions.Add(Txn)
End Sub
This is very similar to the New() code for AttackState. The first transition is identical; it has the same criteria and the same next state. The second transition uses a different transition, and it goes to a different state, so of course the comment is changed as well. The final step remaining is to get these states into the machine.
Switch to the Code view of Monsters.vb and go to the Load event handler. Below the existing call that loads the Hiding state, add these lines:
Brains.LoadState(New AttackState)
Brains.LoadState(New FleeState)
Recall that the first state loaded is the Start state, so make sure these lines come after the line that loads the Hiding state. Now select Start Debugging from the Debug menu. Change the settings on the user interface and click Think to watch the monster react. This monster AI is pretty simple, but with a few more states it would be as smart as the monsters in the original version of Doom.
This chapter shows that a collection of a few simple states and transitions is enough for many simple game AI tasks. Once the framework is created and understood, new behavior states can be added quickly and easily without upsetting existing work. There is an up-front cost, but it pays off quickly with every new capability added. Using this technique, game AI programmers can quickly turn a design diagram into changing behaviors in a game. While experienced programmers often use FSM, they also know when not to use them and how to modify them to control complexity and ensure intelligent behavior.
Answers are in the appendix.