
Our working definition for AI is the ability to act intelligently in the face of changing conditions. Embedding such capability in a game makes it game AI. We will return to this definition throughout the book to make sure that we can identify how any given AI meets the definition. We will also take care to examine what is not game AI. While this definition seems simple enough, all three parts of it—the ability to act, the requirement that the action be intelligent, and the requirement that the action be in response to changing conditions—are worth separate inspection.
First, as mentioned, the AI should have the ability to act in some fashion. AI that has no output is wasted computation. In a game context, this means that the actions of the AI must have the possibility of being noticed by the player. Games that are noted for good AI often have an AI that is no better than other games, aside from the fact that the game gives the player the ability to see the AI acting intelligently. For example, if, in a game, the player sees a room with an AI-controlled character working at a computer, the player may conclude there is nothing special about the AI. Even if the AI character happens to be playing a world-class game of chess in real time, it is all wasted unless the player gets a chance to notice this amazing ability of the AI. The player does not necessarily have to see the intelligent behavior at the time a decision is being made, but evidence of the intelligence should be made available to the player in time for the player to enjoy it.
The second part of our definition requires that the AI decisions be intelligent ones. Making the AI decisions appear intelligent is a recurring challenge. The hardest part is not always making the AI look smart; often, it is preventing the AI from looking dumb. At an AI roundtable many years ago, I dubbed this “avoiding artificial stupidity.” Even purely random decision making may fit this criterion. Pundits describe insanity as “doing the exact same thing and expecting different results.” In this light, random decision making gives the appearance of an AI that is learning from past mistakes or one that is changing how it plays to keep the player from countering the AI’s past successes. If players cannot detect the purely random nature, they often interpret it as highly intelligent. The final judge of “intelligence” is the player.
Note
It may seem unfair that AI will be judged by how stupid it is in its low points instead of how smart it is in its high points, but other aspects of games are judged in a similar way. For example, Id Software spent well over a year perfecting the graphics engine for one of the very first full 3D games, Quake. The hard part was not hitting 30 frames per second at the top end, but keeping the frame rate above 10 frames per second at all times [Abrash96].
The third part of our definition requires the game AI to react to changing conditions. It is generally accepted that a core part of what makes computer games fun is a high degree of interactivity. Quality interactivity requires that the players’ decisions matter—that they change the state of the game. Players are free to make whatever choices they find agreeable and to change the game state in such ways as they can. This is the changing world in which game AI must exist. This changing world places great pressure on the ability of the AI to appear intelligent. If the AI cannot act differently in different situations, it will be only slightly more interesting than watching a stick fall to the ground when you let go of it.
Those three parts give us a working view of AI, but this book is about game AI. As an entertainment product, everything must further the player’s enjoyment. Our AI must make the game more fun. A harder challenge appeals to only one of the four basic ways people have fun [Lazzaro04]. Even worse, a harder challenge lacks fixed definition—one player’s “harder” is another player’s “frustrating.” A game AI programmer must never lose sight of fun as the primary goal. Making the AI smarter and more sophisticated often makes the game more fun, but not always. An online game that programmed the monster AI to target healers and mages preferentially proved to be far more effective at defeating the players but far less fun for the players.
Having a reasonable definition of what game AI is, it is worth considering what game AI is not. AI is not physics. The code that decides whether a virtual rock on the edge of a cliff should stay on the cliff or fall off the cliff is not AI. The rock has no free choice in the matter and no options to pick from, no matter how smart it is. Forces of a certain magnitude always push the rock off the cliff, and forces below that level cannot. The rock is not free to make a sub-optimal choice in the short term that better suits its long-term goals. The code may resemble AI—the rock evaluated changing conditions and the decision was made to fall off the cliff—but it had no choice in the matter.
AI need not always be complex. While there is a need for complex AI methods, a large amount can be accomplished with simple methods. These simple methods are still AI, despite a feeling in academia and industry that, “stuff we know how to do isn’t really AI and stuff we can’t do yet is real AI.” This book has many basic techniques for game AI. All of them, even the simplest, are in widespread use by professional game developers.
The rest of this chapter deals with where to find Visual Basic and using Visual Basic to create your first project. If you have experience programming with Visual Basic .NET, you may be able to skip ahead to Chapter 2, “Simple Hard-Coded AI.” If you are an experienced programmer who is new to Visual Basic, you should be able to fly through the rest of this chapter. The projects and material in the rest of the book will be far less elementary than this introductory project.
The projects in this book were written in Visual Basic .NET using Microsoft Visual Basic 2008. VB.NET, like VB before it, is easy to learn and write, and yet quite powerful. With the advent of VB.NET in 2001, VB no longer carries an inherent performance penalty compared to other languages. You will need to install VB to use the software on the CD that is included with this book. Once you have installed it, you’ll bring up the development environment and proceed through the walk-through example in this chapter.
Note
There is extensive support for VB on the Internet. Many questions can be answered with a few careful Internet searches; you will usually need to include VB and .NET as keywords. The Microsoft Developer Network (MSDN) library is another valuable resource for Windows developers. It can be viewed online at http://msdn.microsoft.com/en-us/library/default.aspx; you can download it or the Express Library from http://www.microsoft.com/express/download/msdn/Default.aspx.
Visual Basic 2008 requires a Microsoft Windows XP or later operating system. Older versions can run on Windows 2000. The Visual Basic 2008 Express edition is free for non-commercial use. Further details and the software itself are available at http://www.microsoft.com/Express/default.aspx. In addition to the software, the Express Web site offers tutorials and other information that may be valuable to first-time Visual Basic users.
VB is included in the retail versions of the Visual Studio development environment. The screens will be similar, but will carry more options. If you have Visual Studio, you can safely substitute “Visual Studio” wherever you read “Visual Basic” in this book with few problems. Note that the dialog boxes will not match exactly; Visual Studio is more sophisticated than the Express versions of the languages it supports.
If you are an experienced C programmer, you may prefer to use C# or C++. Download Visual C# 2008 Express Edition or Visual C++ 2008 Express Edition instead of Visual Basic. The C# and VB languages both utilize the .Net Framework Common Language Runtime, making them utterly interchangeable. C++ requires modest translations that should not prove taxing for an experienced programmer who happens to be new to AI.
For those new to Windows programming, a few brief words of description are in order. A Windows application starts with forms (the windows in Windows are forms). On the forms are controls such as buttons and text boxes. When the user interacts with a control, an event is fired and the application software handles that event. When the application software is done handling the event, it gives control back to the operating system. There is no “main,” familiar to C programmers, only a startup form that is shown to the user when the application launches. Giving control back to the operating system after handling an event does not mean that the application finishes execution and exits, only that it is done handling the last event and is ready to handle another. This is called event-driven programming.
The game projects in this book will be Windows forms applications written in VB. The forms will display the game and take user input. We will separate the AI for the game from the user interface. Not only is this an industry-accepted good practice, but it will also help provide focus and clarity on the AI portion of the code. Separating the AI from the rest of the code will make interfaces between the two explicit. One of the more important jobs of a game AI programmer is to make sure that the rest of the game will provide the AI with the information it needs to work effectively. In addition, the game AI programmer must insist that the rest of the game provide ways for the AI to manipulate the world and the interactive experience.
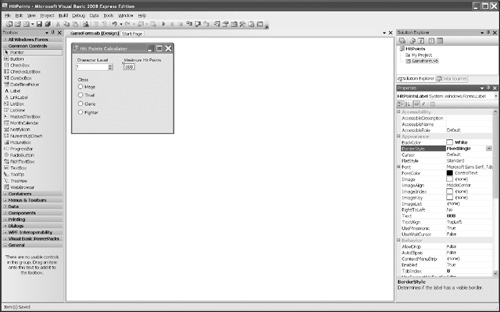
Our first project will be a hit point calculator. The user will input a character class and level, and the software will compute the maximum number of hit points for the character. The values match those used in numerous familiar fantasy role-playing games.
This project will familiarize you with creating a project, adding forms to it, adding controls to the forms, and writing code to handle events. Start by launching Visual Studio. From the File menu, select New Project. Visual Basic will show a dialog box similar to the one in Figure 1.1.
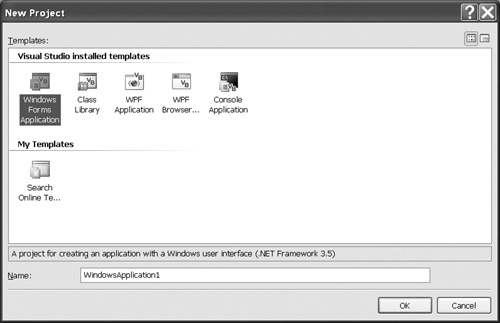
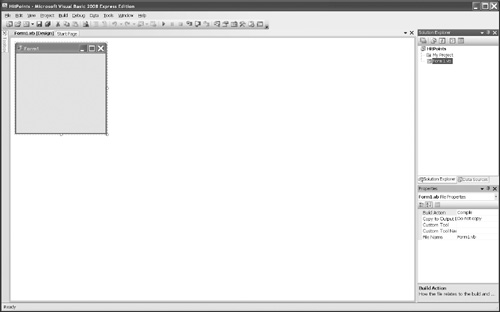
On the left side of Figure 1.1, Windows Forms Application is selected. Instead of using the default name, WindowsApplication1, change the name of this application to HitPoints and click OK. Your screen should resemble the one shown in Figure 1.2.
Note
If you happen to have version control software such as Visual Source Safe, Subversion, or Git, it is always a good idea to use it. Version control enables you to go back to any of the ideas you have tried out without losing any work. In general, programmer time is more expensive than disk space, so professionals keep everything they produce under version control. Another good argument for version control is the fact that predicting the best idea out of many cannot be done without trying all of them out.
The large area contains a window marked Form1. This is the editing pane. To the right is the Solution Explorer, showing all the files in the project. (A solution in Visual Basic can have more than one project, but we will not use this capability.) Below the Solution Explorer is the Properties window.
The Properties window lists the properties of whatever object was most recently in focus. Buttons near the top of the Properties window control what you see and how it is organized. Starting from the left, the first two buttons control how the window is organized. Click the first button (marked with two plus signs) to organize the properties by category; click the second button (marked with an A and Z and an arrow) to arrange the properties alphabetically.
If the focus is on a form, you will see five buttons. The third and fourth buttons control what is displayed. The Properties window usually shows properties, which you select with the third button. Clicking the fourth button, marked with a tiny lightning bolt, shows events and event handlers. These two buttons are not visible in Figure 1.2 because the focus is on the file Form1.vb in the Solution Explorer. The form has one set of properties, and the file the form is stored in has a different set. These buttons will show up shortly when we change the properties of the form itself.
Figure 1.2 shows all the files with room for more but only part of the Properties window. You can adjust the height of the Properties window by clicking and dragging the area between the Solution Explorer and the Properties window. This is just one way in which Visual Basic is extremely adjustable; another is the way you can choose to hide or display various window elements. For example, note the pushpin icons. The Solution Explorer and Properties window are pinned in Figure 1.2, so you can see their contents. To the left of the editing pane is the Toolbox; click it, and it slides open. Clicking the Toolbox’s pushpin will pin it open. Clicking outside the Toolbox when it is unpinned slides it back out of the way.
Visual Basic created a default form and named it Form1. This is typical of Visual Basic, so one of the first tasks when creating a new form or adding a control to a form is to give the new object a more useful name than the default. Visual Basic also gives default values to other properties, some of which we will also change.
Click anywhere on Form1 in the editing pane.
Look for the Properties window on the right side. Here you will find the names of all the properties of the current object and their values. Note that the row of buttons went from three buttons to five.
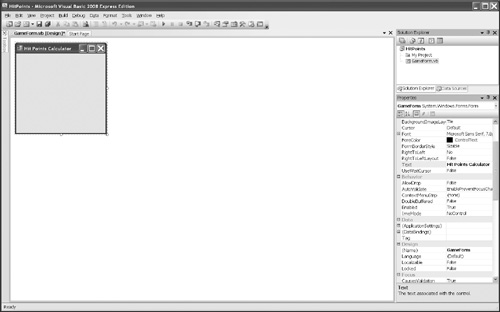
Change the Text property from Form1 to Hit Points Calculator; this text will be displayed in the title bar of the form. The value Form1 is bold and easy to find; values that have been changed from the default are marked in bold, as are Text and Name properties. Simply click where it says Form1 and type over it. If you are having trouble finding the property, it is in the Appearance category near the top. If you alphabetize the properties instead of grouping them by category, it will be near the bottom.
Scroll down to the Design category and change the Name property to GameForm. This name is used in code and should be selected for enhanced clarity.
Change the name of the form in the Solution Explorer from Form1.vb to GameForm.vb. Do this by clicking the letters of the name and then typing the new name or by right-clicking and selecting Rename from the context menu that appears and then typing the new name. If you click the form in the editing pane, your project should resemble Figure 1.3.
Our next task is to place controls on the form and operate them.
Click the Toolbox to slide it open. If your monitor has enough room, pin it open. The Toolbox has many categories of controls. The controls we will use are in the Common Controls category. Click the minus signs by the names of all of the other categories to close them, simplifying what you see. In general, all controls appear twice; once in a particular category and again in the All Windows Forms category at the top.
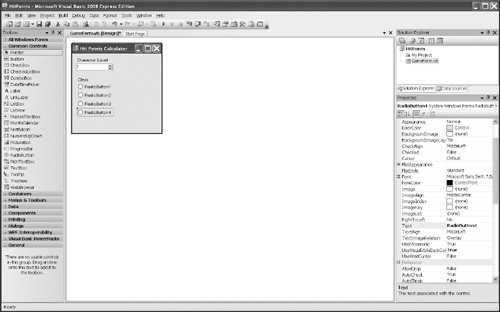
Scroll down the Common Controls to find the Label control. Then drag a Label control onto the form and place it near the upper left corner of the form. Little helper lines appear and disappear while the control is moving to aid in the placement of the control.
Visual Basic names the Label control Label1 and makes its Text property Label1 as well. Change the Text property of the label to Character Level.
Find the NumericUpDown control in the Toolbox and drag one to the form. The helper lines make it easy to line up beneath the label we just added.
Change the Name property from NumericUpDown1 to Level.
Find the Data group in the Properties window and change the Maximum property from 100 to 12.
Change the Minimum property from 0 to 1.
Drag another Label control from the Toolbox and place it below the Level control.
Change the Text property of this Label control to Class.
Drag four RadioButton controls from the Toolbox one at a time and put them below the Class label. Your project should look something like Figure 1.4.
At this point, we have invested some effort into the project, so it’s a good idea to save it. Click the File menu, select Save All, navigate to an appropriate location, and save the files. There will be two HitPoints folders in the file system. The parent folder is for the solution and contains the HitPoints.sln file. The child folder is for the project and contains HitPoints.vbproj. Recall that a solution can have more than one project; each project in a solution has its own folder.
Click the RadioButton1 control and change its Text property to Mage.
Change the Text property of RadioButton2 to Thief.
Change the Text property of RadioButton4 to Fighter.
In a similar manner, change the Name property of the controls to MageRadio, ThiefRadio, ClericRadio, and FighterRadio, respectively.
Drag another Label control from the Toolbox and place it to the right of the Character Level label.
Change the Text property of this new label to Maximum Hit Points.
The end of the label may go past the edge of the form. To fix this, click the form’s title bar. Small white boxes appear on the edges and corner of the form; drag the little white box on the right edge of the form to the right to make the form bigger.
Drag another Label control from the Toolbox and place it below the Maximum Hit Points label.
Change the Text property of this Label control to 888.
Change the Name property of this new label to HitPointsLabel. (You cannot have any spaces in a control name, so mixed case is used. We want this label to stand out.)
Type over the BackColor property to change it to White.
Use the drop-down list to change the BorderStyle property to FixedSingle.
This finishes the user interface part of the project. Your application should resemble Figure 1.5.
Note that we did not change the name of Label1 or any of the other labels, but we did change the name of this last label. We did so because code that we will write later will need to refer to the label, so it needs a clear name. Label1 will never be referenced by code we will write, so since life is short, we did not bother to rename it. We added the word Label at the end of the name so that the name will tell us what kind of control this particular one is. Complex projects employ many controls. Often, they will have similar names; by adding the control type on the end of the name, we can distinguish them easily.
You may have noticed that there are many properties that can be set. One of the advantages to VB is that you can generally get away with setting the ones you need and safely ignoring the rest. The Toolbox offers more controls than we need, and we can safely ignore the extras as well. Curious students will want to learn more about them by using the help system and the MSDN library. By now, it should be getting obvious how this project will work.
It is time to write code. Our application needs code to handle three things: events associated with the NumericUpDown control, events associated with the RadioButton controls, and gracefully starting up. The easiest way of getting from a form or a control on a form to the code that handles the events for the form or the control is to double-click the form or the control. We start with handling the events related to startup.
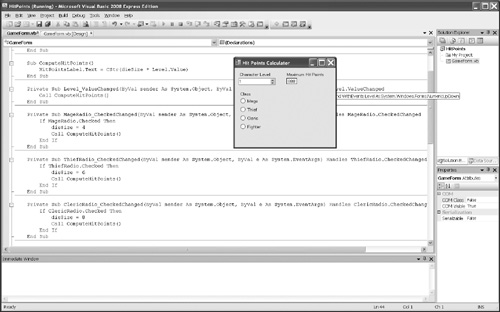
Double-click the GameForm form background, taking care not to double-click one of the controls. Visual Basic brings up a tab labeled GameForm.vb. The code for the form and all its controls live here. Visual Basic added the skeleton of the event handler for the form’s Load event. The Load event is the most typical place to put startup code for a form. When the application launches, the form will be created, and the form’s Load event will fire. Let us look carefully at the code for the form.
All of the code lives between the Class and End Class lines. If you are unfamiliar with classes, we will expand on them in Chapter 3, “Finite State Machines (FSMs).” For now, all the code for the form goes inside the class. We are more interested in the event handler.
Private Sub GameForm_Load(ByVal sender As System.Object, _
        ByVal e As System.EventArgs) Handles MyBase.Load
Going from left to right:
The first keyword is
Private.Privateconceals this routine, making it visible only inside the class. You can safely ignore it for now; we will not change it.Subimplies that the code does not return a value. If we need to return a value, we would use theFunctionkeyword instead.VB needed a name for this routine, so it used the name of the form and the name of the event being handled to come up with
GameForm_Load. We could change this name if we wanted to, but the name the system picked is clear enough.Next, you will find a comma-separated list of parameters inside a pair of parentheses. Each parameter is declared the same way as all variables in VB are declared. There is a modifier (
ByVal), the name of the parameter (sender), the keywordAs, and finally the parameter’s type (System.Object). Our code will ignore both parameters. (Note that these are preceded by an underscore character; this is the line-continuation character in VB, used when a single line of code spans multiple lines in text.)The
Handleskeyword tells the system that this routine is an event handler, and the event it handles is what comes after theHandleskeyword. The name suggests to the programmer that this is theLoadevent handler, but theHandleskeyword is authoritative.
We will add our initialization code between the Sub and End Sub lines shortly. We can ignore the complexities safely as long as we remember that the code we add here will run when the form is loaded, which for us means once, at startup.
Our application will want to compute the correct value of maximum hit points and show it as the text in the HitPointsLabel field instead of 888. To do this, the code needs to compute the product of the level of the character times the size of the character’s hit dice. It would be nice if the radio buttons would directly tell us the size of the character’s hit dice, but they do not. The Level control will give us a numeric value for level, but we need an integer variable to hold the die size. Just like on a car radio, we have to program the number we want to associate with each button. To make life easier, we will store that number away whenever a button gets clicked.
Below the Public Class GameForm and above the handler for Load, type the following and press Enter:
Dim dieSize as integer
Visual Basic will reformat and color the text as you go.
Note
As you type, Intellisense will offer various options that you can select. Pressing Ctrl+spacebar brings up Intellisense if it is not already there, and pressing Esc makes Intellisense go away. When Intellisense offers an option list, you can scroll to the one you want and press Tab to select it. The help system and Wikipedia can tell you more.
We want our software to “wake up sane.” That means the value shown for maximum hit points should be based on the level and class selected on the user interface. We could have set the Maximum Hit Points label Text property to 4 instead of 888 and selected Mage as the character class, knowing that we set the Level control to start with a value of 1. Doing so would force us into keeping all three controls synchronized whenever we reprogram any of them. It also means that the formula to compute maximum hit points would exist in two places: invisibly implied by the value we use in the Maximum Hit Points label Text property and explicitly stated somewhere in our code. If we change the formula, we would also have to remember to change the label.
There is a better way to ensure that our software wakes up sane. We are going to write code that changes the Maximum Hit Points label Text property whenever the user changes the level or class. Our Load event handler will act like a user and set the user interface to sane values. Then, all the code we have to write anyway will work on our behalf to wake up sane. We will be able to see at a glance that our code works.
We want the formula to exist in only one place. Add the following code between the end of the form Load event handler and the end of the class:
Sub ComputeHitPoints()
    HitPointsLabel.Text = CStr(dieSize * Level.Value)
End Sub
Adding this code sets the label text to the product of the character level (from the Level control) and their die size (the variable) all converted to a string, since the Text property is of type string and not of type integer. We need to call this code any time the user interface changes the level or class settings. How will our code know the user interface changed?
Whenever the controls are changed by the user, VB will fire events for the controls. We have an event handler for the form’s Load event; now we need handlers for the Level and Class controls.
Click the GameForm.vb [Design] tab.
Double-click the NumericUpDown control.
Visual Basic creates a handler for the
ValueChangedevent. This is the exact event we need to handle. Add a line to the handler to compute the new maximum hit points:Call ComputeHitPoints()The Call keyword is not required, but it does help beginning programmers understand that the code is invoking a subroutine. Click the Design tab again.
Double-click the Mage radio button. Visual Basic again takes us to the code, and this time it creates a handler for the radio button’s
CheckedChangedevent. This event fires when the checked status changes, which includes when the button goes from checked to unchecked. We only want to act if the button was checked. Add the following code for the event handler:If MageRadio.Checked Then dieSize = 4 Call ComputeHitPoints() End IfAdd similar code for each of the other radio buttons. When finished, your new code should look like the following:
Private Sub Level_ValueChanged(ByVal sender As System.Object, _
        ByVal e As System.EventArgs) Handles Level.ValueChanged
    Call ComputeHitPoints()
End Sub

Private Sub MageRadio_CheckedChanged(ByVal sender As System.Object, _
        ByVal e As System.EventArgs) Handles MageRadio.CheckedChanged
    If MageRadio.Checked Then
        dieSize = 4
        Call ComputeHitPoints()
    End If
End Sub

Private Sub ThiefRadio_CheckedChanged(ByVal sender As System.Object, _
        ByVal e As System.EventArgs) Handles ThiefRadio.CheckedChanged
    If ThiefRadio.Checked Then
        dieSize = 6
        Call ComputeHitPoints()
    End If
End Sub

Private Sub ClericRadio_CheckedChanged(ByVal sender As System.Object, _
        ByVal e As System.EventArgs) Handles ClericRadio.CheckedChanged
    If ClericRadio.Checked Then
        dieSize = 8
        Call ComputeHitPoints()
    End If
End Sub

Private Sub FighterRadio_CheckedChanged(ByVal sender As System.Object, _
        ByVal e As System.EventArgs) Handles FighterRadio.CheckedChanged
    If FighterRadio.Checked Then
        dieSize = 10
        Call ComputeHitPoints()
    End If
End Sub
That code takes care of all of the user interface events our code will need to handle. Let us see how well it works.
From the Visual Basic main menu, select Debug→Start Debugging or press F5. You should see something like Figure 1.6. Note that the application changed the value of 888 to 4 as expected. You can stop debugging by clicking the Close button (the red button with an × inside) in the upper-right corner of the application window or by selecting Stop Debugging from the Visual Basic Debug menu.
We can tell at a glance that our code does not wake up sane. It shows no class selection, and 888 is probably not the right number of hits points for a first level character of any class. At least the Level control is sane. Click one of the radio buttons to select a class and see the number of hit points change to the correct value. Change the Level and Class settings and verify that the code properly handles user input. Stop debugging so that you can edit the code.
We need our code to wake up with a class selected. The Level control wakes up sane, but the Class settings do not. We could set the Checked property to true for one of the radio buttons using the Properties window, but there is a better way. Add the following line to the empty GameForm_Load routine:
MageRadio.Checked = True
Now when our code wakes up, it will check the MageRadio radio button. This means that the radio buttons will appear to the user to wake up sane. One button will be selected. Run the application again. Notice that the maximum number of hit points is shown as 4 and not as 888. We did not directly change the label text, so why did it change? When our code selected the radio button, the system did as we asked and selected the button. The system also did as it always does and fired the CheckedChanged event for the control. The event handler we added for that event of that control ran, setting the die size to 4 and calling ComputeHitPoints. ComputeHitPoints set the label for us, using the formula. Not only will user interaction cause events to be fired, but actions by our code cause them as well.
We exploited the capability of our code to raise events in order to let it use the regular code for operation to also work for initialization. This cut down on the coding and the complexity. We eliminated a hidden dependency between the formula and the initialization code. Getting rid of special initialization code gets rid of potential bugs; there are no bugs in code that is not there.
In this chapter, we established a working definition for game AI. Game AI must act intelligently in the face of changing conditions. Unlike physics, game AI has choices when making its decisions. This chapter also gave us our first project, providing a grounding in Visual Basic that we will build upon in future chapters.
Answers are in the appendix.