Chapter 19. Building web applications
- Integrating JPA with CDI and JSF
- Browsing data in tables
- Implementing long-running conversations
- Customizing entity serialization
In this chapter, you see how Hibernate works in a typical web application environment. There are dozens of web application frameworks for Java, so we apologize if we don’t cover your favorite combination here. We discuss JPA in the standard Java Enterprise Edition environment, in particular combined with standards Contexts and Dependency Injection (CDI), JavaServer Faces (JSF), and Java API for RESTful web services (JAX-RS). As always, we show patterns you can apply in other proprietary environments.
First we revisit the persistence layer and introduce CDI management for the DAO classes. Then we extend these classes with a generic solution for sorting and paging data. This solution is useful whenever you have to display data in tables, no matter what framework you choose.
Next, you write a fully functional JSF application on top of the persistence layer and look at the Java EE conversation scope, where CDI and JSF work together to provide a simple stateful model for server-side components. If you didn’t like the stateful EJBs with the extended persistence context in the last chapter, maybe these conversation examples with detached entity state on the server are what you’re looking for.
Finally, if you prefer writing web applications with rich clients, a stateless server, and frameworks such as JAX-RS, GWT, or AngularJS, we show you how to customize serialization of JPA entity instances into XML and JSON formats. We start with migrating the persistence layer from EJB components to CDI.
19.1. Integrating JPA with CDI
The CDI standard offers a type-safe dependency injection and component life-cycle management system in a Java EE runtime environment. You saw the @Inject annotation in the previous chapter and used it to wire the ItemDAO and BidDAO components together with the service EJB classes.
The JPA @PersistenceContext annotation you used inside the DAO classes is just another special injection case: you tell the runtime container to provide and automatically handle an EntityManager instance. This is a container-managed EntityManager. There are some strings attached, though, such as the persistence-context propagation and transaction rules we discussed in the previous chapter. Such rules are convenient when all of your service and DAO classes are EJBs, but if you don’t employ EJBs, you may not want to follow these rules. With an application-managed EntityManager, you can create your own persistence context management, propagation, and injection rules.
You now rewrite the DAO classes as simple CDI managed beans, which are just like EJBs: plain Java classes with extra annotations. You want to @Inject an EntityManager and drop the @PersistenceContext annotation, and thus have full control over the persistence context. Before you can inject your own EntityManager, you must produce it.
19.1.1. Producing an EntityManager
A producer in CDI parlance is a factory used to customize creation of an instance and tell the runtime container to call a custom routine whenever the application needs an instance based on the declared scope. For example, the container will create an application-scoped instance only once during the life cycle of the application. The container creates a request-scoped instance once for every request handled by a server and a session-scoped instance once for every session a user has with a server.
The CDI specification maps the abstract notions of request and session to servlet requests and sessions. Remember that both JSF and JAX-RS build on top of servlets, so CDI works well with those frameworks. In other words, don’t worry much about this: in a Java EE environment, all the integration work has already been done for you.
Let’s create a producer of request-scoped EntityManager instances:
Path: /apps/app-web/src/main/java/org/jpwh/web/dao/EntityManagerProducer.java

- This CDI annotation declares that only one producer is needed in the entire application: there will only ever be one instance of EntityManagerProducer.
- The Java EE runtime gives you the persistence unit configured in persistence.xml, which is also an application-scoped component. (If you use CDI standalone and outside a Java EE environment, you can instead use the static Persistence.createEntity-ManagerFactory() bootstrap.)
- Whenever an EntityManager is needed, create() is called. The container reuses the same EntityManager during a request handled by your server. (If you forget @RequestScoped on the method, the EntityManager will be application-scoped like the producer class!)
- When a request is over and the request context is being destroyed, the CDI container calls this method to get rid of an EntityManager instance. You created this application-managed persistence context (see section 10.1.2), so it’s your job to close it.
A common issue with CDI-annotated classes is mistaken imports of annotations. In Java EE 7, there are two annotations called @Produces; the other one is in javax.ws.rs (JAX-RS). This isn’t the same as the CDI producer annotation and you can spend hours looking for this error in your code if you pick the wrong one. Another duplicate is @RequestScoped, also in javax.faces.bean (JSF). Like all other outdated JSF bean management annotations in the javax.faces.bean package, don’t use them when you have the more modern CDI available. We hope that future Java EE specification versions will resolve these ambiguities.
You now have a producer of application-managed EntityManagers and request-scoped persistence contexts. Next, you must find a way to let the EntityManager know about your system transactions.
19.1.2. Joining the EntityManager with transactions
When your server must handle a servlet request, the container creates the Entity-Manager automatically when it first needs it for injection. Remember that an EntityManager you manually create will only join a system transaction automatically if the transaction is already in progress. Otherwise, it will be unsynchronized: you’ll read data in auto-commit mode, and Hibernate won’t flush the persistence context.
It’s not always obvious when the container will call the EntityManager producer or exactly when during a request the first EntityManager injection takes place. Of course, if you process a request without a system transaction, the EntityManager you get is always unsynchronized. Hence, you must ensure that the EntityManager knows you have a system transaction.
You add a method for this purpose to the persistence layer, in the super-interface:
Path: /apps/app-web/src/main/java/org/jpwh/web/dao/GenericDAO.java
public interface GenericDAO<T, ID extends Serializable>
    extends Serializable {
<enter/>
    void joinTransaction();
<enter/>
    // ...
}
You should call this method on any DAO before storing data, when you’re sure you’re in a transaction. If you forget, Hibernate will throw a TransactionRequiredException when you try to write data, indicating that the EntityManager has been created before a transaction was started and that nobody told it about the transaction. If you want to exercise your CDI skills, you could try to implement this aspect with a CDI decorator or interceptor.
Let’s implement this GenericDAO interface method and wire the new Entity-Manager to the DAO classes.
19.1.3. Injecting an EntityManager
The old GenericDAOImpl relies on the @PersistenceContext annotation for injection of an EntityManager in a field, or someone calling setEntityManager() before the DAO is used. With CDI, you can use the safer constructor-injection technique:
Path: /apps/app-web/src/main/java/org/jpwh/web/dao/GenericDAOImpl.java
public abstract class GenericDAOImpl<T, ID extends Serializable>
        implements GenericDAO<T, ID> {
<enter/>
    protected final EntityManager em;
    protected final Class<T> entityClass;
<enter/>
    protected GenericDAOImpl(EntityManager em, Class<T> entityClass) {
        this.em = em;
        this.entityClass = entityClass;
    }
<enter/>
    public EntityManager getEntityManager() {
        return em;
    }
<enter/>
    @Override
    public void joinTransaction() {
        if (!em.isJoinedToTransaction())
            em.joinTransaction();
    }
    // ...
}
Anyone who wants to instantiate a DAO must provide an EntityManager. This declaration of an invariant of the class is a much stronger guarantee; hence, although we frequently use field injection in our examples, you should always first think about constructor injection. (We don’t do it in some examples because they would be even longer, and this book is already quite big.)
In the concrete (entity DAO) subclasses, declare the necessary injection on the constructor:
Path: /apps/app-web/src/main/java/org/jpwh/web/dao/ItemDAOImpl.java
public class ItemDAOImpl
    extends GenericDAOImpl<Item, Long>
    implements ItemDAO {
<enter/>
    @Inject
    public ItemDAOImpl(EntityManager em) {
        super(em, Item.class);
    }
<enter/>
    // ...
<enter/>
}
When your application needs an ItemDAO, the CDI runtime will call your Entity-ManagerProducer and then call the ItemDAOImpl constructor. The container will reuse the same EntityManager for any injection in any DAO during a particular request.
If you have more than one database—more than one persistence unit—you can use CDI qualifiers to differentiate them. A qualifier is a custom annotation. You write that annotation, such as @BillingDatabase, and mark it as a qualifier. Then you place it next to @Produces on the method that creates an EntityManager from that particular persistence unit. Anyone who wants this EntityManager now also adds @BillingDatabase right next to @Inject.
What scope then is ItemDAO? Because you don’t declare a scope for the implementation class, it’s dependent. An ItemDAO is created whenever someone needs it, and the ItemDAO instance is then in the same context and scope as its caller and belongs to that calling object. This is a good choice for the persistence layer API, because you delegate scoping decisions to the upper layer with the services calling the persistence layer.
You’re now ready to @Inject an ItemDAO field in a service class. Before you use your CDI-enabled persistence layer, let’s add some functionality for paging and sorting data.
19.2. Paging and sorting data
A very common task is loading data from the database with a query and then displaying that data on a web page in a table. Frequently you must also implement dynamic paging and sorting of the data:
- Because the query returns much more information than can be displayed on a single page, you only show a subset of the data. You only render a certain number of rows in a data table and give users the options to go to the next, previous, first, or last page of rows. Users also expect the application to preserve sorting when they switch pages.
- Users want to be able to click a column header in the table and sort the rows of the table by the values of this column. Typically, you can sort in either ascending or descending order; this can be switched by subsequent clicks the column header.
You now implement a generic solution for browsing through pages of data, based on the metamodel of persistent classes provided by JPA.
Page browsing can be implemented in two variations: using the offset or the seek technique. Let’s look first at the differences and what you want to implement.
19.2.1. Offset paging vs. seeking
Figure 19.1 shows an example of a browsing UI with an offset-based paging mechanism. You see that there’s a handful of auction items and that a small page size of three records is used. Here, you’re on the first page; the application renders links to the other pages dynamically. The current sort order is by ascending item name. You can click the column header and change the sorting to descending (or ascending) by name, auction end date, or highest bid amount. Clicking the item name in each table row opens the item detail view, where you can make bids for an item. We take on this use case later in this chapter.
Figure 19.1. Browsing the catalog pages by offset

Behind this page are database queries with an offset and a limit condition, based on row numbers. The Java Persistence API for this are Query#setFirstResult() and Query#setMaxResults(), which we discussed in section 14.2.4. You write a query and then let Hibernate wrap the offset and limit clauses around it, depending on your database SQL dialect.
Now consider the alternative: paging with a seek method, as shown in figure 19.2. Here you don’t offer users the option to jump to any page by offset; you only allow them to seek forward, to the next page. This may seem restrictive, but you’ve probably seen or even implemented such a paging routine when you needed infinite scrolling. You can, for example, automatically load and display the next page of data when the user reaches the bottom of the table/screen.
Figure 19.2. Browsing the catalog by seeking the next page

The seek method relies on a special additional restriction in the query retrieving the data. When the next page has to be loaded, you query for all items with a name “greater than [Coffee Machine]”. You seek forward not by offset of result rows with setFirstResult(), but by restricting the result based on the ordered values of some key. If you’re unfamiliar with seek paging (sometimes called keyset paging), we’re sure you won’t find this difficult once you see the queries later in this section.
Let’s compare the advantages and disadvantages of both techniques. You can of course implement an endless-scrolling feature with offset paging or direct-page navigation with the seek technique; but they each have their strength and weaknesses:
- The offset method is great when users want to jump to pages directly. For example, many search engines offer the option to jump directly to page 42 of a query result or directly to the last page. Because you can easily calculate the offset and limit of a range of rows based on the desired page number, you can implement this with little effort. With the seek method, providing such a page-jumping UI is more difficult; you must know the value to seek. You don’t know what item name the client displayed just before page 42, so you can’t seek forward to items with names “greater than X.” Seeking is best suited for a UI where users only move forward or backward page by page through a data list or table, and if you can easily remember the last value shown to the user.
- A great use case for seeking is paging based on anchor values that you don’t have to remember. For example, all customers whose names start with C could be on one page and those starting with D on the next page. Alternatively, each page shows auction items that have reached a certain threshold value for their highest bid amount.
- The offset method performs much worse if you fetch higher page numbers. If you jump to page 5,000, the database must count all the rows and prepare 5,000 pages of data before it can skip 4,999 of them to give you the result. A common workaround is to restrict how far a user can jump: for example, only allowing direct jumps to the first 100 pages and forcing the user to refine the query restrictions to get a smaller result. The seek method is usually faster than the offset method, even on low page numbers. The database query optimizer can skip directly to the start of the desired page and efficiently limit the index range to scan. Records shown on previous pages don’t have to be considered or counted.
- The offset method may sometimes show incorrect results. Although the result may be consistent with what’s in the database, your users may consider it incorrect. When applications insert new records or delete existing records while the user is browsing, anomalies may occur. Imagine the user looking at page 1 and someone adding a new record that would appear on page 1. If the user now retrieves page 2, some record they may have seen on page 1 is pushed forward onto page 2. If a record on page 1 was deleted, the user may miss data on page 2 because a record was pulled back to page 1. The seek method avoids these anomalies; records don’t mysteriously reappear or vanish.
We now show you how to implement both paging techniques by extending the persistence layer. You start with a simple model that holds the current paging and sorting settings of a data table view.
19.2.2. Paging in the persistence layer
When you want to coordinate querying and rendering data pages, you need to keep some details about the size of the pages and what page you’re currently viewing. Following is a simple model class encapsulating this information; it’s an abstract superclass that will work for both the offset and seek techniques:
Path: /apps/app-web/src/main/java/org/jpwh/web/dao/Page.java

- The model holds the size of each page and the number of records shown per page. The value -1 is special, meaning “no limit; show all records.”
- Keeping the number of total records is necessary for some calculations: for example, to determine whether there is a “next” page.
- Paging always requires a deterministic record order. Typically, you sort by a particular attribute of your entity classes in ascending or descending order. javax.persistence.metamodel.SingularAttribute is an attribute of either an entity or an embeddable class in JPA; it’s not a collection (you can’t “order by collection” in a query).
- The allowedAttributes list is set when creating the page model. It restricts the possible sortable attributes to the ones you can handle in your queries.
Some methods of the Page class that we haven’t shown are trivial—mostly getters and setters. The abstract createQuery() method, however, is what subclasses must implement: it’s how paging settings are applied to a CriteriaQuery before the query is executed.
First you introduce the Page interface in the persistence layer. In a DAO interface, an API accepts a Page instance where you want to support retrieving data page by page:
Path: /apps/app-web/src/main/java/org/jpwh/web/dao/ItemDAO.java
public interface ItemDAO extends GenericDAO<Item, Long> {
<enter/>
    List<ItemBidSummary> getItemBidSummaries(Page page);
<enter/>
    // ...
<enter/>
}
The data table you want to render shows a List of ItemBidSummary data-transfer objects. The result of the query is not important in this example; you could just as easily retrieve a list of Item instances. This is a brief excerpt of the DAO implementation:


Path: /apps/app-web/src/main/java/org/jpwh/web/dao/ItemDAOImpl.java

- This is a regular criteria query you’ve seen many times before.
- Delegate finishing the query to the given Page.
The concrete Page implementation prepares the query, setting the necessary offset, limit, and seek parameters.
Implementing offset paging
For example, here is the implementation of the offset paging strategy:


Path: /apps/app-web/src/main/java/org/jpwh/web/dao/OffsetPage.java

- For offset-based paging, you need to know which page you’re on. By default, you start with page 1.
- Test whether the sorting attribute of this page can be resolved against the attribute path and therefore the model used by the query. The method throws an exception if the sorting attribute of the page wasn’t available on the model class referenced in the query. This is a safety mechanism that produces a meaningful error message if you pair the wrong paging settings with the wrong query.
- Add an ORDER BY clause to the query.
- Set the offset of the query: the starting result row.
- Cut the result off with the desired page size.
We haven’t shown all the methods involved here, such as getRangeStartInteger(), which calculates the number of the first row that must be retrieved for the current page based on page size. You can find other simple convenience methods in the source code.
Note that the result order may not be deterministic: if you sort by ascending item name, and several items have the same name, the database will return them in whatever order the DBMS creators deemed appropriate. You should either sort by a unique key attribute or add an additional order criterion with a key attribute. Although many developers get away with ignoring deterministic sorting problems with the offset method, a predictable record order is mandatory for the seek strategy.
Implementing seek paging
For seek paging, you need to add restrictions to a query. Let’s assume that the previous page showed all items sorted by ascending name up to Coffee Machine, as shown in figure 19.2, and that you want to retrieve the next page with an SQL query. You remembered the last value of the previous page, the Coffee Machine record and its identifier value (let’s say 5), so you can write in SQL:
select i.* from ITEM i
where
    i.NAME >= 'Coffee Machine'
    and (
        i.NAME <> 'Coffee Machine'
        or i.ID > 5
    )
order by
    i.NAME asc, i.ID asc
The first restriction of the query says, “Give me all items with a name greater than or equal to [Coffee Machine],” which seeks forward to the end of the previous page. The database may perform this efficient restriction with an index scan. Then you further restrict the result by saying you want no records named Coffee Machine, thus skipping the last record you’ve already shown on the previous page.
But there may be two items named Coffee Machine in the database. A unique key is necessary to prevent items from falling through the cracks between pages. You must order by and restrict the result with that unique key. Here you use the primary key, thus guaranteeing that the database includes only items not named Coffee Machine or (even if named Coffee Machine) with a greater identifier value than the one you showed on the previous page.
Of course, if the item name (or any other column you sort by) is unique, you won’t need an additional unique key. The generic example code assumes that you always provide an explicit unique key attribute. Also note that the fact that item identifiers are incremented numerical values isn’t important; the important aspect is that this key allows deterministic sorting.
You can write this same query in a more compact form in SQL with the row-value constructor syntax:
select i.* from ITEM i
where
    (i.NAME, i.ID) > ('Coffee Machine', 5)
order by
    i.NAME asc, i.ID asc
This kind of restriction expression works even in JPQL in Hibernate. JPA doesn’t standardized this, though; it’s unavailable with the criteria API and not supported by all database products. We prefer the slightly more verbose variation, which works everywhere. If you sort in descending order, you invert the comparisons from greater than to less than.
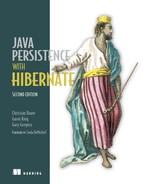
The following code in the SeekPage implementation adds such a restriction to a criteria query:

Path: /apps/app-web/src/main/java/org/jpwh/web/dao/SeekPage.java

- In addition to the regular sorting attribute, the seek technique requires a paging attribute that’s a guaranteed unique key. This can be any unique attribute of your entity model, but it’s usually the primary key attribute.
- For both the sorting attribute and the unique key attribute, you must remember their values from the “last page.” You can then retrieve the next page by seeking those values. Any Comparable value is fine, as required by the restriction API in criteria queries.
- You must always sort the result by both the sorting attribute and the unique key attribute.
- Add any necessary additional restrictions (not shown) to the where clause of the query, seeking beyond the last known values to the target page.
- Cut off the result with the desired page size.
The full applySeekRestriction() method can be found in the example code; this is criteria query code we don’t have enough space for here. The final query is equivalent to the SQL example you saw earlier.
Let’s test the new paging feature of the persistence layer.
We said earlier that jumping directly to a page with the seek technique isn’t easy because you don’t know what the last values to seek for are, given a particular page number. You can find out what those values are with an SQL statement like this:
select i.NAME, i.ID
from ITEM i
where
    (select count(i2.*)
      from ITEM i2
      where (i2.NAME, i2.ID) <= (i.NAME, i.ID)
    ) % :pageSizeParameter = 0
order by i.NAME asc, i.ID asc
This query with a modulo (%) operation returns all (NAME, ID) pairs that are page-boundary values: they’re the last values on each page. We’ve included a criteria version of this query in the example code.
19.2.3. Querying page-by-page
When you call the ItemDAO#getItemBidSummaries() method now, you must provide a Page instance. A service or UI layer client on top of the persistence layer executes the following code:
Path: /apps/app-web/src/test/java/org/jpwh/test/service/PagingTest.java

Advancing to the next page is easy, and you can jump directly to any page number:
page.setCurrent(2);
result = itemDAO.getItemBidSummaries(page);
The seek technique needs a bit more information. First you instantiate a SeekPage with the additional required unique key attribute:
Path: /apps/app-web/src/test/java/org/jpwh/test/service/PagingTest.java

With the offset strategy, all you had to know to jump to a page was the page number. With the seek strategy, you must remember the last values shown on the previous page:
ItemBidSummary lastShownOnPreviousPage = // ...
<enter/>
page.setLastValue(lastShownOnPreviousPage.getName());
page.setLastUniqueValue(lastShownOnPreviousPage.getItemId());
<enter/>
result = itemDAO.getItemBidSummaries(page);
This is clearly more work for a client of the persistence layer. Instead of a simple number, it must be able to remember the last values dynamically, depending on the sort and the unique attribute.
We implemented the UIs for earlier screenshots with JSF and CDI, including the necessary glue code for our paging API. Look at the source code for inspiration on how to integrate this technique with your own service and UI layer.
Even if you don’t use JSF, it should be straightforward to adapt our paging and sorting solutions to other web frameworks. If you plan to use JSF, the next section is for you: we dive into complex use cases such as placing a bid and editing an auction item with a JSF web interface and a stateful service layer.
19.3. Building JSF applications
In the previous example, you can click an auction item name in the catalog. This brings you to the auction page for that item, with more detailed information, as shown in figure 19.3.
Figure 19.3. Viewing item details and placing a bid

The item auction page has one form, allowing you to place a bid on the item. This is the first use case to implement: placing a bid. You can handle this with a simple request-scoped service.
19.3.1. Request-scoped services
Let’s start with some important excerpts from the XHTML template for the page:
Path: /apps/app-web/src/main/webapp/auction.xhtml
<f:metadata>
    <f:viewParam name="id" value="#{auctionService.id}"/>
</f:metadata>
The page is bookmarkable—that is, it can and will be called with a query parameter, the identifier value of an Item. The view metadata tells JSF it should bind this parameter value to the back-end property id of the AuctionService. You implement this new service in a minute.
You render some item details on the page, asking the AuctionService for the data:
Path: /apps/app-web/src/main/webapp/auction.xhtml
<h:outputText value="Auction End:"/>
<h:outputText value="#{auctionService.item.auctionEnd}">
    <f:convertDateTime pattern="dd. MMM yyyy HH:mm"/>
</h:outputText>
<enter/>
<h:outputText value="Starting Price:"/>
<h:outputText value="#{auctionService.item.initialPrice}"/>
Rendering this information repeatedly calls the AuctionService#getItem() method, something you have to keep in mind when you work on the service implementation. Finally, here’s the form for placing a bid:
Path: /apps/app-web/src/main/webapp/auction.xhtml

- You need to transmit the identifier value of the item when the form is submitted. The back-end service is request-scoped, so it needs to be initialized for every request: this calls the AuctionService#setId() method.
- The entered bid amount is set by JSF with the AuctionService#setNewBidAmount() method when the POST back of this form is processed.
- After all values have been bound, the action method AuctionService#placeBid() is called.
Let’s now move on to the back-end service class, which is a simple CDI managed bean:
Path: /apps/app-web/src/main/java/org/jpwh/web/jsf/AuctionService.java

- You don’t need to hold state across requests for this use case. A service instance is created when the auction page view is rendered with a GET request, and JSF binds the request parameter by calling setId(). The service instance is destroyed after rendering is complete. Your server doesn’t hold any state between requests. When the auction form is submitted and processing of that POST request starts, JSF calls setId() to bind the hidden form field, and you can again initialize the state of the service.
- The state you hold for each request is the identifier value of the Item the user is working on, the Item after it was loaded, the currently highest bid amount for that item, and the new bid amount entered by the user.
Remember that in JSF, any property accessor methods bound in an XHTML template may be called multiple times. In the AuctionService, data will be loaded when accessor methods are called, and you have to make sure you don’t load from the database multiple times by accident:
Path: /apps/app-web/src/main/java/org/jpwh/web/jsf/AuctionService.java
public class AuctionService {
<enter/>
    public void setId(long id) {
        this.id = id;
        if (item == null) {
            item = itemDAO.findById(id);
            if (item == null)
                throw new EntityNotFoundException();
            highestBidAmount = itemDAO.getMaxBidAmount(item);
        }
    }
<enter/>
    // Other plain getters and setters...
<enter/>
}
When JSF calls setId() for the first time in a request, you load the Item with that identifier value once. Fail immediately if the entity instance can’t be found. You also load the currently highest bid amount to initialize the state of this service fully, before the view can be rendered or the action method called.
Note that this is a nontransactional method! Unlike EJBs, methods in a simple CDI bean don’t require a transaction to be active by default. The produced EntityManager and the persistence context used by the DAOs are unsynchronized, and you read data from the database in auto-commit mode. Even if later, while still processing the same request, a transactional method is called, the same unsynchronized, already-produced, request-scoped EntityManager is reused.
The placeBid() method is such a transactional method:
Path: /apps/app-web/src/main/java/org/jpwh/web/jsf/AuctionService.java

- The @Transactional annotation is new in Java EE 7 (from JTA 1.2) and similar to @TransactionAttribute on EJB components. Internally, an interceptor wraps the method call in a system transaction context, just like an EJB method.
- Perform transactional work and store a new bid in the database, and prevent concurrent bids. You must join the persistence context with the transaction. It doesn’t matter which DAO you call: all of them share the same request-scoped EntityManager.
- If another transaction is committed for a higher bid in the time the user was thinking and looking at the rendered auction page, fail and re-render the auction page with a message.
- You must force a version increment of the Item at flush time to prevent concurrent bids. If another transaction runs at the same time as this and loads the same Item version and current highest bid from the database in setId(), one of the transactions must fail in placeBid().
- This is a simple redirect-after-POST in JSF, so users can safely reload the page after submitting a bid.
When the placeBid() method returns, the transaction is committed, and the joined persistence context flushes changes to the database automatically. In Java EE 7, you can finally have the most convenient feature of EJBs: the declarative transaction demarcation, independent from EJBs.
Another new feature in Java EE is the CDI conversation scope and its integration in JSF.
19.3.2. Conversation-scoped services
You can declare beans and produced instances in Java EE as @ConversationScoped. This special scope is manually controllable with the standard javax.enterprise.context.Conversation API. To understand conversation scope, think about the examples in the previous chapter.
The shortest possible conversation, a unit of work from the perspective of the application user, is a single request/response cycle. A user sends a request, and the server starts a conversation context to hold the data for that request. When the response is returned, this short-running transient conversation context ends and is closed. Transient conversation scope is therefore the same as the request scope; both contexts have the same life cycle. This is how the CDI specification maps the conversation scope to servlet requests and therefore also JSF and JAX-RS requests.
With the Conversation API, you can promote a conversation on the server and make it long-running and no longer transient. If you promote the conversation during a request, the same conversation context is then available to the next request. You can use the context to transport data from one request to the next. Usually you’d need the session context for this, but the data from several parallel conversations (a user opens two browser tabs) would have to be manually isolated in the session. This is what the conversation context provides: automatic data isolation in a controllable context, which is more convenient than the regular session context.
You implement the conversation context with server-side sessions, of course, and store the data in the user’s session. To isolate and identify conversations within a session, each conversation has an identifier value; you must transmit that value with every request. The parameter name cid has even been standardized for this purpose. Each conversation also has an individual timeout setting so the server can free resources if a user stops sending requests. This allows the server to clean up expired conversation state automatically without waiting until the entire user session expires.
Another nice feature of the long-running (not transient) conversation context is that the server protects concurrent access to conversation-scoped data automatically: if a user quickly clicks an action button several times, and each request transmits the identifier value of a particular conversation, the server will terminate all except one of the requests with BusyConversationExceptions.
The flow scope added in recent JSF versions is similar to the CDI conversation scope. It’s focused on how the view templates of a workflow are grouped and discovered, and how navigation rules in a workflow can be automated. You can also use it to hold state across requests. Unfortunately, flow-context timeouts within a session aren’t specified, and neither is there a control API for manually ending or promoting workflow contexts. We think flow scope isn’t usable in its current incarnation beyond the most trivial cases—only where excessive resource consumption on the server doesn’t matter. We hope that future versions of Java EE will align CDI conversation and JSF flow-scope features and combine the strengths of both.
We now walk through an example of conversation scope usage in JSF. You implement a use case with a workflow that takes the user several requests to complete: putting an item up for auction.
The “edit item” conversation workflow
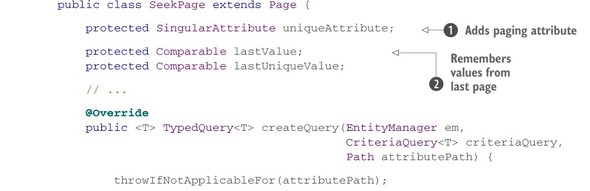
If you think about it for a minute, creating and editing an auction item are very similar tasks. These workflows are conversations: units of work from the perspective of the application user, and your users will expect them to look similar. Your goal is therefore to avoid code duplication; you should implement both cases with a single UI and back-end service. Your application guides the user through the workflow; figure 19.4 shows a graphical representation as a state chart.
Figure 19.4. The workflow of the “Edit item” conversation
Here’s how to read this diagram. The user may start the conversation without any data, if no item exists. Alternatively, the user may have the identifier value of an existing item, which is probably a simple numeric value. How the user obtained this identifier isn’t important; maybe they executed some kind of search in a previous conversation. This is a common scenario, and many conversation workflows have several entry points (the solid filled circles in the state chart).
From the perspective of the user, editing an item is a multistep process: each box with rounded corners represents a state of the application. In the Edit Item state, the application presents the user with a dialog or form where they can change the item’s description or the starting price for the auction. Meanwhile, the application waits for the user to trigger an event; we call this user think-time.
When the user triggers the Next event, the application processes it, and the user proceeds to the next (wait) state, Edit Images. When the user finishes working on the item images, they end the conversation by submitting the item and images (the solid circles with an outer circle). Clicking Cancel on any page aborts everything. From the application user’s perspective, the entire conversation is an atomic unit: all changes are committed and final when the user clicks Submit. No other transition or outcome should result in any permanent changes to the database.
You’ll implement this with a wizard-style user interface with two web pages. On the first page, the user enters the details of the item to sell or edit, as shown in figure 19.5.
Figure 19.5. The first page in the item auction wizard

Note that rendering this page won’t start a long-running conversation context on the server. This would waste resources, because you don’t know yet whether the user wants to follow through and work on the item details. You begin the long-running conversation context and hold state across requests on the server when the user clicks the Next button for the first time. If form validation passes, the server stores the conversational data in the user’s session and advances the user to the Edit Images page (see figure 19.6).
Figure 19.6. Editing images on the second page of the wizard

The unit of work is complete when the user submits the item after uploading images for the item. The user may at any time click Cancel to end the conversation or walk away from the terminal and let the conversation expire. The user may work in two browser tabs and run several conversations in parallel, so they must be isolated from each other on the server within the same user session. All conversation data for a user is removed if the user session expires (or if, in a cluster of servers with sticky sessions, a server fails).
The XHTML templates for this wizard have no markup relevant for the conversation; JSF with CDI automates this. Conversation identifiers are transmitted automatically with regular JSF form submissions in a generated hidden field, if a long-running conversation context was discovered when the form was rendered. This works even across JSF redirects: the cid parameter is appended automatically to the redirect destination URL.
The conversation-scoped back-end service bound to those pages—the EditItemService—is where everything happens and where you control the contexts.
The persistence context in a conversation
The EditItemService is the back end for the entire wizard and workflow:


Path: /apps/app-web/src/main/java/org/jpwh/web/jsf/EditItemService.java

- The service instance is conversation-scoped. By default, the conversation context is transient and therefore behaves as a request-scoped service.
- The class must be Serializable, unlike a request-scope implementation. An instance of EditItemService may be stored in the HTTP session, and that session data may be serialized to disk or sent across the network in a cluster. We took the easy way out in chapter 18 by using a stateful EJB, saying, “It’s not passivation capable.” Anything in the CDI conversation scope must be passivation-capable and therefore serializable.
- The injected DAO instances have dependent scope and are serializable. You may think they aren’t, because they have an EntityManager field, which isn’t serializable. We talk about this mismatch in a second.
- The Conversation API is provided by the container. Call it to control the conversation context. You need it when the user clicks the Next button for the first time, promoting the transient conversation to long-running.
- This is the state of the service: the item the user is editing on the pages of the wizard. You start with a fresh Item entity instance in transient state. If this service is initialized with an item identifier value, load the Item in setItemId().
- This is a transient state of the service. You only need it temporarily when the user clicks Upload on the Edit Images page. The Part class of the Servlet API isn’t serializable. It’s not uncommon to have some transient state in a conversational service, but you must initialize it for every request when it’s needed.
- setItemId() is called only if the request contains an item identifier value. You therefore have two entry points into this conversation: with or without an existing item’s identifier value.
- If the user is editing an item, you must load it from the database. You’re still relying on a request-scoped persistence context, so as soon as the request is complete, this Item instance is in detached state. You can hold detached entity instances in a conversational service’s state and merge it when needed to persist changes (see section 10.3.4).
Unlike stateful EJBs, you can’t disable passivation of the conversation context. The CDI specification requires that the class and all non-transient dependencies of a conversation-scoped component be serializable. In fact, you’ll get a deployment error if you make a mistake and include state that can’t be serialized in a conversation-scoped bean or any of its dependencies.
To pass this test, we lied earlier by saying that GenericDAO is java.io.Serializable. The EntityManager field in GenericDAOImpl is not serializable! This works because CDI uses contextual references—smart placeholders.
The EntityManager field of the DAOs isn’t an actual instance of a persistence context at runtime. The field holds a reference to some EntityManager: some current persistence context. Remember that CDI produces and injects the dependency through the constructor. Because you declared it request-scoped, at runtime a special proxy is injected that only looks like a real EntityManager. This proxy delegates all calls to an actual EntityManager it finds in the current request context. The proxy is serializable and doesn’t hold a reference to an EntityManager after a request is complete. It can then be easily serialized; and when it’s deserialized, maybe even on a different JVM, it will continue to do its work and obtain a request-scoped EntityManager whenever called. Therefore, you’re not serializing the entire persistence context—only a proxy that can look up the current request-scoped persistence context.
This may sound strange at first, but it’s how CDI works: if a request-scoped bean is injected into a conversation-, session-, or application-scoped bean, an indirect reference is required. If you try to call the EntityManager proxy through a DAO when no request context is active (say, in a servlet’s init() method), you’ll get a ContextNotActiveException because the proxy can’t obtain a current EntityManager. The CDI specification also defines that such proxies may be passivated (serialized), even when the component they represent may not be.
Assume now that the user has filled out the form on the first page of the wizard with the item details and clicks Next. You have to promote the transient conversation context.
Beginning long-running conversations
Clicking Next in the wizard submits the form with the Item details and takes the user to the Edit Images page. Because the EditItemService is bound to a transient conversation context, processing this request happens in a new, transient conversation context. Remember that the transient conversation scope is the same as the request scope.
When you process the request with an action method, you call the Conversation API to control the current transient conversation context:
Path: /apps/app-web/src/main/java/org/jpwh/web/jsf/EditItemService.java

The action method is called after all the Item details have been set on the EditItemService#item property by the JSF engine. You make the transient conversation long-running with an individual timeout setting. This timeout is obviously shorter than or equal to the timeout of the user’s session; larger values don’t make sense. The server preserves the state of the service in the user’s session and renders an automatically generated conversation identifier as a hidden field on any action form on the Edit Images page. If you need it, you can also obtain the identifier value of the conversation with Conversation#getId(). You can even set your own identifier value in the Conversation#begin() method call.
The server now waits for the next request with the identifier of the conversation, most likely originating from the Edit Images page. If this takes too long, because either the long-running conversation or the entire session expired, a NonexistentConversationException is thrown on request.
If the user wants to attach an image to the auction item, the next request may be an Upload action bound to this service method:
Path: /apps/app-web/src/main/java/org/jpwh/web/jsf/EditItemService.java

- Create the Image entity instance from the submitted multipart form.
- You must add the transient Image to the transient or detached Item. This conversation will consume more and more memory on the server as uploaded image data is added to conversational state and therefore the user’s session.
One of the most important issues when building a stateful server system is memory consumption and how many concurrent user sessions the system can handle. You must be careful with conversational data. Always question whether you must hold data you get from the user or data you load from the database for the entire conversation.
When the user clicks Submit Item, the conversation ends, and all transient and detached entity instances must be stored.
Ending long-running conversations
The conversation workflow ends when the transient or detached Item and its images are stored:
Path: /apps/app-web/src/main/java/org/jpwh/web/jsf/EditItemService.java

- The system transaction interceptor wraps the method call.
- You must join the unsynchronized request-scoped persistence context with the system transaction if you want to store data.
- This DAO call makes the transient or detached Item persistent. Because you enabled it with a cascading rule on the @OneToMany, it also stores any new transient or old detached Item#images collection elements. According to the DAO contract, you must take the returned instance as the current state.
- Manually end the long-running conversation. This is effectively a demotion: the long-running conversation becomes transient. You destroy the conversation context and this service instance when the request is complete. All conversational state is removed from the user’s session.
- This is a redirect-after-POST in JSF to the auction item details page, with the new identifier value of the now-persistent Item.
Alternatively, the user may click Cancel at any time to exit the wizard:
Path: /apps/app-web/src/main/java/org/jpwh/web/jsf/EditItemService.java
public class EditItemService implements Serializable {
<enter/>
    // ...
<enter/>
    public String cancel() {
        if (!conversation.isTransient())
            conversation.end();
        return "catalog?faces-redirect=true";
    }
<enter/>
    // ...
}
This completes our example of stateful services with JSF, CDI, and a JPA persistence layer. We think JSF and CDI are great in combination with JPA; you get a well-tested and standardized programming model with little overhead, both in terms of resource consumption and lines of code.
We now continue with CDI but, instead of JSF, introduce JAX-RS combined with JPA in a stateless server design for any rich clients. One of the challenges you face in this architecture is serializing data.
19.4. Serializing domain model data
When we first talked about writing persistence-capable classes in section 3.2.3, we briefly mentioned that the classes don’t have to implement java.io.Serializable. You can apply this marker interface when needed.
One of the cases when this was necessary so far was in chapter 18. Domain model instances were transmitted between EJB client and server systems, and they were automatically serialized on one end into some wire format and deserialized on the other end. This worked flawlessly and without customization because both client and server are Java virtual machines, and the Hibernate libraries were available on both systems. The client used Remote Method Invocation (RMI) and the standardized Java serialization format (a stream of bytes representing Java objects).
If your client isn’t running in a Java virtual machine, you probably don’t want to receive a stream of bytes representing Java objects from the server. A common scenario is a stateless server system that handles a rich client, such as a JavaScript application running in a web browser or a mobile device application. To implement this, you typically create a Web API on the server that speaks HTTP and transmit either XML or JSON payloads, which clients must then parse. The clients also send XML or JSON data when changes must be stored on the server, so your server must be able to produce and consume the desired media types.
Many people call a system with HTTP remote communication and JSON or XML media types RESTful. But one of the most important aspects of an architecture with representational state transfer is that client and server exchange hypermedia documents. These hypermedia documents contain the data and the affordances (actions) available on that data: Thus, the name Hypermedia As The Engine Of Application State (HATEOAS). Because this is a book about Hibernate and not Web API design, we can only show you how to build a simple HTTP API that exchanges basic XML documents, which isn’t RESTful and doesn’t use hypermedia.
When you design your own API, consider the H Factor of your chosen media type (see http://amundsen.com/hypermedia/hfactor/) and study the excellent book RESTful Web APIs by Leonard Richardson, Mike Amundsen, and Sam Ruby (Richardson, 2013). We recommend that you avoid using JSON, because it requires proprietary extensions to improve its H-Factor.
Designing your own XML-based hypermedia format, perhaps by extending the example shown in this chapter, isn’t much better. Our favorite media type is plain XHTML: it has a great H-Factor, and it’s easy to write and read with APIs available everywhere. Compressed, it can be more efficient than JSON, and it’s a joy to work with interactively when building and testing your API. Jon Moore presents a great example of such a design in “Building Hypermedia APIs with HTML” (www.infoq.com/presentations/web-api-html).
You now write an HTTP server with the JAX-RS framework, producing and consuming XML documents. Although the examples are in XML, they’re equally applicable to JSON, and the fundamental problems we discuss are the same in both.
19.4.1. Writing a JAX-RS service
Let’s start with the JAX-RS service. One service method delivers an XML document representing an Item entity instance when a client sends a GET HTTP request. Another service method accepts an XML document for updating an Item in a PUT request:


Path: /apps/app-web/src/main/java/org/jpwh/web/jaxrs/ItemService.java

- When the server receives a request with the request path /item, the method on this service handles it. By default, the service instance is request-scoped, but you can apply CDI scoping annotations to change that.
- An HTTP GET request maps to this method.
- The container uses the path segment after /item as an argument value for the call, such as /item/123. You map it to a method parameter with @PathParam.
- This method produces XML media; therefore, someone has to serialize the method’s returned value into XML. Be careful: this annotation isn’t the same producer annotation as in CDI. It’s in a different package!
- This method consumes XML media; therefore, someone has to deserialize the XML document and transform it into a detached Item instance.
- You want to store data in this method, so you must start a system transaction and join the persistence context with it.
The JAX-RS standard covers automatic marshalling for the most important media types and a whole range of Java types. A JAX-RS implementation, for example, must be able to produce and consume XML media for an application-supplied Java Architecture for XML Binding (JAXB) class. The domain model entity class Item must therefore become a JAXB class.
19.4.2. Applying JAXB mappings
JAXB, much like JPA, works with annotations to declare a class’s capabilities. These annotations map the properties of a class to elements and attributes in an XML document. The JAXB runtime automatically reads and writes instances from and to XML documents. This should sound familiar to you by now; JAXB is a great companion for JPA-enabled domain models.
Here’s an XML document for a sample Item:

Several design decisions were made to come up with this XML schema. Let’s look at the JAXB annotations in the Item class to explore the available options:
Path: /apps/app-web/src/main/java/org/jpwh/web/model/Item.java

- An Item instance maps to an <item> XML element. This annotation effectively enables JAXB on the class.
- When serializing or deserializing an instance, JAXB should call the fields directly and not the getter or setter methods. The reasoning behind this is the same as for JPA: freedom in method design.
The identifier and auction end date of the item become XML attributes, and all other properties are nested XML elements. You don’t have to put any JAXB annotations on description and initialPrice; they map to elements by default. Singular attributes of the domain model class are easy: they’re either XML attributes or nested XML elements with some text. What about entity associations and collections?
You can embed a collection directly in the XML document and thus eagerly include it, as you did with the Item#bids:
Path: /apps/app-web/src/main/java/org/jpwh/web/model/Item.java
public class Item implements Serializable {
<enter/>
    @OneToMany(mappedBy = "item")
    @XmlElementWrapper(name = "bids")
    @XmlElement(name = "bid")
    protected Set<Bid> bids = new HashSet<>();
<enter/>
    // ...
}
There is some optimization potential here: if you say, “Always eagerly include bids” when your service returns an Item, then you should load them eagerly. Right now, several queries are necessary in JPA to load the Item and the default lazy-mapped Item#bids. The JAXB serializer automatically iterates through the collection elements when the response is prepared.
Hibernate initializes the collection data either lazily or eagerly, and JAXB (or any other serializer you have) serializes each element in turn. The fact that Hibernate uses special collections internally, as discussed in section 12.1.2, makes no difference when you serialize. It will later be important when you deserialize an XML document, but let’s ignore this issue for now.
When you don’t want to include a collection or a property in the XML document, use the @XmlTransient annotation:
Path: /apps/app-web/src/main/java/org/jpwh/web/model/Item.java
public class Item implements Serializable {
<enter/>
    @OneToMany(mappedBy = "item", cascade = MERGE)
    @XmlTransient
    protected Set<Image> images = new HashSet<>();
<enter/>
    // ...
}
Collections are easy to handle, regardless of whether they’re collections of primitives, embeddables, or many-valued entity associations. Of course, you must be careful with circular references, such as each Bid having a (back) reference to an Item. At some point, you must make a break and declare a reference transient.
The most difficult issue you face when serializing an entity instance loaded by Hibernate is internal proxies: the placeholders used for lazy loading of entity associations. In the Item class, this is the seller property, referencing a User entity.
19.4.3. Serializing Hibernate proxies
Item#seller is mapped with @ManyToOne(fetch = LAZY), a lazy entity association. When you load an Item entity instance, its seller property isn’t a real User: it’s a User proxy, a runtime-generated class from Hibernate.
If you don’t declare anything else, this is how JAXB will render the property:
<item id="1" auctionEnd="2018-03-06T15:00:00+01:00">
    <!-- ... -->
    <seller/>
    <!-- ... -->
</item>
Such a document would indicate to a client that the item has no seller. This is of course wrong; an uninitialized proxy is not the same as null! You could assign special meaning to an empty XML element and say, on the client, “An empty element means a proxy” and “A missing element means null.” Unfortunately, we’ve seen serialization solutions, even designed for Hibernate, that don’t make this distinction. Some serialization solutions, not designed for Hibernate, may even stumble and fail as soon as they discover a Hibernate proxy.
Usually, you must customize your serialization tool to deal with Hibernate proxies in some meaningful way. In this application, you want the following XML data for an uninitialized entity proxy:
<item id="1" auctionEnd="2018-03-06T15:00:00+01:00">
    <!-- ... -->
    <seller type="org.jpwh.web.model.User" id="123"/>
    <!-- ... -->
</item>
This is the same data as the proxy: the entity class and the identifier value represented by the proxy. A client now knows that there is indeed a seller for this item and the identifier of that user; it can request this data if needed. If you receive this XML document on the server when a user updates an item, you can reconstruct a proxy from the entity class name and identifier value.
You should write a model class that represents such an entity reference and map it to XML elements and attributes:
Path: /apps/app-web/src/main/java/org/jpwh/web/model/EntityReference.java
@XmlRootElement
@XmlAccessorType(XmlAccessType.FIELD)
public class EntityReference {
<enter/>
    @XmlAttribute
    public Class type;
<enter/>
    @XmlAttribute
    public Long id;
<enter/>
    public EntityReference() {
    }
<enter/>
    public EntityReference(Class type, Long id) {
        this.type = type;
        this.id = id;
    }
}
Next, you must customize marshalling and unmarshalling the Item, so instead of a real User, an EntityReference handles the Item#seller property. In JAXB, you apply a custom type adapter on the property:
Path: /apps/app-web/src/main/java/org/jpwh/web/model/Item.java
public class Item implements Serializable {
<enter/>
    @NotNull
    @ManyToOne(fetch = LAZY)
    @XmlJavaTypeAdapter(EntityReferenceAdapter.class)
    protected User seller;
<enter/>
    // ...
}
You can use the EntityReferenceAdapter for any entity association property. It knows how to read and write an EntityReference from and to XML:


Path: /apps/app-web/src/main/java/org/jpwh/web/jaxrs/EntityReferenceAdapter.java

- JAXB calls this constructor when it generates an XML document. In that case, you don’t need an EntityManager: the proxy contains all the information you need to write an EntityReference.
- JAXB must call this constructor when it reads an XML document. You need an EntityManager to get a Hibernate proxy from an EntityReference.
- When writing an XML document, take the Hibernate proxy and create a serializable representation. This calls internal Hibernate methods that we haven’t shown here.
- When reading an XML document, take the serialized representation and create a Hibernate proxy attached to the current persistence context.
Finally, you need an extension for JAX-RS that will automatically initialize this adapter with the current request-scoped EntityManager when an XML document has to be unmarshalled on the server. You can find this EntityReferenceXMLReader extension in the example code for this book.
There are a few remaining points we need to discuss. First, we haven’t talked about unmarshalling collections. Any <bids> element in the XML document will be deserialized when the service is called, and detached instances of Bid will be created from that data. You can access them on the detached Item#bids when your service runs. Nothing else will happen or can happen, though: the collection created during unmarshalling by JAXB isn’t one of the special Hibernate collections. Even if you had enabled cascaded merging of the Item#bids collection in your mapping, it would be ignored by EntityManager#merge().
This is similar to the proxy problem you solved in the previous section. You would have to detect that you must create a special Hibernate collection when a particular property is unmarshalled in an XML document. You’d have to call some Hibernate internal APIs to create that magic collection. We recommend that you consider collections to be read-only; collection mappings in general are a shortcut for embedding data in query results when you send data to the client. When the client sends an XML document to the server, it shouldn’t include any <bids> element. On the server, you only access the collection on the persistent Item after it’s merged (ignoring the collection during merge).
Second, you’re probably wondering where our JSON examples are. We know you’re most likely relying on JSON right now in your applications and not on a custom XML media type. JSON is a convenient format to parse in a JavaScript client. The bad news is that we couldn’t figure out a way to customize JSON marshalling and unmarshalling in JAX-RS without relying on a proprietary framework. Although JAX-RS may be standardized, how it generates and reads JSON isn’t standardized; some JAX-RS implementations use Jackson, whereas others use Jettison. There is also the new standard Java API for JSON Processing (JSONP), which some JAX-RS implementations may rely on in the future.
If you want to use JSON with Hibernate, you must write the same extension code we wrote for JAXB, but for your favorite JSON marshalling tool. You’ll have to customize proxy handling, how proxy data is sent to the client, and how proxy data is turned back into entity references with em.getReference(). You’ll certainly have to rely on some extension API of your framework, just as we did with JAXB, but the same pattern applies.
19.5. Summary
- You’ve seen many ways to integrate Hibernate and JPA in a web application environment. You enabled the EntityManager for CDI injection and improved the persistence layer with CDI and a generic sorting and paging solution for finder queries.
- You looked at JPA in a JSF web application: how to write request- and conversation-scoped services with a JPA persistence context.
- We discussed problems and solutions associated with entity data serialization, and how to resolve those in an environment with stateless clients and a JAX-RS server.