
Chapter 10. Building a Dart web app
- The structure of a single-page web app
- Building dynamic views with dart:html elements
- Handling browser events with Dart
Dart’s primary use is building complex web apps. A web app typically comprises a single web page that loads in the browser and provides a host for the application’s code. This application source code is responsible for building the user interface, providing methods for navigating around the application, and storing the user’s data by either sending it to the server or storing it locally.
When building a web app in Dart, it’s good practice to build it working offline first. Working offline has a number of benefits, both for you as the developer and for the end user. When you build a web app offline first, you provide some mock injected data that will ultimately be replaced by a combination of local, client-side storage (supported by HTML5 APIs) and server-side data persistence. This setup lets you write the client-side app in Dart without needing a server component or database up and running, thereby reducing debug times and aiding the ability to unittest your app.
The end user of your app will be able to use your app in disconnected situations, such as on a flight or in areas of limited network coverage. This setup allows you to write mobile, browser-based apps in Dart that function even when the device isn’t connected. Another benefit to the end user is that apps designed to work offline also work much faster when online: the data that they use tends to be stored locally, so the app can start up much faster without needing to first load a large amount from the server.
This chapter shows that by using HTML elements, you can build a multiscreen UI from a single set of source code files. At the time of writing, there’s no UI widget library in the Dart SDK, but you can build compelling UIs using the dart:html library Element and Event classes with relatively little code. Once you’re familiar with the Element classes, we’ll examine the browser event model and show you how the browser can trigger Dart event handlers to react to the user. While exploring the dart:html library, you’ll discover how to build a reusable grid from scratch that you can use in your own applications.
10.1. A single-page web app design
Single-page application design is different from traditional web application design. In a traditional website built with Java or C# (or even PHP, Ruby, or Python), you typically use a server-side controller to compose the UI by merging an HTML view with some data classes (the models), and this information is then sent to the client. Navigating to another page (perhaps to perform an edit) triggers a new request to the server for another view and data.
But in recent years, frameworks have appeared that first let you send the view to the client and then use AJAX requests to get the data from the server and bind it to the view. In effect, the view, data model, and controller classes have moved onto the client, where they can take advantage of the power of the user’s computer and leave the server free to serve more requests, as shown in figure 10.1.
This is the model that Google’s GWT product uses; it’s a model you can also achieve with a number of JavaScript frameworks. Dart apps also follow this model, with the Dart environment and tools working best when you design your Dart app to function this way. By combining the view with the data on the client, you also get the ability to provide mock data in the client, which can be used for development and testing.
10.1.1. Introducing DartExpense
In this chapter, you’ll create an example expense application called DartExpense that lets you store a list of your work expenses. Your finance department has decided to rid themselves of spreadsheets that employees send by email; instead, they want a web app. The current spreadsheet system works regardless of whether the users are online; typically, they submit the spreadsheet only once a month. The sales team has a habit of using flying time to complete their expenses, and the finance department wants to ensure that they don’t do so.
The existing spreadsheet app contains only five fields of data for each expense claim:
Figure 10.1. Modern web apps use the capabilities of the client to build a UI from views and data, rather than performing that processing on the server.

- The date of the expense
- The type of expense
- The amount
- Some detail text
- Whether it has been claimed already
Your task is to implement this model in Dart.
The app, although simplified for the purposes of example, represents a real-life application design containing model and view classes. At the time of writing, Dart doesn’t have a separate UI abstraction library such as ExtJS or jQuery UI; but the Dart development team has stated that they want Dart to be a fully featured solution and that a UI library will appear. This means UIs need to be constructed using HTML snippets and elements and bound with the data as required. We’ll explore ways to achieve this using the dart:html library, which we first looked at back in chapter 3. The dart:html library is analogous to the jQuery core library for JavaScript, which standardizes HTML and browser DOM manipulation.
The DartExpense app will have two screens that users can navigate: the list of expenses and the Add/Edit screen to modify expenses. The screens are shown in figure 10.2.
Figure 10.2. The DartExpense example application has list and edit views.
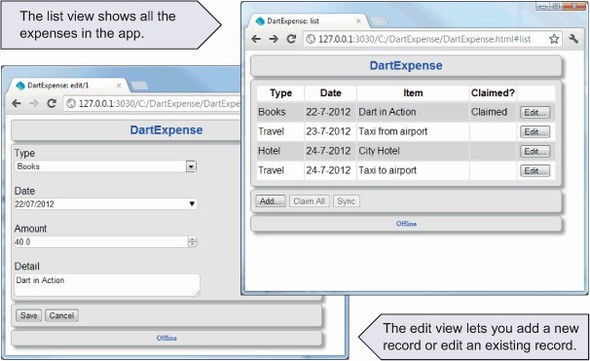
For this chapter, the app works entirely offline using mock data, which allows you to run it directly using the Dart Editor and Dartium. You can find the source code on the book’s website at www.manning.com/DartinAction. In the next chapter, you’ll add HTML5 client-side storage, and in chapter 14, you’ll add a server component. But for now, the data access classes are hardcoded mocks.
In JavaScript, if you want to use mock data, you need a mechanism to prevent the mock data code from being deployed to the client browser (wasting bandwidth). In Dart, only code that will actually be executed ends up in the resulting JavaScript, via a mechanism called tree-shaking. You can safely create mock data in your app while developing; once you remove references to the mock data-access functions, you can be sure that no mock data is sent to the end user, even though the original mock functions remain in the project.
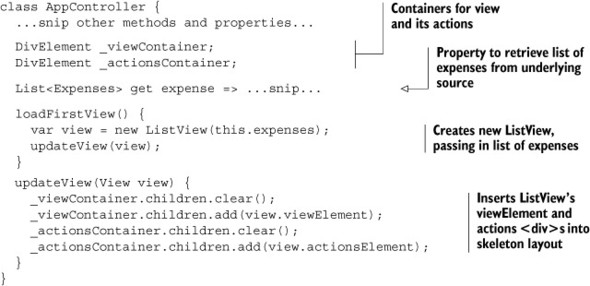
Two model classes, Expense and ExpenseType, store the data from the user and the standard reference data. There are also two views: ListView, which shows the list of expenses, and EditView, which allows you to add and edit expenses. Each view contains two top-level elements: the view itself, stored in the viewElement property, and the actions container, which holds the menu buttons such as Save and Cancel. A single controller class, AppController, is responsible for bringing together the views and the data. The public methods and properties on these classes are shown in figure 10.3.
Figure 10.3. The main classes in the application are the models, the views, and the controller, with the constructors marked in bold.

In addition to these model, view, and controller classes, additional classes represent your data-access functions. The DataAccess interface specifies properties and methods to retrieve a list of expenses and add a new expense. For the purposes of this chapter, and for building your app in an offline fashion, a MockData class implements the DataAccess interface:
abstract class DataAccess {
  Map<String, ExpenseType> expenseTypes;
  Map<int, Expense> _expenses;
  List<Expense> get expenses;
  bool addOrUpdate(Expense expense);
}
The MockData implementation prepopulates the expenses and expense types and is passed into the constructor of the AppController class. Calling addOrUpdate() adds or updates the expenses list by adding a new item to the list or updating an existing item. In the following chapters, you’ll replace the MockData class with locally persisted data, and later with server-persisted data.
10.1.2. Dart application structure
When you navigate to the Dart app, either on a real web server or by running it from the Dart Editor, the browser requests the HTML file that contains a link to the application code. The DartExpense app’s HTML file, shown in listing 10.1, is minimal. There are two script tags in the standard editor-created HTML file. The first specifies a script type of application/dart that references your app’s entry-point source file. The second script tag links to a JavaScript file, which uses a snippet of JavaScript to detect whether Dart is supported natively by the browser. If not, it modifies all application/dart script tags in the HTML page to use the JavaScript version.
Listing 10.1. DartExpense.html

Tip
In JavaScript, you can use detection to determine whether the browser supports native Dart by checking to see if the function navigator.webkit-StartDart() exists.
The application/dart tag loads the initial .dart script, which in turn loads all other files required by part and noncore import statements. Once the entire app is loaded and parsed by the Dart VM, the main() function is called. This ability to parse the entire application when it’s loaded provides a large performance gain over JavaScript applications. This gain doesn’t come without cost, however. Unlike JavaScript, you can’t modify Dart code dynamically at runtime—a practice known as monkey-patching.
You can write a Dart application in a single, monolithic file—or better, as you saw in chapter 5, as a library split into multiple part files. Dart treats part files as though they were part of the same physical library file, which means the application behaves identically regardless of whether you split it into multiple files. This is a feature to help developers organize their code.
Tip
Start building your app in a single file and then move classes and functions into #part files as you begin to find logically grouped functionality.
Figure 10.4. The structure of the DartExpense app is split across multiple files referenced with the #part tag.

DartExpense consists of a single library. It imports two core libraries—dart:html and dart:json—and has its own major classes and functions in separate part files, as shown in figure 10.4.
As you build a Dart app, you may find other logical units of code. This might be a reason to structure the app in a different fashion, such as putting the model classes in one library and the data-access functions in a different library, especially if you plan to reuse them in other applications.
10.1.3. Dart app execution flow
All Dart applications start with a main() function, which executes automatically once all the code has been loaded—and DartExpense is no exception. When a Dart app starts running, it uses the code started by main() to build a UI and wire up event handlers, such as button on-click events. Once that code finishes executing, the app is still running, but in a passive state, waiting for the browser to trigger events in the app.
Figure 10.5. The app remains running and waiting for events.
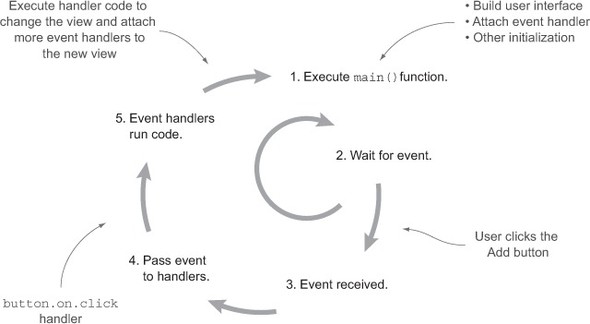
These events could be internal, such as an HttpRequest completing, or external, such as a user interacting with the UI or clicking the back button in the browser. The app continues waiting for events until the app is unloaded from the browser by either closing the browser tab or navigating to a different URL. Figure 10.5 shows this flow.
Dart is single-threaded, just like JavaScript. This design feature was built into the language: one of the core requirements of Dart is that tools can convert it to JavaScript. This means events are each processed in turn as the app receives them from the browser.
As you can see, main() is particularly important. If it built up a UI without attaching any event handlers, the browser UI would render but never respond to any events. Likewise, if the app started a number of calls to retrieve data but didn’t build a UI, although the data would be loaded into the app, the user would never see it.
The DartExpense app, therefore, has the following flow in the main() function:
1. Get the dartexpense <div> from the HTML in which the app will be placed.
2. Create a datasource that the app will use to access data. This is your mock data source at present.
3. Create an instance of AppController, passing in the <div> and the data source.
4. Call the AppController’s buildUI() function, which builds the basic UI elements, such as the header and footer, and the container <div>s for each view and actions panel. This doesn’t wire up any event handlers yet.
5. Call the AppController’s loadFirstView() function, which takes the window location as a parameter. This is responsible for setting up the initial application view, which to start with is the ListView, showing the list of expenses and attaching event handlers to the buttons shown in the view.
The instance of AppController is stored in a library-level private variable accessed by a getter called app(). This lets you reference the AppController instance elsewhere in the application.
Of course, it’s better to see this in code, so the following listing shows the DartExpense.dart entry point file with the main() function.
Listing 10.2. DartExpense.dart main() function
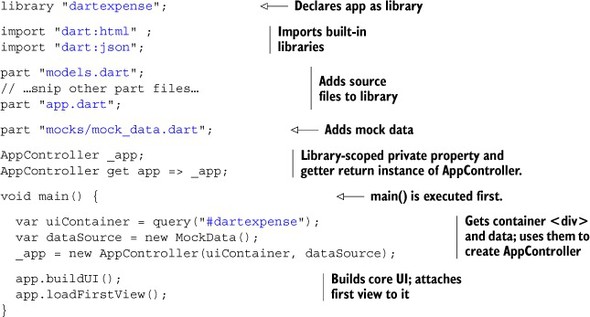
Once the UI is built and the first view is attached, main() finishes. The application goes into its wait-event loop phase, during which the user can begin to interact with the application by clicking the Add button to create a new expense or the Edit button to edit existing expenses.
- Dart’s primary use case is complex web applications.
- Single-page web apps bind the view code to the data on the client side rather than on the server.
- Offline-first design provides benefits such as availability and speed to developers and users of the application.
- A Dart app can be made up of many part files linked to the main entry-point Dart script.
- The main() function is the first function to execute and should call code to build the UI and hook up event handlers.
Now that you know how a Dart app fits together, the next step is to build a UI with the dart:html library, which lets you create UI elements with code and HTML.
10.2. Building a UI with dart:html
This section concentrates on building a UI with a combination of HTML and dart classes defined in the dart:html library. We’ll look at what happens in the DartExpense buildUI() and loadFirstView() methods.
The dart:html library provides a set of APIs and classes for working with the browser DOM elements. In this way, it’s similar to the core jQuery library for JavaScript, and it provides ways to query the browser DOM for specific elements and Dart lists, sets, and maps for accessing attributes, child elements, and event handlers.
At the time of writing, there’s no built-in UI library, although a number of open source third-party libraries are appearing on the web. Instead of working with library abstractions such as LayoutPanel and MenuBar (found in the GWT widget library), you deal with lower-level Dart classes such as DivElement and ButtonElement. This way of working gives you fine-grained control over the HTML that’s built, especially because in many cases you’re dealing with the HTML directly. This should provide you with a good understanding of how to use Dart to manipulate the browser DOM, which will still be of use when higher-level widget libraries appear.
Looking forward, Dart will use web component technology, allowing components to be built using Shadow DOM templates. You will be able to insert and manipulate these components like native HTML elements. For more information, search online for “Dart web components.”
10.2.1. Understanding the Element interface
The primary class in the dart:html library is the Element interface. It provides two named constructors—Element.html() and Element.tag()—which you saw back in chapter 3 and which both construct an HTML element, but in slightly different ways.
Element.tag(String tag) creates an empty HTML tag from the name given; for example, if you provide "div" as the tag parameter, you get back an element object that creates this HTML: <div></div>. You can then use properties and methods on that object to add attributes, child elements, and event handlers.
Element.html(String html), on the other hand, can be used to create a nested hierarchy of HTML tags, with the restriction that any child tags must be wrapped in a single HTML element. For example, using Dart’s multiple-line string syntax, which starts and terminates strings with three quotes (for example, """text"""), you can define a block of HTML that lives in a single <div> element:
var actionDiv = new Element.html("""
  <div id="actions">Select:
    <button id="saveButton" class="primary, selected">Save</button>
    <button id="cancelButton" name="cancel">Cancel</button>
  </div>""");
You can use the Element.tag constructor only to create a single element, but you can use the Element.html constructor to create either a single element or multiple nested elements. Once you’ve created an element, you can use two key methods to access child elements:
- query(String selector)
- queryAll(String selector)
These methods let you find a single child element or multiple matching child elements. For example, the following snippet lets you access the saveButton and then all the buttons from the previously declared actionDiv element:
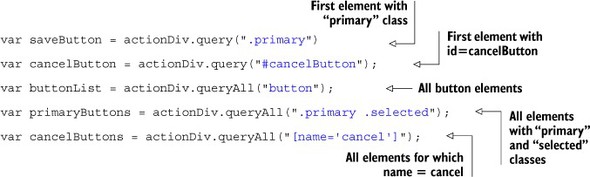
These methods take CSS selectors as their parameters, just like the jQuery $() function. CSS selectors provide a mechanism to identify a tag or groups of tags based on their properties, such as their ID (which should be unique to the page) or class (which can be shared by multiple tags).
The Element interface provides a host of properties and methods you can use to manipulate elements programmatically. These start from the browser’s document and window objects, which are both top-level properties in the dart:html library, and both of which implement the Element interface.
$ is a valid function name in Dart, so if you like the jQuery $() function, you can simulate it in Dart by providing a function in your library that redirects to the document.query() function:
$(String selectors) => query(selectors);
This code has the effect of providing a $ function in your library that you can use in the same manner as jQuery:
$("#actionDiv").innerHTML = "No Actions";
All other HTML elements implement the Element interface; some commonly used properties and methods are shown in table 10.1.
Table 10.1. Key properties and methods of the Element interface
|
Purpose |
|
|---|---|
| Element.tag(String tagName) | Constructor to create an element by tag name. |
| Element.html(String html) | Constructor to create an element from a block of HTML. |
| String id | Get/set the element ID. |
| String innerHTML | Read and write the element’s inner HTML. |
| List<Element> children | Access the child element’s collection. |
| List<Element> queryAll(String selectors) | Select a group of matching child elements. For example, myDiv.queryAll("button") returns all the buttons in the <myDiv> element. |
| Element query(String selectors) | Select a single child element. |
| ElementEvents on | Access the element’s events to attach event handlers. |
| AttributeMap attributes | Access the attributes of the element. |
| Collection classes | Access the collection element classes. |
Specific HTML elements also have their own Element interfaces with additional properties and methods; for example, InputElement also has a value property to access the value that has been entered. When using the element constructors, if you know you’re creating a <div>, <input>, <button>, or some other specific element, you can strongly type the variable with a specific element type that inherits from the Element interface. This approach allows the tools to validate your code by providing specific attribute properties on the element:
![]()
Currently, approximately 70 subinterfaces inherit the Element interface; some of the more common ones are listed in table 10.2. You can find more on the Dart API reference website: http://api.dartlang.org.
Table 10.2. Common subinterfaces that inherit the Element interface
| BodyElement | ButtonElement | CanvasElement |
| DivElement | EmbedElement | FormElement |
| HeadingElement | ImageElement | InputElement |
| LabelElement | LinkElement | OptionElement |
| ParagraphElement | ScriptElement | SelectElement |
| SpanElement | StyleElement | TableElement |
Most of the common HTML tags have specific element interfaces defined, but you can still use the base element class attributes property to access any attribute that doesn’t explicitly appear on an element implementation. Here’s an example:
textbox.attributes["value"] = "Some text";
10.2.2. Element constructors in action
To see the element constructors in action, look at the AppController.buildUI() method, which is called by the main() function and produces a skeleton UI such as that shown in figure 10.6. The skeleton contains only the header and footer and empty view and action <div> elements.
Note
The dartexpense.css stylesheet attached by the entry-point DartExpense.HTML file provides the styling that produces the UI look and feel. Detaching the content from the specifics of the design is good practice because it allows you to provide different skins for your app, which makes it easier to specify alternative stylesheets for the desktop and mobile browsers, for example. And although specific CSS usage is out of scope for this book, there are many good books and internet resources on CSS design.
When the user starts the DartExpense app, the buildUI() method builds the UI skeleton, which contains header and footer sections and the content and action <div> elements that will contain your views. These are all added to the root <div> that was passed into the AppController constructor. The buildUI() method and the HTML it creates are shown in figure 10.7.
Once the skeleton UI is built and you have a handle on the two important <div> elements, to which the AppController has stored a reference in the private _actionsContainer and _viewContainer properties, DartExpense’s main() function calls the method app.loadFirstView(). This has the effect of loading a specific view into the relevant content and action <div> elements by removing any other view and adding the new view. Views implement the View interface, which contains two DivElement properties: viewElement and actionsElement. When a new view such as ListView is created, it’s responsible for building the relevant HTML structures into these elements (which you’ll soon see). The AppController.updateView() function first clears any existing view from the _viewContainer and _actionsContainer properties; then the elements from the new view are attached. The next listing shows relevant code from AppController to populate the content and actions <div>s in the UI from a view.
Figure 10.6. The skeleton DartExpense UI, waiting for views and actions to be added

Figure 10.7. The buildUI() function uses Dart Element constructors to build the skeleton UI.

Listing 10.3. Populating the content and actions <div>s with a view
The elements.clear() function that’s used to remove the child elements from the _viewContainer and _actionsContainer properties is part of the standard Dart List interface and has the effect of removing those items from the browser DOM. When you use the elements.add() method, you’re adding new elements into the browser DOM, and at this point, your application begins waiting for events.
Note
The types used in the DartExpense app, such as the View interface and the ListView and EditView classes, are specific to DartExpense, not part of a built-in Dart model-view framework. At the time of writing, such a framework doesn’t come with Dart, but it’s the intention of the Dart team for these features to ultimately be available.
10.2.3. Building interaction with views and elements
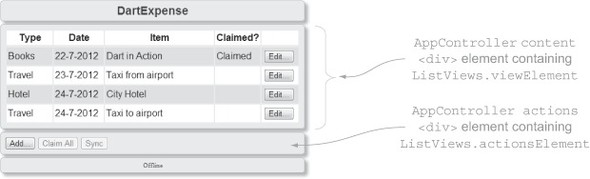
The DartExpense application’s ListView uses an HTML table to display the list of expenses. When users access DartExpense, the first view they see is the list of expenses, as shown in figure 10.8.
There are two views in the application. A class called ViewType, which looks like the following snippet, uses a private constant constructor to create two types of view, ViewType.LIST and ViewType.EDIT:

Figure 10.8. The ListView content and actions rendered with the mock data
Unlike C# and Java, Dart doesn’t have enums built into the language. Enums let you define a fixed number of constant values for a special type of class. Defining a class with a private constant constructor and a fixed list of static final values is a neat alternative.
Switching Between Views
These ViewType instances are used by a top-level library function called navigate(), which provides a central point of navigation for the app. The navigate() function, which is called when the user clicks the Edit button, allows transitioning between UI elements and has a simple implementation. It creates a new view based upon the ViewType and passes it into the AppController’s updateView() function, which, as you saw earlier, removes the existing view and populates contentContainer and actionsContainer with the new view:

This is a trivial implementation for the purpose of example. It would be more efficient to cache these views in the AppController so that you don’t need to re-create them every time.
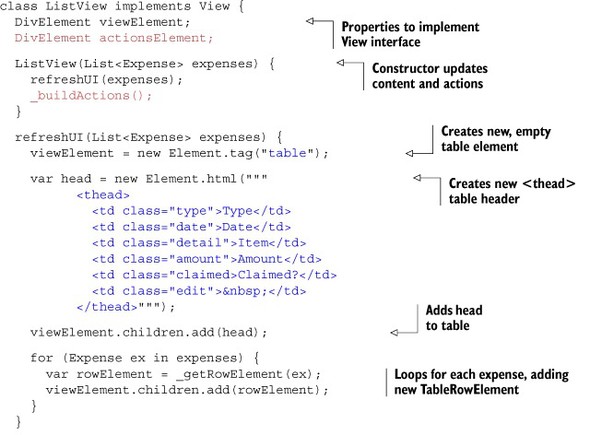
Building the Listview
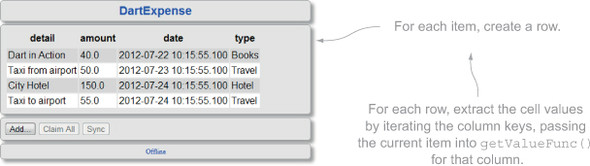
The AppController.loadFirstView() method, which is called as part of main(), calls the ListView(List<Expense> expenses) constructor, passing in the list of expenses to render. The ListView then passes the list of expenses to the refreshUI() function, which builds up the HTML table from Element instances, storing the result in the view’s viewElement property, as shown in listing 10.4. This is a long code listing because there’s a lot going on, but essentially it creates a table element and adds a table header and rows to that table. Each row in the table is built by calling the private _getRowElement(Expense ex) function in a loop over the list of elements, passing in the current element. A TableRowElement is built for each row and added into the table.children list. The _getRowElement(ex) function is also the first place an event handler is added: an on.click event handler for the Edit button appears next to each row.
We’ll look at event handlers in more detail in the next major section, but for now you need to know that the event handler calls a top-level library navigate(ViewType, int id) function. The interesting part is that the anonymous event-handler function (shown in italic in listing 10.4) that calls navigate() forms a closure around the specific expense object passed to _getRowElement(ex). This is because although the method exits, the event handler retains a reference to the ex.id value (see chapter 4 for more discussion on closures). The ex.id value is an autogenerated number on the Expense class that’s required by the navigate() function along with the name of the view to which you currently want to navigate.
Listing 10.4. ListView class, which builds the HTML table of expenses

The code in the ListView.refreshUI() function iterates through each row and builds up the expense properties into an HTML table. In a real-world application for which you might use this functionality in multiple places, it would be better to write a generic function to return a table that dynamically builds rows and columns based on the data passed into it, rather than being tightly bound to the Expense class.
10.2.4. Building a simple generic grid
A generic list should be able to create a table dynamically based on the list of objects passed in and some configuration that determines which columns are shown. For example, for your Expense objects, you want to display the following values on each row:
expense.type.name, expense.date, expense.detail, expense.amount
Unlike with JavaScript, you can’t dynamically access these properties as attributes of the object. In JavaScript, because objects are also maps of key/value pairs, you could pass in a list of column names and a list of objects and, for each object, access the property. A trivial implementation is shown in the following JavaScript snippet:
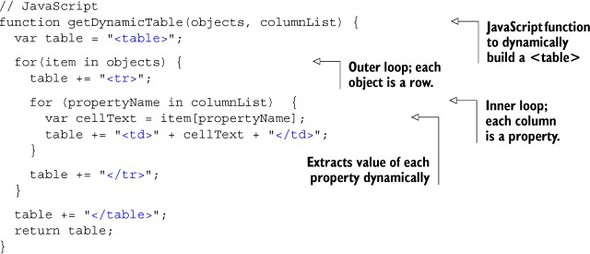
But Dart doesn’t allow this type of property access. You could create a similar function in Dart that accepted a List<Map> instead of a List<Object> (or List<Expense>), but doing so would require the calling function to iterate through each Expense object in the list, converting each expense to a map and passing in that list of maps. A better implementation would be to provide a way for the getDynamicTable() function to extract the value of each property only when it’s required. Using this approach would be especially important for performance if you implemented paging in the list—for example, if the table loop processed only 10 items at a time.
Fortunately, by using first-class functions stored in a list as part of the column config, you can let the calling code define how each value is retrieved in an anonymous function and pass that list of anonymous functions to the getDynamicTable() function. Instead of passing in a column list, pass in a map, keyed on the column (or property) name and setting the value to a function that extracts the relevant property as the value. This function type, called GetValueFunc(), has the following definition; it’s expected to take an item as its parameter and return a string from that item:
typedef String GetValueFunc(dynamic item);
Now that you have a function type, you can rewrite refreshUI(List<Expense>) as follows to define a column configuration that’s passed into the getDynamicTable() function:

By storing a function in a map, keyed on the column name, the getDynamicTable() function can later extract the property for each item by using the function associated with that property stored in the map:

You now have a way to dynamically extract values from an object based on arbitrary text such as "detail". The full getDynamicTable() function is shown in the following listing.
Listing 10.5. getDynamicTable() to dynamically build an HTML table

This is an effective solution to providing a generic way to access properties. Instead of accessing the item property directly, you can pass the item into the getValueFunc() implementation specific to the current column, which the caller defined. In this way, you can dynamically access property values without knowing the property names in advance. The table created by using the getDynamicTable() function rather than your original ListView code is shown in figure 10.9.
getDynamicTable() is fairly simplistic in its current design, for the sake of example, but with a couple more development iterations, you could add extra features. Examples that shall be left as an exercise for you include better header row descriptions (instead of using the columnConfig key), passing in a list of actions that should be performed for each row (such as edit and delete), and CSS class information so rows and columns can be attached to CSS styles.
Let’s continue with the original ListView code, because it also provides an Edit button that you’ll use in the next section when you start to navigate around the application UI.
Earlier in this section, you saw the Edit button get an event handler attached to it. In the next section, we’ll look in more detail at event handlers as you add a second view, Edit, to the DartExpense app.
Figure 10.9. The table created by the new generic table-generation function
- The Element interface is a key class in the dart:html library, implemented by the top-level document and window dart:html properties and all other HTML elements.
- Many HTML elements also have their own subinterface that inherits from the Element interface, such as ButtonElement and InputElement.
- Element defines two constructors: Element.tag() for creating a single, empty element that you can attach children to in code, and Element.html() for creating a single HTML element that can contain many predefined child elements.
- Dart SDK doesn’t currently provide a widget library, so you need to build your own elements such as grids and lists, either specifically for your use case or in a more general fashion so they can be reused.
10.3. Handling browser events with dart:html
In the previous section, you saw how to build a view and attach it to the browser. That’s only half of the story before you get to a working web app, though. The code executed from the main() function needs to build a UI and attach event handlers to that interface. This section deals with the event handlers.
Event handlers are functions that you attach to HTML elements, which react when a specific event occurs. The most common example is clicking a button on a web page, such as when the user clicks the Add button from the DartExpense app’s list view. Browser events all live in a property of the Element interface called on, which is an implementation of the ElementEvents interface. It provides a list of events by name (useful for autocomplete in the Dart Editor) and overrides the [] operator so you can attach event handlers to unlisted events (maybe to support some experimental browser technology) or events that you want to declare dynamically. Each event is an implementation of EventListenerList, which lets you attach multiple events handlers to an event. Listing 10.6 shows the two ways you can attach an event handler to the Add button, which is created in the DartExpense ListView class’s _buildActions() method. The private _buildActions() method is used to populate the actionsElement <div> containing the action buttons associated with the view. The event-handler functions are highlighted in bold.
Listing 10.6. Attaching an event handler to the Add button

The function that’s added to the EventListenerList for the specified event, such as click or mouseOver, is executed when the browser triggers the event on that element. You can add many events to a specific event on a single element; likewise, a single element can have listeners for many different types of event. It’s also possible to intercept events that are intended for child elements, as you’ll see in the next section.
Approximately 50 named event properties are available on the Element’s ElementEvents on property. Table 10.3 shows some of the common events.
Table 10.3. Some of the named event properties available on the ElementEvents on property
|
Events |
Purpose |
|---|---|
| click, doubleClick | Fired when user clicks the mouse on an element |
| focus, blur | Fired when an element receives or loses focus |
| keypress, keyDown, keyUp | Fired when a key is pressed on a focused element |
| mouseOver, mouseMove, mouseUp | Fired when the mouse pointer is moved over an element |
| mouseDown, mouseUp | Fired when the mouse button is pressed or released |
| touchStart, touchMove, touchEnd | Fired when a touch-sensitive device detects a touch |
These are just a few of the events the browser can fire. Many more are listed on the dartlang API website under the ElementEvents interface documentation at http://api.dartlang.org.
10.3.1. Managing browser event flow
When a user clicks the Add button in the DartExpense app, the web browser creates an event that propagates from the top-level document element down through each child element until it reaches the innermost child. At that point, the event begins to rise back up the element hierarchy (also known as bubbling), calling any event handlers on each element that’s listening for that event. Thus, under normal circumstances, parent elements can listen and respond to events targeted at their child elements, but only after the child has responded to the event. In DartExpense, the Add button is the innermost child in the hierarchy shown in figure 10.10. The actions <div> and the Add button both have click event handlers registered, but the Add button event handlers execute first, followed by the actions <div> event handlers.
Figure 10.10. The default browser event flow finds the innermost child element of the hierarchy and begins calling event-handler functions, going back up the hierarchy.
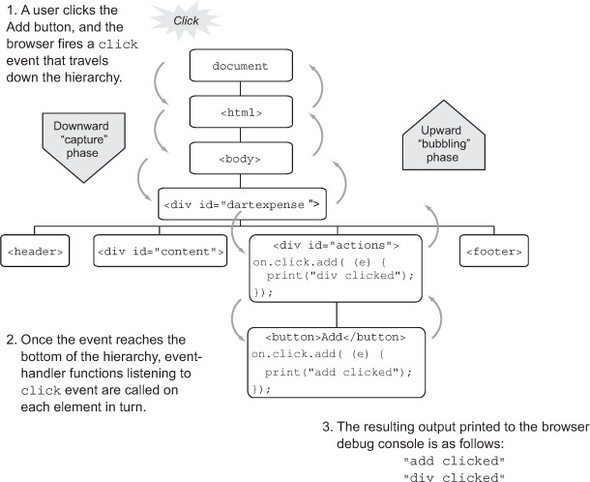
This is the default flow; the downward event flow is called the capture phase, and the upward flow is the bubbling phase. There are exceptions to every rule: some specific event types, such as focus, don’t bubble. You can find a comprehensive list on the DOM_events Wikipedia page, but there are also a number of things you can do in your own code to modify this default flow.
Modifying the Bubbling Phase
The first thing you can do to stop the upward flow is call the stopPropagation() method on the event parameter, which is passed into the event-handler function:

This code will stop the click event from calling the on.click handler functions of any other elements, but it doesn’t stop the event from being raised on other handler functions of the same element. You can add a second handler to the button:
button.on.click.add( (event) => print("second event handler"));
Although the event-handler function on the actions <div> won’t be called, both event handlers on the button will be called. Fortunately, there’s a way to stop this, too: calling the event’s stopImmediatePropagation() method, which stops the event from calling any further event handlers on any element.
Modifying the Capture Phase
You might at some point want the parent elements to handle an event before the child event. Fortunately, there’s an optional parameter on the event-handler method signature:
add(eventHandler, [bool useCapture=false])
The useCapture parameter, when passed true, causes the event handler to be fired on the downward capture phase, before any child elements have had a chance to respond. Figure 10.11 shows how you can modify the actions <div> click event handler to handle the click event on the downward flow.
Event handlers that are called in the downward capture flow can also use the event parameter’s stopPropagation() and stopImmediatePropagation() methods to prevent the event from going any further.
Figure 10.11. Event handlers can intercept the event on the downward capture flow instead of waiting for the default upward flow to be called.

In the last section of this chapter, we’ll examine the Event interface. You’ve already seen the stopPropagation() and stopImmediatePropagation() methods that are available on the base Event interface, and as with the base Element interface, there are a number of specialized subtypes.
10.3.2. Common event types
When the browser calls an event-handler function, it passes data about that event into that function via the event parameter. This is a generic event interface that contains a number of properties and methods that are common to all events, such as stopPropagation(), timestamp, and type. Some events contain more information about the specific event, and approximately 25 event types inherit from the base Event interface. Many of these support newer technologies, such as SpeechRecognitionEvent and DeviceOrientationEvent; but other event types support more mundane uses, such as MouseEvent, which provides mouse coordinates of the event, and KeyboardEvent, which provides the key code of the key that was pressed on the keyboard. Table 10.4 lists some of these common event properties.
Table 10.4. Common MouseEvent properties
|
Property |
Purpose |
|---|---|
| int button | The button number that was pressed. Zero is the left button. |
| int clientX, int clientY | The X and Y coordinates of the event in the browser client. |
| int screenX, int screenY | The X and Y coordinates of the event in the whole screen. |
| bool altKey, bool ctrlKey, bool metaKey, bool shiftKey | True if one of these keys was also pressed at the time of the event. |
You can use these specific event types by accessing the property on the event parameter passed into the event handler. If you also specify the event type, you get the benefit of type-checking support from the tools. The next listing shows how you can add the screen coordinates to your button click event.
Listing 10.7. Using the specific MouseEvent type to extract more event details

The browser event flow isn’t something specific to Dart; instead, it’s built into the browser, and unfortunately, there are differences in browser-specific implementations. Dart is designed to work primarily with modern web browsers, which means when it’s converted to JavaScript, IE6 is unlikely to work well with much of the code shown here.
Hint
If this lack of backward compatibility troubles you, please visit the Microsoft-run website www.ie6countdown.com, which states that “it’s time to say goodbye” to IE6.
- Event-handler functions can be added to the Element.on property either by name, such as on.click.add(...), or by value, such as on["click"].add(...).
- Elements can call multiple event-handler functions that have been added to a specific event.
- Elements can have handlers listening to multiple events.
- When an event is raised, the browser sends the event from the document element downward through the hierarchy of elements. This is the capture phase; event handlers aren’t fired by default.
- After the capture phase, the bubble phase begins, as event-handler functions are called in turn going back up the hierarchy.
- This default capture and bubble event flow can be modified in Dart code.
This was a long section, but a good understanding of browser events can help you build interesting and reactive UIs. We’ll look at some of the more interesting events relating to browser storage and touch in later chapters, but you should now have a good handle on how events flow around the web browser. For more information about the general principles of browser events, the Mozilla Developer Network (https://developer.mozilla.org/en-US/docs/DOM/DOM_event_reference) and w3.org (www.w3.org/TR/DOM-Level-3-Events/#event-flow) websites are both useful references.
10.4. Summary
This was a pretty lengthy chapter, in which we looked at the design of a single-page web app that works offline in order to aid development and provide an enhanced user experience. Then you saw how the main() function is key to starting a Dart app; it should be responsible for building the UI and attaching event handlers.
We discussed building a UI with the dart:HTML library, which is like Dart’s version of the core jQuery library for browser manipulation. At the time of writing, there’s no widget library in the Dart SDK, so you need to deal with HTML elements via Dart’s various Element classes. As part of building your UI, you saw how it’s possible to build from scratch a generic grid that accepts a list of arbitrary objects and lays them out in an HTML table.
Finally, we looked at the browser event model, and you saw how Dart uses event handlers to react to browser events and how to modify the default browser event flow of downward capture and upward bubble.
In the next chapter, you’ll learn how to store real data in the browser using JSON and client-side storage, and you’ll explore the navigation between views, including reacting to the browser forward and back button events by manipulating the browser history.