
Chapter 14. Sending, syncing, and storing data
This chapter covers
- Using two-way client and server communication with web sockets
- Sharing code between the client and server
- Using HttpClient to communicate between servers
- Storing server-side data
Although your web application should be designed to work offline, most web applications also need to store some data on a server, whether in the filesystem, in an SQL-based solution such as MySQL, or in a NoSQL database such as CouchDB. The nature of the web is that users of your application will connect from different machines, which means even if data isn’t stored on the server, you’ll use a server component to provide server synchronization.
In this chapter, we’ll revisit the DartExpense application from part 3 of the book and add server-side synchronization with web sockets, an HTML5 technology that provides two-way, client-server communication by maintaining a permanent connection between the client and the server. Once you have DartExpense clients in separate browsers communicating with each other via the server, we’ll look at persisting data on the server using Apache CouchDB, a scalable NoSQL database server. We chose this particular database because it doesn’t require any other third-party drivers or libraries—it provides a REST API that your server can access using Dart’s HttpClient classes. You can use the server-side HttpClient classes to access any servers that provide an HTTP-based API—the HttpClient is not only for data storage.
But to get started, you need to take the static fileserver you built in the last chapter and use it to serve DartExpense to the client. This will be your base for adding web socket support and data storage.
14.1. Serving DartExpense from the server
In the previous chapter, we showed you how to write a server-side static fileserver that serves the client-side application files to the browser. You’ll use this static fileserver again to serve part 3’s DartExpense application to the browser. Figure 14.1 shows the DartExpense application and flow from the server, as a reminder.
Figure 14.1. Dart HttpServer sends the application’s files to the browser.
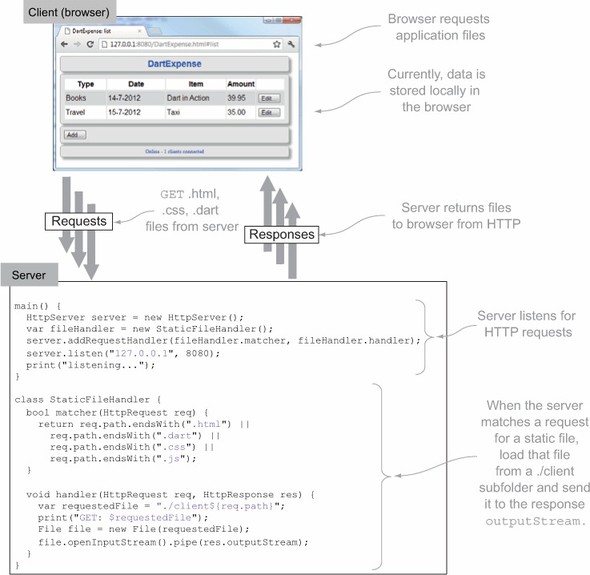
The client-side DartExpense files live in a ./client subfolder of the server part of the application, in which the server serves the client-side application files from HTTP. The application doesn’t run any differently than if you load it directly from the server’s filesystem; it’s still only a client-side application that happens to have its files sent from a Dart server. Now that you have this, you can start to add server interactivity in the form of HTML web sockets.
14.2. Using web sockets for two-way communication
In the previous chapter, we discussed how to use a RESTful API to send data in the form of GET requests for directory listings from the client to the server. The server requested a list of files and folders in c:/dart, and the server responded with JSON data representing the files and folders. This represents the standard way that data is transmitted around the web: clients make requests, and servers respond to those requests. The connection between the client and server is maintained only for the length of each request/response.
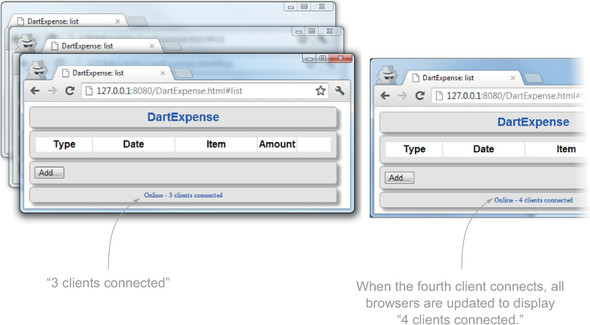
Web sockets provide a new model of transmitting data by allowing the server to maintain a persistent connection to the client. This lets the server send data to the client without the client making a request for it. Later, you’ll use this feature in DartExpense to provide synchronization between multiple DartExpense clients, allowing you to edit an expense in one browser and see the update appear in another browser. First, though, we’ll look at a simpler example: you’ll display the number of connected DartExpense clients that the server knows about. When a new client connects, the server will send the number of connected clients back to each connected browser, as shown in figure 14.2.
Figure 14.2. Web sockets allow two-way communication between the client and server, which lets the server send data to the client without the client requesting it first.

To use web sockets, you need to add code to both the client and server parts of the application. The client must connect to the server and respond to messages sent from the server with an event-handler callback function. The server must listen for new clients connecting, store a list of connected clients, and handle a client sending data.
Note
Web sockets and traditional HttpRequest GET and POST requests can coexist perfectly well. It’s common to use GET and POST request methods to communicate with a server’s RESTful API and also provide specific additional functionality with web sockets.
14.2.1. Connecting web sockets on the client side
The client application running in the browser needs to initially open the web socket connection with the server. To do this, you’ll add a new method called connectToWebsocket() in the DartExpense AppController class. The AppController class, which you built in chapter 10, is responsible for building the user interface and hooking up event handlers, so this is a perfect place to connect to a server and provide a mechanism for listening to web socket messages. Listing 14.1 shows DartExpense’s main() function, which calls connectToWebsocket(). It also introduces a constant called WEBSOCKET_URL, which contains the URL to connect to the web socket. This uses the ws:// protocol rather than http:// to indicate to the browser that it’s a web socket connection.
Listing 14.1. DartExpense.dart main() function creating a web socket connection

The new client-side connectToWebsocket() function needs to perform two tasks: it creates a web socket connection object using the WEBSOCKET_URL and then sets up an on.message event listener to listen to events retrieved from the server. This event listener is like other asynchronous browser event listeners, such as button clicks; in the same way that a user can click a button on the browser at any time, the server can send data to the client at any time. The message-listener function extracts the number of client connections sent from the server and displays them in the DartExpense footer area by calling refreshFooterStatus().
Listing 14.2 shows the new connectToWebsocket() and refreshFooterStatus() methods of the AppController class. The server sends the number of connected clients as JSON data containing an action type and some data, such as {"action":"CLIENT_COUNT_REFRESH","connectedClients": 3}. If the action type is CLIENT_COUNT_REFRESH, you need to extract the connectedClients value from the JSON map and display it in the footer.
Listing 14.2. Adding connectToWebsocket() to the AppController class

The act of creating the new web socket connection opens the two-way connection to the server. Next, you need to get the server side to respond when this connection is opened and send an updated count back to all the connected browsers.
14.2.2. Handling web socket connections on the server
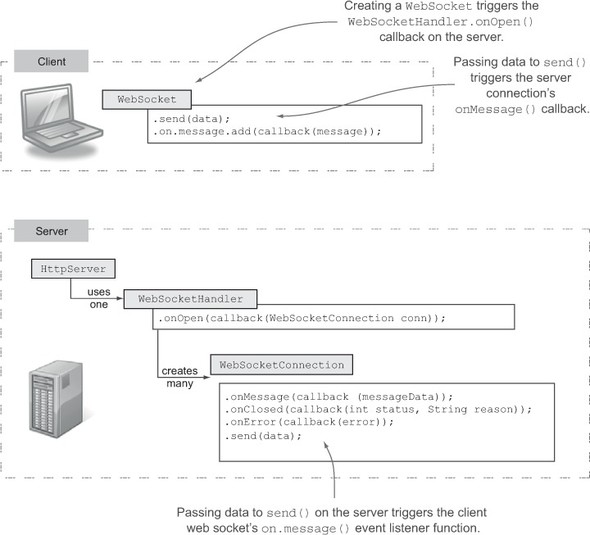
The server-side application already handles HTTP requests by using the HttpServer class, which is provided in the dart:io library. You’ve added a specific request handler to serve static files to the browser, but now you can also add a WebSocketHandler to manage web socket connection requests. WebSocketHandler is also provided in the dart:io server-side library and is responsible for creating a new WebSocketConnection object for each browser that connects. This WebSocketConnection object provides a send() function for the server to send data to the client and an onMessage() callback that’s called when the browser sends data to the server. Figure 14.3 shows the client and server classes that make up the web socket story.
Figure 14.3. The built-in classes you use to manage web socket connections on the client and server
Handling the Web Socket Request
In order for the server side to handle web sockets, it needs to use HttpServer’s addRequestHandler() method, which you saw in the last chapter. You pass in the built-in WebSocketHandler’s onRequest() function, as shown in the following snippet:

To perform actions when a browser connects, you need to also provide an implementation for the WebSocketHandler’s onOpen() method. This method’s callback handler gets a new connection object to allow communication between the specific browser connected and the server.
Tracking Browser Connections
The server gets a new WebSocketConnection object for each browser that connects, and you need to store each of these connections. Each web socket connection provides a unique identifier (in the form of the hashCode property), allowing you to store the connections in a Map so you can identify them and remove each connection from the map when it’s closed. This will also be useful later, when you want to send synchronization data to all browser connections except the one that sent some original data.
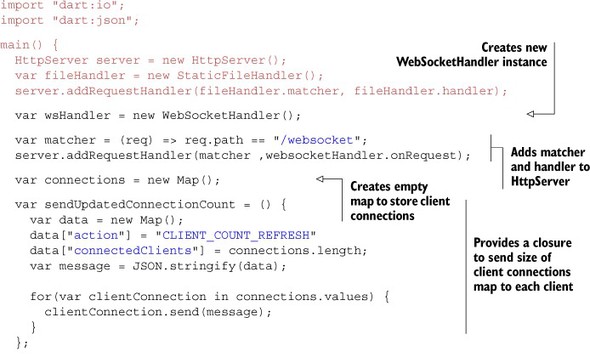
When the server gets the new WebSocketConnection object from the WebSocketHandler.onOpen() method, you can send the updated count of connections back to the browser. This is performed by passing String or List<int> data to each connection’s send() method. You send the data as a JSON string, iterating through the list of connections and calling the send() method on each, as shown in the following listing.
Listing 14.3. Sending a client count when each browser connects

Tracking Browser Disconnections and Errors
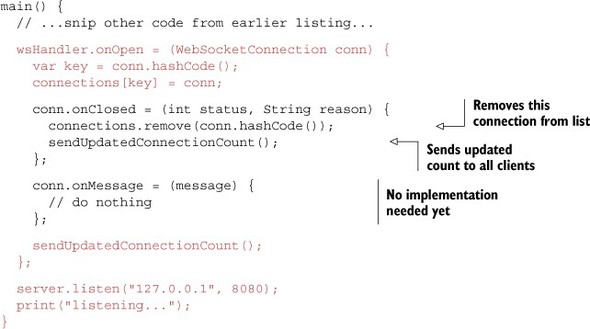
In addition to adding the new connection to a map and sending an updated count to all connections, you need to provide implementations for the callback functions on the WebSocketConnection object: onMessage() and onClosed(). The onMessage() implementation is empty for now because the browser clients aren’t sending data to the server yet. But the onClosed() handler needs to remove the connection from the map and send the updated client count to the remaining connected browsers. The onClosed() callback is called when the browser explicitly closes the connection or when there’s an error. The status parameter, which has values defined in the WebSocketStatus class, indicates whether an error condition occurred. You need to add these handlers in the wsHandler.onOpen callback, shown in the following listing, while you still have access to the WebSocketConnection.
Listing 14.4. Adding onClosed() handler to the connection
The server can now send arbitrary data to all connected client browsers. When you run the server and start adding clients, you’ll see the number of connected clients shown in the DartExpense footer panel change in each browser as the server notifies the browser that there has been a change, as shown in figure 14.4.
Figure 14.4. As clients connect, they’re notified of the updated number of connected clients.
Now that you’ve implemented a simple client-connection scenario, let’s look at a slightly more complicated scenario: synchronizing the expenses between browsers.
14.2.3. Using web sockets for cross-browser synchronization
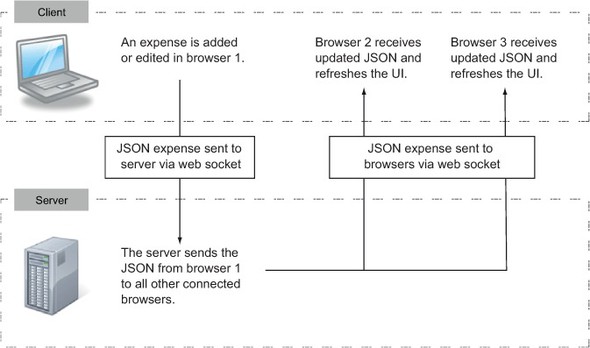
You have a method for the server to push data to multiple clients, so you can begin to send synchronization data to multiple clients. In the simple count example, you didn’t send any data to the server with the client web socket’s send() command. Merely connecting to the server was all you needed. You can use this send() command, though, to send a JSON representation of an Expense to the server via your web socket connection. When the server receives the JSON expense, it can send that to all the other connected client browsers without the other browsers needing to explicitly request that data from the server. This will trigger the user interface to be refreshed with the updated data, as shown in figure 14.5.
Figure 14.5. Sending synchronization data from one browser to other browsers via web socket connections
The synchronization mechanism will be simple for the purpose of example (see the sidebar “Real-world synchronization”). Currently, when you click Save when editing a record, you save a JSON expense in browser web storage via an addOrUpdate(Expense expense) function. You’ll modify the client-side DartExpense application to also send the edited Expense object to a sync(Expense expense) function that’s responsible for sending the JSON data to the server.
In the real world, data synchronization is a more complex problem. Issues arise such as what happens if two users are editing the same data simultaneously. Typical solutions include the following:
- Latest edit wins— Take each edit as it comes, so the second user’s edit clears the first user’s edit. This is the easiest approach to implement but provides a poor user experience (for the second user).
- First edit wins— When the second user tries to save the record, notify the second user that it’s been edited elsewhere. This keeps the first user’s edit and allows the second user to make informed choices.
With web sockets, you also get the possibility of more advanced solutions. These are available because you can send data back to a client in response to changes elsewhere. Example solutions include the following:
- Collaborative editing— As the first user keys in an edit, the edit appears on the second user’s screen at the same time, and vice versa.
- Disabling editing— When the first user starts to enter data, the record being edited becomes disabled in the second user’s interface. When the user clicks Save, the data updates on the second user’s screen and becomes enabled again. This is a more advanced version of “first edit wins,” with better feedback for the second user.
These more advanced solutions are also more complex to implement and thus require careful thought regarding their design, but a user experience such as this helps make a good web application great.
Sending Web Socket Data From the Browser
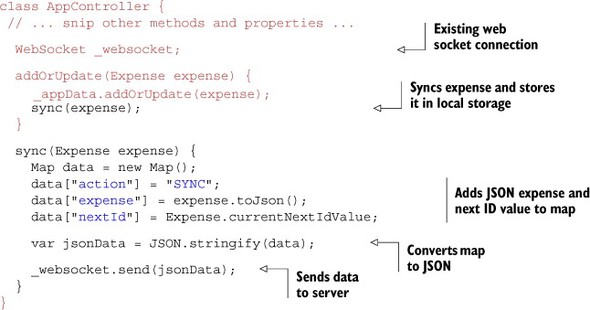
Sending the data to the server is as simple as calling the web socket’s send() method and passing the String or List<int> data into it. In fact, it’s a mirror of the server-side send() function that you saw earlier. You’ll implement that part first, as shown in figure 14.6.
Figure 14.6. Sending the edited JSON

Listing 14.5 shows the modifications to the DartExpense AppController class to send the JSON data to the server via web sockets. In order to keep the Expense’s ID values in sync between browsers, you also send the current value of the Expense class’s static nextId value. You send the data as a new action type of SYNC so the data can be distinguished from the CLIENT_COUNT_REFRESH action.
Listing 14.5. Sending JSON data to the server with web sockets
Receiving Web Socket Data from the Browser
The data has started its journey to the other browsers. Now you’ll implement the server side, shown in figure 14.7.
Figure 14.7. Receiving JSON expense data from a connected client

Earlier you left the WebSocketConnection onMessage() callback without an implementation. Now is the time to provide that implementation. If the action type is SYNC, then the server should resend the edited expense data to all the other connected browsers. You can use the connection’s hash code to identify the current connection (that received the data) and ensure that you don’t send the edited expense data back to the same browser that initiated the edit. The server-side changes to DartExpenseServer.dart are shown in the next listing.
Listing 14.6. Receiving and resending data from a web socket message

Receiving Synchronization Data in Other Browsers
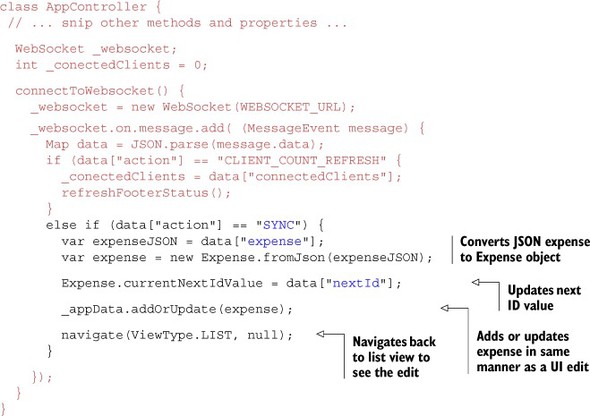
The final part of the sequence is to return to the browser code in order to let other browsers update when they receive the updated data, shown in figure 14.8.
Figure 14.8. Other clients receive the JSON data and refresh.

You already have an on.message handler that looks for the CLIENT_COUNT_REFRESH action. You need to add another if clause to look for the SYNC action. When the browser receives a SYNC action, it will convert the JSON expense data back to an Expense object and pass it into its addOrUpdate(Expense expense) method, as though it had been edited from the browser. Finally, you’ll update the browser to display the list of expenses by navigating to the list view. The following listing shows this step in action.
Listing 14.7. Receiving synchronization data in the browser
That was a long section, but now you have an application that can communicate between browsers, using a server to push data to multiple browsers. This is useful for providing push notifications such as “new mail” notifications, keeping browser-based multiplayer games in sync, and improving the user experience in line-of-business applications.
In the next section, you’ll take the sync data received from a browser and use it to save data into a CouchDB NoSQL database.
- A server can handle web socket connections by using a WebSocketHandler to provide a request handler for the HttpServer class.
- The client needs to open the web socket connection to the server by creating an instance of the WebSocket class pointing at a specific server URL.
- When a client connects to the server, the WebSocketHandler creates a new WebServerConnection instance that lets the server communicate back to that browser.
- The send() method on the client or server connection sends data to the recipient’s on.message (client side) or onMessage() (server side) callback function.
14.3. Storing data with HttpClient and CouchDB
In this section, you’ll use Dart’s server-side HttpClient to store data in an Apache CouchDB database. CouchDB is a NoSQL database that stores data in a JSON format; in this respect, it functions similarly to the browser-based local storage you saw in part 3 of the book.
CouchDB has a RESTful API that serves data to client systems such as DartExpense’s server using HTTP. Even if you don’t plan to use CouchDB in your solution, the following examples will build on your use of the InputStream and OutputStream types you saw in the previous chapter and introduce the use of HttpClient to talk to HTTP-based RESTful APIs. HttpClient is server-side Dart’s version of the HttpRequest you’ve already used to request data in the web browser.
Dart’s HTTP client and HTTP server are built on a lower-level Socket type, which is used for binary transfer of data between TCP systems. The Socket type lets database driver developers communicate directly with database servers that expect to communicate via a proprietary protocol. At the time of writing, open source drivers in various states of development are available for MySQL, MongoDB, Redis, and Riak.
It’s also possible to interface server-side code with third-party native code via the external keyword, which allows native drivers written in C/C++ to be bound to Dart libraries. An open source SQLite binding is an early example, but this advanced topic is outside the scope of this book.
At the moment, the DartExpense application receives data from the application running in a browser and uses web sockets to sync that data to other browsers. Each client also stores the data offline in local storage. The problem with this at present is that if the application starts in one browser and a user enters a new expense, the expense record isn’t added to the application running in a second browser that starts up later; it’s only synchronized to browsers that are running at the time the edit is made. You need to pull the existing data from the server each time the application begins running in the browser. You’ll add the following features to the application to enable server-side data persistence:
- Loading all existing records from the server
- Saving edited (new and existing) records to the server
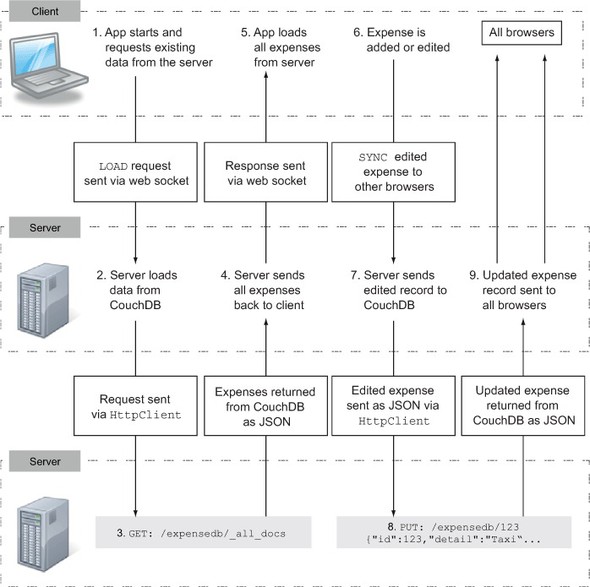
At present, the client sends JSON data over web sockets with a SYNC action and a CLIENT_COUNT_REFRESH action. You’ll add a LOAD action to request the initial data load from the server and reuse the SYNC action to send the data to the database as well as to other browsers. The flow of data with these new features is shown in figure 14.9.
Figure 14.9. Integrating server-side persistence with CouchDB
Adding a new layer to the application’s architecture will also add some complexity. At the core, you’re LOADing expenses from the database and SYNCing expenses to other browsers and the database. But before you begin, let’s take a quick look at how you can talk to CouchDB.
14.3.1. A quick CouchDB primer
Apache CouchDB is a NoSQL database. It stores data such as your expenses in JSON form, accessible via a RESTful API. Installers are available from the CouchDB website, and no configuration is required other than running the installer and starting the server (on Windows systems, a handy batch file to start the server is added to the Start menu).
When the server is running, you can access data using HTTP methods such as GET, PUT, and POST to interact with the server and get and store data. You can also use the Futon locally hosted web application that’s built into the server to manipulate the data in a more visually friendly way. Figure 14.10 shows an expense record with ID=1 in the Futon application that was returned via a GET API call in the browser, which is possible because the CouchDB server communicates via browser-friendly HTTP.
Figure 14.10. The CouchDB GUI web interface and the HTTP API interface

You’ll use the HTTP API, which uses HTTP methods and paths to access specific records in a database in the server-side code. Table 14.1 shows the API calls you’ll use in the code. Where a specific Expense ID is used, you’ll replace it with the ID the expense was given in the browser.
Table 14.1. API calls that you’ll use in your code
|
HTTP method |
Path |
Request data |
Result |
|---|---|---|---|
| PUT | /expensedb/ | None | Creates a new database called expensedb |
| GET | /expensedb/_all_docs | None | Retrieves all records in the database |
| PUT | /expensedb/1 | New or existing expense as JSON | Creates or updates an expense with ID = 1 |
| GET | /expensedb/nextId | None | Retrieves the nextId record |
Each JSON document is represented by an ID value, which can be any string. A single document called nextId will store the current next expense ID value that running instances of the browser application should know about. This prevents the application from assigning two different expenses the same ID value. You currently SYNC this value along with the Expense record, and you’ll also store it whenever a record is updated.
One more important feature of CouchDB is that it requires you to store a unique revision number as part of the Expense JSON data. This allows CouchDB to identify whether it’s a new or existing record; and if it’s an existing record, this ensures that the most recent version of the record is updated.
Warning
Adding a layer to your application in the form of a database increases the app’s complexity. The listings in this chapter build on listings from this and earlier chapters, and only the relevant extracts to demonstrate the use of HttpClient, InputStream, and OutputStream are shown. The full code that makes up the working application is available on the book’s website: www.manning.com/DartInAction.
14.3.2. Sharing the Expense model class between client and server
The Expense class, stored in the models.dart file, will now be used on the server as well as on the browser. Rather than writing nearly identical code twice, you can use the same source file by converting models.dart into a library in its own right. To do so, you add a library indicator at the start of the file. Now the client and server parts of the application can import the same library code.
JSON data stored in CouchDB also needs a _rev property to store the unique revision number inserted automatically by CouchDB. To achieve this, you’ll modify the Expense class to also have a _rev property. Listing 14.8 shows models.dart converted to a library and the additional _rev property added to the Expense class. When you use JSON.stringify() on the Expense object, it will use Expense’s Map implementation methods to return the value of the _rev property.
Listing 14.8. models.dart: Expense class updated to include a _rev JSON property

14.3.3. Adding server support for data persistence
All interaction with the CouchDB database will be via Dart’s HttpClient class, which is also in the dart:io library. HttpClient, like other server-side APIs, is asynchronous and nonblocking. You need to make a request and return a future value that will complete when the CouchDB server returns data to you. In order to achieve this, you’ll wrap all your calls to CouchDB in a class called CouchDbHandler.
When using HttpClient, you typically make a request for data to a specific URL path, such as http://localhost:5984/expensedb/1, using either GET or PUT. If you use PUT, then you might also supply some request data, such as the edited expense you’re PUTting into the database. The HttpClient response from CouchDB is always a String delivered as an InputStream. Because these are common patterns for all your interactions with CouchDB, you’ll also create two private utility methods in the CouchDbHandler class. _getStringFromInputStream() will convert an InputStream to a Future<String>, and _getData() will return a Future<String> from a call to CouchDB.
Utility Functions for Httpclient Interaction
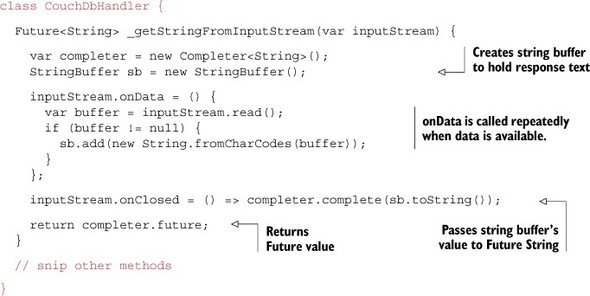
These two utility functions are where all the interesting work happens when you talk to CouchDB. _getStringFromInputStream() is similar to the code we looked at in chapter 13 when you read data from a file’s InputStream. This time, instead of reading the data from a file, you’re reading the data from an InputStream provided by an HttpClientResponse object, which is created when the server responds to a request. Although data is available, you read that data into a StringBuffer; and when the InputStream is closed, you complete the Future<String> value with the contents of the StringBuffer. The following listing shows the _getStringFromInputStream() method.
Listing 14.9. CouchDbHandler class’s _getStringFromInputStream() utility method
This method is used by the second utility method, _getData(), which you’ll use as a general-purpose method to send and retrieve data from CouchDB. It uses the HttpClient.open() method, which returns a new connection object to create a connection to the CouchDB API. This returned connection object is important because you need to assign handler() functions to its onRequest(), onResponse(), and onError() methods. Figure 14.11 shows how these methods are used in conjunction with an HttpClient object.
Figure 14.11. Using HttpClient to read data from HttpServer

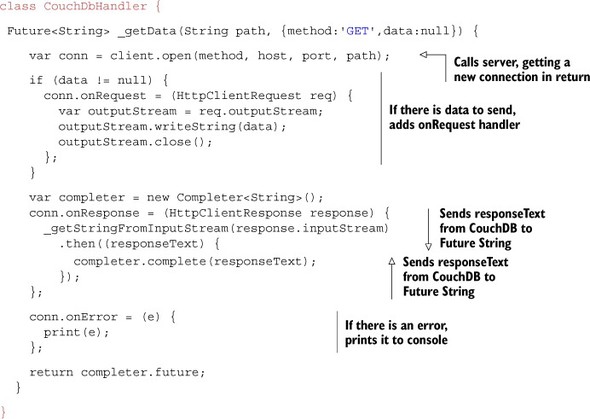
You can add to the CouchDbHandler class your specific implementation of _getData() that follows this pattern. As shown in listing 14.10, _getData() has two optional parameters, method and data, which let you change from the default GET request to a PUT or a POST, and add data such as an edited expense, as required. The Future<String> returned by _getData() represents the JSON retrieved from CouchDB.
Listing 14.10. CouchDbHandler class’s _getData() utility method
Adding Dartexpense Functionality
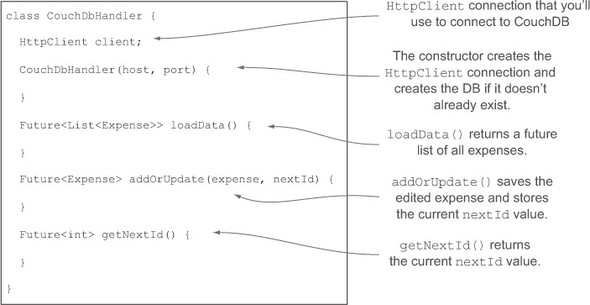
Now that you have the utility functions in the CouchDbHandler class, you can add the rest of the functionality in the form of a constructor and three public methods. The constructor will create a new expensedb database if it doesn’t already exist; and you’ll add a loadData() method, an addOrUpdate() method, and a getNextId() method, all of which return Future values. The outline for these methods is shown in figure 14.12.
Figure 14.12. The skeleton of the server-side CouchDbHandler class
The _getData() function will be called from these methods, and you’ll use the Future<String> returned from it to convert the returned JSON string back into Expense objects. Table 14.2 shows the method calls to _getData() that the code will use.
Table 14.2. The calls to the _getData() utility function that your code will make
|
Action |
|
|---|---|
| _getData("/expensedb/", method:"PUT"); | Creates the database |
|
_getData("/expensedb/ |
Retrieves all expense JSON strings |
|
_getData("/expensedb/$id", method:"PUT", data:expense.toJson()); |
Creates or updates an expense in the database |
| _getData("/expense/nextId"); | Retrieves the nextId value |
The following listing adds the constructor and three methods to the CouchDbHandler class. The method calls listed in table 14.2 are highlighted in bold; the rest of the code is straightforward and converts CouchDB JSON to and from Expense records.
Listing 14.11. CouchDbHandler: adding specific DartExpense functionality
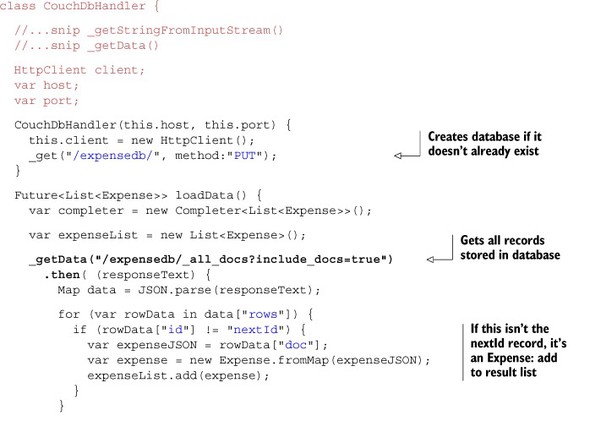

That’s a long listing, but it provides all the functionality you need in order to save and load expense data on the server. You can integrate this class with the existing application by making calls to loadData() and addOrUpdate() from the existing web socket connection code you saw earlier in the chapter. When the browser requests a LOAD action, you send the JSON expenses to the client side; and when a browser requests a SYNC, you pass the expense to the addOrUpdate() method. The complete source code is available on the Manning website.
- HttpClient’s open() method returns a connection object that provides onRequest() and onResponse() handler functions.
- The onRequest() handler has an HttpClientRequest parameter, and you can send data by writing to its OutputStream.
- The onResponse() handler has an HttpClientResponse parameter, and you can receive data by reading from its InputStream.
14.4. Summary
We’ve tackled two more server-side APIs in this chapter that will help you build exciting and functional applications in Dart. HTML5 web sockets let you maintain a permanent, two-way connection between the client and server, allowing the server to push data to connected web browser applications without the browser needing to request the data first. You can use this to provide collaborative editing and cross-browser synchronization of data.
We also looked at the HttpClient class, which lets your Dart server-side application talk to other HttpServers via a RESTful API. It’s the server-side equivalent of the browser’s HttpRequest. You also used CouchDB’s HTTP server to store DartExpense objects in the form of JSON data sent to the server from the client-side application.
In the next chapter, we’ll look at an advanced area of Dart: isolates. Isolates let you use modern multicore processors by providing multiple event loops with message passing between them to achieve concurrency. This can be useful when you have long-running batch processes but you still need your event loop to respond to client requests.