Chapter 2. A taste of Scalatra
- Understanding the framework’s major features
- A brief introduction to the concept of routing
- Sending parameters to a Scalatra application
As an introduction to building applications with Scalatra, let’s start with a basic page-retrieval system and then move on to more-advanced functionality. Because it’s your first app, we’ll keep the initial requirements fairly simple. You want to be able to visit URLs in the browser, retrieve data from a data store, format the data into styled HTML, and display the page. These are the sorts of common tasks that can be accomplished by pretty much any web framework. In this case, you’ll build a site that displays food-related text.
2.1. Your first Scalatra application
Let’s try generating a Scalatra application. Scalatra code generation is handled by a utility called g8, which grabs application templates from the internet, customizes them, and saves them on disk for you. To use g8, type the following on the command line:
$ g8 scalatra/scalatra-sbt.g8
    organization [com.example]:
    name [My Scalatra Web App]: Scalatra CMS
    version [0.1.0-SNAPSHOT]:
    servlet_name [MyScalatraServlet]: PagesController
    package [com.example.app]: com.example.cms
    scala_version [2.11.6]:
    sbt_version [0.13.8]:
    scalatra_version [2.4.0]:
When you run the g8 command, you’re asked some questions about your application, in the order shown. Once you answer the last question, giter8 creates your project for you, and you can run the project using the ./sbt command:

Your application is now running, although it doesn’t do anything yet. Let’s turn to the user interface, so you can see something happen.
If you haven’t yet installed g8, conscript, and sbt, make sure you read the installation instructions in the appendix before proceeding any further in the book.
2.2. Designing the UI
Next you’ll build an HTML user interface for your application. It’s often best to start by visualizing the interface you want, so figure 2.1 shows a quick sketch of the user interface you’ll achieve.[1]
We copied the text from the fabulous http://baconipsum.com. If your tastes run in a different direction, you can always head over to http://veggieipsum.com, or the canonical http://lipsum.com.
Figure 2.1. Bacon Ipsum
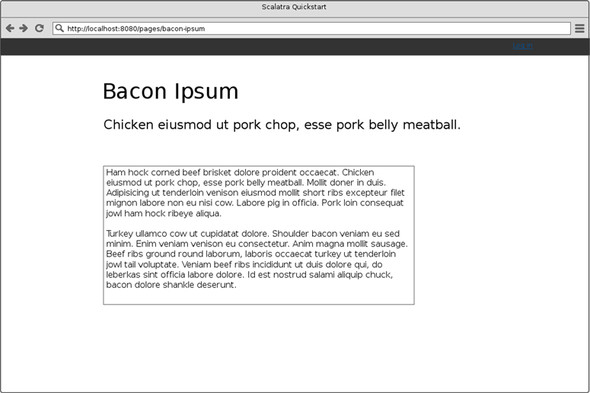
The page is pretty simple. You can see a title at the top, a summary below that, and body text at the bottom. The application will run at the web address http://localhost:8080/pages, and you’ll retrieve the page via its slug, bacon-ipsum, which you can see in the address bar.
2.3. What’s in a Scalatra project?
At its core, Scalatra is nothing more than a way of routing HTTP requests in order to execute blocks of code on the server. Almost everything else comes from external libraries, which are regular JAR files containing packaged JVM bytecode. Scalatra handles HTTP requests and responses; for all other functionality, you choose from the vast array of Scala (and Java) libraries and use them as building blocks for your application.
Figure 2.2 shows the relationship between the various components, with some commonly used external libraries grouped by function. The default g8 template gives you the Scalatra core DSL, Scalate templating, the Specs2 testing library, a logger, and a Jetty web server to run your project. You’re free to customize the application stack, using the libraries that suit your needs. Your application can use zero or more of the libraries from any given group. To add a library to your application, add a new dependency line in the libraryDependencies section of the file project/build.scala (see the appendix for more on this).
Figure 2.2. Scalatra and a few related technologies

When you generate a project using g8, Scalatra sets up a project as shown in figure 2.3. The PagesController class, which is the class file you’ll do most of your work in (shown in listing 2.1), is found in src/main/com/example/cms/PagesController.scala. It looks much like the Hello World application you generated in chapter 1.
Figure 2.3. A new Scalatra project

Listing 2.1. Generated PagesController

You should be able to visit your application at http://localhost:8080. It doesn’t look like much yet, but that will change. Before working on the user interface, though, you should think about the data you want to show.
2.4. Building the data model
Data is fundamental to most applications, so let’s begin building Scalatra CMS by defining the data model. All you need to start with is a simple Scala case class. If you believed the application was going to grow significantly, you could create some new package namespaces and files for your models to live in, but in this case you’ll keep things simple. Drop the following code into the end of PagesController.scala:
case class Page(slug:String, title:String, summary:String, body: String)
A Scala case class automatically creates accessors for all the properties listed in the constructor. So in the case of the Page class, you can get all the properties with which you initialize an instance.
The Page class has a title, a summary, and main body text. It also has a slug, which allows you to retrieve the page.
You could store the page data in a database such as PostgreSQL or MySQL. Like other web frameworks, Scalatra can do this, and you’ll find out how in chapter 9. For the moment, you’ll set up the simplest possible data store for your pages: an immutable List containing Page data. Let’s make some pages now.
You’ll make two pages: one for Bacon Ipsum lovers, and another for veggies. Drop the code from the next listing into the end of the PagesController class file, after the case class Page definition.
Listing 2.2. A simple data storage mechanism


Classes in Scala aren’t allowed to define static methods—but you can get roughly the same effect by defining an object. Listing 2.2 sets up a Scala object called PageDao. You can call PageDao.pages directly, without explicitly instantiating anything, just like a static method in Java or C# or a class method in Ruby.
2.5. Retrieving pages
Now that you have some pages stored, you need a way to retrieve them. Scalatra is an implementation of Ruby’s Sinatra DSL in Scala, and when it comes to dealing with HTTP, it looks almost identical to Sinatra. You make methods available over HTTP by setting up routes, and you execute code, called actions, inside the routes.
2.5.1. A page-retrieval route
There are several different types of routes, and most of them correspond to an HTTP verb—your choices are GET, POST, PUT, and DELETE, along with a few others for specific situations. You’ll see more about routes in chapter 3. For now, let’s define a route that you can use to retrieve your pages.
The route needs to GET a page, identified by the page’s slug. Delete the entire get("/") action, which currently looks like this:
get("/") {
  <html>
    <body>
       <h1>Hello, world!</h1>
       Say <a href="hello-scalate">hello to Scalate</a>.
    </body>
  </html> }
Replace that code with a page-retrieval route, which looks like this:
get("/pages/:slug") {

}
Let’s break that down. The route starts with get and defines a route matcher (pages/:slug). The :slug portion of the route matcher tells Scalatra that you’re defining a parameter in the URL, so anything submitted at the :slug part of the URL is treated as input to the route.
You’re running this web app on http://localhost:8080. Any HTTP GET request to the path http://localhost:8080/pages/anything-at-all will match the route and cause the route’s body, or action code, to execute.
2.5.2. A page-retrieval action
Let’s fill in the action so your web application starts to do something useful. Enter the body of the action as shown next.
Listing 2.3. Retrieving a page

There’s quite a bit going on here. The route’s action uses the find method from Scala’s List class. The _ may look strange if you haven’t seen it before; although the _ symbol has many different uses in Scala, in this case it’s used as a wildcard pattern. Every Page object instance in the PageDao.pages list is iteratively sent to the match function, and if a Page’s slug matches the params("slug"), the match block yields that Page’s title. If no matching page is found, the match block calls halt and returns an HTTP 404 status code.
Time to try it out. Save your work, and ensure that you’ve enabled automatic compilation. You know your data store contains pages with the slugs bacon-ipsum and veggie-ipsum, so choose the one that matches your preference and retrieve it in a browser. For our part, we chose http://localhost:8080/pages/bacon-ipsum. Type your chosen address into a browser address bar, and you’ll get back something like figure 2.4, displaying the page title.
Figure 2.4. Following a route in the browser

Next, let’s try using a slug that you know doesn’t exist: http://localhost:8080/pages/pizza-ipsum. This time, you’ll see the “not found” message you defined in the case None => halt(404, "not found") matcher in your controller, as shown in figure 2.5.
Figure 2.5. Generating a 404 message

Finally, let’s try a route that doesn’t exist: http://localhost:8080/foo/bar. The behavior is slightly different. You’ll see something like figure 2.6.
Figure 2.6. The default Scalatra 404 page

In this case, you’re shown the default Scalatra error-handling page, because no matching routes were found. This one is subtly different from the /pages/pizza-ipsum route in figure 2.5. Although you didn’t define a Page with the slug pizza-ipsum, the URL path /pages/pizza-ipsum did match the route get("/pages/:slug") defined in your application. You defined your own 404 message to be shown when the page wasn’t found. The URL path /foo/bar doesn’t match any of the routes you defined in the controller class, and it falls through to the default Scalatra 404 page, which lets you know that no routes were matched.
You may have noticed that we’re not using any automated tests here. You can find a short introduction in section 2.7. In chapter 8 you’ll see how to write tests in Scalatra in detail.
Now that you’ve got a handle on hitting route matchers and sending simple text back in response, let’s look at how to render more-complex content for display in a browser.
2.6. Rendering the page
The get("/pages/:slug") action does its job and shows you the page title, but it’s not likely to win any design awards. Let’s fix that by rendering an HTML page to the browser.
2.6.1. A quick introduction to Scalate
Scalatra has a number of different ways of rendering HTML, and you’ll get full coverage of the options in chapter 7. For the moment, let’s use the Scalate template engine, which is probably the most common way of doing templating in Scalatra.
Scalate supports multiple templating styles. We’ll use the Scala Server Pages (SSP) style, which is similar to Java’s Velocity or Ruby’s ERB template engines.
First, let’s change the output of the page-retrieval action so that it renders a page instead of merely displaying the page’s title. You can do this by changing the body of the page-retrieval action so it contains the code from the following listing.
Listing 2.4. Using Scalate from an action

The ssp method attempts to render a template, and it passes the page from your PageDao to the template. In order for this to work, you need to make a template for displaying pages.
The default Scalatra project structure includes a webapp folder, which holds your application’s static assets (images, CSS, and JavaScript) and also provides a place for you to keep your HTML templates, in the WEB-INF/templates folder. Figure 2.7 gives you an idea of where this sits in the project’s structure.
Figure 2.7. Views in your project structure

By default, g8 generated two template files, default.jade and hello-scalate.jade, both of which use the Jade templating style. You’ll use the SSP style instead, so delete both of the .jade files. Create a pages directory to hold page-related templates and a show.ssp template file, as shown in figure 2.8. The contents of show.ssp should look like the next listing.
Figure 2.8. Create a show.ssp template.

Listing 2.5. Initial page template
<%@ import val page: com.example.cms.Page %>

<div class="row">
  <div class="span6">
      <h2><%= page.title %> </h2>
      <p class="lead"><%= page.summary %></p>
      <p><%= page.body %></p>
  </div>
</div>
If you’re coming from a dynamic language such as Python, Ruby, or PHP, you may be surprised by the first line. Like most other things in Scala, variables in Scalate templates are statically typed, and you need to explicitly define all template variables and their types before you can use them. The import statement ensures that this template has access to your com.example.chat.Page class. val page declares a page variable so Scalate knows how to access the page being passed to it from the page-retrieval action.
With the page template in place, you can view http://localhost:8080/pages/bacon-ipsum in your browser. You see the page’s title, summary, and body displayed, as shown in figure 2.9
Figure 2.9. Template output using SSP

2.6.2. Adding a layout
You can quickly make things look nicer by wrapping the page template in a layout that includes some boilerplate CSS. Open the layouts folder, and create a new file called default.ssp containing the contents of listing 2.6. By convention, Scalate will use this file as the layout for your pages/show.ssp template. It will wrap the contents of listing 2.6 around the HTML output of each of your controller’s actions, inserting the action’s output into the layout at the point where the layout says <%= unescape(body) %>.
Listing 2.6. A Scalate layout
<%@ val body:String %>
<html>
  <head>
    <title>Scalatra CMS</title>
    <!-- Bootstrap -->
    <link href="/css/bootstrap.min.css" rel="stylesheet" media="screen">
    <style type="text/css">
      body {
        padding-top: 60px;
      }
    </style>
  </head>
  <body>
    <div class="navbar navbar-inverse navbar-fixed-top">
      <div class="navbar-inner">
        <div class="container">
          <a class="btn btn-navbar" data-toggle="collapse"
            data-target=".nav-collapse">
            <span class="icon-bar"></span>
            <span class="icon-bar"></span>
            <span class="icon-bar"></span>
          </a>
          <ul class="nav">
              <li>
                <a class="brand" href="#" id="server">
                  Scalatra CMS
                </a>
              </li>
          </ul>
        </div>
      </div>
    </div>

    <div class="container">

      <%= unescape(body) %>

    </div> <!-- /container -->
  </body>
</html>
This is a fairly unexceptional layout based on the popular Twitter Bootstrap framework. Download the referenced CSS and JavaScript from http://getbootstrap.com/2.3.2/, and put them into your application’s webapp/css, webapp/js, and webapp/img folders. Refresh the page in your browser, and you should get a result like figure 2.10.
Figure 2.10. Adding a layout

You now have a much better-looking result. The output of the action get("/pages/:slug") is inserted into the default SSP layout you just defined.
When a page is found, the get("/pages/:slug") action calls ssp("/pages/show", "page" -> page). The HTML generated out of views/pages/show.ssp is then inserted into the default.ssp layout at the point where it says <%= unescape(body) %>.
Now that you’ve been introduced to templating, it’s time to turn your attention to another important tool: automated testing.
2.7. Writing tests
Scalatra has integrations for the major Scala test frameworks: ScalaTest, Specs2, and ScalaCheck. Which one to use is mostly a matter of personal taste. You’ll get a full tour of Scala testing libraries in chapter 8, but for the moment let’s test the /pages/bacon-ipsum route using the Specs2 library, which is used by default in Scalatra’s g8 template.
2.7.1. Writing your first test
When you generated your project, you may have noticed that the src folder containing your application’s source code has two subdirectories: main and test. So far, you’ve done everything in the application’s main directory, which contains the application itself. Now let’s explore the test directory, which you can see expanded in a file browser in figure 2.11.
Figure 2.11. You’ve got tests!

If you open the test directory tree, you’ll see that when you generated your PagesController, g8 automatically generated a matching test file called PagesControllerSpec. Open that now.
The default generated test looks like this:

This is a Specs2 acceptance test designed to exercise the PagesController. In its present form, it’s not much use, though, because it’s not testing a route that you’ve defined. There’s a test for the root path of the servlet (/), but there’s no test for the route get("/pages/:slug") you’re interested in testing.
First, change the route being tested to GET /pages/:slug, as shown in the following listing, so you’re testing the correct route.
Listing 2.7. Testing the /pages/:slug route

Let’s take a closer look at the structure of the test. The def pagesWork function is fairly self-explanatory: it’s a regular Scala method that follows the get("/pages/bacon-ipsum") route in the PagesController and gets access to the resulting response status and the response body. The ! pagesWork^ part probably deserves a bit more explanation, though.
Specs2 uses the ^ operator to separate your test headings into a series of tests that it can then output into your test runner. The ! operator tells Specs2 that you’d like to run the pagesWork method to prove the assertion that hitting the pages route should return status 200. The 200 HTTP status, of course, is the web server status, which denotes a successful request. As you add more tests, you’ll slowly build out the list of assertions, adding more spec lines that call methods using ! and separated by ^.
2.7.2. Running your tests
Let’s try running the new test. In a new terminal window, run ./sbt again so you have a fresh sbt prompt running. Then type ~ test to execute all test code in your application. Additionally, because the command is prefaced with ~, it watches your filesystem for changes, recompiles, and reruns the test command whenever you make a change in your application. You’ll see output like figure 2.12: there’s a green success indicator after every passing test, and an overview message about the entire test run (in this case, a green success message).
Figure 2.12. Test output

2.7.3. Adding another test
To round things out, let’s add one more test. When hitting the get("/pages/:slug") route, you can expect to see the word Bacon in the response body. Check that it’s there by adding the following test code.
Listing 2.8. Setting an expectation on the response body

If you’re still running your ~ test terminal, then sbt should automatically recompile your test code and run it.
Before moving on to deployment, it’s a good idea to see a failing test (because that’s what you’re supposed to write first). Generally speaking, there are two cases you’ll encounter over and over when testing: code errors and test failures.
Code errors
You may see syntax errors in either the code being tested or the test code itself. Try generating error output by opening your PagesController and dropping some garbage into the body of the class. We typed the word foo right before the end of the class and saved the file; our tests ran, and the compiler displayed the error shown in figure 2.13. (Remember to take the foo out of your PagesController class body before you continue!)
Figure 2.13. A compile error in the test terminal

Test failures
The application may compile and run but not meet the expectations you’ve set up. To see what happens, change the containsBacon function in your PagesControllerSpec so that it looks like this (substitute the word flowers instead of Bacon in the assertion testing the response body):
def containsBacon = get("/pages/bacon-ipsum") {
  body must contain("flowers")
}
You’ll see output like that in figure 2.14.
Figure 2.14. A failure of expectations

You’re told that although the code compiled and everything ran without problems, the expectation that the response body contains the word flowers wasn’t met. Your application is “working” insofar as it’s not throwing a 500 error. But it’s not doing what the test is asserting about the way the application should behave. Set that test assertion back to Bacon, and bask in the warm glow of a test suite running green.
2.8. Getting ready for deployment
Now that your app has some basic tests, you may want to deploy it so you can show off what you’ve done. You’ll see a full breakdown of deployment options in chapter 9. For the moment, we’ll show you only the basics of exporting a deployable copy of your application.
First, stop automatic compilation in your sbt console by pressing the Enter key. Then type package and press Enter again. sbt packages your application into a WAR file—a web application archive. This is a self-contained export of your entire application, including the Java bytecode, templates, and other resources needed to run it, all zipped up into a single file. When packaging is complete, sbt will tell you where it put the file, with console output as shown in figure 2.15. In our case, the file ended up at target/scala-2.10/scalatra-cms_2.10-0.1.0-SNAPSHOT.war.
Figure 2.15. Packaging a WAR file

Once the WAR file has exported, you can drop it into a servlet container (Tomcat, JBoss AS, and Glassfish are popular open source containers), or you can upload to a platform such as Jelastic, which takes care of the infrastructure for you. You’ll see detailed deployment instructions in chapter 9.
2.9. Summary
- Routes, route parameters, actions, and template rendering work together in a Scalatra application. We’ll go into these in greater detail in future chapters.
- Adding a layout can give your application a consistent look and style.
- Scalatra serves static CSS, JavaScript, and image files from inside the webapp directory.
- Automated tests ensure the correctness of your code. You can easily distinguish between test failures and broken application code by watching for compilation errors.
- Scalatra applications can be exported as self-contained WAR files for production deployments.