
Chapter 13. Creating a RESTful JSON API with Swagger
- API basics and construction styles
- Adding an HTTP API to the Hacker Tracker
- Refactoring code to remove trait duplication
- The Swagger documentation framework
- Annotating the Hacker Tracker API using Swagger
- Securing your API with HMAC
Scalatra is commonly used as a way to build HTTP application programming interfaces (APIs). An API is a way for one computer system to talk to another. It usually exposes business processes and data from one computer system, making it available for another computer system to talk to.
If you’ve done any web development over the past several years, you’ll be aware that large web companies—Google, Facebook, Twitter, Amazon—all have APIs that you can integrate with. This functionality often mirrors what you get from their websites. In the case of Google, for instance, you can send machine-readable requests to and from the Google Maps API, just as you can request human-readable information from the Google Maps web interface. With the web interface, you get back HTML that your browser allows you to read yourself. With the API, you get back JSON or XML responses that your programs can use.
Now that you know what an API is, let’s make one.
13.1. An API for the Hacker Tracker
At present, the Hacker Tracker application is set up solely for use by a person, using a web browser. You’re going to build a simple REST API that will allow you (or other people) to access and update the information inside the Hacker Tracker’s data store programmatically.
The example API will be a RESTful one. The term REST (short for Representational State Transfer) is one of the most meaningless acronyms ever, but RESTful APIs aren’t difficult to understand. A RESTful API uses the standard HTTP verbs combined with route matchers to define functionality.
In your API, you’ll have method names like GET /hackers (which brings back a list of hackers), POST /hackers (which creates a single hacker), and GET /hackers/1 (which gets the first hacker). REST APIs tend to be self-describing, and they usually operate on a single well-defined resource (such as a hacker).
13.2. Adding an API controller
You’ll start with the Hacker Tracker as it last appeared, at the end of chapter 11. Before you start coding, let’s consider what you can reuse and what you’ll need to add to the application.
At the moment, you’ve got a functional data storage system that uses Squeryl for persistence. It allows you to create new hackers and to list all hackers in the database. You don’t need to modify any of this.
You need to add a new controller to deal with incoming API requests. Just like the existing HackersController, the new controller will have operations for creating and retrieving hackers. The big difference is that it’ll return JSON instead of HTML responses.
Let’s add the API controller. Create a new file called ApiController.scala at the same level as HackersController.scala. Because you won’t have a user interface, there’s no need to inherit from HackerTrackerStack, which has references to ScalateSupport and FlashMapSupport. Instead, you can inherit directly from ScalatraServlet (which gives you the HTTP DSL) and MethodOverride (which allows you to support HTTP’s PUT and DELETE operations in addition to GET and POST). Your controller should look like the following listing.
Listing 13.1. The API controller


This is just a skeletal controller, and it should look familiar. It’s structurally similar to the HackersController, with one difference. There’s no need for a get("/new") action, because the API has no reason to show an HTML form.
You need to mount the ApiController in ScalatraBootstrap, so that it becomes available to the outside world, as shown in the next listing.
Listing 13.2. Mounting the ApiController

All the functionality you define in the ApiController will now be available at http://localhost:8080/hackers-api. In REST terms, you’ve defined some of the operations of a Hacker resource and made it addressable via standard HTTP routes. See chapter 3 for a refresher on the standard REST routes, if you need one.
13.2.1. Returning Hacker JSON from the ApiController
We covered JSON handling in chapter 5. Now we’ll look at interacting with the database and returning JSON from your routes.
As in chapter 5, you’ll need to add the line "org.json4s" %% "json4s-jackson" % "3.2.11", to your libraryDependencies in project/build.scala and restart to pick up the dependencies.
Now let’s add the necessary JSON-handling traits and return JSON from the controller. You can see what you need to add in the following listing.
Listing 13.3. Adding JSON support

You add the JacksonJsonSupport trait so that you can parse JSON and import the DefaultFormats implicit so that you can transform case classes and JSON. You also ensure that you always respond with JSON by setting the contentType in the before filter. If any of that is unfamiliar to you, please refer back to chapter 5 for a detailed explanation.
You’ll work directly with the Hacker model, so make sure you’ve got a reference to it in your controller:

Now it’s time to implement the actions inside your routes. All the actions in Api-Controller will be functionally similar to the corresponding actions in Hackers-Controller, but they’ll respond with JSON. First up: the get("/") action.
Currently the action body is blank. Change it so it looks like the following listing.
Listing 13.4. Implementing get("/")
/**
 * List all hackers.
 */
get("/") {
  Hacker.all.toList
}
Pretty simple. Because you’ve added all the JSON support code, you should be able to run your application now. Hit http://localhost:8080/hackers-api, and you’ll get a JSON representation of the hackers in your database. Ours looks like figure 13.1.
Figure 13.1. Hacker API output

As you can see, Scalatra has serialized the Hackers into a list structure and given it back as JSON output. Yours may be different if you’ve already input different hackers, or it may be empty if you haven’t entered any yet (you can log in and enter some hackers if so).
Next, let’s add the show action, which returns a single hacker. Change the get ("/:id") method so that it looks like the next listing.
Listing 13.5. Hacker retrieval action
/**
 * Retrieve a specific hacker.
 */
get("/:id") {
  val id = params.getAs[Int]("id").getOrElse(0)
  Hacker.get(id)
}
Once again, JSON serialization is handled automatically by Json4s and Scalatra. Assuming that you’ve got at least one hacker in your database, you should be able to hit http://localhost:8080/hackers-api/1 and retrieve data for a single hacker, as shown in figure 13.2.
Figure 13.2. Hacker

The JSON output this time is for a single Hacker. You can retrieve different hackers by changing the :id parameter in the URL.
Now on to the final action, post("/"), which creates a new Hacker in the database. Add the following code to the action body.
Listing 13.6. Hacker creation action
/**
 * Create a new hacker in the database.
 */
post("/") {
  val firstName = params("firstname")
  val lastName = params("lastname")
  val motto = params("motto")
  val birthYear = params.getAs[Int]("birthyear").getOrElse(
    halt(BadRequest("Please provide a year of birth.")))


  val hacker = new Hacker(0, firstName, lastName, motto, birthYear)
  if(Hacker.create(hacker)) {
    hacker
  }
}
You can try it with the following curl invocation:
curl -X POST
--data "firstname=Richard&lastname=Stallman"
--data "motto=Free+as+in+Freedom&birthyear=1953"
http://localhost:8080/hackers-api
This will post a new Hacker to the API and save it to the database. If you refresh the list view, you’ll see that the hacker has been inserted, as shown in figure 13.3.
Figure 13.3. A new Hacker added to the tracker

13.2.2. Refactoring to remove duplication
Let’s pause and take stock. The functionality of the application has grown, and with the addition of the API controller, things are starting to get a bit messy. Time for some refactoring.
There are several problems you can easily clean up. First, the traits being mixed into the ApiController and HackersController have some duplication (and as you know, duplication is maintainability’s greatest enemy). Here’s what you currently have mixed into the ApiController:
class ApiController extends ScalatraServlet with MethodOverride
  with DatabaseSessionSupport with JacksonJsonSupport {
This is strikingly similar to your HackerTrackerStack, which is mixed into the Hackers-Controller:
trait HackerTrackerStack extends ScalatraServlet with ScalateSupport
  with DatabaseSessionSupport with FlashMapSupport with MethodOverride {
Several traits are duplicated between the two: MethodOverride, DatabaseSession-Support, and ScalatraServlet. These three traits are core to your application, and almost every controller will probably use them. But only controllers that serve HTML will need FlashMapSupport or ScalateSupport.
The solution is simple: you need to refactor these traits so that you have a CoreAppStack trait that can be used by all controllers, a BrowserStack that can be used by controllers that serve HTML, and an ApiStack that you can mix into your API controllers. Because you’re now multiplying your stacks, you might as well give them a home. Create a package directory for the new stacks to live in, as shown in figure 13.4.
Figure 13.4. Creating a package for your stacks

Next, create the HackerCoreStack trait in the new stacks package, and mix in the traits you’ll want to use in every controller:
package com.constructiveproof.hackertracker.stacks

import org.scalatra.{MethodOverride, ScalatraServlet}
import com.constructiveproof.hackertracker.init.DatabaseSessionSupport


trait HackerCoreStack extends ScalatraServlet
  with DatabaseSessionSupport with MethodOverride {

}
Rename the current HackerTrackerStack so it’s called BrowserStack, move it into the stacks package, and replace the core traits by mixing in HackerCoreStack. You’ll end up with a trait declaration that looks like this:
trait BrowserStack extends HackerCoreStack with ScalateSupport
  with FlashMapSupport {
Finally, create an ApiStack that extends the HackerCoreStack with JSON support:
package com.constructiveproof.hackertracker.stacks

import org.scalatra.json.JacksonJsonSupport

trait ApiStack extends HackerCoreStack with JacksonJsonSupport{

}
You can now proceed to clean up your controllers. HackersController, for instance, can be simplified quite nicely:
class HackersController extends BrowserStack
  with AuthenticationSupport {
The SessionsController cleans up in a similar way:
class SessionsController extends BrowserStack
  with AuthenticationSupport {
The DatabaseSetupController mixes in a different authentication trait, but it’s otherwise the same:
class DatabaseSetupController extends BrowserStack
  with OurBasicAuthenticationSupport {
The ApiController also sheds a lot of declarative weight:
class ApiController extends ApiStack {
With the refactoring complete, you have a much more rational structure of traits mixed into your controllers. The final directory structure looks like figure 13.5.
Figure 13.5. The stacks package after refactoring

There are several other refactorings you could apply. Usually, we prefer to have controllers in their own package.
We’d probably rename Api-Controller to something like HackersApiController so that future API controllers could be added more easily. You can also drop in a business logic layer to abstract communication between controllers (which should only handle user input and response generation) and the persistence layer (which should handle persistence but not much application logic). But the application is clean enough for now, so let’s move on.
Let’s turn our attention back to the ApiController and add another hacker:
curl  -X POST
--data firstname=Alan
--data lastname=Turing
--data motto="We can only see a short distance ahead,
  but we can see plenty there that needs to be done."
--data birthyear=1912 http://localhost:8080/hackers-api
It works, but it’s pretty cryptic. Anyone wanting to use the API would need to read your code to figure out what routes are available, what parameters are required, and what the return values of each action are. This is impractical, especially if you don’t want to publish your source code.
13.3. Self-documenting APIs using Swagger
There are two common solutions to the problem of API documentation. Typically, people write up a spec document and email it to prospective implementers as a PDF. A more advanced, but still very manual, approach is to make a web page detailing available routes, parameters, and return types, and update it by hand.
These options are terrible. Even with the best of intentions, the code and documentation will probably drift apart eventually—and it’s potentially a lot of work to document all this information for even a small API. Because (as Larry Wall argues) laziness is one of the cardinal virtues of a programmer, it seems like this isn’t the right way to do things. How can you fix this? The Scalatra community solves it by integrating with a library called Swagger.
13.3.1. Swagger—what is it?
Swagger is a specification and complete framework implementation for describing, producing, consuming, and visualizing RESTful web services. Scalatra integrates Swagger so that your API always has autogenerated documentation that you can easily keep in step with your application code. Swagger also lets people try out API methods using autogenerated forms in a web browser.
Swagger is an open source project from Wordnik, the word-meanings people. It’s a specification that allows you to create simple JSON-based documents that describe your API. These JSON specs can then be used for several things.
First, there’s a project called swagger-ui. This is a simple idea—it’s a set of HTML/CSS/JavaScript that reads Swagger JSON specs and kicks out a web page allowing you to explore a REST API. Let’s take a look at the Swagger Petstore, which is their sample app.
Go to http://petstore.swagger.io/ and wait a moment. The HTML interface will load up, and you’ll be presented with a page that allows you to explore a sample Petstore API, which will look something like the one in figure 13.6. It may have slightly different names and methods as the Swagger people update their demo. The important thing is to get a feel for how easy Swagger makes it to browse REST APIs.
Figure 13.6. The Swagger Petstore as viewed in Swagger-ui

You can see all the APIs that this application exposes: pet, store, and user. Click the pet link to see what operations you can perform on pets, as shown in figure 13.7.
Figure 13.7. Exploring the pet resource

This API has some methods similar to what you’ve got, plus a few more—this API allows you to retrieve a single pet, add a new pet, update a pet, and find pets by tags or status.
Let’s see what parameters you’d need to use to add a new pet. Click the GET /pet.json link. You’ll be presented with a form input such as figure 13.8, allowing you to retrieve a pet by its petId. Enter the number 2 in the petId input field, and click the Try It Out button.
Figure 13.8. Exploring the GET /pet/{petId} method

This gives you information related to this pet, including its name (Cat 2), what categories it’s in, and the API’s response status (200 OK). All of this information came from the Swagger spec file for the Petstore API, which you can see by clicking the Raw link on the right side of the /pet definition. It looks like figure 13.9.
Figure 13.9. A raw machine-readable JSON spec

This machine-readable JSON is what the swagger-ui HTML client is reading in order to autogenerate documentation for the pet store or, potentially, for your Hacker Tracker API.
In addition to the documentation, the Swagger spec for this application can be used to automatically generate client code (in multiple languages) in order to speed the process of creating integrations with an API. This is part of the swagger-codegen project (https://github.com/wordnik/swagger-codegen). There’s also support for generating server-side code in Scala and Java.
You might be thinking that all of these benefits sound wonderful, but if you need to build a JSON file by hand for each of your APIs, and keep it up to date manually whenever you make any changes, you’re not very far ahead. Luckily, this isn’t the case.
Scalatra has Swagger support baked right into it. This means you can annotate your controller and your actions with a few extra bits of information, and Scalatra will automatically generate a full Swagger spec for the APIs and models in your application.
13.3.2. Swaggerize the application
Let’s set your application up to use Swagger. First, add the Swagger dependencies to your build.sbt file:
"org.scalatra" %% "scalatra-swagger" % ScalatraVersion,
Exit your sbt console, and again type sbt in the top-level directory of your application in order to pull in the dependencies. Then run ~jetty:start to start the server and get code reloading going again.
Any Scalatra application that uses Swagger support must implement a Swagger controller. Those JSON specification files, which you’d otherwise need to write by hand, need to be served by something, after all. Let’s add a standard Swagger controller to your application. Drop the code in the following listing into a new file next to ApiController.scala. You can call it HackersSwagger.scala.
Listing 13.7. Standard Swagger controller to serve JSON spec files
package com.constructiveproof.hackertracker

import org.scalatra.swagger.{Swagger, JacksonSwaggerBase}
import org.scalatra.ScalatraServlet
import org.json4s.DefaultFormats

class HackersSwagger(implicit val swagger: Swagger)
  extends ScalatraServlet with JacksonSwaggerBase {
}
That code will automatically produce Swagger-compliant JSON specs for every Swagger-documented API method in your application. The rest of your application doesn’t know about it yet, though. In order to get everything set up properly, you need to change your ScalatraBootstrap class so that the container knows about this new controller, and provide some summary information about the API; see the next listing.
Listing 13.8. Mounting the Swagger docs controller
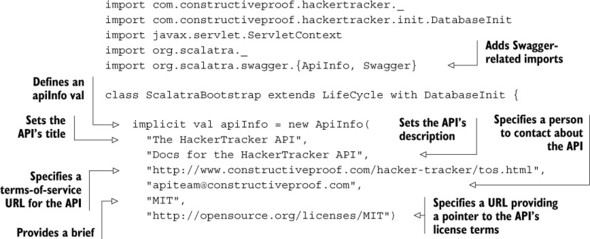

val apiInfo holds global information about the Hacker Tracker API—what it’s called, a brief description, contact details so that implementers know who to talk to about the API, and licensing information. This information will presumably be constant for all methods in the API, so it’s defined at the application level in ScalatraBootstrap.
Next, you instantiate a new swagger object, which will implicitly be passed to all Swaggerized controllers. Finally, you mount the HackersSwagger controller at the location api-docs/*. The HackersSwagger controller will now automatically spit out Swagger JSON spec files for any route in your application that you’d like to document. Let’s document your ApiController to see how this works.
Currently, the ApiController declaration should look like this:
class ApiController extends ApiStack {
This needs to change a bit. You need to ensure that the ApiController has a reference to the swagger object you just defined in ScalatraBootstrap. Change the constructor parameters so that they look like the following listing.
Listing 13.9. Adding Swagger constructor parameters
class ApiController()(implicit val swagger: Swagger)
  extends ApiStack with SwaggerSupport {
Because Swagger already implements jsonFormats, you need to remove the following line from your ApiController:
protected implicit lazy val jsonFormats: Formats = DefaultFormats
The ApiController is now Swagger-enabled.
What have you accomplished so far? You’ve got a controller, which, given information from Swagger annotations in your controllers, can automatically generate machine-readable descriptions of your API’s methods. These machine-readable descriptions can, in turn, be read by an HTML5/JavaScript user interface, allowing easy browsing of the API documentation in a web browser.
You can see Swagger starting to work already. Take a look at http://localhost:8080/api-docs/resources.json (figure 13.10). You should see a JSON description of your API’s capabilities, built from the apiInfo you entered into ScalatraBootstrap.
Figure 13.10. The resources.json API descriptor file

That’s pretty much it for setup. Now you can begin documenting the API methods with Swagger.
13.3.3. Documenting the routes
You’ve already added an apiInfo to ScalatraBootstrap to add some information about the API. Now you should add some information about the ApiController. Drop a controller name and description into the body of the ApiController class, as in the following listing.
Listing 13.10. Adding controller information

It’s time to document a route. Swagger annotations are fairly simple in Scalatra. You describe each route as an ApiInfo object and decorate each of your routes with it, and Scalatra generates the JSON spec for your route.
Let’s do the get("/") method first. Right now, it looks like this:
/**
 * List all hackers.
 */
get("/") {
  Hacker.all.toList
}
You’ll need to add some information to the controller in order to tell Swagger what this method does, what parameters it can take, and what it responds with. Drop a new apiOperation val into the body of the controller class, and start describing the get("/") method. Then add the apiOperation into the method call.
Listing 13.11. Documenting the get("/") route

These annotations are used by Scalatra’s Swagger integration to automatically generate Swagger spec files for your API’s methods. You can see the spec file in raw JSON form at http://localhost:8080/api-docs/hackers-api.json (see figure 13.11).
Figure 13.11. Swagger spec file for the ApiController

Swagger-ui can read this JSON spec and show you a set of dynamic forms. These allow you to interact directly with your API, seeing the methods available and each method’s required and optional parameters.
To try out your API using swagger-ui, go to http://petstore.swagger.io/ in a browser. By default, this shows you the Swagger Petstore API, but you can use it to browse your own local APIs as well.
Paste the path to your application’s resources.json file, http://localhost:8080/api-docs, into Swagger UI’s location field, and then click Explore. You’ll be presented with a view like that shown in figure 13.12.
Figure 13.12. Browsing local API docs using Swagger UI

Note
Swagger UI can be used to browse any Swagger-compliant API. You can run your own local copy by grabbing the wordnik/swagger-ui project code from GitHub. There are no dependencies.
Clicking the Hackers-api link will present you with a list of all the Swagger-annotated RESTful API methods in your ApiController. Clicking the GET /hackers-api/ route will give you an interactive user interface, as shown in figure 13.13, which you can use to explore that route.
Figure 13.13. Getting a list of hackers

You can now document the post("/") route, which allows you to add a new hacker to your list. Right now the route definition looks like this:
/**
 * Create a new hacker in the database.
 */
post("/") {
You can add Swagger information to the route, so it looks like the next listing.
Listing 13.12. Documenting the hacker creation action


Each parameter to the API method is documented as a Parameter object within a List of parameters. Each parameter is thoroughly documented and includes information about the parameter name; what data type is acceptable; a human-readable description; any notes about the parameter that implementers need to know about; and whether the parameter should be sent in a POST body, as a file, within the URL path, on the query string, or as a header. Finally, you can specify whether the parameter is required or optional. Adding these annotations increases the JSON specs at http://localhost:8080/api-docs/hackers-api.json by a considerable amount, as shown in figure 13.14.
Figure 13.14. Hackers-api.json with a second annotated method

Clicking Explore again in the Swagger UI browser and expanding the POST / route will show you the documentation for the route, as you can see in figure 13.15. Note that this form is fully interactive, and it generates real API requests that you can use to explore your application. Click the Try It Out button to see your API method in action.
Figure 13.15. Swagger UI for POST/

Let’s document the last API method, get("/:id"). Add the code from Listing 13.13 to the ApiController. The process is fairly similar to the previous two examples. First define an apiOperation, and then add the operation to the route so that it gets documented.
Listing 13.13. Documenting get("/:id")

That’s it—the API methods are now documented with Swagger. But there are a few security-related mysteries. Why does the documentation browser work at all (the docs are on a remote server and your API is local)? Also, what’s that empty api_key text field doing there in the Swagger documentation browser? We’ll deal with these questions in the next few sections.
13.3.4. Cross-origin API security and Swagger UI
How is it possible that you can use a form on the internet, at http://petstore.swagger.io/, to browse an application running on http://localhost:8080? Why does Swagger UI work at all? Shouldn’t the JavaScript security sandbox, which normally blocks these kinds of cross-domain shenanigans, swing into action and deny the request?
Normally, this would be true. But Scalatra has built-in support for cross-origin resource sharing (CORS), and it’s enabled by default whenever you mix SwaggerSupport into a servlet.
You can restrict access to the documentation browser (or to your API itself) by setting the init parameter org.scalatra.cors.allowedOrigins to a comma-separated list of values, in your ScalatraBootstrap file:
context.initParameters("org.scalatra.cors.allowedOrigins") =
 "http://example.com:8080 http://foo.example.com"
13.4. Securing your API
API security is a complex subject—there are a lot of ways to do it. Because you’ve built a RESTful API here, it’s normal to want to keep things stateless. This means API clients don’t log in first to pick up a session and then use the session as their authentication mechanism. Every request needs to authenticate itself separately from every other request.
There are many ways to accomplish this. Probably the simplest way is to use the same HTTP Basic authentication mechanism you used back in chapter 11, and send the username and password to the API with every request. It’s not particularly pretty, but if secured with an SSL connection, it’ll do the job with minimum fuss for low-ceremony applications.
Other ways to do it are more complex. Popular ways to secure APIs include HMAC request signing using shared secrets, multiple authentication flows using OAuth2, and heavyweight solutions such as SAML.
Which authentication method you choose will depend on many different factors. What kinds of clients do you plan to support? What degree of technical sophistication do you expect your API client implementers to have? What’s your strategy for protecting shared secrets? Do you need to support JavaScript clients?
These subjects warrant a book of their own, and they’re way beyond the scope of what we can cover in detail here. But we can look at simple API security using HMAC signing.
13.4.1. HMAC—what is it?
Hash-based message authentication codes (HMACs) are a way to guarantee two things: that an incoming request was sent by a client your application knows about (authentication) and that the request data hasn’t been tampered with in transit (data integrity). The API server and the API client both have access to a shared secret. The client cryptographically signs requests to the API, using the shared secret. It then makes the request, and submits the signature alongside the request.
When the server receives a request, it uses the same shared secret to sign the incoming request data, and compares the resulting hash with the submitted signature. If the two values match, the server knows that the request originated from someone with access to the shared secret. To illustrate this in a practical way, let’s try it out using Amazon’s signing strategy as a guide.
If you’ve ever used the popular Amazon S3 API, you’ve used HMAC signing to authenticate, although you might not have realized it. S3 uses HMAC signatures to guarantee a lot of things about the data integrity of each request: the HTTP verb, the path being requested, the date, the Content-Type, submitted HTTP headers, and incoming parameters. It’s worth reading Amazon’s HMAC article.[1]
Amazon Web Services, “Signing and Authenticating REST Requests,” http://mng.bz/DlDH.
For the purposes of this chapter, you’ll use a simplified version of the S3 signatures. It will look like this pseudocode:
Signature = Base64( HMAC-SHA1( secretKey, stringToSign ) );
In this case, stringToSign will contain two things: the HTTP verb for the request, and the path you’re going to hit on the server, concatenated together in order as a comma-separated list. You’ll use the string thisisthesecretkey as a shared secret. So for a request such as GET /hackers-api, you calculate the signature as follows:
Base64 ( HMAC-SHA1 ( "thisisthesecretkey", "GET,/hackers-api" ) )
If the client signs its request this way and sends the signature along with the request, the API will know whether the client had access to the shared secret. It will also be able to tell that neither the requested path nor the HTTP verb were tampered with in transit.
13.4.2. An HMAC calculator in Scala
Let’s build an HMAC calculator in Scala, borrowing from the Java security libraries included in the standard library. Create a new package inside the existing auth package and call it utils. Then create the file HmacUtils.scala inside that package. It should look like the following listing.
Listing 13.14. HmacUtils.scala

It’s a pretty straightforward translation of the pseudocode into Scala. The secret key is used to cryptographically sign a string called stringToSign and hash it with the bytes of the secretKey using the HmacSHA1 hash function.
What does this get you? You can now sign a string with a shared secret to produce a cryptographic signature. If you drop the code in listing 13.15 into HmacUtils.scala, you’ll see the verification part. It adds the ability to verify that a submitted hmac matches a signed string.
Listing 13.15. Verifying the signature

Now you’re getting somewhere. Let’s use the new HmacUtils.verify function to protect the Hacker Tracker’s API.
13.4.3. Protecting the API with a trait
In chapter 11 you saw various uses of Scentry to secure the Hacker Tracker: HTTP Basic authentication, a username/password strategy, and using a Remember Me cookie to let users back in without re-authenticating. This time, let’s try something a bit more lightweight: you’ll secure the API using a simple trait with a before filter. Drop the code from the following listing into a file called ApiAuthenticationSupport in the auth directory.
Listing 13.16. ApiAuthenticationSupport trait


Let’s take this one step at a time. You’ve built a trait that you can mix into either the ApiController or the ApiStack. It has a validateRequest method, which you can execute in a before() filter to check that requests have been properly signed.
The secretKey defines a shared secret. When making requests, API clients need to concatenate a string consisting of the HTTP verb and the request path, separated by a comma, and sign it with the shared secret. The signed hash is then submitted as a query string parameter sig, as ?sig=thisiswherethesignaturegoes.
The ApiAuthenticationSupport trait’s validateRequest function reads the signature sig from the query string, and then concatenates the HTTP verb (GET, PUT, POST, or DELETE) and the request path, separated by a comma, in the signMe function. It then sends both these values, and the secret key, to HmacUtils.verify to see whether the incoming request is properly signed (that is, whether the request being received has a hashed value equal to the incoming signature). Requests with incorrect or nonexistent signatures will be stopped in their tracks when the unauthorized function is called. Additionally, both the sbt console and the response have the correct signature added to them, for your learning convenience. Obviously, it’d be a bad idea to do this in production.
Let’s see it in action. First, add the ApiAuthenticationSupport trait to the ApiStack:

Now you have the ability to use the validateRequest function in your controllers. Let’s try it. Add the validateRequest function call to the before() filter in the ApiController, as in the next listing.
Listing 13.17. Adding API request validation

Your API is now protected from access by unauthenticated clients. Try it by hitting the URL http://localhost:8080/hackers-api, and you’ll see a message like that in figure 13.16.
Figure 13.16. API authentication is now required.

As you can see, the API no longer allows access without a valid HMAC signature. The error message in the response tells you the proper sig parameter to append. You can see it in action in figure 13.17.
Figure 13.17. A request with a good HMAC signature

It works! Now you can sleep easy, knowing your API has been secured from use by world + dog.
There are several other things you’ll want to do in production. First, you should include a timestamp in the request and include it in the request signature, so that anyone who gets hold of a signed request can only replay the request within a fairly small time period (Amazon uses 15 minutes). This prevents what are called replay attacks, where an unauthorized person gets hold of signed requests after they’re made and executes the same actions as the original client.
Unless your API has only one user, you’ll probably also want to include some kind of keyid parameter so you can have one shared secret per user, or per client application. When a request comes in, you’ll read the keyid parameter, retrieve the shared secret for that account from your data store, and use the shared secret to verify the incoming request.
If you have an account-based setup that allows external parties to register apps, like Twitter and Facebook do, you might generate a shared secret when a user decides to create a new client app, and show it to users in their account area.
This is just the start of your API construction journey; there’s lots still to learn. But this should be enough to get you started.
13.5. Summary
- You’ve seen the basics of constructing and interacting with a RESTful HTTP API using Scalatra.
- The Hacker Tracker now sports an API, so it can be accessed not only by humans using a web browser but also via machine-to-machine interactions on the internet.
- The Swagger API documentation framework lets your API users browse methods and data. You can use Swagger docs as a way to communicate with both technical and non-technical people about the capabilities of your API. You can also send requests directly to your API and see them in Swagger’s handy human-usable web interface.
- API security is just as important as securing HTML-based information and forms. You can use HMAC request signing to authenticate requests and guarantee data integrity for requests to your API.
And with that, the book comes to an end. We hope it proves useful to you. Stop by for a chat on https://gitter.im/scalatra/scalatra if you need to discuss any aspects of the framework in real time, have questions, or just want to hang out.
From the Scalatra crew, thanks for reading. We wish you good luck in your use of the framework!