Chapter 11. Authentication
- Stateful vs. stateless authentication
- The Scentry authentication framework
- HTTP Basic authentication
- Session handling in Scalatra
- Form-based login with a username and password
- Remembering a user with a cookie
- Defining multiple authentication strategies for a single application
Authentication, the act of confirming that somebody is who you think they are, is something you’ll do over and over when constructing HTTP applications. To illustrate how authentication works in Scalatra, you’ll protect parts of the Hacker Tracker application from chapter 4. You’ll change it so that only logged-in users can add, remove, or edit hackers.
It’s worth understanding right at the start that typically there are big differences between web applications and HTTP APIs when it comes to authentication. Web applications usually require a user to log in once, and then they hold on to that authentication state across multiple requests: they are stateful. APIs usually require that each request is authenticated independently of all other requests: they are stateless.
We’ll take a look at web application security using stateful authentication in this chapter. If you’re interested in protecting your APIs, there are many ways to accomplish that—OAuth2 and HMACs are the most popular. OAuth2 is beyond the scope of this chapter. HMAC is shown in chapter 13.
11.1. A new, improved Hacker Tracker
In the code samples for this chapter, you’ll find two versions of the Hacker Tracker application. The first, chapter11/hacker-tracker-unprotected, is a more advanced version of the Hacker Tracker from chapter 4. The version in chapter 4 demonstrated routes, actions, and parameters, but it didn’t actually save anything. This new version has a web form for creating new hackers and the ability to save them using an embedded H2 database.
To see it in action, start Scalatra:
cd chapter11/hacker-tracker-unprotected
chmod +x sbt
./sbt
~jetty:start
Let’s look at what’s been added since the last time you saw the project. Open it in your editor or IDE. You’ll see that there are two new folders in src/main/scala/com/ constructiveproof/hackertracker. In the init folder, there’s a bunch of database initializer code; and in the models folder is a persistence system for hackers that uses the Squeryl object-relational mapper. The functionality of HackersController has been expanded so that it can save hackers to the database. There’s also a new controller, DatabaseSetupController, which can create or drop a database for you, set up the database schema, and print out the database schema to the console.
Let’s try setting up a new database. Open your browser and hit the URL http://localhost:8080/database/create. Several things will happen:
- Scalatra will tell Squeryl to create an H2 database storage file on disk.
- Squeryl will attempt to create the file in your home directory, at the path ~/db/hackertracker.db.
- You’ll be redirected to a hacker-creation form.
The hacker-creation form looks like figure 11.1 (note that there are a lot of problems with this form from a security perspective).
Figure 11.1. The hacker-creation form

There’s also a route allowing you to drop the database, at http://localhost:8080/database/drop. Hit that route, and you’ll destroy the database. You’ll see output as shown in figure 11.2.
Figure 11.2. Dropping the database

If you’re a security specialist, you’ll have noted the problem: most web applications don’t allow anonymous web users to create, drop, and re-create the data store. In fact, most don’t expose these operations via HTTP. Let’s put the second objection aside and assume that you want routes for database creation and destruction, but that only properly authenticated users should be allowed to do these things. How can you enforce this?
There are many ways to do it. If you’re an old Java servlet hand and can deal with the stench of XML configuration, you can use native servlet security configuration to protect your routes. After all, Scalatra runs inside a normal Java servlet container; all the 2003-era options are available to you, if you want them.
Another option is Apache Shiro. Again, because Shiro is designed for servlet applications, and Scalatra is a servlet-based framework, this will work just fine. The good thing about Shiro is that you get not only authentication support (is this user who they say they are?), you also get authorization support (what is this user allowed to do?). But in this chapter, we’ll focus on what Scalatra provides natively.
11.2. An introduction to Scentry
Scalatra includes its own authentication framework called Scentry. It’s a version of Ruby’s Warden authentication framework that has been ported to Scala.
Like Warden, Scentry is structured around the concept of authentication strategies. A strategy is a self-contained piece of logic for checking whether an authentication attempt should succeed or fail. Strategies can run additional code after authentication or logout takes place, allowing you to take care of things like giving the user a session or destroying cookies on logout.
You can protect your application in whatever ways you’d like, but these are some common strategies:
- A BasicAuthStrategy that prevents a user from seeing a web page without the proper credentials.
- A UserPasswordStrategy that allows a user to log in from a web form.
- A RememberMeStrategy that remembers the user for a week after they’ve logged in, so that they don’t need to enter their credentials every time they visit the site.
Another way in which Scentry is like Warden is that it requires a session. Let’s take a quick detour and look at session handling in Scalatra.
11.2.1. Session handling in Scalatra
Most of the stateful authentication methods we’ll be looking at involve using server-side session mechanisms to remember a user’s identity between requests. Because session-handling mechanisms underpin so much of the stateful security model, it’s a good idea to understand how sessions work in Scalatra.
Like many other frameworks, Scalatra needs to use some tricks to remember anything about a given user between requests. In reality, every HTTP request is independent of every other HTTP request; all HTTP applications are naturally stateless. To get around this, Scalatra can be configured to set a session cookie in a user’s browser during a request. When the user later makes another request, the session cookie is sent back to the server. The server has a bit of RAM put aside to remember the information inside the user’s session cookie. This allows the server to differentiate between users and provide a decent illusion of statefulness between requests.
Scalatra is a servlet-based framework, and the Java servlet specification dictates how sessions are implemented by whatever container (such as Jetty, Tomcat, JBoss, WebSphere, GlassFish) your application is running in.
By default, Scalatra controller classes don’t set up sessions. Leaving session functionality out of your application reduces RAM consumption and data transfer, so it makes sense to leave sessions off if you’re building a stateless application, such as an API. But when you need them, you need them.
Sessions are a core part of Scalatra, and you can start a session in one of several ways. The most explicit way to trigger a session is to mix Scalatra’s SessionSupport trait into one or more of your controllers. This will cause Scalatra to set a session cookie and remember a user between successive requests. Mixing in FlashMapSupport, which allows you to “flash” short amounts of information to a user between requests, will also trigger a session. This is why FlashMapSupport isn’t turned on by default.
Let’s use Scentry to protect the Hacker Tracker. You’ll start simply and use Scentry to protect the database creation and destruction routes using HTTP Basic authentication.
HTTP Basic authentication will be familiar if you’ve been around on the web for a while: it pops up an ugly-looking login box that’s part of the browser, and it requires a username and password in order to proceed.
11.2.2. Scentry setup
Setting up Scentry is fairly simple. First, add the Scentry dependency to your project/build.scala file in the libraryDependencies section:
"org.scalatra" %% "scalatra-auth" % ScalatraVersion,
Make sure you restart sbt to pick up the dependency.
Now you have access to all of Scentry’s authentication methods in your application, and you’ve had a basic introduction to sessions in Scalatra. Let’s look at how you can protect routes using Scentry.
There are a variety of ways to protect routes but still give access to logged-in users:
- HTTP Basic authentication
- Forms authentication with a username and password
- A Remember Me cookie
We’ll look at each of these over the next several sections.
11.3. Protecting routes with HTTP Basic authentication
Giving anonymous users on the web the ability to drop your database is a little dangerous. Now that Scentry is installed, you can fix that hole. You’ll need to write two pieces of code:
- An authentication strategy
- A trait that you can mix into the controller you want to protect
You’ll write a BasicAuthStrategy and a BasicAuthSupport trait to mix into the DatabaseSetupController to protect it.
11.3.1. The simplest possible Scentry strategy
The anatomy of any Scentry strategy is fairly simple. Strategies are just regular Scala classes that inherit from ScentryStrategy. They must implement two methods: a way to retrieve a user for authentication purposes, and a way to authenticate that the user is who they say they are.
The simplest possible strategy would look something like the following code. Don’t add this code to your application—it’s just an example to explain what a very simple strategy should look like. You’ll write a working one in a moment:

Note that you’re obliged to carry an implicit request and response around with you when defining strategies. This is ugly, but it’s needed in order to make asynchronous requests work in a safe way.
When defining a strategy, you need to tell Scentry what your User class is. In most cases, it will probably be called something like User or Account. In security speak, this is the security subject—the thing that you’re trying to authenticate. In the previous example code, the subject is YourUserClass.
The only method you must include is authenticate(). If authentication succeeds, this method should return Some(user). If authentication fails, it should return None.
Strategies are flexible, and you can define a lot of extra things about them. For instance, you can conditionally determine whether an authentication strategy should be run, or trigger actions at quite a few different points in the authentication lifecycle. You’ll see some of these in this chapter.
11.3.2. A basic auth strategy
Enough of the theory. Let’s define a real strategy.
First, you need to define a User class. Put the following code into models/Models.scala:
case class User(id:String)
This defines a User model that you can use as an authentication subject. It’s a Scala case class that takes a single string parameter as an id. It won’t persist to disk using Squeryl, but it’s enough to show authentication in action.
You need a place to keep your strategies. In the src/main/scala/com/constructiveproof/hackertracker folder, create a folder called auth, and inside it, create a folder called strategies.
Scalatra comes with one built-in strategy for you to extend: the BasicAuthStrategy. It requires that you pass a reference to your Scalatra application into the strategy’s constructor, so that it can reference incoming HTTP params. It also requires that you specify an HTTP Basic authentication realm, so the user knows what they’re authenticating to. This is a requirement of HTTP Basic authentication—it shows up at the top of the authentication box that opens when a user tries to log in.
Create the file OurBasicAuthStrategy.scala inside the strategies folder, and drop the following code into it.
Listing 11.1. OurBasicAuthStrategy


Scentry’s built-in BasicAuthStrategy is an abstract class. It has its own authenticate() method—but that method calls validate(), which you’ve implemented here. In OurBasicAuthStrategy, validate returns an Option[User], indicating that there’s a possibility that it’ll return either Some(User) or None. The body of the validate method checks whether the userName and password parameters that the app has received are both equal to "scalatra".
You can put any authentication logic you want into your strategy. In a more complex system, you might, for instance, decide to do a database lookup on the username that came in on the app’s HTTP params, and then check whether that User’s hashed and salted password was equal to the incoming password parameter.
11.3.3. A basic authentication support trait
Now that you have an authentication strategy defined, you need a way to use it in a controller. Let’s make a trait that you can mix into your DatabaseSetupController, forcing it to use OurBasicAuthStrategy. Just as Scalatra has a built-in BasicAuthStrategy that you can extend, it also has a BasicAuthSupport trait to make your life a bit easier. All you need to do is extend that one, and it’ll take care of the mundane details of HTTP Basic authentication redirects, HTTP headers, and status codes for you.
The trait should look like the following listing. Drop it into the auth folder you created earlier.
Listing 11.2. The OurBasicAuthenticationSupport trait
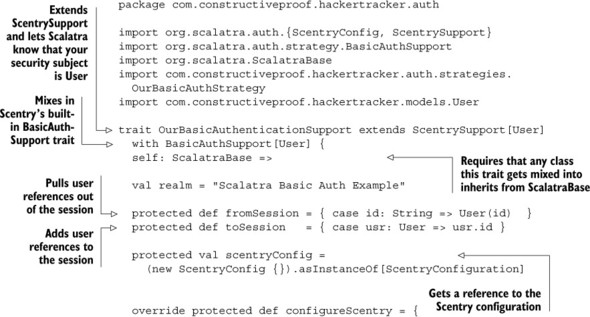

The trait extends ScentrySupport with a user type of User for an authentication subject. It’s worth pointing out the self: ScalatraBase => idiom used here, because you’ll see it used in lots of Scala traits. In English, it would mean any class that mixes in the BasicAuthenticationSupport trait must inherit from ScalatraBase. In other words, this trait can only be mixed into Scalatra controllers.
You also hardcoded an HTTP Basic authentication realm into place. When a user attempts to view a protected URL, they’ll see a login prompt pop up, and it’ll have the title Scalatra Basic Auth Example set as the security realm.
The support trait must be able to pull a User object out of the session and serialize a user into the session, so that your users don’t need to reauthenticate on every request. The fromSession and toSession methods do this in a simple way. Given a User object with an ID, toSession whacks the user’s ID into the session and stores it between requests. When you want to pull a User out of session, fromSession instantiates a User with the proper ID. Once again, in a more complex application you’d likely be doing some sort of retrieval from your data store, but this is enough to get the job done here without getting bogged down in persistence details.
scentryConfig is a value in the constructor that gives you a reference to your application’s Scentry configuration. It’s used to define Scentry’s behavior. In this case, you’re using it to answer a fairly simple question: what should happen when an unauthenticated user hits a protected controller action?
The answer is here:
override protected def configureScentry = {
  scentry.unauthenticated {
    scentry.strategies("Basic").unauthenticated()
  }
}
You tell your support trait that if any unauthenticated user hits a protected controller action, it should look up Scentry’s built-in "Basic" strategy and run its unauthenticated() method. If you nose around inside Scentry, you’ll see that this causes a halt(401, "Unauthenticated"). Scalatra will stop the user from proceeding any further, and the user will see the word “Unauthenticated” as the response body.
The last thing you do in the support trait is register OurBasicAuthStrategy with Scentry’s list of possible strategies. As you’ll see in a little while, it’s possible to define multiple Scentry strategies and fall back from one to another. For the moment, you’re only registering the "Basic" strategy.
All the infrastructure you need is now set up, and you can protect your DatabaseSetupController. At present, the top of DatabaseSetupController looks like this:
class DatabaseSetupController extends HackerTrackerStack {

  before() {
    contentType = "text/html"
  }
Once again, you can take advantage of some built-in Scentry functionality: there’s already a way to trigger a check for basic authentication. Just mix in OurBasicAuthenticationSupport and add a call to basicAuth to the before() filter, so it looks like this:
class DatabaseSetupController extends HackerTrackerStack
  with OurBasicAuthenticationSupport {

  before() {
    contentType = "text/html"
    basicAuth
  }
That’s it. All routes in the controller are now protected by the basicAuth call, which checks Scentry’s list of registered strategies and triggers an authentication box if Scentry’s built-in BasicAuthStrategy (or one of its subclasses) is registered.
11.3.4. Protecting the DatabaseSetupController
The result is wonderfully simple. Hit http://localhost:8080/database/drop. Instead of dropping the database as before, you’re confronted with the browser’s HTTP Basic authentication box asking you to log in, as shown in figure 11.3.
Figure 11.3. HTTP Basic authentication in action

If you enter scalatra as the username and scalatra as the password, the validate() method in OurBasicAuthStrategy will succeed, and Scentry will allow you to hit the route and drop the database. If you do anything else, you’ll be shown the word Unauthenticated instead, as shown in figure 11.4.
Figure 11.4. An unsuccessful login attempt

The Basic authentication strategy works, but that browser-specific login box is rather ugly. Most public-facing applications use a styled HTML login form instead. Let’s see how to make a login form using a forms authentication strategy.
11.4. Using forms authentication
You don’t want unauthenticated users to be able to add new hackers to the database, which they can currently do. The problem is, HackersController isn’t protected. To fix this, let’s turn our attention toward securing get("/new"), which displays the new hacker form, and post("/"), which creates a new hacker in the database.
Unauthenticated users who hit the new hacker route or try to create a new hacker should be redirected to a login page. After logging in, users should be able to see the new hacker form and create new hackers in the database. Scentry doesn’t have a built-in strategy for doing this, so you’ll write the code from scratch.
You want users to supply a username and password when users attempt to log in, so you’ll call the strategy UserPasswordStrategy. You also want to have a Remember Me check box that allows the system to remember a user for a week, so the user can bypass authentication as long as a cookie is set. This requires a different strategy: RememberMeStrategy. You’ll also make an AuthenticationSupport trait that you can mix into your controllers in order to protect them with your new strategies.
11.4.1. Creating a simple login form
You may as well start with the user interface. Add a new folder named sessions in your webapp/WEB-INF/templates/views folder, and create a file in it called new.ssp. That file is a simple login form, as follows.
Listing 11.3. A simple login form
<p>Please login:</p>
<form action="/sessions" method="post">
    <p>
        <label>Login:</label>
        <input type="text" name="username"/><br>
        <label>Password:</label>
        <input type="password" name="password"/><br/>
        <label>Remember Me:</label>
        <input type="checkbox" name="rememberMe" value="true" />
    </p>
    <p>
        <input type="submit">
    </p>
</form>
This form defines the user interface: a text input field for users to type their username into, a password field, and a check box that causes Hacker Tracker to remember the user for a week if it’s selected when they log in successfully.
You’ll now create a SessionsController so that you can display this form. Add the code from the following listing to it.
Listing 11.4. A basic sessions controller
package com.constructiveproof.hackertracker

class SessionsController extends HackerTrackerStack {
  get("/new") {
    contentType="text/html"
    ssp("/sessions/new", "allHackers" -> Hacker.all,
      "authenticated" -> isAuthenticated)
  }
}
Nothing too noteworthy here; it’s a standard Scalatra action that renders the form. Remember to mount the controller in ScalatraBootstrap by adding context .mount(new SessionsController, "/sessions") to the init() method. Point your browser at http://localhost:8080/sessions/new, and you’ll be able to see the form, as shown in figure 11.5.
Figure 11.5. The login form

11.4.2. Building a UserPasswordStrategy
At this point, you need to set up a Scentry strategy that can deal with form input and deal with login attempts by checking whether a user’s username and password should log them in. Create a new file called UserPasswordStrategy in auth/strategies/, and drop the following code into it.
Listing 11.5. The start of a UserPasswordStrategy

This looks very much like the minimal strategy from section 11.3.1, with one difference: it has an explicit name, which becomes important when multiple strategies with fallbacks are in play. The code will compile, but you only have a nonfunctional stub of the authenticate() method’s functionality. Before you finish that, let’s add a few convenience methods so your strategy can read incoming HTTP parameters.
You’ll add one for reading the incoming username parameter and another for the incoming password parameter. Drop these into the body of the strategy class:
private def username = app.params.getOrElse("username", "")
private def password = app.params.getOrElse("password", "")
Both methods use the app val that this strategy was initialized with to read incoming form parameters. During authentication attempts, instances of this strategy will be created, and you can use these methods to either grab the parameters you want or return an empty string.
Now you’re ready to finish the authenticate() method. Add code to that method so it attempts to authenticate the user:
def authenticate()
  (implicit request: HttpServletRequest,
    response: HttpServletResponse): Option[User] = {

  if(username == "foo" && password == "foo") {
    Some(User("foo"))
  } else {
    None
  }
}
This is a simple method that uses the convenience methods for username and password to check a user’s credentials. If the user enters “foo” for both the username and password, authenticate() returns a User and authentication succeeds. Otherwise, the method returns None, and authentication fails.
Part of a Scentry strategy’s job is to package up all authentication-related logic into one neat little bundle. Let’s use Scentry to define what should happen when an unauthenticated user requests a protected resource. Add the function in the following listing to UserPasswordStrategy.
Listing 11.6. Defining what happens when someone accesses a protected resource

When an unauthenticated user attempts to hit a route that’s protected by this particular Scentry strategy, you issue a redirect to "/sessions/new" and the user sees the login form, requesting their username and password. Now let’s create an AuthenticationSupport trait that you can use to protect the hacker-creation form, and see this in action.
11.4.3. Creating an AuthenticationSupport trait
As with the UserPasswordStrategy, you’ll need to write the AuthenticationSupport trait from the ground up. Create a new trait beside OurBasicAuthenticationSupport in the auth namespace, and call it AuthenticationSupport. Its contents are shown in the following listing.
Listing 11.7. AuthenticationSupport trait for use across the app


The trait defined in listing 11.7 is almost exactly the same as the OurBasicAuthenticationSupport trait you defined in section 11.3.3, but there’s one crucial difference. When you used Scentry’s built-in BasicAuthStrategy, you were able to protect a route by using the basicAuth method in the before filter of your DatabaseSetup-Controller. That’s what told Scentry to protect all the routes in that controller.
In the case of your new AuthenticationSupport trait, you need to build your own equivalent functionality, and that’s what the requireLogin() method does. You can put requireLogin() either in a before() filter (to protect an entire controller) or in an action (to protect only a single action). It triggers a Scentry authentication check, and if the user is authenticated, it does nothing. But if a user isn’t authenticated, they’re redirected to the login form.
11.4.4. Protecting your controllers with AuthenticationSupport
Let’s try it. You only need to make two small changes. Right now, the class definition for HackersController looks like this:
class HackersController extends HackerTrackerStack {
First, change the definition of HackersController so that it inherits from AuthenticationSupport in addition to HackerTrackerStack:
class HackersController extends HackerTrackerStack
  with AuthenticationSupport {
Second, add the requireLogin method call to the get("/new") route in Hackers-Controller. Right now, it looks like this:
get("/new") {
  val allHackers =  from(Db.hackers)(select(_))
  ssp("/hackers/new", "allHackers" -> allHackers)
}
All you need to do is drop the method call into place:

Now try hitting the URL http://localhost:8080/hackers/new. You’re instantly redirected to the form asking you to log in. A small victory! The trouble is, currently there isn’t any way for you to log in. Let’s change that.
Open SessionsController again. At present, the controller definition looks like this:
class SessionsController extends HackerTrackerStack {
Change it by mixing in AuthenticationSupport:
class SessionsController extends HackerTrackerStack
  with AuthenticationSupport {
That gives the controller access to Scentry. You’ll need that in a moment.
Next, paste a session creation action into it, as in the next listing.
Listing 11.8. Scentry login action

This session-creation action is deceptively simple. The login form at webapp/WEB-INF/templates/views/sessions/new.ssp posts the parameters username and password to this action. When scentry.authenticate() is called, Scentry checks which strategies are currently registered for this controller. There’s only one at the moment: UserPasswordStrategy.
Scentry instantiates an instance of UserPasswordStrategy, passing in the current controller as the strategy’s app. Then it runs the authenticate() method on the strategy. You might want to reread that code right now to see what it does: it returns a User to Scentry if both the username and password parameters from the form submission are equal to the string "foo".
The authenticate() method has another effect, though. If authentication succeeds, it stores a reference to the user in the session, using whatever the strategy has defined in the toSession method. At any time after that, you can call isAuthenticated and find out whether the current user has a login session.
The login code is complete, so let’s stop talking about it and try it. Try a failure first: enter a username of foo and a password of bar into the form, and submit it. Authentication will fail, and you’ll be redirected back to the login form to try again.
Now try logging in with a username of foo and a password of foo. Authentication will succeed this time. The user will have a login session, and Scentry will remember that the user is logged in, even over multiple requests (try hitting Refresh a few times).
Because you’re logged in, you can also click the New Hacker link or visit http://localhost:8080/hackers/new. You’ll see a form like the one shown in figure 11.6.
Figure 11.6. You can visit the hacker-creation form again.

You’ve achieved your objective of protecting the new hacker action. You should add requireLogin to the post("/") action in HackersController, so you don’t forget to protect that route. Now, let’s optimize a little.
11.4.5. Deciding whether to run a strategy
The way the code is set up right now, UserPasswordStrategy will run in full every time the scentry.authenticate() method is called. But sometimes you won’t want this to happen, depending on your application state. Let’s see how you can tell Scentry to not bother running a strategy under certain conditions. The key to this is Scentry’s isValid() method.
The isValid() method determines whether a strategy should run or not. It returns a Boolean, and you can use override in your strategies to determine the conditions under which they will run (or not).
Let’s try it. You want the UserPasswordStrategy to run if and only if the strategy has received username and password params. Add the following code to UserPasswordStrategy.
Listing 11.9. Conditionally running authentication strategies
override def isValid(implicit request: HttpServletRequest) = {
  username != "" && password != ""
}
Your strategies will only run if their isValid methods return true; and by default, isValid set to true. The code in listing 11.9 tells Scentry to run UserPasswordStrategy’s authenticate() method only if the user has entered both a username and password.
This isn’t much of a gain from an efficiency point of view, but it illustrates that you can choose to run strategies conditionally. You might decide, for instance, that you shouldn’t allow anyone to log in to your application between the hours of 10:00 p.m. and 8:00 a.m. on Tuesday nights.
The strategy is starting to become more full-featured. There’s still a problem with the code as it stands, though: users can’t log out.
11.4.6. Logging out
You need to add a Log Out link to the main navigation if the user is currently logged in, and a Log In link to the main navigation if the user is currently logged out. But first you need to make some additions to SessionsController and Hackers-Controller. You need to ensure that your Scalate templates know whether the user is currently logged in.
Open HackersController, and take a look at the get("/") action:
get("/") {
  ssp("/hackers/index", "allHackers" -> Hacker.all)
}
Add a new value, authenticated, to the outgoing template parameters:
get("/") {
  ssp("/hackers/index", "allHackers" -> Hacker.all,
    "authenticated" -> isAuthenticated)
}
You’ll need to add the authenticated value to every one of your controller actions, in both HackersController and SessionsController. You’re going to use it in the application’s default layout, and everything will explode if it’s not available.
Let’s add a Log Out link to the top navigation. Open the Hacker Tracker’s layout file at webapp/WEB-INF/templates/layouts/default.ssp. At the moment, the nav section looks like the following listing.
Listing 11.10. Navigation menu without Log In and Log Out links
<!-- Header and Nav -->
    <div class="row">
      <div class="large-3 columns">
        <h1><a href="/hackers">
        <img src="http://placehold.it/400x100&text=Logo" /></a></h1>
      </div>
      <div class="large-9 columns">
        <ul class="inline-list right">
          <li><a href="/hackers/new">New hacker</a></li>
        </ul>
      </div>
    </div>
<!-- End Header and Nav -->
Declare the authenticated value at the top of webapp/WEB-INF/templates/layouts/default.ssp:
<%@ val authenticated: Boolean %>
Now add conditional Log In and Log Out links to the default.ssp template.
Listing 11.11. Navigation menu with Log In and Log Out links
<!-- Header and Nav --> <div class="row">
  <div class="large-3 columns">
    <h1><a href="/hackers">
    <img src="http://placehold.it/400x100&text=Logo" /></a></h1>
  </div>
  <div class="large-9 columns">
    <ul class="inline-list right">
      <li><a href="/hackers/new">New hacker</a></li>
      #if(authenticated)
        <li><a href="/sessions/destroy">Log out</a></li>
      #else
        <li><a href="/sessions/new">Log in</a></li>
      #end
    </ul>
  </div> </div>
<!-- End Header and Nav -->
Your view code can now tell whether the user is authenticated: the #if(authenticated) conditional code will check to see whether the user is logged in.
If you’re logged out, you’ll see a link inviting you to Log In. It’s in the upper-right corner of the page shown in figure 11.7. If you’ve logged in, you’ll see a Log Out link instead, as shown in figure 11.8.
Figure 11.7. A conditional Log In link

Figure 11.8. A Log Out link

Now it’s time to wrap things up and fix the last problem. At present, clicking the Log Out link won’t do anything. Open SessionsController, and add a route for destroying the session, as follows.
Listing 11.12. A session-destruction action
get("/destroy") {
  scentry.logout()
  redirect("/hackers")
}
Calling scentry.logout() tells Scentry to destroy the session for the current user and log them out. The servlet container that Scalatra is running inside destroys its reference to this user’s session, and the user can no longer access any Scentry-protected routes without logging in again.
The UserPasswordStrategy is complete. You’ve defined your own strategy, built an AuthenticationSupport trait that you can mix into your controllers, and protected a couple of routes in the HackersController so that anonymous users can’t access them. Now let’s add a second strategy, so you can see how you can fall back when using multiple Scentry strategies.
11.5. A fallback Remember Me cookie strategy
Take another look at your login form, shown in figure 11.9. There’s a Remember Me check box on the login form, but you haven’t done anything with it yet. A check box like this typically sets a cookie and remembers the user for a week, so they don’t need to log in again. Let’s implement this functionality. To do so, you’ll build another strategy, RememberMeStrategy, and register it with the AuthenticationSupport trait.
Figure 11.9. Note the Remember Me check box

You want to implement fallback behavior. When a user attempts to access a protected route, Scentry will first check to see if the user has a cookie set, and, if so, the user will be logged in without being asked for a username and password. This will happen using RememberMeStrategy.
If no cookie is set, Scentry will fall back to using UserPasswordStrategy, redirect the user to the login form, and ask for a username and password. If the user checks the Remember Me box in the form, you’ll set a cookie so the user is remembered next time. Finally, you’ll ensure that the Remember Me cookie is destroyed when the user logs out, so you don’t inadvertently create a huge security hole.
11.5.1. Building the RememberMeStrategy class
The process of building authentication strategies should be familiar by now. Let’s start by defining the RememberMeStrategy class. Create a RememberMeStrategy.scala file inside auth/strategies, and add the following code to it.
Listing 11.13. RememberMeStrategy


This strategy compiles, but it’s not yet complete. So far, it looks almost exactly like OurBasicAuthStrategy and UserPasswordStrategy. It inherits from ScentryStrategy, and it defines User as the authentication subject. It has an explicit name, RememberMe. Let’s take a closer look at what it’s doing.
The authenticate() method checks if there’s an incoming cookie, using the tokenVal method. For simplicity’s sake, you’re only checking to see whether the incoming rememberMe cookie contains the string "foobar"; if it does, you return a User, which causes Scentry to log the user in.[1]
A real-world application would save a randomized token value into the User object’s backing data store when the user decided to be remembered, and would check the incoming cookie to see if it had the same value as the user has in the database.
The main problem with the code as it stands is that nothing ever sets the rememberMe cookie, so the strategy will never log a user in. You can set and unset the rememberMe cookie at appropriate times using Scentry’s callbacks.
11.5.2. Scentry callbacks
You’ll often want to perform actions before, during, and after authentication or logout. In the case of Hacker Tracker, you want to set a rememberMe cookie if the user has checked the Remember Me check box during login, and destroy the rememberMe cookie when the user logs out. Other applications may need to do different things, such as notify all users that somebody has logged out, or log messages to a security audit log when a user logs in.
Scentry defines quite a few callbacks. Table 11.1 lists them.
Table 11.1. Scentry callbacks
|
Callback |
What it does |
|---|---|
| beforeAuthenticate | Runs code before authenticating; is only run when the module is valid |
| afterAuthenticate | Runs code after authenticating; is only run when the module is valid |
| beforeSetUser | Runs code before setting the user in the session |
| afterSetUser | Runs code after setting the user in the session |
| beforeFetch | Runs code before fetching and deserializing the user from the session |
| afterFetch | Runs code after fetching and serializing the user from the session |
| beforeLogout | Runs code before logging the user out and invalidating the session |
| afterLogout | Runs code after logging the user out and invalidating the session |
Let’s try a few of them. You want to set a cookie after authentication takes place if the user selected the Remember Me check box. Add the following code to your RememberMeStrategy.
Listing 11.14. afterAuthenticate callback to set the rememberMe cookie


In this code, you use Scentry’s afterAuthenticate callback to set the rememberMe cookie. The cookie is set if the winningStrategy is "RememberMe", and it’s also set if the winningStrategy is "UserPassword" and the Remember Me check box form element was checked during login. Under any other conditions, the cookie doesn’t get set.
The cookie is now being set, but there’s nothing to trigger an authentication attempt. You need to add this code to the top of SessionsController:
before("/new") {
  if(!isAuthenticated) {
    scentry.authenticate("RememberMe")
  }
}
With this code in place, Scentry will attempt to authenticate users against the rememberMe cookie before they’re shown the login form.
One last thing: you need to register RememberMeStrategy with Scentry. Open the AuthenticationSupport trait, and add the following code to it:
override protected def registerAuthStrategies = {
  scentry.register("UserPassword",
    app => new UserPasswordStrategy(app))
  scentry.register("RememberMe",
    app => new RememberMeStrategy(app))
}
You should now be able to select the check box when you log in. If you then restart your browser and attempt to hit a protected action, you’ll automatically be logged in via the RememberMeStrategy. You may want to add a bit of code to the get("/new") route in the SessionsController, because it can be confusing to see a login form when you’re already logged in:

With this code in place, if you try to view the login form when you’re already logged in, you’ll be redirected to the /hackers route.
The last thing you need to do is destroy the rememberMe cookie when the user logs out. If you don’t do this, users will have their sessions invalidated on the server when they click the Log Out link, but they’ll be reauthenticated as soon as they attempt to view a protected part of the application, which probably isn’t what anybody expects. You can use Scentry’s beforeLogout callback to fix this, as follows.
Listing 11.15. beforeLogout callback to destroy the rememberMe cookie
override def beforeLogout(user: User)
  (implicit request: HttpServletRequest,
  response: HttpServletResponse) = {
  if (user != null){
    user.forgetMe
  }
  app.cookies.delete(CookieKey)(CookieOptions(path = "/"))
}
In the callback examples in listings 11.14 and 11.15, you can see the use of Scentry’s winningStrategy. There can be multiple strategies in play during any authentication attempt where more than one strategy is registered. The winningStrategy is the one that succeeded.
Scentry strategies for which isValid evaluates to true run successively until one of the following happens:
- A strategy succeeds
- All strategies have failed
- There are no more valid strategies
You’ve seen how to log in a user with a Remember Me cookie, and you’ve had a broad overview of using multiple Scentry strategies, falling back one after another. Like most things in Scalatra, the way in which your authentication strategies fall back on each other gives you maximum flexibility to structure your application in the way you want.
11.6. Summary
- Scentry is the authentication module shipped with Scalatra. To keep Scalatra as light as possible, Scentry isn’t enabled by default. You need to add a dependency on scalatra-auth in order to use it.
- Scentry triggers a cookie-based HTTP session when it’s used, so remember that you’re setting a cookie on every request as soon as you extend Scalatra’s SessionSupport.
- Scentry is ideally suited to stateful authentication scenarios, where credentials are submitted at the beginning of a session as opposed to per request.
- The pluggable design of Scentry makes it simple to support several authentication mechanisms, such as HTTP Basic or HTML login forms, or “remember-me” cookies.