
Appendix C. Configuring a proxy
Using a proxy configuration to access secured services in a browser-based application is optional. You could continue developing the application by requiring a user to log in each time, and the application would still work as expected.
Sometimes you might want to be more lax about security requirements. For example, suppose a handful of users have access to the application—only from within an internal network. You might consider using a proxy page so users don’t have to enter their usernames and passwords in the Identity Manager each time the application loads.
Although I encourage you to set up users with their own passwords on your internal ArcGIS Server or via your organization’s ArcGIS Online account, this appendix covers the details of using the ASP.NET proxy page provided by Esri (https://developers.arcgis.com/javascript/jshelp/ags_proxy.html). You complete similar steps to set up the application for other proxy pages provided by Esri.
C.1. Setting up the proxy page
Regardless of the proxy page you use (ASP.NET, PHP, or JSP), setting it up involves the same easy process. If using a secured ArcGIS Server service, you can place your username and password in the configuration file for the proxy. In the case of the ASP.NET page, it may look like this:
<serverUrl url="http://services1.arcgis.com/"
    matchAll="true"
    username="<USERNAME>"
    password="<PASSWORD>">
</serverUrl>
This generates a new token for your application using the provided username and password when you need access to the secure services. Another method if using ArcGIS Online services is to provide the clientId and clientSecret you would be provided by your application in your ArcGIS Online account. You can configure them like this:
<serverUrl url="http://services1.arcgis.com/"
    matchAll="true"
    clientId="<CLIENTID>"
    clientSecret="<CLIENTSECRET>">
</serverUrl>
For more details on setting up the proxy configuration, please refer to the documentation at https://developers.arcgis.com/javascript/jshelp/ags_proxy.html.
After you set up the configuration, you can add the proxy page URL to the application.
Tip
Add the URL for static.arcgis.com as allowed by the proxy as well. This is used to display attribution information on the map; without the URL, you’ll see an error in your application.
C.2. Using the proxy in your application
To tell your application to use the proxy page for all its requests, add the code as shown in the following listing to js/main.js where the application starts to load.
Listing C.1. Using the proxy page
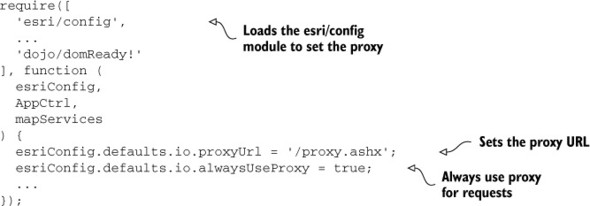
This code adds a reference to the esri/config module, which allows you to assign the proxy details. Next, assign the URL. When you’re working with secured services and tokens, the most critical step is to set the value of alwaysUseProxy to true. Otherwise, the proxy is used only if your application makes an HTTP request that exceeds 2,048 characters in length. This is a browser limit, and it’s a good idea to use a proxy if you think you may run into this issue. In this case, you want to use it for secured services, so you need to tell the ArcGIS API for JavaScript to always use the proxy.
The proxy page is a great tool to use in a variety of scenarios. As I mentioned, it may even be a requirement if your application makes large requests that could exceed the browser limit. It’s also a great option when developing with secured services so you don’t have to log in each time. The drawback to this technique is that tokens don’t last forever, so you need to set up a schedule to replace the tokens as needed. When using tokens from ArcGIS Online, the maximum duration is 15 days.