Meet WKInterfaceObject
When you’re making user interfaces for 38mm and 42mm screen sizes, every user interface element on the screen must be carefully considered. Not only can fewer elements fit on the screen than on iOS, but due to the smaller size, the user’s finger will necessarily obscure more of the screen while interacting with it. These truths impact the design of every element, as well as the overall design of watchOS apps in general.
From a code standpoint, there’s a huge difference between UIView and WKInterfaceObject: you cannot subclass WKInterfaceObject to create your own user interface objects. Instead of implementing custom rendering and touch handling, watchOS apps compose the built-in interface objects and achieve their desired user interface customizations through images and colors. You’ll also notice that instead of setting properties on the interface objects directly, you’ll be calling methods on the objects to set their properties indirectly. The reason for this indirection is that the interface objects aren’t really in the WatchKit extension that we’re writing. As you learned, the WatchKit app and WatchKit extension are separate entities on the device, and the interface objects live in the WatchKit app portion. The WKInterfaceObject instances we deal with in the WatchKit extension represent the objects onscreen. Why methods instead of properties? They’re write-only; you can’t inspect an interface object for its state. Because neither Swift nor Objective-C has a mechanism for write-only properties, this changes a simple task, such as setting the text of a label. Where you would write this for iOS
| | self.label.text = "Hello, World!" |
the equivalent code for a watchOS application would look like this:
| | self.label.setText("Hello, World!") |
All WKInterfaceObject objects share some common properties that you can set, either by calling methods on them or directly in the storyboard. Most of them are familiar, if slightly different than their UIView counterparts: you can set their width, height, and alpha, as well as make them hidden. In the storyboard, you can check the Installed check box to determine if an interface object is created when the storyboard loads. From there, the individual interface object classes define more properties that you can set. Instead of enumerating them one-by-one, we’ll look at them in three categories: objects that display data, objects that receive user input, and objects used for layout.
Objects that Display Data
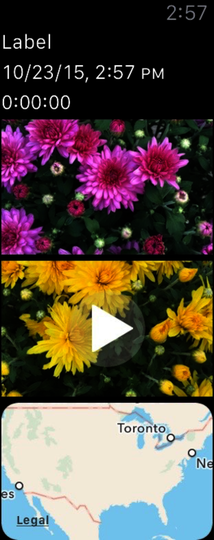
You’ve already seen one of these interface objects, WKInterfaceLabel, which you used to display “Hello, Watch!” to your users. Labels act much like UILabel in UIKit, and you can call setText or setAttributedText to change their contents, just like in UIKit. The other objects in this category include WKInterfaceTimer and WKInterfaceDate, which help your watch app tell time. A timer object counts down to a given moment in time, represented by an NSDate, using a format you specify. The format must be specified in Interface Builder, but once you’ve created your timer, you can change it by calling setDate on it. Using its start and stop methods, you can control whether your WKInterfaceTimer updates, though it always counts down to the same date, regardless of you stopping it. Finally, WKInterfaceDate displays the current date and/or time to the user in a label. Like setting up a timer, you must set up your date formatting in Interface Builder. Once you’ve created a date object, you can use setTimeZone and setCalendar to adjust the display of the date. There are three more interface objects in this category, and you can see them all in this image.

Interface objects for displaying data to the user. From top to bottom: WKInterfaceLabel, WKInterfaceDate, WKInterfaceTimer, WKInterfaceImage, WKInterfaceMovie, and WKInterfaceMap.
Another important object is WKInterfaceImage, which acts like UIImageView on iOS, displaying images to the user. Image objects support displaying static and animated images with setImage(_:), setImageData(_:), and setImageNamed(_:) methods, and if you supply template images, you can provide a tint color using setTintColor(_:). Images in your WatchKit app can come from your watch app’s asset catalog or your WatchKit extension.
WKInterfaceMovie is a similar class to WKInterfaceImage but for movies instead of images. You can set a placeholder image using setPosterImage(_:) and a movie URL using setMovieURL(_:). When the user taps the Play button, the movie will begin playback if it’s stored locally on the device; otherwise, it’ll download before playing. WKInterfaceMovie doesn’t support streaming, so if you want to watch Netflix and chill, you won’t be doing it on your wrist. In general, the watch is not designed to play movies, but for short clips, it can do in a pinch.
The last interface object you can use to display data to the user is WKInterfaceMap. Like its MKMapView counterpart, the map object displays a map using Apple’s mapping service. You can add your own pins to the map using its addAnnotation(_:withPinColor:) method, allowing you to show locations to your users. If you have a custom image to use instead of the default colored pins, you can use addAnnotation(_:withImage:centerOffset:) or addAnnotation(_:withImageNamed:centerOffset:), providing an offset in case you need to move the pin image relative to the map location (normally the pin image is centered over the location). You’ll want to position the map in the proper location so users see your pins, which you’ll do with setVisibleMapRect or setRegion. These methods take the same MapKit types as MKMapView.
Interacting with Maps | |
|---|---|
|
|
There’s one caveat to using WKInterfaceMap: once you position the map, users can’t interact with it. There’s no zooming, panning, or selecting of pins. Scrolling the watch’s Digital Crown will only scroll your interface controller’s content, if there’s enough to scroll. When the user taps the map, the watch’s Maps app opens. The center of the visible location of your map is a pin in the user’s Maps app. This allows your users to get directions or anything else they’d be able to do in the Maps app normally. If you want to display a specific location to users, set that location as the center of your map; in the Maps app on the watch, the users will be able to get directions or anything else they’d normally do with a map location. |
Objects that Receive User Input
On iOS, user interface objects that respond to user input derive from the UIControl class, itself a subclass of UIView. Although there’s no equivalent intermediate class in WatchKit, some interface objects embody the spirit behind controls on iOS. You’ve already seen WKInterfaceButton, which allows you to call a method when the user taps the button. Unlike UIControl’s action methods that you can add with addTarget(_:action:forControlEvents:), you have to connect WKInterfaceButton objects to @IBAction methods in your storyboard. Aside from buttons, there are switches and sliders: WKInterfaceSwitch and WKInterfaceSlider, respectively. They mostly act like UISwitch and UISlider, with a few differences. Visually, a WKInterfaceSwitch looks a lot like a WKInterfaceButton, with a title label in front of the background, but there’s also a switch control on the right side. Sliders have a similar appearance, with incrementing and decrementing buttons on either side and the main slider in the middle. You can see all of these objects in this image.

Interface objects for receiving input from your user. From top to bottom: WKInterfaceButton, WKInterfaceSwitch, WKInterfaceSlider, and WKInterfacePicker.
Sliders and switches, just like buttons, require you to set up the method they call in your storyboard. The method you write for a switch must take a Bool parameter for the switch’s value, and a slider’s method must take a Float. Both are called every time the user adjusts the value. For sliders you have some additional control: in the storyboard you can set the minimum and maximum value for the slider, and either in the storyboard or by calling setNumberOfSteps you can set the number of steps between those values. If you wanted to make a slider that could select any integral value between 0 and 5, you’d set the minimum to 0, the maximum to 5, and the number of steps to 6.
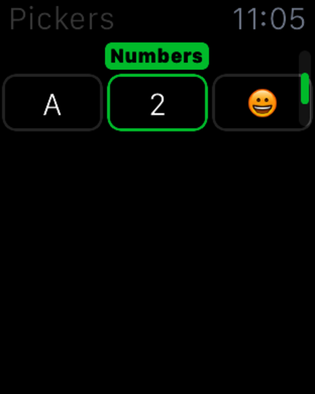
New in watchOS 2 is a fantastic interface object for getting user input: WKInterfacePicker. A picker allows the user to select from a list of elements. These elements can be text, images, or both. What’s unique about pickers is that instead of swiping the screen, as they might on iOS, your users will use the Digital Crown on the side of the Apple Watch to select the values. This interaction feels great, whether selecting from photos in a photo album, remotely controlling the climate settings in their car, or fine-tuning a setting with more precision than a slider would comfortably allow. You can even place multiple pickers onscreen at once; the currently active picker is optionally highlighted with a green border and optional caption, as shown here:

Three WKInterfacePicker objects in one interface controller; the middle one is selected with the caption Numbers.
You’ll see more on pickers in depth later as you add one to your sample app. Pickers allow you to replace complicated input schemes like text entry with simple Digital Crown interactions, so they’re a great addition to any app that needs any input from a user.
Objects Used for Layout
The final category of interface objects is an interesting one; these objects exist to help out with WatchKit’s unique layout system. The most important of these is WKInterfaceGroup, which is so vital to the watch UI that it has its own chapter coming up. In short, a group can contain other objects, allowing you more freedom in how they’re laid out. Groups can even contain other groups, allowing you to create complex hierarchies of layout. Along with groups comes WKInterfaceSeparator, which is by far the simplest of all interface objects—it’s basically a line drawn between other objects to separate them, and it has but one method for you to call, setColor.
The final interface object that helps with layout is WKInterfaceTable. Since every interface object you use must be created in your storyboard, using a table is one of the only ways to get dynamic content into your app. Each row in the table is actually a group, so you can lay out whatever objects you need in each row. (More on tables later, in their own chapter.)
