 Sharing Images from Your Trip
Let’s Get Those Awesome Images Out There!
This is what it’s really all about: you come back from a trip to some exotic locale (or Indiana) and you want to share your images with people who you want to make insanely jealous. This is the glorious gift of travel photography. Sure, a great travel photo makes the viewer want to go there, but your job is to make them feel bad about them not having been there, and that, perhaps, something is wrong with them. You want them to feel the stench of failure because they didn’t have the amazing experience you did. Crushing the spirit of others with your travel imagery is one of the greatest things you can experience, so don’t let them steal one moment of your glorious trip. If they start with, “That reminds me of our trip to Cancun…” you shut that down on the spot. This isn’t about them and their cruise to Mexico. This is about your trip of a lifetime and your spectacular images that will stay entrenched in their minds forever. Now, let me warn you about a possible scenario you may encounter when you share your shots from your trip: Let’s say you’re showing a friend images from your trip to Ibiza, and while looking through them, they casually drop, “Oh, I have a picture just like that from when we were there. We had the greatest paella on that trip!” That. Right. There. That’s some bull! They turned the tables on you. You gotta call ’em on it right there. “Oh really, Mildred? You got the same shot? I’d like to see that. In fact, I’d like to see that right now.” Well, you know, and I know, Mildred was shooting with a disposable film camera and her shot probably looks like trash, so you have to make her dig it up—I don’t care how long it takes, or how long you have to wait. And when she finds it, and it looks nothing like the amazing, artistic, Michelangelo-quality image you crafted, you can tell her, “Really, I found the paella a bit fishy,” and just let it hang there. That, my friends, is sticking it to the man! (In this case, the role of “The Man” was played by Mildred, but you knew what I meant, right?)
Adobe Spark Page: Best Way to Share Online
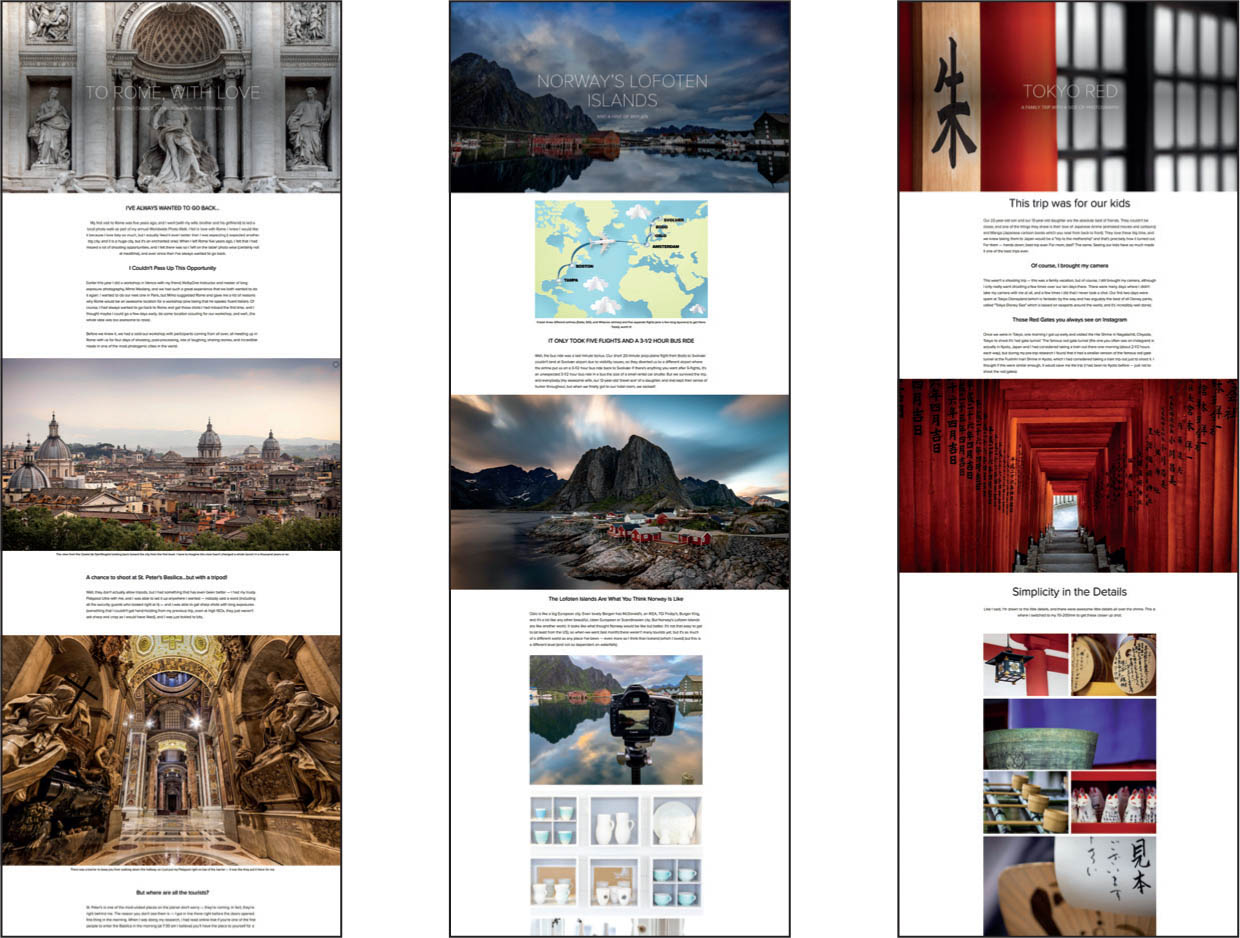
The best way I’ve found to share the visual and written story of a trip online, and the one that I hands-down get the greatest response from, is using Adobe Spark Page. If you have any one of Adobe’s subscription plans, like their Photography plan, this service is included for free. Essentially, it’s a webpage that looks and reads like a magazine article. Big, beautiful photos (you pick the size and style, and it’s all just drag-and-drop), and if you want to add a headline or some text to tell your story, you just click and start typing. It’s all predesigned for you. You just choose a template you like and start making your Spark page. There’s no coding. No HTML. No experience necessary, and you can have yours up and running in no time (a perfect Saturday morning project). The images can appear edge-to-edge in your browser (so great for panos), and once you add an image, you can simply type your story below it, or just add captions to your images instead, and wow—it just shows your images online in the best way I’ve ever seen. When you’re done, it looks like an online magazine article in a high-end travel magazine, and you’re going to get reactions from it you’ll never get from just sharing your images on social media (though I do lead people to my Spark page by posting about it on Twitter, Facebook, Instagram, etc.). You start your story at spark.adobe.com (you’ll log in with your Adobe ID and password and choose your template). When I teach in-person travel photography workshops, I teach my class how to create these (well, we all build our pages together in class), and it’s so much fun, and so easy, and everybody winds up with these beautiful stories. I just can’t recommend this enough, and that’s why it’s the first thing in this chapter on sharing.
Getting Big, Beautiful Prints from a Photo Lab
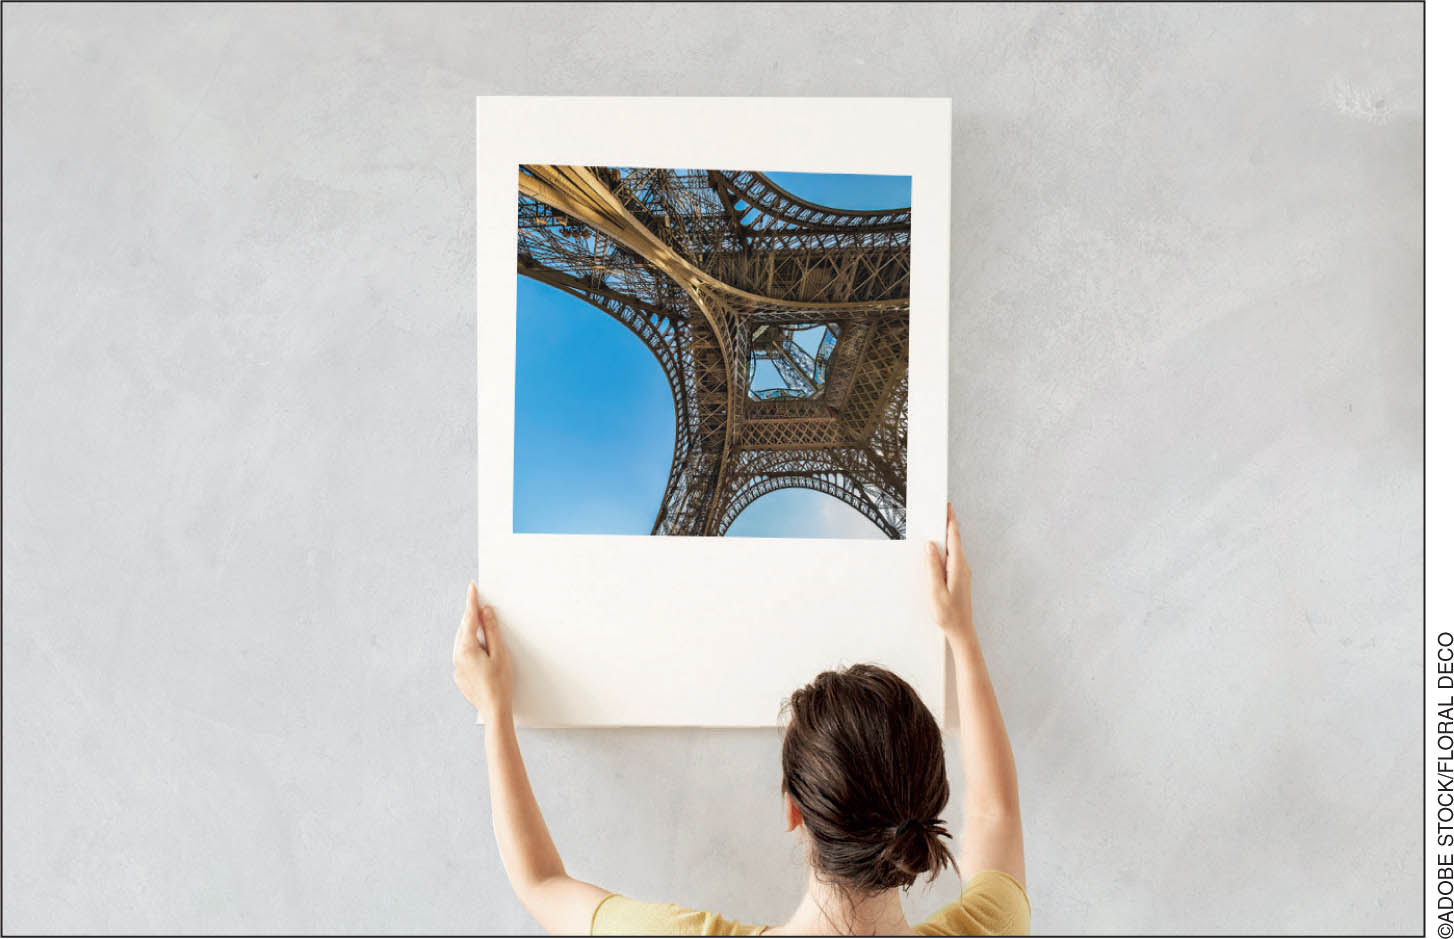
You don’t have to buy a printer and learn the craft of photographic printing to enjoy big, beautiful prints of your images because using an online photo lab today is so easy and affordable. Just upload your image, choose the size you want, hit upload, and in a couple of days, your print arrives and you’ll fall in love with your photo lab. I have my own printers (a number of them, in fact), but it’s just so easy to use a photo lab that I wind up using them more and more. I’m always delighted with the results because they handle everything (they’ll even color correct your photo if they notice something wrong—unless, of course, you choose “don’t color correct my photo”). I use BayPhoto.com and MPIX.com as my go-to online labs. Both deliver great quality prints—they’ll even frame them (with your choice of glass and the whole nine yards) if you like—and have impeccable customer service. They’re legends in the industry. You’ll be hooked! Two tips: (1) Get your print mounted on foam core or double-weight matboard or masonite—some kind of mounting to keep it from getting warped or wrinkled (plus, they’ll last longer). Another bonus of mounting is that you can just hang it on the wall like that with no frame (though, if I’m going to do that, I get the mounting in black instead of white), or you can lean it against a wall or a dresser, so it’s kind of ready to go when you get it. It costs a little more, but it’s worth it. (2) Go big. The bigger the print, the more the impact. If a friend asked me what size to go with, I’d tell them to go with a 16x24” print or larger. That size perfectly fits the physical dimensions of images from today’s DSLR and mirrorless cameras without having to crop the image, and the print size is big enough to really have that “wow” factor. Start making prints—big prints—and it will open up a whole new world of appreciation for your photography. Plus, if you want to blow somebody’s mind, send them a large print as a gift. Seriously, the reaction you’ll get will astound you!
Printing a Photo Book
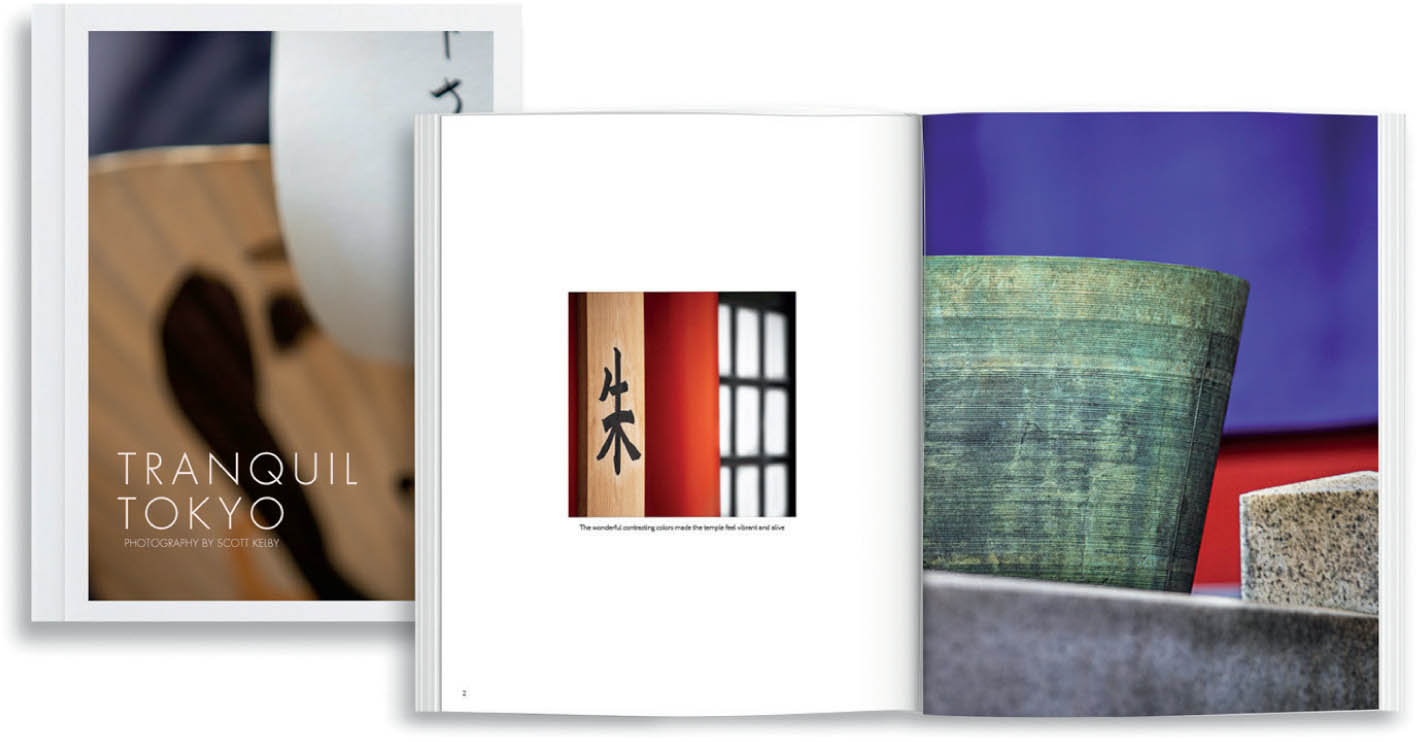
Not only will you love having a coffee-table-quality photo book of your trip, you will absolutely fall in love with the process of putting it together. You become the “photo editor” of your book as you decide which images make the cut, which images go on which page, how many images go on a particular page, and what size and orientation to make them. It’s such a fun, creative experience, and I can’t recommend it enough. The nice thing is: Lightroom Classic has its own photo book feature built right in with its Book module. You do all the layout there, putting your photos in the order and size you want them, and when you’re done, you hit Send Book to Blurb, and it packages everything up and uploads it to Blurb.com for printing. Then, within just a few days, you’re holding a beautiful book of your trip, and it’s a very powerful way to share your trip with other people (you can see part of the photo book I put together from my family’s trip to Tokyo above). You can make it a simple softcover photo book (most of the books I make are softcover—the prices are great and they look fantastic), or you can literally go for a bookstore-quality, large, coffee-table-style book, complete with a dust jacket wrap. You have a choice of styles and layouts right there in Lightroom, and the whole process is really easy and surprisingly fun (shameless plug: I have an online course on how to build photo books in Lightroom at kelbyone.com, ya know, just in case). This is one of the best and most fun ways to share your trip, and you’ll get incredible reactions from it. Two tips: (1) You don’t have to print your book. You can lay it all out in Lightroom, then save the book as a PDF and email it to friends or post it for downloading. (2) When you print a book through Blurb.com, you have the option of making it for sale through their online store. You get to choose your price, your markup, etc., and then you can lead people to where they can buy a copy of your book. Come on now, that is pretty darn cool!
Sharing on Instagram
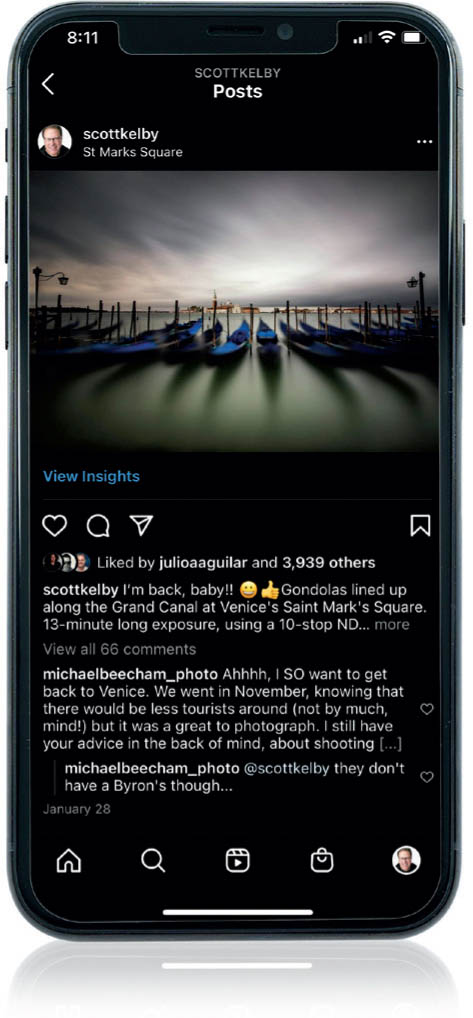
It’s the most popular place in the world to share travel photos, and each day, a whopping 95 million+ photos get uploaded to Instagram, which is just staggering (I didn’t make that number up—I looked it up—but if I had made a number up, I wouldn’t have been so bold as to choose a number as high as 95 million. That’s just crazy, right? I’d hate to have to pay their online storage bill). Anyway, Instagram is free to use, free to view, and…well, it’s just free. The tricky part about Instagram is getting the photos from your camera onto your phone to post them using the Instagram app (and yes, there’s a way around this using your desktop computer and a bit of configuration, but it’s a limited version of posting and editing—not the full Instagram experience). On my Mac, I add photos to my Apple Photos app, which sync over to my iPhone, and then I upload them to the Instagram app. It’s a bit of an “instapain,” but it is what it is, and we do it, but we grumble the whole time that it should be easier. Anyway, pain that it might be, it’s one of the best ways to not only share your images with friends online, it’s also the best way for your images to reach a broader audience. When you include popular travel hashtags in your caption (hashtags are simply search terms), your image has a chance to reach lots of people. The better your image looks at a small size, the more likely people will be to tap on it, see it at a larger size, and then want to follow you to see more great travel photos (travel photos are all I share on my personal Instagram page: @scottkelby). If you want to resize your images for posting on Instagram, set your width to 1080 pixels. You can post larger sizes, and Instagram will automatically resize them for you, but I’d rather do that part in Photoshop, which I feel does a much better job quality-wise. One more thing: the community, in general, on Instagram is very kind and supportive of you sharing images, so start posting and get ready for lots of “likes.”
Sharing on Facebook
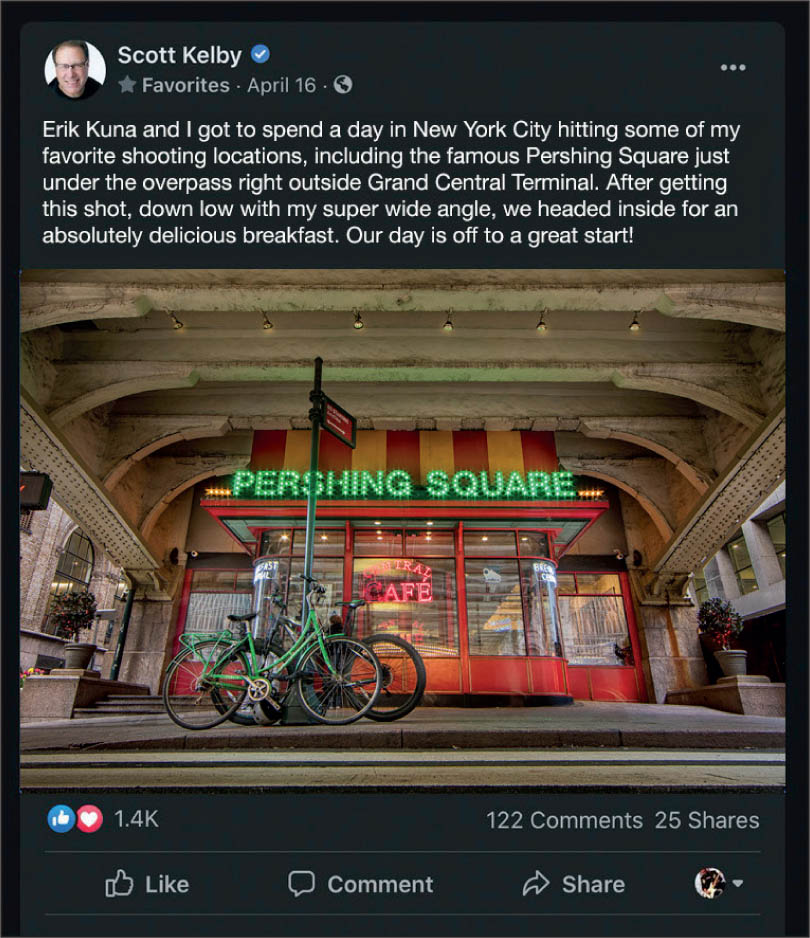
If you want to share the images from your trip with just your family and friends (and not the general public, like it does if you share on Instagram from a public account), Facebook is the place. Like with Instagram, I prefer not to let Facebook resize my images (so I get the best quality results and the photos still look nice and sharp after posting), so I go to Photoshop and resize them down so the width is 1200-pixels wide by whatever that winds up being for your image. Now, Facebook (and Instagram) could change these ideal settings at any time, so it wouldn’t hurt to do a quick Google search to see what today’s ideal dimensions are (and be prepared to find conflicting info on exactly what the right size is for Facebook, as it seems there’s little agreement on this topic online). But, of course, you could just let Facebook resize your images for you. It won’t trash them—they just might not be quite as sharp as they would be if you resized them yourself in Photoshop or Lightroom.
Group Sharing with Download Privileges
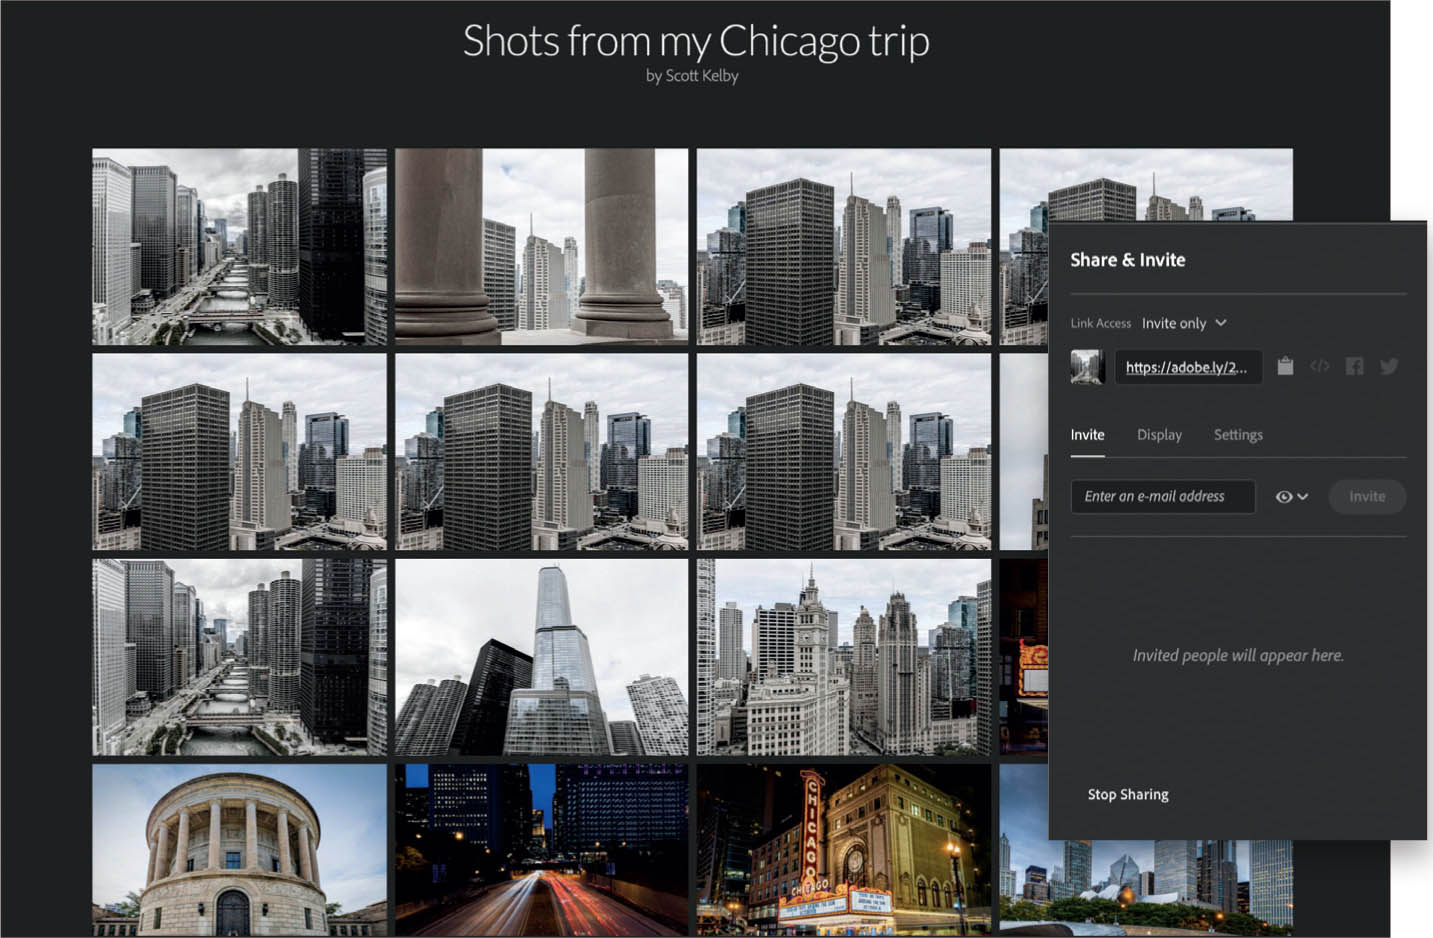
This is one of those kinda hidden features of Lightroom that a lot of folks miss. Lightroom will let you not only create an online collection of your photos, but it allows you the option of letting people download your photos (maybe you want people that were on your tour group to download some of your images), mark their favorites, and even leave comments. This feature is already enabled if you’re using the cloud version of Lightroom, but if you’re using Lightroom Classic (like me), then all you have to do is turn on Sync, then make a collection of the photos you want to share and sync that collection. Once you do that, go to your web browser, head to light-room.adobe.com, enter your Adobe ID and password, and you’ll find your collection already online. To share it with other people, click on it, then click the Share button, and now you can choose the options (seen above in the inset), including whether this page is private or available to anyone with the link to see, if you want them to be able to download the high-resolution images, and so on. Plus, it will give you a web address (URL) that you can email or text to anyone, so they can view and download images from this webpage. It’s all much easier and more intuitive than it sounds, and it offers you lots of sharing options.
Create a Portfolio of Your Travel Work
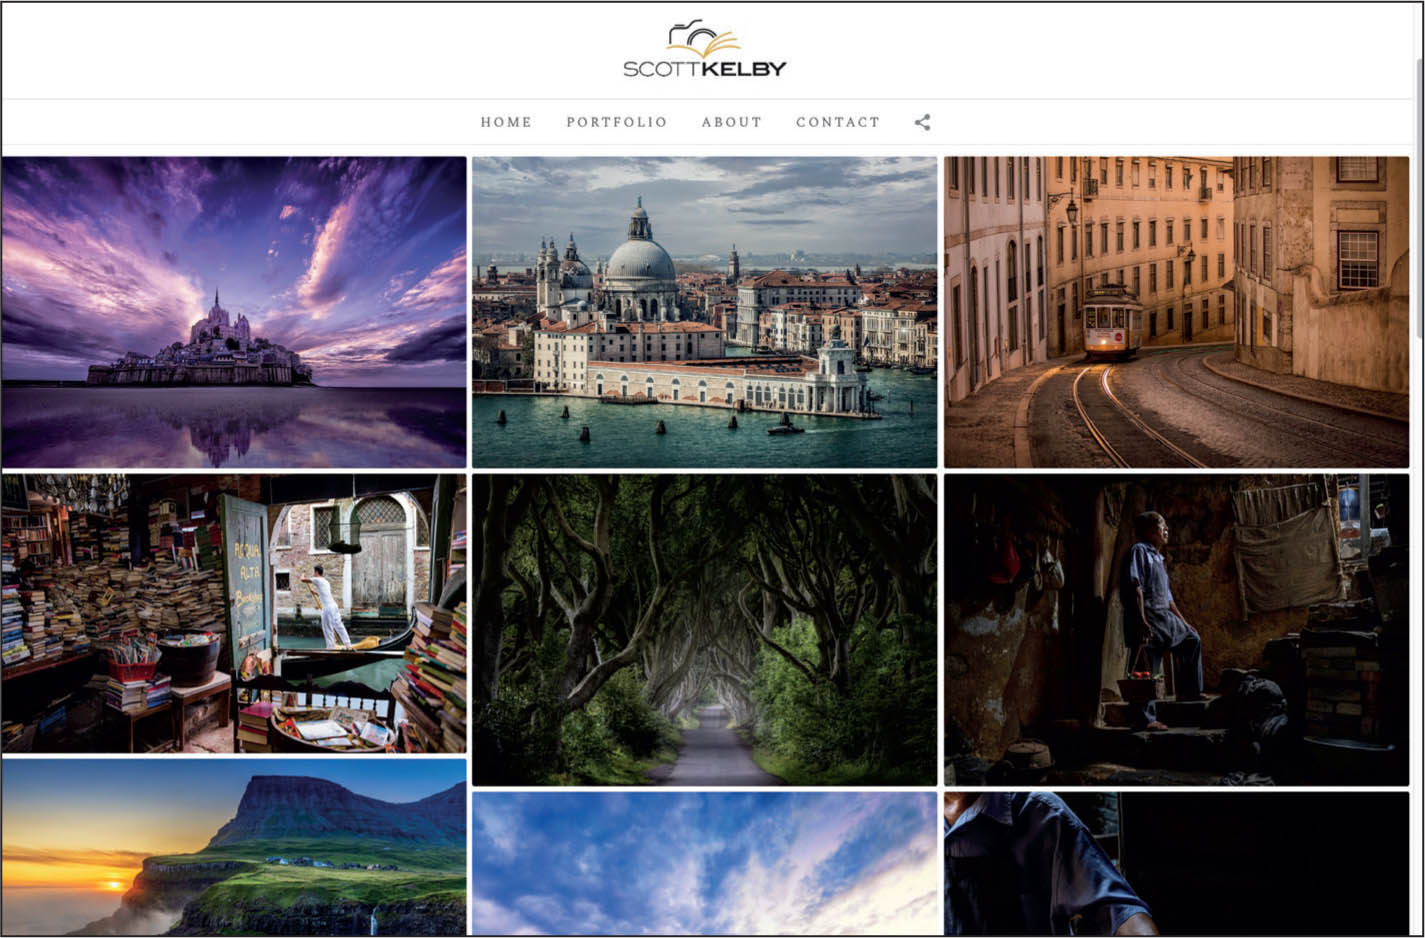
It’s one thing to share the images from your most recent trip, but wouldn’t it be great if there was a place you could send your friends, family, and other folks where they could see all your best travel images from all your favorite destinations all in one place? That’s when a portfolio is really handy. I’m a big proponent of having a portfolio in the first place, and one of the main reasons is: putting one together helps you to know where you are in your journey as a photographer. If you take the time and careful thought process to put together 24 of your best travel images (I think 24 is about the right number for a photography portfolio), when you put them into a portfolio, one way or another, you’ll know exactly where you stand on your journey. You might look at the 24 images as a group and think, “Ya know, these are pretty good!” and that can propel you forward to continue on your journey to make even better images. You might also compile these 24 images and think, “Ya know, these are okay, but I can do even better,” which is actually good, too. It still propels you forward to learning more about capturing the type of images you’d be proud to share in your portfolio. Now, if you look at your portfolio and think, “Man, these images are trash,” then you really have some work to do. But, at least you’ll know, and now you can get to work. I use SlickPic.com for my portfolio—they create portfolios just for photographers and they have great templates. You just upload your images, arrange them in order, and customize the site easily without any experience necessary. They also have an option where a designer can work with you one-on-one to custom design your site (it’s cheaper than you’d think). Another route, if you have an Adobe subscription plan, is to use Adobe Portfolio (myportfolio.com. It’s included in your subscription). It uses templates, too, but it’s a bit trickier to set up than SlickPic, but then again, it is free for Adobe subscribers.
Take a Portable Hand-Held Printer
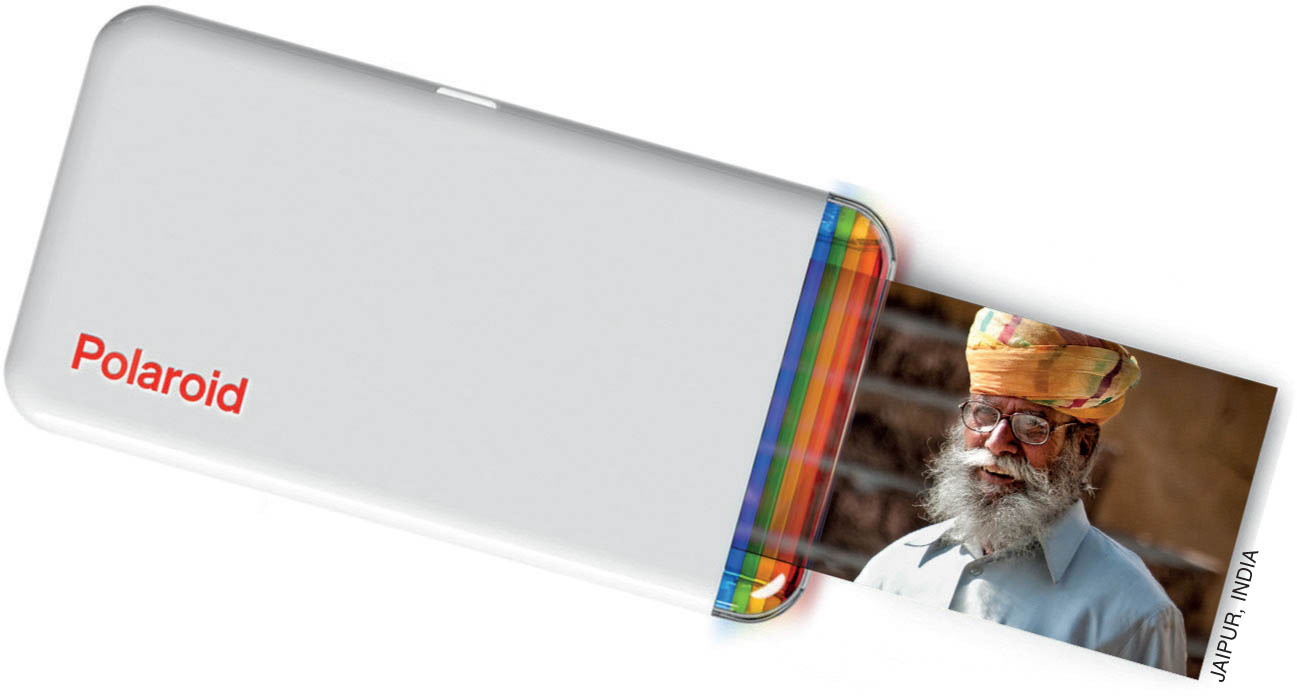
When you carry a tiny battery-powered printer that fits in the palm of your hand with you on your trip, it has the power to do something very special. Imagine taking the portrait of someone you’ve met on your travels, someone who agreed to pose for a portrait, or maybe a photo of a mother and child, and in 46 seconds, you hand them the print. It’s something they will treasure. Something they’ll keep forever. Something with real value to them, and something they may not have any other way if you didn’t gift it to them. I know friends who have taken a hand-held printer, like this $99 Polaroid Hi-Print 2x3 Pocket Photo Printer, on trips with them and the stories they tell would bring a tear to your eye (well, they did to mine). Consider taking one of these on your next trip. You never know the doors it might open, and the hearts you might touch forever from something so simple, yet so powerful.
Sharing on the Big Screen
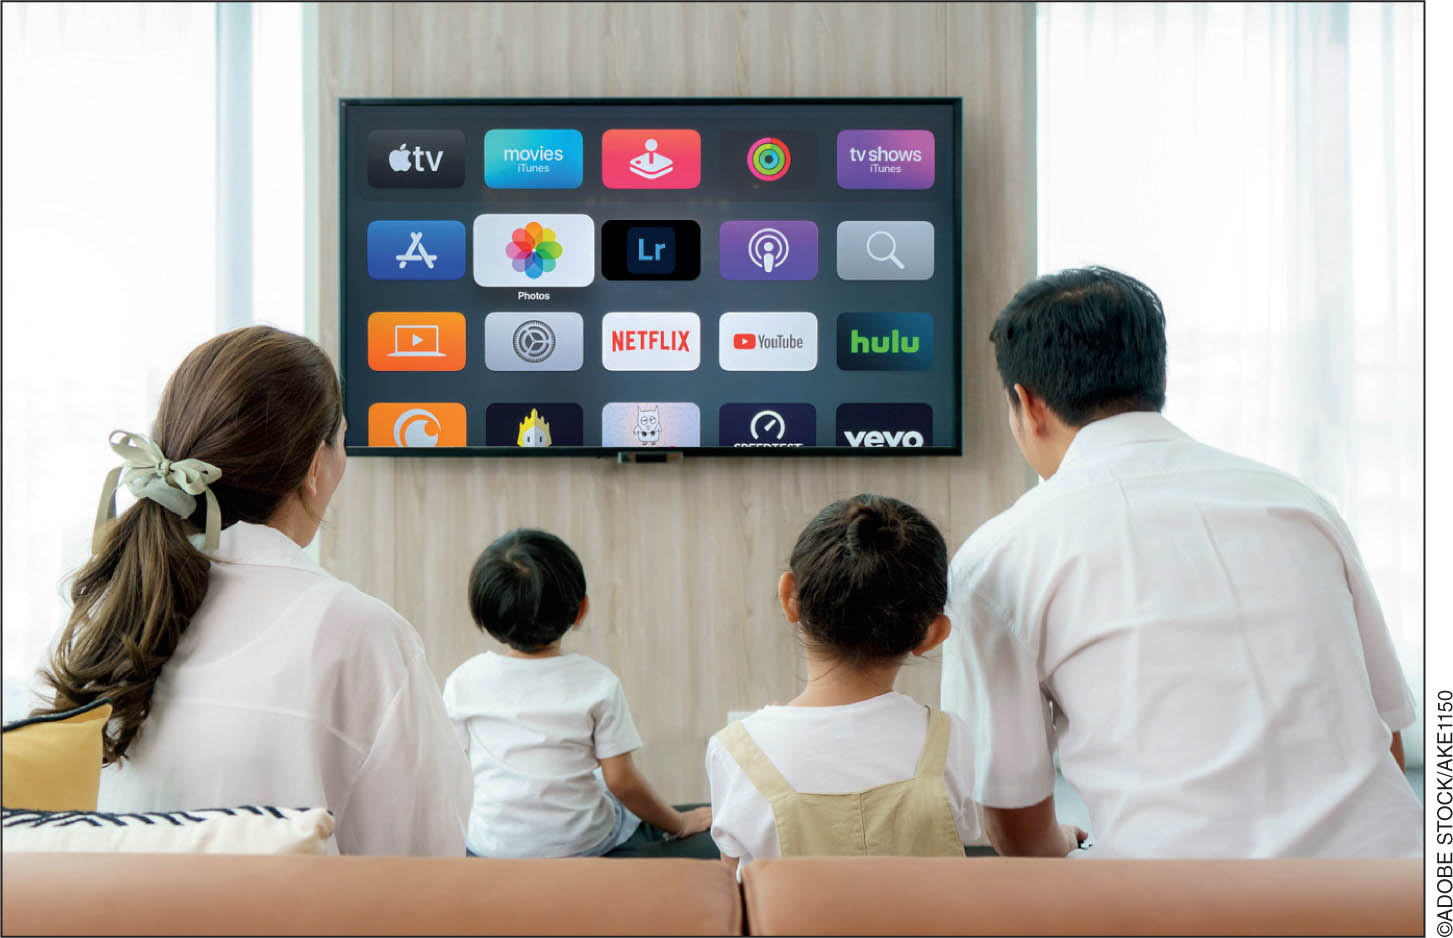
This is one way of sharing travel shots from your trip that a lot of people overlook, but with today’s technology, you can easily share your images from your phone, or straight from your computer, right on your TV. If you have an Apple TV, there’s even a Lightroom app that you can share from. If you’re a Lightroom Classic user, any collections of images you’ve synced (if you’re a Lightroom cloud user, there’s no need to sync) are available to view on the big screen, right there from within the app. If you’re a Mac user, you can share your images to an Apple TV through Apple’s Photos app and see them full screen, or if you’re an iPhone user, you can share any photos you’ve imported into your phone’s Photos app. Tip: This is the modern day equivalent of having friends over to see the “slides” from your trip, but don’t do what we did back in the ’70s and ’80s, which was to show every photo from our trip. Keep it short and narrate as you bring up each picture. I would also split the presentation into two parts: (1) start with your beautiful photographic shots that really show the charm and wonder and fascinating side of the place you visited, and then (2) show the “family” style shots with you and your spouse posing with a camel, or having a gelato, and stuff like that. Otherwise, you go from a few “wow” shots to a shot that’s kind of “meh” (look, it’s a photo of their appetizer), then back to a great shot, then a family shot, and it’s kind of all over the place. Make it two parts: great shots, and then the family shots last. And, close out with a killer shot or two from the trip. Open strong, end strong. It works like magic.
Sharing an HD Slide Show Complete with Music
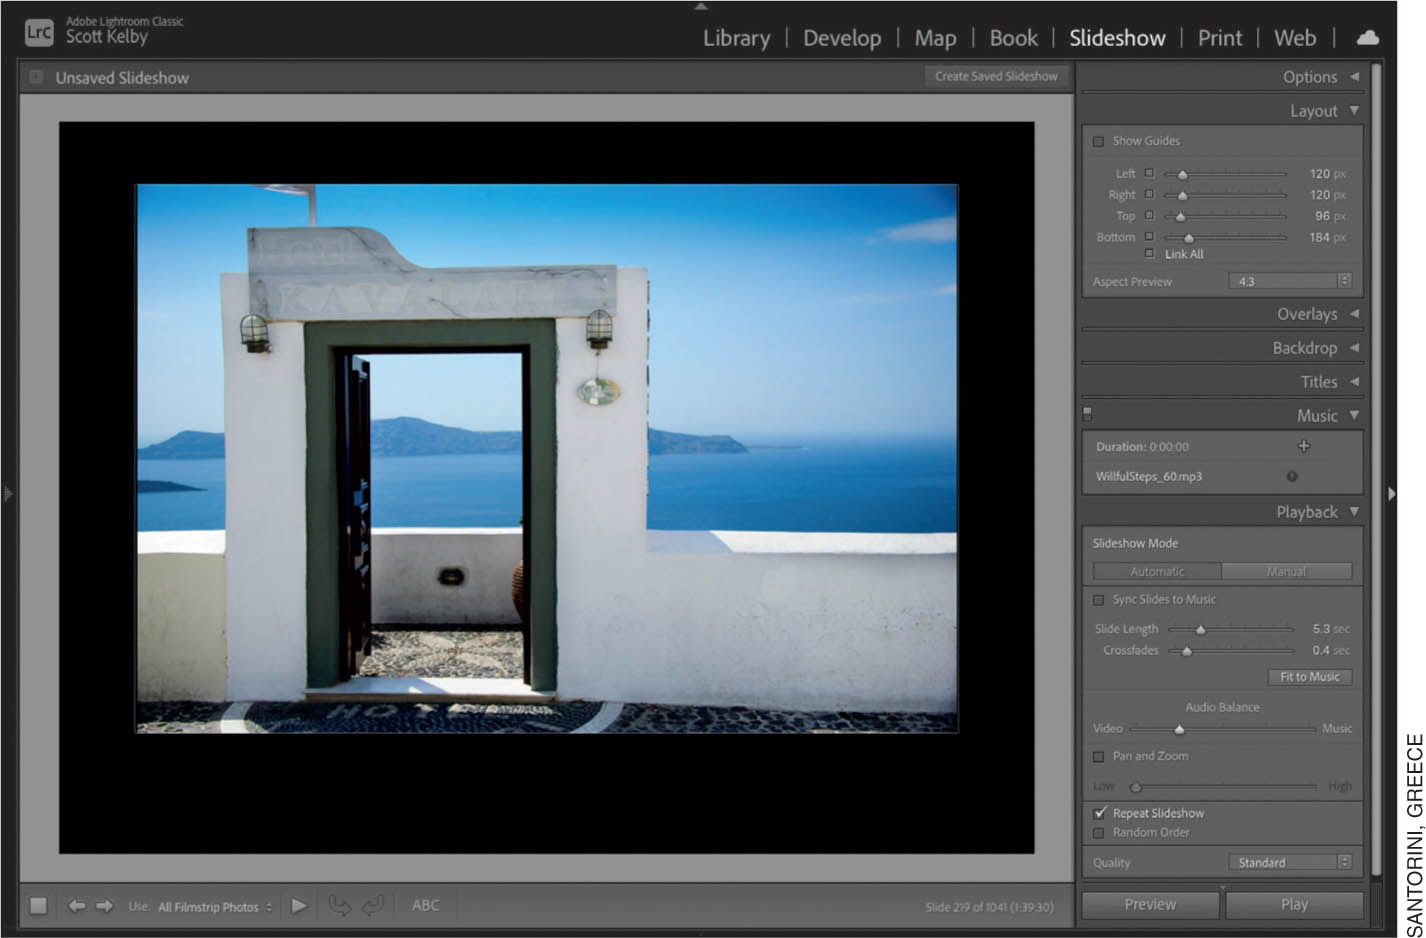
I’ll be the first one to tell you that Lightroom Classic’s Slideshow feature is not the best one out there—it’s not even in the top 20. But, here’s what it does let you do: you can take a collection of the best images from your trip, add background music, have it do nice, smooth dissolves between each image, and even have it add the Ken Burns effect (called Pan & Zoom in Lightroom), which adds a subtle movement to your images, giving the whole slide show a nice feeling of movement. You can control how much time each slide stays onscreen, and even the speed of the dissolves (cross fades), and it has a few other features, too. Best of all, when you’re done, you can save it as a full HD 1080p movie to email to friends, post online to social media, whatever, and it will have all those features (and music is just so important for slide shows). It’s another way to share the images from your trip, but the background music adds that emotion and mood, which can really take it over the top.