 Photo Recipes to Help You Get the Shot
The Simple Ingredients That Make It All Come Together
When you’re in the kitchen, and you’ve got all the right ingredients to make a wonderful meal, I’ve learned that you can still totally destroy dinner. I’ve had situations where the only viable option, after carefully following the directions, was to throw the entire thing out and call Domino’s. (Tip: Get the Ultimate Pepperoni specialty pizza and get it Brooklyn Style. Make sure you look under Specialty Pizza. Don’t just get a regular pepperoni pizza Brooklyn Style—it’s not the same. No charge for the awesome tip. It’s on the house.) Anyway, before we get to how this all relates to photography, there is something I need to address, because I think a lot of folks misread this chapter as “Photo Recipes,” like you’re making a dish, but it’s actually pronounced “Photo Re-Cipes,” and RECIPES is actually an acronym that is used quite a bit in professional commercial photography. It stands for “Rectilinear Exposure Compensation In Photographic Effects Situations,” which is a nerdy term for something that generally happens when you mix certain camera settings that don’t belong together. For example, if you have a mirrorless camera made within the last couple of years, it most likely has a built-in high dynamic range (HDR) feature, but if you were to couple that feature with exposure bracketing, with your exposure set to more than –1, it creates an effect that is similar to “crossing streams.” You should also be aware that, by now, after reading 12 other of these meandering, semi-conscious chapter intros, there’s a pretty good chance (a better than good chance. Okay, it’s a lock) that this is all made up, that there is no RECIPES acronym and it’s not called Re-Cipes, and that we’re all actually living in a simulation run by whomever the bad guys were in The Matrix. I never could make heads or tails of that part, but I know this: I hate those little Sentinel robots with the insect-like legs. If I saw them coming at me, you know what I’d do? I’d yell, “Hey, look! Is that Beyoncé?” Works every time. Boom. Drops the mic.
The Recipe for Getting This Type of Shot
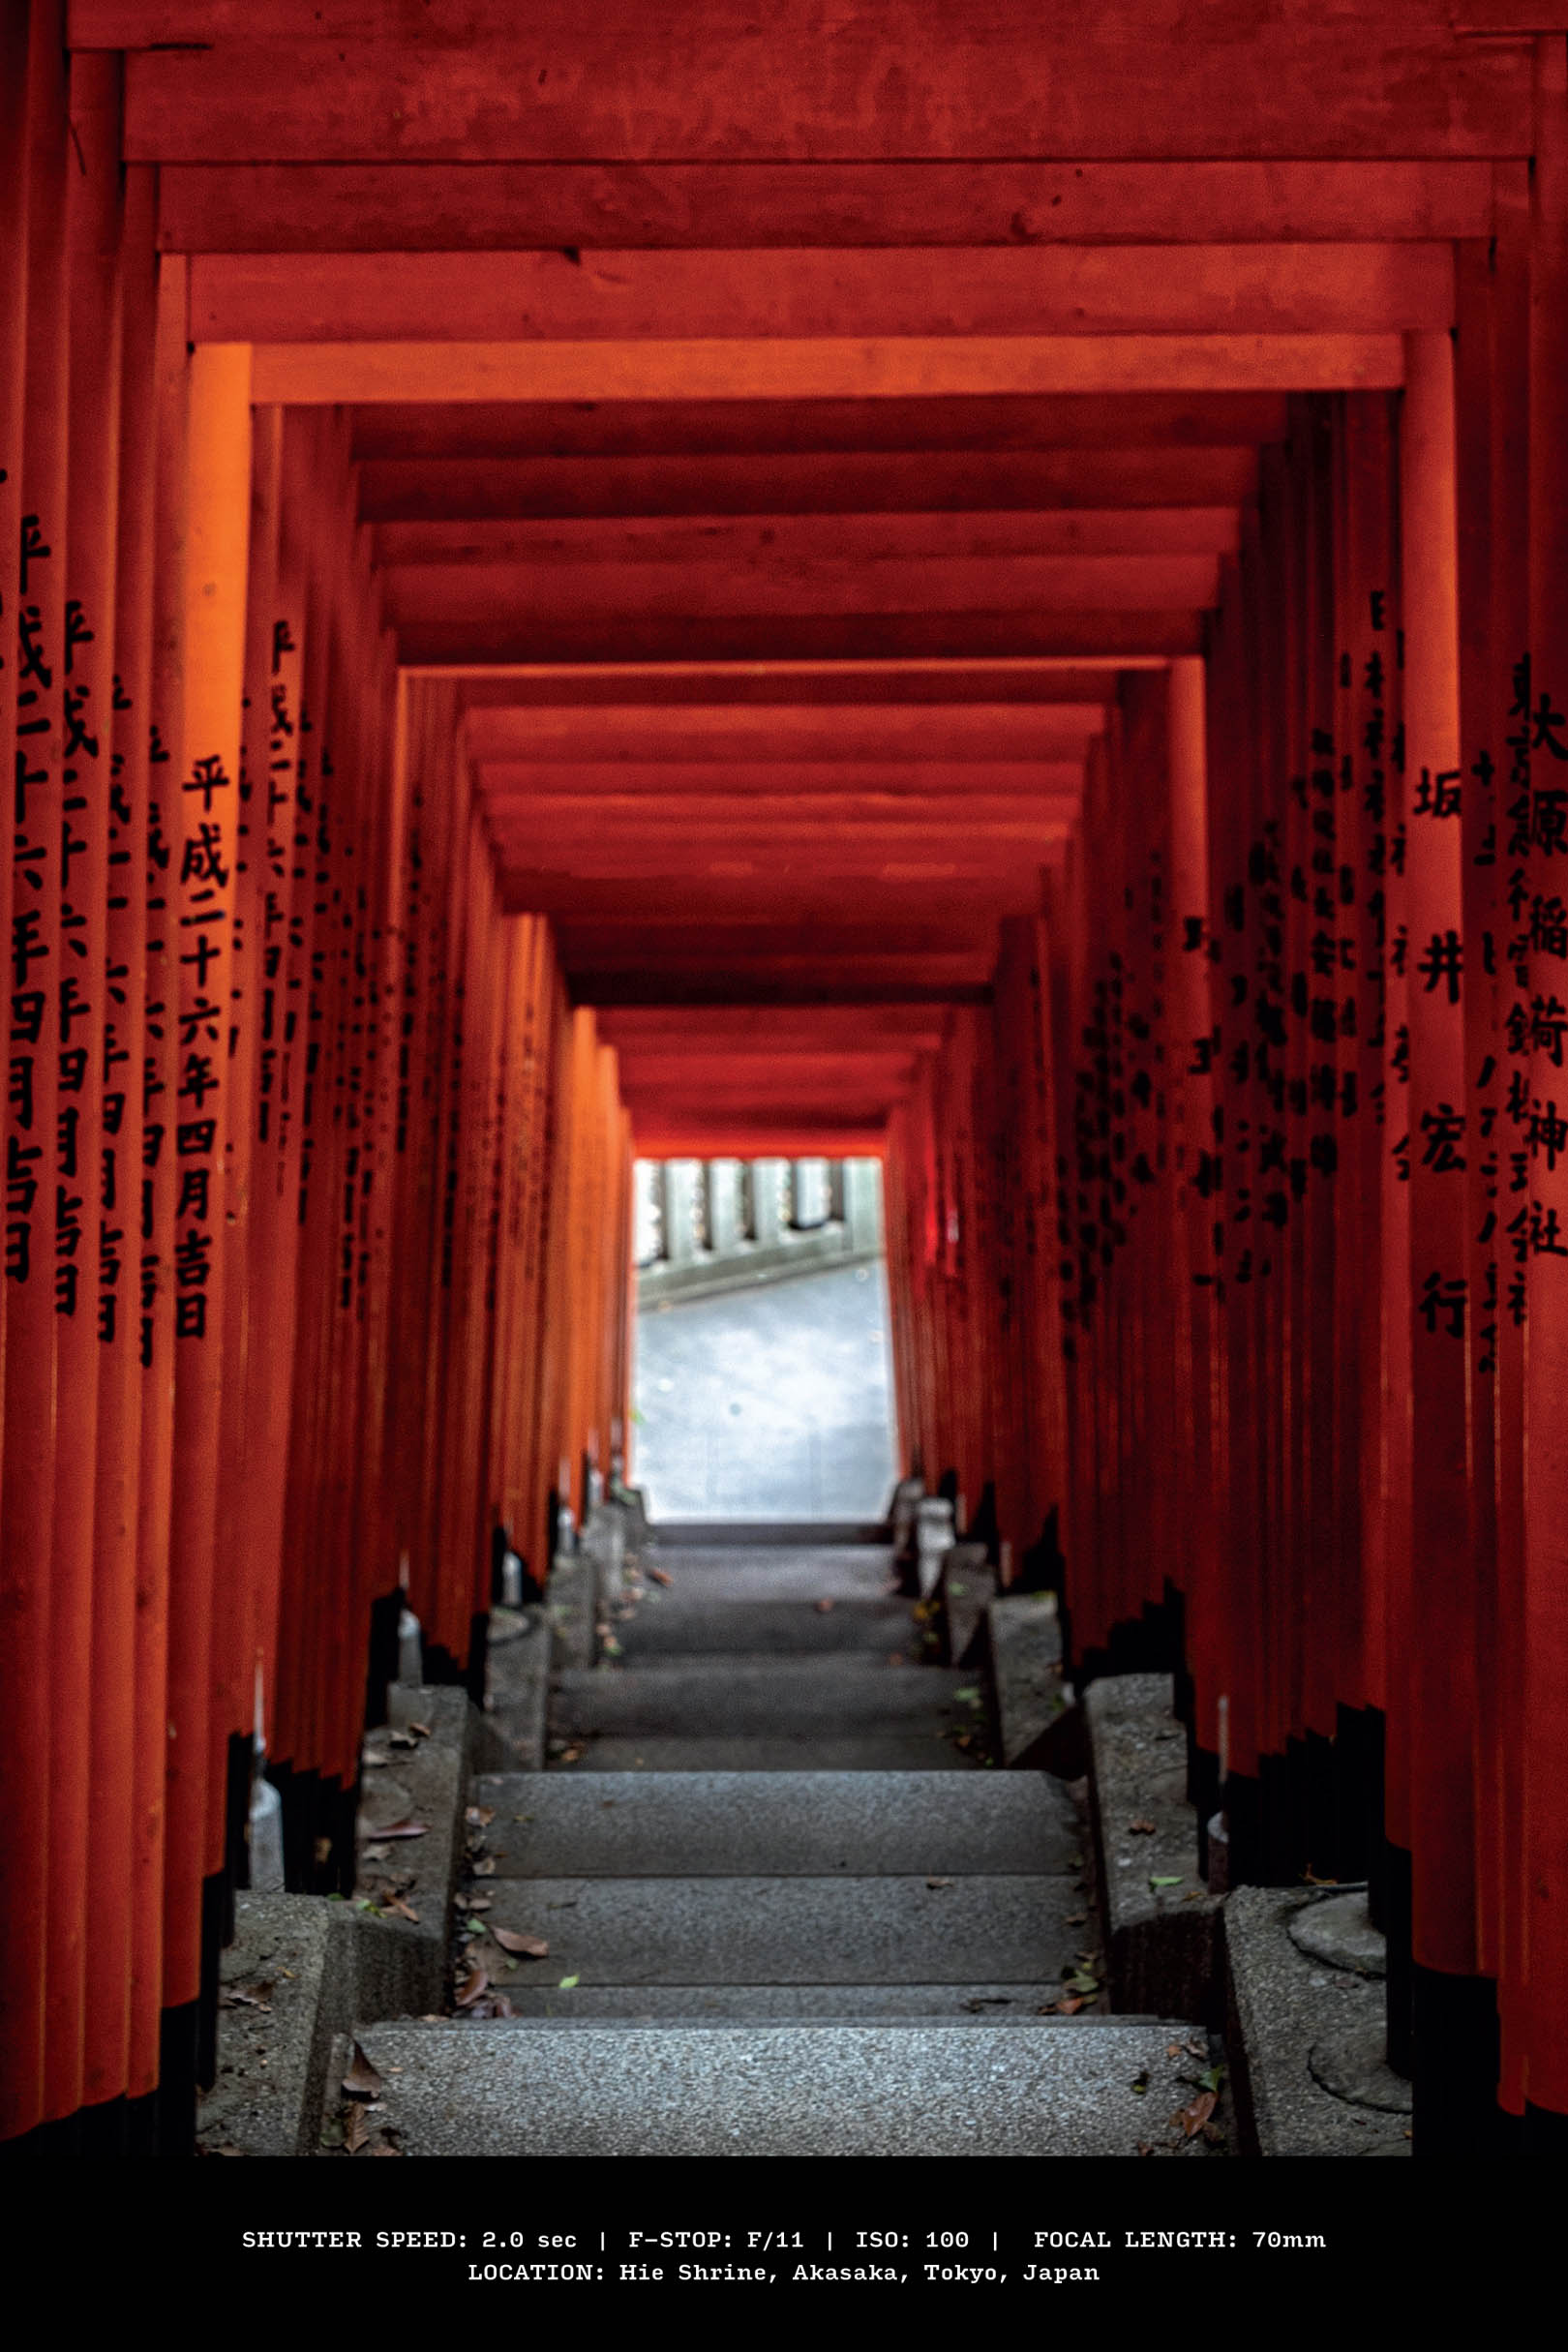
Characteristics of this type of shot: A dark, dramatic interior shot with a wide range of tones (from dark to light), a sweeping floor-to-ceiling view, and vibrant color.
Location: Lakewood Cemetery Memorial Chapel, Minneapolis, Minnesota
GEAR: This was taken on a full-frame mirrorless camera body. To capture both the floor and the ceiling like you see here, you’ll need a super-wide-angle lens, and I used a 16–35mm lens zoomed all the way out to 16mm (that would be around 12mm on a crop-sensor). In a low-light setting like this, you’ll need to be on a tripod (or, in this case, I used a Platypod Ultra). I positioned my camera on top of the lectern, so it would align perfectly with the center aisle.
SETTINGS: Shot in aperture priority mode, at f/9, which puts everything in focus (I normally would’ve shot this at f/11, but at some point, I probably moved the aperture dial by accident), and 100 ISO (or your lowest, cleanest setting). This was taken using Exposure Bracketing (see page 117) to capture the dark interior detail without blowing out the stained glass windows above.
KEY TECHNIQUE: It’s the point of view. It’s different because it was taken from the altar looking back at the front door, where the congregation sits. We usually see the view from the pews looking toward the altar. Also, the super-wide-angle lens lets you include so much in one shot, including the beautiful ceiling, which is key.
POST-PROCESSING: The first step was to combine the multiple exposures into a single HDR image in Lightroom (see page 229), then I dropped the Highlights slider to –100 to lessen the light hitting the stained glass windows. I increased the Contrast a lot, which made the image more colorful, and I also increased the Texture slider a lot, and Clarity a little bit. I also added sharpening to give it a crisp look.
The Recipe for Getting This Type of Shot
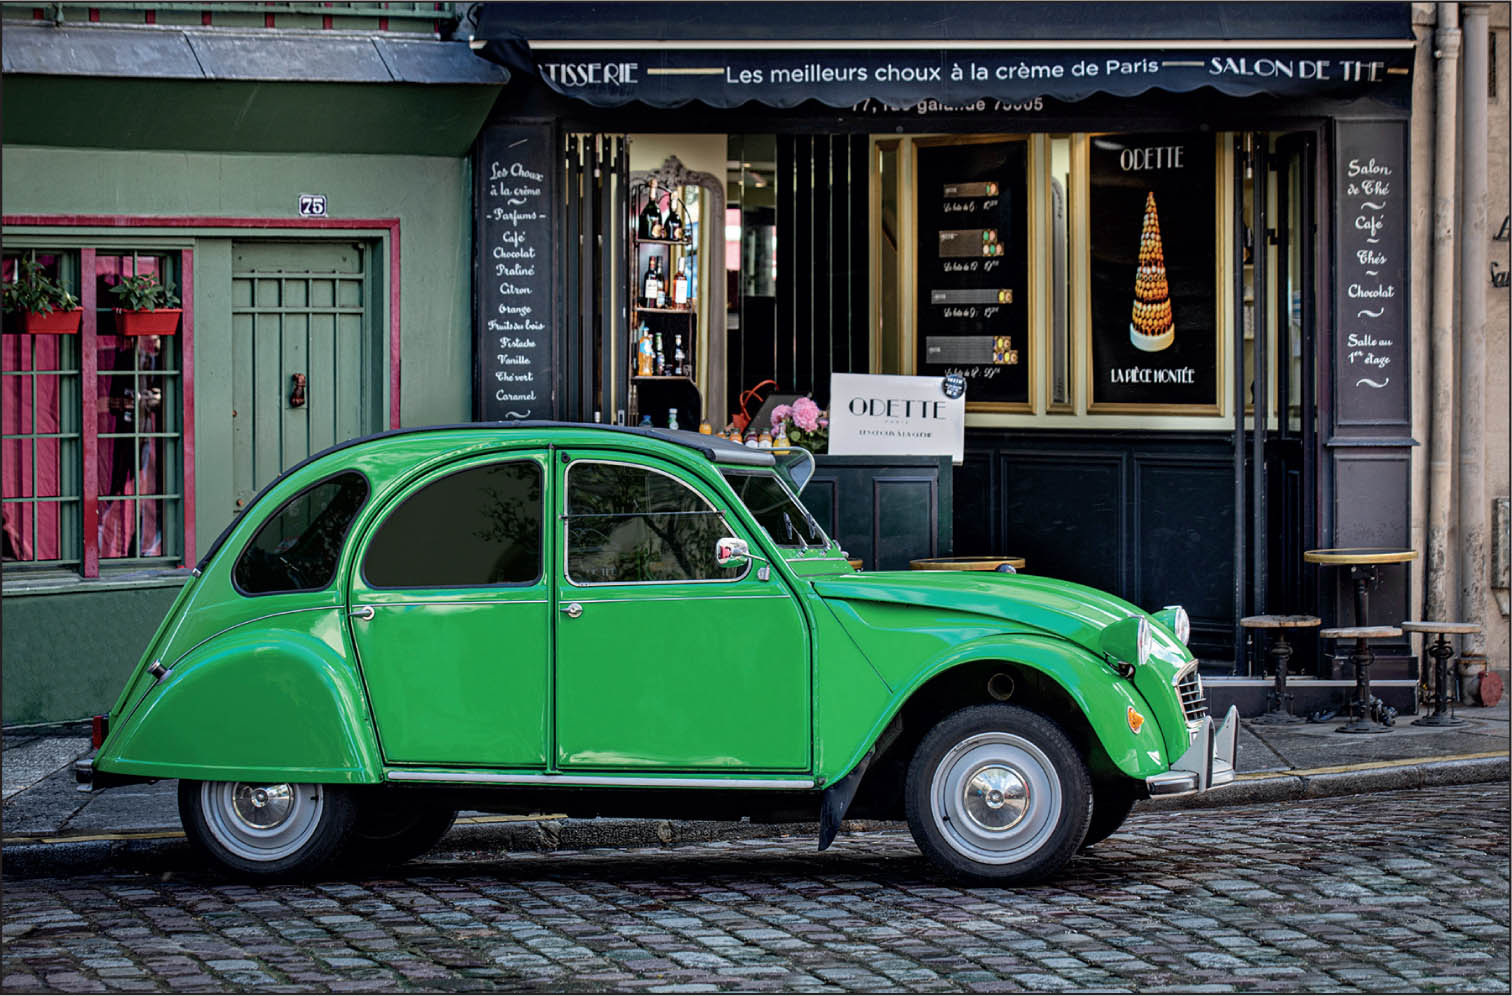
Characteristics of this type of shot: A romantic, timeless street scene of Paris with a charming pastry shop as our background.
Location: La Maison Odette Pastry Shop, 77 Rue Galande, Paris, France
GEAR: Taken on a full-frame body, with a 70–200mm f/2.8 lens at 100mm. This was taken hand-held while standing in the street with a friend watching for cars.
SETTINGS: Shot at f/5.6, ISO 100, and 1/80 of a second shutter speed.
KEY TECHNIQUE: What makes this scene is its timelessness. I found this great location researching on 500px.com, and then to give the shot something special, I hired an old French classic car from a tour operator (they drove the car out to the location and positioned it where I wanted. They were very helpful). The lucky part of all this was getting the parking space right in front of the pastry shop, so we could shoot without seeing any other new cars that would take away from the romance of the shot. I zoomed in tight to keep from seeing any modern signs or other distractions, and I intentionally included a good amount of the cobblestone street, which adds to the timelessness. I put the car near the bottom of the shot because it’s not about the car; it’s about the scene (the car is a prop in the scene).
POST-PROCESSING: Nothing too special with the post-processing for this shot, just mostly adding a lot of Contrast (which I commonly do—contrast is my “thing”) in Lightroom, then using the Texture slider to bring out detail, and a little bit of Clarity to make the car look more shiny and darken the street. I also used Photoshop’s Healing Brush tool to remove any little distractions on the car body, the building, etc., to simplify the image. I darkened the edges all the way around by adding a –11 vignette (see page 226), and of course, I finished it off by adding sharpening.
The Recipe for Getting This Type of Shot
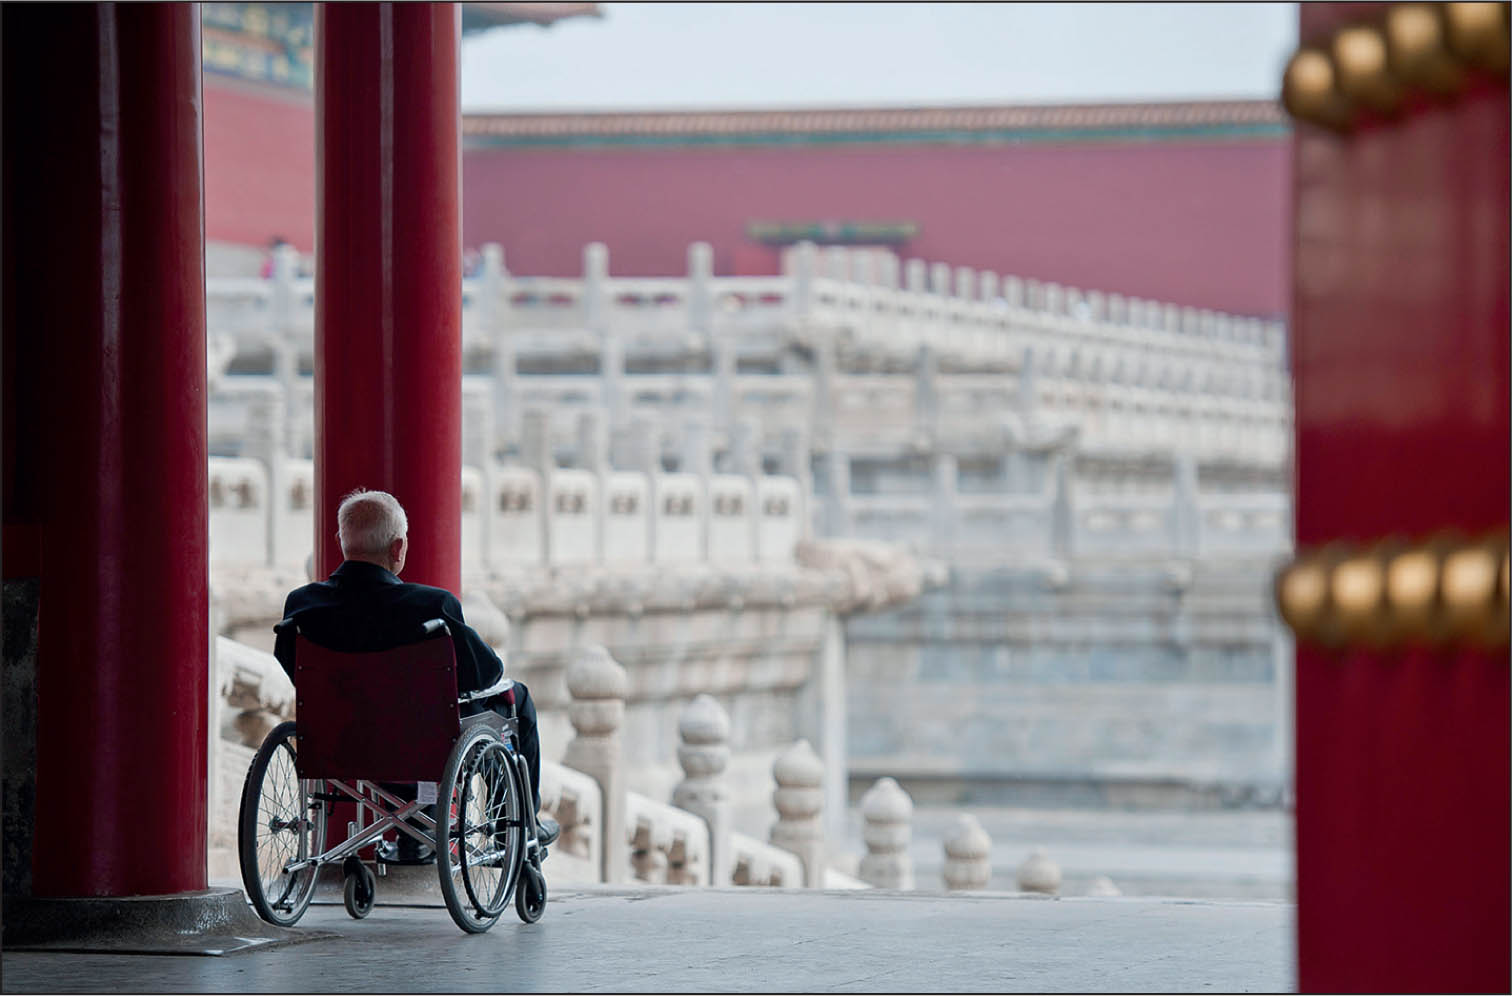
Characteristics of this type of shot: An environmental, storytelling-type of candid portrait with great simplicity and minimum distractions.
Location: The Forbidden City, Beijing, China
GEAR: Taken on a full-frame body, hand-held, with a 70–200mm lens.
SETTINGS: I zoomed in to 140mm and set my aperture to f/2.8 to help get the background out of focus, which separates it from the subject. ISO 200 and shutter speed 1/1600 of a second, so I didn’t have to worry too much about camera shake.
KEY TECHNIQUE: Hands-down, the key technique here is patience. As you might imagine, The Forbidden City is packed wall-to-wall with tourists, so framing this up without seeing any was the start because the gentleman in the wheelchair was also surrounded by his family, including very young children. I’m positioned on the far edge of the large door you see on the right, and I just stood there, leaning against that door, hoping to get a shot where the family wasn’t in the frame because then it just looked like a shot with some tourists. Some family members kept walking over to the left, out of the frame, so I just stuck with it (doing that whole patience thing, which is so hard for us photographers), and son-of-a-gun, for a moment or two they were all out of the frame to the left, and I was already aimed and ready to take the shot, which you see here.
POST-PROCESSING: Just the standard Lightroom stuff, like adding Contrast. I post-processed this shot before Lightroom had added the Texture slider, but I can see that I used the Brush tool to apply Clarity to him and his wheelchair (Clarity makes metal shiny, but I would avoid using it on the out-of-focus areas because it looks weird and processed). And, of course, sharpening to finish.
The Recipe for Getting This Type of Shot
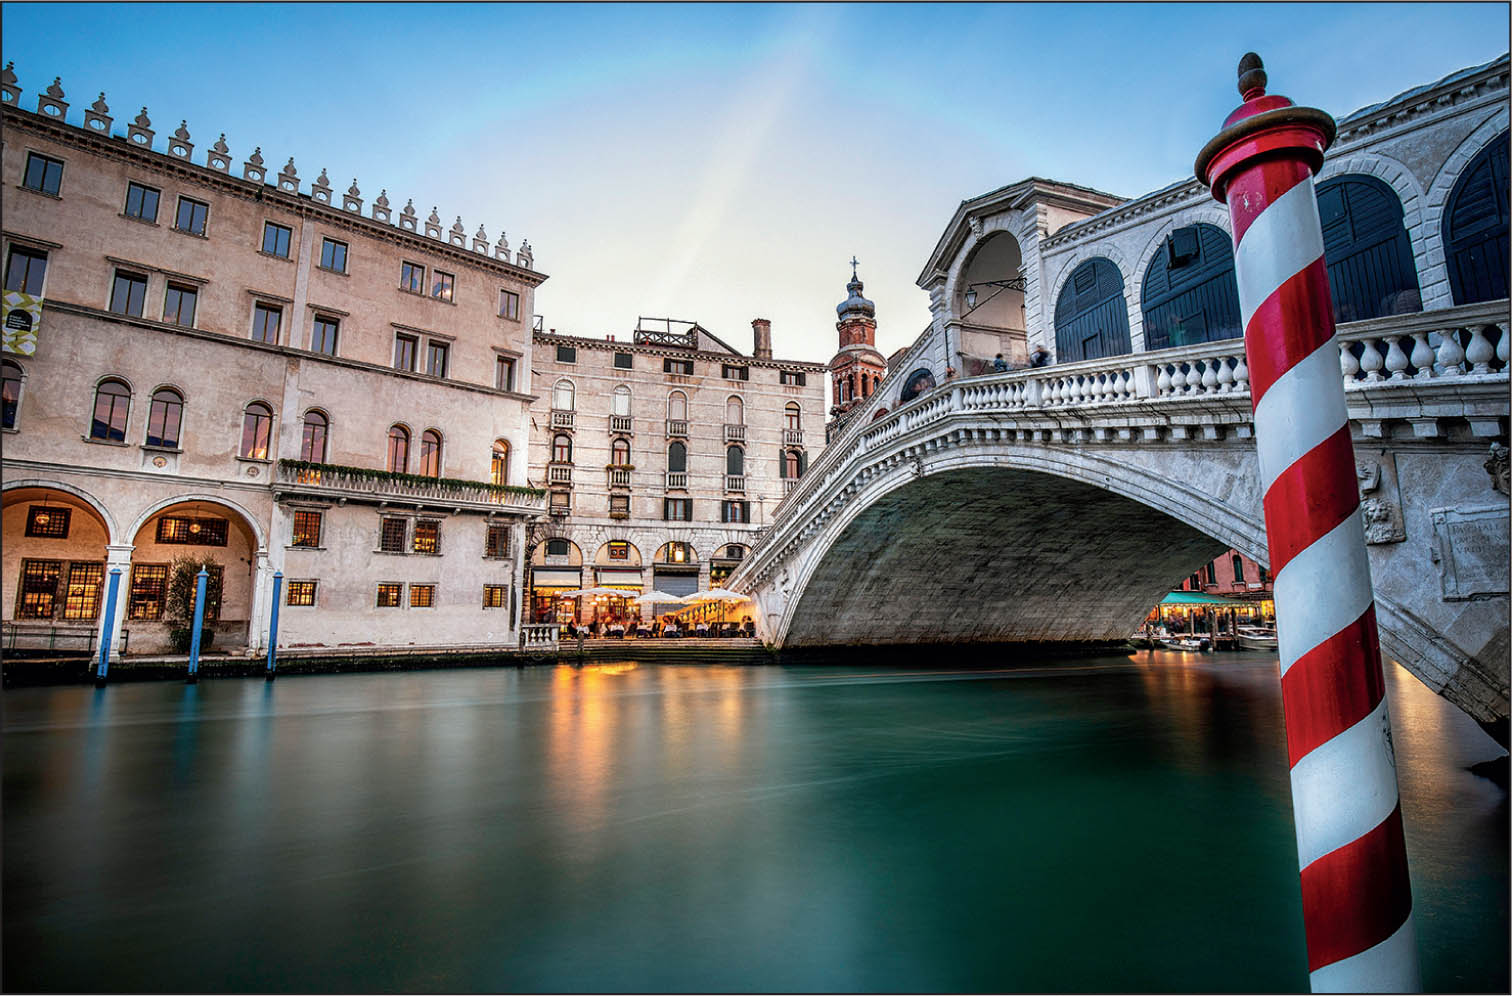
Characteristics of this type of shot: A classic travel-style shot with smooth water in the canal, vibrant colors, and lots of texture. An overall simplified image.
Location: Rialto Bridge, Venice, Italy
GEAR: Taken on a full-frame body, with a 16–35mm f/4 lens, and mounted on a tripod with a shutter release.
SETTINGS: The aperture was f/9, ISO 100, and my shutter speed was 89 seconds (you read that right—89 seconds). It’s a super-wide-angle shot at 16mm.
KEY TECHNIQUE: I think what makes the shot is the smooth, silky water in the canal, which is created by using a 10-stop ND filter to get a really long exposure (see page 115) to make my shutter stay open 89 seconds even during the day (though this was late in the day, which helps. At high noon, I would have needed to stack ND filters—like a 10-stop and a 3-stop—to get that long of an exposure). Because the shutter was open so long, traffic going by on the canal (it’s not just charming gondolas, there are also garbage boats and ferries and other random boats) disappears. Compositionally, including the “barber pole” on the right side not only acts as a foreground object to help lead you into the image, but it also adds a nice pop of color, which contrasts nicely with the other colors in the scene. The leading lines in the image lead the viewer’s eye to the outdoor cafe in the center of the image, but the bridge itself is such a large part of the image that it becomes the subject.
POST-PROCESSING: The colors are really vibrant in this image, so to bring them out, not only did I add lots of Contrast in Lightroom, but I also increased the Vibrance slider a bit. I added both the Texture slider and some Clarity to add shine to the water, and sharpening to finish.
The Recipe for Getting This Type of Shot
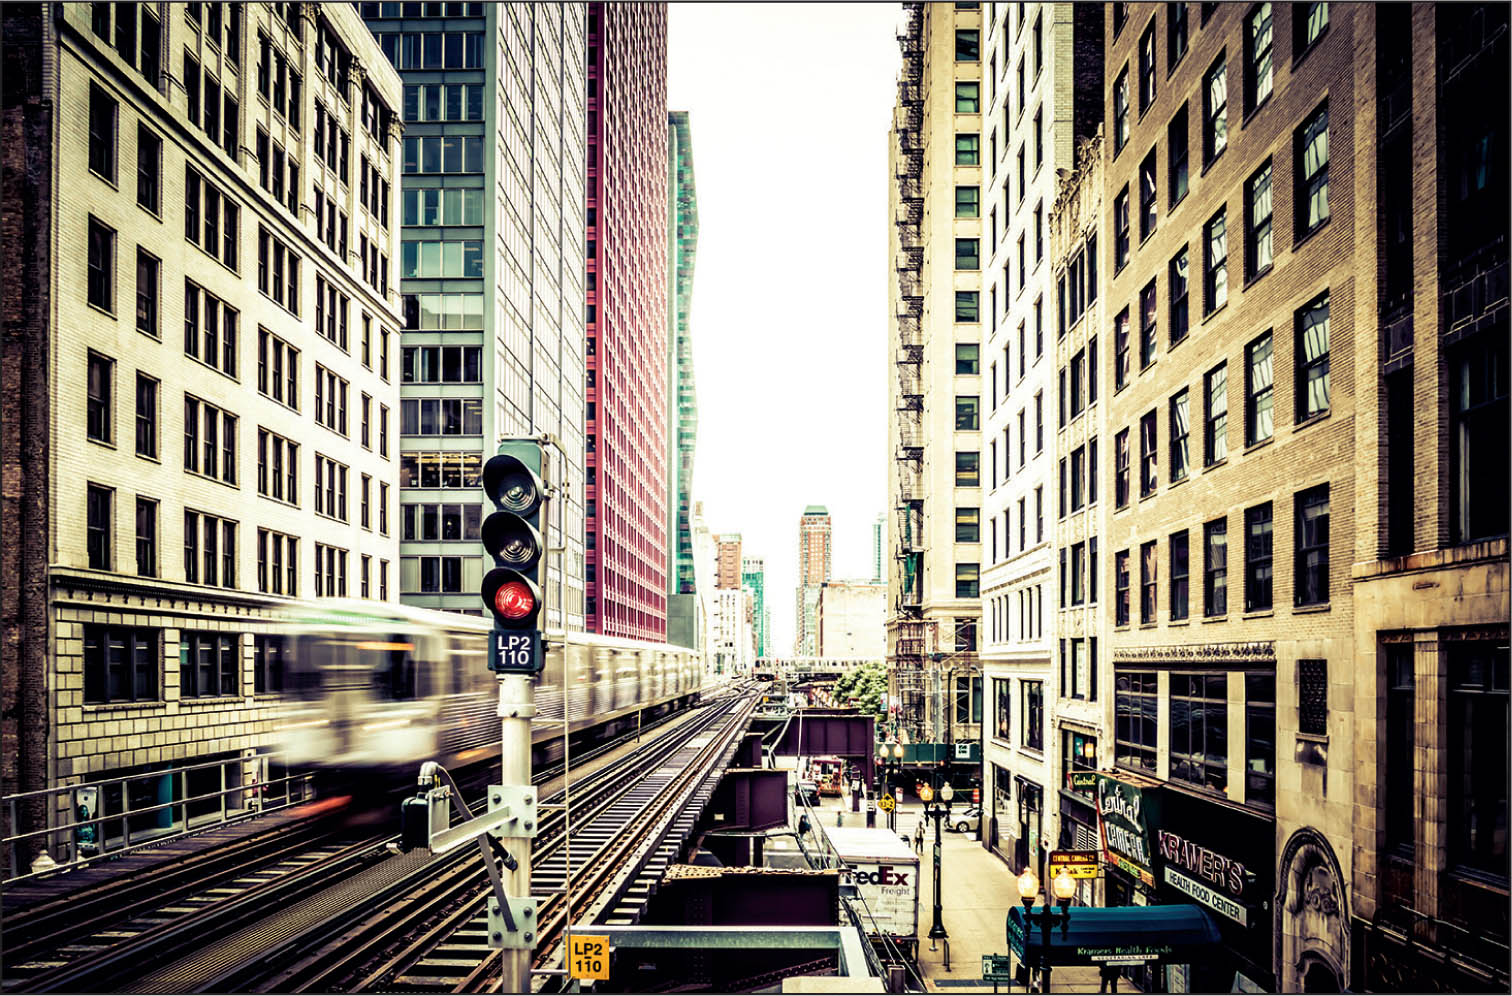
Characteristics of this type of shot: A gritty-style city shot with a sense of movement and a color effect added in post-processing.
Location: Adams/Wabash “The L” station platform, Chicago, Illinois
GEAR: Taken on a full-frame body, with a 24–240mm lens at 62mm, and mounted on a travel tripod with a cable release.
SETTINGS: Aperture was set at f/22, ISO 100, and shutter speed at 1/3 of a second.
KEY TECHNIQUES: The motion of the train and the post-processing. The motion is created by using an f-stop that would keep my shutter open longer (f/22), so it would show the movement of the train. It was kind of shady between the tall rows of buildings on either side, so I didn’t need to use an ND filter and I could just get away with choosing a high-numbered f-stop to keep the shutter open long enough to create some motion blur. I did not “pan” with the train as it was moving—I aimed directly down the track with my camera on the tripod. It took quite a few tries to get the timing right (those trains move fast).
POST-PROCESSING: The buildings were leaning backward more than I’d like, so first, I applied a Lightroom lens profile, and then, in the Transform panel, I clicked Upright Auto to make them more upright (see page 225). To give it a vintage look, I applied the Vintage 04 creative profile (see page 223), increased the Amount slider to 200, and then I dragged the WB Temp slider a bit toward yellow. I bumped the Contrast all the way up, added a dark vignette around the outside edges, lots of Texture and Clarity, and I increased the Highlights a bit to blow out the sky to white for effect. I added extra contrast using the Tone Curve panel (see page 212) by choosing Strong Contrast from the Point Curve pop-up menu, and finally, I added sharpening.
The Recipe for Getting This Type of Shot
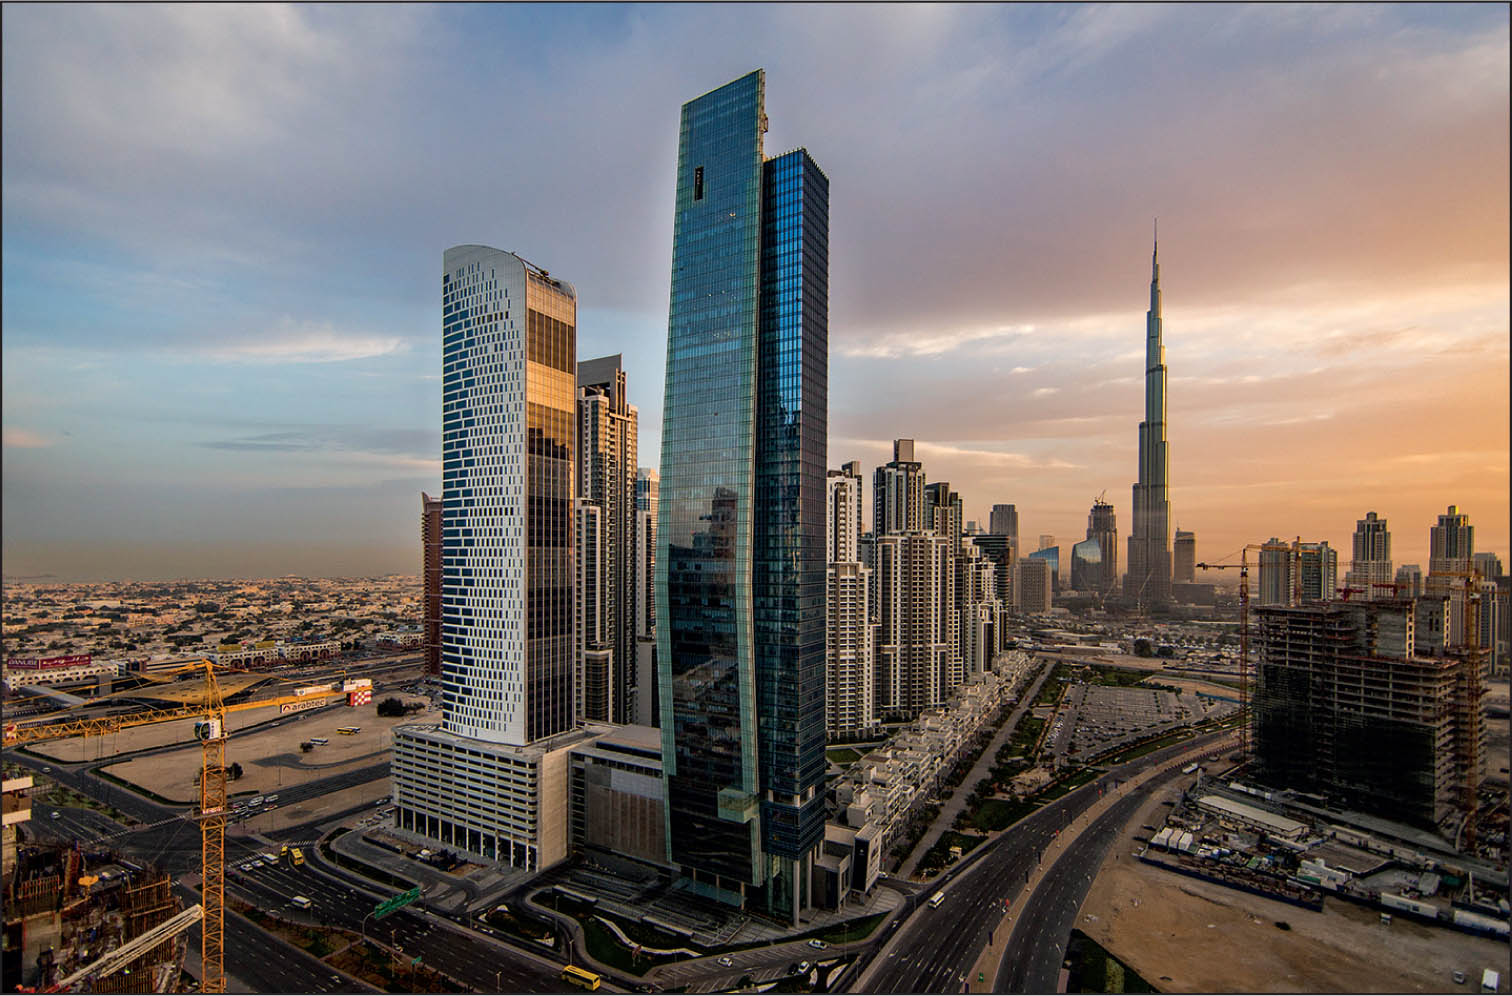
Characteristics of this type of shot: Sweeping cityscape from a high point of view with soft light and color in the sky.
Location: The Oberoi Hotel, Dubai, United Arab Emirates
GEAR: Taken on a full-frame body, hand-held, with a 14mm prime lens.
SETTINGS: Shot in low light, my aperture was f/3.5, ISO 800 (to get a high enough shutter speed for a sharp shot), and shutter speed was 1/800 of a second (I could’ve lowered my ISO and used a slower shutter speed—that’s explained below).
KEY TECHNIQUE: Here, it’s access. I was staying at the Oberoi Hotel (picked by the folks who organized the event), and as soon as I had its info, I started looking for where I could shoot from. I found that they had a rooftop bar and Google Earth showed it would have a great view of the world’s tallest building: Burj Khalifa (seen in the back right above). I sent a note to the hotel’s concierge before I arrived, letting them know I was a photographer and asking if there was any way I could shoot from the rooftop bar at dawn. They were happy to oblige, and they had a security guard meet me who unlocked the door and gave us the run of the place. For this shot, I was standing on a bar stool to get up high enough to get my camera over the safety glass surrounding the bar. So, I had to hold my camera out away from my body (less stability) to take the shot, so I knew there would be some movement (not including me shaking from my intense fear of heights), hence the high ISO.
POST-PROCESSING: As usual, I added a lot of Contrast and bumped up Lightroom’s Dehaze slider to remove some of the haze in the scene (see page 212). I also used the Brush tool to brighten the two backlit buildings on the left. I added Texture and Clarity to bring out detail, and of course, I finished off by adding sharpening.
The Recipe for Getting This Type of Shot

Characteristics of this type of shot: A posed environmental portrait with a simplified scene and an out-of-focus background behind the subject.
Location: Li River, China
GEAR: Taken on a full-frame mirrorless body, hand-held, with a 24–240mm lens.
SETTINGS: Shot at an aperture of f/6.3 with –1.3 Exposure Compensation, ISO 400, and with a shutter speed of 1/200 of a second. It was shot at 140mm.
KEY TECHNIQUE: Remember when I talked about hiring a model (on page 191)? That’s what I did here. This gentleman was a fisherman for most of his life, but after the river was fished to the point there were no fish left, he and his family retired and now he models for photographers. We contacted a fixer (see page 6) based in China to arrange for the model to be available for a dawn shoot where we could pose and position him (so the natural early morning light was giving him kind of a dramatic Rembrandt-style lighting), giving all the instructions to our fixer to translate for us. The light is soft and flattering because these shots were taken right after dawn and not in direct sunlight, as the sun hadn’t cleared the mountains around us.
POST-PROCESSING: Besides adding Contrast (like always), the biggest thing I did here was to warm up the white balance, dragging Lightroom’s Temp slider a bit toward yellow. I also added Texture and a bit of Clarity to give the smoke more detail, but I added the Clarity using the Brush tool, just painting over the smoke itself, because applying it to the entire image would apply the Clarity to the out-of-focus background, which usually looks kind of weird (Clarity looks kind of artificial when applied to blurry backgrounds, so I avoid it). I also darkened the edges all the way around the image to focus more attention on our subject (see page 226).
The Recipe for Getting This Type of Shot

Characteristics of this type of shot: A wide, tropical, vacation-style shot taken on a bright, sunny, blue sky day.
Location: Mama’s Fish House, Maui, Hawaii
GEAR: Taken on a full-frame body, hand-held, with an 11–24mm f/4 wide-angle lens (the widest lens I own) at 11mm.
SETTINGS: Shot with the aperture set at f/7.1, the ISO at 100, and a shutter speed of 1/250 of a second. The long, soft shadows let you know this shot was taken later in the day, around an hour or so before sunset.
KEY TECHNIQUE: It’s the composition, but essentially two parts of it. The first is the compositional choice of using an ultra-wide-angle lens to capture so much of the scene in front of me, giving it a wide-open feel. The second part is using the front part of this outrigger on the beach as the foreground element, leading the viewer into the scene. Also, despite the many palm trees, it’s a very simple, clean scene. It’s essentially just the front of the boat, the palms, the beach, and the ocean. Not a bunch of junk on the ground, or creeping in from the sides, or lying on the beach.
POST-PROCESSING: Just adding Contrast (as always), and using Photoshop’s Healing Brush tool to remove any distracting scratches and junk inside the outrigger itself. I added some Texture and a little bit of Clarity to make the end of the outrigger look a little shiny. To make the sky bluer, I used the Lightroom technique on page 217. And, I added sharpening to finish off the image.
The Recipe for Getting This Type of Shot
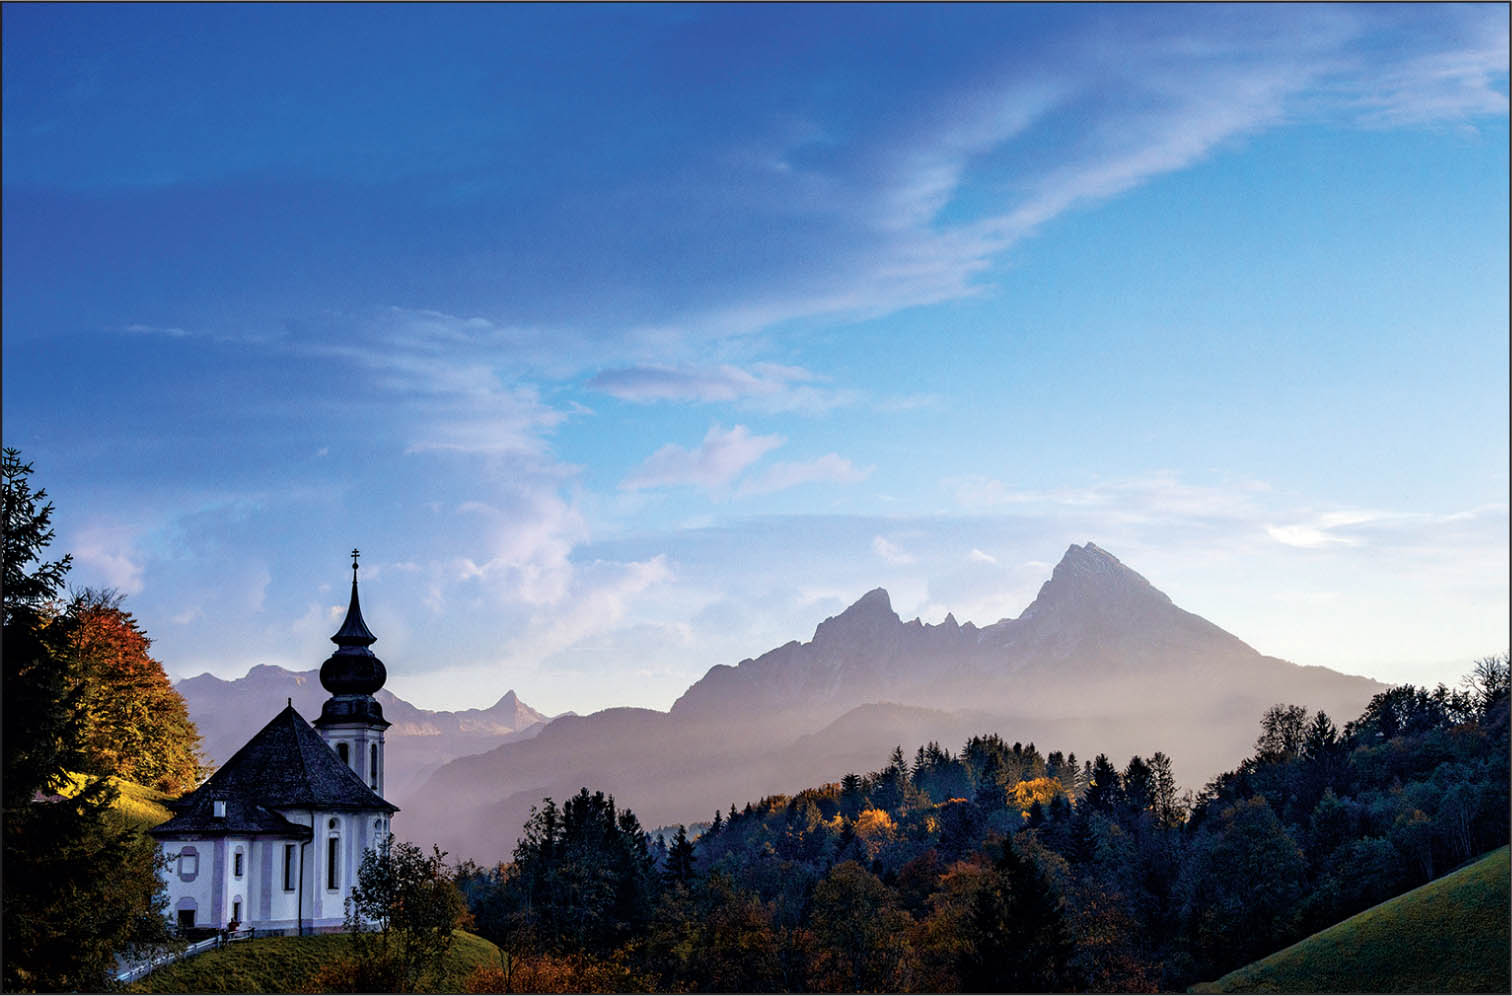
Characteristics of this type of shot: A landscape-style travel shot with soft light and our subject in the shadows and offset from the center.
Location: The pilgrimage church Maria Gern, near Berchtesgaden, Germany
GEAR: Taken on a full-frame body, hand-held, using a 24–105mm lens.
SETTINGS: I zoomed out to 43mm to get a wide view. I didn’t want to go out fully wide because it would make the church too small in the frame. Shot in aperture priority mode at f/9, ISO 400, and a shutter speed of 1/1600 of a second.
KEY TECHNIQUE: First, it’s a great location—a tiny, picturesque church in a beautiful mountain scene. The key technique is the composition, and by a putting the church over to one side, it still remains the subject of the shot, but it doesn’t take over the scene. It’s almost a negative space type of composition because your eye is drawn directly to the church, despite its small size in the frame. The church and trees in the foreground work to help lead the viewer into the image, as well.
POST-PROCESSING: There’s a lot of haze in this shot, but that haze also helps to give the image depth, so taking it all away won’t make the image stronger, just more shallow. So, while I added a little of Lightroom’s Dehaze slider (see page 212), I only added a little. I also added Contrast, Texture, and a hint of Clarity, along with some sharpening to finish off the image.
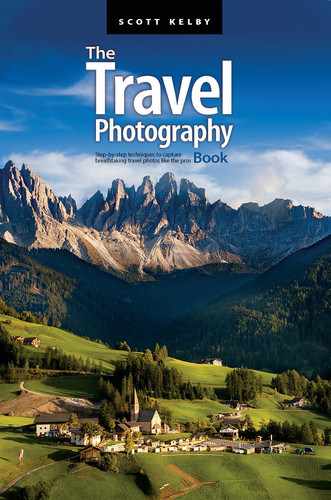
The Recipe for Getting This Type of Shot
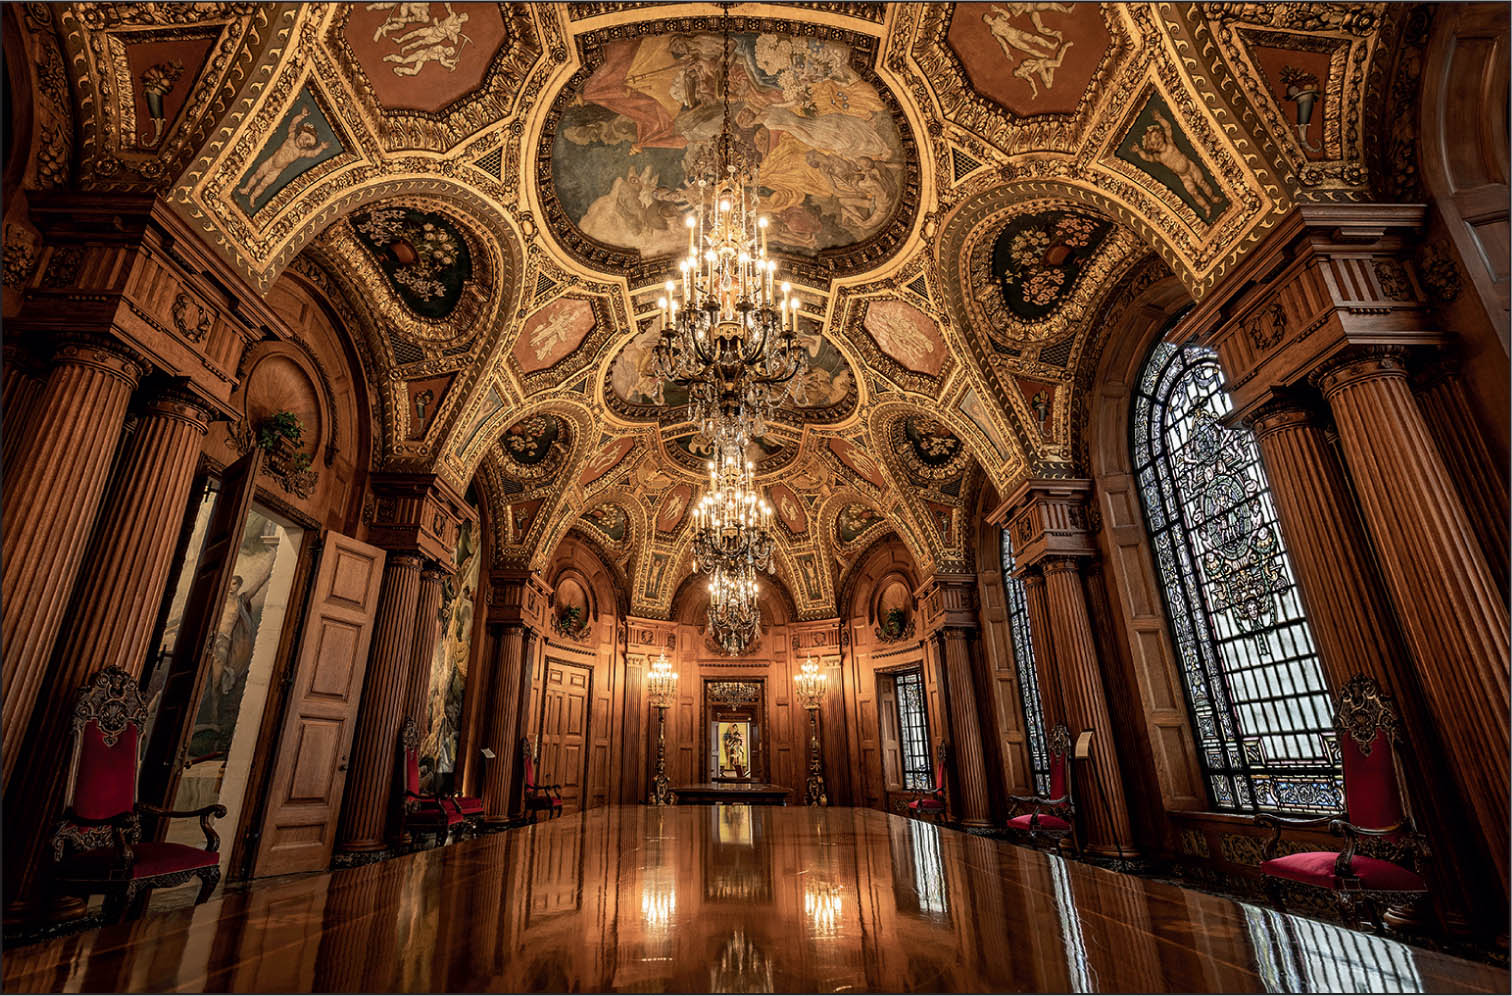
Characteristics of this type of shot: A Gothic-looking interior shot with an epic feel and lots of warm tones.
Location: Elks National Memorial and Headquarters, Chicago, Illinois
GEAR: Taken on a full-frame mirrorless body, with a 16–35mm lens at 16mm, and mounted on a Platypod Ultra.
SETTINGS: Shot at f/11, ISO 100, and a shutter speed of 1.6 seconds, using Exposure Bracketing (see page 117), which takes three shots (combined into one shot in post): one normal exposure, one two stops lighter, and one two stops darker.
KEY TECHNIQUE: The epic feel comes from a recipe I use often in my travel photography, which is to use a super-wide-angle lens, down low, and tilted upward, so it includes the ceiling. It gives the image an epic, larger-than-life type of feel (this is a fairly small room, but it looks much larger thanks to that technique). To get that mirror-like reflection, I put my camera directly on the end of the table, mounted on a Platypod Ultra, tilted up a bit. When you get really close to a floor or table like this, you pick up a ton of reflections. This table doesn’t look nearly as reflective when you’re standing there (it’s a nicely polished wood dining table, but it’s not a mirror), but when you get the lens that close to the table, it becomes incredibly reflective.
POST-PROCESSING: Start by combining the three images into a single HDR image (see page 229), which helps capture all the detail of the interior without blowing out the stained glass windows. One thing taking an HDR image like this allows you to do is open up the shadows a ton (using the Shadows slider), without introducing a bunch of noise. I also added Contrast and a lot of Texture, and the nice shine comes from adding Clarity. Of course, like always, I finished it off by adding sharpening.
The Recipe for Getting This Type of Shot
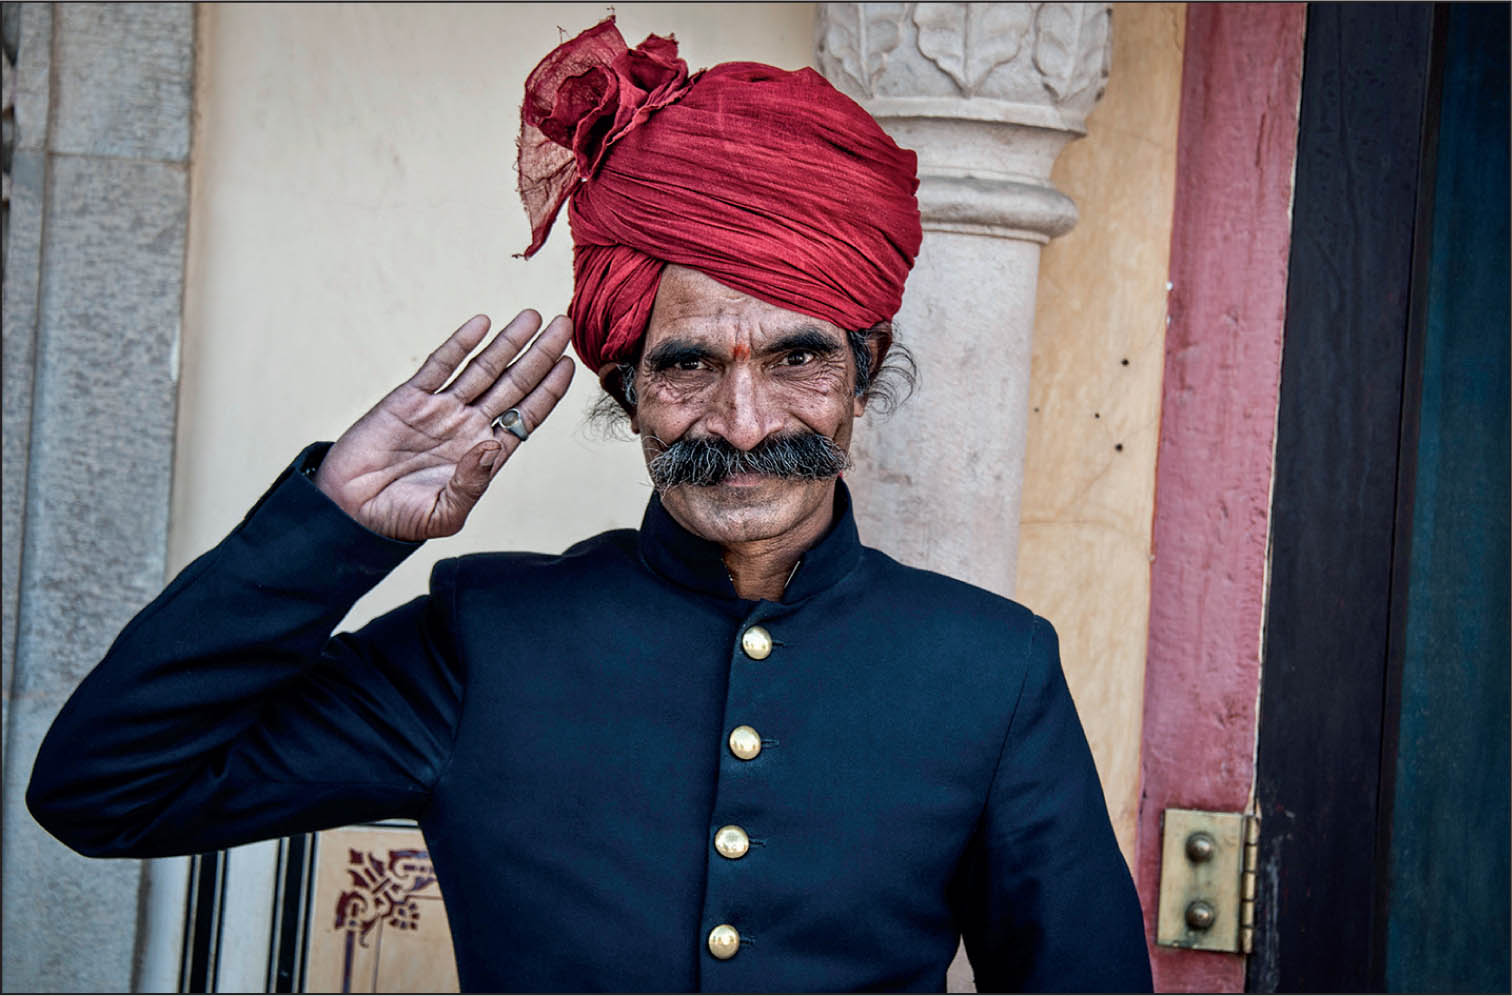
Characteristics of this type of shot: A location portrait with a great pose on a simple background.
Location: Jaipur, India
GEAR: Taken on a full-frame body, hand-held, with a 28–300mm f/3.5-5.6 lens.
SETTINGS: Shot while on a tour of the city, I zoomed in to 100mm and set my aperture to f/5.6 to get the background just a little bit soft behind him. ISO was 200 and shutter speed was 1/160 of a second (the shutter speed was slower like this because he’s not in direct sun).
KEY TECHNIQUE: I was on a walking tour, heading inside a building, where this gentleman was dressed in this costume outside in the courtyard and would pose for photographers for a fee. If he saw you had a serious camera, he would call out to you, so I went over and took a few shots. Before I go over and accept an offer like this (it was around $1 to get him to pose here), I look around the immediate area for a contrasting background, so when I engage them, I first ask if it’s okay if they move over to that background. They’re always happy to oblige, and they’re very patient. They’re professionals at posing, and they’re usually very friendly and chatty.
POST-PROCESSING: I did the standard things in Lightroom—adding Contrast and stuff—but when I see someone whose face has a lot of texture and character, I add more Clarity than usual. It brings out every nook and cranny and it can look really great, plus it accentuates all the detail in the image. Adding a lot of Clarity can make the image look darker, so you usually have to increase the Exposure slider a bit to brighten the image back up. Lots of sharpening added, too (see page 227).
The Recipe for Getting This Type of Shot
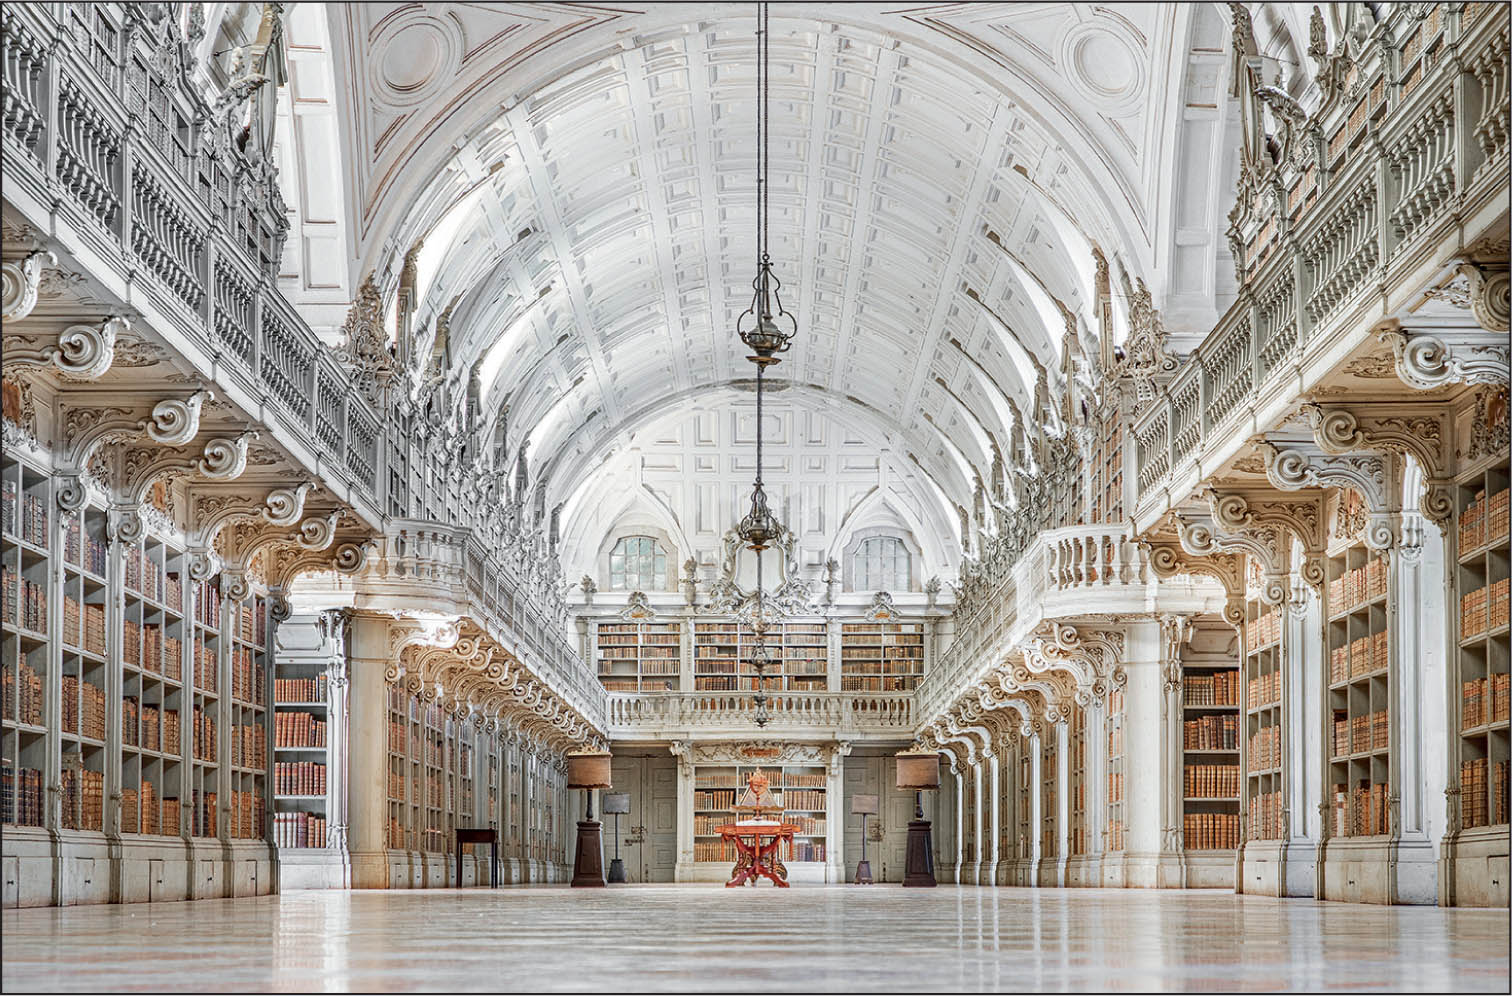
Characteristics of this type of shot: A bright interior shot taken on a public tour.
Location: Mafra National Palace Library, Mafra, Portugal
GEAR: Taken on a full-frame body, with a 70–200mm lens at 70mm, and mounted on a Platypod Ultra.
SETTINGS: Shot at f/4, ISO 400, a shutter speed of 1/8 of a second, and with Exposure Bracketing turned on (see page 117) because of the range of brightness in the room, from the very bright ceiling to parts of the hallway that were in shadows.
KEY TECHNIQUE: The key technique here was making the interior look as big and epic as it was by using that combination of getting down really low and using a super-wide-angle lens (see page 188). This was taken on the public tour and they had a little gallery area at the far end of this hall, but you were not allowed to actually enter the hall (they had ropes and stanchion in place and two security guards). So, when I got a chance, I made my way right up to the ropes and set my camera on the floor with the self-timer turned on.
POST-PROCESSING: First, in Lightroom, I combined the bracketed shots into a single HDR image (see page 229). After that, the challenge here was getting the color right and the light balanced. The Auto white balance setting on my camera made the white library look kind of yellowish, but the parts that were in the shade had a blue tint. So, I dragged the Temp slider toward blue until the interior looked white again, and then I switched to the Brush tool and painted with a yellowish white balance over those blue areas to make them look white. I also used the Brush tool, with the Exposure set to 0.50 to help brighten some of the areas in the shadows. Then, I added a little Contrast, Texture, and sharpening.
The Recipe for Getting This Type of Shot
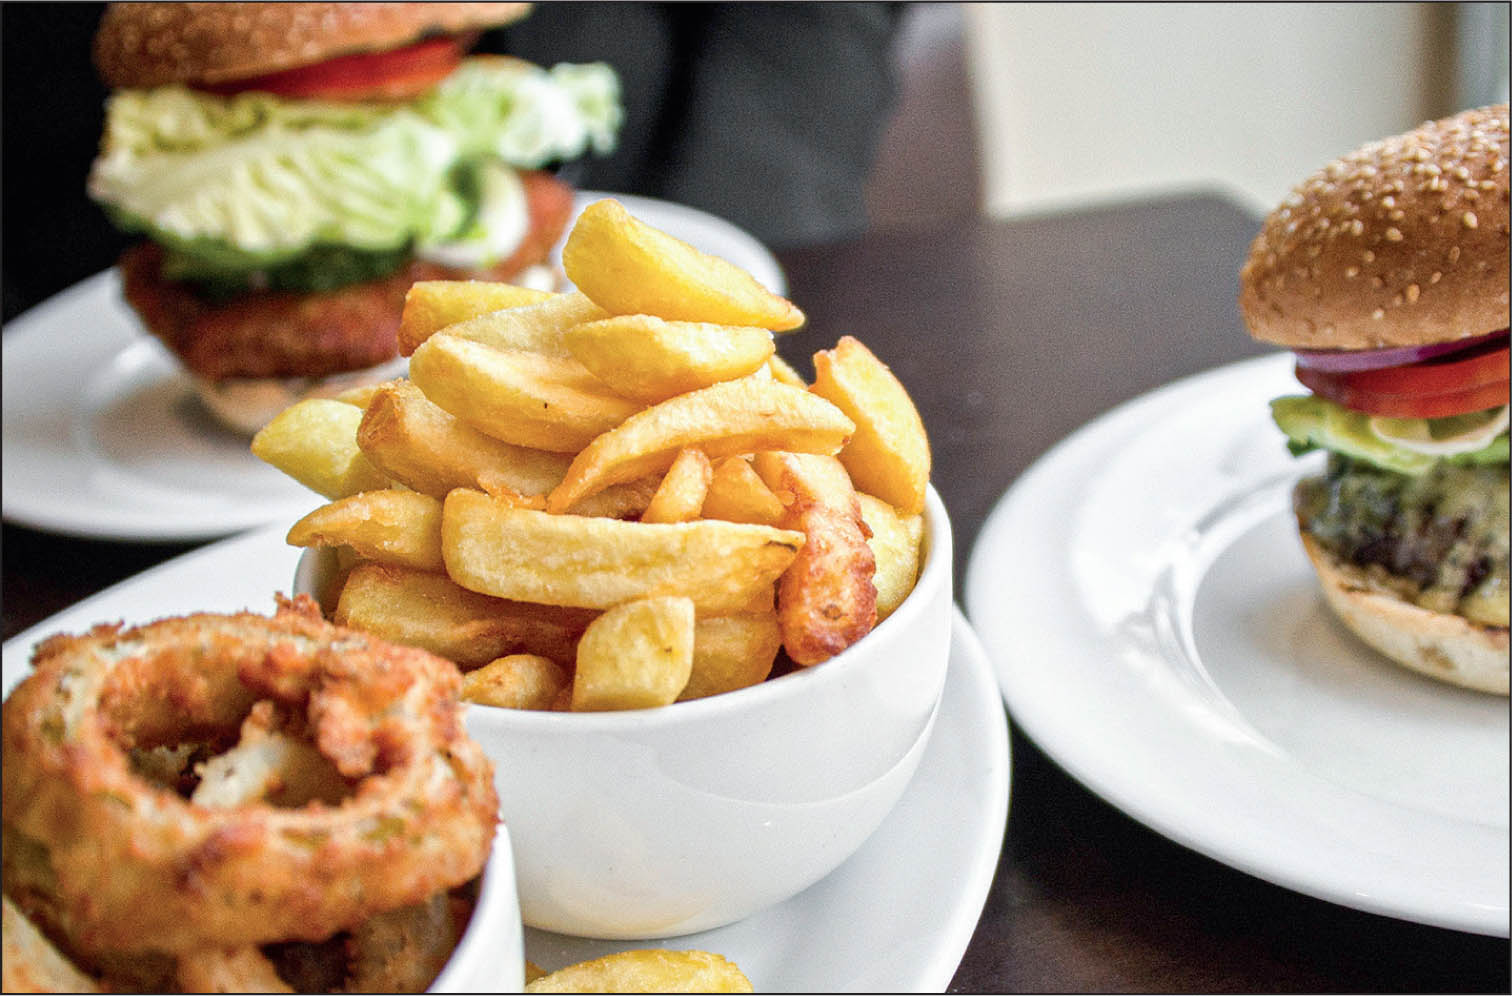
Characteristics of this type of shot: A nice, tight food shot of some super-yummy burgers, fries, and onion rings.
Location: Gourmet Burger Kitchen (GBK), Oxford, England
GEAR: Taken on a full-frame body, hand-held, with a 28–300mm lens.
SETTINGS: This was shot at 28mm. I like to get back farther and zoom in more, but there was a table too close to me to do that. Aperture was f/3.5, with ISO 800, and shutter speed at 1/1000 of a second (I didn’t need that fast a shutter speed, so I didn’t really need that high an ISO, but I think I was temporarily affected by the size and juiciness of the burgers. That’s my out).
KEY TECHNIQUES: There are two things: (1) making sure you ask to either sit outdoors, or in this case, right next to the window, so your lighting is great, and (2) not showing the full plate of food and instead, getting in tight. Use your lowest possible f-stop, stand back a bit from the table, and zoom in really tight, which puts the background out of focus (and part of the foreground, as well). You’ll often see food shots like this where you get in really tight, and then tilt the camera to the right or left a bit to make it dynamic (though I didn’t do that here, but it’s a popular choice).
POST-PROCESSING: Not really much to do to this image, just the standard stuff in Lightroom—adding Contrast and sharpening—but you have to be careful, especially shooting indoors, that your plates don’t get a blue tint. Mine had a tinge of blue, so I dragged the Temp slider to the right, toward yellow, until the blue tint went away and the plates looked white again (see page 207).
The Recipe for Getting This Type of Shot
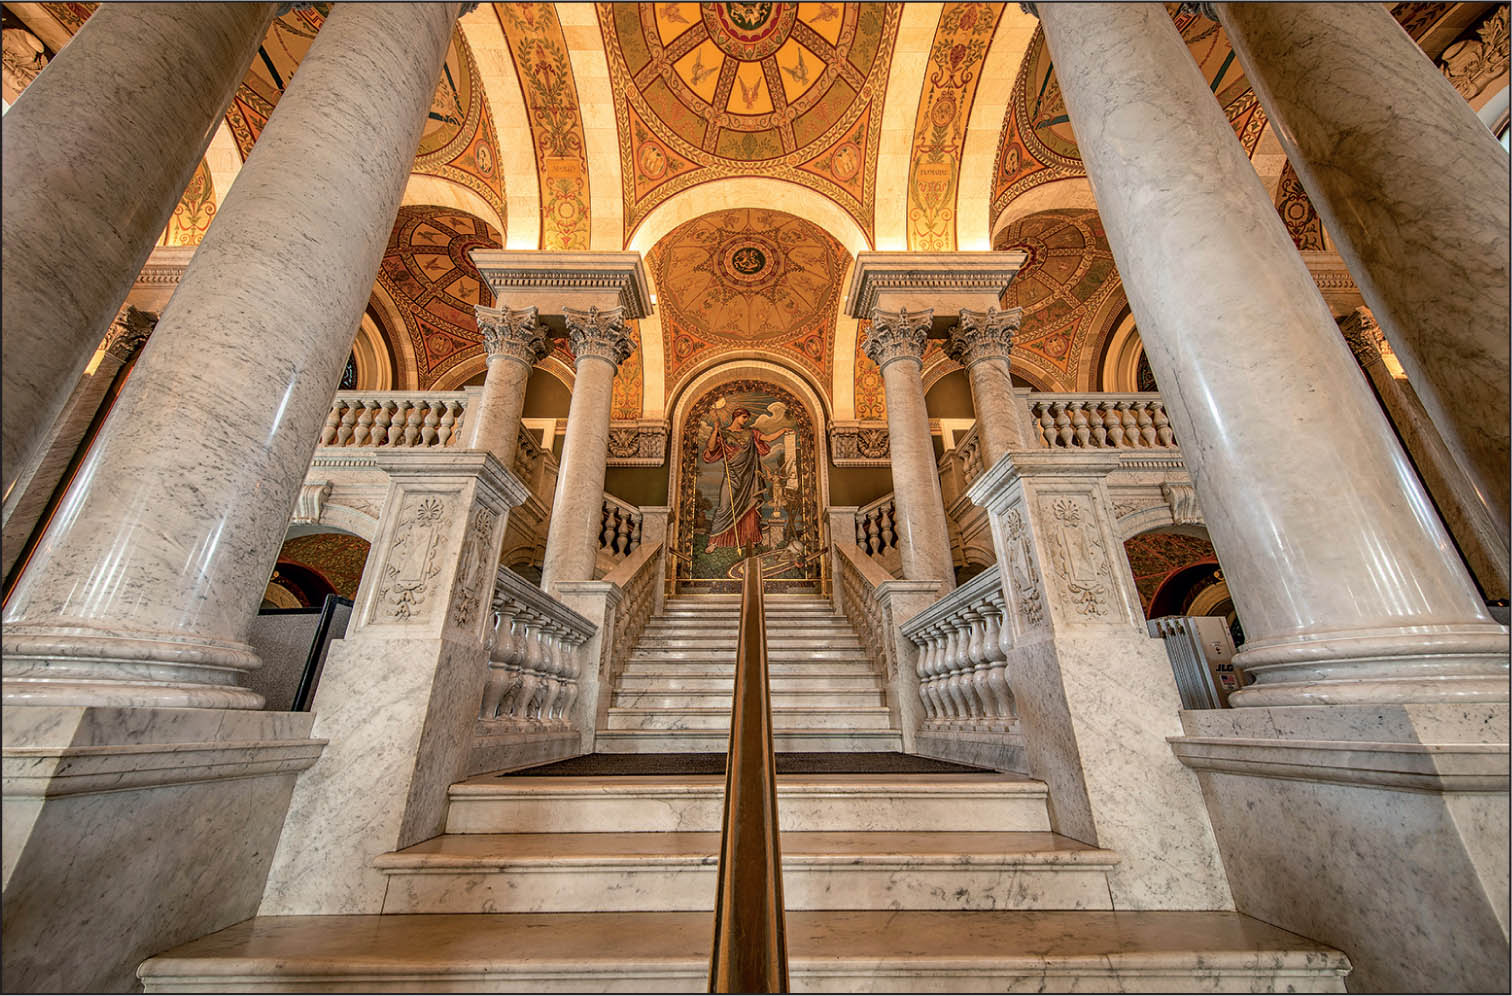
Characteristics of this type of shot: A classic interior shot with a wide floor-to-ceiling view with lots of detail and texture.
Location: The lobby of the Library of Congress, Washington, DC
GEAR: Taken on a full-frame body, with an 11–24mm f/4 lens at 13mm, mounted on a travel tripod, using a cable release to take the shot to minimize any camera shake.
SETTINGS: Shot at an aperture of f/11, ISO 100, and a shutter speed of 1/2 a second, with Exposure Bracketing turned on (though I’m not sure it was really necessary).
KEY TECHNIQUES: Two things: (1) It’s the symmetry. We love symmetry in photos (see page 110), and I was careful to line my camera up with the bottom of the railing to make sure it was truly centered (in shots where the symmetry is pretty much the subject, you have to nail being in the center of the image). And, (2) the super-wide-angle lens and lower angle lets you see all the way up to the beautiful detail in the ceiling, so you have the feeling of really being there.
POST-PROCESSING: After combining the bracketed exposures into a single shot in Lightroom (see page 229), I added a lot of Contrast, dragged the Shadows slider almost all the way to the right to open them up (you can do that with HDR images, without seeing a bunch of noise—it’s part of the magic of shooting with Exposure Bracketing, and then making an HDR image), then I added a lot of Texture, and added some Clarity to make everything a bit shiny. The white balance isn’t exactly accurate or those columns would be gray. Instead, I thought it looked better a little warmer, so I dragged the Temp slider a little bit toward yellow. Just a bit. And, of course, I sharpened the living daylights out of it.
The Recipe for Getting This Type of Shot
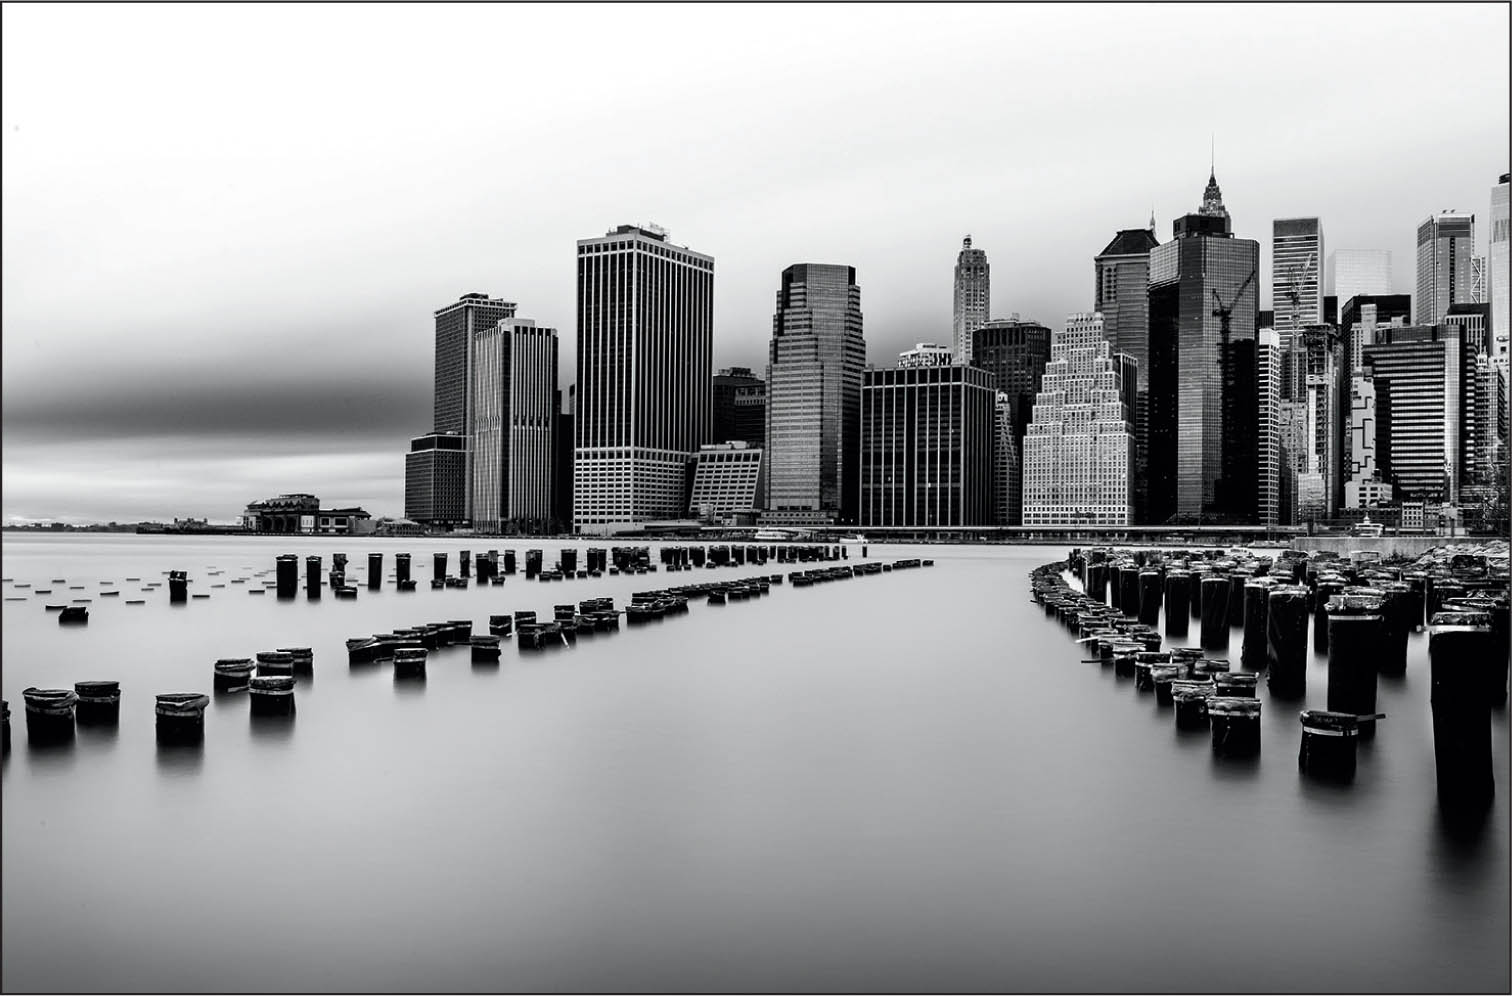
Characteristics of this type of shot: A cityscape with soft, silky water and leading lines drawing you into the photo.
Location: Brooklyn Bridge Park, Pier 1 Palisade, Brooklyn, New York
GEAR: Taken on a full-frame body, with a 16–35mm lens zoomed in to 35mm, and mounted on a Platypod Ultra, sitting on the rocks using the Ultra’s spiked legs (out of frame). I added a 10-stop ND filter in front of my lens to darken the scene, so I could get a really long exposure (see page 115).
SETTINGS: I’m trying to keep my exposure long and my depth of field very deep, so I set my aperture at f/16. My ISO was set to 100 and my shutter speed was 151 seconds (2.5 minutes).
KEY TECHNIQUES: The location is a big factor, and I chose it because of the pylons, which I could use as both a foreground object and leading lines, leading the eye into the image. Another key technique is the very long exposure, which took the choppy, uninteresting water you’d normally see and replaced it with that smooth, smoky, silky water you see here, courtesy of the 10-stop ND filter. A last key technique is placing the camera down low on the rocks, right at the water’s edge. That low angle really makes a big difference.
POST-PROCESSING: In Lightroom, the first thing I did was to convert the image to black and white using one of the built-in B&W creative profiles (there are 17 to choose from. See page 224). After that, I added even more Contrast than usual and lots of Texture, and of course, Clarity to help make the buildings shiny, and I finished off with lots of sharpening.
The Recipe for Getting This Type of Shot
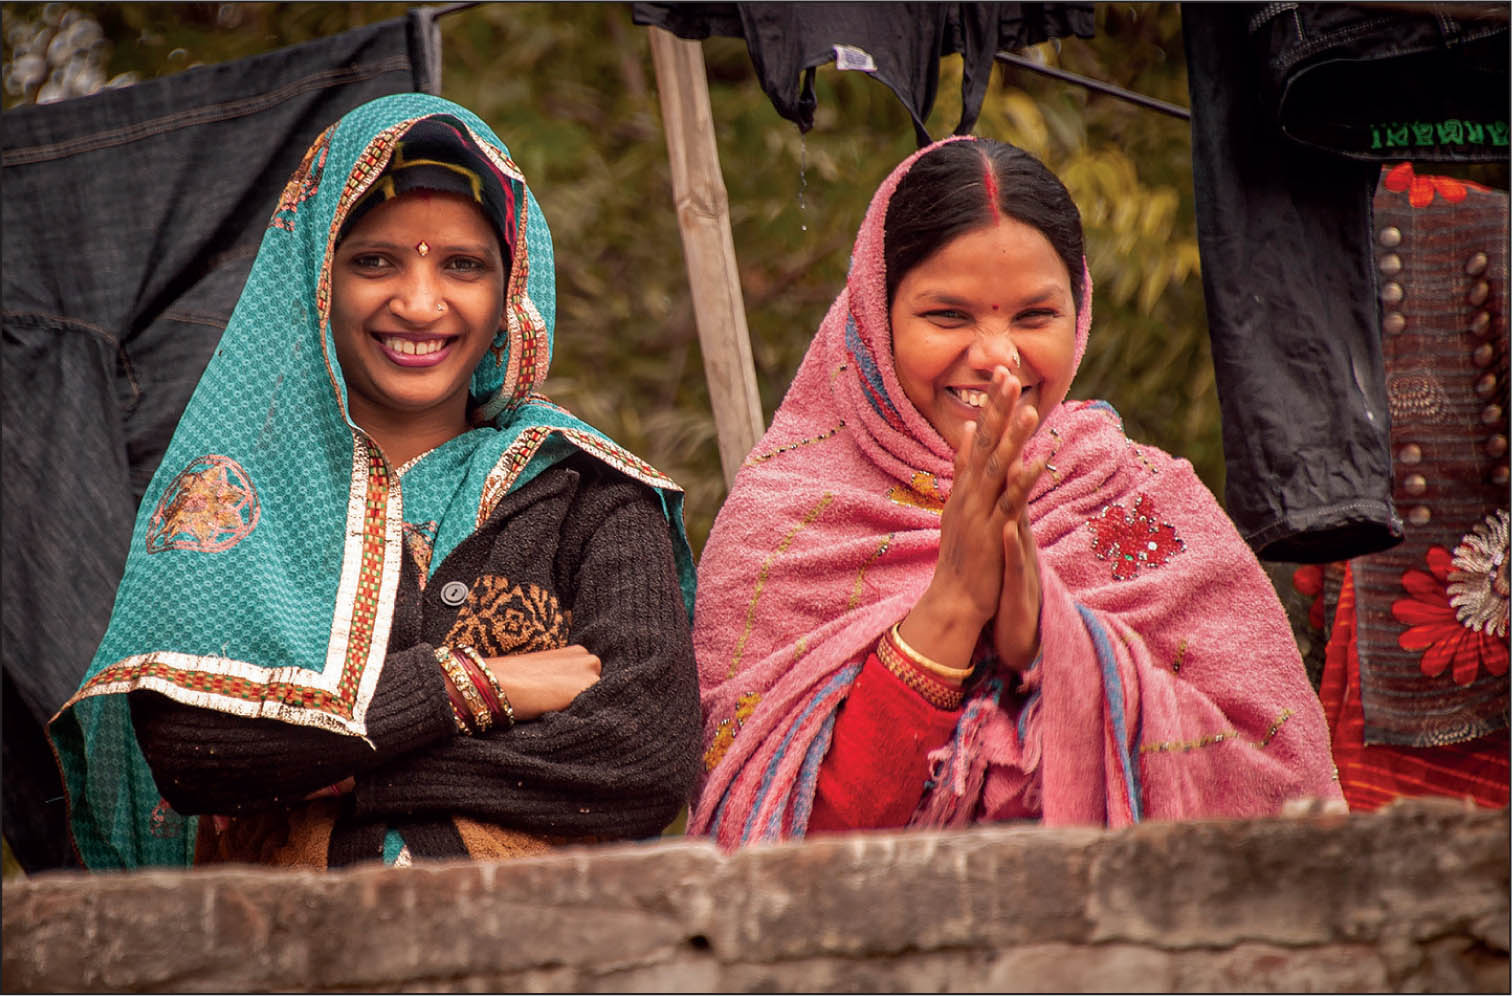
Characteristics of this type of shot: A candid portrait taken while on a walking tour where the environment is key to the shot, so you zoom out wider than normal for a portrait to include it.
Location: Agra, Uttar Pradesh, India
GEAR: Taken on a full-frame body, hand-held, with a 28–300mm lens at 300mm.
SETTINGS: Shot at f/5.6, ISO 200, and a shutter speed of 1/125 of a second.
KEY TECHNIQUE: In addition to the environment, hands-down, it was giving them a friendly smile and tacitly asking (by holding up my camera while smiling), “Is it okay if I take your photo?” They giggled and nodded and I got this shot. I just got this one frame as we were walking by with our small tour. They were on top of a small roof doing the day’s laundry, so I couldn’t do the sharing part, but I thanked them and they waved and giggled some more, and it was really a cute moment. For more on this (the full smile, shoot, and share technique), see page 76.
POST-PROCESSING: I don’t add as much Contrast to portraits as I would to other travel shots because it makes the subject’s skin tone look too saturated and unnatural. I added a tiny bit of Texture, but skipped the Clarity (it looks great on older men with craggy skin, but it’s not very flattering in portraits of women or children). I also used Lightroom’s Brush tool to darken the trees behind them to help them stand out, and I darkened the edges all the way around the image by adding a post-crop vignette (see page 226). Of course, I finished off the shot with some sharpening, but not too much for an image of a softer nature like this.
The Recipe for Getting This Type of Shot
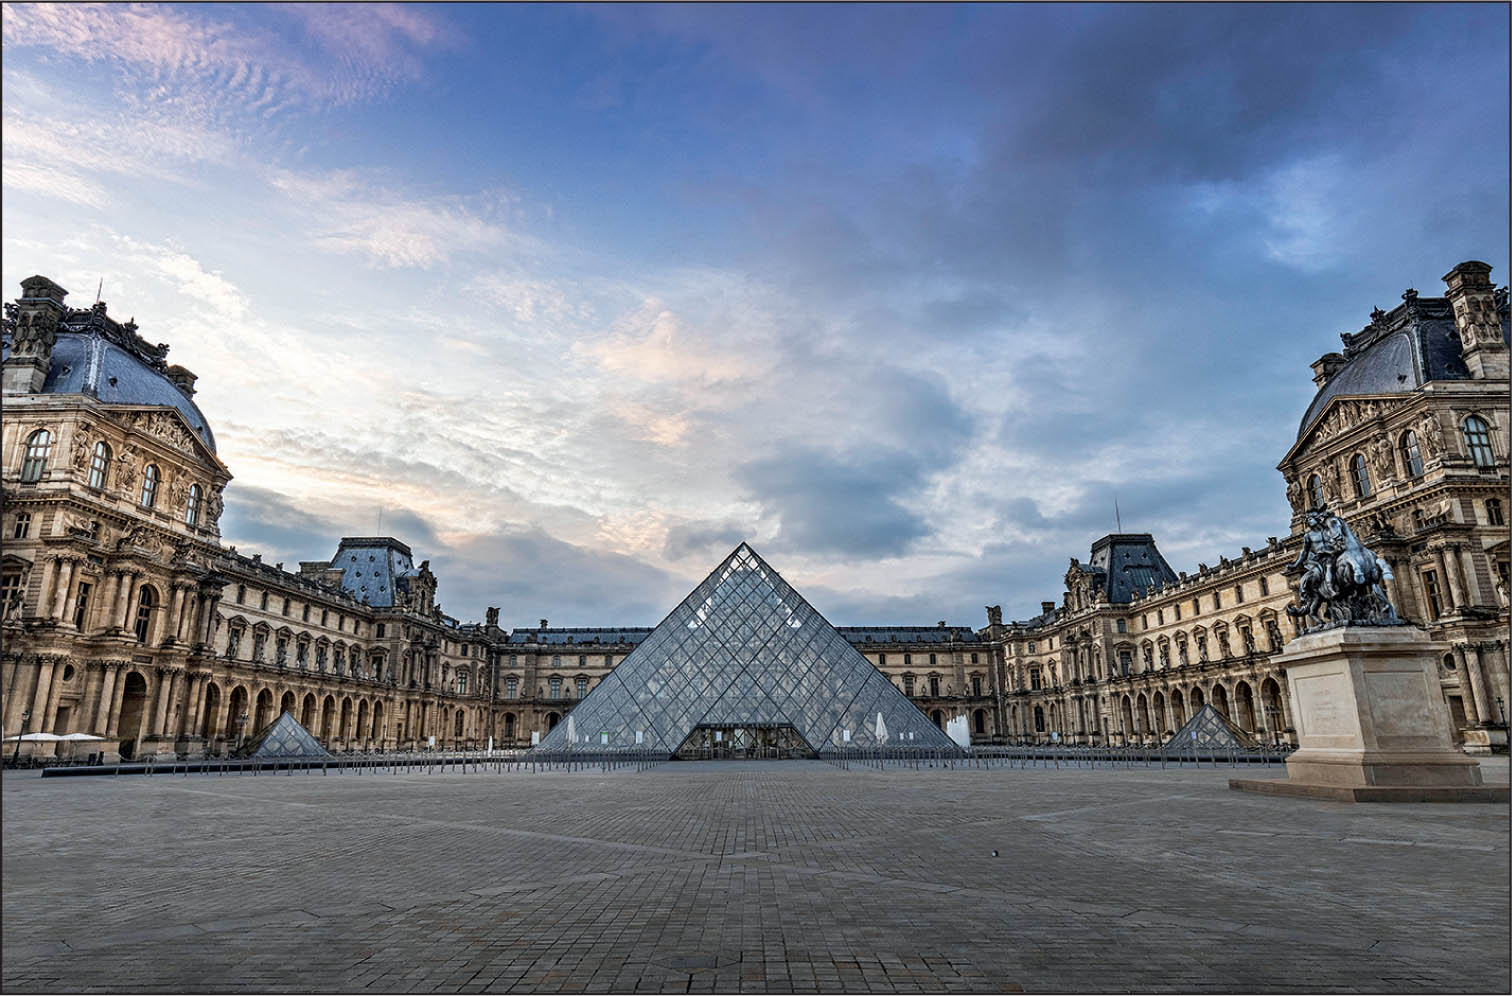
Characteristics of this type of shot: A wide shot of a classic attraction, but taken without the distraction of tourists.
Location: The Louvre Museum, Paris, France
GEAR: Taken on a full-frame mirrorless body, with a 16–35mm lens at 16mm, and mounted on a travel tripod.
SETTINGS: Shot at an aperture of f/11 (my go-to aperture for keeping as much in focus as possible), ISO 100, and shutter speed at 1/125 of a second.
KEY TECHNIQUE: Hands-down, the key technique here is getting a tourist-free shot, and to do that I got up before dawn and got in place ready to shoot. Getting up that early pretty much ensures you’ll be there all by yourself. This was taken shortly after sunrise and right before the sun got up so high that the light turned harsh (you can see the sunlight just starting to hit the right side of the Louvre). Compositionally, I set my horizon line low since there was a pretty nice sky and I wanted to show more of it (see page 98). I used a super-wide-angle lens at 16mm to capture almost the full side-to-side view of the Louvre from this angle. I could have walked back farther to get the towers on either end fully in the shot, but it would add some grass to my foreground, so I decided to stick with the clean look of the cobblestones.
POST-PROCESSING: The sky didn’t look as deep and rich in the original image, so I did a trick in Lightroom I use often, which is to use the Exposure slider to darken the entire image until the sky looks really nice, and then I drag the Shadows slider nearly all the way to the right to open up the shadows on the building. Works like a charm. Then, I added lots of Contrast, Texture, and Clarity and finished up with, of course, lots of sharpening.
The Recipe for Getting This Type of Shot
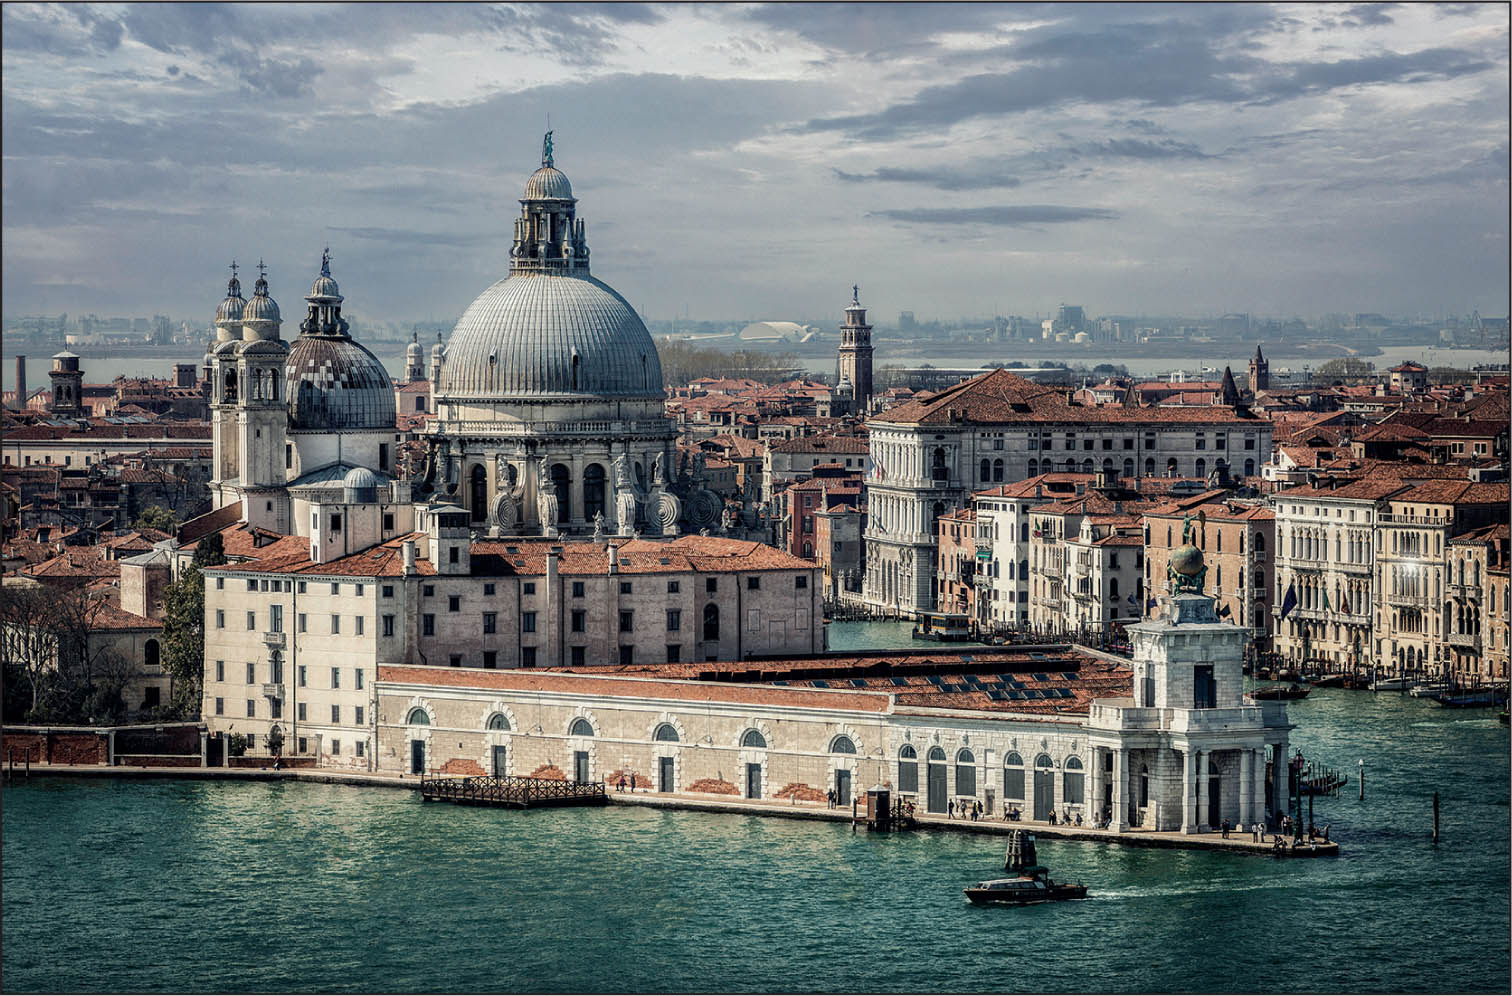
Characteristics of this type of shot: A cityscape shot, but framed with a single building as the focus of the shot.
Location: The top of San Giorgio Maggiore campanile (bell tower), Venice, Italy
GEAR: Taken on a full-frame body, hand-held, with a 70–200mm f/2.8 lens at 150mm.
SETTINGS: Shot at f/2.8, ISO 100, and shutter speed at 1/3200 of a second.
KEY TECHNIQUES: There are two: (1) The high vantage point here is what really makes the shot. This is shot from the top of a bell tower on a tiny island just across from Venice’s Piazza San Marco. It’s much less crowded (with hardly any line at all, versus the main bell tower at San Marco), and I love the view from here. That high angle gives you a less-common view of the Punta della Dogana museum (in front), with the beautiful soaring dome of the Basilica di Santa Maria della Salute right behind it, making it look like it’s all one building. The other technique (2) is using a long zoom lens, which gives a compression to the scene that makes everything look closer together. You don’t get that compression with wide-angle lenses, so while it looks like a wide-angle shot, it’s actually taken at 150mm.
POST-PROCESSING: The standard Lightroom stuff, but I used the technique to darken the sky I explained on the previous page. Besides adding a lot of Contrast, and a lot of Texture and Clarity, I jumped over to Photoshop to use the Healing Brush tool to remove a bunch of pylons in the foreground of the shot in the water right in front of the building. It was a little messy, and removing them simplified the shot and made it stronger. Then, of course, I sharpened the heck out of it.