
Twig (http://twig.sensiolabs.org) is the new template engine introduced to Drupal 8 and is a companion to Symfony, the new PHP framework that Drupal 8 is built on. Twig provides us with a fast and secure way to separate content from PHP logic in a manner that makes it easier for non-developers to work with templates. To help us get a better feel in order to work with Twig, let's first dive into the steps involved in enabling Twig debugging.
When Twig debugging is turned on within Drupal, we are able to trace which template is being used, where a template is located, and a list of suggested file names to override a template. This functionality is very advantageous and actually quite simple to set up by following these steps:
- Open the
development.services.ymlfile located in thesitesfolder. - Add the following lines to the bottom of the file:
parameters: twig.config: debug : true auto_reload: true cache: false - Save the file.
- Clear Drupal's cache.
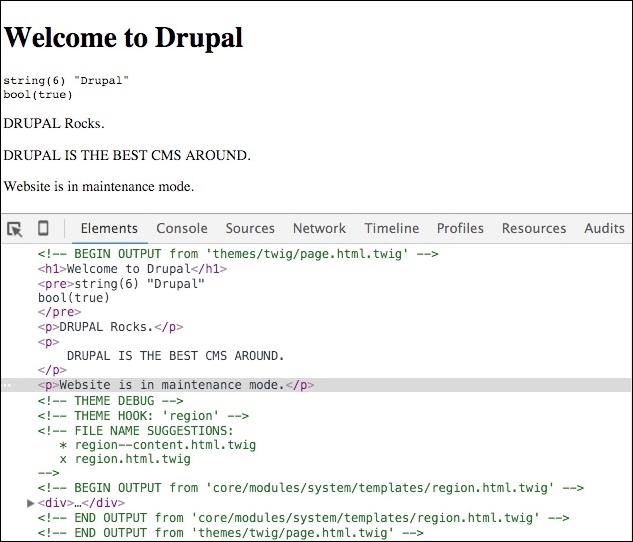
If we navigate back to the homepage and inspect the markup using Google Chrome's Developer Tools, we can now see Twig debug outputting information, as shown in the following image:
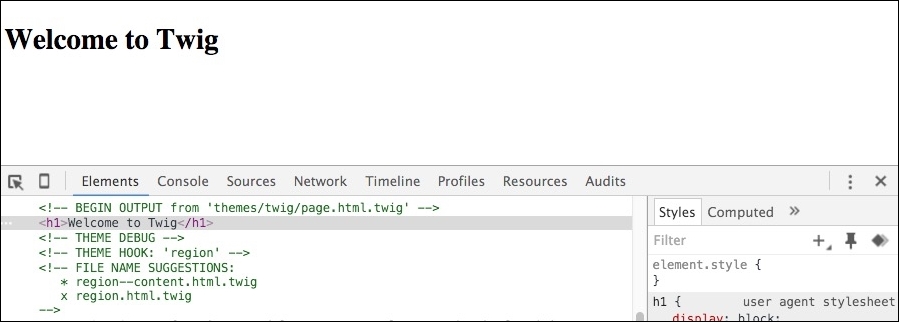
There are a couple of items we should make note of when Twig debugging is enabled:
- FILE NAME SUGGESTIONS: This displays suggestions to name Twig HTML templates and displays in the order of precedence in which Drupal folders would look for templates.
- OUTPUT: This displays the location of the template currently being displayed, which, in our case, is
themes/twig/page.html.twig.
Remember that we will only see the debug output when we have the Twig debugging enabled as part of our local development environment. It is best to remember to disable debugging before moving a Drupal site to production. So now that we have an understanding of what Twig debug provides us with, let's begin writing some of our own Twig syntax, beginning with comments.
A Twig template outputs PHP with a template-oriented syntax using opening and closing curly brackets {{ ... }}. This syntax interprets the variable between the brackets and outputs HTML in its place. The following are three kinds of delimiters in Twig that trigger an evaluation to take place:
- The first is Twig commenting, which uses the comment tag
{# ... #}to provide comments inline or around a section of HTML. - Next is the print tag
{{ ... }}, which is used to print the result of an expression or variable. The print tag can be used by itself or within a section of HTML. - The third tag is to execute a statement such as conditional logic, looping structures, or the assignment of values to variables and is expressed by using
{% ... %}.
Each of the three delimiters will be used when we do any type of theming projects within Drupal 8. We will find that they are just as simple as using any regular HTML element, and we will quickly be writing these tags.
We are familiar with HTML commenting such as <!-- This is a comment -->, which allows us to add descriptive text to our markup. We saw an example of this in the Twig debug output once we enabled it. Twig provides us with the ability to add comments as well using the {# comment #} syntax.
If we open page.html.twig within our editor, we can add a Twig comment by adding the following:
{# This is a comment in Twig #}
<h1>Welcome to Twig!</h1>
Once we save our template, refresh the browser and inspect the heading. We will note that we don't actually see the comment being displayed. Unlike HTML comments, Twig comments are meant to be hidden from browser output and are meant only for the developer.
Twig can also assign values to variables using a technique named Assignment. Assignment uses the set tag to place a value into a variable, which can then be used later within a template to output the value.
Open page.html.twig and add the following above our heading:
{# Setting a variable #}
{% set name = 'Drupal' %}

{# This is a comment in Twig #}
<h1>Welcome to Twig!</h1>
If we save our template and refresh the browser, we will not see any changes to our HTML as we are only setting a variable but not using it anywhere in our document. So how do we then use a variable?
Twig allows us to print variables by simply referencing them within our document using the {{ variable }} syntax to trigger the interpreter to replace the variable name with the value stored in it. We can try this by replacing the word Twig in our heading with the name variable.
Open page.html.twig and add the following:
{# Setting a variable #}
{% set name = 'Drupal' %}

{# This is a comment in Twig #}
<h1>Welcome to {{ name }}</h1>
If we save our template and refresh the browser, we will see that our heading now says Welcome to Drupal. The name variable we set has output the word Drupal in its place. This is the same technique that we will be using to output variables in our Twig templates to display content from Drupal. In fact, if we sneak a peek at our html.html.twig template, we will see a variety of twig variables being used to output content.
While theming in Drupal, we will be working with both simple and complex variables consisting of PHP arrays that contain multiple values. Knowing that there can be multiple values, it is sometimes useful to dump the contents of the variable to know exactly what we are working with. The {{ dump() }} function allows us to view information about a template variable and is only available to us when Twig debugging is turned on. Let's take our name variable for instance and dump the contents to see what it contains.
Open page.html.twig and add the following to the bottom of the template:
{# Dumping variables #}
{{ dump(name) }}
If we save our template and refresh the browser, we will now see the name variable being dumped to the page displaying some additional info about our variable.
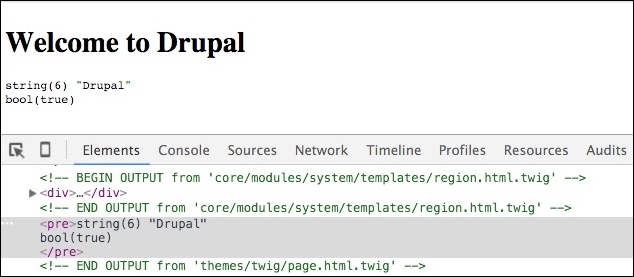
Using the dump() function, we can introspect more than one variable at a time by passing multiple arguments. Let's try this by adding an additional Drupal variable named is_front, as shown in the following code sample:
{# Dumping variables #}
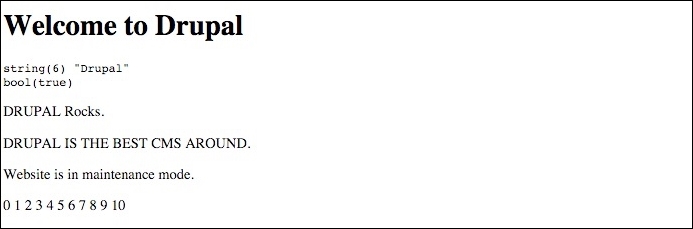
<pre>{{ dump(name, is_front) }}</pre>If we save our template and refresh the browser, we will now see the is_front variable being dumped to the page as well as displaying some more information, as shown in the following image:
By now, we should be comfortable working with a Twig template and variables. However, we can do much more with Twig than just print variables though. We can also apply filters to variables to achieve different functionality.
Filters provide us with a way to modify variables. The filters are generally separated by a pipe character (|) and may accept arguments depending on the filter's purpose. Twig provides us with currently 30+ filters that we can apply to variables. Let's try out filters now by applying an uppercase filter on our name variable.
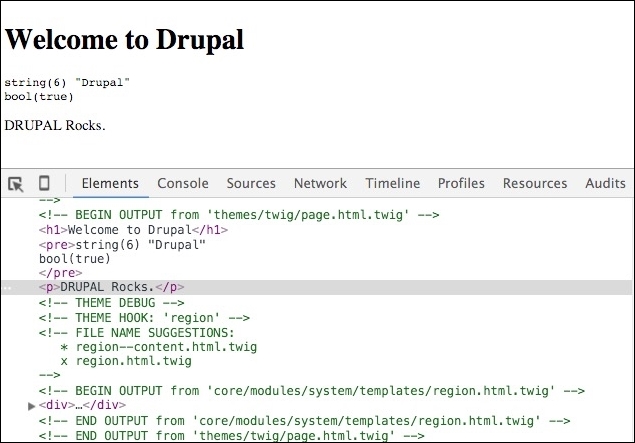
Open page.html.twig and add the following:
{# Apply filter to name variable #}
<p>{{ name|upper }} Rocks.</p>
If we save our template and refresh the browser, we will now see that the name variable is converted to uppercase inside our paragraph tag, as shown in the following image:
We can also use filters to wrap sections of HTML and variables, which apply the filter to more than one item at a time. An example of this would be if we wanted to uppercase a whole paragraph versus just the name variable.
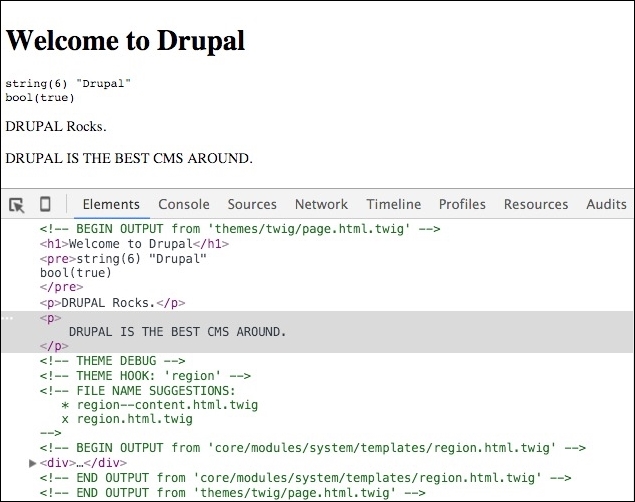
Open page.html.twig and add the following:
{% filter upper %}
<p>{{ name }} is the best cms around.</p>
{% endfilter %}
If we save our template and refresh the browser, we will now see that the entire paragraph including the name variable is converted to uppercase, as shown in the following image:
This is just an example of one of the many filters that can be applied to variables within Twig. For a detailed list of filters, we can refer to http://twig.sensiolabs.org/doc/filters/index.html.
There will be situations while theming with Twig where we will need to check whether a variable is True or False or need to loop through a variable to output multiple values contained in an array.
Control structures in Twig allow us to account for these types of functions using {% … %} blocks to test for expressions and traverse through variables that contain arrays. Each control structure contains an opening and closing tag similar to PHP logic. Let's take a look at a couple of the most commonly used control structures starting with the if tag used to test an expression.
Open page.html.twig and add the following:
{# Conditional logic #}
{% set offline = false %}

{% if offline == true %}
  <p>Website is in maintenance mode.</p>
{% endif %}
If we save our template and refresh the browser, we will not see anything actually displaying yet. The reason is that the offline variable is currently set to false and we are checking to see whether it is true.
Open page.html.twig and edit the offline variable changing its value to true:
{# Conditional logic #}
{% set offline = true %}

{% if offline == true %}
  <p>Website is in maintenance mode.</p>
{% endif %}
Now resave our template and view the page in the browser. This time, we will see our paragraph displayed, as shown in the following image:
By now, we are starting to see how control structures within Twig can come in handy to hide or show certain markup within our template based on the value of a variable. This will come in handy when we have certain Drupal regions that we want to display when a block is placed into a region.
The other commonly used control structure in Twig is looping. The for tag is used to loop over each item in a sequence. For our example, let's try looping based on a number of items and outputting the count.
Open page.html.twig and add the following:
{# Looping #}
{% for i in 0 ..10 %}
  {{ i }}
{% endfor %}
If we save our template and view the page in the browser, we will be presented with the count within our loop displaying on the page starting at 0 and going to 10, as shown in the following image:
This is a simple loop, and it only really demonstrates the use of the for tag. Once we start creating additional Twig templates, we can loop through more complex Drupal variables. More extensive documentation regarding the for tag can be found at http://twig.sensiolabs.org/doc/tags/for.html.