
The easiest way to work with Twig templates is to allow Drupal and the Twig debug settings we enabled earlier to do the entire work for us. So what do I mean? Begin by navigating to the homepage and inspecting the markup using Chrome's developer tools. Locate the section of markup where we see the div element with a class of layout-container, as shown in the following image:
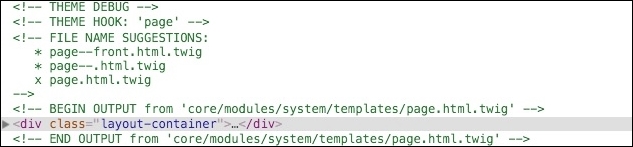
Twig debugging allows us to view all the information we need to identify which Twig template we can use for our homepage. If we look at the information provided, we can identify the following:
- Drupal is currently using
page.html.twig - The template is located at
core/modules/system/templates/page.html.twig - Drupal suggests that we can use
page--front.html.twigto display the same content
With these three pieces of information, we can locate, copy, and modify any Twig template we may need in order to modify the layout and markup of the content coming from Drupal.
One rule that comes in handy while creating any Twig template is to be as specific as possible. There is generally multiple FILE NAME SUGGESTIONS that Drupal recommends and the more granular we are in choosing to name that template the less we will have to worry about overriding the content we didn't mean to overwrite.
Let's create our homepage template by following these steps:
- Navigate to the
core/modules/system/templatesfolder. - Copy
page.html.twig. - Place the copy of
page.html.twigintothemes/tweetfolder. - Rename
page.html.twigtopage--front.html.twig.
Clear Drupal's cache, browse the homepage, and use Chrome's developer tools to verify that we are using the page--front.html.twig template in the themes/tweet folder:
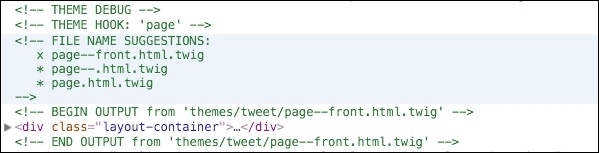
Since we have now created a page--front-html.twig template, any markup we add or modify within this template will only affect the homepage. Any interior pages that are added to our website will default to using page.html.twig.
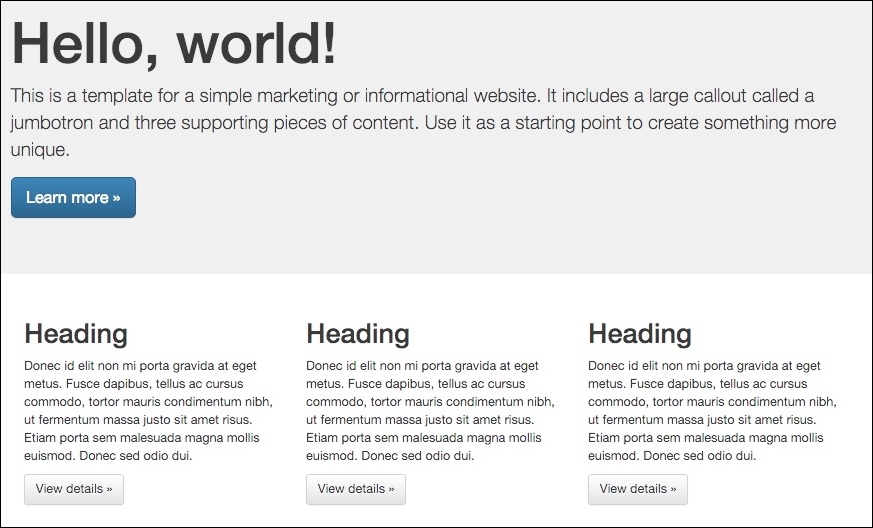
The Jumbotron mockup only needs to display the header, primary menu, footer, Jumbotron, and featured regions. We can modify our page--front.html.twig template by replacing the current markup with the following code:
<div class="layout-container">
  <header role="banner">
    {{ page.header }}
  </header>

  {{ page.primary_menu }}
  {{ page.highlighted }}
  {{ page.jumbotron }}
  {{ page.featured }}

  <footer role="contentinfo">
    {{ page.footer }}
  </footer>
</div>
Now save the template and refresh the homepage in the browser. We should now see the regions we have defined being displayed along with any blocks that are assigned to them. Speaking of blocks, our Jumbotron block contains markup within the body field when it should really be moved to a region template.
Just like we were able to create a page-specific Twig template, we can also create region-specific Twig templates. If we inspect the Jumbotron region using Chrome's developer tools, we will see from the FILE NAME SUGGESTIONS that we can create a new Twig template named region--jumbotron.html.twig.
Create the region template by following these steps:
- Navigate to the
core/modules/system/templatesfolder. - Copy
region.html.twig. - Place the copy of
region.html.twigintothemes/tweetfolder. - Rename
region.html.twigtoregion--jumbotron.html.twig.
Clear Drupal's cache, browse the homepage, and use Chrome's developer tools to verify that we are using the region--jumbotron.html.twig template.
Next, we will want to replace the markup within region--jumbotron.html.twig with the following markup:
{% if content %}
  <div class="jumbotron">
    <div class="container">
      {{ content }}
    </div>
  </div>
{% endif %}
Now save the template and refresh the homepage in the browser. If we inspect the Jumbotron region, we will see that our new markup has been added. All we have left to do is to edit the block and remove the layout markup that we added to the content previously.
Locate the Jumbotron block on the homepage, hover over it to reveal the context menu, and follow these steps:
- Click on the Edit link.
- Locate the Body field.
- Click on the Source button within the WYSIWYG bar.
- Replace the current markup with the following markup:
<h1>Hello, world!</h1>
<p>This is a template for a simple marketing or informational website. It includes a large callout called a jumbotron and three supporting pieces of content. Use it as a starting point to create something more unique.</p>
<p><a class="btn btn-primary btn-lg" href="#" role="button">Learn more »</a></p>
- Click on the Save button.
We have now completed our Jumbotron region of the homepage by separating layout markup from presentational markup. This approach is now reusable and makes a great location in our starter theme to add Hero content. Let's replicate this process by adding a Twig template for our featured region as well, as follows:
- Begin by creating a new file Twig template named
region--featured.html.twigwithin ourthemes/tweetfolder. - Replace the current markup with the following code:
{% if content %} <div class="container"> {{ content }} </div> {% endif %} - Now save the template and refresh the homepage in the browser. Our featured region now has the
containerclass. In addition, the featured region is constraining the content to the same width as our Jumbotron region.
In order for us to complete the featured region, we need to know which blocks are within it and add CSS classes to them. Time to look toward the Drupal 8 Theme layer for help.
Drupal 8 has an extensive API that includes the Theme layer, which gives us the ability to alter and preprocess variables before they are output by Drupal. The API is so extensive that we won't even scratch the surface of the functionality we can use. More detailed information can be found at https://api.drupal.org/api/drupal/8.
One such function we will be working with is template_preprocess_block, which prepares values passed to each block before them being output by block.html.twig. Before we can begin using preprocess functions, we will need to create a *.theme file.
Begin by creating a new file named tweet.theme within our themes/tweet folder. Once our theme file has been created, we can add the following preprocess function:
<?php

function tweet_preprocess_block(&$variables){

}
Within our function, we will look for specific blocks based on their IDs and then apply a CSS class to them that allows the blocks to be displayed in three columns. One thing to note is that this is by no means the only way to accomplish this requirement, but to avoid getting too far into the Drupal API we will opt for a simple solution.
While working with the Theme layer, we need some way to print out the $variables array that is passed by reference to most functions. Although PHP provides us with the var_dump() function, this can be a tedious task of reading through all the information that is printed to the screen, especially since it is not formatted.
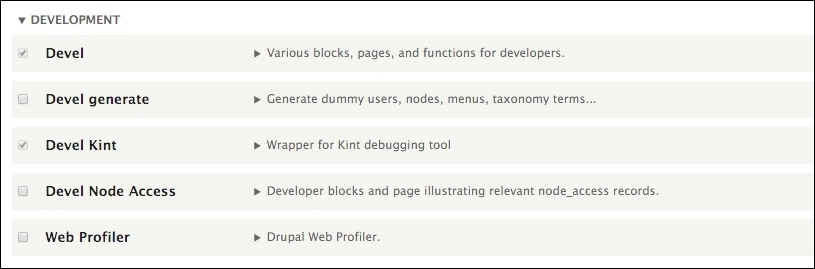
The Drupal community has provided us with a better mechanism of working with variables using a third-party contributed module named Devel. The Devel module can be found at https://drupal.org/project/devel and is a set of helper functions to work with variables as well as a list of other functionality that we will not be using at this time.
Because this is our first time installing a contributed module for use with Drupal 8, we can follow these steps to download and install the module:
- Navigate to the Devel project page https://drupal.org/project/devel.
- Click on the TAR or ZIP download link for the latest Drupal 8.x version.
- Create a folder named
contribwithin themodulesfolder of our Drupal 8 instance. - Extract the contents of the
develmodule to thecontribfolder, as follows:
The contrib folder will hold any contributed modules that we install, including the Devel module. Now we need to install and configure the Devel module by following these steps:
Now that we have Devel and Devel Kint installed, we can move on to using it to display $variables within our preprocess function to help identify information we will need to complete our function.
If we open back up our tweet.theme file, we currently have an empty preprocess function. This function accepts a parameter that is passed by reference that holds any $variables available to be used by blocks. We can use the Devel module to now output $variables to our page by adding the following line of code to our function:
<?php

function tweet_preprocess_block(&$variables){
  dpm($variables);
}
The dpm() function will take whatever values that are passed to it and output the contents in a print friendly format. To see this in action, let's save our file, clear Drupal's cache, and browse to our homepage. If Devel is working properly, we should see six different sections of our site displaying a collapsed information box that contains the contents of the $variables array. Each instance represents the values for each block currently assigned to regions. This is due to the fact that our preprocess function runs once for each block, as follows:
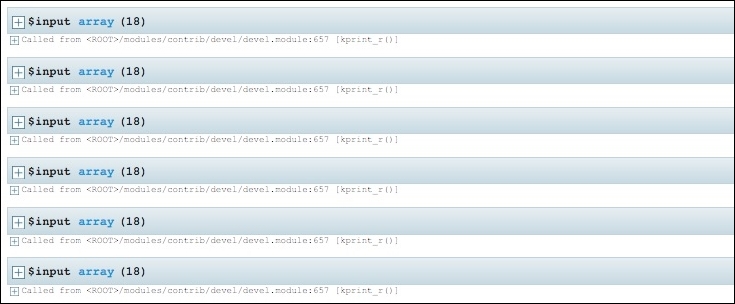
We are interested in the three custom blocks that appear in our featured region. Assuming the blocks load in the order that the regions are printed, we should be able to expand the fourth information box to see more information. In particular, we are interested in the block attributes that contain the ID of each block, as follows:
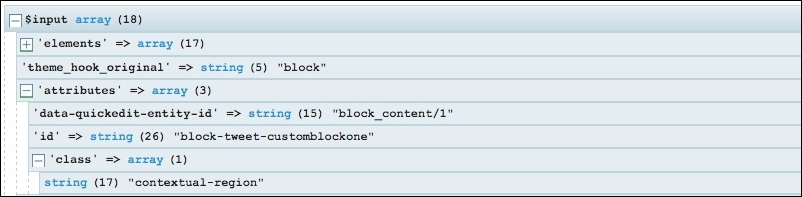
The longer we look at the information being output, the more it makes sense how to traverse through the array to access information we can use. For instance, to grab the ID of each block, we could access it by writing $variables['attributes']['id'] within our preprocess function. Now all we need to do is add some logic to our function that looks for the ID within a list of block IDs and add a CSS class to the block if found. We can accomplish this by adding the following to our preprocess function:
function tweet_preprocess_block(&$variables){

  // Add layout class to Featured Blocks
  $featured = array('block-tweet-customblockone','block-tweet-customblocktwo','block-tweet-customblockthree'),

  $id = $variables['attributes']['id'];

  // If block id matches list - add class
  if(in_array($id, $featured)){
    $variables['attributes']['class'][] = 'col-md-4';
  }
}
Remember to remove the dpm() function we added previously. Next, we can clear Drupal's cache and then browse our homepage where we will see our three custom blocks aligned to our grid:
We have definitely mastered using the Twitter Bootstrap framework with our starter theme to recreate the mockup Jumbotron example. By modifying Twig templates, using theme suggestions, working with new regions, and diving deeper into the Theme layer, we were able to have Drupal output HTML markup exactly how we needed it.
While starter themes are very flexible, they do require a little more work than simply using an existing base theme. We can take a quick look at what this means by creating a subtheme next.