
Creating a node template is not foreign to us; our process begins the same way we would create any Twig template. We begin by inspecting the markup of our page to identify which template is currently being used and the various file name suggestions available to us. Since our Post Listing block is referencing the listing view mode of our post content type, we can create a new Twig template called node--post--listing.html.twig.
Begin by grabbing a copy of the node.html.twig template from core/modules/node/templates and placing it into our themes/octo/templates folder. We will then rename the file to node--post--listing.html.twig so that we only affect the markup for this particular content types display. Next, we will need to replace the current markup within our template with the following new markup:
New markup
<article{{ attributes }}>
  {{ content }}
</article>
Make sure to save the template, clear Drupal's cache, and refresh the Blog page. At first glance, nothing has changed, but we are now using a custom Twig template to display our content. We will be walking through building up our template until it resembles our mockup by discussing the following techniques:
- First, we will use Twig to add additional CSS classes to our
articleelement. This will allow us to apply formatted styling to each individual post that is being repeated on the page. - Next we will work with the
{{ content }}variable to print individual fields. This will give us the opportunity to add additional HTML markup for both formatting and structure to each post. - We will learn how to work with field level templates to account for multiple content within a single field. This will enable us to create the image slider for each post when it has more than one image uploaded, as well as add additional markup to individual fields so that taxonomy tags display correctly.
- Twig filters play an important role in theming and we will learn how to use them to format dates. This will allow us to display the post date properly, based on the design.
- Finally, we will dive into the Theme layer to preprocess variables needed to help identify the path for each page and to retrieve the comment count if one exists for each post.
Adding additional CSS classes to our markup is not new for us. We implemented this technique in the previous lesson when we developed our node--landing-page.html.twig template in Chapter 7, Theming Our Interior Page. In fact, Drupal 8 provides us with various ways to work with its attributes, with everything from adding classes to removing classes. We are only touching the surface of how we can use this technique. For even more information, we can refer to the documentation at Drupal.org, located at https://www.drupal.org/node/2513632.
For our post listing,, we need to add two CSS classes to our article element. We can accomplish this by setting a classes variable within our template and then using the {{ attributes.addClass() }} function to inject the two new classes into the attributes.
Open up node--post--listing.html.twig and replace the markup with the following:
New markup
{% set classes = ['post', 'post--listing'] %}

<article{{ attributes.addClass(classes) }}>
  {{ content }}
</article>
Make sure to save the template, clear Drupal's cache, and refresh the blog page. We should see a slight change in our styling with the introduction of a bottom border separating each post.
So far, our node template is just printing out the {{ content }} variable, which contains all the fields we have enabled for the listing display mode. In some cases this may suffice, but we can actually print the individual fields that the {{ content }} variable contains by referencing the field using dot syntax notation. Having this flexibility allows us to add structural markup for each field.
Let's give this a try by opening node--post--listing.html.twig and modifying our markup to print the image field for our post:
New markup
{% set classes = ['post', 'post--listing'] %}

<article{{ attributes.addClass(classes) }}>
   {{ content.field_image }}
   {{ content }}
</article>
Make sure to save the template, clear Drupal's cache, and refresh the blog page. We should see our post image is now duplicated for each post. Why is this? Well, if we refer back to our markup, we are telling Drupal to output {{ content.field_image }}, which prints the image field. But we are also following that by printing all of the content using {{ content }}.
Any time we are developing a Twig template and start printing individual fields for a content type, we will want to prevent the same field from being printed again when the {{ content }} variable is called. Twig provides us with the without filter to assist us in accomplishing this.
To test this, open up node--post--listing.html.twig and modify the markup to reflect the following:
New markup
{% set classes = ['post', 'post--listing'] %}

<article{{ attributes.addClass(classes) }}>
   {{ content.field_image }}
   {{ content|without('field_image') }}
</article>
Make sure to save the template, clear Drupal's cache, and refresh the Blog page. We now only have a single instance of our image field displayed. Using the without filter and passing the field name as a value has successfully prevented the field from printing a second time. We will continue using this technique, as well as printing the individual fields for our Post Listing block as we theme our node.
If we refer back to our mockup of the blog page by opening the blog.html page located in our Mockup folder, we will notice that our post can contain one or more images. However, when more than one image exists, we present the image in a slider for the user to see all post images:

In order for us to implement this functionality, we will need to know exactly how many images our image field contains. While we can't access this information from the node level, we can implement this from the field level by creating a field template specifically for the field.
If we browse back to our Drupal instance and navigate to the blog page, we can inspect the image field and locate which Twig template is currently being used by Drupal:
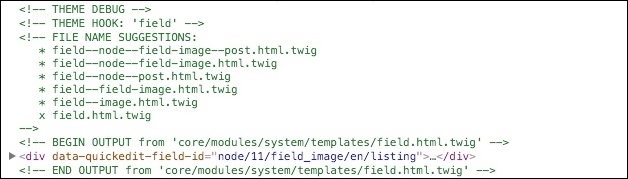
Drupal provides multiple FILE NAME SUGGESTIONS for us to choose from, but since we don't know if we will reuse this field with another content type later, we will be as specific as possible and create field--node--field-image--post.html.twig by following these steps:
- Navigate to the
core/modules/system/templatesfolder and copy thefield.html.twigtemplate. - Place
field.html.twiginto ourthemes/octo/templatesfolder and rename itfield--node--field-image--post.html.twig. - Open
field--node--field-image--post.html.twigand replace the markup with the following:{% if items|length > 1 %} <div class="post-image"> <div class="owl-carousel"> {% for item in items %} <div class="img-thumbnail"> {{ item.content }} </div> {% endfor %} </div> </div> {% else %} <div class="single-post-image post-image"> {% for item in items %} <div class="img-thumbnail">{{ item.content }}</div> {% endfor %} </div> {% endif %}
Make sure to save the template and clear Drupal's cache. Before we preview the blog page let's take a moment to discuss what exactly is happening in this new template.
- First, we are using a Twig filter
{% if items|length > 1 %}to test the length of the items variable to see if our image field contains multiple images. If it does, we will print the markup for that condition, but if not, we will print the markup contained in the{% else %}condition. - Second, since any field item can contain multiple items, we need to loop
{% for item in items %}through the items and print{{ item.content }}. - Finally, the remaining markup adds the necessary structure and CSS classes for the next step of the process, which is adding the Owl Carousel library to our theme.
If we now browse to the blog page, we will see that our field images are styled to include a rounded border, a light box shadow, and some necessary padding.
In order to add the slider functionality to multiple images, we will be implementing Owl Carousel, which can be found at http://owlgraphic.com/owlcarousel/. Owl Carousel provides us with a responsive touch enabled slider that we can apply to our post images. We will be grabbing a copy of the library from our exercise files, adding the library to our theme, configuring it within our octo.libraries.yml file, and then using Twig to attach the library to our node templates.
Begin by navigating to the Chapter08/start/themes/octo/vendor folder and copying the owl-carousel folder to our themes/octo/vendor folder. Once the files are accessible by Drupal, we can add the reference to our library by following these remaining steps:
- Open
octo.libraries.yml. - Add the following entry:
owl-carousel: version: 1.3.3 css: theme: vendor/owl-carousel/owl.carousel.css: {} vendor/owl-carousel/owl.theme.css: {} js: vendor/owl-carousel/owl.carousel.min.js: {} dependencies: - core/jquery - Save
octo.libraries.yml.
Before we can preview the new functionality, we still have a few steps left to complete. Next, we will need to attach the library to our Blog listing page. As we will not want this library to load on every page, using the {{ attach_library() }} function will be our preferred method.
Begin by opening node--post--listing.html.twig and then adding the following Twig function to the top of our template:
{{ attach_library('octo/owl-carousel') }}It is very important to make sure that we are using single quotes to surround the path to our library, otherwise the slightest typo will cause the library to not be loaded. Now make sure to save the template and then we can move on to initializing Owl Carousel.
Begin by opening octo.js and adding the following script to the bottom of our file directly below our Scroll to function:
//-- Owl Carousel
(function() {

  if (typeof $.fn.owlCarousel === 'function'){
    $('.owl-carousel').owlCarousel({
      slideSpeed : 300,
      paginationSpeed : 400,
      singleItem:true
    });
  }

})();
Make sure to save octo.js and then let's review exactly what our new function is doing:
- First, we are conditionally checking if the Owl Carousel function exists. This ensures we avoid any JavaScript errors on other pages where our library is not loaded.
- Next, we are initializing Owl Carousel and passing three parameters to it: one for how fast an image should slide, one for pagination, and then finally we tell it how many images we want to display.
With our library added, attached to our template, and initialized, we can now clear Drupal's cache and refresh our Blog listing page. We will now see that any posts that contain multiple images display as a slider. This provides some nice responsive functionality for our users.
The next section of our post listing we need to address is the post date. By default, Drupal will print dates in the form of a Unix timestamp. In most cases, we will want to convert these dates into a more user friendly format. Luckily, we can take advantage of another Twig function, date(), to convert dates easily.
Begin by opening node--post-listing.html.twig and adding the following markup directly after where we are printing the post image:
New markup
<div class="post-date">
  <span class="day">{{ node.createdtime }}</span>
  <span class="month">{{ node.createdtime }}</span>
</div>
Make sure to save the template, clear Drupal's cache, and then refresh the Blog listing page. We will now see exactly what the Unix timestamp looks like when printed. While our theming is now being applied, we need to convert the timestamp into day and month:

Let's now use the date() function and apply it to node.createdtime to display the day and month format of our timestamp.
Open node--post-listing.html.twig and modify our post-date markup to reflect the following:
New markup
<div class="post-date">
  <span class="day">{{ node.createdtime|date('d') }}</span>
  <span class="month">{{ node.createdtime|date('M') }}</span>
</div>
Make sure to save the template, clear Drupal's cache, and then refresh the Blog listing page. By adding the simple Twig function to our timestamp, we now have the correct formatting and styling:

Our post listing is starting to come together. Next, we will add the title of our post along with the teaser field, before moving on to our metadata.
Working with Node titles when theming can sometimes be a mystery, unless you have a good understanding of what Drupal is doing behind the scenes. The title field is one of the few required fields that each Content type must contain. The challenge is that while it's considered a field, it doesn't truly function like other fields. We do not have access to manage the Node title in the admin, as we can with the rest of our fields. While we could extend the functionality by using modules such as https://www.drupal.org/project/title, we will manage the Node title directly within our Twig template.
Open node--post-listing.html.twig and add the following markup directly after our post-date section:
New markup
<div class="post-content">

  {{ title_prefix }}
  <h2{{ title_attributes }}>
    <a href="{{ url }}" rel="bookmark">{{ label }}</a>
  </h2>
  {{ title_suffix }}

  {{ content.field_teaser }}

</div>

{{ content|without('field_image','field_teaser') }}
Make sure to save the template, clear Drupal's cache, and then refresh the Blog listing page. Our post title and teaser should now be displayed:

We are familiar with printing individual fields and removing them from the main content flow. What is new though is how we print the title. Within a node template, the title is referred to as {{ label }} and the {{ url }} variable points to the path of the individual post. We utilize these two variables to create our title within a h2 heading and a link. We also have some extraneous variables, such as {{ title_prefix }} and {{ title_suffix }}, which are utilized by contributed modules to inject markup before or after our title.
We are getting close to completing the theming of the post listing. We are still missing the post metadata, which consists of the author, the categories that a post has been tagged with, and the comment count.
We will begin with adding the structural markup for our post-meta content, including printing the author associated with each post:
- Open
node--post--listing.html.twig. - Add the following markup directly below the teaser variable:
<div class="post-meta">

  <span class="post-meta-user">
    <i class="fa fa-user"></i> By {{ author_name }}
  </span>

</div>
Make sure to save the template, clear Drupal's cache, and then refresh the blog listing page. Our post author is now displayed, with a link to the user profile. Since we are using the default author information for the node, and not a specific field, we have the ability to print that information using the {{ author_name }} variable:

Now we need to address the tags field, which displays any categories associated with a post. The tags field, as we will see in a moment, can contain one or more values, which will require us to modify the markup on the field level:
- Open
node--post--listing.html.twig. - Add the following markup within our
post-metasection, directly below ourpost-meta-usermarkup:<span class="post-meta-tag"> <i class="fa fa-tag"></i> {{ content.field_tags }} </span> - Make sure to exclude the
field_tagsvariable from the main content variable.
Make sure to save the template, clear Drupal's cache, and then refresh the Blog listing page. We should now see our post categories displayed only once per post. However, our tags are displayed stacked on top of each other, instead of inline as our design requires. If we inspect the page markup for our tags, we will see that each category has a div element wrapped around it, causing them to be block level elements.
In order for us to modify the markup for our taxonomy tags, we will need to create a field level template. Using the file name suggestions provided by Twig, we can create our own template by following these steps:
- Navigate to the
core/modules/system/templatesfolder and copy thefield.html.twigtemplate. - Place a copy of the template in our
themes/octo/templatesfolder. - Rename the file
field--field-tags.html.twig. - Replace the markup with the following:
<ul>
  {% for item in items %}
    <li{{ item.attributes.addClass('field-item') }}>
         {{ item.content }}
    </li>
  {% endfor %}
</ul>
Make sure to save the template, clear Drupal's cache, and then refresh the Blog listing page. Based on the markup we added, we have replaced the block level elements with an unordered list, and each taxonomy tag is now a list item:

Our post listing is starting to take shape, but you may have noticed that we are not returning the number of comments that each post contains. How do we remedy this when there is no comment count variable available to the Node template?
One of the new things introduced in Drupal 8 is the comment field. Previously, when you created or edited a content type, you would simply enable Comments by turning them on or off. Well, comments are now their own field and must be added to a content type like any other field that you want to create.
If we navigate to /admin/structure/comment, we will get a glimpse of the Default comments configured by Drupal.

Comment types are similar to Content types, as they are fieldable and multiple comment types can be created. Feel free to inspect the comment type in more detail, but be aware that this is the comment type we are using with our Post content type.
In fact, if we navigate to /admin/structure/types/manage/post/fields, we will see that we have a field called field_comments which is of FIELD TYPE Comments. The comment field was added to our Post content type and provided to us with the database snapshot.
If we were to add this field to our Listing display, it would not return a comment count, but instead display the Comment form. Based on our design, that does not help us. However, knowing the field name for our comments will allow us to do some advanced theming within the Drupal 8 theme layer to retrieve the comment count, place it within a variable and print it within our Twig template.