
Using the recipes discussed previously in this chapter, it is possible to set up multiple transactions in one route with many transacted/policy blocks each referring to a different transaction manager, each managing a different transactional resource. When an exchange's processing is completed, the various transaction managers are instructed to commit one-by-one. If one of them fails to commit, perhaps due to an inconveniently-timed outage, that failure may leave the other backends in an inconsistent state overall, with some already having been committed, and now unable to roll back.
To get around this, you can employ a single over-arching transaction manager to coordinate multiple backends through a standards-based scheme known as XA transactions. eXtended Architecture (XA) transaction are supported in Java through the Java Transaction API (JTA). To enable this, the resources being managed, databases or message brokers, must be able to have their interactions managed through XA's two-phase commit (2PC) protocol.
This recipe will show you how to set up an XA transaction manager to manage a single transaction across two resources—a database and a JMS message broker. The concepts discussed here can be built on to enable coordinated transactions between whatever combination of brokers and databases you require.
The Java code for this recipe is located in the org.camelcookbook.transactions.xatransaction package. The Spring XML files are located under src/main/resources/META-INF/spring and prefixed with xaTransaction.
The example shown here is based on Spring and the Camel XML DSL. A Java-only version that replicates the same steps described here is provided in the sample code in the XATransactionTest class.
Note
This example uses the Atomikos TransactionsEssentials® open source XA transaction manager due to its popularity, and abundance of documentation. The specifics of setting up other XA transaction managers, such as JOTM, will be quite different, although the end behavior in your Camel route should be the same.
Servers based on the Java EE specification provide JTA/XA out of the box.
To use the Atomikos transaction manager, with support for JMS and JDBC, you will need the following Maven dependencies:
<dependency>
  <groupId>com.atomikos</groupId>
  <artifactId>transactions</artifactId>
  <version>${atomikos-version}</version>
</dependency>
<dependency>
  <groupId>com.atomikos</groupId>
  <artifactId>transactions-jdbc</artifactId>
  <version>${atomikos-version}</version>
</dependency>
<dependency>
  <groupId>com.atomikos</groupId>
  <artifactId>transactions-jms</artifactId>
  <version>${atomikos-version}</version>
</dependency>
The ${atomikos-version} used here is 3.9.1.
To use the Atomikos classes from your Camel application, you will additionally require the following Maven dependencies:
<dependency>
  <groupId>org.apache.camel</groupId>
  <artifactId>camel-spring</artifactId>
  <version>${camel-version}</version>
</dependency>
<dependency>
  <groupId>org.springframework</groupId>
  <artifactId>spring-tx</artifactId>
  <version>${spring-version}</version>
</dependency>To get Atomikos-managed XA transactions working across a database and a JMS provider, we need to perform the following high-level steps:
- Set up an XA-capable
DataSource, and wrap it with an Atomikos bean that ties it into the XA transaction. - Set up an XA-capable
ConnectionFactory, and wrap it with an Atomikos bean that ties it into the XA transaction. - Instantiate the Atomikos transaction classes, and wrap them with a Spring
PlatformTransactionManagerthat will be used from Camel through a transaction policy. - Use the transaction policy from within a Camel route.
In order to use XA transactions that span a database and a message broker, we need to wire together a number of classes as follows:
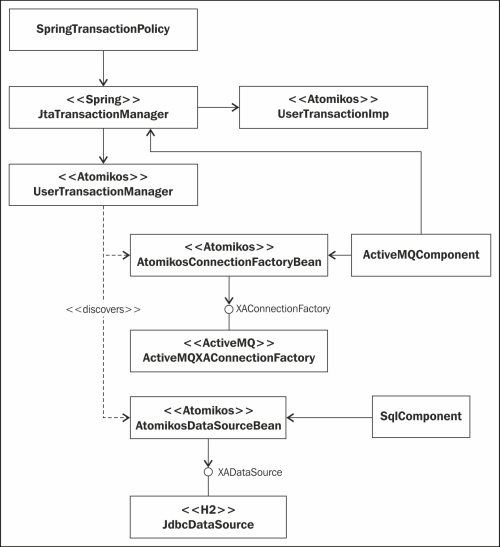
In detail, the wiring is performed as follows:
- A
javax.sql.DataSourceclass is the main entry point to your database. Your database vendor provides the actual class used here. In order for a database to participate in an XA transaction, theDataSourceimplementation needs to also implement thejavax.sql.XADataSourceinterface.Here we use the H2 in-memory database:
<bean id="xa.h2DataSource" class="org.h2.jdbcx.JdbcDataSource"> <property name="URL" value="jdbc:h2:mem:db1;DB_CLOSE_DELAY=-1"/> <property name="user" value="sa"/> <property name="password" value=""/> </bean> - Each
XADataSourceresource that you want to engage in an XA transaction needs to be wrapped by anAtomikosDataSourceBeanobject. This bean is a delegate to the underlyingauditDataSource, and will automatically register itself with the XA transaction manager:<bean id="atomikos.dataSource" class="com.atomikos.jdbc.AtomikosDataSourceBean"> <property name="uniqueResourceName" value="xa.h2"/> <property name="xaDataSource" ref="xa.h2DataSource"/> </bean>
This bean will be the
DataSourceinstance that you use from your SQL Component.<bean id="sql" class="org.apache.camel.component.sql.SqlComponent"> <property name="dataSource" ref="atomikos.dataSource"/> </bean> - A
javax.jms.ConnectionFactoryclass is the main entry point to using a JMS-based message broker. In order for a broker to be able to take part in an XA transaction, itsConnectionFactoryimplementation class needs to also implement thejavax.jms.XAConnectionFactoryinterface.Here we use an embedded ActiveMQ broker:
<bean id="xa.amqConnectionFactory" class="org.apache.activemq.ActiveMQXAConnectionFactory"> <property name="brokerURL" value="vm://myEmbeddedBroker"/> </bean> - Wrap the
ActiveMQXAConnectionFactoryobject with an Atomikos-specific bean that also supports theConnectionFactoryinterface. This step is required to make the factory visible to the transaction manager:<bean id="atomikos.connectionFactory" class="com.atomikos.jms.AtomikosConnectionFactoryBean" init-method="init" destroy-method="close"> <property name="uniqueResourceName" value="xa.activemq"/> <property name="xaConnectionFactory" ref="xa.amqConnectionFactory"/> <property name="maxPoolSize" value="10"/> <property name="ignoreSessionTransactedFlag" value="false"/> </bean>
This bean is the
ConnectionFactoryinstance that should be used from your JMS/ActiveMQ Component:<bean id="jms" class="org.apache.activemq.camel.component.ActiveMQComponent"> <property name="connectionFactory" ref="atomikos.connectionFactory"/> <property name="transactionManager" ref="jta.transactionManager"/> </bean>The
jta.transactionManagerbean will be defined shortly. - Set up the Atomikos JTA transaction classes as follows:
<!-- javax.transaction.UserTransaction -->
<bean id="atomikos.userTransaction"
      class="com.atomikos.icatch.jta.UserTransactionImp">
  <property name="transactionTimeout"
            value="300" />
</bean>

<!-- javax.transaction.TransactionManager -->
<bean id="atomikos.transactionManager"
      class="com.atomikos.icatch.jta.UserTransactionManager"
      init-method="init"
      destroy-method="close"
      depends-on="atomikos.connectionFactory,atomikos.dataSource">
  <property name="forceShutdown"
            value="false"/>
</bean>
Note
While the transactional resources
atomikos.dataSourceandatomikos.connectionFactoryare not explicitly registered with theatomikos.transactionManagerbean, they do need to be added to thedepends-on attributeof the transaction manager's Springbeantag.This ensures that any XA transactions that are in-flight are allowed to complete before Spring attempts to clean up the underlying resources on
ApplicationContextshutdown. - Wrap these in a Spring JTA-aware
PlatformTransactionManager. Camel uses the Spring transaction management abstractions as discussed in the Introduction section:<bean id="spring.transactionManager" class="org.springframework.transaction.jta.JtaTransactionManager"> <property name="transactionManager" ref="atomikos.transactionManager"/> <property name="userTransaction" ref="atomikos.userTransaction"/> </bean> - Wrap the transaction manager in a
SpringTransactionPolicyelement, for use within the route:<bean id="PROPAGATION_REQUIRED" class="org.apache.camel.spring.spi.SpringTransactionPolicy"> <property name="transactionManager" ref="spring.transactionManager"/> <property name="propagationBehaviorName" value="PROPAGATION_REQUIRED"/> </bean> - Use this policy (the
PROPAGATION_REQUIREDbeanidfrom step 7) in a route that consumes from one JMS queue (inbound), and inserts to a database and another JMS queue (outbound). Note that for the consumption to be transacted, we need to use thetransacted=trueattribute in thefromendpoint's URI—Atomikos will very helpfully complain if you fail to do so.<from uri="jms:inbound?transacted=true"/> <transacted ref="PROPAGATION_REQUIRED"/> <log message="Processing message: ${body}"/> <setHeader headerName="message"> <simple>${body}</simple> </setHeader> <to uri="sql:insert into audit_log (message) values(:#message)"/> <to uri="jms:outbound"/> <to uri="mock:out"/>
If an exception is thrown from the
mock:outendpoint, the send to the outbound queue, and the insert into the database, will be rolled back. The message consumed from the inbound queue will be returned to ActiveMQ, which will attempt to redeliver it up to six times before sending it to a dead-letter queue, by default.
The Atomikos XA transaction manager keeps a local log (journal) of transaction operations on disk for rollback purposes (this is not a strict requirement of all XA transaction managers). The transaction manager instructs any XA-aware resources (the database and the message broker) that they need to execute their operations within an externally-coordinated transaction. Both the broker and the database keep their own view of the transaction written to disk.
The database insert and the message send are performed but not yet committed.
Once all of the processing steps are complete, the transaction manager asks each resource whether it is capable of proceeding, that is, committing the transaction successfully. This is known as the prepare phase. During this phase, any responses received from the resources are written to disk by the Atomikos transaction manager.
If all the resources agree they are ready to commit, the transaction manager issues this instruction during the commit phase, persisting the fact that it did so, as well as any subsequent success or failure responses that it receives.
If the transaction fails at any time during this process, for example due to a resource outage, the transaction manager will tell all the resources to rollback to their previous state. If the transaction manager's process goes down, there is a recovery process defined by the XA standard that will followed by the Atomikos transaction manager based on the state that it has written to its journal on disk. This recovery process will again attempt to perform the transaction, or tell the resources to rollback.
The XA standard tries to provide a predicable set of outcomes for these various failure scenarios.
The communication involved in coordinating the various resources, and the logging of each step to a journal (disk forcing), take additional time over that of the actual routing logic. In the majority of cases, this is an acceptable trade-off to guarantee consistency. Information around tuning options can be found in the Atomikos documentation.
An in-depth discussion of JTA/XA transactions, and the vast number of corner cases and failure scenarios, is beyond the scope this book. If you would like to find out more, refer to the XA Exposed article link given in the See also section for an excellent primer.
- Atomikos TransactionsEssentials®: http://www.atomikos.com/Main/TransactionsEssentials
- Java Open Transaction Manager (JOTM), another JTA transaction manager implementation: http://jotm.ow2.org
- XA Exposed: http://jroller.com/pyrasun/category/XA