So far we've got two models: a simple cruise controller and a beautiful car. Until now, they've been treated separately in an open loop. Remembering what we learned in the previous chapter, we're going to place the required blocks and connect them in a closed loop.
Let's open both the models and copy them to a new model named cruise_control_sim.slx. If their workspaces aren't loaded automatically, load them by dragging them from their folders to the MATLAB's Command Window and save the new workspace as cruise_control_sim.mat. It's suggested to have the new workspace loaded automatically via the PreLoadFcn model callback as we have learned in the previous chapter.
In order to see what's happening inside the engine, let's pull out the Gear and RPM signals from Alfa Romeo 147 GTA | Engine force | Gearbox and differential until we reach the root block, by adding and connecting the output ports to every parent subsystem.
Then we need to make the important connections: the Throttle output of the Cruise controller system has to be connected to the Throttle input of the Alfa Romeo 147 GTA system. The same goes for the Speed port, going from the car to the controller.
We need to place a Scope block to view the outputs too. This block will be placed near the upper-right corner of the root view above the systems.
In order to easily connect the signals to the Scope block, we'll use four From blocks paired with four Goto blocks. Three of the From blocks will be connected to the car's output, which are labeled using their names, while the fourth From block will be connected to the throttle signal and labeled as Throttle. The Goto blocks will be labeled the same way as the From blocks and placed near the Scope block.
Another couple of Goto/From blocks will be added to feed the remaining controller's input. The From block will be connected to the Target speed input of the controller, and the Goto block is placed above the systems near the upper-left corner of the root view. Both will be labeled as Target.
We now have a system, as shown in the following figure:

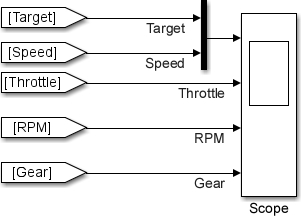
It's time to connect the From blocks, tagged, Target, Speed, Throttle, RPM, and Gear, to the Scope block.
To visualize the Target and Speed signals on the same Scope graph, rather than having them in separate graphs, we'll add a Mux block and connect these signals to it.
Note
The Mux block creates a virtual bus containing the muxed signals, which must be of the same datatype. The subsequent blocks (connected to that virtual bus) will execute their operations on each virtual signal. This is extremely useful when you need to perform the same operations on many signals. The Demux block does the opposite operation; it pulls out the muxed signals in the same order that they were muxed.
The Bus Creator block may seem to be equivalent to the Mux block, but it serves different purposes. Unlike the Mux block, the Bus Creator block creates real buses (accepted only by bus-enabled blocks). The signals entering the bus must be named; they can be complex and have different datatypes. The Bus Creator block is used by code-generation tools to declare and populate C structs.
Open the Scope block configuration window and set the Number of axes to 4, then connect the signals from the Mux block and the Throttle, RPM, and Gear From blocks. Finally, give a name to each signal exiting the From blocks by double-clicking on the signal lines. Use the corresponding From block label as the signal name. The signal names will be displayed above the Scope block graphs.
The portion of the system connected to the Scope block should look like the following figure:
We're now ready to race.