
Qt's style sheet system enables us to create stunning and professional-looking UIs with ease. In this example, we will learn how to set custom properties to our widgets and use them to switch between different styles.
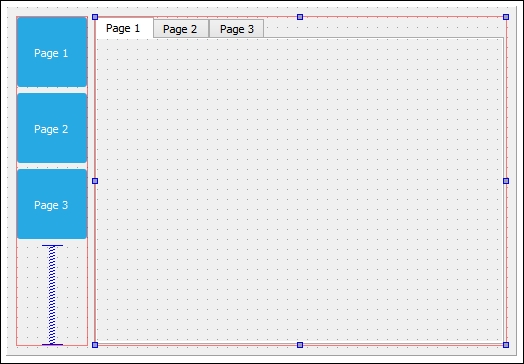
- Let's try out the scenario described in the preceding paragraph by creating a new Qt project. I have prepared the UI for this purpose. The UI contains three buttons on the left side and a tab widget with three pages located at the right side, as shown in the following screenshot:
- The three buttons are blue in color because I've added the following style sheet to the main window (not to the individual button):
QPushButton { color: white; background-color: #27a9e3; border-width: 0px; border-radius: 3px; } - Next, I will explain to you what pseudo states are in Qt by adding the following style sheet to the main window, which you might be familiar with:
QPushButton:hover { color: white; background-color: #66c011; border-width: 0px; border-radius: 3px; } - We used the preceding style sheet in the previous tutorial to make the buttons change color when there is a mouse-over. This is made possible by Qt Style Sheet's pseudo state, which in this case is the word
hoverseparated from theQPushButtonclass by a colon. Every widget has a set of generic pseudo states, such asactive,disabled,enabled, and so on, and also a set of pseudo states which are applicable to their widget type. For example, states such asopenandflatare available forQPushButton, but not forQLineEdit. Let's add thepressedpseudo state to change the buttons' color to yellow when the user clicks on it:QPushButton:pressed { color: white; background-color: yellow; border-width: 0px; border-radius: 3px; } - Pseudo states allow the users to load a different set of style sheet based on the condition that applies to it. Qt pushes this concept further by implementing dynamic properties in Qt Style Sheets. This allows us to change the style sheet of a widget when a custom condition has been met. We can make use of this feature to change the style sheet of our buttons based on a custom condition that we can set using custom properties in Qt.
First, we will add this style sheet to our main window:
QPushButton[pagematches=true] { color: white; background-color: red; border-width: 0px; border-radius: 3px; } - What it does is basically change the push button's background color to red if the property called
pagematchesreturnstrue. Obviously, this property does not exist in theQPushButtonclass. However, we can add it to our buttons by usingQObject::setProperty():- In your
MainWindow.cppsource code, add the following code right afterui->setupUi(this);:ui->button1->setProperty("pagematches", true); - The preceding code will add a custom property called
pagematchesto the first button and set its value astrue. This will make the first button turn red by default. - After that, right click on the tab widget and choose Go to slot. A window will then pop up; select the currentChanged(int) option from the list and click Ok. Qt will generate a
slotfunction for you, which looks something like this:private slots: void on_tabWidget_currentChanged(int index);
- The
slotfunction will be called whenever we change page of the tab widget. We can then decide what we want it to do by adding our code into theslotfunction. To do that, open upmainwindow.cppand you will see the function's declaration there. Let's add some code to the function:void MainWindow::on_tabWidget_currentChanged(int index) { // Set all buttons to false ui->button1->setProperty("pagematches", false); ui->button2->setProperty("pagematches", false); ui->button3->setProperty("pagematches", false); // Set one of the buttons to true if (index == 0) ui->button1->setProperty("pagematches", true); else if (index == 1) ui->button2->setProperty("pagematches", true); else ui->button3->setProperty("pagematches", true); // Update buttons style ui->button1->style()->polish(ui->button1); ui->button2->style()->polish(ui->button2); ui->button3->style()->polish(ui->button3); }
- In your
- The preceding code basically does this: when the tab widget switches its current page, it sets the
pagematchesproperties of all three buttons tofalse. Just be sure to reset everything before we decide which button should change to red. - Then, check the
indexvariable supplied by the event signal, which will tell you the index number of the current page. Set thepagematchesproperty of one of the buttons totruebased on the index number. - Lastly, refresh the style of all three buttons by calling
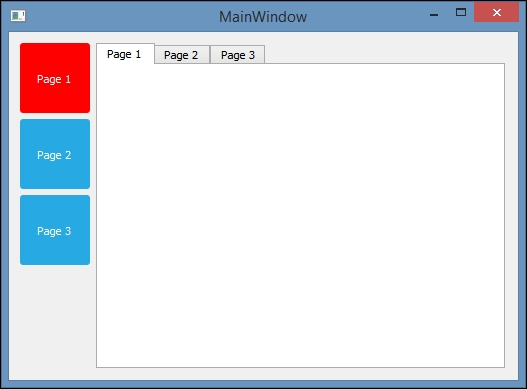
polish().Then, build and run the project. You should now see the three buttons changing their color to red whenever you switch the tab widget to a different page. Also, the buttons will change color to green when there is a mouse-over, as well as change their color to yellow when you click on them:
Qt provides users the freedom of adding their own custom properties to any type of widget. Custom properties are very useful if you want to change a particular widget when a special condition is met, where Qt doesn't provide such a context by default. This allows the user to extend the usability of Qt and makes it a flexible tool for customized solutions.
For example, if we have a row of buttons on our main window and we need one of them to change its color depending on which page the tab widget is currently showing, then there is no way the buttons would know when they should change their color, because Qt itself has no built-in context for this type of situation. To solve this issue, Qt provides us a method to add our own properties to the widgets, which is using a generic function called QObject::setProperty(). To read the custom property, we can use another function called QObject::property().
Next, we will talk about sub-controls in Qt Style Sheets. It's actually quite self-explanatory by looking at the term sub-controls. Often, a widget is not just a single object but a combination of more than one object or control in order to form a more complex widget, and such objects are called sub-controls.
For example, a spin box widget contains an input field, a down button, an up button, an up arrow, and a down arrow, which is quite complicated compared to some other widgets. In this case, Qt grants us more flexibility by allowing us to change every single sub-control using a style sheet, if we wanted to. We can do so by specifying the name of the sub-control behind the widget's class name, separated by a double colon. For instance, if I want to change the image of the down button in a spin box, I can write my style sheet like this:
QSpinBox::down-button
{
  image: url(:/images/spindown.png);
  subcontrol-origin: padding;
  subcontrol-position: right bottom;
}
That will only apply the image to the down button of my spin box, and not to any other parts of the widget.
By combining custom properties, pseudo states, and sub-controls, Qt provides us with a very flexible method to customize our user interface.