
Qt supports bridging between C++ classes with the QML engine. This combination allows developers to take advantage of both the simplicity of QML and the flexibility of C++. You can even integrate features that are not supported by Qt from an external library, then pass the resulting data to Qt Quick to be displayed in the UI. In this example, we will learn how to export our UI components from QML to the C++ framework and manipulate their properties before displaying them on screen.
- Once again, we will start everything from scratch. Therefore, create a new Qt Quick application project in Qt Creator and open up
MainForm.ui.qml. - We can keep the mouse area and text widget, but place the text widget at the bottom of the window. Change the Text property of the text widget to Change this text using C++ and set its font size to
18. After that, go to the Layout tab and enable both Vertical center anchor and Horizontal center anchor to ensure it's always somewhere in the middle of the window, regardless of how you rescale the window. Set the Margin for the Vertical center anchor to120:
- Next, drag a Rectangle widget from the Library window to the canvas and set its color to
#ff0d0d. Set its Width and Height to200and enable both the vertical and horizontal center anchor. After that, set the Margin of the horizontal center anchor to-14. Your UI should now look something like this:
- Once you are done with that, right-click on your project directory in Qt Creator and choose Add New. Then, a window will pop up and let you pick a file template. Select C++ Class and press Choose…. After that, it will ask you to define the C++ class by filling in the information for the class. In this case, insert MyClass in the Class Name field and select QObject as the Base class. Then, make sure Include QObject option is ticked and you can now click the Next button, follow by the Finish button. Two files—
myclass.handmyclass.cpp—will now be created and added to your project:
- Now, open up
myclass.hand add a variable and function below the class constructor, like so:#ifndef MYCLASS_H #define MYCLASS_H #include <QObject> class MyClass : public QObject { Q_OBJECT public: explicit MyClass(QObject *parent = 0); // Object pointer QObject* myObject; // Must call Q_INVOKABLE so that this function can be used in QML Q_INVOKABLE void setMyObject(QObject* obj); signals: public slots: }; #endif // MYCLASS_H - After that, open up
myclass.cppand define thesetMyObject()function:#include "myclass.h" MyClass::MyClass(QObject *parent) : QObject(parent) { } void MyClass::setMyObject(QObject* obj) { // Set the object pointer myObject = obj; } - We can now close
myclass.cppand open upmain.qml. At the top of the file, add in the third line, which imports the custom library we just created in C++:import QtQuick 2.4 import QtQuick.Window 2.2 import MyClassLib 1.0
- Then, define
MyClassin theWindowobject and call its functionsetMyObject()within theMainFormobject, like so:Window { visible: true width: 480 height: 320 MyClass { id: myclass } MainForm { anchors.fill: parent mouseArea.onClicked: { Qt.quit(); } Component.onCompleted: myclass.setMyObject(messageText); } } - Lastly, open up
main.cppand register the custom class to the QML engine. We also change the properties of the text widget and the rectangle here using C++ code:#include <QGuiApplication> #include <QQmlApplicationEngine> #include <QtQml> #include <QQuickView> #include <QQuickItem> #include <QQuickView> #include "myclass.h" int main(int argc, char *argv[]) { // Register your class to QML qmlRegisterType<MyClass>("MyClassLib", 1, 0, "MyClass"); QGuiApplication app(argc, argv); QQmlApplicationEngine engine; engine.load(QUrl(QStringLiteral("qrc:/main.qml"))); QObject* root = engine.rootObjects().value(0); QObject* messageText = root->findChild<QObject*>("messageText"); messageText->setProperty("text", QVariant("C++ is now in control!")); messageText->setProperty("color", QVariant("green")); QObject* square = root->findChild<QObject*>("square"); square->setProperty("color", QVariant("blue")); return app.exec(); }
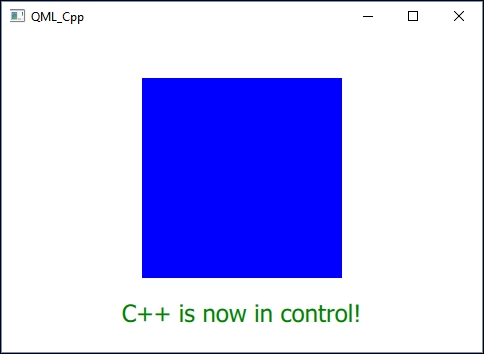
- Build and run the program now, and you should see the colors of the rectangle and the text are completely different from what you defined earlier in Qt Quick. This is because their properties have been changed by the C++ code:
QML is designed to be easily extensible through C++ code. The classes in the Qt QML module enable QML objects to be loaded and manipulated from C++.
Only classes that are inherited from the QObject base class can be integrated with QML, as it is part of the Qt ecosystem. Once the class has been registered with the QML engine, we get the root item from the QML engine and use it to find the objects we want to manipulate. After that, use the setProperty() function to change any of the properties belong to the widget.
Notice that the Q_INVOKABLE macro is required in front of the function that you intend to call in QML. Without it, Qt will not expose the function to Qt Quick and you will not be able to call it.