
In this recipe, we will learn how put our knowledge to use and create a functional login screen using Qt and MySQL.
Create your first functional login screen by following these steps:
- First, open up a web browser and go to phpMyAdmin. We will create a new data table called
user, which looks like this:
- Next, insert our first item of data into the newly created table and set the
employeeIDto the ID of an existing employee's data. This way, the user account we created will be linked to the data of one of the employees: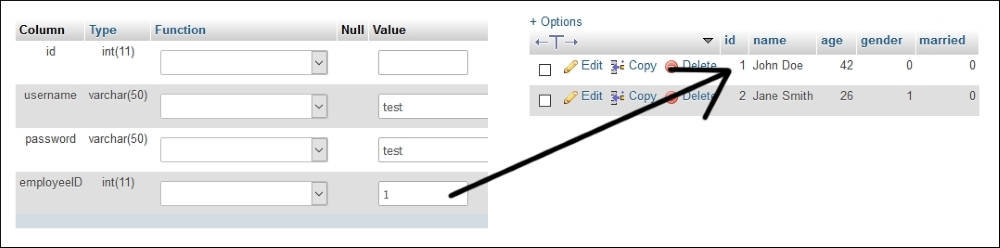
- After that, open up Qt Creator and create a new Qt Widgets Application project. We will start off with
mainwindow.ui. First, place a stacked widget on the canvas and make sure it contains two pages. Then, set up the two pages in the stacked widget like this:
- Then, on the first page of the stacked widget, click the Edit Tab Order button on top of the widget so that we can adjust the order of the widgets in our program:

- Once you click the Edit Tab Order button, you will see some numbers appear on top of each widget in the canvas. Make sure the numbers look like this. Otherwise, click on the numbers to change their order. We only do this for the first page of the stacked widget; it's okay to keep the second page as it is:

- Next, right-click on the Login button and select Go to slot…. Then, make sure the clicked() option is selected and press OK. Qt will then create a slot function for you in your project source files. Repeat this step for the Log Out button as well.
- Then, open up
mainwindow.hand add the following headers after the line#include <QMainWindow>:#include <QMainWindow> #include <QtSql> #include <QSqlDatabase> #include <QSqlQuery> #include <QMessageBox> #include <QDebug>
- After that, add the following variable to
mainwindow.h:private: Ui::MainWindow *ui; QSqlDatabase db; - Once we're done with that, let's open up
mainwindow.cppand put this code in the class constructor:MainWindow::MainWindow(QWidget *parent) : QMainWindow(parent), ui(new Ui::MainWindow) { ui->setupUi(this); ui->stackedWidget->setCurrentIndex(0); db = QSqlDatabase::addDatabase("QMYSQL"); db.setHostName("127.0.0.1"); db.setUserName("yourusername"); db.setPassword("yourpassword"); db.setDatabaseName("databasename"); if (!db.open()) { qDebug() << "Failed to connect to database."; } } - After that, we will define what will happen if the Login button is clicked:
void MainWindow::on_loginButton_clicked() { QString username = ui->username->text(); QString password = ui->password->text(); QSqlQuery query; if (query.exec("SELECT employeeID from user WHERE username = '" + username + "' AND password = '" + password + "'")) { if (query.size() > 0) { while (query.next()) { QString employeeID = query.value(0).toString(); QSqlQuery query2; if (query2.exec("SELECT name, age, gender, married FROM employee WHERE id = " + employeeID)) { while (query2.next()) { QString name = query2.value(0).toString(); QString age = query2.value(1).toString(); int gender = query2.value(2).toInt(); bool married = query2.value(3).toBool(); ui->name->setText(name); ui->age->setText(age); if (gender == 0) ui->gender->setText("Male"); else ui->gender->setText("Female"); if (married) ui->married->setText("Yes"); else ui->married->setText("No"); ui->stackedWidget->setCurrentIndex(1); } } } } else { QMessageBox::warning(this, "Login failed", "Invalid username or password."); } } else { qDebug() << query.lastError().text(); } } - Then, we also define what will happen if the Log Out button is clicked:
void MainWindow::on_logoutButton_clicked() { ui->stackedWidget->setCurrentIndex(0); } - Lastly, close the database when the main window is closed:
MainWindow::~MainWindow() { db.close(); delete ui; } - Compile and run the program now and you should be able to log in with the dummy account. After you have logged in, you should be able to see the dummy employee information linked to the user account. You can also log out by clicking on the Log Out button:

In this example, we select data from the user table that matches the username and password that we have inserted into the text fields. If nothing is found, it means we have provided an invalid username or password. Otherwise, obtain the employeeID data from the user account and do another SQL query to look for information from the employee table that matches the employeeID variable. Then, display the data accordingly to the UI of our program.
We must set the widget order in the Edit Tab Order mode so that when the program has started, the first widget that gets focused on is the username line edit widget. If the user presses on the TAB button on the keyboard, the focus should switch to the second widget, which is the password line edit. Incorrect widget order will totally ruin the user experience and drive away your potential users.
Do make sure that the
echoMode option of the password line edit is set to
Password. That setting will hide the actual password inserted into the line edit and replace it with dot symbols for security purposes.