
In this example project, we will explore the basic features of the web engine module in Qt and try building a simple working web browser. Since Qt 5.6, Qt's WebKit module has been deprecated and replaced by the WebEngine module, which is based on Google's Chromium engine. Note that when this chapter was written, WebEngine was still heavily under development and may be subject to changes in the near future.
First, let's set up our web engine project:
- First, you are required to download and install Microsoft Visual Studio if you do not have it installed on your computer. This is because at the moment, Qt's WebEngine module only works with the Visual C++ compiler and not others, such as MinGW or Clang. This might change in the future, but it all depends on whether Google wants to make their Chromium engine support other compilers or not. Meanwhile, you can download the latest Visual Studio from here: https://www.visualstudio.com.
- At the same time, you may also need to make sure that the Qt you installed on your computer supports the Visual C++ compiler. You can add the mvc2015 component to your Qt installation using Qt's maintenance tool. Also, make sure that you have installed the Qt WebEngine component in your Qt as well:

- Once you are done with that, open up Qt Creator and create a new Qt Widgets Application project. This time, you must select a kit that uses the Visual C++ compiler:

- After that, open up your project file (
.pro) and add the following modules to your project:QT += core gui webengine webenginewidgets - Open up
mainwindow.uiand remove themenuBar,mainToolBar, andstatusBarobjects, as we don't need those in this project:
- Place two horizontal layouts on the canvas, then place a line edit widget and a push button for the layout at the top:

- After that, select the canvas and click on the Lay Out Vertically button located at the top of the editor:

- Once you have clicked on the Lay Out Vertically button, the layouts will expand and follow the size of the main window. The line edit will also expand horizontally based on the width of the horizontal layout:

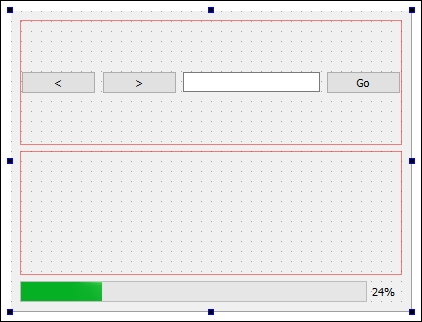
- Next, add two buttons to the left side of the line edit. We'll use these two buttons to move back and forward between page histories. Then, add a Progress bar widget at the bottom of the main window so that we can find out whether the page has finished loading, or loading is still in progress. We don't have to worry about the horizontal layout in the middle at this point, as we'll be adding the web view to it later using C++ code, and the space will then be occupied:
- Right-click on one of the buttons and select Go to slot…, then select clicked() and click OK. A slot function will be automatically created for you in
mainwindow.handmainwindow.cpp. Repeat this step for all the other buttons as well. - After that, right-click on the line edit and select Go to slot…, then select returnPressed() and click OK. Another slot function will now be automatically created for you in
mainwindow.handmainwindow.cpp. - Now that we are done with our UI design, let's hop over to
mainwindow.h. The first thing we need to do is to add the following header tomainwindow.h:#include <QtWebEngineWidgets/QtWebEngineWidgets>
- Then, declare
loadUrl()function under the class destructor:public: explicit MainWindow(QWidget *parent = 0); ~MainWindow(); void loadUrl(); - After that, add a custom slot function called
loading()tomainwindow.has we'll be using it pretty soon:private slots: void on_goButton_clicked(); void on_address_returnPressed(); void on_backButton_clicked(); void on_forwardButton_clicked(); void loading(int progress); - Lastly, declare a
QWebEngineViewobject and call itwebview:private: Ui::MainWindow *ui; QWebEngineView* webview; - Once you're done with that, open up
mainwindow.cppand initiate the web engine view. Then, add it to the second horizontal layout and connect itsloadProgress()signal to theloading()slot function we just added tomainwindow.h:MainWindow::MainWindow(QWidget *parent) : QMainWindow(parent), ui(new Ui::MainWindow) { ui->setupUi(this); webview = new QWebEngineView; ui->horizontalLayout_2->addWidget(webview); connect(webview, SIGNAL(loadProgress(int)), SLOT(loading(int))); } - After that, we declare what will happen when the
loadUrl()function is called:void MainWindow::loadUrl() { QUrl url = QUrl(ui->address->text()); url.setScheme("http"); webview->page()->load(url); } - Next, call the
loadUrl()function when the Go button is clicked or when theReturn/Enterkey is clicked:void MainWindow::on_goButton_clicked() { loadUrl(); } void MainWindow::on_address_returnPressed() { loadUrl(); } - As for the other two buttons, we'll ask the web view to load the previous page or the next page if it is available in the history stack:
void MainWindow::on_backButton_clicked() { webview->back(); } void MainWindow::on_forwardButton_clicked() { webview->forward(); } - Lastly, change the value of the
progressBarwhen the web page is being loaded:void MainWindow::loading(int progress) { ui->progressBar->setValue(progress); } - Build and run the program now and you will get a very basic but functional web browser!

The old web view system was based on Apple's WebKit engine and only available in Qt 5.5 and its predecessor. Since 5.6, WebKit has been completely abandoned by Qt and replaced with Google's Chromium engine. The API has been completely changed and therefore all the code related to Qt WebKit will not work correctly once migrated to 5.6. If you're new to Qt, it's recommended to skip WebKit and learn the WebEngine API since it is becoming the new standard in Qt. If you have used Qt's WebKit in the past, this web page teaches you how to port your old code over to WebEngine, https://wiki.qt.io/Porting_from_QtWebKit_to_QtWebEngine.
In Step 16, we connected the loadProgress() signal that belongs to the web view widget to the loading() slot function. The signal will be called automatically when the web view is loading the web page you requested by calling QWebEnginePage::load() in Step 17. You can also connect the loadStarted() and loadFinished() signals as well if you need to.
In Step 17, we used the QUrl class to convert the text obtained from the line edit to URL format. By default, the address we inserted will lead to the local path if we do not specify the URL scheme (http, https, ftp, and so on). We may not be able to load the page if, say, we gave it packtpub.com instead of http://packtpub.com. Therefore, we manually specify a URL scheme for it by calling QUrl::setScheme(). This will ensure the address is properly formatted before passing it to the web view.